Distribution of water supply in a private house. Proper water distribution in the apartment - protection against leaks
Nowadays, it is possible to install an autonomous water supply in a private house, which significantly increases the comfort of living. Now there is no need to carry heavy buckets and heat water in a basin to take water procedures. If the water supply is installed in a building under construction, it is possible to take into account all wishes at the design stage, and its implementation will be much easier. If the building has been erected and has been in use for a long time, then arranging a water supply is more difficult, but possible.
Schematic diagram of the water supply system in the house
Laying out a water supply system in a private house that is in operation requires solving additional problems of tying the pipeline to the existing premises and the location of plumbing fixtures. In addition, you will need to knock out openings in the walls, floor and foundation for laying pipes. All this creates additional difficulties, but can be implemented if desired.
Plumbing systems
Depending on the power source, there are:
- Centralized water supply system. It is arranged if a central water supply pipe runs near the house, to which the water supply is supplied. Such a system is easier and cheaper to install, but in the future you will need to pay for the water supply. In addition, it is difficult to control water quality.
- Autonomous water supply system. Requires significant physical and financial costs, but the water quality is much higher. Autonomous water supply is absolutely independent of public water supply. The power source is wells or boreholes located on the plot.
The source of drinking water from which the water supply is drawn must be located no closer than 20 meters from cesspool, compost heap, toilet, septic tank, etc.
Pump and its connection
Most often, submersible or surface pump s. The choice depends on the water supply source. First you need to decide whether it will be a well or a borehole. A well is much cheaper; this work can be done with your own hands. But its installation requires a lot of physical effort, and the water in the well, due to its shallow depth, does not undergo sufficient natural filtration and contains many harmful components. For wells up to 8 meters deep, it is advisable to install a surface pump and lower a flexible hose from it into the water for intake. The pump itself can be installed in the house, utility room or directly near the well.
The well is installed by specialists using special equipment. They conduct surveys on the availability and quality of water. Wells are installed quickly, and the water from them is always clean. Well installation is very expensive. To draw water from a well, a submersible pump is used, which is lowered to a great depth in the water.

Left – surface, right – submersible pumps
Plumbing diagrams
There are two main water supply connection schemes:
- The sequential connection scheme is used for temporary water supply, for a summer residence or for a house with low water consumption. In this scheme, all plumbing fixtures are connected in series, from one pipe. If one plumbing fixture is working, then the pressure in all others drops significantly.
- The collector circuit of the water supply system requires large expenses for the device and materials, but it is possible to operate several devices simultaneously without loss of pressure in the pipe. In this case, water is supplied to the collector, and pipes extend from it to each plumbing fixture separately.

Water pipe connection diagram
- A control station that regulates the operation of the pump and turns it off in case of danger.
- Cord with plug for connecting to the mains.
- A cord with a socket to which the pump is connected.
- Circuit breaker. If there is a danger to the equipment, it turns off.
- Electrical power socket in the house.
- A submersible pump is lowered into the well casing, takes water and delivers it to the surface.
- A cord that provides power to the pump.
- Nipple for connecting pipes; has threads on both ends.
- A check valve is designed to prevent water from returning to the pump.
- An injection pipe through which water is supplied from a well to the surface.
- The crosspiece ensures the intersection of pipes in one plane.
- Transition nipple is designed for connecting pipes of different diameters.
- Flexible hose that connects to the control station.
- A hydraulic accumulator is a container for storing water.
- Pipes for supply to consumers.
When laying pipes, the most labor-intensive process is preparing the building structure. Following the laying diagram, you need to make holes in the walls and drill grooves. Thanks to them, it will be possible to hide pipes in the walls.
Types of pipes
Steel
These are traditional pipes that have been tested for many years, and which until recently were most widespread. Nowadays, they are being replaced by pipes made from modern materials that have better technical performance.
Pros:
- Relatively low cost;
- Strength of the material;
- A wide range of fittings for them.
Minuses:
- Are subject to corrosion;
- Plaque formation on the inner walls of pipes;
- Good electrical conductivity: if a wire breaks, current is transmitted through the steel structure and can cause injury;
- High labor costs during installation. The pipes are connected by welding, which can only be done by a qualified specialist, or by threaded connections. Installation is difficult and dangerous.
Galvanized
The product is much better quality and more reliable. The surface coated with zinc does not corrode, and deposits of salts or other minerals do not stick to it.
Pros:
- High strength;
- Do not corrode;
- There is no sediment left on the walls;
Minuses:
- High price;
- Conductivity of electricity;
- Corrosion may form at the joints;
- Difficult to install.
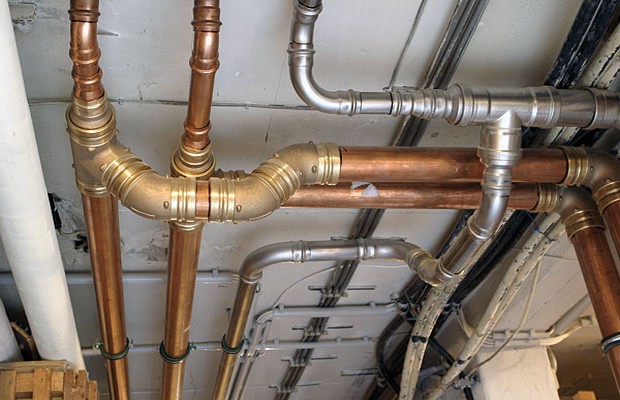
Copper
Copper pipes have many advantages, but the cost of such material is quite high. It is advisable to use them to play with water pipes in the interior of the house, because... they have a beautiful appearance.
Pros:
- Do not corrode;
- Deposits do not stick to the pipe walls;
- Wide operating temperature range;
- Aesthetic appearance;
- Long service life.
Minuses:
- High price;
- Small range of fittings for pipes;
- Difficulty of installation;
- Due to the thin walls of the pipe, it is easy to damage.
Metal-plastic
These pipes appeared on the market not long ago and have already become widespread. They combine the qualities of metal and plastic.
Pros:
- Do not corrode;
- Do not conduct electricity;
- Easy installation;
- Large range of fittings.
As a minus, one can consider the fact that their service life is limited.
Polypropylene
Pipe data by technical specifications have the best performance.
Pros:
- Low cost;
- Easy to install. Soldering pipes can be easily done with your own hands without noise and dust, and the soldering equipment has compact dimensions;
- Elasticity, which prevents damage;
- Strength of the material;
- Long service life.
The only disadvantage is that the connections can no longer be disconnected.
Polypropylene pipes for hot water must be fiberglass reinforced.

Pipes and fittings for water supply
Pipe diameter
Choosing the right diameter is very important for the water supply system. If the diameter is small, then extraneous noise will occur inside the water pipe, and if it is large, the pressure will decrease and more energy will be required to provide the required pressure.
The diameter is determined based on the length of the water pipe:
- For lengths ≤ 10 meters Ø = 20 mm;
- For lengths ≤ 30 meters Ø = 25 mm;
- If more than 30 meters Ø = 32 mm.
Water consumption is determined based on the diameter and number of plumbing fixtures. Based on these indicators, the required collector is determined:
- Ø 25 mm passes 30 liters of liquid in 1 minute
- Ø 32 mm passes 50 liters of liquid in 1 minute
Initially, it is necessary to determine the number of consumers and the length of the water supply system; based on this, the optimal pipe diameter is determined.
Water supply installation
Installation is carried out from the power source to the consumer. Installation begins with installing the pump in the well or pumping station for a well.
Pump installation
The pumping station is installed on the surface. You can place it in the house, which will simplify control, but it is noisy in operation. The most suitable place for her – utility room.
A submersible pump is lowered into a deep well. A cable is connected to the unit to secure it at the desired depth. Using an adapter or clamp, a flexible hose is attached, through which water is supplied to the hydraulic accumulator.
Installation of a hydraulic accumulator
The hydraulic accumulator is designed to maintain stable pressure in the water supply system and protects the pump from idling. Such a device is an optional element of the system; it is installed in two cases:
- to increase water pressure in the system;
- in case of interruptions in water supply.

What do hydraulic accumulators look like?
The hydraulic accumulator is mounted at the highest point of the water supply system, but so that it can be accessed. A tee comes out of the storage tank, on which is installed shut-off valves. The other two outlets go to the cold header and water heater.
Collector device
The collector is designed to uniformly distribute pressure in pipes for all consumers. The number of collector pipes depends on the number of plumbing fixtures that are consumers.

Cold water collector
Cold water from a pump or filter is supplied to the collector. A shut-off valve with a drain valve is installed in front of it so that, if necessary, the collector can be disconnected from the pipe.
For best quality water filters are installed. They must be installed in front of the collector and boiler.
The second flow is directed to the boiler, which heats the water to the required temperature and is supplied to the hot collector, where distribution to consumers occurs.
Each collector outlet has a shut-off valve and, in case repair work one device, the entire system continues to operate uninterruptedly. A separate cold and hot water pipeline is laid from the distributor to each device. For a private house and apartment best choice are polypropylene pipes.
How to solder polypropylene pipes with your own hands:
- The dimensions of the pipes for distribution are determined and cut to the required length. Cutting is easy to do with your own hands using special scissors. It is important to ensure that the blade of the scissors is perpendicular to the pipe.
- The depth of the adhesion is marked at the edges.
- The soldering area must be thoroughly cleaned of dirt and dust.
- A nozzle of the appropriate diameter is installed on the soldering iron.
- The soldering iron turns on and heats up to the desired temperature.
- The pipe moves in the soldering iron nozzle to the mark.
- After 7 seconds, the nozzle is removed and the pipes are connected. You need to hold them a little, but do not rotate them.

Soldering water pipes
Installation of water supply
The water pipeline is laid from the collector to each consumer in the following sequence:
- The distributor has taps for each pipeline; if not, then shut-off valves are installed.
- A pipe comes out of the tap.
- The next pipe is connected with a fitting using a soldering iron.
- For rotation, a corner fitting is installed.
- To adjust the pipes to size, they are cut with special scissors.
- Clips are mounted to the wall, with the help of which the pipe is attached to the wall.
- Water consumption devices are connected (washbasin, shower, sink faucets; compact; washing machine, dishwasher and others).

Piping in the house
- If pipes pass through walls, then it is advisable to protect the pipe with a ring at the point of passage to avoid their contact.
- The distance between the pipes should be 200-250 mm for ease of repair work.
- It is necessary to secure the pipes using special clips mounted on the wall. Fastenings are installed in corners, and on flat areas they are located at a distance of 1500-2000 mm.
- Angles and turns in the pipeline must be minimized.
Video about water supply
This video will tell you about installing a water supply in a country house with your own hands.
After a little instruction, you can easily install the water pipe yourself. For this you will need necessary tool. During operation, you need to monitor the reliability of the connections so that there is no leakage. High-quality work will ensure reliable operation of the water supply system for a long time.
In contact with
The water supply system in the apartment is one of the main communications. Sometimes in new buildings you have to do it yourself. In addition, over time, the components of the plumbing system become unusable and require replacement. You can replace the water supply yourself if you understand the wiring, selection of pipes and equipment.
Why you need to change your water supply - the main reasons
Let's look at the main reasons why the plumbing system is changing. Installed in old communications steel pipes, on which deposits, sand, scale and other contaminants accumulate inside. Over time, they become clogged, their permeability is impaired, and traffic jams occur, so they need to be replaced. You can get by with fewer losses if you regularly clean the pipes with steel cable. But you can completely get rid of the problem only by completely replacing the water supply system.
One of the reasons for replacement is leakage. It occurs when using suture-type products. The leak can be eliminated by welding. But this is a temporary solution to the situation; over time, it is better to replace the pipeline. The unaesthetic appearance of old pipes (peeling paint, traces of rust) also requires their replacement with modern plastic analogues that fit well into the interior. During a major renovation, all communications are usually updated: water supply, sewerage, heating. Replacing the water supply may be necessary if the wiring was done incorrectly.
How to find the right pipes - steel, stainless steel or polypropylene?
An important stage in installing a water supply system is the selection of pipes. For plumbing, they can be metal or made of various polymer materials. Products differ in their characteristics and cost, which influences their choice. One of the old options is galvanized steel pipes. Their main qualities are: strength and resistance to mechanical stress. Service life exceeds 25 years. The disadvantages of metal products are instability to corrosion processes, the appearance of growths inside pipes, which impedes the movement of water and reduces its quality. In addition, installation difficulties arise due to the need for threading and twisting together. This work requires great precision, maintaining dimensions down to the millimeter.
Stainless steel pipes are not afraid of corrosion. Their service life exceeds 50 years. The advantage is high assembly speed and good repairability. The disadvantage is the high cost of products and fittings. Most often they are used as heated towel rails. Universal option pipelines - copper pipes. They are not afraid of corrosion, ultraviolet radiation, durable, smooth, able to withstand high pressure, and are not afraid of impurities. They have the longest service life - up to 70 years. But the cost of copper analogues is the highest.
The lowest cost is for metal-plastic pipes, the price of fittings is in the middle price category. The service life is 20-30 years. Metal-plastic is easy to bend, install, does not rust, and deposits do not accumulate on the walls. Disadvantages: places with fittings cannot be bent, they do not tolerate high temperatures. Polypropylene pipes are becoming increasingly popular due to the following advantages:
- affordable cost;
- the ability to hide in the wall, as they do not require regular checking;
- high strength;
- versatility;
- durability - service life exceeds 50 years.
When installing, you will need a special welding machine, with the help of which individual parts of the water supply are welded. Reinforced pipes (fiberglass or aluminum) are used to supply hot water.
Taps for water supply – which ones to choose?
The plumbing system includes not only pipes, but also fittings, water taps, meters and mixing devices. The main purpose of the taps is to block the movement of the carrier through the pipes. You can install a tap at the entrance to the pipeline, but in this case, you will not be able to use the entire pipeline during repairs. It is more advisable to install taps on logical branches or on separate bathrooms, which will make it possible to turn off the water at any time in a certain segment.
Any faucet consists of a body, a valve, seals and a shut-off element. The taps differ according to the type of locking mechanism. It can be spherical or in the form of a valve. In a ball valve, water can only flow in one direction; if the valve is turned, the flow is completely blocked. In a ball mechanism, it is undesirable to install the valve in an intermediate position, as it wears out quickly. The tap can be either open or closed. It is better to choose a product with a butterfly-shaped handle. The lever handle can break at the most inopportune moment.
The valves are designed slightly differently than Ball Valves. The valve is adjusted using a handle; the power of the water flow can be adjusted. Such devices are used in places where it is necessary to regulate the amount of water.
According to their functional purpose, cranes are divided into the following types:
- standard;
- corner;
- tees;
- water folding mechanisms and valves.
Standard shut-off valves use a ball mechanism, so they are used to shut off water in individual sectors. They include straight couplings. Angle taps differ from standard ones in that their body is curved at a right angle. The tee has three outlets and serves to redirect the flow of water. Water taps are taps with a valve-regulator that are installed on pipes to control the flow force. TO metal pipes you need to select faucets made of metal, for plastic ones - from plastic.

Classic wiring diagram - an option for small apartments
The distribution of water supply pipes in an apartment can be done according to one of two schemes: sequential (tee) or collector. The tee circuit is classic. It consists of sequentially connecting to a common pipe all devices and equipment that require water supply. First, the main branch with hot or cold water, and then using tees, separate branches going to consumers are connected.
The main pipe should have a larger diameter than the other water supply pipes, since it acts as a collector. This scheme is intended for high pressure systems. Since the connection is made in series, water is supplied to the last device with the lowest pressure if several consumers are turned on at once. This should be taken into account when installing the water supply system.
This scheme is easy to implement. Its installation requires a small number of pipes, fittings and taps, which minimizes the cost of creating a plumbing system. But this scheme is suitable for small apartments dream big amount plumbing, since the longer the pipeline, the less pressure will be at the end. In this case, the latest plumbing fixture may not work correctly.

When repairing a device in a system with a serial connection, it is necessary to turn off the water everywhere, since such wiring does not make it possible to turn off an individual device. Typically, connection points are disguised under decorative trim and access to them is limited. In the event of a leak, it is sometimes difficult to determine the location of the leak. In addition, when renovating, you have to remove the trim and then install it again.
Despite the disadvantages, the tee wiring diagram is popular for apartments with a small area. Serial connection makes it possible to save on system arrangement. If the pipeline is short, then the pressure in the system remains high even at the extreme points. To reduce costs as much as possible, you need to think carefully about the pipe laying scheme and provide access to the tees. The better the installation is done, the less likely there are leaks.
A system with a collector is the optimal choice for large areas
For large apartments with a large number of plumbing fixtures, a manifold wiring diagram for water supply is most suitable. This wiring is the best option for systems with variable pressure. It makes it possible to ensure an uninterrupted supply of water with the ability to control the flow strength and turn off some branches in case of repair work. Peculiarity collector circuit– collector available. From the common riser, water first enters a special container and is then distributed to individual branches. The throughput of the collector depends on the volume of the container and the diameter of the inlet pipe. Each appliance or bathroom has a separate supply line, equipped with a control tap, thanks to which you can turn off the water supply.
For the manufacture of collectors, stainless steel, brass, polypropylene, polyethylene and other materials are used. When choosing a collector, you should take into account the installation method. Metal products have a traditional threaded connection. The cost of collector-type water supply is higher, but the system is reliable, convenient and ensures uniform distribution of water. The pressure does not depend on the distance at which the consumer is located or the number of devices.
The advantage of the collector circuit is the ability to turn off one device for repairs without shutting off the general water supply. This allows you to personalize the characteristics of an individual device. Between the collector and the sanitary fixture, you can install filters and rectifiers that allow you to purify the water and saturate it with useful substances. Installing control devices makes it possible to reduce or increase water flow.

Collector wiring diagram
The disadvantage of a collector circuit is the high cost of investment for its creation. More devices, fittings, taps and pipes will be required than for tee wiring. The connection begins with the installation of a collector for cold and separately for hot water, if there is a centralized water supply. You need to choose the right place. Shut-off valves should be installed between the collectors and the central riser, allowing hot or cold water to be completely shut off if necessary.
After installing the collectors, pipes are laid to each appliance and bathroom. Both hot and cold water are supplied to the bathtub, washbasin and shower stall. TO automatic washing machine and only cold water is supplied to the toilet cistern. Hot water is connected to the heated towel rail. Some plumbing systems use combined wiring diagrams. Branches with sequential connections have the disadvantages of the tee system, but the combined scheme makes it possible to save on the installation of water supply and optimally design the pipeline layout in residential premises.
New plumbing system on your own - installation instructions
Before installation, the pipe routing must be designed. The project can be roughly divided into three stages: drawing up a wiring diagram, determining connection points, calculating the quantity necessary materials. You immediately need to decide on the method of laying pipes: open or closed.
The diagram should indicate:
- how the pipes will be laid, indicating the turns, diameter and length of the pipes;
- insertion points;
- connection points for devices and components;
- the dimensions of the premises and appliances to which water will be supplied;
- number, size and type of fittings installed, etc.

Connections of metal-plastic pipes
Connection points are places where water supply is needed: a tap in the kitchen, a tap and shower in the bathroom, a toilet cistern. If you have a washing machine and dishwasher, they should also be connected to the water supply. According to the diagram, you need to accurately calculate the amount of materials needed. Dismantling the old system should be done after drawing up a diagram and purchasing all the necessary materials. Next, we proceed to the installation of the water supply.
- 1. Before starting work, turn off the water, dismantle the old riser and install a shut-off valve on it. We open the water supply through the riser to the neighbors and begin installing the water supply system inside the apartment.
- 2. To improve the quality of water coming from the central water supply, we install a coarse filter at the beginning of the system. After the filter there are water meters. There is a separate meter for each type of water.
- 3. If necessary, install a fine filter after the meter. We equip the main line with a water reducer if the pressure in the main line exceeds the norm. The gearbox must be equipped with a pressure gauge, which sets the value in atmospheres.
- 4. Then we install either a manifold with the required number of outputs, or a tee if a serial wiring diagram is used.
- 5. Next, pipes are laid out and devices are connected according to the diagram.
It is carried out in two ways: press connections and pressure fittings. The second method cannot be used for hidden pipe laying. When using the compression fitting method, first cut off the pipe the right size. Using a chamfer calibrator, we remove the chamfer from the pipe. We take a nut from the fitting kit and put it on the pipe, and then insert the ring, fitting and crimp it using open-end wrenches. This connection is of the horn type, which means leaks are possible, so once a year the connections need to be checked for leaks and tightened if necessary.
We also start connecting with press fittings by preparing pipes of the required size. Then we perform calibration. Next, we insert the pipe into the fitting and press it with a hand press. This connection is durable and can withstand sudden temperature changes, but it is not separable. If polypropylene pipes are used for water supply, then for cold water pipes with a diameter of 25 mm and a wall thickness of 2.8 mm are taken, and for hot water, pipes with reinforcement of the same diameter and a wall thickness of 3.2 mm are taken. Holding special scissors at right angles, cut the pipes to the required length. At the ends of the pipes we mark the welding depth, depending on the depth of the fitting. Using a trimmer, remove the middle layer of the pipe to a depth of 1–2 mm.
Turning on the welding machine, we begin welding. We connect the pipes or fitting and pipe, and then slide them onto the nozzles of the welding machine. After seven seconds, remove the pipes from the device. Next, carefully connect the pipes without rotational movements. You need to act quickly and accurately. The pipes must be kept connected until they cool. After installation, you need to check the quality of the connections, the functionality of the system, and the correct connection of devices and components. After checking the strength of the pipes and high pressure connections, you can connect the water.
Even an inexperienced craftsman can install the water supply system of a private home with his own hands. Manufacturers of modern water fittings have done everything possible to simplify the technology for joining water supply elements. And we will tell you about the procedure for installing a home water supply system - from marking the lines to running water into the taps.
How does household plumbing work?
In most cases, the water supply to a private home is based on an autonomous source drinking quality. This could be a well or a borehole. Therefore, the internal water supply in the house starts from the pumping station, or more precisely, from the first shut-off valve, which cuts off the pressure unit from the distribution.
Behind this valve there is a cold water branch and a hot water supply (DHW) line. And in most cases, the hot water supply line is formed on the basis of a branch from a cold pipeline, which goes into a heating device that generates hot water.
Sources of consumption - taps, mixers, dishwashers and washing machines, cisterns and so on - connected to the cold and hot branches using taps cut into the main hot or cold pipe or manifold. IN the latter case the consumer is forced to buy more pipeline fittings. However, using a water collector will protect you from pressure surges in the network. Simply put: you won't get scalded by boiling water in the shower after someone uses the flush tank.
The joints of the bends and the center line are played out using tees. Turns (corner mates) are made using corners. To facilitate the repair process, a shut-off valve is installed into the outlet to the source of consumption. It allows you not to turn off the water in the entire house in case of repair of one tap.
As you can see, a typical water supply installation in a private house is very simple. Any novice mechanic can assemble such a network. And you need to start designing a water supply network by calculating the footage of pipes and the number of connecting and shut-off fittings.
How to calculate pipe footage and number of fittings
If the water supply is based on the main pipe, then water distribution in a private house begins with laying a central line encircling the perimeter of the building. The footage of the pipes in this case is equal to twice the sum of all the houses (two perimeters).
With the collector the situation is more complicated. In this case, a separate line will go to each tap. Therefore, the footage in this case can only be determined from a full-scale diagram, by drawing lines on the walls along which the wiring will be laid. After completing the drawing, measure the length of the lines and record the footage of the cold and hot branches.

If you are building a water supply system with your own hands, the full-scale wiring diagram will not fit in any case. Take blue and red crayons in your hands and draw the trajectory of laying cold and hot pipes on the walls, marking the positions of tees, corners and shut-off valves with arbitrary icons. This drawing will help you not to make a mistake with the length of the pipes and the number of valves, and during installation it can be used as a contour for laying the fixing elements that hold the pipes on the wall.
The number of corner fittings is determined by turns (corner mates). The number of valves is calculated according to the sources of consumption (one per source, plus one more if we are talking about a mixer). Tees are counted only when installing a water supply system based on the central line, determining their number by the number of valves.
After that calculation and subsequent purchase of fittings and fittings, you can do it in any private house literally in a day. We will tell you how this is done further, discussing both the cold and hot branches of the water supply separately.
How to install a cold water line
Installation of cold water supply in a private house begins with the installation of a collector. This unit is placed in the kitchen area if it is located near the toilet and bathroom. Otherwise, the collector is placed closer to the sanitary zone. Moreover, this work is easy to do with your own hands - to do this you need to do the following:
- 1. We buy a collector, the number of outlets of which is equal to the number of consumption sources.
- 2. We fix it on the wall using screw clamps with a self-tapping leg or brackets on the distributor body.
- 3. We lay a metal-plastic pipe with a diameter of ¾ inches from the central valve of the water supply to the inlet pipe of the manifold, using push-in fittings for mating.
- 4. Using the same fittings, we arrange bends with a diameter of ½ inch from the collector to the points of consumption, laying pipes in the baseboard area. Moreover, a valve should be installed between the pipe and the collector, closing each outlet.
- 5. Having reached the outlet under the sink (tank, tray or bathtub), we design vertical section, raising the pipe above the floor by 50 cm.
- 6. We connect the pipe and the tap (mixer or tank) with a bellows or reinforced hose.
Finally, we install the faucet on the sink and connect the drain to the sewer. And we repeat this operation with all points of consumption. At this point, the installation of the cold branch can be considered complete.
How to install a hot water supply line
The DHW branch is made in almost the same way as the cold water supply. Only instead of a central valve, the starting point for the hot line is the cold branch manifold.
From this distributor we run a ½ inch line to the heater. Moreover, at the connection point you need to embed check valve so that water from the boiler or heat exchanger of the column does not drain back. It is described in a separate article.

The next step is to install a hot water collector. It is placed either under the boiler, or in the bathroom or kitchen. Next, a ½-inch diameter pipe is pulled to the wall-mounted distributor, connecting the manifold and the “hot” fitting of the boiler/boiler.
Finally, separate hot water supply lines are connected to each mixer, connecting the taps and the distributor. Moreover, to facilitate connecting the pipeline to the tap, you can use a bellows hose. The reinforced version is not recommended in this case - it is designed for cold water.
If the house has no more than 2-3 sources of hot water consumption, then the collector can be replaced with a pair of tees, laying a central line to the shower or faucet in the bathroom, and arranging an outlet to the kitchen. But in this case, be prepared for pressure surges if you use faucets in the bathroom and kitchen at the same time.
How to save money on plumbing installation
Installing a water supply system in a private home will cost much less if you follow a few tips. First, stop using elbow fittings. A metal-plastic pipe can be bent along a 25-centimeter radius, fitting into any turn.
Secondly, special manifolds with shut-off units at each outlet will help save on valves mounted under each entrance to the faucet or mixer. Third, consider the location of the flow splitter. Ideally, it should be between the kitchen and the bathroom. But if there are more taps in the bathroom, then it is better to move the manifold there. In this case, you will only spend money on one kitchen outlet.
Fourthly, if the distributor and the consuming device are separated by 2-2.5 meters, then instead of pipeline fittings you can use a reinforcing or bellows hose of the appropriate length. Fifthly, when choosing between metal-plastic and polypropylene, vote for the first option. Polypropylene pipes are installed using a special welding machine or expensive electric couplings. Therefore, professionals will have to be involved in such work. In addition, polypropylene does not bend like metal-plastic.
If you listen to these tips, you will be able to save up to 10-15 percent on the cost of consumables.
Laying water supply pipes in an apartment is a problem that has to be solved during overhaul. Sooner or later, the time comes when the water supply system becomes unusable. There can be many reasons for repairing and replacing the water supply system; we will list the main ones - the formation of fistulas, condensation on pipes, the appearance of rusty water from the tap, etc.
Is it possible to replace the water supply system in an apartment or private house on your own? After all, the work of plumbers will not be cheap. And the answer to this question is positive - yes, this is possible.
At the same time, special permits and registrations will not be required for work. All that is necessary is to shut off the water supply to the riser for an hour.
All work on installing the water supply system will have to be carried out in strict sequence, otherwise the constructed structure will not operate without failure.
Pipe selection
The arrangement of the water supply network begins with the selection of pipe materials. Recently, domestic steel mains are not often installed. This material has already lost its popularity.
His place was taken cheaper and more practical structures made of plastic and metal-plastic. You can also use copper water supply systems, but their too high cost in this option causes the rejection of this material.
- Copper. Despite its many positive properties, this highway is not without some disadvantages. The first is harmful cuprous oxide, which is formed upon contact with an aqueous environment. Secondly, tin is used in solder when soldering. This material turns into powder over time, causing the joint to leak.
- Metal-plastic. This material does not belong to the line of cheap materials, but it can be joined without the use of special tools. The laying of such a pipeline is permitted for open area, where you can quickly move through the joint at any time.
- Plastic. These systems are called plumbing design standards. But plastic is different. And to do right choice, you need to know the properties and features of these materials. For example, a material such as polybutylene (PB) is distinguished by optimal thermal conductivity. Joints made of this type of plastic are absolutely reliable.
 Polyethylene (PE) not an expensive material, but for hot water supply (DHW) you will have to install reinforced products. Despite significant disadvantages, this material has a very significant advantage of not bursting after freezing. Therefore, such a highway works successfully indoors without heating or outdoors. Polyvinyl chloride (PVC) is chemically resistant, but fragile and degrades when exposed to ultraviolet light.
Polypropylene pipework for arranging water supply in an apartment will not be very expensive. Such a water supply main given time is used more often than others. This material is distinguished by its strength and durability.
The soldered polypropylene joint on the wiring reliably withstands pressure loads of up to 12 atmospheres, and is not much different from the base material. In a city pipeline there can be up to 6 atm, so this range is ideal for polypropylene wiring in an apartment. The routing of pipes for water supply in an apartment where polypropylene is used is characterized by higher hydraulic resistance than previous analogues and increased thermal stability.
When describing the characteristics of polypropylene wiring, it is necessary to remember their disadvantages. Polypropylene has only two of them. First, polypropylene cannot be glued, and when welding, you need to use special equipment and strictly follow all plumbing technology. Secondly, polypropylene has a significant coefficient of thermal expansion, which must be taken into account when performing installation.
Watch the video
The installation of water supply pipes in an apartment where polypropylene is used is recommended by experts as the only system at this time that, after correct installation does not require constant care. It is also necessary to add to the above that polypropylene is soldered at a lower temperature than other types of plastic.Choosing a method for distributing water in an apartment
The layout of the water main can be carried out using the tee method (it is considered to be classic options). Or it can be produced using a modern collector method.
The first method is to sequentially run the main from the common riser to the dismantling points. First, the main branches with different water are diverted, and then, using a tee, the water moves along the branches.

The classic scheme has the following advantages.
- Small price.
- Compact dimensions.
- Simple gasket.
And her disadvantages are the following.
- Constant pressure drops.
- Impossibility of shutting off one point of consumption.
- Tees are not always convenient to place in a bathroom or toilet.
- For a small apartment, such a wiring is acceptable, but in a large country house it will cause a lot of inconvenience.
Collector wiring carried out for water supply in an apartment or private house is a method in which an individual pipe is installed at each intake point. With a collector design in an apartment, the sink, toilet, shower stall and all other plumbing fixtures supply water in the required quantity independently of one another.

All pipes are connected to a collector, which is located at the entrance of the main line to the housing. The collector design is a system equipped with one input and several outputs. When connecting to it, not only the number of valves is taken into account, but also the number of all plumbing fixtures.
ADVICE. The connection of the collector structure to the home can be made after connecting the filter mechanisms for water purification and pressure reducers.
Collective distribution of water supply pipes in an apartment has numerous advantages:
- The first is the possibility of turning off water at one of the points, without damaging other water intake points.
- The control valves for this system are located in one zone and are always freely accessible.
- Constant stability.
- The risk of breakdowns is minimized. And if repairs need to be made, they can be done easily and quickly.
- All water intake points have the same water temperature level.
- If necessary, you can quickly connect a new valve or plumbing fixture. To do this, you first need to install a collector structure with several spare exits.
Watch the video
Perhaps the only negative in this case is the need for a large amount of building materials. After all, a “couple” of pipes is not enough in such a situation. Accordingly, such a scheme will require significant financial costs. In addition, such a design will require a lot of space.Water supply wiring diagram
The layout of water supply pipes is, most of all, necessary for the owner of the apartment. A detailed plan helps to accurately navigate the location of various elements of the highway. Special permitting documents to compile detailed plan not required. Only when registering the meter, city water utility workers can ask for this scheme.

Creating a complete circuit according to all standards, even for a professional craftsman, is a serious job. Because such a scheme for country house With summer kitchen required for project approval. For an apartment, it is enough to draw a diagram where everything will be simple and clear. Such a plan should include:
- Water supply pipes.
- Accounting mechanisms.
- Emergency drains and valves.
- Shut-off valves.
- Water collection points.
- Branches for natural use.
- Direction of water movement.
The collector and any other distribution of water supply pipes must be carried out according to a scheme that will be understandable not only to the owner of the apartment. Therefore, there are certain norms and rules for drawing collector and other circuits. In this case, they recommend:
- do not use isometrics, otherwise the intersections of pipes will confuse the entire manifold or tee circuit.
- Do not overuse arrows and pointers so as not to confuse the plan.
- Shut-off valves and metering devices must be indicated according to the rules and clearly.
- The diameter and type of pipe products must be indicated.
As a result, it turns out that the collector or tee circuit must be drawn up according to strictly defined standards and must be without frills.
How to calculate the diameter of a pipe assortment
 The diameter of the water supply pipes should be calculated correctly. And such a calculation is needed for a reason. After all, the smaller the diameter of the pipe, the less it costs. And on the reverse side, an excessively small diameter of the pipeline causes turbulization of the liquid. In this case, the throughput function of the main line decreases, and at a normal level of pressure from the tap, very little water will flow.
For a pipeline in an apartment, you can correctly calculate the diameter yourself. The initial parameters are as follows:
- The lowest pressure is 0.3 atm.
- For 1 meter of a 16 mm tubular product, the pressure loss can be 0.05 atm.
- Pressure loss per fitting connection is possible at 0.15 atm.
- At the water intake point, losses are 0.25 atm.
- The headroom for the most distant point can be at least double.
Now, it is necessary to find out whether the sequential distribution of water supply pipes in the apartment will be equipped with the necessary pressure at the most distant point. Will the current assortment be enough for a consistent design, or will it be necessary to purchase larger pipes?
The pressure level at the bottom of the risers is determined using a pressure gauge, then 0.6 atm is subtracted for each floor. But in multi-storey buildings such a calculation is not acceptable. In order not to increase the cost of construction in housing, risers are removed separately from the building. First, this is done on the lower, and then on the upper and middle floors.
Horizontal distribution of water supply pipes is characterized by a nonlinear dependence of heat loss in the pipeline. Such losses depend on the flow speed, which in turn depends on the cross-section of the pipe structure.
The slightly increased diameter of the range significantly reduces heat loss. For these reasons, a simple design in a 20 mm apartment with 16 mm bends functions properly.
What tools and materials will be needed for work?
 To work on assembling the highway, you will need a standard set of tools. These are: a welding machine, a tape measure, devices for cutting and bending pipes. Before purchasing materials, you need to carefully calculate the footage.
Also, before installation, doing it yourself, you will have to dismantle the old pipeline. This replacement is performed using traditional methods. In an apartment, it is better to do this after turning off the water measuring device, so as not to turn off the water supply to other floors for a long time.
Another tip that will be useful in this situation is that you should not take a valve with a lever. It is made of plastic, which tends to break at the most inopportune moment. It is better to use a ball device with a butterfly-shaped handle to shut off the water supply.
Do-it-yourself wiring installation
 So, it was time to assemble the system. Directly. This is absolutely not difficult process, which even a novice master can handle. If you adhere to the technology of this work, then in the end you can get a structure that will function reliably and for a long time.
You should also pay close attention to the gating and arrangement of channels in the screed. They should not extend further than 150 mm from the wall and no less than 20 cm from the furniture. All plumbing fixtures must be removed and removed from the premises before starting work.
On initial stage actions are set by arcs. These are plastic strips with corners for faucets. They are secured to the main wall with self-tapping screws. When performing this fastening, you should take into account the dimensions of the finish. This could be plaster, tiles or any other finishing design.
If House master does not have significant skills, it is difficult to accurately position the output workpieces flush. It is recommended to first make them with a protrusion at a distance equal to half the width of the side of the caps on the mixer. If these caps are not adjustable, then it is not recommended to “adjust” them using an emery wheel.
Watch the video
The next stage is connecting the sections of the highway. It is more convenient to collect the water supply on the table, and pull it into the recesses in one piece. But now the question naturally arises, how to stretch the structure through the walls?In the case of metal-plastic, this is not a problem; such a line is made on detachable fittings. And soldered pipe products are carried out using adapters and metal-plastic inserts. The second, more reliable method is to install the network on site. Only for such actions you will have to purchase a compact welding machine.
It is also necessary remember that for cold and hot water you will need individual units for metering devices. It is recommended that counters and valve handles be distinguished by color.
Readings on metering devices must be viewed conveniently. For this reason, this area of the highway is often performed in a very bizarre form. . This seal should be preserved; without it, the device is considered unusable.
After installing the meter, you should call an inspector from the water utility. He records the data on the device, and seals the meter and filter drain with his seal.
Watch the video
It is better to use a pipe cutter to cut pipes. By working with this tool, you can not only save time, but also better prepare pipe materials for soldering.Special attention should also be paid to pipe bending. When working with metal-plastic products, it must be remembered that the minimum permissible bend level is equal to five outer volumes of the tubular product.
And at the final stage, the boiler is installed. These actions were included in a separate cycle installation work. This work is carried out after the pipeline is put into operation. The pipes for the boiler are prepared in advance. Valves are placed near both pipes, and at this stage they are immediately closed and additionally sealed.
Laying out water supply pipes is not a very complicated job, and it is quite possible to create such a system with your own hands. Only, it is necessary to take into account that this work will not tolerate careless and careless attitude.
Watch the video
Will tee or collector distribution of water supply pipes in an apartment be better? In order to answer this question, you should not only carefully study the installation principle in both cases, but also evaluate the pros and cons of each option. Comparison of installation and operation features with the conditions of a specific facility (house or apartment) will allow you to make optimal choice. The importance of choice cannot be underestimated - the ease of use of water supply systems (hot and cold), durability and maintainability of communications depends on it.
Technically tee diagram of water supply distribution in an apartment is a serial connection– one pipe extends from the riser, to which plumbing and other water-consuming equipment are connected using tees.
The advantages of such a system are:
- economical (with a series connection, a minimum number of pipes is required),
- ease of installation.
Tee wiring diagram for water supply in an apartment It also has its disadvantages:
- a large number of connections and serial connection make it difficult to find leaks,
- there is always a risk of pressure drops in the system and a decrease in pressure at the points furthest from the riser when several taps are turned on simultaneously,
- if necessary, repair work will be required complete shutdown water supply, which represents a certain inconvenience,
- Installing tees is not always convenient in small spaces.
Tee water supply schemes recommend choosing for small apartments . With a small number of consumption points and their location close to each other, many disadvantages become less relevant - in this case it is much easier to coordinate water consumption, which means the risk of pressure loss is minimized.
When installing a tee circuit, the tees are often hidden in the walls or under the floor, which complicates inspection of communications, and during repairs inevitably leads to damage to the finish.
Collector circuit
The collector wiring in the house makes it possible to connect a large number of consumption points, including those located at a distance from the riser. Collector circuit is a parallel connection– each element (faucet, shower, toilet, bidet, etc.) is connected to the collector using an individual outlet equipped with a valve.
The advantages of the collector circuit are:
- constant pressure regardless of the number of plumbing fixtures turned on,
- easy detection of faults on each individual line,
- high reliability of communications due to the small number of connections in the system,
- the ability to shut off the water on the line requiring repair and maintain the ability to use other lines at the same time (for example, while repairing a shower, you can wash dishes, wash your face, etc.),
- connection lines collector wiring easily camouflaged in boxes, niches, etc., ensuring an attractive appearance of the premises.
Collector distribution of water supply pipes in an apartment It also has its disadvantages:
- its implementation requires a larger number of pipes,
- installation of parallel connections is more complex (if you plan to do it not yourself, but with the involvement of specialists, the complexity directly affects the cost of services).

The collector distribution of water supply pipes in the apartment allows you to optimize the operation of each device included in its composition. Filters or pressure regulators can easily be installed on individual outlets in accordance with the characteristics of water-consuming equipment and its requirements for operating conditions.
Installation according to the collector circuit
Principle of organization of collector systems
Do-it-yourself collector distribution of water supply in an apartment is carried out according to the following principle - the central branch does not have branches, but is connected to a collector, to which, in turn, the supply lines for each device are connected. When installing heating systems, collectors are installed in special cabinets (when implementing a scheme for houses with several floors, collectors are installed on each floor).
Cold and hot water supply systems are installed in the same way. In apartments, water supply collectors are conveniently installed for. The collector principle of supplying water or coolant is also called radial, and it has its own characteristics for water supply and heating systems. These nuances deserve close attention.

Installation of collector water supply
The junction of the collector with the central pipe is equipped with a ball valve to allow a general shutdown of the water supply. The valve is complemented by a pre-filter (coarse) filter, which traps large insoluble inclusions that can damage other equipment.
If you follow the flow of water, after the coarse filter there should be a counter, and after it there should be another filter that removes smaller inclusions (compared to the first).
The next element of a well-designed water supply pipe distribution system in an apartment is a check valve, which prevents the reverse flow of liquid from the collector into the central pipe when the water supply pressure decreases.
Note: It should be noted that the installation of the above equipment at the beginning of the pipeline is also necessary for the sequential layout of water supply pipes in the apartment.
Only after the equipment listed above is the connection to the collector made. Each collector outlet is equipped with its own tap to turn off the branch’s water supply.

When selecting and installing a collector, one of the determining factors is number of water consumption points. It must correspond to the number of outlets, and to be able to connect additional plumbing equipment in the future, you should choose collectors with a large number of outlets. Those of them that are not used in the system until a certain point are provided with stubs.
If the central branches of both cold and hot water supply enter a house or apartment, the installation of water supply distribution in a collector-type apartment is identical in both cases. If there is only a central cold water supply, one of the outlets of the cold water collector directs the liquid to the water heater, from where the heated water flows into a separate collector for hot water distribution.

