Ready-made gazebos with barbecue. Garden gazebo or summer kitchen with barbecue, barbecue, stove: DIY construction options
There is probably no person who would not like to eat barbecue in nature, relax, relax, be with family or chat with friends. Your own summer cottage is exactly the place where you want to relax. Properly organizing a recreation area is the primary task of any owner. A gazebo or summer kitchen with a barbecue stove (barbecue) will be an excellent option for a pleasant time with the family. This article presents drawings and descriptions of two such projects that you can easily build with your own hands.
Types of garden gazebos
The erected building should not only fit well into the design of the garden, but also be functionally convenient for use. You can create a garden gazebo with a barbecue from many materials: wood, brick or metal. Each has its own advantages and disadvantages.
Wood
Wooden gazebos are a versatile addition to any garden area. The following advantages can be noted:

Wooden gazebo with barbecue
- does not require special financial costs and special tools;
- quite reliable and durable;
- easy and quick to build;
- no need for a massive foundation.
Brick
The capital construction of such a gazebo, as in the photo, will cost you much more than a wooden one. Since the building is heavy, it needs an appropriate foundation. The advantages include:
- fire resistance;
- strength and durability, does not require annual repairs;
- protects well from rain, wind and snow. With a major construction, those who like to celebrate the New Year in nature will not freeze.

Brick gazebo
Metal
Forged gazebos, as a rule, are purchased ready-made or made to order. Its cost depends on the size and complexity of the model. Advantages:
- durability, subject to the use of paints and primers;
- fire resistance;
- creates a special romantic atmosphere in your garden.

Gazebo with forged inserts
How to choose the right grill
Barbecues can be portable or built-in. The choice should be made already at the stage of drawing up the drawing. The good thing about a portable grill is that its location can be easily changed at any time. However, built-in barbecues perform more functions and are equipped with additional elements, for example, a niche for firewood, a shelf for storing dishes, and a countertop. The massive design of the built-in barbecue requires a solid foundation. It is usually located on the north side.

Closed wooden gazebo with barbecue
Did you know that in our time there are technologies, the use of which will allow you not to use solid fuel (coals or firewood) for cooking food and barbecue. Some braziers in barbecues are equipped with volcanic stones, which are heated by gas or electricity. The heat transfer from them is two times greater than from firewood and coals. In addition, there is no soot or smoke. After three years the stones should be replaced.
In order for the gazebo to be as functional as possible, you should choose its location in advance and correctly. The choice should be made taking into account the convenient supply of communications: electricity, water, gas. It is also preferable to make a resting place away from outbuildings, toilets, compost pits or a fence with animals.

To build a gazebo you need an open area
A gazebo built near the house is convenient. You can use it not only for cooking barbecues and gatherings with friends. It will be nice to sit in silence in the gazebo, watching nature.
DIY gazebo with barbecue
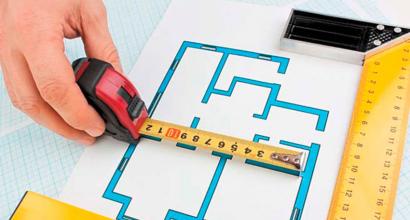
Before any construction, be it a gazebo or a house, you should create a drawing. It is necessary in order to accurately determine the amount of building and finishing material, identify all the constituent elements of the building and choose the optimal roof shape.
Marking and building the foundation
So, after the drawings are ready, proceed to marking the site and laying the foundation. The marking stage is very important, because the entire future construction will depend on its correctness and accuracy.

Drawing of a gazebo with barbecue
Laying the foundation is the next step. Its size will depend on the massiveness of the gazebo. When constructing light buildings, a columnar foundation is most often used. It is financially more economical. For heavy brick buildings, a slab foundation is often used, which will subsequently serve as a floor. There is also a strip foundation. It is optimal for both types of buildings.
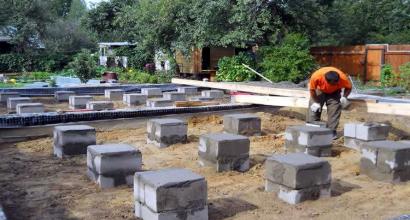
In our example in the photo, a columnar foundation will be used. To install it, dig holes of the appropriate size, line the walls with roofing felt, insert several reinforcement rods into the center and fill with cement mortar. As a result, you should have columns that protrude slightly beyond the soil level.

Arrangement of a columnar foundation
Construction of the subfloor
The next stage is building the floor. Its base can be made of wooden beams. It will be fastened with screws and boards. When building an open gazebo, the floor should be made with a slight slope so that rainwater does not collect.
Important! When building a gazebo, do not forget to impregnate the building materials with protective agents. They will protect the structure from the negative effects of the environment and insects.

Gazebo floor
Wall and roof construction
The basis of the entire gazebo is load-bearing corner beams. Their installation should be given special attention, because they will support the roof. The walls in the gazebo can be solid or lattice.
After the walls comes the construction of the roof. When building a gazebo with your own hands, a ridge or lean-to inclined structure is most often used. Ondulin or polycarbonate is used to cover the roof. A gazebo with a carved roof plaited with flowering plants looks beautiful. But you won't be able to cook in it when it rains.

Construction of a gazebo frame
Installation of barbecue
If you plan to equip the gazebo with a built-in barbecue, then it should be installed before the exterior finishing. It is worth remembering that brick or stone structures require a good foundation. In light wooden gazebos it is better to use portable barbecues.
Making a durable brazier out of brick is not easy. It is necessary to know all the nuances and have some experience, so it is better to entrust this work to a specialist. For general information, below we suggest you familiarize yourself with the classic scheme of its construction.

Capital barbecue for a country gazebo
You should decide what kind of barbecue the gazebo will be equipped with at the stage of creating the construction project, since when building the main foundation it is necessary to lay the foundation for the built-in barbecue. The thickness of the base should not be less than 30 cm. After this, make two rows of solid brickwork and a niche for solid fuel. The next stage is making an opening for cooking. Usually these are 7 rows of bricks lined with a solid wall. Then the grill should be equipped with a chimney and pipe. They are laid out in a circle. A special roof is installed over the pipe to prevent precipitation from getting inside the barbecue.
Construction of a summer kitchen with a stove
Any construction begins with a well-drawn drawing that takes into account all the subtleties of constructing the frame and the nuances of placing important, one might say “strategic” parts (such as a stove, for example). The correct drawing will show you the future building from different angles.

Drawing: summer kitchen for a summer house
Unlike a gazebo, building a summer kitchen, such as the one in the photo, is a more labor-intensive and complex process. It can also be made either open or closed.
Arranging the base and laying the foundation
Before laying the foundation, the surface of the selected location should be leveled and the foundation of the future building should be marked. If your choice leans towards an open summer kitchen, then a platform that is not too deep, about 10-15 cm, is suitable for the foundation. To equip it, the specified layer of earth around the perimeter is removed, sand is poured into the resulting hole, everything is carefully compacted and leveled. Then the base is covered with paving slabs or bricks.
A strong, fairly heavy brick structure requires the construction of a complex foundation: slab, strip or columnar. It is buried 50-80 cm.

Furnace foundation
- The process of laying a solid foundation occurs in several stages:
- Removing the top layer of soil to a depth of at least 50 cm along the entire perimeter of the building.
- Laying a sand layer of 15-20 cm.
- Construction of the foundation.
- Floor equipment. A layer of crushed stone is laid on top of the laid and compacted sand. A concrete screed is made on top.
Important! Make the floor in the summer kitchen at least 5 cm higher than the soil level. This will prevent precipitation from entering during rain or snow.
Wall forcing
To build a stone kitchen, one or half brick bricklaying experience is required. It’s easier and faster to make walls from timber. In this case, a wooden frame is erected, the joints are fastened with screws. Corner beams are attached to the foundation using metal corners. The outer side of the finished frame is sheathed with boards, sheets of plasterboard, clapboard or tiles.

Design layout of a summer kitchen with a stove
Erection of the roof and installation of windows
If the summer kitchen area is planned to be used in winter, then the roof structure should be of a gable type and covered with a layer of thermal insulation. The final stage will be covering the roof with slate, tiles or ondulin. The summer kitchen, which looks like an open area, should also be equipped with a canopy.

Summer kitchen roof design option
A closed room requires the presence of window openings. The large floor-to-ceiling windows look interesting. They let much more light into the room. When installing windows, make sure that the frame fits tightly into the opening. During installation, you can use special silicone gaskets.
Stove installation
Wood stoves are financially economical. They are most often used in summer kitchens. The stove is made of special fireclay or refractory bricks. It is resistant to high temperatures, heats up quickly and retains heat. Of course, with a solid fuel stove, the risk of a fire increases significantly, so immediately consider a ventilation system in the kitchen.
Interior decoration
The floor surface in the summer kitchen can be laid with tiles, boards or linoleum. Most often, wooden floors are made, which gives the kitchen a special rural charm. To prevent it from deteriorating, it is coated with varnish or enamel. Ceramic tiles are very resistant to external influences, which are also popular and often used for summer kitchens.

Choose furniture for the summer kitchen that matches the style of the building
To finish ceilings, use 20 mm thick boards or sheets of water-repellent plasterboard. Before installation, boards are usually coated with drying oil, and drywall after installation is usually coated with paint.
To use a summer kitchen in winter, the walls are insulated with glass wool. For their finishing, wooden or plastic lining or drywall are used.
Proper care of the gazebo
The gazebo with barbecue you have built will please you longer if it is cared for correctly and regularly:
- Clear the floor and walls of the open gazebo from snow, ice and fallen leaves;
- treat all wooden and metal elements of the gazebo annually with special protective agents;
- Regularly clean any cracks in the wood with putty;
- Cover open areas in the gazebo with film for the winter.
Ideas for building gazebos with barbecues or grills: video
Country gazebo and summer kitchen: photo


It is not surprising that gazebos with barbecues can turn banal cooking into a truly enjoyable pastime and even a kind of culinary magic, because the event will be held over an open fire. Few dishes are as popular as the juicy kebabs cooked on the grill.
Today we will find out how to get even more pleasure from this process! Let's get acquainted with the best options for gazebos with barbecues, consider drawings and several detailed master classes.


What you should know about gazebos with barbecue facilities
Today, a gazebo with a barbecue is already something more than a place for preparing barbecue. Here, according to many, there should be all the amenities that are available in the house. In addition to the barbecue itself, there can be an oven, smokehouse, brazier, etc. Let’s be clear, there are many options, but you must choose only one of them – the one that best suits your needs. In any case, often a small gazebo, in which there is only a minimum of the most necessary things, is more comfortable than a pretentious structure, “stuffed” with all possible devices.

You can add a cooking area. In the case of a small gazebo, you can place a sink and a table near the barbecue in order to turn it all into a true summer kitchen. Take care in advance of the table top (it should be easy to clean), as well as a small shelf on which the most frequently used kitchen tools will be stored. If possible, install a refrigerator there for more convenient storage of drinks and, of course, meat.

The space should be used practically. The traditional dining area of such a gazebo is a dining table and benches. However, if your plans include saving space, you can have the benches slide under the table (this will give you more room to maneuver while cooking).

Take care of cleanliness! In terms of the use of materials, all elements of the structure must be durable, resistant to outdoor use, and they must also be easy to clean. Simply put, it is better to give preference to metal (pre-treated), stone or wood (also treated).

The cook should be comfortable. It will hardly be pleasant for him to cook while hearing bursts of cheerful laughter behind him. His place should be isolated from the epicenter of the party, but at the same time he should be able to quickly turn into the “highlight of the program.” The ideal option is a good bar counter, slightly raised from the side of the cooking area. Can a feast begin with something more pleasing to the eye than the sight of a chef preparing meat on a grill?

The gazebo should be warm. In case of cold weather, you can use special PVC curtains in the building. If you do not intend to purchase such curtains, you can easily make them yourself - to do this, purchase PVC film, cut it according to the dimensions of the openings, edge it with thick fabric, and subsequently equip it with eyelets on the edges. In order to secure these curtains inside the gazebo with barbecue, thread a cord through the eyelets.

Note! You can also take care of auxiliary heat sources - install, for example, IR lamps, preferably in areas of maximum functionality (near the cooking area, next to the table).
If the barbecue is not equipped with an exhaust fan, it is better not to place it inside the gazebo - instead, install it nearby. Take care of a high-quality canopy over the grill (you also need to think about the comfort of the cook), otherwise sudden rain can easily interfere with your plans.

You can equip an open hearth. And not only next to the gazebo, but also on the edge of the structure. Such a hearth will serve as an additional cooking surface on which, for example, you can cook kulesh.

Take care of an additional seating area. Equip next to the gazebo, say, a paved area or, as an option, an additional canopy - a kind of extension to the gazebo, a separate umbrella, etc.

And if the climate in your region is cool, then a separate gazebo can serve as a recreation area.

Take care of a convenient firewood rack. There should be a place near the structure where firewood would be stored. This way you won’t have to go to the other end of the site to get fuel.

From the gazebo with barbecue you can make an entrance to the basement. This means that there will be no need to install a refrigerator inside, and the entrance itself will look more harmonious (when compared to a lonely mound in the yard).

High-quality lighting is the key to a good mood! If you take care of bright lighting for the gazebo, it, in tandem with the general lighting of the area, will provide a harmonious and functional atmosphere. It is important that the cooking area is illuminated especially brightly, while the table and rest area can be equipped with adjustable lighting (to create the same special mood).

Don't forget about safety measures! Be sure to ground each electrical appliance! To install wiring outdoors, use a special cable; In addition, additionally treat all wood elements with a fire retardant.

Correct location of the gazebo. This should be the coziest corner of your garden. While it is more advantageous to locate a summer kitchen directly next to the house, placing a gazebo further away also has its advantages. This way, you will provide yourself with a kind of “escape” from the daily hustle and bustle, enjoying instead the silence and luxury of the garden.

Take care of good decoration. A garden gazebo is a great chance to test yourself in choosing decorative elements. And the decor in this case will consist not only in decorations on the walls, but also in flowers on the table, attractive kitchen utensils, curtains and so on. Transform your gazebo into your own personal sanctuary!

Combine the structure with landscape elements to highlight the entire area in the garden.

You can take care of the original addition near the gazebo in order to emphasize the importance of this entire area. For example, create a small flower bed or a small kitchen garden.

Gazebo with barbecue – best projects
Not everyone can afford to build a gazebo from expensive Siberian pine. For this reason, we bring to your attention several functional, but fairly simple gazebo designs. Quite ordinary materials are used for their manufacture; the projects themselves are not complicated and are accessible to almost every owner of a suburban area.
Option one. Construction with bathroom and barbecue


Option two. Project of a gazebo equipped with a washbasin, pantry and barbecue


Option three. A gazebo with a barbecue, as well as an entrance to the bathhouse and basement


Option four. Original hexagonal design with barbecue


Option five. A project with a pantry, a sauna and, again, a barbecue


It should also be noted that the gazebo options described in the article have become increasingly popular in recent years. If weather conditions permit, then in such a structure you can gather guests at the festive table - it will be much more pleasant and less troublesome than if the feast was traditionally held in the house. This way you and your loved ones can really relax!

But maybe there are some other important elements that you can use to complement your gazebo with barbecue? Yes, there are some - they are described in detail in the thematic video below.
Video - Examples of designing gazebos with barbecue facilities
Now, having familiarized yourself with the main important nuances and some simple projects, you can proceed directly to production. Let's look at a few step-by-step instructions, illustrated with high-quality images.
Master Class. Making a wooden gazebo with barbecue
As you probably already guessed, the structure itself in this case will be made of wood, and the grill will be brick. When manufacturing, we recommend using boards and beams 6 meters long - this way you will significantly reduce the amount of waste.

First, you need to choose a suitable location, and also decide on the configuration of the future building. Be sure to keep the following important points in mind.
- Don't forget about fire safety! There will be an open fireplace inside the gazebo, so do not build it in close proximity to the house.
- It is also important that the front door “looks” at the entrance to the gazebo (this requirement is related to the convenience of setting the dining table).
When you decide on a location, use sand to outline the contours of the future object. The design described below will be octagonal and with a round base. To “draw” this circle, it is convenient to use a pipe fixed into the ground with a rope tied to it. Due to the fact that the weight of the structure is insignificant, small columns of concrete can act as the base. It is recommended to remove the soil under the posts by pouring a mixture of sand and gravel instead (thanks to this, you will be able to level the height).
Make the bottom trim from 10x10 centimeter timber. Use a cardboard template so as not to make mistakes when determining the cutting angles. Make the cross beams from 5x10 cm boards. Additionally, you can fasten the strapping elements with iron corners (inside and outside) to make the gazebo more stable. Give preference to galvanized corners at 90/135 degrees. Be sure to lay roofing material between concrete columns and beams for waterproofing.

As for the floor of your gazebo with barbecue, for its construction use the same edged board 5x10 centimeters. Cut the required amount to size immediately. Plan the outside of the boards with a plane, and treat the inside surfaces with an antiseptic (at least two layers). Use screws to secure the floor boards, then check again that the trim is horizontal using a level.

As for the top trim, it is most convenient to make it at the bottom. This way you can adjust the lengths of the rafters and locks. Make the frames and rafters themselves from the same board.

The roof of this gazebo, as noted earlier, will have an octagonal shape. Therefore, the rafter lock should also be octagonal. To make it, use a 10x10 centimeter beam. Pay special attention to the placement of supports for the bars! The octagon for their installation is extended using 1.5-centimeter boards.

Now start making the rafters. Make a triangle-shaped cut at the bottom of the fastening. You will use it as a bottom lock.

The truss structure itself, as before, should be built on the ground to make it easier to correct minor defects.

The structure will be supported by ten support pillars made of 10x10 centimeter timber. Saw off their ends at an angle of 90 degrees - this will significantly simplify the installation process. To attach the supports to the base, use galvanized corners 10.5x10.5x9x0.2 centimeters. Periodically check the structure using a building level. Slopes (at least in our example) are not required.

After this, install the top trim and rafter system. When installing, use 90/135 degree angles, as well as metal connecting plates.

To construct the roof, use inch boards, the width of which is 10 and 15 centimeters. Lay them close to each other, start at the bottom and move in a circle until you reach the top point of the structure. To fasten each board, use four self-tapping screws (two per side) so that the roof does not deform over time.


You can start building a brick grill. First, dig a 40-centimeter foundation pit.

Build the formwork. You can use boards from old pallets for it, as in our example.

Cover the formwork with roofing felt, securing it with a mounting stapler.

Place reinforcement in the hole, fill the foundation with concrete (sand and cement in a ratio of 3 to 1). The cement itself should be M250, in total you will need about five bags.

Sew the perimeter of the structure with an imitation log of 4.5 x 14.6 centimeters. This way the frame will be more rigid, and the structure itself will be more attractive.

Make window sills from 5x10 cm boards. For fixation, use all the same corners.

Make benches from tongue-and-groove boards, strengthening the ends with metal plates.
Decorate the barbecue area of the gazebo with a barbecue with a wooden lattice to divide the space of the structure (use 1.5 x 2 centimeter bars).


Now that the gazebo is almost built, start building the grill itself. We recommend abandoning frills and using simple drawings.
For work you will need:
- 360 red bricks;
- 90 units of fire bricks;
- stove hood made of galvanized steel;
- 175 kilograms of oven mixture;
- 7 meters of hot-rolled corner (dimensions - 4x4x0.4 centimeters);
- 50 kilograms of fireproof mixture.


When laying brick, follow a few simple recommendations. Do not use too thick a mortar so that you can adjust the bricks after installation. The thickness of the seam should be 3 millimeters. And finally, don’t rush – keep the masonry level. In principle, this is where our instructions end. All subsequent steps are clearly understood from the pictures below.

Finally, cover the roof with bitumen shingles, fixing it with a mounting stapler and nails, and the structure itself should be treated with an antiseptic and varnish.


Master Class. Construction of a brick gazebo
If you prefer brick over wood, we recommend that you read the step-by-step instructions for building a brick gazebo with barbecue. We will not talk about the specifics of choosing a suitable location and the marking procedure, since all this has already been described in the previous section of the article. In a word, let's get straight to the point!

The weight of the future brick structure will be impressive, and therefore the foundation in this case must necessarily be reinforced and monolithic. Having completed the construction of the foundation, feel free to begin laying the walls.


To make the rafter system, you can use the same materials and technology as for the previous version of the gazebo.

It is better to lay the bricks of the first row “dry”, that is, without using mortar.

Build a firewood shed, which will additionally serve as the basis for a smokehouse and barbecue.

Continue laying the barbecue yourself. The next step is the construction of the firebox and table top. If you want, you can additionally equip a niche for storing dishes.

In addition, you must install a stove under the cauldron. In the image below you can see an example with removable rings.

Now that the base of the barbecue is finished, you can start laying out the countertop using fireclay bricks.

Remember that when laying bricks at this stage, a fire-resistant mixture must be used!

After this, proceed to organizing the chimney pipe, as well as making a channel for the smokehouse.

The stove (at least in this example) will be Russian. Start forming the hearth for it.

Do not forget that each of the rows must be reinforced with steel wire.

It is also important that the walls are laid out at the same time. To check the accuracy of the work performed, use a building level.

Finish with the stove vault.

The back wall in the example described here is slightly extended.

You will have to spend a lot of time on the work, but the results will definitely warm your soul.

Continue construction. Install smokehouse doors. Also finish with the arches over the grill, the oven itself and the hob.

As for unstitching, you don’t have to do it yourself; instead, your assistant can do the procedure.

You can additionally install a stainless steel mesh over the stove. Subsequently, this mesh will be very useful for drying mushrooms, berries or dishes.

How exactly to equip and cover the roof has already been written in detail in the previous section of the article.

The construction process of the brick gazebo is being completed, and the facility can already begin to be used.

Organize the water supply to the sink at the rear of the structure. In winter, the water can always be turned off.

As for the pipe, it is better to make it three-channel, so that the draft is subsequently more stable.

Do not forget to cover the entire masonry with a special moisture-repellent impregnation.

In about a week, the structure will dry completely. That's it, now we can definitely continue to use the gazebo with barbecue!

Master Class. Brick grill step by step

Traditionally, the construction of a brick barbecue begins with the construction of a reliable foundation. The dimensions of the latter should be selected in accordance with the dimensions of the future structure.


First, dig a pit and arrange wooden formwork along its walls (you can use the same old pallets). Fill the foundation with concrete, having previously completed the reinforcement. Wait until the concrete has completely hardened (this usually takes from 7 to 14 days).

When the concrete has dried, begin the actual construction of the barbecue.

It is very useful to have a ready-made drawing on hand - it will help to more accurately determine the amount of required consumables. These include:
- fireclay brick;
- lime;
- steel wire for reinforcement;
- reinforcing bars or, as an option, mesh;
- cement;
- galvanized corners;
- sand.


This brick absorbs moisture well, and therefore it is recommended to lay waterproofing underneath it. The best option is roofing felt laid in several layers. Now you can begin the actual construction work.

Prepare the solution by mixing lime, sand and cement in a ratio of 3/4:3:1. You will use the finished mixture for laying bricks.

Be extremely careful and careful during laying. Align the bricks, and be sure to watch the seams.

Remember that the rows should be laid in a checkerboard pattern. Start laying from the corner, then gradually fill the side space.

Obviously, the grill will be exposed to high temperatures. Therefore, for laying the second row, it is imperative to use a fireclay clay mixture.

To build a base for the brazier, install reinforcing bars between the walls. Install the firebox base on the latter (you can use, say, an iron pallet as such).


For efficient combustion of fuel, it is necessary that oxygen constantly flows inside. For this purpose, leave several gaps in the masonry that are not filled with mortar.

Install a grate over the rods and select a suitable countertop.


Master Class. Brick country barbecue
This barbecue is the most suitable option for a suburban area. The construction is simple, but reliable and durable. The step-by-step instructions below will help you do everything quickly and correctly.

First, make a detailed plan. Below is an approximate diagram, however, you must take into account the fact that your stove will have its own characteristics - both decorative and structural.

Think in advance about the niche for fuel, as well as the place for the grill (it should be located at a height of approximately 0.6-0.7 meters), while the stove should be approximately 10 centimeters lower.

Having finished drawing up the project, go directly to practice. Start work, as in the case of the previous options, by building a foundation.

The base in this case must also be reinforced and monolithic. Dig a pit about 50 centimeters deep, fill the bottom with a gravel-crushed stone mixture, add water and compact it well.

Proceed to install the reinforcement and form the frame. Make formwork and fill the foundation with concrete.

After about two weeks, when the concrete is completely dry, begin construction of the brick barbecue.

Lay out the stove using fireclay bricks. It is inexpensive, but is durable and resistant to critical temperatures. Prepare red clay, sand and cement in advance (all this will be needed to prepare the solution).

Note! The clay should be watered with water and wait at least a few days.
Prepare the solution and start laying. Do not rush while working, follow the plan, gradually lay out each new row. Regularly monitor the quality of work at the construction level.

Place a pedestal under the barbecue. No more than 70 centimeters in height.

Row No. 2 should be offset by 1/2 brick.

The depth of the furnace should be at least 3 bricks, while the length should be 6. Use the same fireclay bricks, and place reinforcing rods on the ceilings.


Finally, add decorative elements to suit your taste. Clean the masonry from excess mortar; you can paint the structure with paint to visually highlight the seams. In principle, you can already begin to operate the structure.


Now you know everything about gazebos with barbecues, their features, types and construction options. Don't forget to watch another useful video at the end of the article! Good luck with your work!
Video - Making a barbecue with your own hands
A modern gazebo project can include a whole range of amenities that allow you to move not only the kitchen with its smells, but also the living room outside the residential building. With the appropriate approach, you can receive guests in such a room all year round and at the same time feel no less comfortable than in your home.
In terms of dimensions, this building can be much more spacious than a traditional gazebo, but if you have a large garden plot at your disposal, then why not give yourself such pleasure. The video in this article, like our instructions, touches on the topic: “Do-it-yourself gazebo made of foam blocks.”
We will tell you not only how to build it correctly, but also offer some good ideas for exterior and interior design.
In principle, a gazebo can be built from any material used today for the construction of residential buildings. Oddly enough, many readers are interested in what seems to be the most unsuitable material for this purpose - blocks of cellular concrete.
The reason for this popularity is the large format, which allows you to build masonry faster than brick (see), and, of course, the affordable price of the material. The cheapest brick costs about 4,000 rubles/1 m3, and for example, foam blocks measuring 500*400*300 mm will cost no more than 2,500 rubles/m3. As you can see, the difference is significant.
Plus, a cubic meter of masonry made of cellular concrete weighs almost three times less than the same volume of brick, even hollow brick. This means that the load on the foundation will be significantly less. Of course, in terms of strength, walls made of cellular concrete are still inferior to brick walls, but for a gazebo this is not so important.
Pros and cons of foam concrete
The construction of walls made of foam blocks requires compliance with certain rules, and this is due to the high absorbency of this material. Some readers ask whether a bathhouse and gazebo can be built from foam blocks? As for the bathhouse, frankly speaking, this is not the best idea.
So:
- Having saved on structural material for walls, you will have to spend a lot on internal waterproofing of premises. Since both humidity and steam are present in the bathhouse, you will have to perform both impregnation and adhesive insulation. If you really want, use polystyrene concrete blocks.

But for the construction of a winter gazebo, foam concrete can be considered the best choice. In terms of thermal conductivity, this material is close to wood. During the cold season, such a gazebo will be much warmer than, say, a brick room.
Accordingly, sound insulation in a gazebo made of foam blocks will also be better. The reason for this is the cellular structure of foam blocks - and as you can see, this is not always a disadvantage.
Zero cycle: where to start
Before you begin marking the site and performing excavation work, you need to decide on the size and design of the building (see). At the stage of construction of the zero cycle, it may be necessary to provide for some nuances.
These are supports for columns, embedded parts for racks, a monolithic slab for a barbecue oven, etc. But how to do this if you don’t really understand where and what will be located?

So:
- It is clear that not everyone is capable of designing such a beautiful gazebo as in the picture at the beginning of the article on their own. But it is quite possible to take a ready-made drawing as a basis. There are many of them: here you have a bathhouse with a wooden gazebo, a permanent terrace with a canopy, and a gazebo with a barbecue made of foam blocks. The main thing is to find an option that fits perfectly into your site configuration.
- Knowing the size of the building and its appearance, it is easier to determine the quantity and cost of materials. You may want to change something - for example: the glazing option, the shape of the roof, or do the finishing differently. The more thoroughly the concept of construction is thought out, the easier it is to implement it.
Do not forget that at the stage of construction of the zero cycle, work related to the communications supplied to the building is also carried out: laying the power cable; water supply and drainage pipelines; septic tank, inspection well.
Choosing a foundation option
Since we decided to use concrete blocks for the construction of our gazebo-living room, we will need to build a capital foundation for them (see). The most suitable option for block walls is a prefabricated or monolithic foundation strip. In the first case, FBS concrete blocks are placed in a trench with a prepared bottom.
- The advantages of this choice are that the prefabricated strip can be erected in one day and to continue work you do not have to wait a whole month for the concrete to gain strength. In terms of cost, this is also quite acceptable, but given the need to use lifting mechanisms, additional costs cannot be avoided. And there are also difficulties associated with the fact that not every site can be driven by a truck crane.

- Therefore, preference is often given to the second option – monolithic. In this case, formwork is installed in a trench, the bottom of which is filled with a sand-gravel mixture. It is covered with polyethylene, a reinforcement cage is laid on the bottom and concrete is poured. Schematically it will look something like the picture above.
- A gazebo is still not a house, and its structures are quite light in weight - and therefore the monolithic tape does not need to be deepened too much. In any case, if there are no problems with the groundwater level on the site and the quality of the soil allows it.
- A support height of 30-35 cm is quite enough, and it is buried 20 cm. Considering the same thickness of the sand cushion, the depth of the trench will be 40 cm. The width of the foundation can be the same in width as the wall material, or it can be 5-7 cm wider, to create a protruding base.

- All of these are, of course, general recommendations. It is necessary to make a decision on choosing the type of foundation not only depending on the geological features of the soil - the design of the gazebo is also of great importance. If you want to build, for example, a gazebo with a terrace, then the foundation can be combined: a concrete strip under the walls of the gazebo, and point supports (piles, pillars) under the terrace frame.
- A slab foundation is often installed under a gazebo, the walls of which are made of brick or concrete blocks. This is the most expensive option, since concrete is poured over the entire area of the building. But, firstly: to install a permanent floor, you also need a concrete screed.
- Secondly: the cost of the foundation will not be so high, since the thickness of the slab in this case does not exceed 30 cm. And thirdly, there are many situations when a design of this type is the most rational. For example, on peat bogs and swampy areas, a monolithic slab foundation is the only possible option.

- This type of support structure is also excellent for heaving, water-saturated clay and sandy soils. For example, a foundation strip may simply float up in such difficult conditions. If the soil is mobile, with a high water level and deep freezing, there should be piles under the monolithic strip or slab.
Of course, each type of foundation has its own construction technology. You can easily find the necessary instructions or videos, including on this site.
Try to arrange the supporting part of the gazebo in accordance with generally accepted construction standards, and do not try to save where this should not be done. Only in this case, further operation of the gazebo will not cause any problems.
Construction of walls from blocks
To ensure that there is no dampness in the constructed gazebo, you need to pay close attention to waterproofing the base. If this is a strip support, under the first row of the block there must be a layer of rolled material glued to bitumen mastic.
- Horizontal waterproofing prevents capillary absorption of moisture from the soil by wall blocks. It would be good if the same layer was under the base of the foundation.
- To perform block masonry, you should use a specially designed composition, which, in fact, is an adhesive. Typically, sellers also offer the consumer dry mixtures for their installation, and it is always better to purchase them together with blocks from the same manufacturer.

- So, the first row of blocks should be laid on a well-insulated rigid base. A layer of adhesive mortar is first applied to it, but the laying is not carried out immediately along the entire length of the wall. First, the corner elements are laid - and the highest corner is determined by the level and starts from there.
- The lighthouse block is placed on a bed of mortar 2 cm thick and must be leveled: both in the longitudinal and transverse directions. Once the corners are laid and leveled, a mooring cord is pulled between them and they begin directly to lay the walls.

- Ordinary blocks are laid starting from the already established corner, leveling their position due to the thickness of the mortar layer. If you do not pay due attention to this, too large gaps will form between the blocks and the mortar may simply fall out of the joints. The quality of such masonry cannot be called high - even if these cracks are then well covered.
- Depending on the manufacturer, foam concrete blocks may have smooth ends that need to be sealed with an adhesive solution, or they may be joined together with a tongue-and-groove joint. This installation system allows you to do without making vertical seams, and if a smooth end of the block is needed in the corner area, then the protruding ridge is simply cut off with a plane.

- The same tool can also be used to remove minor protrusions from the edges of the blocks. This is done after they are laid in a row, before applying the adhesive composition. Mix the solution in small portions using a conventional electric drill with a mixing attachment. The masonry elements are adjusted to each other by lightly tapping with a rubber hammer.
- If your gazebo has a large stained glass window resting on the masonry, or just a window, the opening under it must be reinforced. To do this, two parallel cuts are made along a row of blocks, into which reinforcing bars are then laid. This is done using a tool called a wall chaser.

The resulting groove is filled with mortar during the laying process and forms a strong connection between the blocks. The advantage of cellular concrete is its ease of processing.
You can cut the block with a regular hacksaw, hammer a nail into it, screw in a self-tapping screw—you don’t even need a screwdriver or hammer drill. Thanks to this, the labor intensity of the work is significantly reduced, which allows the owner of the site not only to independently build a gazebo on it, but also to erect a residential building.
Block masonry finishing
Unlike brickwork, walls built from foam concrete blocks are never left unfinished. The only exception is the inner surface of the walls - and only if the interior of the room is decorated in an antique or loft style.
So:
- In principle, any finishing options can be chosen. The only difference is that not all types of soil compositions are suitable for porous surfaces. This is relevant if, for example, you want to plaster or tile the walls. When purchasing a primer, carefully read the manufacturer's instructions. Usually the label says: “For cellular concrete” - and that’s exactly what you need.

- As for the type of plaster, there is a wide choice: colored, pebble, marbled, with relief. The main thing is that the plaster is thin-layer, polymer-cement based. If the gazebo is open and has only one or two blank walls, cladding with decorative stone will look great. Usually a grill or barbecue oven is placed in such a gazebo, as was done in the example above.
- It makes sense to insulate a gazebo that is supposed to be used all year round. In this case, it is better to line the outside walls with thermal panels or basement siding. You can also sheathe the walls with OSB boards and do the paneling in the half-timbered style - according to the same principle as the house in the photo below is decorated. Thus, the walls will not only be decorated, but also insulated.

Interior design is made based on the style of the building itself, glazing options and design. You may want to line the walls with natural wood, trim them with bamboo, or line them with interior panels. It all depends on how much your imagination is enough and how much you are willing to spend on arranging a gazebo-living room.
Staying outside the city or at the dacha can be made more comfortable. To do this, you should take care of communication lines. First of all, you need to properly organize the recreation area. That's why you need a cozy gazebo with a barbecue. Photo projects of excellent design ideas are presented on the website. Structures with a barbecue, a solid stove or a durable grill are installed on the territory. Such buildings are used as a place where, regardless of the weather, you can make not only fried meat, but also a variety of dishes.
Our review will help you purchase the right model for yours. Useful recommendations will help you choose the right material and design a functional project.
When choosing a gazebo with a barbecue, photo projects will allow you to choose the optimal design. Such a building can be open on all sides or surrounded by strong walls. It is built from metal, wood or brick. Open type buildings are used as a summer option.
Can be performed in different configurations. They can have a round, rectangular and hexagonal shape.

The most popular materials include wood, which is additionally treated against pests, moisture and fire. If the soil is dense, then you can do without a foundation. Instead, a massive concrete slab is used, which serves as the base and floor for such a structure. The concrete is covered with boards. If the building is open, then it is worth installing special drains for water.

For your information! To use the structure during cold periods, it is necessary to erect a closed structure. For this purpose, a chimney is planned, and ventilation is also thought out.
Wooden structures
Projects for gazebos with barbecues and barbecues for a summer residence are an excellent solution in every sense. So, let us highlight the following advantages of such structures:
- aesthetic appearance;
- suitable for summer and winter structures;
- combined with buildings made of other materials;
- ease of installation work;
- there is no need for special construction equipment.
Wooden elements are easy to assemble and process. The natural look allows the buildings to look great in any exterior. For construction work, logs or slats for decorative grilles are used. If a stove is installed in the building, then a solid foundation must be placed under it.
Timely treatment of wood with special impregnations will make structures resistant to fire.
Wooden design options. Includes unusual configurations and modern designs.
Helpful information! Wood structures provide excellent stability and do not require the construction of a strip foundation, since this material does not weigh so much. With proper surface treatment and quality care, such buildings can last a long time.
Brick structures
A brick gazebo with barbecue is characterized by increased reliability. Photo projects demonstrate the best options. Structures made from such material are not afraid of sparks flying from the fireplace. With the proper approach, they will not require repairs for many years. The walls are quite reliable and can protect against any weather conditions.
Such buildings can be combined. Combinations of stones and wood are relevant.
Brick structures are popular due to their fundamental nature and high performance qualities. In addition, they have high fire safety. Under such structures a more powerful foundation is made.
Brick buildings are known for their strength, durability and capital construction.
Combined gazebos
It can be made from several materials; projects involve combinations of wood and brick, metal and stone, or metal and wood. The photos show the most interesting combinations.

The combination of brick and wood suggests a zoning method. In this case, the work area is constructed of brick, and the recreation area is made of wood.
Brick structures will take more time and money. In addition, they require a solid foundation.

Here is an example of a combined option:
- the wall next to the stove is made of stone or brick;
- The rest of the space is made of wood, and it is also used;
- open openings are decorated with wooden grilles and panels, as well as forged parts.

Forged structures are often sold ready-made. They are installed on site. This is a more expensive option, but openwork models will become a real decoration. It does not require preparatory work or cladding, except for treatment with an anti-corrosion compound. It doesn't need a foundation. From forged elements you can choose a whole ensemble of a beautiful pavilion, forged seats and lamps.
For your information! Wood elements are treated with a moisture-proof primer and varnish composition. Metal parts are coated with protective impregnations and painted.
Options for gazebos with barbecues and barbecues for the dacha: photos of interesting solutions
To find a suitable design, it is worth considering different photos of gazebos with grills and barbecues. In addition, you should decide on the type of fireplace. Is a standard roaster suitable or can the device be supplemented with a set with a sink or a special place for firewood. For original buildings the following options are used:
- built-in oven is a special equipment made of brick, which includes an oven, smokehouse and. This design allows you to cook any type of food. To build it requires serious masonry;

- oven-barbecue has a complex structure and is often combined with a smokehouse. It requires skewers;
- oven - barbecue equipped with a special grill that simplifies the cooking procedure;

- portable grill made of metal. This device is resistant to corrosion and does not require special care. It can be faced with brick;
- Inexpensive metal is used for collapsible structures. They are mobile devices;
- in a gas grill heat from the stone is applied;
- stove-cauldron involves a special hole where the cauldron is placed;

- used for a winter gazebo with barbecue.

The construction of furnaces requires a professional approach. And when creating gazebo projects, it is important to take into account the type of construction, materials, the presence of holes in the roof and the number of fire points. You also need to consider free access to the fireplace for its maintenance. The layout involves installing fresh air ventilation if the pavilion is closed.

The project must contain drawings of the roof structure with its structure and all technical components. The electrical wiring diagram, as well as gas and water distribution systems and areas for the location of electrical points are also being worked out.
When constructing pavilions with stoves, it is necessary to install them, which will guarantee the strength of such a building. For such a structure, you can use a columnar foundation. In this case, a recess of up to 90 cm is made under the supports, and at its bottom a cushion of sand and crushed stone is made. Such a base requires special waterproofing, so roofing felt is used.
If you plan to install the slab, then you should use reinforcement. A variety of reinforcement bars are suitable for this. If the pavilion is made of stone or brick, then a shallow-type strip foundation will be needed. This creates a trench, the depth of which is up to half a meter. In this case, a pillow is placed on the bottom and compacted. Then the formwork is done and the foundation is poured.

Screw piles are rarely used for such buildings. In this case, the exact parameters of the pavilion must be known. For a monolithic base, formwork and a frame of reinforcement are formed, which are filled with concrete.
Article
A barbecue in a gazebo is not just relaxation in comfort, it is a real paradise for gourmets who prefer food cooked over coals. Such projects most fully satisfy the needs of lovers of outdoor treats, and therefore are in great demand when arranging personal plots. Just look at the photo of a gazebo with a barbecue to understand how wide the range of braziers is: from small mobile devices to stationary oven complexes.
And in this article we will tell you in detail how to choose the right project, how to make your own drawing, and build a gazebo with a barbecue with your own hands.


A little bit about everything
How to build a gazebo
For vertical supports we use laminated veneer lumber with a cross section of 100*100 mm. We insert the supports into brackets pre-recessed into the foundation, then we make the upper and lower trim of the pillar heads along the perimeter. In addition, we tighten the supports located opposite each other with a 100*100 mm beam.

It is better to use glued timber for construction
We lay the logs, the distance between the beams is 600 mm, we lay a tongue-and-groove floor on top, and sew up the sides for aesthetics.

All wooden elements of the gazebo should be impregnated with antiseptics, which will protect against moisture and fungi
Along the perimeter of the gazebo, with a slope of 3-5 o, we install a plastic gutter for water drainage. We divide the structure along the long side into 3 parts, along the edges of the middle third, onto the central upper beam of the trim, install 2 beams perpendicular to it, and tighten them from above with the third - this is the ridge.

We build the rafter system from edged boards 40*100 mm
We attach rafter legs from the ridge beam to the corners of the gazebo, which we strengthen with jibs. We install 3 trusses on the ridge; it is better to make them on the ground according to a template, and then lift them to the roof.

Hanging rafters protrude 400 mm beyond the frame of the gazebo
We use 20*60 mm slats to frame the roof of the gazebo, but do not completely sew up the rafter system on one side. At this stage, we begin to lay out the grill according to the diagram below.

The batten can be replaced with moisture-resistant plywood
Construction of a barbecue in a gazebo
We cover the foundation for the stove with roofing felt, and first we lay out the first row of the future barbecue without mortar and do a fitting.

Be sure to check the geometry of the barbecue with a level, and make sure that the angles are strictly 90°
From the second row, use a plumb line to ensure that the walls are vertical. We use red brick, and for the firebox it must be fireproof, fireclay.

In addition to bricks, the base of the barbecue can also be laid out with blocks of cellular concrete
From rows 1 to 8, the masonry is identical; we lay out the bricks as shown in the photo above, with the obligatory bandaging of the seams of the bottom row.
In the 9th row, in the inner part of the working sections, the corner of the outer brick is cut into a corner. This is necessary to lay out the arches.

Brick can be cut well with a grinder and an abrasive disc.
It is better to lay out the arch from fireclay bricks, grade Sh-47. To make the arch even, you need to make a template and carefully fit the bricks. A steel corner and strip are used to cover the central niche.

In the 10th row we overlap the barbecue firebox, slightly shifted forward, as shown in the diagram. In addition, those bricks that are adjacent to the arches of the side niches must be sharpened to fit the vault of the arch.

Make the arched ceiling with fireclay bricks
In the 11th row, it is necessary to carve the bricks that cover the side arched structures. Here we lay the steel corner.

Please note that the photo shows that above the barbecue itself, in the center, there are 2 connected corners, they seem to form an inverted letter “T”
In row 12, the entire surface is covered, the barbecue firebox is lined with fireclay bricks.

Brick in the work area can be faced with tiles, stone, or laid on a wooden tabletop
On the left and right, where the working segments are, the bricks are released sideways by a quarter. And above the barbecue firebox, the masonry moves slightly forward to create a small canopy.
In the next (13) layer we lay out the base of the barbecue firebox. The outer sides can already be laid with ordinary bricks, which results in a separate fireclay core and separate walls.

To avoid unnecessary costs, you can use a special finishing brick for the front layer
14 – form the base of the barbecue firebox.
Important: We must leave a gap between the fireclay brick core and the outer walls and make a lining of basalt cardboard so that the bricks in the firebox can expand freely when heated without affecting the geometry of the entire structure.
In our case, the firebox is approximately 600 mm, quite enough to cook for 4-6 people at the same time
15 – we continue to raise the firebox, always with bandaging the seams of the lower layer. The photo below shows that it is necessary to make cut-out grooves on the inside of the brick, and the barbecue grill will be laid on them. Row 16 is identical to row 15, with bandaging, and again we make grooves in the bricks so that it is possible to raise the lattice. Here we make a template and lay out the arch for the barbecue firebox.

To facilitate the work of laying out the arched vault, use fireclay brick Ш-47, it has a wedge shape
The 17th, 18th, 19th rows are laid out identically, but only the outer ones are cut out in the shape of an arch. At 20, we begin to narrow the firebox, move the bricks inward a quarter, and cut them diagonally from the bottom.

Bricks are cut at an angle to improve traction
21 and 22 are similar - the masonry is pulled out another quarter inside, the bricks are again sawn from below. At 23 and 24, the front bricks are also moved a quarter inward and filed down. We need to ensure that the internal dimensions of the pipe are equal to the whole brick.

If the gazebo is made of wood, then it is recommended to lay out the back wall with 2-3 bricks
From the 25th row we begin to lay out the pipe, its height depends on the height of the gazebo.

Barbecue for gazebo in section
Final stage
When the pipe is ready, construction can be completed. The sheathing is covered with a layer of waterproofing, and roofing material is laid on it.

The roofing options for the gazebo can be any: ondulin, tiles, corrugated sheets
The joints where the pipe adjoins the roof should be sealed so that the roof does not leak; first coat it with liquid bitumen mastic, and attach a corner cut from a sheet of galvanized steel to it.

The photo shows a finished gazebo with barbecue
All that remains is to decorate and paint the gazebo. The parapet can be made from a wooden lattice, sewn with a batten or using carved balusters. A barbecue oven is usually finished with natural stone, tiles or facing bricks.
 a glazed gazebo with a barbecue, because they are so good for our climate, you can relax in them in the heat, in the rain, and in the cold. By the way, the structure, the construction technology of which we have described, can be completely modified: strengthen the parapet and install double-glazed windows.

A large stove complex, as in the photo, which is better protected from bad weather with a canopy, is also suitable for a dacha.
Building a comfortable place to relax is not difficult, you just need to show your imagination and think through each stage of constructing a gazebo. There is a good proverb about this: The eyes are afraid, but the hands do!

The photo shows an open barbecue built using the described technology