Sizes of birdhouses for different birds. Do-it-yourself birdhouse - a classic wooden version and its installation (95 photos)
Most people have an underlying sympathy for their feathered neighbors, whether it's a sparrow, a tit, or a starling. Otherwise, the tradition would not have been preserved in the first decade of March on trees, wooden box-shaped houses or nesting places assembled with their own hands. It used to be that a habitable birdhouse is a sign of good luck and a good harvest.
The science of how to make birdhouses with your own hands and lure a starling to the garden was passed along with the secrets of caring for the garden and crops. Today, making a birdhouse is more about helping birds grow and protect their offspring than a real calculation for the complete destruction of garden pests.

What you need to know before trying to build a birdhouse
Even if you make several birdhouses for the garden, this cannot replace seasonal processing and special pest control products. An adult pair of starlings can increase the effectiveness of the fight against aphids and caterpillars by 20-30%, especially if the fruit trees have grown to their maximum size, and you know exactly how to make a birdhouse with your own hands.

Lure and "prescribe" starlings in the garden is not as easy as it might seem at first glance. It will take several years to observe the bird kingdom before it becomes clear where it is right to make and establish a nesting site. Tips on how to make a birdhouse with your own hands on video will be useful
There are few requirements for building a bird dwelling, but they are all extremely important and should not be ignored:
- Each bird has its own optimal size of a birdhouse, for tits they are smaller, for a starling a little more. In any case, it is necessary to find the exact scheme of the birdhouse specifically for the starling, and try to do everything correctly and according to the recommendations;
- The design of the birdhouse should be protected from predators that destroy nests. If the starlings lose their offspring due to weak protection, the birdhouse will remain unclaimed for another five years.
- It is important to choose and use the right material for the manufacture of the nesting box. The walls and roof should not only be safe, durable and resistant to moisture, first of all, the birdhouse should not scare away the bird.
Important! If you need to make a truly cozy birdhouse, when making it, refuse to use any synthetic resins, adhesives, paints, primers.

Birds, including starlings, have an exceptionally keen sense of smell, so even traces of tobacco, cream or technical fluids must be excluded. Before making a birdhouse, the materials must be thoroughly washed, and the individual parts of the structure must be dried in the sun to remove remnants of irritating substances and odors.
What to make the body and roof of the birdhouse
The construction begins with the selection of material, it would be right to choose a few old dry boards that are not painted with enamels or varnishes. If the board has been in the sun for a couple of years, then you can use spruce lumber, it will be correct to use maple, linden or fruit woods. Trying to make a structure out of painted material, freshly planed softwood, poplar, or boards etched with an antiseptic will lead to nesting rejection by birds.

Experts do not recommend trying to make a birdhouse from pressed fibreboard with a polymer binder. OSB or plywood, especially chipboard, is not suitable for such purposes. Even if the material is properly deresined, the smell will still remain, and the birds will ignore the dwelling.
It would be correct to make the body of the birdhouse from a waterproof OSB board, but inside to make the finish from a thick cardboard box. In addition to blocking the smell, such a birdhouse will be much warmer, without harmful drafts.
Advice! In the spring or after the end of the season, it will be necessary to remove the contaminated cardboard liner along with litter, garbage and burn the contents, and lay a new paper case inside.
If desired, you can make a disposable birdhouse for one season from cardboard or multilayer paper packaging. The idea of cardboard feeders, birdhouses, nests is very popular in Western countries, where there is a whole industry for the production of disposable things and extremely expensive hand-made items.
In order to make a disposable birdhouse, you must do the following:
- Choose the right working material, it is best to pack from a cardboard grocery box;
- Transfer and cut the pattern correctly;
- Glue the seams with water-soluble glue such as PVA or connect the parts with adhesive tape;
- The outer surface of the birdhouse will need to be treated with an acrylic waterproof primer.
Advice! Before you make a birdhouse out of cardboard, you will need to make a canopy or find a suitable shelter from the rain, since even when using protective coatings, cardboard does not tolerate moisture very well.
If the processing is done correctly, then the birdhouse made of cardboard will regularly last three to four months. After the chicks fly out of the cardboard box, you can make a trap for pests or flying insects.
How to build a birdhouse by science

If you have material, carpentry tools and a certain skill in working with wood, you can correctly make a birdhouse in a few hours of leisurely work. Most often, a nesting place for birds is made in several versions:
- Classic birdhouse as we remember it from school;
- Nest - a hollow or a log structure;
- Box nests for songbirds;
- Small-sized titmice, designed for the smallest birds.
To make a birdhouse, you will need a jigsaw, a planer, a screwdriver, a brush nozzle with a cruel bronze bristle, self-tapping screws, PVA glue and a marking tool. To make the body correctly and as accurately as possible, it is advisable to have carpentry clamps on hand or, at worst, several meters of nylon cord.

The classic version of the birdhouse
A drawing of the simplest housing for a starling is presented below. To make the front and back walls, you will need to cut a board 190 mm wide + double the material thickness tolerance. A board 20 mm thick is best suited. Then the desired width of the board will be 190+2∙20=230 mm. Initially, you will need to cut the front and back walls according to the markings shown in the drawing.
In a similar way, we mark and cut out the side walls, the bottom and the roof, only the base width will be 150 mm, without allowance for the thickness of the board. For the cover, you will need to additionally make and attach an inner lining so that the roof can be installed without slots and gaps.

In the front wall, you need to make a window with an annular drill, and hammer a wooden perch below.
A properly made birdhouse should not have even the smallest gaps, otherwise the chicks risk dying due to dampness of the internal parts and hypothermia. At the next stage, it will be necessary to apply artificial roughness on the inner surface of the walls so that the chicks and adult birds can freely cling to the walls with their claws. Scratches are easiest to make with a bronze nozzle for a screwdriver.

At the last stage, we once again check how correctly the blanks are cut, glue and tighten with a clamp or cord, after which the adhesive connection can be duplicated with self-tapping screws. We fasten the roof lining with four self-tapping screws, cut the ends obliquely so that the cover is put on the body like a cork, with little effort.

Birdhouse safety
Even if the birdhouse is correctly installed on a tree, the risk of attack by predators or woodpeckers still remains quite large. Therefore, it will be correct to make some protective additions, as in the diagram:

- First of all, the entrance must be covered with tin, or an overlay made of thick aluminum sheet should be made, which will protect the tree from pecking by woodpeckers;
- Installing a wire mesh will protect the birdhouse from rats and cats. The mesh is made of steel wire - wire rod or a piece of wickerwork - chain-link;
- In order to properly protect the birdhouse from rodents and any crawling reptiles, you will need to make a safety belt. This is a strip of tin, 40-60 cm high, which is wrapped around a tree trunk below the installation point of the birdhouse;
- As an additional measure, you can make a shelf from cat paws. Correctly made protection is installed on the inside of the front wall, under the inlet. Such an increase will not stop a squirrel, but it works flawlessly against a cat.
It is necessary to fix the birdhouse with your own hands on a wire suspension, at a height of at least three meters above the ground. It is right to make houses for tits and hang them out in the garden in the fall; for the starling, “housing” must be installed among the trees in early March.

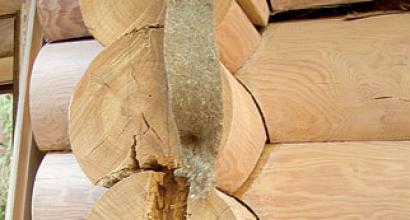
Log birdhouses
A dwelling for starlings can be made from a log, a dry deciduous tree, maple is best. The main thing is that there are no knots or fiber defects. A correctly cut blank with a diameter of 20 cm and a length of 40 cm is cut lengthwise with a saw into four logs.

The inner pulp of the wood is shrunk by 5-7 cm, after which the quarters are glued and pulled together with soft aluminum or steel wire. The roof and bottom are properly made from a log or a piece of board of a suitable size and attached to the body with nails. Slots and gaps between the parts of the birdhouse should be properly greased with an adhesive mixture of sawdust and PVA glue.
Making titmouse with your own hands
Nests for tits are built according to a slightly modified scheme. Examples of the most correctly designed structures are shown in the diagram below.

The dimensions of the box must be correctly selected based on a particular breed. For a great tit, the diameter of the hole must be made 35-40 mm, the height of the back wall is 30 cm, the front wall is 25 cm, the bottom is 12x12 cm. For the rest of the tits, the dimensions must be made 10% smaller. The overhang and overhangs of the roof should be at least 5 cm, while the perch can be omitted, the titmouse is easily controlled without it.

For nesting of songbirds, for example, in a private house, in a garden, in a country house, you can make a birdhouse according to an original project in the form of a hut. The side walls of the building simultaneously serve as roof slopes. To protect against moisture and predators, the roof is upholstered with galvanized metal or tin. After assembly, the outer surface will be correctly covered with waterproof acrylic varnish in 2-3 layers, this allows you to strengthen the structure, make it waterproof and resistant to cat claws.
Conclusion
The presence of starlings in the country inexplicably affects the functioning and health of trees, shrubs and even beds. In addition to the destruction of pests, insects and aphids, birds have a positive effect on growth and fruiting. For a garden of six acres, three or four birdhouses are enough, no more. But if the starlings settled in the garden plot, the use of chemicals should be seriously limited.
You can take care of the birds by throwing them bread crumbs or seeds. Pigeons and sparrows flock to such a treat with pleasure. What else can we do for birds? In the city and in your country house? Of course, to build them a house for housing - a birdhouse. Why do people build birdhouses? In fact, they also build titmouses. They are similar to birdhouses, only smaller in size and have a slightly different architecture. But why do we still call bird houses birdhouses and do not use other names? The fact is that not all birds will agree to settle in a “house” built by strange creatures on two legs. It is clear that this does not apply to the impudent sparrows. And the starlings settle down.
Starlings live as a friendly family without noisy sparrow fights. They are able to perfectly imitate the singing of other birds, including the famous nightingale trills. And no one better than starlings cleans our squares, parks, forests and garden plots from insects. Do you know how many May beetles can be eaten by one starling during the nesting period? 8 thousand beetles with larvae! And caterpillars, slugs, snails are absorbed by him simply without counting. Therefore, building and hanging birdhouses, a person cares not only about the birds. A man takes care of his future harvest. And you should be happy if a couple of starlings choose your house. This is great luck!
But it is not enough to build a birdhouse. You have to build it right and hang it right.
A few simple rules to be aware of
Here are a few rules to follow before you start building your starling house:
- The birdhouse must be checked, otherwise the birds will not be able to live there in the summer. For ventilation, a couple of small gaps between the roof and the walls of the house will be enough. For the same reason, making a birdhouse out of metal is a bad idea.
- It is necessary to organize "drainage" in it. Water that enters the house must immediately leave. To do this, drill very thin holes in the floor, and to protect the notch (inlet), install a small canopy over it.
- It is best to hang a new birdhouse in early April. And in the old one, through the removable roof, at the same time carry out a “general cleaning”. Birds will not return to the birdhouse if it has not been cleaned for almost a year.
- In rural areas, the optimal height for a birdhouse is about 4 meters. In the city it must be weighed higher. See that there are no branches nearby. So cats and other lovers of starling meat will have less chance.
- The birdhouse should be covered with foliage from direct sunlight.
- Your creation must be nailed strictly vertically, no Prague "dancing houses". The letok should look in the direction from which the wind blows least often.
- Very important! It should be remembered that it is not enough to nail a birdhouse. It must be cleaned every spring before the arrival of new guests.
Classic wooden birdhouse
The best material for making such a house is wood. However, not every tree will do. A board made of birch, oak and alder is well suited. Coniferous trees are not suitable because of the resin they release. Do not use chipboard and fiberboard for the construction of birdhouses - the chemical components used in their manufacture are harmful to birds. Plywood would not be the best option.
There is a birdhouse standard. The board must be used with a thickness of at least 20 mm, so the house will better retain heat. Do not use a sanded board - this will make it difficult for the chicks to leave the birdhouse. If the board is polished, it is necessary to scratch with a knife or nail that side of it, which will be inside. Usually birdhouses are made with a width of 120 to 150 mm, a height of 300-350 mm, a side wall length of 150-160 mm. It is important to observe two more dimensions: the diameter of the notch (inlet) should be 40-50 mm, the distance from the notch to the bottom of the house should be at least 150 mm.
A larger birdhouse will accommodate more pets, but natural selection will oppose your plan in this matter. Parents will not be able to feed all the hatched chicks, and even those who survive will not survive the flight to wintering in warmer climes - they will grow up weak. Entrust this question to Nature and try to stick to standard sizes when building a birdhouse. In this case, out of all the offspring, a couple of chicks will survive, but strong and strong.
The indicated dimensions are well suited for the dwelling of starlings. Sparrows will happily settle in. And for great tits, the diameter of the notch will have to be reduced to 35-40 mm, for small tits, an inlet with a diameter of 30 mm will be enough.
Of course, changes can be made to the design of the birdhouse and imagination can be shown, but then the given dimensions should be adjusted. Compliance with the basic dimensions is very desirable; the very life of the bird family may depend on them.
Below are a few drawings of the simplest birdhouses:


Prepare in advance a ruler with a pencil, a hacksaw for wood, a screwdriver, a hammer, self-tapping screws and a drill. We cut the boards to the dimensions in the selected drawing and proceed to assemble the birdhouse (in this photo, the birdhouse has a rectangular entrance).

To fasten the elements of our design, we pre-drill holes for self-tapping screws with a thin drill.


We fasten the walls together with self-tapping screws. Nails can also be used in the work, but you must carefully watch so that one of them does not accidentally come out. We remember what miniature guests should settle in our house.


The perch below the entrance can be made from a planed stick and then inserted tightly into the prepared hole. The perch may have the shape of a triangular shelf. A perch is especially needed when the house is attached to a pole. After all, the head of the family must sit somewhere with food for the younger generation in his beak. She is needed, and to sing songs at the entrance to your house. The perch is made with a diameter of 10 mm and a length of 40 mm.

Letok make a round or rectangular shape. Remember that its diameter should be 50 mm. We drill a notch with a drill or cut it out with a jigsaw.

Unlike the inner walls, the edges of the notch are carefully sanded. There are cases when starlings expressed dissatisfaction with the poor quality work of the owners of the site and demanded that the defects be eliminated. First of all, this concerned the size of the notch and its raw edges. I'm not kidding.


The letok should be located so that the cats could not reach the chicks from the roof of the birdhouse (see dimensions).


Important! A fixed roof is inconvenient for the annual cleaning of the birdhouse. And this must be done every spring before the birds arrive, otherwise you will end up with a “disposable” birdhouse. Turning the roof into a removable one is quite simple. From below, a sleeve is attached to it, corresponding in size to the bottom of the house. The sleeve should fit snugly against the walls and enter the hole that they form with some effort, then the lid will hold well. For reliability, you can screw the lid to the house with wire. In this case, the wind will not blow it away, and the cat will not be able to remove it. And cats and crows will show increased attention to your birdhouse. The roof is easier to make a shed. It definitely will not leak (unlike a gable). Make a roof with a slight slope back.

The last stage of our work is fixing the finished house to the tree. It is convenient to attach a long bar to the back wall of the birdhouse with screws in advance and then nail or screw this bar to the tree with screws. For reliability, we also fasten the house with wire. The height is about 4 meters, in the shade, without direct sunlight, there should be no branches nearby.
The finished birdhouse can be pre-decorated from the outside. Contrary to popular belief, a painted bird house will not scare away, but it will decorate your site. However, be prepared that starlings will not immediately move into a new home, some time will definitely pass. And it may take more than one month.


Birdhouses from unusual materials
A birdhouse can be made not only from boards, but also from completely unexpected materials.
Birdhouse made of cardboard
Cardboard in our view is poorly associated with building material for the construction of a dwelling. However, as experience shows, cardboard can easily cope with the task of urgent construction of a birdhouse with a service life of at least one season. Only it is necessary to use not the usual and familiar cardboard (it will quickly get wet under the influence of atmospheric precipitation), but dense corrugated cardboard.

In addition to corrugated cardboard, we need paper with a self-adhesive coating, rope, pencil and starch. And, of course, a tool: scissors, ruler, square, knife and compass.
We will need to cut out all the elements for assembling the house (roof, walls, bottom) from corrugated cardboard, only in double quantity. Starch is needed to make a paste. The paste has a natural smell and, unlike synthetic glue, it will not scare away the birds and inspire them with the idea that they have chosen unfavorable housing from an environmental point of view.

Each pair of parts is glued together with a paste, due to this they acquire increased strength. The only problem will be the lack of ventilation in the house. Cut a hole for the notch in the front wall. We can make a perch in such a design, only it will not hold very firmly. In the back wall we need four holes through which we will pass the rope. Rope or twine can be replaced with wire. We need them in order to tie our house to a tree.
We glue the walls end-to-end, observing a right angle.

We should get such a box:

While the paste is not dry, we wrap the box with threads. So it doesn't get out of shape. After the paste dries, we will no longer need threads.
We glue the roof of the house in two parts. The design will be somewhat reminiscent of the roof of a wooden house with a sleeve that we nailed to make the roof removable. When making a house from corrugated cardboard, the smaller part of the roof should be inside the structure, and the large part with allowances on all sides forms a kind of overhang that will protect the house.
We glue the house with laminated paper. It will add density to the whole structure and at the same time will serve as a decorative element.

And what, a good house turned out?

house out of the box
An unexpected (albeit temporary) solution would be an empty juice or milk container. The use of ready-made containers will allow us to solve the problems that suddenly fell on our heads even faster. Or rather, a problem that has arrived.
We quickly empty the container from the contents, wash and dry. While the container dries after washing, we prepare the wire, scissors and an awl. An ordinary notch is cut out in the front wall. We pierce holes for the wire in the upper part of the box - our makeshift house will hang on it. The bottom must be reinforced with cardboard or corrugated cardboard, which we attach to the bottom of the container.
It remains to decorate our house with laminated paper or craft paper with a protective layer. We hang the house in a suitable place, wait for the melodious guests and tell the neighbors that this is the most fashionable house design that you personally found in the Belgian birdhouse community.
Housing with panoramic windows from a bottle
We are used to empty plastic bottles being used as bird feeders. A hole is cut in the bottom of the bottle, into which food is poured, and the bottle is hung up. By the same principle, you can make a bird house from a plastic bottle. In this case, the notch hole is cut out where it should be - in the upper part of such an unusual building material. In the lid we make a couple of holes for the wire, with which the house will be hung on a tree. To prevent the life of the starling family from being like the show "Behind the Glass", the bottle can be pasted over with beautiful paper or a decorative pattern applied. Although the starlings themselves, judging by the observations, treat the “transparent” walls of their dwelling quite calmly.

As you can see, building housing for starlings is a simple matter. At the same time it is very exciting. And also useful for raising their own offspring. Join now! Just not like in a stupid ad about sausage. After all, this is really a good deed - to make birdhouses with your own hands.


Indispensable helpers in the fight against all sorts of pests of green spaces are invariably birds. To attract them to the personal plot, you should make a house for them. If you give the birds a comfortable home, then there will be no need to worry about the safety of the crop. Although it is customary to call a birdhouse a birdhouse, not only starlings, but also other birds can live in it. Sparrows, flycatchers, tits, nigella and swifts settle in such apartments.
The location and size of the bird house must be chosen in accordance with the characteristics of different birds. For example, it is more convenient for titmouses when the height of the birdhouse is about 30 cm, and the bottom is 12 cm, while the diameter of the notch is 3–3.5 cm. As for wagtails, these birds do not have the necessary paw tenacity, so a small ladder. Such a house is suspended under the roof of buildings, at a height of 3 to 5 m. The pika bird feels comfortable in a house with two through holes located on the right and left. The presence of additional letok allows the bird to hide from predators.
Selection of materials
Thinking about how to make a bird house, you should first take care of preparing the necessary material for the construction.
Coniferous woods are not suitable for building a birdhouse, because they release resins, as a result of which the interior space in it will become sticky.

Materials that emit toxins are also unacceptable for the construction of a bird house, among them the material of fiberboard and chipboard. Plywood is also not an option, because it practically does not let in sounds, and feathered friends need very good audibility to avoid danger. In addition, plywood does not retain heat well, so it will be difficult for the birds to hatch. The best material for a birdhouse is larch wood. The inner surface of the boards must remain rough. This will make it easier for the birds to get out. On a smooth surface, you can make horizontal notches with a chisel.
Drawing and dimensions of a wooden structure

The drawing of the product can be made directly on the boards. They need to be laid out on the table. For marking you will need a pencil and a square. With special care, you should draw the boards for the front and rear walls, as well as for the side surfaces. For these purposes, boards of different widths are needed. At the end, you should get 7 blanks with predefined parameters:
- 2 side parts 15 cm wide, made of edged boards;
- 3 parts for the facade, back wall and cover, with a typical size of 30 × 20 cm;
- 2 pieces measuring 15x15 cm, used for the bottom of the roof and the bottom of the birdhouse.
To simplify the connection of parts, they need to be cut out as accurately as possible, and then signed with a pencil.
The typical size of a bird house is 20 cm wide, 15–20 cm deep and 30 cm high. Spacious bird apartments are not always the best idea. Of course, more chicks will shelter in a large house, but it is not always possible for feathered parents to feed a brood consisting of many individuals! If the chicks are not properly cared for and fed poorly, they will not be able to make long flights and will grow up sickly. And, on the contrary, in a compact house it is possible to shelter only 3 chicks, but they will grow up healthy and able to maintain the power of the population of their species.
Blueprints


Assembly sequence
Initially, the front wall is connected to the side. Nails should be hammered along the edges and center of the board. You should get a U-shaped design. Before further connection, it is important to check the reliability and rigidity of the elements that are already connected. For hardening, you can hammer in a few more nails between those that were hammered earlier.
In order not to drive a splinter into the skin, it is better to work with a tree with gloves.
By the same method, the back wall and the bottom of the structure are assembled. To round the inner corners, you can nail a wooden bead to the bottom. All elements are fixed with nails. If necessary, you can strengthen the structure with additional nails. Now you need to prepare the roof, which must be removable. This will allow you to clean the bird's home if necessary. The edges of the roof should protrude beyond the dimensions of the birdhouse itself. This is especially important to do from the side of the facade. So you protect the bird house from rainwater and other precipitation.

The roof should consist of two parts - the sleeve and the main part. The roof is held in place by a second piece. It needs to be adjusted to size and connect the two parts with nails. Now a plank or perch is being installed on which the birds will sit before entering their comfortable home.
When coloring a finished birdhouse, it is better to use soft colors. Dirty green and brownish tones are perfect. In this case, it will be harder for predators to find the bird house.
Economy version of the birdhouse
In some cases, you can make a temporary birdhouse using materials at hand, such as cardboard. Although this type of construction cannot be compared with its wooden counterpart, it may well become a haven for birds for the season. The raw material used is thick corrugated cardboard. The following materials are needed for work: corrugated cardboard, starch, self-adhesive paper with a laminated coating and twine. Tools: scissors, ruler, cardboard cutter, pencil, square, compasses.
First, all blanks are marked, they must all be duplicated. From starch it is necessary to cook a paste. Finished parts must be glued in pairs. All walls will be double, which increases their strength. A hole is cut in the front wall for the notch. 4 small holes are made in the back wall, designed for twine, thanks to which the house can be tied to a tree. The walls of the birdhouse are glued end-to-end at a right angle. The end result should be a box. During drying, it should be wrapped with threads.

The roof should consist of two parts glued together. Its outer part must be made with allowances. Such a product will be more durable if it is glued on the outside with laminated paper.
From a box or plastic bottle
If there is nowhere to get lumber, then you can make a birdhouse from a finished box, for example, from juice or milk, with a capacity of more than 1 liter. It must first be washed and dried. After that, a notch is cut out. To strengthen the bottom, you can use thick cardboard. Small holes are made on top of the box so that it is possible to thread a wire through them, on which the birdhouse will be fixed. Outside, the product can be pasted over with decorative laminated paper.

For the manufacture of another option, very few materials are used: a plastic bottle, paint to color the bottle or laminated paper, wire and a knife. A hole is cut in the upper part of the 5-liter bottle for the notch. Two holes should be drilled in the roof for the wire on which the structure will be attached. Birds feel uncomfortable in a transparent house. Therefore, to create coziness, the bottle can be painted or pasted over with laminated paper.
As you can see, making a simple version of a birdhouse is not difficult at all. However, in order for the bird house to fulfill its tasks completely, it is important to install it correctly.
Installation rules

It is necessary to follow some installation rules. It is customary to read that you need to mount bird houses in early April, but birdhouses can be installed at any time of the year. The installation height is on average 3-5 m, this applies to cottages and villages. In cities, such structures are mounted at a height of 8–10 m.
The inlet should be on the side with the least amount of wind. The birdhouse should be installed in the shade or partial shade, it is impossible for direct rays of the sun to fall on it. You need to hang structures at a certain distance from the branches. This will protect birds from domestic cats and other predators.
The position of the birdhouse should be strictly vertical. Let's allow a slight lean forward, but you can't lean back. If the structure is made of durable materials, then you need to provide access to the inside for annual cleaning.
Birds are orderlies not only of the forest, but also of the garden. Every summer resident knows this, in which fruit trees and shrubs grow on the site. All year round, birds not only delight the ear with their singing, but also help gardeners in their hard work of protecting trees from pests, destroying small insects and feasting on their larvae. To attract birds, feeders are hung on trees and volunteers are fed in the cold winter season, when it is not so easy to find "prey", and they also arrange a home for them. A solid wooden house will appeal to any bird, in which she can not only live and hide from the weather, but also breed.
Nuances that are important to know before you get started

As it is already clear, the best birdhouse is made of natural materials, in the sense of wood. Some craftsmen make houses from cardboard boxes or plastic bottles, however, this is not at all the same. In the first case, the dwelling will be temporary and will last one season if it does not get wet earlier in the rain. Plastic containers are more suitable for manufacturing, besides, there is no question of their naturalness. It will scare away birds and the smell of chipboard or plywood, the latter is also too thin and the house will be cold.
For a bird house, it is worth using hardwood boards, but in no case coniferous ones - they contain resin that will stick to the plumage, which is fraught with the health of birds. The thickness of the boards should be at least 20 mm so that they retain the heat needed by the chicks.
Planing boards, achieving their perfect smoothness, is not necessary. A rough surface, especially inside the birdhouse and under the entrance, will help the birds get inside and move around without difficulty.
We make a birdhouse step by step

First of all, you should draw up drawings of the future home. This will facilitate the process of manufacturing blanks and make them even, so that in the future there are no gaps between the walls.
Birdhouses can be of different sizes and shapes - it all depends on which birds will live in it. Too spacious "apartments" do not need to be done, because the bird family is small and the young can freeze or grow weak. The standard dimensions of the house are approximately as follows:
- bottom width - 15 cm;
- birdhouse height - up to 30 cm;
- roof - approximately 20x24 cm;
- the diameter of the protrusion (notch) - no more than 5 cm.
It is better that the back wall is a couple of centimeters lower than the front panel - such a slope is necessary for water to drain. Accordingly, then on the side walls the upper cut will go obliquely. The roof should protrude a little, so its dimensions are somewhat larger than the bottom.
 Now you can get to work:
- Transfer the drawing with a pencil to the boards.
- Cut out all the details.
- Trim the outer surface of the blanks.
- In the front panel, cut out the “entrance” in the form of a circle.
- Assemble the birdhouse in the following order: facade, side walls, bottom, back wall, roof, notch. All parts must fit snugly together. It is better to fix them on self-tapping screws or nails.
It remains to attach a fastener in the form of a bar on the back wall to the birdhouse and install it on a tree, wrapping it well with wire. Do not paint - the smell of paint will scare away the birds.
A birdhouse is a type of artificial closed nesting site, the most popular among both people - friends of wild birds, and their wards. The tradition of hanging birdhouses on Bird Day exists all over the world, and in places suitable for nesting, real birdhouse towns appear in some places, see fig.

Note: International Bird Day, April 1, is not celebrated in the Russian Federation. In Russia, it is customary to consider the Day of the Birds of the so-called. Finding, but not a Christian church holiday, but a folk one. People's Finding falls on March 9 according to the Gregorian calendar, this date is more suitable for hanging birdhouses, see below. The origin of the name of the people's Finding is not connected with finding the head of John the Baptist, but with beekeeping - if by this day the bees are found (are) in the hives, then they have wintered safely.
Making a good birdhouse with your own hands is easy; a student can handle it too. Birdhouses are used to attract not only birds - insect exterminators to home gardens and summer cottages, but also small songbirds to cities and housing, as well as to create nests for hollow-nesting birds in forests and parks. Many useful and beautiful birds nest in hollows and the competition for "living space" during the nesting season is fierce, because. there are not so many hollows in the trees and, as a rule, they have been occupied by someone since autumn.
The birdhouse assembly technology is really simple, it does not require expensive and / or complex processing materials. But, to make a birdhouse, you need to know in advance who will live in it. In closed nesting places, many small birds, which in other conditions are able to nest openly, do not mind making a nest. All potential new settlers of the birdhouse have their own requirements for the nest, so the designs of birdhouses for different species or groups of bird species differ, which is expressed in their names: titmouse, flycatcher, wagtail, owlet, etc.
General terms
The device of a birdhouse in general is as follows: it is an upwardly elongated cavity, mainly in wood, with a blank bottom and a removable lid. Under the roof there is a hole - notch - for the birds that settled in it. A removable cover is necessary, firstly, for autumn inspection and cleaning of the cavity: among the birds, only starlings, tits and nuthatches, after the chicks fly out, will certainly throw away the old nesting material and do a “general cleaning”. Most of the others leave the garbage as it is and the next year the cluttered “secondary” will no longer be taken. Secondly, instead of birds, the birdhouse can be captured by unwanted occupying animals; we will talk about them below.
The body (structure) of the birdhouse can be prefabricated from boards, as well as some other materials, or dug or chipped from a piece of log - churak; the latter are called hollows. The dimensions of the birdhouse are usually, depending on the type of birds for which it is intended, 20-40 cm in height; a notch with a diameter of 2.5-6 cm is located 5-6 cm under the roof. The removal of the roof over the notch is needed at least 5 cm in order to protect it from rain and cats. The diameter of the internal cavity (nesting chamber) is from 10x10 to 15x19 cm in birdhouses made of boards or from 7 to 20 cm in diameter in hollows. Sometimes a pole or landing area for parents is required in front of the entrance; in what cases - let's see further.
Houses like a birdhouse are also made for other animals living in hollows: squirrels, bats, but their proportions are different. It is necessary to make a birdhouse for birds within the indicated height limits so that the chicks can still climb the walls for feeding, but for squirrels, and especially for dormouse, such a high threshold would be inconvenient. You should not make the nesting chamber too spacious, firstly, for the same reason. Secondly, in a large nesting area, the female will lay more eggs, but the parents will not have enough strength to feed them all. Some of the chicks will then die, and the rest will grow stunted and will not survive the winter.
What are the birds waiting for?
The birdhouse must meet very specific requirements. First, it must be durable and opaque: the secrecy of the brood is the main thing for which hollow nests nest in tree cavities. Further, the inner walls should not be very hard and slightly rough so that the chicks can climb towards the parents who have arrived with food. Without this physical exercise, the chicks will not get on the wing properly and will not survive the flight for the winter or become victims of predators.
The following conditions: the birdhouse material should be moderately sound-permeable, keep heat as best as possible, and its structure should not have cracks. Reasons: the chicks should hear the arriving parents or a sneaking predator, but at the same time, their squeak should not spread far. In addition, the chicks of all hollow nesters are initially naked, the slightest draft can kill them, and wetting the nest will kill the entire brood for sure. Chicks, like all birds, emit quite a lot of heat, and in a warm, dry dwelling, they will have a much better chance of surviving a sudden cold snap.
About materials
Make a birdhouse best of all from edged, unplaned hardwood boards. Conifers are only suitable when aged, without visible streaks or a noticeable smell of resin. The best ones are used, from some sort of dismantled shed. The thickness of the boards is 20-30 mm, then the conditions of sound transmission and thermal insulation will be maintained. If the boards are planed, then the inside of the one where the notch will be must be “roughened”: treated with a large sandpaper, covered with notches or scratches with the tip of a knife or the corner of a chisel.
Note: in some cases, some other materials are suitable or even preferred, incl. and junk henchmen. We will talk about their application later.
Plywood is not suitable for birdhouses, even waterproof: it muffles sounds and does little to prevent heat loss. OSB, chipboard, fiberboard are absolutely unsuitable - birds are much more sensitive than us to pairs of phenol compounds. The nesting chamber made of artificial lumber on a phenolic binder of the highest consumer class for chicks will turn into a gas chamber. MDF, in which there are no phenolic resins, would, in principle, be suitable, but this is a material for internal use and, under the influence of precipitation, it will soon swell and become limp.
Enemies and defense
There are plenty of people who want to eat eggs or chicks in nature. In addition, the birdhouse can be occupied by newcomers “without a warrant”, or even extremely undesirable in the garden, such as, for example. sleepyhead Dormouse is interested in seeds in juicy fruits, and just a couple of these animals can spoil the harvest in the whole garden. Another birdhouse can be captured by squirrels, bats, and in Siberia, chipmunks. In general, there is no harm from four-legged invaders, but useful birds are deprived of nesting sites.
The worst destroyers of birdhouses are large woodpeckers, large motley and yellow. By the beginning of the nesting time, these generally useful birds are experiencing an acute shortage of animal protein, it is also time for them to nest, and for this, woodpeckers peck at birdhouses, destroying eggs and chicks. Nothing can be done, everything is poison and everything is a medicine, not only in medicine.
In second place in terms of danger to the brood are cats, domestic and wild. Small predators from the marten family, oddly enough at first glance, do not pose any particular danger to masonry and chicks: by the time the birds nest, they have at their disposal plentiful easily accessible prey - mice, voles.
Ways to protect the birdhouse from ruin are shown in fig. Pos. 1 - from woodpeckers: a tin collar 5-6 cm wide, upholstered with small studs at the same distance or an overlay made of straight-grained wood with fibers oriented horizontally; the fact is that woodpeckers can only peck a tree with vertical fibers. The latter method is preferable, because. the overlay does not rust and does not create inconvenience to the owners of the house. But keep in mind that the rest of the structure must be made of wood with fibers oriented vertically or obliquely, otherwise the bird house will quickly split.
Pos. 2 - protection from cats. The best way is an anti-cat “skirt”; it can be made from dry branches or pieces of wire. 1-2 short twigs at the root part are cut so that small inclined stumps remain, and the entire belt is fastened with a wire passing under them, without pulling it tight so as not to damage the tree. The "skirt" is placed at the same height as the lower tin belt, see below.
The threshold inside under the notch (at the bottom in pos. 2) is less laborious, but inconvenient for both the chicks and their parents. It is done if it is not possible to arrange an anti-cat belt. Another good remedy “from cats” is a wooden collar around the notch that protrudes outward by 3-5 cm.
Way to pos. 3 - tin belts - gives a full guarantee from both any predators and invaders. Indicated in fig. dimensions, in cm, must be maintained with an accuracy of 3-4 cm; they are designed so that potential destroyers cannot jump over the belts, then catching on to the bark, neither from below nor from above. Of course, on the section of the trunk between the belts there should be no branches, twigs, feeders and other supports for predators.
Note: a good way only from the invaders - hanging in the fall, before the cold, the so-called. temporary substitute birdhouses. We will talk about them further.
For starlings
Common starlings are the most frequent and most desirable inhabitants of birdhouses. Therefore, without going into details, let's see how to make a birdhouse for starlings. The common starling is a rather large bird for hollow nesters, and its relatives, the starling myna, etc., are even larger. Therefore, in general, a birdhouse, which is a birdhouse, is larger and deeper than the others, its notch is wider, and a hearth is definitely needed under the notch. Starlings prefer to nest in places inaccessible to predators, but with a good view, and the starling is the head of the family is very caring. He will sing a marriage song only if the chosen one has the opportunity to immediately inspect and accept the living space attached to the proposal of the wing and heart.
Drawing of the most popular birdhouse, the so-called. village type is shown in fig. The build order is:
This instruction for making a birdhouse is designed to use PVA glue. In the old manuals, from where the current authors write off a lot of really useful tips, it is recommended to assemble birdhouses on wood glue, but this is because there was simply no better PVA then. Compared to PVA bone carpentry glue:
- Blanks are cut out of the board;
- In the facade, a notch is cut out in advance with a pen drill or a crown on a tree, a pole is inserted into the drilled hole, the inside of the front wall, if necessary, is “roughened”, as indicated above;
- Sidewalls are glued to the bottom and right there - the front and back walls;
- The box is leveled from the bottom and side walls, while the glue is liquid, and tied with twine until it sets;
- The box is dried in a vertical position on a spread plastic film;
- When the glue sets, the box is fastened with nails or self-tapping screws, 2-3 for each glue line;
- Trying on the cover blank without a lining, trim / cut the upper edges of the front and rear walls so that the roof lies tightly;
- The lining of the lid is put on fluid glue, the lid is put in place, and supporting the lining with a finger through the notch, the roof is finally adjusted in place;
- After the glue has set under the lining, it is pulled to the cover with 4 small nails or self-tapping screws.
- Water resistant.
- Plastic in the dried state: does not dry out, does not crack, provides complete tightness of the seams.
- It allows, having smeared the parts with glue and immediately folding them, within 3-5 minutes to adjust the connection in place, slightly moving the parts casually, without breaking the adhesive layer.
- Always ready to work, does not require the use of a glue cooker and other special equipment.
- Used as an impregnating composition diluted 3-5 times with water, it allows the use of some waste hygroscopic materials for the birdhouse.
- Cheaper than wood glue and more durable outdoors.
There are only 2 disadvantages of PVA before carpentry glue: its seam is plastic, which is not essential for a birdhouse that is not a sideboard or a sofa, and after assembly on PVA, the product must be dried for at least a day in a warm room, and carpentry glue seizes immediately.
When and how to hang?
Well, let's assume that the birdhouse is ready. When and how to hang it? There are 2 seasons for hanging birdhouses: in autumn, after harvesting, but before the cold weather, birdhouses are hung for wintering birds: titmouses, nest boxes for nuthatch and substitute birdhouses for invaders. Birdhouses for migratory birds, incl. starlings are hung in the spring, a week and a half before the start of the mating games of birds.
If you are familiar with ornithology, then you need to hang birdhouses, especially for certain types of birds (see below), by noticing the harbinger birds. They arrive in advance at the places of summering, spin there for several days, almost without eating, then fly off. There are always few harbingers, they examine the site, “report” to their relatives and, if everything is in order, a mass arrival begins. Among the points of the "report" is the nesting situation; if the harbingers spotted "fresh", i.e. obviously not competitive and not looked after by the destroyers of nesting places, they will not fail to notify their fellows about this in their own way, and the settlement of "new buildings" is ensured.
In case you have no birdwatching experience, you should hang nests in the Central Strip of the Russian Federation during March, but before the April heat hits. Here you can roughly navigate by the first thawed patches: when the tubercles “wilt” on them, you need to hang them. Somewhat more precisely - according to the weather, when the equinoctial storms pass; as meteorologists say, when the latitudinal movements of atmospheric masses in the temperate zone prevail over the meridional ones, but in places with a continental climate this sign is weakly expressed.
It will not be a mistake to hang birdhouses on the National Day of Birds (March 9) or on the first Sunday after it, but in this case there is a rather high probability that they will be occupied, and the harbingers will overlook them. From the first, however, you can insure yourself by hanging substitutes in the fall.
The second question is how to hang a birdhouse correctly? General rules:
- The letok should be oriented to the east-southeast, so that in the spring the first rays of the Sun penetrate into it.
- Suspension height 3-5 m.
- It is preferable to hang on trees, so the birds seem safer.
- An exception is wagtails (see below), they must be hung under the roof of a barn (not a residential building!) At the same height.
- Titmouse can be hung on the wall of the house, balcony or under the ceiling of the veranda, if the birds were regularly fed nearby during the winter.
- A birdhouse for starlings can be carried up on a pole in a bare yard.
- If the birds were fed in winter, the birdhouse should be no closer than 15-20 m from, so as not to attract the attention of the ruins.
A rather serious sub-question - how to attach a birdhouse to a support? To nail - the path to diseases with pests opens into the tree, and the benefits of birds can be lost in vain. In addition, cats can slowly tear off nailed birdhouses or, dropping the roof, grab chicks.
The main ways of hanging birdhouses and errors are shown in fig. According to pos. 1 bird house is attached if there is not enough thick wood. The method according to pos. 2 - optimal, it does not harm the tree at all, and the birdhouse holds firmly. According to pos. 3 birdhouses are attached to a pole. Please note: in the end, the birdhouse should be tilted down by 2-3 degrees, this will completely protect it from cats and make it easier for the chicks to feed.
At pos. 4 - incorrect, pseudo-ecological way of hanging with wire and a wooden block; in fact, it harms trees worse than nails, the block of wood soon falls out, the birdhouse begins to slosh. And finally, when hanging on a tree, protection from cats is necessary, pos. 5.
How to climb a tree?
Birdhouses are also hung in the forest, and even at home a ladder will not always help to climb a tree if it is spreading. That is, to hang a birdhouse, you have to climb a tree. The first thing to remember here is not to climb like children, clinging to branches. Let them race with squirrels or monkeys there, but you are two or three times heavier, if you fall from the same height, the impact will be about five times stronger, the bones in children are more elastic, and the internal organs are more resistant to deformations than in adults.
The art of climbing trees is called arborism, and those who are fond of it are called arborists. Arborists climb trees using a safety belt and special devices - gaffs, which, in essence, are the same claws. You can familiarize yourself with the technique of lifting on gaffs in the video:
Video: how to climb trees?
And about how to make gaffs yourself - from the video:
Video: homemade gaffs for climbing a tree
However, much less time-consuming and, paradoxically, statistically safer is the method of climbing with a rope loop, which has long been used by pickers of tropical fruits, see the video:
Video: how to climb a tree without knots?
But in any case, what is called as otchenash must be observed the following precautions:
- Work only together, with the insurer downstairs, who knows how to provide first aid for bruises and fractures.
- Have transport at hand so that you can quickly deliver the victim to a medical facility; all workers must be able to manage it.
- Do not lift with a load; you need to attach a rope to your belt, and only then, having established yourself in place, lift a birdhouse on it and, if necessary, a bag with a tool.
- The insurer must not come closer than 3 m to the place of possible fall of objects or the climber, taking into account the strength and direction of the wind.
- The insurer must see the climber at all times; when it disappears from the field of view - immediately command the descent, and the climber must unquestioningly execute the command.
- And most importantly: before starting the ascent, look out for yourself the path of descent and clearly understand the procedure for doing it.
Sinichniki and spetsstroy
You can attract many more useful, interesting and / or beautifully singing birds with the help of a birdhouse. But they are unlikely to settle in a birdhouse-birdhouse, great. Artificial nests for small songbirds are of various types; then we will figure out which of them which birds need. First of all, we will consider stationary birdhouses made of wood, and after them - temporary substitutes for wintering birds and distracting invaders from other materials.
Note: making special birdhouses, as a rule, is more difficult than usual ones. Therefore, before starting work, make sure that potential newcomers are part of the local avifauna, and be patient - they, except for tits, do not trust a person like starlings. A “small-singing” birdhouse can hang for a year or two until it is populated, and all this time you need to make sure that it does not dilapidate, is not littered, or is not occupied by someone else.
Who else is waiting?
Desired neighbors both in the city and on the plot will be, in addition to starlings and great tits, crested, blue tit, Muscovy, long-tailed and chickadee (pos. 1-7 in the figure), also pikas, common and short-toed, or garden (pos. 8 ; common and short-toed pikas are almost indistinguishable from a distance), nuthatches (5 species in the Russian Federation; at pos. 9 - common), gray flycatcher, pos. 10, and a pied flycatcher, pos. 11. All these birds (pos. 8-11) are hollow nesters, actively destroying harmful insects.
For redstarts (at pos. 12 - coot redstart; you can also expect black and red belly) and robins (pos. 13), any of the titmouses described below will do. But the wagtail (pos. 14) needs a special "wagtail", because. The paws of this bird are not adapted for vertical climbing. You can build a birdhouse for wagtails, as if laying a school-type titmouse on its side, see below, and providing it with a kind of balcony, see fig. The "wagtail" must either be installed in a bare yard on a pole 2.5-3 m high, reliably protecting it from cats, or hung under the overhang of the roof of a non-residential building for the same purpose. But the new settlers will not keep you waiting and, walking on the ground, peck out a lot of pests, and so far no one has noticed grass from wagtails.
If a sparrow owl (pos. 15) is seen nearby and it was possible to attract it to the site - the owner is happy, and the pests are sorry: this little scoop is a living WMD for them. The small birds of the sparrow owl have nothing to be afraid of: it was so named not because it is somehow dangerous to sparrows, but because it is the size of a sparrow. The Owl, like the Sply Owl, can be tamed by feeding small pieces of raw meat and mealworms from time to time. He is friendly, his behavior is funny. But it will nest only in a nest box made of natural material (see below), and to make it, considerable skill is required, as for any owl house.
Types and designs
I. Sokolovsky was engaged in the design of birdhouses a lot. His developments served as the basis for many further designs. The device of 3 types of Sokolovsky's birdhouses is shown in fig; nests will be discussed later.
Sinichnik
On the left in fig. - a diagram of a titmouse based on a typical birdhouse.
Designations, as for the next. pos:
- A - tap-hole diameter: 35 mm for the great tit, crested tit, blue tit, redstart and 30 mm for other tits and robins;
- B - the side of the square bottom, 10 cm is enough. If the titmouse is intended only for great and crested tits, common in the city, then it is better to take B = 12 cm;
- C is the height of the front wall, 22 and 25 cm in the same order as in paragraph 1;
- D is the height of the back wall, 28 and 30 cm, respectively.
Note: the distance of the top of the notch from the top of the front wall is 5 cm and the roof extension is from 5 cm, as for a conventional birdhouse. Six in front of the notch is not needed.
Bird lovers, using the recommendations of Sokolovsky, are trying to create a birdhouse-titmouse suitable for any small songbirds. Projects of 3 such titmouses are presented in fig. They differ, in essence, only in the design of the roof. A school birdhouse is the easiest to make, no roof fitting is required. It was these that were mastered in Soviet schools at labor lessons, some students managed to make up to 3 products per lesson. Birdhouse-house better protects from cats and, especially, from precipitation. These are desirable to hang in rainy places, with a protracted spring. Flycatchers also nest in universal titmouses, but it is better to attract them with special birdhouses.
Note: if you make a bottom of 15x15 cm in a universal birdhouse (maximum according to projects), then it will turn into a birdhouse mainly for starlings. Other birds will occupy it if there are not enough starlings for all the hung.
Half-hollow and flycatcher
The gray flycatcher prefers to nest in half-hollows, similar to natural hollows in trees. The scheme of the half-hollow birdhouse is shown in the center in fig. with Sokolovsky's birdhouses. Dimensions:
- A - 4 cm;
- B - 10 cm (square);
- C - 7 cm;
- D - 14 cm.
Pied flycatchers are more likely to occupy hollows in horizontal or slightly sloping thick branches, so they want a birdhouse-house in the form of a cubic nesting chamber with an inner side of about 12 cm, installed with a “rhombus”, i.e. downward angle, see fig. on right. The front wall needs to be made larger, about 20x20 cm, to protect against cats. Taphole diameter - 40 mm.
Flycatchers start nesting comparatively late, when enough insects are breeding. By that time, heat is established, parents supply the chicks with high-calorie food in abundance, so that the thermal insulation of the flycatcher no longer has a decisive value. This circumstance can be used to more fully imitate the nesting habitual for these birds by building a birdhouse for flycatchers from a plastic bottle or can, see fig. A light-colored roof is a must, otherwise the chicks will die from solar overheating!
Note: as for other birdhouses from bottles, see fig. on the right, these are products, perhaps artistic, but not functional. The blank does not meet any of the requirements for the birdhouse. If the birds occupy such a nesting place, as they say, out of bitter need, then for a brood such a housewarming party ends tragically - it dies either in the cat's mouth, or falling out of the fledgling; birds abandon such chicks.
For pikas
A birdhouse for pikas has a very special design. These birds in nature nest in hollows with 2 holes in order to escape through an emergency exit if necessary. Therefore, in the "pischushnik" 2 notches are needed in the side walls. The birdhouse device for pikas is shown on the right in fig. with Sokolovsky's birdhouses. The common and short-toed pikas are similar in appearance, but differ in size, therefore the sizes of the nests for pikas differ, see table.
Note : artificial nests for pikas and are hung differently than for other birds - only on a tree and at a height of approx. 1 m from the ground.
duplyanki
Birdhouses-hollows are made from logs of straight-leaved deciduous trees 25-40 cm long and 15 cm in diameter. For hollow-nesting birds, this is the most comfortable, reliable and healthy housing. The percentage of death of broods in nest boxes is much less than in birdhouses.
The manufacture of a hollow in the simplest way is shown in pos. 1 fig. The wide bottom and lid, as in this case, are designed for wagtails. If, however, the notch is made not from the side, but in the lid closer to one of the corners, and the whole structure is hung on its side, orienting the nesting chamber with a rhombus, then you will get an excellent flycatcher. For other songbirds, the lid and bottom are cut to the size of the log-blank diameter.
Counsellor, pos. 2, it is more difficult to make, because owls are demanding on the configuration of the camera and do not tolerate slots in its sides and bottom. So you have to sweat, hewing the workpiece and gouging the camera. Dimensions in fig. fit and sparrow owl; the diameter of the notch for him is 4 cm, because all owls are heavily built.
Birdhouses are often hung in forests and parks. In this case, it should be taken into account that the composition of the bird contingent in broad-leaved, coniferous plantations and birch forests differs not only in species, but also in the average size of birds. The sizes of nest boxes for coniferous-deciduous forests / parks and birch forests are given in pos. 3.
About the design of hollows
A few words about the design of birdhouses in general will be said later. As for the hollows, they look good on trees even without additional decoration, on the left in fig. If you want to show your skill and taste, then they should really be skill and taste, combined with a subtle sense of material, in the center and on the right there.
Park birdhouses
The tradition of attracting songbirds to parks is widespread in Europe, and is developing in our country. Park birdhouses should, firstly, attract beautiful birds that sing loudly and beautifully; secondly, and themselves to be attractive in appearance to people. Of domestic structures of this kind, birdhouses of the Blue Reel type are popular, on the left in the figure, but the Germans prefer birdhouses-huts, painted in the color of foliage or bark, with a tin lining on the roof ridge, which perfectly protects from cats, right there. The diameter of the notch marked with (*) is chosen according to the type of birds, see above.
More about design
Birdhouses should be painted in discreet colors: this is not a feeder, bird housing should not attract attention. The shape of the birdhouse should be inconvenient for the ruins. For example, pos. 1 and 2 in fig. - unsuccessful. Both are clearly set low, a cat or a woodpecker has where and how to establish itself for ruin, and the first one is also brightly colored. But pos. 3 and 4 are both tasteful and functional enough. If pos. 3 to provide a collar around the notch, and on pos. 4 to make an anti-cat skirt from a tree oriented horizontally with fibers, then both birdhouses will become inaccessible to both predators and woodpeckers.
Atypical samostroy - birdhouses from improvised materials
Sometimes you should not waste your energy and wood on a stationary birdhouse. Firstly, if it is intended for wintering birds, the same tits. They do not like to nest twice in the same place. over the winter, hungry ruins became familiar and the annual change of nesting site significantly increases the chances of survival of the brood. Secondly, you do not need to try very hard for the sake of the occupying animals. They need to be distracted from the fall with temporary wintering housing. Then in the spring, fearing to lose him too, they will not occupy the bird houses, and they will live through the summer anyway. In both cases, it is desirable to make a temporary birdhouse from a material that does not require special tools, labor-intensive processing and a separate workplace.
The first thing that comes to mind is paper. Paper birdhouses were invented by amateur poultry farmers in the USA, equipment for keeping and breeding pets is very expensive there. At home, in an aviary, in paper nests, it is indeed possible to breed budgerigars or, say, red cardinals. But you can’t seriously talk about a street paper birdhouse: the material is absolutely unstable. However, we give in Fig. a couple of patterns of birdhouses made of paper: on the left - a distracting substitute for four-legged invaders, and on the right - a bird one. They will be useful to us a little lower, and on occasion, using the same patterns, you can make a bonbonniere or a gift box.
Note: paper birdhouses have one more unpleasant property - bumblebees and, especially, wasps willingly settle in them. The latter build paper nests themselves, and here is the finished zero cycle. Having a swarm of hornets in your neighborhood is not only unpleasant, but can be very dangerous.
Temporary birdhouses are best made from cardboard impregnated with a water-polymer emulsion or liquid diluted PVA, then they will last outside from autumn to spring. The house is glued with the same PVA. The manufacturing technology according to the pattern is shown in fig. below. Pay attention to pos. 4: fold lines must be cut before bending; this is the only subtlety in this process.
Making according to a pattern gives a large waste of material, which is not always desirable, and there may simply not be a lot of cardboard in the closet. In such a case, in Fig. on the right is a method of cutting a cardboard strip into parts of a birdhouse.
If dormouse is seen on the site, then a winter trap for them is obtained from a box insulated with foam; it is possible from its pieces, see fig. left. Two sixes are needed to attract exactly the dormouse. It is difficult to catch an active sleepyhead, but it is not difficult to get rid of sleeping animals. There is no need to kill them: dormice are actually cute and funny, they are most likely to be taken to a pet store or bought by lovers of wild animals. They check Sonya's bedroom when a hard frost hits, just do not bring the discovered animal into the house. Dormouse do not fall into a real hibernation, they wake up in the warmth and go to roam the furniture and curtains.
Finally, good birdhouses are obtained simply from scrap materials, you just need to know the habits and preferences of birds. For example, a construction from a bucket and trimming a board, pos. 1 in fig. below, flycatchers will surely like it. House substitutes from empty cylinders (pos. 2 and 3) are well suited for small quadrupeds; if it's a squirrel, then why chase it? Birdhouse from a table beer or wine and cognac keg, pos. 4, it is unlikely to attract birds, it is too big, but bats, which are also very useful, will fit. A basket with a wicker lid, suspended under the roof of the veranda, will be willingly populated by tits, if they were fed and not offended in winter.
At pos. 6 is not such a curiosity as it might seem: it is soft and warm for the chicks, it is convenient for a bird (it looks like some kind of nuthatch) to feed the brood, the woodpecker does not hammer the skin, and in cats the shoe is firmly associated with a crushed tail and broken sides. Finally, a plastic pot with slightly rough, durable walls can turn into a small owl house, pos. 7.
Direct benefit
The author once set out to calculate: what is the economic efficiency of a birdhouse on a plot of 6 acres “for himself”? The main share of the cost of the bird house fell on labor costs; the cost of working time was taken as 200 rubles per hour, which corresponds to a decent salary for that time of 32,000 rubles. With this in mind, a birdhouse and 2 titmouse cost about 1000 rubles.
After 4 years, while the birds were living, it turned out that only the savings on the purchase of vegetables, fruits and plant protection products compared to the same period without attracting birds is ... about 28,000 rubles, or 7,000 rubles / year! That is, birdhouses paid off 28 times, or 2800%. Wow profit!
(1 ratings, average: 5,00 out of 5)