The procedure for supplying water to a private house. How to bring water into a private house from the central water supply with your own hands, which pipe to use underground
Do-it-yourself water supply in a private house can be done from a central water supply or from a well (well). The principles of its creation, the main components of the system in each of these cases are virtually the same.
Selecting a wiring diagram
There are two ways to supply water to points of consumption, and the choice of a water supply layout in a private house with your own hands depends on the parameters of the system, as well as on the intensity of water consumption (permanent or periodic residence, number of residents, etc.).
Serial connection
This connection is also called tee. The tap, shower and other points are connected in series. This method requires the use of fewer materials (pipes, fittings, etc.), and is therefore cheaper.
The disadvantage of a series connection when laying out a water supply system is the likelihood of a decrease in pressure pressure at the most remote points when several water intake points are used simultaneously.
Collector connection
Collector (or parallel) connection is the organization of a collector (or two collectors - hot and cold water supply), to which lines leading to each water intake point are connected. To implement such a scheme, a larger number of pipes will be required, but its operating principle is allows for stable pressure.
There are additional nuances when choosing the principle of water supply. Do-it-yourself installation of water supply in a private house can be done in two ways:
- "Blind" lines ending in a dead end (stub). This scheme for wiring the water supply system in the house is more economical, however, when supplying hot water, it can create some inconvenience - when opening the tap, you must wait a certain time until the liquid reaches the plug, and only after that hot water appears in the tap.
- Circulation closed lines more practical and convenient, however, to implement such a project you will need not only a larger number of pipes, but also a special circulation pump.
Experts recognize the most rational combination option, in which the “blind” cold water distribution is combined with a hot water supply circulation line.
Main components of the circuit
The water distribution diagram in a private house, or more precisely, the part of it that is responsible for supplying water to the house, consists of the following main components:
- pumping unit for a well or borehole,
- nipple (adapter),
- preventing reverse,
- pipeline,
- filter equipment (one or more different filters depending on water quality),
- shut-off valves,
- five-piece (fitting) for connecting the main elements and instruments (pressure gauge, pipes).

Sequence of water supply scheme
In order to visualize how to install water in a private house with your own hands, you can consider the flow of communications from the source to the end point.
1. An individual water unit (well or borehole) is equipped with pumping equipment, the selection of which is carried out according to the following principles:
- for deep artesian wells only submersible pumps can be used,
- for narrow channels and casing pipes - only surface units, including pumping stations,
- in other cases, the choice between submersible and external equipment is made depending on the technical characteristics of specific models and operating conditions.
2. The pipeline supplying water to the house is usually laid underground. The depth of the trench is usually selected taking into account the depth of soil freezing in a given region. As additional protection against freezing, communications are equipped with a thermal insulation layer.
 Plumbing a house from
 3. The point at which the pipeline enters the house deserves special attention.
- Firstly, the hole for the pipe is made with a large margin - a gap of at least 150 mm on all sides. This allows you to avoid deformation and destruction of communications if over time the wall begins to sag or deform.
- Secondly, a small section of pipe, located between underground and ground-protected communications and internal wiring in a warm room, is located in the open air. This is where the risk of pipeline freezing is highest, so good thermal insulation is required.
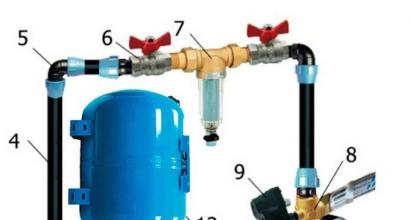
4. The hydraulic accumulator and control devices are installed, as a rule, in the basement, basement or on the first floor near the point of entry of the pipeline into the house. Technically, it would be more correct to place such equipment at the highest point, but from the point of view of practicality and ease of use, lower levels are more suitable. You should only take into account the need to raise water to the upper floors at.
The hydraulic accumulator is designed to stabilize pressure in communications and prevent frequent switching on (and, accordingly, rapid wear) of pumping equipment.
The control and monitoring unit includes a pressure gauge, pressure switch and, which prevents air entrapment and the formation of air locks in the system when the water level in the well or well decreases.
5. Filter systems are equipped, depending on the need, with devices for:
- preliminary rough removal of large particles of impurities (more about),
- fine cleaning,
- water softening.
Afterwards, you install the water supply system in a private house with your own hands according to the chosen scheme. For a collector circuit it might look like this:
- Immediately behind the accumulator there is a tee along with a shut-off valve. The tee divides the flow of water into two directions - into the house and for other needs (watering, car washing, etc.);
- A deep cleaning filter is connected;
- Next comes a tee, from which the water supply pipes in a private house are divided into a pipe for cold water, which immediately goes to the cold water collector, and into a pipe through which the water will go to a boiler or another for heating. After heating, the water is sent to the hot water manifold.
 The photo shows a diagram of water distribution in a private house
 Important: When installing water supply in a private house with your own hands using a collector circuit, it is necessary to install shut-off valves at each point of water consumption.
Pipe selection
Diameter of communications
When installing a water supply system into a private house with your own hands, the right one will ensure efficiency at the installation stage of the system, as well as avoid unpleasant noise when water moves through communications.
To calculate the parameters of lines supplying water to points of consumption, the starting point is total length of each line:
- for a branch less than 10 meters long, pipes with a diameter of 16-20 mm can be used,
- for branches of about 30 meters - with a diameter of 25 mm,
- For the longest lines over 30 meters, pipes with a maximum diameter of 32 mm are required.
Important: Particular attention should be paid to choosing the diameter of the collector pipe. An insufficient value can cause problems in the system.
The distribution of water in a private house from the collector is calculated based on the fact that each tap has a throughput capacity of about 5 liters per minute. After this, roughly calculate how much water is taken simultaneously from all points at peak moments and select the diameter of the collector:
- 25 mm for a flow rate of 30 l/min,
- 32 mm for 50 l,
- 38 mm for 75 l.
Pipe material
Laying a water supply system in a private house allows you to use pipes made of various materials, each of which has its own advantages, disadvantages and operating features.
 .
.
In order for the system to work flawlessly, it is important to know how to install plumbing in a private house with your own hands correctly. This concept can include both the basic principles regulated by building codes and rules, as well as some nuances and subtleties known to experienced craftsmen.
- Ideally, the pipeline should not pass through building structures, however, in practice, creating such a circuit is often impossible or impractical. If it is necessary to conduct communications through the wall, the pipe must be placed in a protective cup.
- Despite the fact that the owner of the house almost always wants to get maximum free space and to do this, “press” the pipeline against the wall, there must be a gap of at least 25 mm between the building structures and the communications running parallel to them for easy repair work. The inner corner requires a distance of 40 mm, and the outer corner 15 mm.
- If there are drain valves on the pipelines or hydraulic accumulator, a slight slope is made in their direction.
- The most convenient way to fix the pipeline to the walls is with special clips. You can choose single or double devices; in any case, the distance between them should be about 2 meters.
When deciding how to install water in a private house, remember that a well-executed internal water supply system has characteristic differences:
- Minimum joints and adapters. This improves the reliability and efficiency of the system.
- All connections are made in strict accordance with the installation technology of this particular type of pipe.
- Availability of valves or shut-off valves in critical areas of the system and at connection points.
- A minimum number of not very reliable flexible connection sections (hose connections), which are most vulnerable to pressure changes.
Owners of private houses have to solve the problem of water supply for their households on their own. The construction of an autonomous source in the form of a well or well is associated with labor, time and finances. It’s good if there is a central water supply line nearby, it is most convenient to extend the pipeline network from it.
In this case, the comfort of living even in an old house is significantly increased, since the normal functioning of the sewage system, heating and other utilities will be ensured. You can supply water to a private house with your own hands, you just need to collect the necessary documents.
You can connect to the central water supply in winterAdvantages of central water supply
Connecting to a central water supply has a number of advantages compared to installing an autonomous water supply system. There is no need to purchase expensive pumping equipment; there is no need to drill, pump and maintain a well. In addition, centralized water supply is a certified type of activity, so the consumer receives:
- drinking water that meets sanitary and hygienic standards;
- normalized pressure in the pipeline network;
- water supply almost without interruption.
You can install the water supply and connect it to the central line yourself, or you can invite specialists. They will help to lay the system underground and connect it to the house. Of course, in this case you will have to pay for their work.
Without documents it will not be possible to supply water to a private house
To connect a private house to a centralized water supply, you will have to contact several authorities and obtain permits.
Without them, you won’t be able to use water, and for unauthorized connection there are huge fines and dismantling of the equipment at the expense of the owner.
It will be necessary to carry out various studies, draw up technical documentation and approve it in the relevant structures. All stages of documentation must be completed sequentially, otherwise everything will have to start all over again.
First we contact the geodetic service
You should first contact your local surveyor's office. Its workers will carry out a topographic survey of the area and draw up a situational plan of the site. All objects located on the ground are plotted on it, indicating the distance between them and the nearest utilities.
This is what geodetic survey and technical conditions look likeSurveyors will complete their work within ten days and issue an invoice for services rendered. If you have a situational plan, more than a year has passed since its preparation, you will have to order a new explication; this is another name for this document. When contacting the geodetic service, you will have to present title documents for the use of the land plot.
We obtain technical conditions for connecting to the water supply system
To obtain specifications for water connection, the owner of a private house can contact the authority that issued permission to construct the facility. There they will determine which company will provide centralized water supply services to the new user. This is where you should submit documents, of which you will have to collect an impressive list. You will need the following:
- confirmation of ownership or use of the house and land;
- owner's identification card;
- seven copies of the explication;
- two copies of the building permit;
- water consumption balance prepared by designers;
- two copies of the application.
The technical conditions, which are provided to the user 14 days after submitting a package of documents without charging a fee, indicate the dates of connection to the central water supply line and the permissible load on the central water supply of the user in question. The authority that provided the technical conditions undertakes to connect a private house to the central water supply.
Now you can order a water supply project
The technical specifications have finally been received, and now the water supply project can be ordered. Without it, you cannot sign an agreement with a company providing centralized water supply services. Based on the developed technical conditions, the water supply project can be carried out by any competent organization, but in any case it must be approved by the local water supply and sewerage company.
 The connection must be made in accordance with the design
 The document will also need to be coordinated with electricity and gas suppliers and even with the telephone exchange due to the fact that their utilities are also connected to the house, and the water supply network should not interfere with their functioning. The project is finally approved by the architectural committee.
Should I lay the pipe myself or contact a licensed organization?
When connecting a private house to a centralized water supply, you must understand that all excavation work outside the site, according to the rules, must be carried out by an organization that has a license for this. Unfortunately, the latter take advantage of their position and charge high prices for their services. The fine for violation is noticeably less, so many people do this work themselves.
 An excavator is clearly more effective than a shovel
 The costs of installing a water supply system consist of payment for installers, the purchase of materials and various fees. The cheapest way to get water is to do all the work yourself and install the water supply network from pipes made of polyethylene or polypropylene.
We contact the water utility to conclude an agreement
Now you should contact the water utility to conclude an agreement on connecting the water supply. Its essence lies in the fact that the organization carries out all the necessary actions to prepare and connect the infrastructure of a private house to the central water supply, and the user pays for these services.
 Contracts for work and water supply
 The price is set by the local water utility department, and it consists of the fee for running the pipeline system from the house to the point of connection into the main network and the connected load of the system. The cost of materials and labor of the installation team is included in this price.
Do-it-yourself plumbing
It is possible to save significantly on installing a water supply system if you do all the installation work yourself. First of all, it is necessary to draw up a diagram indicating the location of pipes and water intake points. When developing it, there is no need to strive for the heights of engineering; the most important thing is that the diagram is easy to navigate, and that it allows you to correct errors made during installation, if any.
The diagram indicates the terrain features, the presence of rocky or sandy soil on the site, and provides the area required for pipeline interchanges. It must be taken into account that all installation work must be carried out on a pre-leveled surface, otherwise unpleasant surprises cannot be avoided.
We build a well at the connection point
A well must be installed at the point of connection to the main water main. It is needed when it is necessary to quickly shut off the water supply for repair work, so shut-off valves are installed in it. The well can be made of red brick or constructed of concrete rings.
 Well options for connecting water supply
 The top of the well is covered with a lid. The latter can be made of plastic, but it must withstand the load of traffic that may pass over its surface. Of course, these worries can be avoided if a well already exists at the connection point.
The connection is made by inserting into the central highway using welding equipment. It is also possible to connect to the central pipe using a special clamp without welding. In this way, you can connect to both a steel and a plastic pipe, without turning off the water supply in the central line.
 Connection methods to the central pipe
 In this case, the clamp is first securely mounted on the supply pipe, and then it is drilled through the hole in the clamp. An electric drill will not work as it will flood with water! Then the tap is screwed onto the thread of the clamp in the open state, after which the valve is closed. When using a ball-type valve, you can drill after it has been installed. Of course, in this case you cannot do without a forced shower, so you need to choose the right weather and clothes.
We dig a trench of the required depth
The most labor-intensive process when connecting a private house to a central water supply is the process of digging a trench. Depending on the distance from the main highway, you can use manual labor or special equipment in the form of an excavator or other earth-moving machine. Of course, you need to understand well at what depth to install the pipe.
 Map of standard freezing depths
 The trench should be dug to such a depth that it is below the freezing point of the soil in the area of work. Otherwise, the water frozen in the pipes will burst them, and in the spring everything will have to start all over again. On the contrary, in regions with a mild climate it is possible to lay a highway without digging a trench.
If the soil does not contain significant inclusions of stones and clay, the work is easier. You can dig several holes along the route, and destroy the earthen bridges between them using a water jet supplied from a high-pressure hose. This technique significantly reduces the cost and facilitates excavation work.
Sometimes, because the soil is too heavy, it is difficult to dig a trench of the required depth. Modern insulation materials, which are used to insulate the pipeline system, can help here. In any case, it is still necessary to go deeper into the ground, at least a hundred centimeters.
A cushion is installed at the bottom of the dug trench before laying the pipes. It is a filling of sand and crushed stone that creates a shock-absorbing pad. In addition, it allows soil water to be drained away from the pipeline, thereby preventing its icing. Now you need to decide how best to lay the pipe underground and run it under the foundation.
We pass the foundation and enter the house
Pipeline entry into a house is often carried out under the foundation. In this case, the issue of the depth of the pipe and the need for its insulation is resolved in the same way as for the entire water supply line laid outside the house.
 Options for introducing pipes into the house
 The pipeline can also be introduced into the house through the foundation, which will require making a hole. This element of the pipeline network should be given special attention if there is a section located shallow in the ground and, as a result, subject to a high risk of freezing. It is imperative to provide high-quality thermal insulation for this section of pipe.
The diameter of the inlet hole should be made larger than the cross-section of the water pipe by approximately fifteen centimeters. This is necessary in order to prevent destruction of the pipeline network if over time the walls of the house begin to sag.
Choosing the best pipe and laying the line to the house
The most significant element of a water supply system is the pipes. There are several options and you need to decide which pipes are best for installing the water supply and bringing it to the house. In principle, galvanized steel pipes are suitable. Products made from this material tolerate mechanical overloads well, but are susceptible to corrosion processes.
 Pipe for water supply and corresponding insulation
 Copper pipes can function for decades, but they are very expensive and difficult to install, so they are used quite rarely. The most widely used are inexpensive pipes made of polymer materials, easy to install and resistant to aggressive chemical environments.
After connecting the pipeline network to the house, there is no need to immediately fill up the trench. First, you should make a test run and carefully examine all butt joints. Detected faults will have to be corrected.
Some features of using water
The pressure in the line is also not always maintained at the required level. Installing a pressure pump can help here. Everyone knows that water supply shutdowns often occur for various reasons. In this case, installing a storage tank helps.
 Useful equipment for owners of water from the central water supply
 The last tip is to think about leak protection.
According to the law of philosophy, quantity develops into quality, that is, a large number of pipes, connections, taps, appliances and, in particular, flexible hoses in a modern home leads to a noticeable increase in the possibility of water leakage.
In the event that this happens in your absence, the costs not only for repairs, but for the water itself will not seem small to anyone! The cardinal solution is to simply turn off the central tap before leaving the house. Of course, there are other flexible and technological solutions to this issue.
A disruption in the functioning of life support systems of the population is called an emergency. In winter, pipelines with hot and cold water most often rupture due to freezing in certain areas. This happens due to a violation of the pipe’s thermal insulation technology or destruction of the insulation. To prevent this from happening in your home, you need to know how and with what to insulate a water pipe on the street, using the latest developments in this area.
The main heat-insulating material at the beginning of the construction of utility networks in populated areas was earth. Additional insulation of pipes was used only when laid open. Subsequently, it turned out that such insulation did not live up to expectations. When the ground gets wet more than 5 times, its specific thermal conductivity changes from 0.2 to 1.1 units.

Soil freezing depth
In addition, laying pipelines in the ground without insulation has a number of disadvantages:
- it is necessary to carry out a large amount of work to prepare a trench with a depth of 20-30 cm greater than the depth of soil freezing;
- the presence of moisture and active elements in the ground accelerates the corrosion processes taking place in pipes;
- a large layer of earth puts increased pressure on the walls of the pipe, causing its deformation and destruction during long-term operation.
When laying pipes underground, to increase the level of thermal insulation, it is necessary to compact the soil being laid layer-by-layer. In some cases, laying pipes at great depths is simply impossible or economically unfeasible. Hoping that a lot of snow will fall on time, and that frosts will not exceed the climatic norm in the presence of insulation materials, is the height of carelessness. It is necessary to carry out thermal insulation in order to increase the service life of pipelines and reduce energy consumption.
Necessary for high-quality insulation
The following materials are used to insulate outdoor water pipes:
- glass wool;
- basalt insulation;
- thermal insulation made of polystyrene foam;
- pipes made of foamed synthetic rubber.


Each of them has its own pros and cons, both when arranging insulation and during operation.
We use glass wool
 Thermal insulation made of glass wool was very popular, but the emergence of new insulation materials is gradually pushing it out of the market. Its ease of use and low price cannot outweigh its disadvantages:
- low environmental cleanliness;
- insufficient physical density.
When laying, maximum protection of the skin and respiratory organs from contact with the material is necessary. A protective casing is required to prevent the insulating layer from shrinking under the weight of the earth. It will also be required when insulating a pipe laid in an open way in order to prevent destruction of the insulation under the influence of water and wind, as well as ensure the necessary safety of people.

Before insulating a pipe outdoors (if the pipe is made of metal), it is necessary to paint it.
When laying in a trench, the pipe is wrapped in material, first securing it with clamps. Then they wrap it in a layer of waterproofing, securing it with turns of knitting wire and clamps. Roofing felt, roofing felt, metallized foil, and fiberglass are used for this.
Provide protection of insulation from compression by:
- laying it in a large diameter pipe that is slightly susceptible to corrosion;
- covering with U-shaped or semicircular elements made of asbestos cement or concrete.
To separate thermal insulation from soil water, it is recommended to provide a waterproofing layer of sand and crushed stone.
What should be the optimal insulation?
The desire to reduce the cost of constructed housing required insulating the pipeline with materials that have:
- low coefficient of thermal conductivity;
- long service life in adverse conditions;
- zero water absorption;
- possibility of repeated use;
- low requirements for the qualifications of the installer.
We use basalt fiber
The material is made from natural basalt stone and has a high level of fire, environmental and biological safety. There is a large amount of air between the fibers, which provides insulation.

Basalt fiber insulation for outdoor pipes is produced in the form of half-cylinders and cylinders. The former are used when carrying out work on existing water pipelines, the latter - on newly constructed areas. To improve resistance to external influences, the products are coated with a thin layer of aluminum foil. For a reliable hermetic connection of adjacent pieces of insulation, a locking connection device is technologically provided.
In addition he:
- has a fairly high density,
- UV resistant;
- used for a long time;
- provides for reuse;
- easy to install.
The quality of thermal insulation is negatively affected by a high degree of water absorption, which is reduced by impregnating the material with hydrophobic compounds. After drying, the quality of insulation is restored. It is recommended to use it when insulating external water supply systems on the street using waterproofing.
We use polystyrene foam
Foamed and extruded polystyrene foam is considered an almost ideal insulation for metal-plastic and plastic pipes. The material made from foamed polystyrene contains a large amount of gas in closed volumes. It has a high degree of fire hazard, low chemical and biological activity. Environmentally friendly.

Available in the form of half-cylinders, ensuring ease of installation by non-professional installers. It has:
- low thermal conductivity;
- almost zero water absorption;
- high mechanical strength in compression and bending;
- service life of 50 years;
- possibility of repeated use.
The main disadvantage is low resistance to direct sunlight. Recommended for use when laying pipes hidden in a layer of soil. Additional waterproofing is not required. Fastening is done using construction tape, clamps, and wire. The grooves are filled with polyurethane foam followed by painting.
Insulation is one of the most convenient options for protecting pipes.

We trust synthetic rubber
Insulation of pipes using foamed synthetic rubber is the most effective method of heat conservation in utility networks. It does not decompose over time, after stretching it restores its shape, and does not require additional fixation during installation.
The thermal insulator is a flexible gray or black hose with a longitudinal cut and an adhesive compound applied to it. Production has been launched in the form of hollow half-cylinders with additional aluminum protection.
It has a number of undeniable advantages. The coefficient of thermal conductivity, which decreases at low temperatures, allows increasing the heat-saving ability. Low water absorption and zero vapor permeability protects pipes from corrosion. Long service life, ease of installation, repeated use, high mechanical density, resistance to tearing and sunlight distinguish insulation for rubber pipes from a number of similar products. A water tap insulated with synthetic rubber will not freeze in the most severe frost.
Its use does not require additional measures before insulating a water pipe on the street. It is enough to remove the protective film from the adhesive layer, wrap the pipe with insulation, and press the edges for a short time for gluing.
Subject to installation technology and knowledge of the operating conditions of insulation, it will be possible to make the correct choice of material for the water supply system, providing an insulating effect for a long time.
Reliable water supply is the key to comfortable living!
For another alternative method of insulation, see the video:
The main requirement for insulation of outdoor water supply pipes is to protect the system from contact with cold. For its installation, both proven polystyrene foam shells and high-tech methods in the form of a cable with a sensor are used.
To protect the highway outside the premises, it is not necessary to deepen it too much. It is enough to do the insulation correctly.
Contents of the article
Which insulation to choose?
The operation of water supply outside the premises, that is, on the street, is carried out under extreme conditions. There are two requirements for its insulation: low thermal conductivity and low water absorption.
Being in the ground, the pipeline simultaneously comes into contact with cold on one side and heat on the other, so condensation appears on its surface. The material must be resistant to the formation of fungi and mold, flexible to installation and have the longest possible service life.
The following water pipe insulation materials are distinguished:
- glass wool;
- basalt wool
- expanded polystyrene.
The glass wool used for installing the heat-insulating layer is produced in rolls. They are characterized by a soft structure, therefore they are widely used for insulating elements of complex configurations: taps, etc. The material is used for insulating metal-plastic pipes. Works only with roofing felt or fiberglass.
Basalt wool is produced in the form of cylinders. Builders call them. These are ready-made connections 1 m long. They can be easily cut into smaller pieces to insulate small sections. Some types of basalt are produced with an aluminum surface. She designed to protect the material from mechanical damage, so it lasts longer than others.
Expanded polystyrene, similar to basalt wool, is available in the form of shells. It is characterized by ease of installation, which is why it has become widespread among private developers. Insulation with angular turns is produced from expanded polystyrene. Can be reused.

The material meets all the requirements set for insulating gaskets, however, it is flammable and therefore is not used in places with an increased risk of fire.
Methods for insulating water mains
In addition to the materials mentioned, there are ways allowing you to effectively insulate pipes from the cold in places where deep laying of highways is not required. Among them:
- Heating cable.
- Air insulation of water pipes.
- Insulation using high pressure.
It is not necessary to wrap the pipe line with thermal insulation material. You can heat the space around it using a heating cable. The power of its operation per 1 m running pipe is 10-20 W.
The advantage of the cable is that it can only be used during the winter months. This method allows you to deepen the pipes only 50 cm from the top soil level, compared to 2 m of conventional installation.
The second way is to create a kind of heat shield in the path of cold air. Warm currents emanate from the lower part of the highway, which are preserved around it due to the umbrella effect. It is mounted in this way: a pipe is placed in a cylindrical insulating material so that in practice a “pipe-in-pipe” system is obtained.
The third method involves connecting a receiver into which pressure is injected. It is effective when installing submersible pumps water supply, since they are characterized by an optimal pressure for the system - 5 atmospheres. The operation of the pump requires the installation of a non-return valve, which allows pressure to be applied to the entire system.
Insulation with basalt and expanded polystyrene
Installation of shells made of basalt and expanded polystyrene is performed in the same way. It is better to start it from a flange connection. The installation steps are as follows:
- Select shells whose internal diameter will correspond to the diameter of the pipe.
- Place their halves on the main sections so that an overlap of 10-20 cm wide is formed.
- Secure the insulation with tape.
- Place selected or self-made shells onto the pipe outlets.
- Insulate street sections of the highway with roofing felt or foil. Segments that are under the soil cover are not covered in fiberglass materials.
- Pull the material around the pipe.
If it is necessary to gain access to the “bare pipe”, dismantling the insulation layer is performed in the reverse order.
Expanded polystyrene and basalt wool are materials with low density. Backfilling of soil into a trench with laid pipes can cause deformation of the insulation, and, consequently, a decrease in the thermal insulation layer.
To speed up the installation of insulation and make it more efficient, backfilling must be done in layers, carefully tamping each layer.

Tamping will also protect against soil erosion during autumn rains, which is important when laying water pipes on the surface.
Pipe heating with cable
There are two known ways to install cables to heat supply pipes:
- laying the cable inside the pipe;
- laying the cable on top of it.
The first method, although effective, has a number of disadvantages, the main one being the complexity of installation.
If you want to use this particular method, you cannot do without the help of a specialist. The second method is easier to install. Cable laying occurs before installation.
To simplify the process, manufacturers have released ready-made insulation (i.e., a shell or cylinder) with a built-in heating cable or a channel for it.
Do-it-yourself insulation of a pipe with a heating cable (video)
Heating cable installation sequence
Insulation of pipes on the street with cable occurs according to the following steps:
- Foil-type tape must be glued along the entire length of the pipe. Its application should not be too tight so that the cable is held when winding through the pipe.
- Lay the wire in an established spiral in increments of up to 15 cm.
- Cover the cable with foil tape to secure the heating cable.
- Cut the insulation lengthwise and secure it around the main line. To prevent the occurrence of cold bridges, you should check the coincidence of the joints between the cable and the insulation.
- Wrap the entire pipe tightly with tape. It not only holds the insulation elements together, but also prevents groundwater from penetrating into it.
- Insulation of highway sections above the soil.
Locations of the cold water supply line that pass above the soil additionally insulated with polyethylene film. It is wrapped around the entire surface of the pipe and covered with a box on top. The insulation will be stuffed under it.
The top of the box is additionally insulated with a moisture barrier.
To monitor the temperature level along the length of the pipeline, control sensors are installed that collect information manually or automatically. When the temperature drops significantly, a voice alarm is triggered.
Planning of utility networks occurs at the building design stage. The question of how to supply water to a private house is decided by each owner independently. The best option would be to connect to a central water supply. If the common highway is not available, an autonomous source is selected - a well or a well. Organizing water supply is a complex process that includes several stages. With a little effort and perseverance, you can cope with it yourself.
Methods of water supply for a private house
If a central water supply is laid near the site, then you will not have to look for options on how to connect water to a private house. The labor-intensive work of digging a well or borehole is eliminated. The connection to the highway must be authorized by the relevant organizations. To do this, with documents for the right to own the plot, they contact the water utility, where they receive specifications. Based on the technical specifications with the insertion point, pipe cross-section and other nuances, the licensed organization draws up a project. The received project and estimate documentation are certified by the SES. The connection is carried out by a company that has received a license for installing water supply systems. After inserting and connecting the pipeline with internal communications, representatives of the water utility draw up a commissioning report. All that remains is to conclude an agreement with the company under which payment will be made.
Water supply for a private house
Attention. The only work that you are allowed to do yourself is digging a trench, installing a sand cushion and burying.
Advantages of centralized water supply:
- The price of connecting to a water supply system is significantly lower than the services of a well installation company.
- The scope of work is limited to digging a trench.
- A year-round water supply is provided without seasonal fluctuations.
Like any system, centralized water supply has disadvantages:
- Low quality (presence of iron, chlorine, pollution).
- Weak pressure - often there is not enough pressure in the system to use the plumbing. In this case, you will have to install a pump.
 Insertion into the central water supply
Selection of material for the pipeline
Water supply to a private house is carried out by a separate branch of the main line. The material for it is selected at the design stage. Valid options include:
- steel;
- plastic;
- metal-plastic.
Products are required to ensure safety and comply with hygienic standards for drinking water.
Steel pipes are a classic option for installing water pipes. They are durable and strong, but will corrode over time. The process of joining products requires threading or welding. Both activities are complex and time-consuming.
Polymer pipes (HDPE or polypropylene) are neutral to any chemical attack and are not afraid of corrosion and rotting. The service life of materials is up to 50 years. They are not afraid of frost and provide a tight connection when welding or using fittings.
 Polymer pipes
Due to their smooth surface, metal-plastic pipes provide high flow permeability. They are a combination of the positive qualities of metal and plastic. The products are resistant to rust and ultraviolet radiation, but are susceptible to high temperatures. Maximum water heating 95 0 .
Advice. A special electrical device is used to weld polypropylene pipes. A large number of connections will require certain skills in working with a welding machine.
 Metal-plastic pipes
The design estimate includes the required number of pipes and their estimated cost. The diameter of the pipeline is no less significant than the material. It allows you to ensure normal flow rate and use of water simultaneously by two or more consumers. The optimal pipe cross-section is influenced by the length of the line:
- up to 30 m – D 25 mm;
- more than 30 m – D 32 mm.
Water pipe laying technology
To ensure water supply all year round, the pipes are laid in a trench dug to a depth below the freezing point of the soil. This figure, depending on the region, is 1.5-2 m. If the characteristics of the site do not allow pipes to be laid to a significant depth, they are insulated with shells made of expanded polystyrene, basalt wool or polyethylene foam.
At the point of entry into the house, an inspection well is built or the pipe is led through the foundation into the room. When insulating, special attention is paid to the entry point; this is the most unprotected area.
 Insulation of the pipe entry point
Organization of autonomous water supply
If there is no central water supply, then the water supply of a private house is organized with your own hands from an individual source. The work can be divided into several stages:
- Construction and pumping of a well or well.
- Installation of external water supply.
- Construction of the internal part of the engineering system.
The most functional way to supply water to a private house with your own hands is to use an automatic system. It includes:
- source of water intake;
- pump equipment;
- hydraulic accumulator;
- filters;
- automation;
- pipeline network;
- shut-off valves;
- water heater.
 Water supply diagram from a well
Advice. A shut-off valve is installed in front of each equipment; this will allow for repairs and replacement of system components.
The water pumped by a submersible or surface pump is supplied to the house through plastic pipes. To ensure constant pressure, a membrane tank is installed. Liquid is pumped into it, and after it is disassembled, the float mechanism turns on the pump for refilling. Water is supplied to the house through pipes laid in a ditch more than 1.2 m deep. During the installation process, a slope towards the well is maintained.
Pipe layout diagrams
Water is supplied to the distribution points in two ways:
- consistent;
- collector
Series circuit
A house or cottage with a small number of residents is equipped with a water supply system with a serial (Tee) connection. All plumbing points are connected from one pipe. Installation requires a small amount of materials, so it will be cheap. Consecutive installation leads to a decrease in pressure at the last points of water intake - this is the main drawback of the scheme.
Wiring around the house is done with plastic or metal-plastic pipes. This option has many advantages over metal products:
- simple installation;
- no corrosion;
- do not affect water quality;
- durability;
- low cost.
Advice. With parallel arrangement of cold and hot water, the cold pipe should be located lower.
Collector circuit
The collector installation involves installing a distributor, from which each point is supplied with a separate pipe. To implement the scheme, a large amount of material will be required, but a stable pressure will be maintained in the system.
Attention. If a hot water supply is planned, then the installation of two collectors will be required.
 Water supply pipe layout diagrams
Rules for installation work
- Installation of water supply in a private house is recommended to be a few centimeters (2-3) away from the wall.
- For proper pipe routing, you will need high-quality shut-off valves, angles, tees and other elements.
- Experts advise you to avoid passing pipes through walls; if this cannot be avoided, then a cup must be installed.
- The pipes are laid with a slope towards the drain valve.
- The pipes are fastened in 2 m increments using special clips.
Options for plumbing in the country
The urgent need to organize a water supply for a dacha is obvious to every owner of a suburban area. Water allows you not only to water, but also to live comfortably in the house. The source of water supply at a summer cottage is usually a well or borehole. The question of how to supply water from a dacha to a house is decided depending on the seasonality of living outside the city. If operation occurs only in the warm season, then a summer version of the water supply is recommended.
The plastic pipeline is laid in shallow trenches and brought out near the wall of the house. The pipe passes inside through a hole in the wall or foundation. The main requirement for summer water supply is the ability to drain water before winter storage.
The winter version will require much more effort. Pipes are laid to a depth of up to 1.5 m. All components of the water supply: well (well), pipeline, pumping equipment require thermal insulation. A check valve must be installed to drain the water.
 Winter water supply diagram
Advice. In some cases, pipes cannot be lowered to the required depth. In such a situation, the heating cable will protect from freezing.
Having figured out how to install water supply in a private home, you can save on the services of specialists. This is a significant amount that will be useful for purchasing building materials.