A brief reminder to landowners. Rules for planning sites and placing private houses with utility rooms Distance from the compost heap to the well
When planning to build a house on a purchased plot of land, you need to find out the building standards land plot Individual housing construction. At the same time, it is worth understanding what is the standard height for the garage of private houses, the distance between the construction of a private house from neighbors and other standards for the placement of structures.
Legislative acts
When figuring out the norms for developing land plots for individual use, it is worth studying the legislative framework. Local authorities regulate the rules for placing a house on a SNiP site and establish requirements for the development of a land plot of individual housing construction. They determine construction standards in a particular region. Therefore, when looking through house designs and options for their placement, it is better to navigate to typical for the region options.
The rules for the construction of a private house are established by SNiPs and GOSTs for construction. When creating a project, when building a house, you must be guided by SNiP 02/31/2001. For the construction of cottages in the country, it is worth following SNiP 02/30/97.
Individual housing construction must be carried out taking into account the provisions prescribed in the Town Planning Code. It is necessary to comply with the established urban planning standards and requirements in terms of preserving the intended purpose of the land, standards for the development of settlements, and compliance with the architectural plan of the city.
When obtaining permission for individual housing construction, you should focus on SNiP 11-3-99.
Established standards
Having become the owner of land intended for individual housing construction, you need to find out the construction standards and understand how the procedure for planning and developing a private plot of individual housing construction takes place. It is necessary to find out what SNiP 2016 says about construction. After all, construction standards for developers are the main document.
When choosing sites for building a house, you should focus not only on the availability of communications. We must remember the established standards for building a house on an individual housing construction site. Look carefully to see if it is suitable for the construction of individual residential buildings.
The procedure for building a house on a plot of land is regulated by SNiP for construction. The standards for building a house on an individual housing construction site are based on the fact that at least 0.06 hectares are allocated for development. Focusing on the standards, they plan what the features of the construction of a residential building will be.
When planning and constructing individual residential buildings, you should remember what SNiPs say about safety. They describe all the site development standards and indicate the distance between buildings on neighboring plots of land.
The layout of the site is brought into compliance with SP 11-106-97. These are construction standards that regulate the process of creating a project for the construction of a private residential building, its coordination and approval. Regulatory document describing the placement of buildings on summer cottages, is SNiP 30-02-97.
Construction standards on a private housing construction plot tell what it should be like:
- location of the house on the site
- distance between residential buildings
- distance of the house from the fence (distance to the neighboring plot from individual residential buildings being built)
- built-up area
- distances between buildings
The distance from the house to the border of the site is regulated by sanitary standards for the development of the site. But the rules for the location of the house, requirements for construction and the location of residential buildings in neighboring areas are regulated by fire regulations. Building codes and the rules tell about the distances between buildings and buildings on neighboring plots of land.
Fire regulations for the location of the house allow for two-row construction. In this case, 2 outbuildings or residential buildings on the site are located close to each other. The main thing is to maintain distances from the boundaries of the conventional red line when erecting structures.
Sanitary standards
 Before erecting a building, you need to understand how the site is planned and what the red building line is. This is the boundary separating private land from the roadway. Red lines for roads are 5 meters, for streets with little traffic and dead-end yards - 3 meters.
When figuring out how to properly place buildings, keep in mind that the red lines determine the distance between municipal property and a residential building. It is recommended to build all utility structures further from the street. Fire regulations must be taken into account when building a house.
Sanitary standards for private construction regulate the development plan and the rules for placing buildings on a land plot. Placement order and distance standards between the house and the neighbors’ fence:
- residential premises should be erected at a distance of 3 m;
- buildings for livestock and poultry are erected at a distance of more than 4 m from the boundary;
- for the construction of outbuildings, 1 m should be retreated from the fence;
- the distance from the toilet to the neighbor's border is 8 meters, the same norm for a compost pit.
The height of the fence between neighbors is adjustable. The requirements for fences between areas are as follows. It is allowed to build a fence 75 cm high from the ground from opaque materials; higher fencing is made from transparent materials. But fences and enclosures can be made blank at any height by agreement between neighbors. It is advisable to record the agreement on paper.
On the street side, homeowners have the right to install fences of any height. Only low plants are allowed to be planted in a private house near the fence.
Safety standards

When constructing buildings, it is necessary to take into account fire safety standards in construction. Based on them, the site is planned, markings are made for pouring the foundation, and the location of objects on the site is determined. Afterwards, the workers begin the construction of buildings on the individual housing construction site. Please note:
- between residential buildings classified as resistance levels 1 and 2 there must be more than 6 meters (walls made of bricks, foam blocks, sandstone, concrete), this is the distance to the neighboring buildings
- for one of the residential buildings of level 3 fire resistance, the distance increases to 8 meters
- when constructing a wooden residential building on the ground, the distance from other structures in neighboring areas reaches 15 meters
The last norm must be remembered when building a bathhouse. If the size of the land does not allow such large deviations from the boundaries of the site, then think about how the layout of the site and the placement of buildings on the land plot can be changed, and the building area can be recalculated. It is allowed to make an indentation deep into the land plot for the construction of structures or to bring the building closer to the fence during construction so that it is not on the same line with neighboring residential buildings.
If the structures have wooden floors, then the distance between the buildings should be doubled.
Fire regulations must be strictly observed when building a house. This will protect buildings from fire and make it easier for firefighters to access in case of an emergency.
Established standards for building a house regulate the number of floors. Without prior approval from the architectural control authorities, it is allowed to build no more than 3, including the ground floor and attic. This will be a low-rise building.
Fire safety standards for the construction of an individual residential building do not regulate the distance between buildings on the same site. They regulate the distance between private houses and the erected outbuildings of private houses.
Private individual housing construction
SNiPs regulate the rules for the construction of a residential building. If the land is intended for individual residential construction, then the construction of a commercial building is prohibited.

Must be observed established distance between houses during the construction of a private house. The neighbors' individual housing construction site must be more than 3 m away. The distance to the fence from the extension can be reduced to 1.5 m. The distance of the house from the forest boundaries is also regulated. Make sure that the trees are more than 15 m from the residential structure.
The 2016 standards regulate the rules for building a garage in the private sector. The distance from the garage to the fence is 1 m, the distance from the residential building to the garage is 2 m. But the option of placing it in the basement is acceptable if additional ventilation is provided.
SNiPs regulate the building area. The following minimum municipal requirements are established for individual housing construction:
- living room area - 12, bedroom - 8 m2;
- for other premises the following construction area is determined: kitchen - 6, bath - 1.8, toilet - 0.96, hallway - 1.8 m2.
- width of stairs, corridors - 0.9 m2;
- ceiling height in a residential building - 2.5, ground floor, basement - 2 m.
Construction standards regulate the process of connecting to communications. Residential buildings are considered suitable for habitation if they are connected to engineering communications. They can be centralized or autonomous.
Electricity supply to the private sector is carried out mainly by overhead power lines. The sewage system of a house on a plot along the street is laid at a depth of at least 0.3 m; it is necessary to make a slope towards the collector. A private residential building is provided with water by connecting to central pipes. Private houses in the city can use artesian wells, wells or water brought in barrels.
Standards for baths
When planning the location of the bathhouse on the site, look at the designs of houses with the indicated buildings. It is recommended to locate the bathhouse so that the entrance and the building are visible from the living space. This will allow you to control the kindling process and notice the danger in time without leaving the residential building.
It is advisable to place the bathhouse on the site as follows:
- smoky bath - more than 12 m from other buildings on the individual housing construction site (not recommended in densely populated areas due to increased fire hazard);
- distance of any living space, country house from a regular sauna - more than 6 m;
- distance from outbuildings - 1-4 m.
It is better to coordinate the distance from the house to the bathhouse with sanitary standards. If the bathhouse is wooden, then you should retreat 15 m. SNiP regulates the distance from the bathhouse to the neighbor’s fence.
Construction of garages
Regulations regulate the rules for constructing a garage in the private sector. There are several options for how to build a garage on a site. The location of the garage on the site may be as follows:
- near a road with access from the street;
- under a residential building;
- separate room.
The following land development regulations apply to the construction of a garage on land. The height of the garage is planned so as not to block the neighbors natural light. It is prohibited to use a garage to block the free access to houses or the entrance to a plot of land. The distance from the garage to the neighbors’ fence is 1 m. This means that to build a garage, you should retreat 1 m from the fence, the distance from the residential building is 2 m.
Installation of fences
 SNiP for the construction of a private house for individual housing construction describes not only the features of developing a site for individual housing construction, but also regulates exactly what distance must be made between the fence and other structures. Prescribes how to install fences SNiP 30-02-97. This document regulates country house construction, but local authorities use it when developing standards for the construction of private residential buildings.
The distance from the fence to the bathhouse is also specified in SNiP. It is necessary to be based on the norms for the location of a residential building and utility structures. This means that the layout of the site is carried out as follows: it is enough to retreat 1 m from the neighbors’ fence. This distance between the fence and outbuildings is determined for cases where the boundaries are separated by mesh or lattice fencing.
In villages, the established distance from the house to the fence is often not taken into account. Many buildings are placed along fences installed between neighboring plots. To build a garage, no one often deviates from the fence, although it is necessary that at least 1 m remain from the boundaries of the neighbors’ property.
When planning the fencing of a land plot, it is necessary to take into account the construction standards on the individual housing construction site. Using a metal mesh to fence an earthen plot for development, the pillars are installed at a distance of 2-3 m. If the owner of the land bought other materials for fencing, then you should be guided by the rules for their installation.
SNiP for construction prescribes how fences should be installed between summer cottages. In other cases, it is necessary to focus on local standards for developing a site for individual housing construction. By agreement with the neighbors, the height and material of the fences can be changed, but the layout of the site must be carried out taking into account what the standards for the location of buildings on the land indicate.
Legislative changes
In 2015, the land law came into force. Thanks to this, Russians have the opportunity to purchase land for individual housing construction without bidding. What is needed to obtain land can be found out in local governments.
Beneficiaries have the right to become owners of the site before the auction if they take it for individual housing construction. In some areas, land for individual housing construction is provided free of charge. This is how specialists are attracted to sparsely populated areas.
Also, the land law provided the opportunity to build country cottages on the free lands of gardening partnerships.
New laws made it possible to annex empty lands to their plots by paying for them amounts not exceeding the cadastral valuation. The construction conditions on them do not differ from the generally accepted ones.
If the land was leased for the purpose of constructing multi-apartment residential buildings, but nothing was built in 5 years, then the lease can be extended for 3 years if there are good reasons. In other cases, the lease agreement is terminated and the unfinished property is sold to bona fide developers who will provide share investors with apartment buildings.
Getting permission
When planning to start building a house on your own land, you need to figure out how to properly place the buildings. The following is taken into account:
- percentage of land plot development;
- built-up area;
- distance to neighboring site utility buildings Location on;
- individual features of the location of the house on the site;
- location of the garage in a private yard;
- distance from the house to the border of the site.
You can understand how to calculate the layout if you look at standard house designs made according to SNiP. The plans of land plots show how the house is placed on the territory of the individual housing construction site. Design standards will help you figure out what kind of building a family needs.
Where to begin? First of all, you need to get a permit to build houses. After this, you can begin building the house. The building area, number of floors of the building, and location on the site must be agreed upon.
This may interest you:
Before you start building a compost pit at your dacha, think about whether you need it and for what purposes. Such a structure performs the functions of recycling household organic waste. A compost pit is also useful for producing the fertilizer necessary for the garden and vegetable garden, if you are not going to plant green manure on your plot of land to fertilize the soil.
You can, of course, put the waste, along with leftover vegetables and fruits, in bags and then take it to the city garbage containers. But you shouldn’t do this - it’s pollution environment. If built on a summer cottage compost pit, you can recycle the vast majority of organic waste into a wonderful nutrient mixture for your plants called compost. And no time will be wasted on waste removal.
Purpose of the compost pit
Each compost pit has a set of corresponding design features, which depend on the needs for which it will be used. If you don't know where to throw your garbage, you may be interested in a nice bonus that you can get in a few years - valuable compost. Then you need to arrange a compost pit using the appropriate diagram.

Obtaining and using compost.
If you want to quickly prepare fertilizer from available materials, which can be leaves, grass clippings, or manure, then the compost pit will have a different design. There are some requirements that must be followed when setting up compost pits.
How to set up and use a compost pit?
When choosing a location compost pit try to take into account some rather important points:
Set up a pit at a distance of at least 25-30 meters from the sources drinking water– wells, boreholes, streams or other bodies of water.

On dacha plots with a slope, the pit is located at a level below the well.
Compliance with such precautions is necessary because otherwise rotted waste may end up in drinking water, which is dangerous and undesirable.
When building a hole, take into account the wind rose so as not to poison yourself and your neighbors with unpleasant odors.
If you place the compost pit in an open sunny area, its contents will overheat. This will stop composting. That's why the best option The pit equipment will be installed in an area shaded by tree crowns.
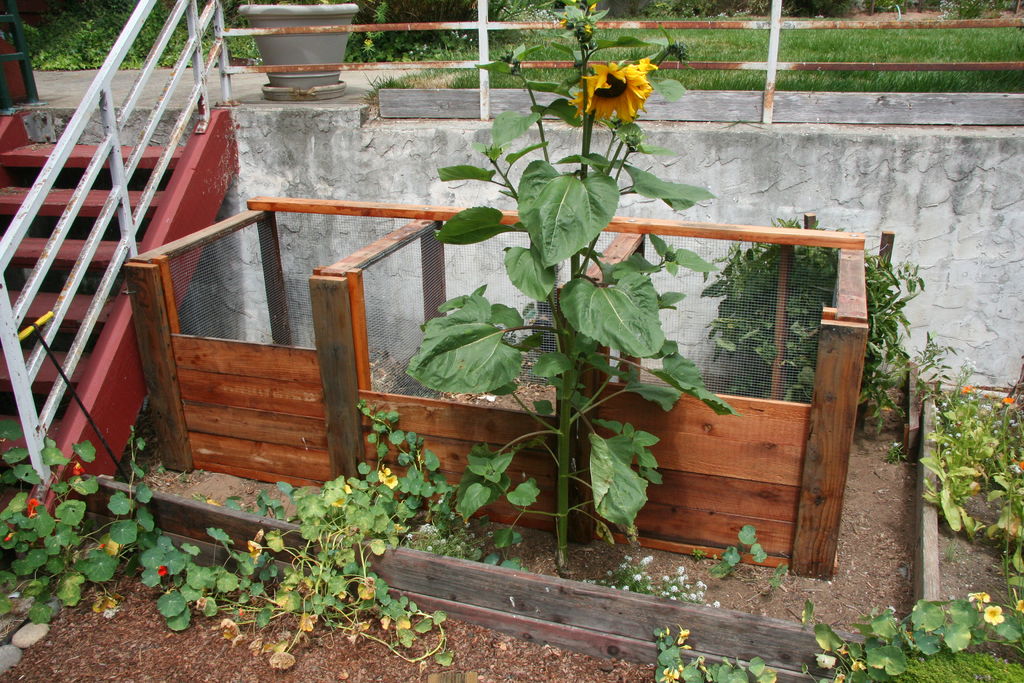
The optimal place for a compost pit is a corner of the plot of land adjacent to a fence or blank wall.
It is also necessary to decide what waste is placed in the compost pit and what waste should not be thrown into it.
Waste that can be used to fill a compost bin
- Raw vegetables, fruits, berries, tea, cereals, coffee, cleaning residues;
- Hay, grass clippings and straw;
- Leafy;
- Branches, tree bark, roots of bushes and trees that need to be slightly chopped;
- Weeds;
- Wood ash;
- Needles;
- Napkins, cardboard, paper bags (the paper must be natural) - all this is crushed;
- Unpainted wood waste;
- Second-year manure of herbivores.

How can you fill a compost pit at your summer cottage?
What is prohibited from filling the pit?
- Bones;
- Experiment with pets because they may have helminth eggs;
- Insect pests and their eggs;
- Disease-affected plants (tomato tops affected by late blight, pumpkin and powdery mildew, and others);
- Plants from soil areas that have been treated with herbicides;
- Inorganic waste, which can be in the form of plastic, iron, rubber or synthetic fabrics.
All waste that cannot be composted should be burned or disposed of if it is excrement.

Rules for sorting household waste for use in a compost bin.
Organic waste is processed by microorganisms and earthworms. Do not insulate all the walls of the compost pit below ground level, because if you dig a hole in the ground at a depth of 50 cm and then line it with impervious material, worms and microorganisms will not enter it. In this case, it is necessary to move them in independently.
As can be seen from the above, the rules cannot be called complex, but they must be followed.
Setting up a compost pit or heap
The most important thing when constructing a compost pit is the necessary provision of good moisture and looseness if you want the composting process to be of high quality. There are no specific recommendations on this issue.

Arrangement of a compost pit on a summer cottage.
To maintain the moisture of the compost heap, you can water it regularly, or cover it with film, which will create a steamy effect. The looseness of the structure of the contents of the compost heap is maintained by the fact that it is periodically crushed using ordinary forks, or materials having different densities are laid in layers.
Optimal compost pit sizes
- Width – no more than 1.5 meters;
- Length – up to 2 meters;
- Maximum height – 1.5 meters;
- Go deeper into the ground no more than 0.4 meters.
There are several different compost pit designs, which can meet the preferences of any owner.
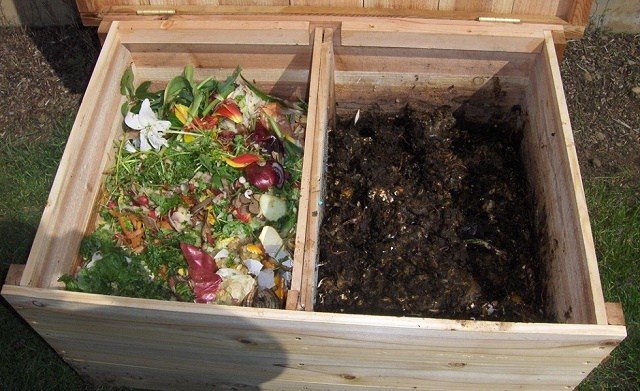
Compost pit with two sections
It takes about 2 years for organic waste to rot and compost, unless you use the services of additional effective microorganisms along with those present in the soil on your site. In order to make the use of the pit more convenient, a two-section structure is constructed:
- Fresh waste is stored in the first section;
- The second section contains waste that has been composted since last year.
Prepared in the second section compost they take it out and lay it out in the beds where they want to improve and saturate the soil with useful substances. The compost pit can be fenced on all sides in the form of a box, but use only material that allows free access of air.

Wooden box for arranging a compost pit.
The box can be made from wooden pickets, which are nailed down while maintaining a small distance between them. At the same time, the contents of the pit will not clog and will not smell unpleasant. You can build such a compost pit yourself in just 1-2 days - the duration of the work depends on the material chosen for fencing.
Compost pit with free access from below the structure:
Such a pit will perfectly replace the first option, because it does not require breaking into sections. Fence the pile 30 cm from the ground. The finished compost accumulates at the bottom. If necessary, it can be easily removed with a shovel and used to fertilize the garden.
Building such a pit is very convenient and causes little trouble. Constantly, when compost is reached from below, the contents of the heap sink lower and take up the free space, at the same time being saturated with oxygen. No special loosening or tossing is required.
Compost heap equipment
Not all summer residents like the artificial creation of unnecessary complications. The best way out of this situation is to do nothing, in which nothing is dug, fenced off, or divided. Only a certain place is selected where organic waste is stored, gradually forming a heap.

Food waste for compost pit.
If desired, this heap is watered with EM preparations, or covered with an opaque film to speed up the composting process. If you have nowhere to rush, then there is no need to cover the pile - its contents will rot on their own, this just takes time.
Use of plastic containers and barrels
Using plastic containers for preparing compost is convenient for those who do not spare money and want their compost pit to look presentable. The container can be installed in any convenient location, since there is no risk of contamination of drinking water due to the tightness of the container. In addition, the container has special ventilation to prevent water from stagnating.

Using plastic barrels to make a compost bin.
When using this option, you need to know that it requires the use of drugs that accelerate the decomposition of organic waste, or the introduction of earthworms into the pit.
Self-construction of a compost pit
An example would be a self-built compost pit in one of the summer cottages. If the structure is fenced on all sides and has a height of one and a half meters, its contents must be shaken periodically, but this is a very inconvenient task. Therefore, it was decided to arrange two heaps, or rather, one heap on two sides.
After choosing a good place - the corner of the site near the fence itself, organic remains were placed in the corner. It is very good if you alternate between grass, manure and soil. First, before the formation of a heap, a place for it is laid with branches of trees and shrubs.

Building a compost pit with your own hands.
When the heap reaches 1 meter in height, deep holes are made (several pieces) into which the EM preparation is poured (this can be “Oxyzin”, “EMochki”, “Bokashi”). On the advice of experts, you can cover the compost heap with an impermeable film - this will maintain constant humidity and temperature, but not everyone does this. When covered with film, the compost will be ready in 2-3 months, but composting uncovered waste requires at least six months to a year.
You don't have to use EM drugs. California worms or prospector worms will do the job well. However, there are also disadvantages to using worms. Worms love warmth, so they do not work in the coldest months of the year. And it is enough for microorganisms that the temperature in the compost heap rises to only +4°C.
It is necessary to water the pile with water from a hose during dry times. If you need to obtain ready-made compost to transfer it to the beds, you can transfer top part heap to another place and select the ready-made humus accumulated at the bottom of the heap. After the humus runs out, waste is again thrown onto this place.
When setting up a compost heap, it occurs to some summer residents to spread plastic film on the ground, onto which they then dump organic waste. They make such a design, believing that this way there will be no leaching of useful elements into the soil. However, they are wrong; this cannot be done for the following reasons:
By isolating the base of the compost heap from the ground, conditions are created that cause moisture to quickly evaporate from the heap. At the same time, moisture does not rise from the ground, despite the fact that even on hot days, thanks to a natural mechanism, moisture should rise upward from the depths of the earth using special capillaries.
If the pile is isolated from the ground, this prevents humus from leaching out of the compost. Mineral fertilizers are washed away, since microelements are combined with organic matter and are constantly located in the top layer of soil.
But these properties are quite convenient for use in gardens - neither rain nor downpour is scary. And when limiting minor leakage, which may still occur, add a 10 cm layer of peat, which perfectly solves these problems: it prevents leakage nutrients into the ground. Peat also allows groundwater to rise into the pile.
Requirements for a proper compost bin
If, after reading the article, you still have questions about building a proper compost pit, get advice - don’t build it at all. Why?
The labor of dragging grass and other organic waste from one place to another can be considered unnecessary and meaningless work. When composting, carbon dioxide vapor is formed - this is an irreplaceable food for plants, which is mediocrely lost on the heap, at the same time getting on the nerves of you and your neighbors with an unpleasant odor.

Proper arrangement and use of a compost pit.
You may be called an eccentric, but it is better to place organic waste directly on the beds, where it rots well and does not emit unpleasant odors. In addition, microorganisms will multiply directly in the beds, and earthworms will crawl in and appreciate such an abundance of work for them. Grass clippings can be used as mulch. Chop and lay branches in paths between the rows, and scatter the peelings of fresh vegetables and fruits in the garden.
This will allow:
- Retain moisture in the beds;
- Feed plants with carbon dioxide;
- Do not allow weeds to grow in the beds;
- Prepare compost in places where it is needed;
- Prevent the leaching of humus;
- Reduce the amount of work.
The work proposed above for the sale of organic and food waste is simple and does not require additional skills or effort.
Roman Konstantinovich(10/20/2014 at 11:26:49 pm)
Good afternoon
At the moment, the main document regarding the compost pit is the document “Planning and development of territories of gardening associations of citizens, buildings and structures” SNiP 30-02-97, which should be guided by when developing the site. Here are the rules it contains:
Fire distance.
Between outer buildings and groups of buildings it must be at least 6 m (between wooden frame buildings - 15 m).
Drainage.
Rainwater from the roofs of neighboring buildings should not flow onto your property.
The proximity of a well and a compost pit, a latrine. The distance between them must be at least 8 m. A minimum of 12 meters must separate the bathhouse, sauna, shower, as well as buildings for small livestock and poultry from the well. The same distance should be maintained between the garden house, cellar and restroom, and showers, baths, saunas should not be placed closer than 8 meters. Far from the cellar (7 meters away) you will have to build a chicken coop or pigsty, as well as a compost site.
The toilet, familiar to many summer residents, in the form of an uninsulated pit and a “birdhouse” is prohibited by the same SNiP (clause 8.6 and clause 8.7). If there is no central sewer system, feces should be removed using local composting devices or using cesspools.
Local composting devices include powder closets (a toilet in which feces are sprinkled with peat and kept in a well-insulated container, for example, a box coated with resin and closed with a lid, until compost is formed) and dry closets (a device where, using electrical heating or chemical additives, fecal waste is converted into organic fertilizer).
Cesspools They must also be well insulated so that their contents do not pollute groundwater and soil. Even at the project development stage, it should be agreed with local authorities on the regulation, use and protection of groundwater, as well as with the SEZ, placement of such a toilet on its site. Backlash closets (a warm indoor latrine with an underground cesspool) cannot be installed in climatic region IV and subdistrict IIIB.
For example, you can’t just pour out soapy water after washing. All drains after a shower, bath, sauna or economic works should be poured into specially designated places - filter trenches with a layer of gravel and sand or in other wastewater treatment plants(SNiP clause 8.8). An external ditch can be used for these purposes.
ATTENTION! The specified distances must be observed both within the territory of one site and between buildings in neighboring territories. For example, your neighbor should not organize a compost pit or install a toilet three meters from your well. For such a violation, he can be held administratively liable, which could result in a fine and the subsequent elimination of this very “bone of discord.” True, in order to punish the violator, you should register your well in the SEZ before your neighbor draws up documents for his compost pit or latrine there. Otherwise, prove that it was he who violated regulations, it will be hard.
Thus, they cannot prohibit you from building or already having a compost pit.
Good luck resolving the matter, I would appreciate your feedback.
At country houses and personal plots Often the problem of disposing of organic waste arises - leaves, weeds, cleaning, sawdust and other things. Unlike inorganic waste (glass, plastic, etc.), all this can be used to produce clean, environmentally friendly fertilizer - compost. It is obtained as a result of the biological process of decomposition under the influence of the vital activity of microorganisms. Adding compost to any soil improves its quality characteristics. Clay soils acquire a lighter, crumbly structure, while sandy soils retain moisture better. Let's look at how you can make a compost pit and prepare compost correctly.
What can you put in a compost bin?
The following organic wastes are suitable for raw materials, which are divided into two large groups.
Brown waste
These include those that emit carbon.

Green waste
 Waste that releases nitrogen is considered green.
- berries, vegetables and fruits unsuitable for food and processing;
- drunken tea and coffee cake;
- stubs and cleaning;
- scraps of wool;
- leftover soups, cereals;
- eggshell;
- waste products of herbivores.
When adding a large amount of freshly cut grass, the compost preparation time will increase significantly. To speed up the process, lightly cover small layers of grass with soil.
What should you not put?
Not all organic matter is suitable for fertilization.

The following cannot be placed in a compost bin:
- fresh pet excrement;
- loach, wheatgrass;
- bones;
- leaves and other parts of plants affected by diseases, especially powdery mildew;
- plants treated with any chemicals;
- weeds whose seeds have ripened;
- inorganic non-degradable waste (rubber, metal, glass, synthetic materials);
- tops of potatoes and tomatoes;
- fats, meat, dairy products;
- fresh and boiled eggs(except the shell).
Potato and tomato tops, even healthy-looking ones, can be carriers of late blight. Subsequently, such fertilizer can infect all plants. In addition, this raw material takes a very long time to dispose of; the process will take about 5 years.
Anything that is not suitable for a compost pit should be thrown into a cesspool or removed from the site as garbage.
Requirements for placement
A place on the site is chosen, as a rule, out of sight and one that you don’t mind - where nothing grows due to dense shade or infertility of the soil, somewhere behind outbuildings, if there are any, in the backyard.
There are other important points.
- You need to understand that rotting raw materials will not emit the most pleasant smell, so you should think about moving away from the resting place and about the neighbors. It would be good to know the compass rose so as not to place the pile on the leeward side.
- Consideration should be given to ensuring free access to the pit, since raw materials will be added and taken constantly throughout the season.
- It is advisable to choose a site on a flat surface, and not in a hole, perhaps with a slight slope, to prevent stagnation of water, which interferes with the flow of oxygen, and therefore extends the process over time.
- The compost heap, although called a pit, must be higher than the ground level. In this case, it will warm up better, it will be more convenient to loosen, water and generally maintain it. Optimal parameters are 50 cm deep, 1 m of fence above the ground. Higher walls will make it difficult to loosen and use compost.
- Avoid proximity to a source of drinking water (must be more than 25 m).
- The place should be in the shade or partial shade - sunlight slows down and dries out the raw materials.
- Do not place the structure under trees, they may get sick and die. Neighborhood with conifers and other evergreen crops is especially not recommended. The best neighbors will be alder and birch.
Do not cover the bottom of the pit with film, slate or other material that does not allow moisture to pass through! It must penetrate from the soil unhindered (depthing will facilitate this), otherwise everything will dry out. The bottom should remain earthen.
Design features
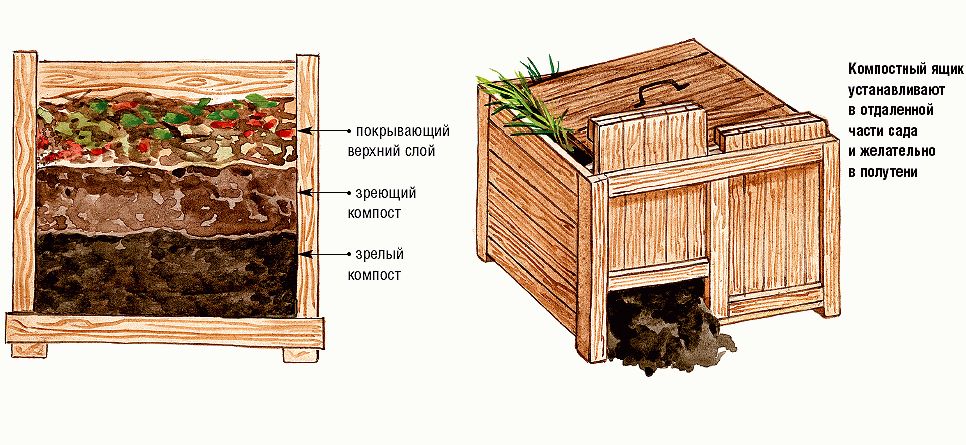
The ideal dimensions of a structure are usually indicated by the parameters 1.5m x 2m, but ultimately they are determined based on the amount of raw materials that can be accumulated in 2 years. This is how long the process of preparing the finished substrate will take. Therefore, the ideal pit should be twice as large and two-section, designed to last two cycles. The first compartment will contain ready-made waste, the other will contain fresh waste over the next two years.
It is important to know that a small pit will not warm up well as a result of rotting, and this temperature may not be enough to kill all pathogenic microflora and harmful spores. Experts determine the required temperature of 60C and the above-mentioned optimal dimensions.
The structure must have a removable lid on top.
Design options
You can arrange a compost pit in different ways; let’s look at several common options.
Regular pit
The simplest construction that does not require additional costs and materials. A shallow hole is made, no more than half a meter deep, into which everything is folded according to the usual principle. The contents are covered with black polyethylene on top. To make it easier to remove for adding waste or using, it is rolled on both sides onto a long handle, which also serves as a load. After each new laying, it is recommended to cover the waste with grass.

The option is simple, but it is difficult to call it effective and convenient. There will be difficulties with mixing, and such a pile will not be able to warm up sufficiently, which means that it will take a longer time for it to rot.
Two-section composter
The material for manufacturing can be boards, old slate, metal sheets, corrugated board, walls from plastic containers, brick, etc. Optimal sizes depending on the size of the plot - 1.5-2 m wide and 2-3 m long. Make a deepening of 0.5-0.8 m. To secure the structure in the corners (stepping back the required distance from the pit), sections of pipes or large-diameter metal rods that can withstand the weight of the compost heap are dug in. Wooden poles are not suitable for this purpose, since the rotting process will invariably affect them, and the structure will not last long due to the load.

Install the walls, not forgetting the ventilation holes. A partition is installed in the middle, dividing the structure into two equal-sized compartments. Ready humus will be stored in one of them, and “young” waste will be stored in the second. It is better to make the lid hinged, on hinges, so that it does not move and tightly covers the contents.
Reference segments metal pipes It is advisable to treat it with an anti-corrosion bioprotective compound, and all wooden parts with protective impregnation, and then cover it with two layers of acrylic paint.
The bottom, as already mentioned, cannot be covered with waterproof material, but straw, sawdust or tree bark are perfect for this - they will provide the necessary air exchange and allow excess moisture to escape quietly.
If desired, you can make three sections. In the first there will be a ready-made substrate, in the second there will be a fully laid ripening one, and the third will be intended for laying new raw materials.

Single section composter
A simpler and fairly compact option. You will have to take the finished product from below, for which you need to make a hole in one of the walls (or better yet, on different sides), from which the ripe fertilizer will be removed. There should be a distance of at least 30-40 cm between the wall of the box and the ground. In this case, there is no need to mix the substrate.
Concrete box
A structure that will be completed literally once and for all. Neat and reliable. To do this, you need to dig a trench of the required perimeter with a depth of 70-80 cm and make formwork. Pour concrete into it, remove the formwork and remove the soil from the box to the required depth. As a cover, you can use a wooden board or film pressed with a metal mesh.

Ready made plastic container
The modern market offers ready-made composter structures made of plastic. They have different size(within 400 -1000l), the necessary ventilation holes (make sure of this!) and a lid.

Their cost depends on the size, design and region and usually ranges from 2 to 10 thousand rubles.
Do not make compost pits that are too large; their contents will overheat, which is also undesirable, since this will lead to the death of the necessary microorganisms.
How to properly fill a compost bin?
Before laying the raw materials, clear the bottom of the pit from the turf and dig it well to a depth of 30 cm. This will provide conditions for the active life of worms and the penetration of beneficial microorganisms, which will provide indispensable assistance in the waste processing process. Besides, in loose soil excess water will drain away well.

We begin laying, alternating layers of wet and dry, brown and green raw materials. Their optimal ratio should be approximately the following: 3 parts brown waste to 1 part green waste, and there should be 5 times more wet raw materials than dry ones. Anything large should be broken or chopped.
Moisten (not too much) and close with a lid.
The raw materials should not be compacted too much, but excessive looseness is also undesirable. Everything should be in moderation, especially humidity.
Storing compost is not everything. Proper further actions will help speed up the decay process and make the fertilizer more nutritious. Please adhere to the following guidelines.


The following additives help speed up cooking.
- Rotted horse manure.
- Some types of plants (valerian, chamomile, dandelions, yarrow).
- Specially produced activating preparations, for example, Baikal EM-1, Compostin and Compostar.
- Stale (dried) bird droppings.
- Legume stems.
- Bone and dolomite meal.
- Superphosphate and complex mineral fertilizers.
As the contents rot, the temperature inside rises, and light steam may even rise from the heap. This is normal and indicates that everything is going well.
Spare no effort and time for this simple structure. This will solve the problem of recycling a considerable part of organic waste, and will provide valuable fertilizer, the quality and environmental friendliness of which you will be absolutely sure of.

