Plywood stool. Do-it-yourself ordinary stool
The range of furniture on the market is so wide that it would seem there is no point in “reinventing the wheel” and making it yourself, when you can buy either a ready-made version or custom-made from companies that have professional equipment for individual project, for every taste and budget. But this is just a boring pattern of life. A creative person who really loves his home or dacha will always find time and opportunity with my own hands make furniture that is not only no worse than what you bought, but also exclusive. With your own hands you can make any cabinet furniture, chairs, cabinets, tables, armchairs, and the most suitable material for this is plywood. If the reader considers himself to be a “Newbie” in this matter, then you should start with the simplest thing - making a chair out of plywood with your own hands.
Plywood for making a chair must be chosen of 1 or 2 grades, 7-25 cm thick.
Plywood is layers of sheets of different wood glued together perpendicularly (it is this arrangement that makes plywood very strong) to each other, with a thickness of seven to twenty-five millimeters. Its application is very wide; thicker sheets are used for laying subfloors and erecting partitions in the house. The walls are covered with plywood up to ten millimeters thick. It is better to make furniture at home from plywood ten millimeters thick; it is quite strong and elastic, in case you need to bend it for a decorative element.
Tools and materials for making a chair

Tools for working with plywood: saw or jigsaw, tape measure, corner, pencil.
- plywood 15 mm thick – 1 sheet;
- timber for legs measuring 40 x 60 mm, 2 pieces of 3 m each;
- foam rubber 70 mm thick, size 500 x 500 mm;
- decorative upholstery – furniture fabric or leatherette, 600 x 600 mm.
The timber must be dried and sanded. It is better to choose plywood from birch, as it is stronger than other types, easy to process and optimal for painting or finishing in any other way.
The tools that may be needed are usually available to any owner. This is a chisel, a jigsaw, a screwdriver, a sanding machine or sandpaper, a stapler with staples and a hammer. You need to get screws and furniture glue.
It’s good if there is a conductor for collecting furniture. It will allow you to clearly drill holes for fastenings, so the chair will be assembled as professionally as possible.
Return to contents
Preparatory stage: nuances

Drawing of a folding plywood chair with dimensions.
Where to start? On a sheet of paper 1 x 1 m (whatman paper) you need to draw on a scale of 1:1 the details from which the chair will be assembled. Cut them out.
The selected chair model consists of the following parts:
- rear leg 800 mm high - two pieces;
- front leg 440 mm high - two pieces;
- strips for strengthening the structure of a chair 400 mm long (drawbars) - four pieces;
- seat measuring 360 x 400 mm – 1 piece.
- strips to strengthen the seat structure: 400 mm – 2 pieces, 280 mm – 2 pieces.
- chair back measuring 300 x 450 mm – one piece.
Return to contents
Features of manufacturing parts
Cut two 800 mm beams for the back legs of the chair. At a distance of 200 mm from the base of the leg, cut out holes for the fastening strips (drawbars). To do this, fold the legs in a row and outline the boundaries of the grooves. Drill out holes on two adjacent sides of the chair legs using a chisel and hammer measuring 20x40 mm and to a depth of 15-20 mm strictly in the middle of the beam. It should turn out that on the 60 mm side of the beam the hole is located horizontally, and on the 40 mm side – vertically. Clean them thoroughly from wood dust. If this is not done, the planks will not fit into the grooves firmly.
To make the front legs, saw off two 440 mm beams. At a distance of 200 mm from the base, make holes for the slats in the same way as on the rear legs.

Layout of chair parts on a sheet of plywood.
Measure 15 mm from the top of the front legs and, using a chisel and saw, cut tenons measuring 20x40 mm for attaching to the base of the chair seat.
The slats that give the chair strength must be made of timber. Cut 4 pieces 380 mm long. Measure 10 mm on both sides and cut out tenons using a saw and chisel, which will be inserted into the grooves of the legs when assembling the chair. This must be done with maximum precision so that the tenons fit into the grooves only with force using a hammer.
Despite the fact that polished timber was chosen for the manufacture of the chair, the manufactured legs and slats need to be treated with sandpaper, as burrs could have formed during the work.
Cut out the back using electric jigsaw. To do this, you need to draw the details on plywood using paper templates prepared in advance. The jigsaw should be worked smoothly, and then treated on all sides with sanding paper, thereby smoothing out the resulting irregularities.
Of course, you don’t have to apply special effort and assemble a simple chair without bends, but a chair with a curved back looks much more aesthetically pleasing, and sitting on it is more comfortable.
In order to bend the back, it must first be steamed or soaked. The process of steaming at home can be very difficult, since it is difficult to choose a suitable container and steam it for several hours. A good alternative is soaking in warm water. Place the part in water at a temperature of 50-60 degrees and wait for 3-4 hours. After this, give the back the desired shape and secure with a tourniquet until it dries completely.

Before you begin assembling the chair, you need to cut out all the parts.
There is another way to bend plywood. It can be used for plywood with a thickness of 15 mm. To do this, cuts are made at the bend so that they do not reach the opposite side by 30%. The greater the bend angle, the more often the cuts need to be made. A sheet of plywood is bent, fixed in the desired position and a thin veneer is glued on, after which it is allowed to dry. This bending method is more labor-intensive and requires professional skills. Of all three methods of bending plywood, it is recommended to choose the method of soaking in warm water.
Cut a seat from plywood according to a paper pattern. Prepare 2 planks of timber 400 mm each and 2 planks 320 mm each to strengthen the structure of the chair. On the larger ones, cut tenons measuring 20 x 40 mm at both ends and grooves measuring 20 x 40 mm on the other two, departing 10 mm from the edge.
Finished parts need to be sanded.
Before you begin assembling the chair, coat all parts with varnish of any color and wait until completely dry.
Furniture stores offer a wide selection of chairs in different stylistic styles. It is also possible to order such an item from a professional craftsman. He will fulfill the order, taking into account the slightest requirements. During production, the master will use any materials (components) chosen by the client. Such pleasure is not cheap. If the services of a craftsman are too expensive, it is better to make a comfortable chair from plywood yourself at a minimal cost. Such furniture will become an original decoration of the room. It is much more valuable than store-bought analogues.
It is also possible to order such an item from a professional craftsman.

Applying ornaments is another interesting way to decorate furniture.
- Possibility to create a unique chair design. Stores offer a limited selection of chair models. It’s easy to create a unique design yourself, which your neighbors and loved ones have no analogues.
- Saving money. To make a chair from plywood, minimal costs will be required. You will only need to pay for the raw materials.
- Gaining invaluable experience. Template furniture has long gone out of fashion. Products are valued today original design. Not everyone can make them themselves. After a good practice in making chairs, it is easy to learn a more complex craft.
- Ease of operation. For many, making chairs yourself seems like something complicated and burdensome. In fact, the work will not take even a few hours, and the process itself does not require any expensive tools and materials. The main rule is to strictly follow the instructions. This article makes very clear recommendations. They will help you get the job done quickly.
- An opportunity to surprise your family. DIY chairs will become excellent option gift for any occasion. A gift like this is doubly nice.

Such furniture will become an original decoration of the room.

After painting, the product is also varnished.

It will be ideal if you use fabric identical to the fabric of the furniture located in the room to decorate the chair.
Preparatory work: we determine the type and size of the structure
Making chairs from plywood needs to be done carefully so as not to spoil the materials. The first stage is preparation. It is necessary to decide on key aspects: size, height, type of design.

Making furniture with your own hands is an exciting activity that has many undeniable advantages.

A product coated with varnish will already look much more attractive.
First you need to decide: why do you need a chair? You may need it in the garage, children's room, or in the country house. For household needs, the chair can have a simple design. For living rooms, it is better to choose original product drawings. A children's chair should be soft, safe, and reliable.

To make a chair from plywood, minimal costs will be required. You will only need to pay for the raw materials.

Today the interior of the room and appearance much more attention is paid to filling it than twenty years ago
Having decided on the purpose, it is worth choosing a style direction. The style of the chair should be intertwined with the style of the room. If the room is decorated in a classic direction, then folding plywood chairs should be truly graceful. They need to be painted and then varnished. For a country style, a product without any special decoration is suitable, while a Provence room needs a chair decorated with fabrics.

The main rule is to strictly follow the instructions.

To do this, we cut out the foam rubber in the shape of a seat, cover it with fabric, and fix it to the seat with a stapler.
Next, we determine the complexity of manufacturing. It all depends on your initial skills. Beginners should only take on simple designs. Working on them will help you gain invaluable experience that will definitely come in handy in the future. If you have experience, feel free to experiment with complex shapes!

Handmade chairs will be an excellent gift option for any occasion.

The stool is held open with wooden spikes.

A soft seat will highlight the interior of the room and make the process of using the chair more comfortable.
Most important aspect– product size. Creating diagrams and drawings is not a task for beginners. Experts recommend that people without experience use standard sizes. The height of the chair can always be adjusted. The correspondence between a person’s height and the required height of the product is presented in the table.

Making chairs from plywood needs to be done carefully so as not to spoil the materials.

The seat can be hard, especially if the chair is needed for household purposes.
Preparing materials
The following materials and tools will help you make a chair with your own hands:
- sheet of plywood (2 cm thick, dimensions – 600x900 mm);
- foam rubber (70 mm thick);
- furniture fabric;
- sheet of cardboard (dimensions 600x900);
- pencil;
- ruler;
- grinding machine;
- construction stapler;
- PVA glue;
- electric jigsaw;
- self-tapping screws;
- conductor for furniture assembly;
- hammer;
- bolts with sleeves.

Having decided on the purpose, it is worth choosing a style direction.

An assembly jig is not a home tool
- Plywood is inexpensive. It will last longer if it is made of birch. Birch wood is durable, easy to process, and easily tolerates painting and various finishes. You cannot use too thin sheets of plywood. Be sure to stick to the specified thickness. A thin sheet will not support the weight of a person, it will break, and can even lead to injury.
- An assembly jig is not a home tool. It can only be found from a person who has long been engaged in the independent production of furniture structures. If you don’t have such a tool, it’s better to purchase one. He will help you assemble the chair structure as professionally as possible.
- It is not necessary to use foam rubber with furniture fabric to create a comfortable seat. The seat can be hard, especially if the chair is needed for household purposes.

If the room is decorated in a classic direction, then folding plywood chairs should be truly graceful.

Plywood is inexpensive. It will last longer if it is made of birch.
Step by step instructions
Step 1 – creating templates. To do this, prepare cardboard, a ruler, and a pencil. We first transfer the drawing of the chair onto cardboard, cut out all the details, and then transfer them to the plywood itself.
Step 2 – cutting out the parts. To make a chair with your own hands, you need to prepare all its components. They can be cut from plywood using an electric jigsaw. The parts are cut out clearly along the marked lines.
Step 3 – sanding the parts. The chair should come out neat, so all parts need to be carefully sanded and trimmed. If a special grinding machine is not available, then you can use regular sandpaper.
Step 4 – creating holes for the hinges. The location of the holes must be consistent with the drawing. It is better to use bolts with sleeves as hinges. To increase the fixation strength of the sleeves, they should be secured in the holes with glue.
Step 5 – forming the holes for the tenons. The folding chair is held open using wooden spikes. For them, holes should be made with a Forstner drill.
Step 6 – assembly of the structure. Now we assemble the chair according to the drawing. Then make a seat. To do this, we cut out the foam rubber in the shape of a seat, cover it with fabric, and fix it to the seat with a stapler.


The height of the chair can always be adjusted.

If you have experience, feel free to experiment with complex shapes!
Decoration
Today, much more attention is paid to the interior of a room and the appearance of its contents than twenty years ago. This is not surprising, because the original ones have come into fashion design solutions. A simple chair made of ordinary plywood is definitely not the ultimate dream. It can (should!) be improved with a little decor.
You can use varnish to decorate the chair. A product coated with varnish will already look much more attractive. If you want to add color, you will need good paint for wood. You can choose any color: red, blue, white, brown. It is better to choose colors based on color range room interior. After painting, the product is also varnished.
Applying ornaments is another interesting way to decorate furniture. To do this, you need to use a thin brush and paints of different colors. You can look at drawing ideas from photos on the Internet, or come up with your own. It is better to use waterproof paints.
Fabric can also become a decoration for the product. A soft seat will highlight the interior of the room and make the process of using the chair more comfortable. It will be ideal if you use fabric identical to the fabric of the furniture located in the room to decorate the chair.

It is better for beginners to take on simple designs only.

The most important aspect is the size of the product.
VIDEO: Chair made from a sheet of plywood.
A stool is one of the simplest types of furniture products. No matter what changes our life undergoes, it remains unchanged. Only the materials from which it is made change. In Soviet times, making a stool with your own hands was one of the first tasks in labor lessons. Not only boys knew carpentry. Sometimes representatives of the fair sex had to learn the basics adult life and learn how to make a stool with your own hands. Modern furniture bears little resemblance to its counterparts from 50 years ago. Wooden stools of that time were rough, but durable. They fit perfectly into the interior of the kitchen, as well as other rooms. Nowadays there is a wide assortment in stores various types furniture, but there are also amateurs who want to learn how to make a stool with their own hands. And in our time of abundance building materials, it won't be difficult at all.

The main parts of a stool are the seat and legs. The legs are tied at the top with drawers, and at the bottom with leggings. Having become familiar with the terms, you can start drawing. First, you need to decide on the sizes. When making a stool, it is better to start from old, but reliable models that can be found in every home. Having measured the height and other parameters, you can begin to develop a diagram. If you don’t have a sample, then for an adult stool the size of the seat side will be 300-450mm, for a child’s stool - 250-280mm. Homemade stools should be even more comfortable than store-bought ones. If only because you can choose the height according to yourself. Usually the size for adults is 420-480mm, for children - 260-280mm. You must have drawings of stools with you, whether it is a diagram from the Internet or drawn up by you. After all, eliminating defects on paper is much easier than redoing the whole job.

Materials and tools
Making a stool will require high-quality materials that have stood the test of time. In the first place, of course, is wood. Wooden stools rank first in terms of convenience and second after forged ones in terms of durability. The wood must be dried in room conditions at 20-30 degrees, chamber-drying wood should not be taken, since the possibility of cracking cannot be ruled out. After air drying, the material needs to be dried at home at room temperature for about a month. It is best to take hardwood: maple, birch, beech, wenge, hemlock, mahogany. Or make legs from them, which carry the main load, and the seat from pine, spruce, MDF, chipboard or plywood.
Making a chair from plywood is not difficult at all. Made by hand under custom sizes such a piece of furniture will become a comfortable and original element of the interior with little material investment. 
Related articles:
Types of features of plywood chairs
Making folding chairs from plywood different types and designs. The easiest option to start with is a plywood stool. The transforming chair is more complex structurally. You can’t do this without pre-prepared drawings and carpentry skills.
Experienced craftsmen bring unusual ideas to life, producing unique products. It’s nice to make almost designer chairs with your own hands, simultaneously acting as a developer, manufacturer, and decorator.
There are no analogues of the product either in a furniture store or in relatives’ homes. An important point is the significant savings in the family budget. Homemade stools cost much less than factory-made options. Almost every owner has the tools necessary for production at home. The main thing is desire and patience.
Step by step instructions
A well-written instruction or work plan will help you make chairs from plywood with your own hands. detailed description every step and action.
First, they create templates for the details of the future piece of furniture. They are made from cardboard. Using a ruler and pencil, draw all the components and details of the product on cardboard and cut them out. Then transferred directly to plywood.
At the next stage, all the parts needed for assembly are cut out. Using an electric jigsaw, parts are cut out of plywood.
It is recommended to sand all elements thoroughly. The surface should be as flat and smooth as possible. Without a grinding machine, it is difficult to completely level the parts and give the back the desired shape. If you use sandpaper, it will take a long time and require a lot of effort.
Drill holes for the hinges according to pre-prepared drawings. It is recommended to use bolts with sleeves as hangers. The sleeves are attached to the holes made with glue, which will increase the reliability of their fixation.
Special wooden spikes are needed to keep folding chairs open. To prepare the mounting points, holes are drilled. The wooden spikes themselves are made from timber, cutting 4 pieces to the length required for their manufacture.
Then you can begin assembling according to the project or diagram. The final step is making the seat. The foam rubber is cut to a given shape, covered with fabric and attached to the seat using a construction stapler.
Required materials and tools
Properly selected tools and materials for making furniture will make the process as comfortable and productive as possible.
You will need:
- a sheet of plywood, preferably 20 mm thick and 600x900 mm in size;
- foam rubber for a soft seat, 70 mm thick;
- fabric for decoration;
- cardboard to the size of plywood;
- ruler with pencil;
- construction stapler;
- jigsaw;
- surface grinding machine or sandpaper;
- PVA glue;
- self-tapping screws;
- bolts with sleeves;
- hammer.
If you can get or borrow a conductor for assembling furniture, this will be an excellent help in your work.
Project
Plywood chairs, like any other type of furniture, should be durable and comfortable. It is difficult for novice craftsmen to independently develop a model and calculate the loads that allow them to withstand the required weight. Therefore, the design and drawing of the future chair can be found ready-made or you can consult with more experienced craftsmen.
There are special tables corresponding to a person’s height and the required chair height. Before manufacturing, you need to think about who will most often use the product. A model made to individual sizes will be comfortable and convenient.
Manufacturing procedure
Before you start making a chair with your own hands, it is advisable to draw up a work plan. You need to decide on the size and design of the product, prepare tools and materials for making the chair, and choose the type of decor and upholstery.
To avoid damage to the material, do not rush. The main thing is to do everything in accordance with the drawings.
Decoration
Simple decor will help give your self-made furniture module a stylish and original look. Ordinary plywood is not the most visually attractive material, so it is worth spending time on giving the product a more interesting and beautiful surface.
The easiest way is to treat the finished model with varnish. This will improve the visual perception of the product and decorate it externally. You can paint the surface of the furniture with wood paint and then varnish it. This way we can achieve unity color scheme the interior of the room in which the chairs will be located.
A rather labor-intensive, but more interesting option is to apply an ornament or a complex design. In this case, a wide scope for creativity opens up and everything depends on the imagination and skill of the author. It is recommended to use waterproof paints rather than ordinary ones. In addition, it is advisable to purchase brushes of different sizes for ease of application.
Decorating the soft seats of chairs with fabric that matches the furniture in the room will make the interior harmonious and stylish.
What do you do with old furniture?
Everyone knows the expression: “simple as a stool.” There is a fair amount of truth in it. This piece of furniture in its classic design is laconic and strict.
It is difficult to do without a stool in the kitchen and workshop, in the garage and in the bathhouse. It is needed wherever cramped conditions do not allow for larger furniture to be placed. For the home craftsman, making such a thing is best way gain practical skills in carpentry.
In this article we will introduce you to the types of wooden stools and tell you about their features self-made. We hope that after this you will be able to confidently get to work and please your family with this useful piece of furniture.
Before you make a stool with your own hands, you should learn more about what carpentry masters in this area have come up with. First, let's study the sketch of a simple product and remember the names of the main parts. This will help us speak the same language using common terms.

So, a classic stool consists of a seat and four legs. The bars of the upper belt serve as a support for the seat and are called tsarg. The lower stiffening belt connecting the legs also consists of four bars called pro-legs. Experts installed it experimentally optimal sizes: height 50 cm, seat width 45 cm.
Stools made of logs, saw cuts and branches
By abandoning the legs, the seat can be made from an ordinary log. By sawing it into several logs and equipping each with a soft pad, we will get an original set for a country holiday.

The disadvantage of this solution is obvious - heavy weight, which creates inconvenience when carrying.
Here's what you can do by combining wooden legs with a massive seat made from a rounded piece of log. This unusual stool claims to be a designer find.

There are no drawers or legs here. The rigidity of the structure is ensured by a massive seat, into which four legs are embedded at 1/3 of its height.
Anyone who is good with a chainsaw can create an original piece of furniture from a log. To do this, you need to make three neat side cuts in a thick block of wood to form the legs. Having made precise markings on the scraps of one trunk, you can cut them out into a set of two stools, nested one inside the other.

Continuing the “forest theme”, let’s see what can be built from the material lying under our feet. A beautiful product can be made from thick branches, freed from bark and polished. This design has one original detail - a drawer for household items located under the seat. The lid is assembled from planed boards mounted on wooden tenons and glue.

This piece of furniture will fit perfectly into a rustic interior style, which is characterized by massive wooden beams, stairs and tables. But it is unlikely to take root in an ordinary kitchen.
Cutting a log makes a ready-made seat for a stool. By cutting three legs from thick branches into it, we get a durable and attractive structure.

Hemp and forks of trunks can be used as bases for the manufacture of original products. Sanded and topped with thick log cuts, they fit perfectly into the interior of a log cabin.

Traditional simple stools
Timeless classics live not only in the facades of buildings. Time-tested solutions are also preserved in the designs of stools. Adding smooth lines to their appearance eliminates boring angularity.
In the photo below we see classic version. Thanks to the rounded drawers and legs, it looks quite decent. The milled grooves on the legs also improve its appearance.

Simplicity has its own charm. Designers successfully play with this quality, creating deliberately rough, brutal products. Artificially aging furniture is not an easy task. The author had to work a lot on the product, the photo of which we see below.

The category of classic “stool design” includes designs with drawers under the seat. To do this, use wide side frames and hinged lids.

Sophistication and originality
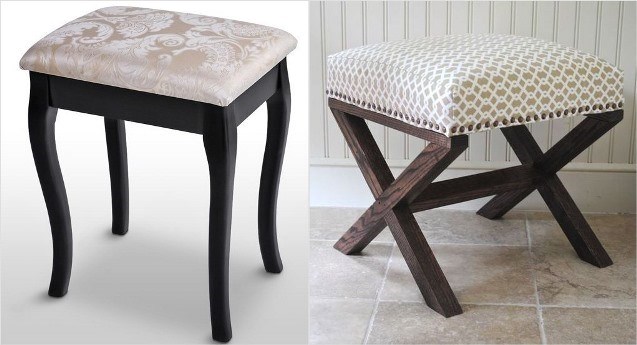
Not everyone likes the hard seat and angular shape of the stool. For fans of aesthetics and comfort, craftsmen offer elegant products with curved legs and soft upholstery.
It is difficult for a beginner to make bent curly legs. Without compromising their beauty, they can be replaced with two pairs of crossed bars connected by a crossbar. But you shouldn’t give up soft foam upholstery.
Let's ask ourselves the question: what is needed for assembly? homemade stool made of wood? Four thick boards for the seat, legs and crossbar. By decorating them with carvings, we get an exquisite and high-quality product. You can use it with pleasure at home, and on occasion, make it an exhibit of an exhibition of folk crafts.

When planning to make your first “masterpiece”, do not forget about using firing, stain and varnish for decoration. Even the simplest piece of furniture acquires a noble gloss after finishing with contrasting tinting.

In addition to natural wood, stools can be made from chipboard and thick plywood. This solution reduces their weight without losing strength. In the photo below we see an interesting plywood structure. Slotted holes in the seat and legs give it beauty and delicacy.

Square, round and oval seats are yesterday's carpentry art. Today, original solutions are in fashion. From these you can assemble a bench of any length and configuration. Invite your friends to visit and show them this miracle. Among them, there will probably be those who want to play with an unusual furniture “constructor”.

Bar stools
Anyone who believes that a stool must necessarily be low and nondescript is mistaken. Designers successfully prove the opposite. A little imagination and a familiar piece of furniture becomes a “fashionable thing” in the avant-garde style.

The high stool captured in the photo is a bar option. They can decorate the interior of a cafe and the decor of your own apartment. Its lower brother, made in the same style, will take its rightful place at the dining table made of Euro pallets.
These days, bar seats are popular not only in catering establishments, but also at home. The tradition of placing bar counters in apartments, which came from overseas, caused a real boom in these products.

A high stool is convenient not only for drinking cocktails at the bar. It can be successfully used as a stand when picking fruit.

Folding stools
There are a huge variety of them, from the most simple solutions and to very complex transformers.
We present to your attention an original folding design. It consists of two rectangular frame-legs connected in the center by a metal axis. The support frames are attached to the seat with carpentry hinges. When folded, the axle moves along two slots cut into one of the legs. The seat rotates on hinges and stands upright.

Here is another version of a folding stool. His seat is made of two halves. When folded, the legs rotate around an axis and are placed in the same plane. The seat halves are pressed against them on both sides.

Fans of complex folding systems are offered an option consisting of eight pairs of lattice legs connected at the base by a common bar.

The upper ends of the legs on one side are hingedly connected to the seat, which is also made of bars. To fold the structure, take it by the lower slats and move them in the opposite direction. In this case, the lattice legs and seat bars fit into the gaps provided for them, and the stool becomes flat.
Another option is a folding stool with a “crawler” seat. Despite the simplicity of the design, it looks very original. Its two crossed legs are hinged in the center and connected at the top by a wooden segmental seat. By holding the edges, you can easily fold and unfold this stool.

DIY example
Having finished brief overview, it's time to start the practical part. We offer you step by step guide. Let's say right away that it is better for beginners to avoid tongue-and-groove joints. They require good carpentry skills and the presence of a special tool - a milling machine or, at worst, a hand router.

To work you will need several tools:
- Tape measure or ruler;
- Hand saw with fine teeth;
- Jigsaw for cutting legs and seat;
- Screwdriver for drilling holes and tightening screws;
- Belt sander for smoothing sharp edges on parts;
- PVA glue or wood glue.

Step one– using a hacksaw from a 30 mm thick planed pine board, we cut blanks for the legs and seat. If there is no board wide enough to make a solid seat, then it can be assembled from several narrow scraps. To do this, you need to mark and drill holes in their side edges for dowels. Having smeared the dowels with glue, they are inserted into the boards, assembled into a single panel and secured with carpentry clamps. After a day, you can start making the seat.
Step two– cut out the profile of one leg from thick cardboard and transfer it to all the blanks. We do the same with the seat blank.
Step three– We cut out the legs and seat with a jigsaw, and then sand their sharp edges with a grinder.
Step four— we assemble the legs in pairs, screwing self-tapping screws into their ends. We also use self-tapping screws to connect pairs of legs together. We arrange them so that they do not meet with previously twisted ones.

Step five– marking holes for dowels on the legs and seat. Having done this work, lubricate the tenons with wood glue and place the seat on the base.
Anyone who wants to simplify the work a little can refuse to fasten the seat with dowels. Instead, you can screw four screws directly through the lid into the legs from above. To ensure that they do not stand out on a flat surface, drill shallow secret nests for them in advance. After screwing, putty them with wood putty and cover the product with varnish and stain.