Independent production of a modern bio-fireplace. How to make a bio-fireplace with your own hands? Do-it-yourself fuel block for a biofireplace
(19
ratings, average: 4,13
out of 5)
 To create a warm and cozy atmosphere in the house, people often purchase bio-fireplaces, which are placed in the rooms of city apartments without taking up much space. Eco fireplaces are in great demand due to easy operation and the use of environmentally friendly fuel, which is very important for small-sized residential premises. The growing production of biofireplaces contributes to a wide range of designs, differing in size, material and type of installation.
Although the price for them is acceptable for people of average income, such a pleasure still remains expensive for many. What to do if you want to add a touch of comfort to your home through... attractive heating tool?
The way out would be to create DIY bio fireplace. Making a fireplace will not be difficult if you know the main components of the device and manufacturing technology.
1. Advantages of a self-made biofireplace:

 Before you sketch a fireplace idea for an apartment, you need to know what parts are included in a biofireplace. The design consists of a biofuel tank, a burner with a plug th and facing materials, which are a decorative part of the home.
The fuel produced from substances of plant origin is ethanol alcohol, which is why such a device is also called an alcohol fireplace. The liquid is poured into a small block located under the burner. With the lid removed, light it with a lighter. The burning flame is turned off by closing the burner. It must be remembered that liquid should be added to the fuel compartment only after the device has completely cooled down. While the fireplace is operating, doors and windows must be open in the room. to improve air exchange.
Some people like wall-mounted fireplaces that can brighten up empty walls. Some people equate the floor-standing version with a standard fireplace, since it is large in size, but at the same time it can be moved, and if the structure is on wheels, then special effort it will not require transportation. Compact tabletop biofireplaces can be carried by hand due to their light weight. In addition, they can be placed on a table, shelf, built into small niches and specially equipped portals to create a more realistic image of a real fireplace.
3. Do-it-yourself bio-fireplace. Step-by-step instruction
 So, you decided to make a bio-fireplace yourself. Where should I start? Of course, from a sketch of the desired device. Decide what shape and size you want to make the fireplace and where will it be located.
The desktop option is more often chosen among other types of installation, and it is recommended for beginners because of its simple technology. Therefore, let’s look at how to make a desktop biofireplace with your own hands.
Materials for making a biofireplace
- — stainless steel mesh;
- — metal container made of heat-resistant raw materials for biofuel;
- - metal box;
- - fireproof glass;
- - glass cutter;
- - silicone sealant;
- — decorative elements (stones, pebbles).
DIY bio-fireplace burner. Blueprints
 A sketch is necessary in order to correctly calculate the distances between parts of the fireplace. The burner should not be closer to the glass screens than 15cm. With a large structure, you can use several burners to heat the room to a greater extent. Don't forget that one block heats 15-16 square meters area. The dimensions of the glass protection and fuel tank depend on body size and shape A.
— The base is made square, rectangular or round based on aesthetic wishes. Typically, a metal box with fire-resistant characteristics is chosen. The sides on the walls are made specifically for fixing the grille.
— The fuel box is located 3-4 cm below the surface of the body; you need to select a suitable part that will not protrude beyond the walls of the housing. From available means, you can use a metal can, mug or glass. Some people prefer to simply buy a ready-made burner in a neat design. Popular are elongated models of containers with a valve, which simply need to be placed in the middle of the finished base and use as intended.
The mesh is cut to a size so that it fits into the body and rests securely on the sides. The cell size varies from 0.5 to 1.5 cm.
Glass screens
The walls protecting from fire are cut out of glass exactly according to the sketch. These can be two partitions located parallel to each other or an “aquarium” that covers the flame from all sides. The parts are glued together with sealant, left until completely dry, and then the excess glue is carefully removed with a blade. Ready screen installed on body supports.
Decor
 Decorative elements Often stones or pebbles serve as a cover, completely hiding the unattractive mesh. You can build ceramic firewood yourself, which will add a pleasant atmosphere, simulating the burning of artificial logs. Blanks made of high-quality ceramics are painted in the desired colors and additionally decorated with knots or cones. The dried dummy firewood is coated with fire-retardant varnish and placed near the flame. However ceramic firewood From time to time it will be necessary to replace them with new ones, since the material is not durable in use.
Do-it-yourself fuel for a biofireplace
 Specialized stores sell ready-made biofuel for eco-fireplaces. The disadvantage of biofireplaces is that they “eat” a large amount of bioethanol, so many resort to making fuel with their own hands, but for this it is necessary to follow safety measures.
To prepare safe fuel, you will need components such as 96 percent ethanol and highly purified gasoline. For a liter of alcohol you need 50-80g of gasoline. In these proportions, the components are mixed until they stop separating. The finished liquid is poured immediately into the fuel compartment of the fireplace and set it on fire with a long lighter. Do-it-yourself biofuel for a fireplace will be more profitable than frequent purchases of ready-made fuel.
 A biofireplace is the safest type of all fireplace devices, but the use of live fire still requires adherence to safety rules.
- Bioethanol is poured into the fuel block when the fireplace is completely cool.
- Fill the fuel compartment no more than two-thirds full. When the tank is full, liquid may splash out at the very beginning of combustion.
- Unintentionally spilled bioethanol should be immediately wiped with a cloth.
- Use only special lighters. With regular ones, you risk getting burned.
- Always set the venting effect when operating the fireplace.
- It is necessary to store bio-fireplace liquid away from the fireplace appliance.
- Make sure that children or animals are not near the bio-fireplace or fuel.
- If apartment residents have respiratory diseases, it is better to consult a doctor to see if such fuel will harm them.
Making bio-fireplaces with your own hands will not only save you a lot of money, but will also help you create a decorative element according to your wishes and ideas. Those who have mastered the technology of making bio-fireplaces open their own business producing bio-fireplaces.
Biofireplaces are an opportunity to enjoy the beauty of live fire in urban environments. Not so long ago, this was an unimaginable luxury for residents of megacities. Today, a fireplace that runs on liquid fuel can be purchased at a store or made independently.
The classic definition of a biofireplace is a heating device that runs on clean liquid fuel. At the same time, there are no usual combustion products: smoke, soot, soot. It is no coincidence that the second name of this device is an ecological fireplace. The Italian Giuseppe Lucifor is considered the founder of modern biofireplaces. In 1977, he developed and manufactured a device that runs on ethyl alcohol. Europeans quickly appreciated the advantages of a fireplace, for which there was no need to lay out a chimney and prepare firewood. In the second half of the 20th century, an autonomous open hearth became a fashionable element of the interior.
The biofireplace is not complicated, and it is quite possible to make it yourself
Eco-fireplaces appeared in Russia relatively recently. However, there are many models on display in store windows. What they have in common is their price – it can hardly be called democratic. However, the device is not complicated, and it is quite possible to make it yourself. Compared to its wood-burning counterpart, a biofireplace has the following advantages:
- No chimney required. Therefore, its installation does not need to be coordinated with the management company and neighbors.
- The weight of an eco-fireplace rarely exceeds 100 kg. This means that it will not require additional reinforcement of the floor.
- These devices are more preferable from a fire safety point of view.
- They are not harmful to environment and human health.
- The fireplace does not require cleaning the chimney or removing ash from the combustion chamber.
However, there are also negative factors. For example, the apartment will have to be regularly ventilated or equipped with proper ventilation - an open fire burns out oxygen. In addition, the fireplace cannot be used as a full-fledged heating device. The amount of calories released when burning biofuel can warm up a room of just a few square meters.
Without which the device cannot operate – 4 main blocks
You cannot make a beautiful and reliable eco-fireplace without understanding its structure. It is not complicated - there are only four blocks. The entire system is based on a fuel tank - the service life and safety of the structure depend on it. The dimensions of the fuel tank also depend on the dimensions of the fireplace. It is recommended to use containers made of materials that are resistant to corrosion and chemically active elements (stainless steel, ceramics).
The burner is sometimes considered constituent element fuel tank. In fact, this is a separate module that can be purchased in the store. However, it is also possible to make such a thing - a burner for a bio-fireplace with your own hands. The design is simple - a fine-mesh metal mesh into which filler impregnated with fuel is placed. Mineral wool or ceramic fabric is used as filler. The dimensions of the burner must correspond to the perimeter of the tank - it serves as its lid.
The wick is needed to ignite the burner. To do this, one end of it is lowered into a tank with fuel, and the other lies on the mesh burner and is masked with artificial firewood or coals. The cost of the finished wick is low, and it can be bought in the store. However, production will not take much time. Essentially, a rope twisted from cotton fabric can be used to light a fireplace.
The overall interior of the room depends on the fireplace portal. For classic fireplaces, they are made of stone (marble, travertine, shell rock) or brick. Sometimes you can find a bio-fireplace framed by stone. But we also have more affordable materials at our disposal (artificial or a natural stone, glass, metal, brick, drywall).
With some imagination, even from a school spirit lamp or kerosene lamp, you can make an original tabletop bio-fireplace with your own hands. Such decorative heating devices are quite versatile. A sparkle dancing on the table will dispel boredom in the office and create romance in the bedroom. The main thing is to have the drawings, and the rest will follow!

A sparkle dancing on the table will dispel boredom in the office and create romance in the bedroom
The key element of a biofireplace is a liquid fuel tank. As a rule, for a tabletop fireplace, the tanks do not differ in dimensions: diameter - 7.5 cm, height - 8 cm (standard corn can). By the way, sometimes tin cans are used as a fuel tank. However, it is better to choose a more reliable container from corrosion-resistant steels with thick walls. You can find similar products in auto parts stores. As a last resort, order a factory tank for a tabletop fireplace. True, there is no need to talk about savings in this case.
TO mandatory elements The items that need to be prepared include the wick and the burner for the fireplace. The wick can be made from lace, rolled into a fabric cord, or bought in a store (the price of such accessories is low). But to make a burner, you will have to tinker. The work is simple, but painstaking. The fireplace burner is made of metal mesh. The dimensions of this element depend on the dimensions of the fuel tank. Using metal scissors, cut two plates from the mesh; mineral wool (filler) is placed between them. Tighten the plates with wire or clamps.

As a rule, for a tabletop fireplace the tanks do not differ in dimensions: diameter - 7.5 cm, height - 8 cm
Having finished preparing the main elements, we begin to assemble them:
- 1. Prepare the fuel tank. For safety reasons, it can be wrapped in non-flammable material (asbestos fabric and its analogues).
- 2. Of course, a metal can in the office and at home looks too avant-garde. Make a box for it from plywood or wood - they can be easily decorated using varnish, paint, burning or embossing.
- 3. Install the burner cover for the tank - it should fit on the box for the fuel tank.
- 4. Place the fuel container in the box prepared for it and close it with a lid.
- 5. We lower the wick into the tank through the burner - one edge should remain in the liquid fuel, and the other should be in contact with it.
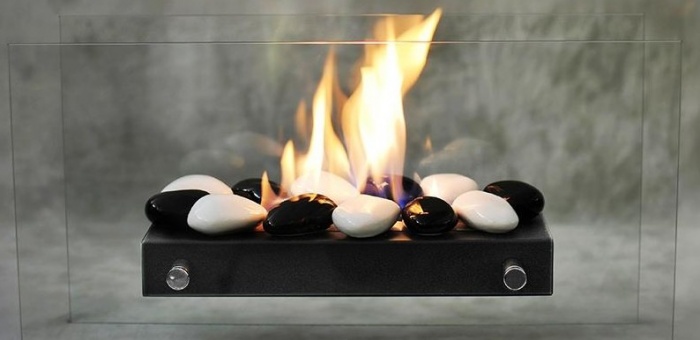
You can put decorative stones or ceramic imitation firewood on the burner - this will give the fireplace a finished look.
Floor-standing “aquarium” for live fire – how to make it?
The floor biofireplace is most popular among craftsmen. This is easily explained by its features - it can imitate a classic wood-burning fireplace or, on the contrary, act as a futuristic element of the interior. When starting work, prepare the necessary materials in advance: thick glass or heat-resistant glass ceramics, silicone sealant, a flowerpot made of wood or metal, two tanks for liquid fuel, a heat insulator, a burner, a wick. The appearance of the future fireplace depends on the size and shape of the flowerpot.

Floor biofireplace is most popular among craftsmen
In fact, assembling the biofireplace modules into a single whole is not difficult. The main problem is in their manufacture. At the heart of the fireplace-aquarium is a flowerpot. You can make it yourself from wood or choose a metal box. Wooden products must be treated with fire-fighting solutions. The next element is a protective glass cube. It is to him that the fireplace owes its name “aquarium”. For assembly you will need silicone sealant, glass or glass ceramics.
You need to prepare four sheets of glass/glass ceramics. Their width depends on the dimensions of the flowerpot, and their height rarely exceeds 50 cm. Note! The finished product must be installed in a flowerpot and adjacent to the inner surface of its walls. To assemble the “aquarium”, coat the vertical edges of the glass blank sheets with sealant and connect them into a cube. Allow the sealant to dry (24 hours), then cut off any excess.
The fuel tank of the “aquarium” is assembled from two containers different sizes. The smaller one is a fuel tank, which is installed in the larger one for safety reasons. By the way, the collected container should be 2-3 cm below the walls of the flowerpot. For safety, wrap your tanks Izover or asbestos fabric. Wick and gas-burner are made in the same way as for a tabletop fireplace. The only difference is in size.

We place a lid on top of the tank - a burner made of metal mesh and filler
After all the components of the future “aquarium” are ready, we begin to assemble them into a single whole:
- 1. Coat the inner surface of the walls of the flowerpot with sealant and lower the glass cube into it.
- 2. Lower the prepared double-circuit fuel tank into the center of the flowerpot.
- 3. Place a lid on top of the tank - a burner made of metal mesh and filler (cotton wool).
- 4. The final stage is the decorations. We lay out decorative coals and firewood along the grid, among which we hide the wick lowered into the fuel tank.
The fire cube will decorate the interior of any room. Sometimes such a fireplace is made mobile. For this purpose, the flowerpot base is equipped with wheels.
A flame blazing in a wall is a non-trivial phenomenon. Meanwhile, there is no mysticism in this. You can easily create a built-in bio-fireplace yourself. By and large, a fireplace aquarium can be used in this capacity. But there is a nuance. It’s unlikely that the builders could have foreseen your desire to place a fireplace in the wall. Therefore, you will have to work.

You can easily create a built-in bio-fireplace yourself.
The best option is to create a niche from plasterboard (GKL), which comes down to 4 stages:
- The wall is cleaned of dirt and, if necessary, leveled.
- We draw a plan diagram of the future niche on the wall with a marker or construction pencil (we take into account switches and lamps).
- We assemble a frame from metal profiles and guides.
- We mount the gypsum board on the frame.
A pre-drawn drawing will allow you to determine the amount of material (plasterboard, guides, profiles, screws and dowels).
At the heart of a plasterboard niche is a frame, and our work begins with its creation. We mount guides using dowels according to the marking lines. The step between them should not exceed 40 cm. Next, we add volume to the structure. To do this you will need to install profiles. They are set using a plumb line and attached to the floor and ceiling. Let's temporarily put the profiles aside - we need to protect the wall from high temperatures. To do this, between the guides that are screwed to the wall, we place Izover or basalt wool. After which we cover the heat insulator with a continuous sheet of drywall.
The next step is the installation of gypsum boards. The side walls are sutured first. At the final stage, we close the pediment, and the niche is ready. However, we are creating it for a specific purpose - we need to install a fireplace. Therefore, we will add a shelf to the niche. By the way, it will give the structure additional rigidity. Considering the weight, it is better to make the shelf from wood.
- 1. Decide on its height and apply markings.
- 2. Using a building angle and a level, screw the stops under the shelf.
- 3. Measure the width of the shelf and prepare a board of the same dimensions.
- 4. Place the cut board in the niche on the stops and secure it with self-tapping screws.
We install an “aquarium” in the resulting niche. This is one of the most simple ways create a built-in bio-fireplace. However, this does not make fire any less attractive. In fact, the work with the niche is not yet finished - its decorative design is ahead. Picking up Decoration Materials, do not forget that they must withstand high temperatures.
A fireplace with a live fire is the dream of many country house owners. However, not everyone has the opportunity to install such a heating device at home. For example, such a solution is not available to owners of city apartments. Even to install a fireplace in a private home, you will have to do quite a lot of work.
In this case, it is necessary to build a ventilation system and chimney. A fairly practical solution is to build a homemade bio-fireplace. Simple instructions will help you figure out how to make a biofireplace with your own hands.

Description of the device
The biofireplace is equipment that runs on liquid fuel and has a high degree of safety. The first biofireplaces were invented in ancient times, when lamps were filled with oil. Since then, the design of such products has changed little. The operating principle remains unchanged.

You can make a budget version of a biofireplace with your own hands without spending a lot of effort and money. Such a structure can give the interior comfort and warmth. Photo similar designs will help you choose the type of structure for your own apartment.

For the fireplace to function properly, you do not need to create a chimney. The only condition is that you need to ventilate the room from time to time. This is due to the fact that with an open fire, oxygen reserves in the air dry up. Biofireplaces are made in different designs. Depending on this, they may have different characteristics and properties:
- Large devices that resemble real fireplaces. Such products are installed on the floor. They are large in size and highly resistant. This improves the safety of apartment residents.
- Elegant fireplaces with a small mass. They are mounted on the wall or suspended from the ceiling. The fire in them is fenced off by a transparent screen.
- Mini fireplaces. They are installed on pedestals and poles. This device is an excellent addition to the interior.
Regardless of the device model, the flame height is adjusted manually. Creating a bio-fireplace with your own hands allows you to save money. This solution increases the attractiveness of the interior.
Advantages of homemade fireplaces
Every day many new devices appear that make human life more comfortable. You can build a fireplace at home or in an apartment without extra costs and effort. In this case, you do not need to have special skills and knowledge.

The main thing is to get acquainted with the fairly simple design of a biofireplace. The work can be done alone. Taking into account the features of such devices, it is possible to build a functional and attractive structure that will serve for quite a long time.
Creating your own bio fireplace
The cost of biofireplaces is quite high, despite the simplicity of the design and small quantity necessary materials. It is more profitable than buying a ready-made bio-fireplace to build the device yourself. You don't need any special skills to do this, and the materials are widely available at most hardware stores.
Step-by-step production of a biofireplace with your own hands requires knowledge of its structure. Before assembling the device, it is necessary to assemble the following components of the device:
- Glass. Its dimensions must be calculated based on the design of the biofireplace. However, it should not be too thin. It is necessary to check with a glazier about the heat resistance of a particular type of glass before choosing it.
- Silicone mixture that will seal all seams.
- For the burner you need to find a tin can. A metal box is suitable for this purpose.
- A small piece of metal mesh. The cells in it should be small.
- Decorative materials for finishing bio-fireplaces. Best used for fireplace decoration wild stone. Large pebbles are also suitable for decoration.
- Wick cord.
After making a homemade fireplace, you need to take care of regularly purchasing liquid fuel. Only specialized biofuel should be used for these fireplaces. When using other compounds, the body may be poisoned. Home craftsmen create bio-fireplaces for apartments with their own hands, taking into account all these conditions.
Fireplace drawing
Before you start making a homemade fireplace, you need to draw up an accurate design drawing.

Each part of the device must be reflected in the drawing.

The burner is designed to ensure fuel combustion. When creating it, it is worth considering the quality of the glass used for the partition. If it is not sufficiently resistant to high temperatures, the distance to the burner must be increased. Glass may crack if placed too close to the burner. The minimum acceptable distance is 15 cm.
A box is used as a fuel tank. The main thing is that the metal must have a thickness of at least 2 mm. If you plan to build a large outdoor fireplace, the tank can be purchased at a hardware store.

For a room of 30 sq. m. you will need no more than two burners. After creating a drawing of the device, construction can begin.
Biofireplace burner
The burner is an important part of the biofireplace. Once a suitable container has been selected, the manufacture of the burner can begin:
- If you choose a transparent design, the container can be painted on the outside. The inside should not be painted. This is explained by the fact that the coating will simply burn under the influence of high temperature when the bio-fireplace is turned on.
- It is necessary to cut a piece of fine mesh that will cover the top of the container. The mesh is designed to ensure that the flame is distributed evenly. In addition, you can put decorative materials on it.

The size of the mesh for a biofireplace can vary depending on the design idea. It must have high strength. This is necessary so that the mesh does not bend under the weight of the stones. In addition, it must completely cover the fireplace area.
Step-by-step instructions for building a biofireplace
Assembling a biofireplace for heating rooms is simple. Once the burner is assembled, the work includes the following steps:

To build a simple and beautiful device, you need to study the step-by-step instructions for building a bio-fireplace with your own hands. The finished device can be put into operation immediately after assembly.

Large bio fireplace
When creating a large floor-mounted bio-fireplace, the frame of the device is made of plasterboard. To create the device you will need:

The level of fire safety can be increased by placing a glass screen in front of the flame. You can also install a forged grille here.
Fuel selection
Building a biofireplace with your own hands will not be very difficult. After its construction, it is necessary to regularly purchase biofuel. The mixture must have the prefix “bio” in its name. Various mixtures for biofireplaces are produced from potatoes and beets, as well as wood shavings.

Biological fuel does not form toxins after combustion in a biofireplace. This ensures the safety of human use of the fireplace. In addition, during combustion the flame burns smoothly and beautifully. If you use other means, you will not be able to achieve this effect.
After building a bio-fireplace with your own hands, it should be used correctly. To do this, you will need to follow a number of principles:
- Fuel for a biofireplace must be purchased only from trusted manufacturers.
- Before pouring fuel into the burner, you must wait for it to completely extinguish and cool.
- To light a bio-fireplace, you will need to use a lighter that has a long spout.
- Containers with fuel for a biofireplace should be stored at a certain distance from open fire.

If you buy decorative parts that imitate firewood, the device will take on the appearance of a real fireplace. During its operation there is no smell or soot.
conclusions
You can build a biofireplace with your own hands without extra costs and effort. Such products are characterized by simplicity of design, which ensures their reliability and safety. The operating principle of such devices has remained unchanged since ancient times. This indicates the high practicality and convenience of such products. In addition, such designs look very beautiful.

Fuel for biofireplaces is made from wood chips, potatoes and beets. When such fuel is burned, no toxins harmful to health are formed. Thanks to this, biofireplaces can be installed in residential areas. However, during operation the room must be periodically ventilated.
Many people dream of a fireplace with a live fire, but not everyone has the opportunity to install a real hearth. It is prohibited to do this in city apartments, and in private houses its installation involves labor-intensive construction of chimneys and ventilation. A good solution in this case would be a self-made biofireplace.
Do-it-yourself biofireplace - description
Biofireplace is a simple and safe design based on the combustion of liquid fuel. The first bio-fireplaces were invented in ancient times, when various oils were poured into lamps or small vats and set on fire.
The operation of biofireplaces does not require the installation of chimneys; the only thing that needs to be done is to periodically ventilate the room, because an open fire in any case has the ability to burn oxygen. There are several designs of biofireplaces, the main difference of which is the installation location:
- Large and realistic fireplaces for installation on the floor. Due to their stability, they can have large dimensions and closely resemble ordinary fireplaces.
- Lightweight and elegant models for wall mounting or hanging from the ceiling. A prerequisite for them is to fence off the fire with a transparent screen for fire safety purposes.
- Miniature fireplaces for installation on tables and cabinets. A wonderful and modern addition to the interior.
Regardless of the model, the flame height can be adjusted by adding or subtracting burners in the volume provided by the design.
Making biofireplaces with your own hands
Despite the simplicity of the design and the minimum of materials required for its manufacture, purchased bio-fireplaces are by no means cheap. It will be much more profitable to make bio-fireplaces with your own hands.
This does not require special skills or complex equipment, and you can purchase materials for construction at any store.
Before you begin the assembly process, you need to collect the following components:
- Glass. The quantity and size are calculated based on the design, but you should not buy something that is too thin. You need to check with a glazier how heat-resistant a particular type of glass is, and then choose the most suitable one.
- Silicone mixture for sealing seams. Sold in building materials stores.
- For the burner you need to choose a tin can or a metal box, both of which can be found in almost any apartment.
- A small piece of metal mesh, the cells in it should be as small as possible.
- Decoration materials- multi-colored wild stone or rolled large pebbles (sold in pet stores for decorating aquariums) look best.
- Wick cord.
After making a bio-fireplace with your own hands, you will need to constantly buy fuel for it. You can only use specialized biofuel for such fireplaces, since other compositions can cause poisoning of the body.
Bio fireplace drawing
For the burner. This is where fuel combustion will occur. When designing it, you need to take into account the quality of the glass used for the partition. If it does not have heat-resistant qualities, you need to increase the distance from it to the burner. If you place non-heat-resistant glass too close, it will crack very quickly. The minimum distance to the burner is 15 cm.
Fuel tank. As mentioned above, a jar or box is suitable for it, the only condition is that the metal must be thicker than 2 mm. If you plan to build a large floor-standing fireplace, you can purchase a special tank in the store.
You can calculate the number of burners based on the area of the room. For a room measuring 30 sq. m. you can install no more than two burners. When the do-it-yourself drawings of the bio-fireplace are ready, you can begin its construction.
DIY bio-fireplace burner
The most important part of a self-built biofireplace is the burner for it. Having chosen a suitable metal container, you can begin manufacturing:
- If the fireplace structure is transparent, you can paint the container from the outside. You cannot paint the inside of it, as it will burn the first time you start the burner.
- A piece is cut out of a fine mesh to cover the top of the container. This mesh serves to distribute the flame evenly, as well as for laying decorative materials, between which the wick will be visible. You need to make sure that the mesh does not fall inside the container.
Thus, a burner for a bio-fireplace can be made with your own hands in a matter of minutes.
Step-by-step instructions for a DIY bio-fireplace
As can be seen from the previous paragraph, if you have step-by-step instructions for a biofireplace, it is very easy to make it yourself. After assembling the burner, the process is divided into the following stages:
The pieces of glass are fastened together with silicone sealant in accordance with the design idea. To dry completely, they need to be left for about 24 hours; a more precise time is indicated in the instructions for the sealant.
If desired, the base of the fireplace can be made from a rectangular metal box. Then it will hide the burner jar.
If the fuel was purchased in a tin can, you just need to place it inside the burner. If it was sold in plastic containers, you should take another one tin can, and pour it there. The size of the jar should be such that it is convenient to remove from the burner.
Place the pre-prepared wick into the fuel. Place a mesh over the burner and sprinkle pebbles on top of it.
To make a beautiful and simple bio-fireplace with your own hands, step-by-step instruction above will provide all the necessary knowledge. The finished fireplace can be put into operation immediately, that is, the wick can be lit.
Large bio fireplace
The previous paragraph described the manufacture of a compact fireplace. When constructing a large outdoor biofireplace, its frame will have to be made of plasterboard. To do this you need:
- Mark the wall and cut the drywall into suitable pieces.
- Install a non-combustible stand at the base of the fireplace. This is especially important since the combustion temperature exceeds +150 C°.
- Drywall is attached to the wall with self-tapping screws.
- The interior of the fireplace must be made of fire-resistant material. The required box is purchased at a specialized store and inserted into a plasterboard frame.
- Insulation material is laid between the drywall and the inside of the fireplace.
- For a large fireplace, it is best to purchase a factory-made fuel tank. Sometimes it is sold with a fireproof stand. The fuel tank is installed in the middle of the fireplace.
- Next you need to carry out the cladding work. For this, heat-resistant tiles or natural stone are used.
To ensure fire safety, you need to place a glass screen or a forged grate in front of the fire.
Choosing fuel for biofireplaces
Making a biofireplace with your own hands is not difficult. After its manufacture, you will have to regularly buy biofuel. Other types of fuel are not suitable for it; only specialized mixtures with the “bio” prefix can be poured into the burner. This prefix was given to fuel due to the fact that it contains plant or animal components.
Different brands of biofuels can be produced from beets or potatoes, or from wood chips.
Having made a bio-fireplace with your own hands, you need to adhere to the following principles in its operation:
- Choose fuel only from well-known manufacturers, whose quality is confirmed by appropriate certificates.
- Before adding fuel to the burner, you need to wait until it goes out completely and cools down.
- To light a bio-fireplace, use a special lighter with a long metal spout.
- Keep fuel containers away from hot surfaces and open flames.
If you purchase special fireproof decorative elements for fireplaces in the form of firewood, you can use biofuel to create the complete illusion of a real fireplace. This fuel does not produce soot or unpleasant odor; the only thing a biofireplace can produce is a small amount of steam. Some manufacturers add impurities to the fuel that color the flame different colors.
Do-it-yourself biofireplace video:
Source: //sampostroikin.ru/biokamin-svoimi-rukami/

Many people want to place a real hearth with a live fire in their home, but a city dweller cannot afford a full-fledged fireplace.
However, the modern market offers us a simpler and more original solution in the form of a biofireplace.
This system allows you to get a fire that does not emit anything except steam and a small fraction of carbon dioxide, which means anyone can install a biofireplace at home, in their apartment.
Ecological fireplaces are sold in a wide range in the store, but if you wish, you can make a biofireplace yourself. In this article we will analyze in detail how to make a bio-fireplace with your own hands, consider the entire production process step by step, study the operating principle of such devices and the main nuances in its design.
The most primitive alcohol fireplace
general information
The biofireplace is a simple system, the basis of which is the combustion of liquid fuel, bioethanol.
Biological fuel is nothing more than natural alcohol, so when burned, only steam and a small part of carbon dioxide are released.
Pure alcohol burns with a blue flame, but a yellow fire should blaze in a fireplace, so bioethanol contains various additives that add realism to the fire.
The simple operating principle of the system allows you to make a bio-fireplace for your apartment with your own hands. At the same time, you will not have to make excessive efforts during the work process, and the cost of materials will be insignificant, but as a result you will receive an original piece of furniture that will bring the warmth of a real living fire into your home.
Note that it is important not only that a homemade bio-fireplace is easy to manufacture, but also that for its operation it does not require the installation of a chimney, hood, or supply engineering systems and communications.
Everything you need for the system to function properly, regular ventilation of the supply room fresh air saturated with oxygen.
After all, as you probably know, oxygen is actively used in the combustion process of alcohol fuel.
Modest biological fireplace
Despite the fact that the operating principle and design of a biofireplace are always the same, there are a large number of different variations in the design of this device. Most often you can find the following varieties in stores:
- Floor-standing options can be installed along the wall or designed to be placed in the corner of the room. These systems can be large or small in size, allowing the bio-fireplace to be moved anywhere in the room.
- Hanging and built-in options have more modest dimensions. Such eco-fireplaces are hung on walls or mounted in special niches prepared in advance for these purposes. Interesting point thing is similar devices are fixed both in walls and in furniture, for example in cabinets, on coffee tables.
- Tabletop options are a miniature version of a floor-mounted biofireplace. These decorative devices will fit perfectly on your table, shelf or nightstand. The easiest way to make a desktop biofireplace yourself is to fully evaluate how such devices work.
Tabletop variation on the biofireplace theme
Regardless of which biofireplace design is chosen, factory models usually provide the ability to adjust the height and pressure of the flame. When self-made this can be done by working with the burners.
Do-it-yourself production of biofireplaces
In most cases, people decide to make a biofireplace with their own hands, having familiarized themselves with the models presented in the store and their prices. Having studied how a bio-fireplace works, you can immediately understand that there is nothing complicated in this system.
The device always consists of four basic blocks:
- frame for fastening elements;
- protective screen made of fire-resistant glass;
- fuel tank for bioethanol;
- burners.
If desired, a portal is mounted around the system, which allows you to fully integrate a biological fireplace into the interior, as usually happens with the classic version.
But despite all the simplicity, the cost of such devices is quite high, which is why in most cases it is more profitable to assemble a biofireplace with your own hands.
In addition, a device you make yourself will become not only an excellent piece of furniture, but also your pride.
You don’t have to make any extra efforts for this; simple skills in handling tools are enough, and all materials for a bio-fireplace can be easily purchased in suitable stores.
Hanging version of eco-fireplace
To assemble a biofireplace with your own hands, you need to prepare the following materials:
- To make a protective screen you will need glass. It is best to choose the hardened version, but in most cases the regular one will do just fine. The thickness should be chosen from 4-5 mm, this will be enough. You can buy a large piece and cut it yourself, but it is better to contact a glass shop, tell them the dimensions, and ask them to polish the edges. In this form, the glass for the bio-fireplace will look much prettier. In addition, in the workshop you can consult on methods for attaching the protective screen, because you can install it without gluing, or you can connect all the glass with sealant. The experts will tell you which heat-resistant sealant to choose.
- Metal containers and cans are usually chosen for the burner and fuel tank. In some cases, the fuel tank, frame and burner are a single unit, but it is best to provide an additional iron container that you will install inside the frame. The fuel block can be considered the main element of the system. Fuel should not leak out; the tightness must be at a high level. You can make a fuel tank for a biofireplace with your own hands by cutting out a metal tank and welding it together.
- To create a distributed fire that will occupy the space allotted to it, you will need a metal stack. The mesh is installed on the fuel tank. It is desirable that the cells in the grid be small; in extreme cases, you can fold the grid several times.
- The fire is brought to the grid using a wick, which can be an ordinary durable fabric cord. The wick for a bio-fireplace connects the fuel tank to the mesh, bringing the fire out.
- To decorate a biofireplace, you will need appropriate elements. You can use stones, pebbles, ceramic imitation coals, firewood, and so on. Decorative elements are loaded inside the biofireplace, directly onto the mesh.
For the system to fully operate, biological fuel is required. You can buy it in the relevant stores. Of course, you can make biofuel yourself, but you won’t save much from it, so it’s easier and faster to use a ready-made option.
You can find everything you need for a biofireplace in stores; there are no secret elements in its design.
Manufacturing nuances
When thinking about how to make a bio-fireplace yourself, the first thing that comes to mind is to find or draw a drawing or diagram of it. It will not be difficult to find such documents on the Internet or photocopy them in a store. As a last resort, you can draw drawings of a bio-fireplace with your own hands if you have the necessary skills.
A drawing of a biofireplace is necessary first of all in order to accurately verify the dimensions of the device.
In this case, it is advisable to draw a diagram of each part of the system in order to understand how your bio-fireplace will be arranged inside, how the parts will be attached to the frame, and what elements will be required.
A well-designed diagram of a biofireplace will subsequently greatly simplify your work on assembling the device, so when creating sketches, try to work out the details as much as possible.
Scheme of a small eco-fireplace
There are some nuances that need to be taken into account when developing such a device:
- The production of biofireplaces begins with the development of the design and general shape of the device. At the same time, do not forget about safety; you should decide how and where to install the protective screen. The glass protective screen should be placed at some distance from direct fire. It is believed that a distance of 15 centimeters will be sufficient. If the fire is closer, there is a chance that the glass will burst, even tempered glass.
- It is advisable to make the fuel tank for a biofireplace from metal with a thickness of 2-3 mm. Thinner steel sheets can simply burn out when exposed to temperature. For large fireplaces, it is best to buy a fuel block in a store; you should not neglect safety once again.
- You set the number of burners at your discretion, but experts recommend not placing large bio-fireplaces in small rooms. So for a room measuring 25-30 sq.m. You can install a couple of burners in the device, but no more.
Original eco-fireplace in the form of a log
Note that, if necessary, you can easily make a burner from a metal container of a suitable size yourself. Step-by-step instructions in this case will look like this:
- For open eco-fireplaces, the burner should be decorated; you can simply paint it the outside color of your choice. Of course, you can’t paint the inside, as the paint will certainly burn.
- A mesh is placed on top of the metal tank and secured. If the cells are too large, you can cut out several pieces. Note that the strength of the mesh is an important parameter, because we will place heavy decorative accessories on it.
- The bottom of the container is connected to the mesh with a wick. It’s okay if it shows a little; decorative elements will hide it later anyway.
When creating a tabletop fireplace with your own hands, you should experiment with the optimal size and type of burner that suits your decorative needs.
Assembly instructions
Having collected the components for the bio-fireplace, you can begin assembling the device. Step-by-step instructions will allow you to assemble a biofireplace with your own hands without unnecessary difficulties:
- The first thing we need to do is glue the glass protective screen. Silicone sealant dries in about a day, so the glass is joined in advance.
Making a Glass Protective Screen
- Then you need to assemble, find, and make a metal frame in the form of a box in which the burner will be installed and on which you will place a protective screen.
Suitable metal frame Installation of a protective screen
- At the next stage, the burner is placed in the frame. If the fuel was sold in a tin can, then it could well play this role. If the container was plastic, you can use any tin can of a suitable size.
We place the burner in the frame
- We place the wick in the jar, place it on the grid and cover it with decorative stones.
Preparing the metal meshInstalling the mesh inside the frame onto the burner
- We cover the resulting structure with a protective screen, add decorative elements and the homemade bio-fireplace is ready.
We cover the mesh with decorative stonesEcological handicraft fireplace
As you can see, creating an alcohol fireplace with your own hands is quite simple, but this is provided that it is small in size. For large-sized systems, the construction of a special portal will be required. The easiest way to build a structure is from plasterboard, an easy-to-use and inexpensive material. In this case, the procedure will be as follows:
- The first step is to prepare a platform for the biofireplace. It is necessary to protect the floor from high temperatures. You can make a screed on the floor or lay a brick.
- Then a bio-fireplace frame is built from a metal profile, which is securely attached to the floor and wall. Insulating material is placed inside the ceilings.
- The resulting structure is covered with plasterboard on the outside and ironed on the inside. tiles or metal sheets. Fireproof materials will protect the plasterboard box from the harmful effects of fire.
Construction of a portal for an eco-fireplace
- From the outside, the box for the bio-fireplace is decorated in accordance with the interior of the room. The finishing with stone and plastic panels imitating brickwork looks great. Forged elements are also welcome, especially the corresponding accessories located next to the fireplace. You can put firewood next to the portal, and throw decorative ceramic replicas of firewood into the firebox of the bio-fireplace.
- A fuel unit is installed inside the resulting portal. If the system is massive, it is best to purchase a ready-made device in a store.
- For guard external environment A protective glass screen is installed on the fuel block.
The resulting bio-fireplace will undoubtedly become the main element of the room, and a real, living fire will allow you to create complete comfort in your home.
We hope that now you understand how to make a bio-fireplace at home.
If you are quite ready to carry out the manipulations described above, create a bio-fireplace with your own hands, but if such work scares you, then just buy a ready-made device in a store.
It is noteworthy that such devices are sold assembled, so you will not have any difficulties in starting the system. Read the instructions, turn on the device and enjoy a live fire.
Source: //ochg.ru/kaminy/ekokaminy/kak-sdelat-biokamin-svoimi-rukami.html
3 options for making a bio-fireplace with your own hands
Modern models of bio-fireplaces have replaced outdated wood-burning fireplaces and have become an excellent alternative, and now you can install them not only in your home or country house, but also in your apartment or office. Modern models have many advantages, more advanced, also:
- easy to maintain;
- safe;
- environmentally friendly;
- aesthetically pleasing and attractive in appearance, can have different designs;
- compact, can be placed anywhere: on the floor, in the corner of the room, portable models are built into walls or simply placed on a table;
- convenient to use.
Features of operation
When installing a bio-fireplace, you no longer need to install a chimney, worry about preparing firewood, and, therefore, constantly rake out soot and get rid of soot. Of course, such a device on the market is not cheap, but you can manufacture and install it yourself, having correctly and accurately calculated all the parameters in advance, drawn up drawings, and prepared the material necessary for the work.
First of all, you need to decide on the location of the device in the room, The area for one burner must be at least 16 meters, also for safety reasons, you need to take care in advance of purchasing a special piezo lighter; matches and paper are not required. The bio-fireplace is practical, thanks to the protective glass screen it is safe and will not allow ignition or accidental combustion of nearby objects. The device can be installed quickly and easily in any place where you want to give the room an atmosphere of warmth and comfort.
A clear example of placing a bio-fireplace in the interior of an apartment will help you decide on the option of such a device that will match the style of your room.
Types of biofireplaces at installation location:
- Tabletop model– miniature, serves to imitate a fireplace, can be very diverse in shape and design.
- Floor bio fireplace perfectly imitates a classic wood-burning appliance and can have completely non-standard shapes, which allows the fireplace to be placed in a niche of any configuration or built into a corner.
- Wall model usually made of metal, the size does not exceed 1 meter, the flame is protected from the room by protective heat-resistant glass.
A biofireplace can have several burners, it all depends on the size of the device itself and how it is positioned. The fuel is gel or liquid bioethanol. It is better to use the second option; there will be no combustion products left. The volume of the fuel block can be 60 ml (for a miniature model) and up to 5 liters. You can make fuel for a biofireplace with your own hands.
You can control the fireplace, flame intensity and damper manually, or remotely, using the control panel.
Self-assembly
If you are thinking about how to make a bio-fireplace with your own hands, then read the following material. You will learn that such a design can be made in at least 3 variations.
Flame between two screens
Install the device on the floor, in another place, protecting the flame source with protective screens on both sides. To work you need to prepare:
- a panel made of thick plywood, plasterboard or wooden blocks, measuring 50x30 or 40x30 cm for installing a container in it;
- self-tapping screws;
- glass made of fire-resistant transparent material for the manufacture of enclosing walls (more about fire-resistant glass for fireplaces;
- fuel tank with a valve;
- a set of washers, bolts, silicone gaskets for fastening metal parts of the fireplace;
- legs made of plastic or metal as glass holders;
- rubber gaskets for glass;
- fire retardant paint or heat-resistant material to form a shield around the fuel container for safety purposes.
Now let's move on to the practical part. Let's consider manufacturing such a device step by step:
- Make a drawing indicating all required sizes.
- According to the indicated dimensions, make a base for the fuel tank by sawing off two identical pieces of lumber as a basis for attaching pieces of plywood to them.
- Cut out a circle of the required dimensions in the upper part of the panel, as well as holes on the sides. The frame for the lower part will be glass, which is convenient; if you choose a different material, the structure will be heavier.
- Treat the edges of all base elements; if using drywall sheets, seal the edges with putty, attach them to the frame at the bottom of the glass panel.
- Drill holes according to the bolt diameters. Glass is heat-resistant, but can crack when drilled, so this task is not easy to cope with; you need to act extremely carefully or entrust this part of the work to a specialist who has the necessary tools for this purpose.
- Make markings on the sides of the base to place the fasteners. Drill holes according to the bolt diameters.
- For strength, place silicone gaskets on the bolts, pass them through the holes of the glass and base on the inside of the frame, screw on the washers, then tighten with nuts. Try not to put too much pressure on the glass; carry out operations very carefully.
- Attach the sides of the glass screens to the base using decorative bolts.
- The legs for the panels also need to be first equipped with rubber gaskets, and then bolted in the same way.
- The structure is almost assembled, all that remains is to install the fuel container and insert it into the sawn hole on top of the fireplace.
- The entire surface around the burners can be covered with decorative non-flammable materials or stones, placing them on the base with special glue.
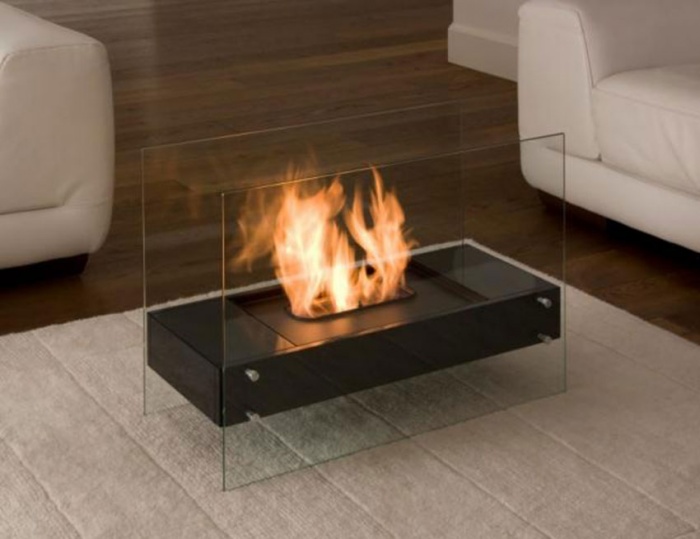
Aquarium type
This type is also easy to install and assemble, but it looks more attractive and respectable. To assemble this “aquarium” type model, you will need the following materials as materials:
- fireproof glass for the walls of the structure, or other material with a sufficiently thick thickness to avoid rapid burnout;
- silicone glue for gluing, sealing corners at the joints of glass walls. Silicone is reliable, it is what is used when assembling ordinary aquariums;
- wooden or metal flowerpot of square shape. Wood burns, so in order to avoid accidental fire, you first need to treat its surface on all sides with a special fire-retardant compound. It’s better, of course, to use a metal mesh to attach it to the flowerpot and lay firewood on top or decorative stones. The dimensions of the mesh should be equal to the measurements of the flowerpot + 2–3 cm for the allowance on top;
- smooth, even decorative stones. Their number depends on the perimeter of the flowerpot, the depth of installation of the mesh;
- 2 containers for the fuel tank are slightly lower in height than the base by 3-4 cm. The containers should be different in size; the smaller one can easily fit into the larger one. The tank is installed directly in the center of the flowerpot; if the material for the flowerpot is wood, then it is additionally wrapped around with isover for better insulation;
- wick in the form of a cotton cord for convenience when igniting biofuel. A flowerpot is considered an important detail in a biofireplace, since all further steps in assembling the structure will depend on its size. You can buy a flowerpot in a store or make it yourself.
Source: //PechnoeDelo.com/dekor/biokamin-svoimi-rukami.html
How to make a biofireplace - step-by-step instructions
Building a home fireplace from brick is not accessible to everyone. Someone lives in apartment building, where it is unrealistic to build a wood-burning fireplace, and owners of private homes are often put off by the cost of the structure.
There is a solution: buy or order from an online store a decorative burner that burns smokeless biofuel and produces a beautiful blue-yellow flame.
We propose to solve the issue even cheaper and want to tell you how to make a similar bio-fireplace for your apartment with your own hands.
Let's understand the principle of operation
The biofireplace owes its existence to devices invented long ago - an ordinary alcohol burner and an oil lamp.
The operating principle is as follows: in a container with liquid fuel an element of finely porous material – a wick – is immersed.
Fuel, obeying the physical law of capillary rise of liquid, saturates it to the very top and evaporates through the open opening. If these vapors are ignited, we get an even, stable flame, as shown in the photo.
The heart of a biofireplace, made from modern materials, is a round or oblong fuel block. It includes the following basic elements (shown in the diagram below):
- container of of stainless steel with a filling neck, equipped with an open opening on top - a burner;
- a damper or lid that blocks air access and is intended for extinguishing a fireplace;
- fireproof ceramic filler with many small pores;
- a side system that prevents fuel from splashing out;
- small portable structures are equipped with protection against ignition when tipping over.
In cheaper options, non-flammable fiber can be used instead of ceramics
Reference. The price of inexpensive models available for sale starts from 80 USD. e. The lion's share of this cost falls on the stainless steel firebox body and ceramic filler.
Corner version of a wall-mounted biofireplace
Based on the design method, eco-fireplaces are divided into the following types:
- Tabletop. They are small in size and portable, but require careful use. The product must not be placed or lit under flammable interior items (for example, shelves).
- Floor-standing models are equipped with both a point and an oblong burner. They can be carried, but placed only on the floor.
- Wall-mounted options are rectangular in shape and can be equipped with several burners.
- Built-in. Designed for installation in a niche or inside a finished fireplace portal.
Tabletop models (left) and built-in (right)
How a factory-made biofireplace firebox functions, watch the video:
Pros and cons of products
The main and obvious advantage of eco-fireplaces is that visually they can replace a real fireplace and create an atmosphere of comfort and coziness in an apartment or private house. Other advantages look like this:
- the design is simple and reliable, there is nothing to break in it, which means no repairs are required;
- due to the smokeless combustion of a small amount of fuel in the room, there is no need to install a chimney;
- hot coals do not fly out of the firebox and, in general, the device is considered fireproof, provided that the manufacturer’s instructions are followed;
- ease of maintenance.
Elite and expensive models of biofireplaces are equipped with electronic control units that allow you to control the operation and remaining fuel on the display, automatically ignite and extinguish the flame, and also control the device from a distance via a cell phone. They also have built-in safety systems - protection from children and pets, rollovers, and so on. But the prices of such products start from 3000 USD. e.
Now about the disadvantages of biofireplaces:
- The burner practically does not heat the room. The flame is natural, but too little heat is generated due to the slow burning of a small amount of fuel.
- Fuel supplied to order and sold in stores is quite expensive. The cheapest bioethanol in a liter container costs from 7 USD. e., and a branded one with the smell of coffee from the Kratki brand – 16 USD. e.
- No matter how little combustion products are released, supply and exhaust ventilation is required to remove them.
Manufacturing - step-by-step instructions with photos
To make a primitive fuel block for a biofireplace with your own hands, which does not require any additional design, you need to prepare:
- a wide bowl made of heat-resistant glass (the kind sold among kitchen utensils);
- empty tin of drink or beer;
- some basalt insulation;
- small and medium-sized decorative stones.
To begin, place the jar in a bowl, mark a line along the height of its side and cut it with a utility knife.
Then drill the bottom of the can in 3-4 places, place basalt fiber tightly inside and insert one half into the other, as shown in the photo.
Place the improvised burner in a glass vessel and decorate it beautifully with stones and shells. Pour fuel into the can through the holes and light it. You can use medical alcohol for testing. How such a homemade bio-fireplace burns can be seen in the next photo:
The manufacturing process is demonstrated in more detail in the video:
If you have a welding inverter in your household that you know how to use, you can make the container out of stainless steel, and then secure it between two thick glasses, as shown in the drawing.
To make a linear version of the burner, take a profile stainless pipe with a cross section of 4 x 4 cm and a wall thickness of 2 mm. Then cut off a corner along its entire length and make cross-shaped slits on the edge with a grinder.
Next, hermetically weld the corner to the cut place on the pipe, turning it edge down to create a depression. Fill the inner cavity of the burner tightly with non-flammable basalt wool, and then weld the ends.
The last step is to make a frame for your fuel block. Cut a frame from thin metal and carefully attach it to the burner. Then fill the latter with ethanol (aka ethyl alcohol) and set it on fire.
You can attach legs to the finished fuel element, or better yet, build it into a fireplace portal or a painted metal body that can be hung on the wall. An example of such a box is shown in the drawing.
Conclusion
In fact, a biofireplace is a fairly simple household appliance, although expensive in its factory version. Using the examples, you were convinced that, if desired, it can be made independently without special costs.
As for the biofuel sold, in reality it is ordinary alcohol with chemical additives that give the fire different colors and even smells.
To avoid buying this expensive fuel, take medical ethanol and add 5-10% gasoline to color the flame of a homemade fireplace.
Biofireplace is a modern replacement for wood-burning fireplaces with the possibility of installation in an apartment or office. Biofireplaces have a lot of advantages: there is no need to install a chimney or prepare logs, compactness, the ability to see a living flame, ease of maintenance, environmental friendliness, safety, aesthetic appearance, absence of soot and soot.
But such pleasure is very expensive. We suggest you make a bio-fireplace with your own hands, it’s really simple, it won’t take you much time and will significantly save your budget!
I use special lighters to light biofireplaces.
It is not safe to use matches and newspapers for this purpose.
Before you start making a bio-fireplace, you need to decide on its type (location in the room).
- Tabletop – miniature imitation fireplaces. The flame burns behind a protective glass screen. Shapes and designs are very diverse.
- Wall-mounted biofireplaces are made of metal, the front part is also protected by glass. The size usually does not exceed a meter.
- Floor-standing biofireplaces can imitate classic wood-burning fireplaces or have a non-standard shape. Such bio-fireplaces are located in niches on the floor, in the corners of the room (including built into a corner).
The number of burners (fuel blocks) in biofireplaces can be very different: from one to five or ten pieces, depending on the size. And taking into account the fact that you are going to do everything yourself, you can determine the required number of burners and the power of each individual unit!
Type of fuel that can be used in a biofireplace:
- bioethanol
- gel-like.
The second is less successful, since combustion products remain.
The volume of the fuel block can be very different; it is recommended to make each individual block no less than 60 ml and no more than 5 liters.
The fireplace control can be:
- manual (flame intensity is controlled manually by a valve);
- automated (remotely using a control panel).
Video - Automation for combustion control Jotul ERS
Making a tabletop biofireplace with your own hands
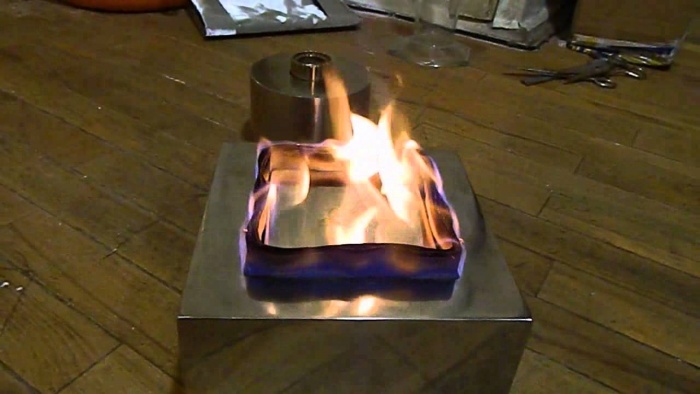
A miniature fireplace is assembled by hand from inexpensive materials within a few hours. The simplest form is with a square or rectangular base.
Materials for work:
- glass;
- glass cutter;
- silicone sealant for gluing glass;
- stainless steel mesh;
- steel box for the base of the fireplace;
- wick (cord);
- bioethanol (fuel);
- metal glass – container for fuel;
- heat-resistant stones and non-flammable composite materials.
Step-by-step instruction:
1. We make a calculation.
The distance from the burner to the side windows should be more than 15 cm. The same distance is taken even if there are two or more burners. The number of burners is no more than 1 piece. for every 16 m2 of room.
2.According to the dimensions of the box and calculations, cut out 4 rectangular glasses.Using silicone sealant We connect the glasses to each other. We secure the result with supports and leave it for a day until it dries completely.
7.We decorate the mesh with heat-resistant stones, ceramic logs and other non-flammable materials. The present stones will additionally distribute the heat from the burner over the entire area of the future bio-fireplace.
8. We install the dried glass on the box, having first cleaned off any silicone that has appeared from the seams.
It is impossible to paint and paste over the outside of the box and, especially, from the inside, since the paint can not only emit toxic fumes when heated, but also catch fire.
You can simplify the task and use only two glasses installed parallel to each other. They will not have to be glued together with sealant, but they will need to be carefully secured in a metal box strictly vertically.
If you have a flask with a round cross-section, you can make a bio-fireplace in the shape of a glass.
To work you will need:
- glass flask without a bottom (diameter at least 30 cm);
- a clay pot or a metal round jar with thick walls (the size should correspond to the size of the flask);
- heat-resistant pebbles or sand;
- metal grid;
- metal scissors;
- metal glass for the burner, wick, fuel.
Fireplace assembly procedure:
- install the glass flask in the flowerpot;
- Place the assembled burner (glass with fuel and wick) in the center;
- Place small pebbles or sand around the burner;
- cover the burner with two layers of metal mesh, cut to the diameter of the flowerpot (using metal scissors);
- We place a layer of heat-resistant decorative stones or other elements on the mesh.
Floor bio fireplace
If a small portable bio-fireplace does not inspire confidence in you, and the space in the room allows you to acquire a wall-mounted or corner analogue of a wood-burning fireplace of decent dimensions, we recommend that you make a niche for the bio-fireplace from plasterboard, to do this, follow these instructions:
Materials for work:
- drywall (non-flammable);
- metal profile (guides and rack profiles);
- ceramic tiles for finishing the firebox;
- metal screws and self-tapping screws with a countersunk head, dowel-nails, tile adhesive (heat-resistant), insulating materials, putty, building level, tape measure, screwdriver, metal scissors, knife for cutting drywall;
- material for the future mantelpiece;
- decorative elements for decorating a floor biofireplace.
Fireplace assembly steps:
- We decide on the location of the structure and draw a sketch of the future structure on checkered paper (observing the proportions and marking the dimensions).
- Frame assembly
- We apply markings to the floor and wall;
- using this marking we attach guide profiles (pre-cut to the required length);
- We insert rack profiles into the guide profiles and fasten them with self-tapping screws;
- We check verticality with a plumb line;
- We fasten the profiles to the wall with dowel nails;
- For structural reliability, we fasten the racks with jumpers;
- if the fireplace has arched lines, cut the profile with metal scissors and bend it according to the drawing;
- We lay insulating material (for example, compressed basalt wool) into the walls of the structure.
Bio fireplace casing
We draw markings on the sheets of drywall and use a knife to cut (make an incision on one side and break the sheet of drywall). We screw in the screws every 10-15 cm, slightly recessing them. Apply gypsum putty.
We trim the walls and bottom of the firebox with ceramic tiles (using hot-melt adhesive). It is imperative to leave a recess at the bottom of the firebox, into which the burner will subsequently be installed.
We rub the seams. We proceed to the installation of the mantelpiece and decorative elements (pilasters, stucco molding, finishing stones, ceramic tiles, mosaics, wooden elements). You can put heat-resistant stones and artificial logs inside the fireplace, which will add aesthetics to the biofireplace.
For additional protection, it is advisable to install a fireplace grille made of heat-resistant glass or forged.
Biofireplace burners
The essence of a biofireplace is to burn biofuel in a special burner. The simplest of them is a metal glass with a wick. But it is impossible to control the flame in such a burner. You can purchase the factory version, but the price will range from four to sixty thousand rubles and more. Doing it yourself is much cheaper.
Video - DIY bio-fireplace burner
Fuel block with valve
For such a burner it is used sheet metal. It is cut out with a grinder or metal scissors and secured by welding. Inside the burner there can be one chamber or two, connected by perforations. Sometimes mineral wool is placed inside. In this case, it is not the fuel itself that burns, but its vapor.