Homemade heaters for home, garden and garage. Homemade heaters Do-it-yourself economical heater for the home
The need for comfortable warmth increases in the off-season and with the onset of cold weather. But not all homeowners have the opportunity to purchase reliable factory-made heating equipment, the cost of which is often inflated. In this case, an alternative option is a home-made heater from available materials, which can easily cope with the task.
Basic requirements for a homemade heater
Any type of heating equipment for the home, regardless of design features and manufacturing complexity, must meet the basic requirements:
- Ease and availability of assembly.
- Safety and reliability in operation.
- Economy in energy consumption.
- High performance and working power.
- Affordable cost of structural elements and materials.
- Ergonomics and ease of transport.
- Durability and practicality.
Among the existing heaters, the most efficient and productive are: infrared, quartz and ceramic emitters, electric convector.
Advantages of homemade devices
Home-made appliances for heating a city apartment, a country house or a summer residence have significant advantages over factory products. They are as follows:
- Possibility of manufacturing from affordable and cheap materials, which leads to a reduction in the cost of the finished device.
- Simple and compact design that can be used in a variety of environments.
- Ease of use and transportation.
- High efficiency with silent operation of structural elements.
- Self build quality.
Today, infrared heaters are available for self-manufacturing, which are the safest and most efficient in operation. If more powerful equipment is required, then you can assemble an oil cooler, an alcohol heater, a heat gun, a battery and gas device.
Making an infrared heater with your own hands
Modern IR emitters for home heating are reliable, practical and have good efficiency. Such devices emit infrared radiation, which, without interacting with air, contributes to the rapid heating of various surfaces in the room. Thus, they efficiently convert electricity into heat energy.
The most affordable option for home assembly is an economical film heater, which is based on a heating film.
For work, you will need to prepare the following materials and tools:
- two identical pieces of glass
- aluminum foil,
- sealant,
- paraffin candle,
- epoxy adhesive,
- electrical cord with plug
- candle holder,
- soot cleaning sticks,
- sponge for cleaning glass surfaces.
Do-it-yourself infrared heater is assembled according to the following scheme:
- Glass is thoroughly cleaned of dirt and degreased.
- A conductive base for the heater is assembled. With a candle, soot is applied on the back of the glass blanks, which acts as a kind of current conductor. Before starting the procedure, the workpieces are slightly cooled.
- Along the perimeter of the blanks, the surface is cleaned of soot with chopsticks to obtain an even edging 0.5 cm wide.
- Strips are cut from the foil with a width equal to the area of the conductive glass base. They will be used as conductive electrodes.
- One blank is placed on a flat surface with the smoked side up, and glue is applied in a thin layer around the perimeter. Foil strips are superimposed on the glued surface with a slight shift beyond the edges of the workpiece.
- From above it is covered with a second workpiece, respectively, with the smoked side down, it is pressed to set the glue. All joints are carefully treated with sealant.
- Checking the power of the finished structure. If the power indicator does not exceed 100 W per 1 sq. m of the room, then the heater is connected to the network using a conductive wire and plug.
A multimeter measures the resistance of the conductive base of the heater. To calculate the power, a simple formula is used: N \u003d U × U / R, where
N - power, U - mains voltage (220 volts), R - resistance.
For example, R is 20 ohms, then N = 220 × 220/20. The result is 2420 watts. This power is enough to heat a room of 25 square meters. m.
Making an oil heater with your own hands
A homemade oil heater is distinguished by functionality, safety and reliability. Such a device can be used for heating residential and technical premises.
Structurally, the device consists of a metal sealed case filled with a coolant - technical oil.
To independently make a powerful heater from a battery, you will need the following materials:
- used battery,
- tubular heater,
- technical oil,
- heating temperature controller,
- conductive cord for 2 cores with a plug,
- electric pump with a power of 2.5 kW,
- metal corners,
- tubes capable of withstanding heating temperatures up to 160 degrees.
All work is carried out using a welding machine and an electric drill.
The technology for manufacturing and assembling an oil heater includes the following steps:
- Production of a rectangular frame of the required size for mounting the device. The corners are cut into segments of the desired length and welded together into a rectangular structure. Legs are welded to each corner at the bottom.
- Holes are made in the prepared container for the installation of heating elements. The holes must be located at the bottom of the appliance. An additional hole in the upper part of the tank will be required to fill the coolant. For cutting, a grinder or welding is used.
- Installation of an electric pump on metal plates welded to the heater body.
- Heat-resistant tubes are used to fix the pump. They are welded to the body and connected to the pump using shutoff valves.
- Fixation of heaters on bolted connections in the holes provided for this.
- A fitting with an external thread is welded to the inlet for the coolant to install a protective cover. A simple version of the cover can be made from a cut of a pipe with an internal thread type, which is screwed onto the fitting from above. A rectangular metal plug is welded onto the other end of the pipe to prevent oil from spilling out.
- The container is checked for leaks by creating a slight internal pressure.
- Connecting heaters in parallel to increase the heat output of the heater.
- Installation and connection of a thermostat, as well as a conductive cable with a plug. Installation of the container on the prepared frame and additional grounding. Filling the coolant into the radiator.
Assembling a gas heater with your own hands
No less popular for home use is a home-made economical heater without electricity, powered by gas. Such a device provides space heating due to infrared radiation and air convection.
To make a gas heater, you need to prepare the following materials:
- gas burner and shut-off valve,
- sieve in the form of a hemisphere,
- sheet galvanized steel,
- metal mesh.
The assembly diagram of the heating device is as follows:
- A pair of round blanks is cut out of galvanized steel, the diameter of which is equal to the diameter of the sieve with small protrusions.
- A gas burner is fixed to one workpiece with bolts. Further, in the opposite direction from the installed burner, the protrusions are bent. A sieve is screwed to them so as to close the burner. In this case, the sieve is used as a heat dissipator.
- The metal mesh is bent in the shape of a cylinder and fixed to the ledges so as to cover the sieve with the burner. Fasteners can be metal rivets. Visually, the device looks like a cylinder, inside of which a burner is installed, and on top of it - a sieve and a grid.
- From above, the cylinder is closed with a second steel billet with a folded protrusion outward. Next, the upper part of the structure is fixed to them.
- The finished heater is connected by a gas hose to a cylinder or a centralized gas supply line.
Homemade heat gun
Another option for equipment that you can assemble yourself is an electric heater like a heat gun.
To make a home heat gun you will need:
- metal cylindrical container (bucket, cut cylinder),
- heating element - a spiral from an electric stove,
- metal grill,
- fan,
- conductive wires,
- switch.
The assembly of the heat gun is carried out as follows:
- The grinder cuts off the bottom part of the structure of the prepared cylindrical container. It turns out a through blank.
- The grill is cut to the diameter of the container. The spiral is fixed on the grate so that the stacking diameter is smaller than the diameter of the container.
- On the sides of the container, horizontal rectangular holes are made to insert a lattice with a fixed spiral. Thus, the spiral is indented 3 cm from the edge of the container.
- From the spiral, conductive wires are led out of the container walls through special insulators. Outside, a circuit breaker with additional insulation is fixed on the tank wall.
- On the opposite side of the grille, a fan is installed, which is securely fixed to the walls with self-tapping screws. The device is connected to the machine.
- Holes are made along the edges of the body for mounting supports with fixation on nuts. The finished structure should be as stable as possible.
- Test run of the finished heater. First, the fan turns on, then the coil is energized.
To construct a home electric heater with your own hands from improvised means, the cost of which is low, is not particularly difficult, so even a novice master can handle this task.
The article will consider an example of how you can make the simplest heater from improvised means. Of course, this is just a sample showing the principle of operation of the device, the process of assembling it, and so on. But on the basis of the described scheme, it is possible to assemble a more powerful option, with which it will be possible to heat a garage or a house without problems.
the device works directly from a 220 volt network, no power supplies are required.
Materials and tools for creating a heater:
- two pieces of glass (you can cut any necessary);
- some aluminum foil
- an ordinary candle;
- sealant, glue and so on;
- a cotton swab or any other similar object;
- a piece of wire with a plug (two cores);
- it is desirable to have a multimeter;
- soldering iron.

Heater manufacturing process:
Step one. We create an analogue of thermal film
First, the glass must be thoroughly washed and cleaned, there should be no traces of dirt and grease on it. Next, an ordinary candle is taken, set on fire, and with the help of it you need to properly smoke one half of the glass. In total, the author moved the glass back and forth about 4 times so that it smoked well. You also need to make at least three pauses before "smoking". That is, smoke the glass the first time, then the second and again the third. The stronger the glass is smoked, the stronger the heater will heat up.
Step two. Construction assembly
Now you need to take a cotton swab and carefully collect excess pieces of soot on the glass. In total, you need to clear a distance of about 0.5 cm along the edge. Next, you need to take the foil and cut out two electrodes from it, in width they should be the same as the width of the remaining soot on the glass.
Now you can assemble the device. The electrodes are applied to the soot, and glue is applied to the edges of the glass. Now you need to carefully press the halves together and let the glue dry. That's all, the heater is ready.

Step three. Heater Tests
As a result of testing a homemade heater, it was possible to determine that it has a resistance of 40 kOhm. The thicker the soot layer, the lower the resistance and the higher the temperature, and vice versa. As a result, the calculated power of the sample was about 1.2 W.
When the heater was connected to the network, it began to heat up very slowly, while in the 40th minute its temperature reached 37 C degrees. The temperature did not rise above, apparently this is a turning point, at which a balance has come between heating and heat transfer.
As a result, the device works normally and you can collect a sample of an already large size. By the way, the picture of soot can be varied, it is not at all necessary that it be a strip. Thus, you can make any picture that will warm no worse. In any case, this is only a sample and there are still many ways to improve the system.
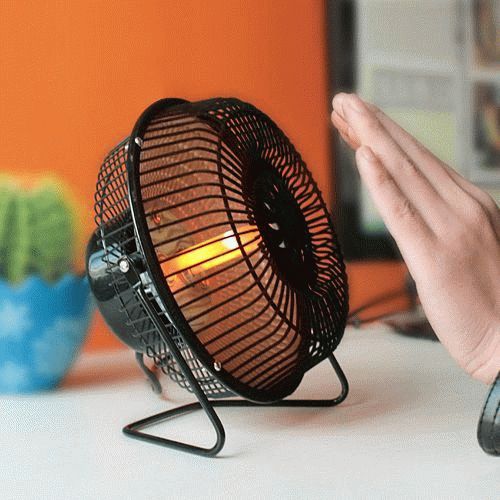
In this tutorial, I will show you how to make a small electric heater that runs on 12 volts and consumes 80 watts of power. It gives a good warm breeze which is enough to warm your hands. The mini heater is very easy to make, made from a computer cooler in less than 30 minutes.
Heater parts and tools


Details you will need:
- Computer fan 12 V, with dimensions 40x40x10 mm.
- Wire for connection, not less than 1 square millimeter in cross section.
- Approximately 1 meter of thin nichrome wire can be taken from a burnt hair dryer.
- Approximately 15 cm thick copper or steel wire.
- A piece of sheet metal, somewhere 40x160 mm. You can take it from a can.
- 4 screws with nuts for fastening to the fan.
- Insulating tape.
- Piece of wire mesh.
- Soldering iron with solder.
- Hacksaw.
- Multimeter.
- Lighter.
- Screwdriver.
Heating element manufacturing
Before starting to make a heating element, it is necessary to select the size of the nichrome spiral to ensure even distribution of heat.I cut segments of the spiral and measured the current of each. Initially, I chose the distance where to cut by measuring the resistance of 8.6 ohms approximately. As a result, each section will consume about 1.4 A of current. There will be five such segments and the current will eventually be a little less than 7 A. I do not take into account the fan.

After preparing the spirals, we proceed to the manufacture of holders for them. They are made from thick wire. We bend such squiggles as in the photo.

We try on nichrome spirals for them so that during installation they are at some distance from the fan. And touched nothing but the ends.


We fasten the holders to the fan with screws.

We dress all heating coils.

Solder the joints. Solder with active flux, as nichrome is practically not soldered.

Wire connection
We clean the fan wires and connect them to the heating element, clamping them with screws on the other side.

On the other hand, we pass the power wire and connect it to the heating element on the other side.


To test the operation of the heater with a fan, we will use a powerful power source. I took the battery. We connect and measure the consumed current. As expected, it is about 7 A. All elements are heated evenly, blown with air from the fan and hot air comes out.
Heater housing

The body can be made of tin from cans. Take a sheet of metal and cut a 4x16 cm strip out of it, bend it into a 4x4 cm square. Then solder everything with solder and the case will be ready. Make sure the fan goes into the case.


The grid can be taken or soldered from pieces of wire. We take the dimensions according to the body. We insert the grid into the body and solder it in the same way.
Today we will consider a number of designs of heaters for topical cases from life. People need devices everywhere:
- in the cellar;
- Outdoors;
- in aquarium;
- in the garage and in the country.
Consider how to make a heater with your own hands, from what elements. We express our gratitude to the enthusiasts and professionals who posted on the forums and websites witty options for the design of heaters. It remains to analyze the ideas and summarize what has been seen.
Oil heater for garage
If an old unwanted car radiator is lying on the ground, just fine. Suitable for hanging from central heating, made of sheet iron. To make an oil heater with your own hands, you will need oil. Technical is suitable, better - used purposefully for elevated temperatures. For example, for engine cooling. Look for transformer oil - such oil is designed for exposure to extreme factors.
Criteria! The oil tank does not reach 80 degrees Celsius. The average value is 60. When choosing an oil, look at the coefficient of thermal expansion.
Start with the frame. We take a sealed radiator into work, it is easy to guess that the design weighs a lot. For the manufacture of the frame of the oil heater, corners are useful, for the construction of a frame mounted on wheels. It is difficult to offer a specific design, preferably suitable for transportation. Corners are fastened by welding.
A pair of holes for heating elements is made in the bottom part of the radiator. Borrow heating elements from old appliances or buy from merchants on the market. The oil heater is equipped with a pump designed to pump the working fluid through the heating elements. It needs an electric motor to run.
The number of heating elements in the oil heater is selected based on the required power of the device. The pump is installed without touching the heating elements. The jet stream is directed along the heating elements. The oil heater is completely sealed. We weld the joints, in extreme cases, solder them. For emergency draining of oil, provide a screw cap. Install a pressure relief valve. This will protect the radiator from damage.
The heating elements are electrically connected in parallel, the maximum power of the network is 230 V. To regulate the temperature of the oil heater, complete the design with switches. After testing the complete product, mount the radiator on the frame, and plug the electric motor and switch into the box. Do not forget about grounding: a garage is not a place where elementary safety rules should be neglected.
The resulting device will not allow the owner to freeze. Now let's look at how to make a heater for vegetables and other food in the cellar.
Cellar
Frozen potatoes turn black and lose their taste, they are simply not stored. A small homemade heater will keep the product from freezing.

The author of the invention recommends using the power section from the voltage stabilizer on the KREN12A chip. The power transistor and a pair of resistors are tightly mounted on a sheet aluminum heatsink. The point is to transfer maximum heat to the metal. Resistors are mounted on a special heat-conducting gel. The tool, for example, lubricates the contact pad of processors in personal computers.
It is possible not to use a textolite substrate by making electrical connections with copper. Glue the latter on an aluminum plate for reliability, a home-made heater is ready. Power is supplied by 25 V DC.
According to the author, the transistor quickly heats up to 75 degrees Celsius. Resistors, prudently mounted on a special gel, are also heated. The temperature of a homemade heater reaches 50 degrees. If placed under a potato tray, the heat generated is enough to prevent freezing of agricultural products.
For home
When it's cold at home, you can make a homemade heater from an old computer power supply. The cooler must be in good working order, as a last resort, to create a homemade heater, replace the broken fan. Product idea: replace the getinax printed circuit board with a substrate made of non-foil textolite, to which strips are attached for winding a nichrome spiral.
The current heats the coils of wire, the fan blows a warm stream over the structure, the owner rejoices in the warmth.
So let's get started. It is logical to start by calculating the power and buy or cut off the required amount of nichrome wire. For a homemade heater, it is better to provide for the presence of two separate spirals so that the temperature can be regulated.
For the frame, a textolite without foil will go, in which holes are drilled under the wire. Three strips are proposed to be installed in parallel. The layout of the holes in a homemade heater corresponds to the principle of presence. It is difficult to advise, it is easier to decide on the place what and where to drill.
With the help of small metal corners, the planks are mounted on the substrate, parallel and at an equal distance. Now we wind the spiral of a homemade heater. Do not touch the body or structural parts other than the slats. To power the cooler, you will have to invent something like a rectifier from diodes, a capacitor, and a small-sized transformer.
The coil is connected directly directly to 220V AC. The resulting device is added with switches for spirals and will begin to blow warm air on the owner. Of course, the design burns oxygen, in addition, it will smell like burnt. Created exclusively for unplanned cold weather.
Fishing
A portable ceramic gas infrared heater is expensive, in addition, fishermen carry their belongings on themselves. For carrying, an iron box is traditionally used, which is either rolled on a sled or hoisted on the back. Who wants to lug a 27-liter gas cylinder in addition to a 1.5-kilogram heater.
Some enthusiasts suggest making a do-it-yourself tent heater from a gas burner for cooking. The size, together with the capacity, is slightly larger than the Dichlorvos bottle. Naturally, take a small device with you on a fishing trip.
The author of the invention suggests using a strainer, a small piece of stainless steel mesh, steel plates for fasteners. The idea is the principle of operation of light gas infrared heaters. The gas burns, heats the grid, it radiates heat to the sides. The author shows that this design is much more efficient than a store-bought cooking stove when it comes to heating.
A cylindrical nozzle is assembled for the torch. The sidewall is curved from a piece of stainless steel mesh, the bottom and roof are made of steel. Each round plate is supplied with four grips along the edges. As a result, not a circle is cut out of the sheet, but rather, a gear with teeth.
When assembled, the design resembles an automobile filter in shape. A hole is cut in the bottom under the fire of the burner, a tea strainer is put on upside down on the bent teeth. It is possible that we can attach a similar strainer to the roof to increase the radiating surface, but the author, creating his own gas heater, did not do this.

How to attach the created “filter” to the burner, everyone will decide for themselves. It's time to deal with the elimination of freezing gas in the cylinder:
- A thick copper wire wrapped around the heated grid and the gas tank helps little. Maybe things will go better if you insulate the top with a sock or fireproof PENOFOL.
- The author suggested using a copper bus instead of a wire. The thermal conductivity, of course, is much higher than that of a single core, things went smoothly. The tire is a piece of strip copper. One end is attached to a hot grid, the other to the cylinder.
Obviously, you need to stock up on an additional cylinder for the device. Just in case the first one isn't enough. The design will not interfere with those who travel by car.
Aquarium
It is enough to pour a saline solution into a U-shaped tube, provide plugs with threaded carbon electrodes at both ends to get a home-made heater for the aquarium. The brine conducts electric current, simultaneously heating up and transferring heat to the walls of the flask. Power is selected by changing the salt concentration. Do not allow the level of the solution to rise above the surface of the water.
Skeptics argue that infrared rays are harmful to humans. At the same time, they willingly bask on the beach, forgetting that the Sun is the most powerful emitter of these rays. Our star has been warming the Earth for billions of years, but nature exists. But there is some truth in skepticism. We have all been burned while sunbathing on the beach, touching a hot frying pan, boiling water or any very hot substance will inevitably lead to injury.
To avoid this natural risk, an infrared film heater was developed, which is easy to make with your own hands. A distinctive feature of heating with infrared rays is the fact that it is not the air that is heated, but objects. Thus, the consumer begins to feel heat almost instantly after turning on this heater. In traditional heating systems, heaters first we must raise the temperature of ourselves, then the air in the room, and only after that we begin to warm up.
A heater made to use radiation does not have a heat transfer fluid that can leak or freeze if you leave for a few days in winter and turn off the system. Boiler, pipe pump and batteries are missing. All of its components.
- Heating element - a lamp, spiral or thread that generates thermal energy.
- Reflector that distributes heat throughout the room.
- Wires.
- Thermostat to set the heating level.
Make the simplest infrared heater with your own hands maybe a child. To do this, just place a sheet of foil behind the radiator. For the manufacture of electrical devices of this type, there are many schemes. Various heat sources can be used - from a spiral for an electric stove to glued sheets of plastic with a graphite layer. A wide range of reflectors, up to chocolate foil and a suitable voltage regulator.
Infrared film
The most modern material for the manufacture DIY heater is an infrared film. Consists of three layers.
- The basis. Electrotechnical polymer with high refractoriness parameters.
- The middle, working, layer is a carbon non-woven fabric, which is a heating element. Silver and copper contact bars.
- The outer lamination is made of the same substance as the base of the film.
Since the installation does not require special surface preparation, and the material itself is flexible, such a do-it-yourself infrared film heater easy to mount on any profile and material of the wall, floor or ceiling.
Work order
 Infrared film as a heater
 - When choosing an IR heating scheme as the main one, it should be remembered that the total area of the heater will be about 70% of the area of \u200b\u200bthe room.
- In the case of installation on the ceiling, the height must be at least 2.5 m.
- It is impossible to assemble the circuit at sub-zero ambient temperatures.
- Draw the boundaries of the areas where the heater will be assembled. When assembling an infrared heater with your own hands, the restriction scheme must be strictly observed. Wooden and metal elements of the building must have a distance of more than 50 mm from the film. The distance to electrical appliances and extraneous wiring cables is at least 20 cm. Each section must have a load limited to 10 A. The wires that will connect the film fragments are laid at a distance of 2.5 cm from the edge of the section.
- Calculate the connection points of the heater parts, and fix the wires. Each sheet must be connected to the main communication in parallel, for this use a copper wire with a cross section of 1.5 mm2.
- At this stage, it is advisable to invite a professional electrician to advise on how to make an infrared heater with your own hands. without violating the order of connection of electricity. Connect the film connection wiring to the lines going to the temperature controller installation points. The total power of the sections connected to one regulator must correspond to its power. Trunks are made of 2.5 mm wires 2 . Bring them to the connection point with the main cable.
- Install a 5 mm thick reflector over the entire surface area. In places where devices will be connected, bring out the wires.
- Fix the film at the points provided for this.
- Lock thermostats.
- Connect and isolate all contacts.
- Turn on the heater. Touch with your hand, heat should be released, but not cause a burning sensation.
- Install the decorative layer, the distance to the film can be from 10mm to 150mm. For walls and ceilings, it is better to choose moisture-resistant materials. If the work was carried out on the floor, then linoleum, laminated flooring, parquet, carpet or tile can be laid directly on the film.
Repair

Now that the question how to make a heater with your own hands is decided, consider the possible causes and methods for repairing such a system.
One of the main advantages of this heating scheme is its survivability. Carbon strips work over their entire surface, and their contact with the tires is carried out for the entire length of the material. Due to this, even in the event of breakdown in one or more places, the remaining area of each section or strip of film will continue to work.
This effect can be compared to a sheet of metal to which an electric current has been applied. You can make a hole at any point, anyway, the sheet itself will remain energized. With such damage, repair of the infrared heater is not required.
Suppose that a wire break has occurred, and one or more sections have stopped working. With such a defect, the remaining area of the heater will continue to heat, because each fragment is connected in parallel.
It is impossible to eliminate this breakdown without disassembling the decorative layer. The only way to deal with the problem can be preventive measures. During installation, try to avoid large fragments, then the failure of a small area will not affect the level of heating. Attach contacts securely. Do not overload the wire. In addition, such a malfunction has an extremely low degree of probability. We boldly put drywall on the ceiling, under which the wires to the chandelier pass or remove the cable under the plaster.
The only real threat that can force you to repair an infrared heater with your own hands is the melting of several sheets. It can occur due to overheating, but several conditions must match for this to happen.
- The surface that transfers heat to the room must be covered with a significant heat-insulating object. As an example, consider a mattress thrown on the floor. If the heater is mounted on a wall or ceiling, this, of course, cannot happen. The threat exists only for the outdoor version.
- When the temperature reaches 70 ° C, the thermostat should work and turn off the heating part. So at the same time they threw a warm blanket on the floor and the regulator broke. The principle of its work is based on the laws of physics. As it heats up, the substance in the sensor expands and opens the contact. Defect is not possible. If such a substance is not there, it will be detected during the initial check.
- All materials used in the production of the film have high heat resistance. The base can withstand temperatures ten times higher. Carbonite, silver and copper are able to heat up more and not be harmed by this.
- Even if a miracle happened and the sheet overheated, it would only lose its shape and continue to function, but with a slightly lower efficiency.
Is it worth it to make a heater from infrared film with your own hands ? Technology does not stand still. Even 100 years ago, the vast majority of the population of our planet did not know about the existence of electricity, and the car could simply be scared. But is life possible today without these things? Think of the 1990 mobile phone that was the walkie-talkie in the president's suitcase. Look at the current smartphone that every student has. This is progress.