Windows 8.1 image for laptop dns recovery. How to restore a laptop to factory settings
A post about how to reinstall Windows 8 and activate it with the “native” key that you already paid for when buying a laptop. In some cases (non-Pro and non-Enterprise version of Windows, key hardwired into UEFI) this turns out to be a non-trivial task. I want to write about one such case. It may be of interest to owners of the Asus Zenbook UX32VD, but there is a suspicion that this edition of the OS was pre-installed on other models.
Background
It all started when I bought myself an Asus UX32VD ultrabook. The advantages of the car have already been written several times. Among the obvious disadvantages: 4 Gb RAM and 500 Gb HDD. I immediately wanted to buy an SSD and a memory stick. Which is what was done.Let me digress a little from the topic: if you are going to upgrade this model, then consider the following points:
- To disassemble the laptop you will need a Torx T10 star screwdriver (I bought it at an auto store).
- Drives, whether SSD or HDD, are not suitable for any SATA 2.5", but only with a thickness of no more than 7 mm. The standard thickness for such drives is 10 mm; such a drive will not allow the laptop lid to close correctly.
Why not transfer the pre-installed system to a new SSD?
For these purposes, many different solutions have been invented, the essence of which boils down to copying HDD partitions to SSD. To do this, you can connect both drives to one machine, for example, you can connect a new SSD via a USB to SATA adapter, and then transfer the partitions directly by booting into a special utility from an external drive. But I couldn’t do that. At that time - February 2013 - the utilities I downloaded did not understand the UEFI HDD markup. They simply refused to work. The situation is probably better now, but that’s how it was back then.Upd.: In the comments they write that they transferred the system from HDD to SSD, using standard Windows backup/image recovery +, if necessary, Ubuntu livecd to fit the partitions.
There are the following arguments against transferring the old system:
- SSD, as a rule, is smaller than HDD. This means that in order to transfer all the partitions to it, some of them will have to be shrinked. It is recommended to do this before capturing the image or starting to transfer the partition directly.
- A pre-installed system usually has bloatware - manufacturer-installed programs that advanced users tend to clean out.
- The pre-installed system was configured to use an additional 24 Gb SSD as a cache in order to retrieve the most frequently requested files from it on the HDD. After installing the main storage device - SSD - such a cache would only get in the way. This means that after migrating the system, it would be necessary to reconfigure it to disable such caching.
- Windows, originally installed on the HDD, is not optimally configured for using an SSD. This has already been written about more than once, for example. In short, each SSD block has a limited number of write cycles, so to extend its lifespan, the driver-OS combination optimizes writes so that the blocks on the SSD are rewritten evenly. If I'm not mistaken, in the case of SSDs it makes sense to disable read-write caching, because SSDs are much faster. An SSD is not afraid of fragmentation, unlike an HDD, so when working with an SSD, the system does not need to leave empty space at the end of the files so that they have room to grow without fragmentation. In general, there are features, you can figure them out, or you can just do a “clean” installation of Windows on the SSD and everything will be configured as it should.
So what's the problem? Download the MSDN image from torrents, activate it with the native serial number - business!
That's exactly what I did. But my Windows key did not work due to an incorrect download Windows versions. I wanted to launch the laptop on new hardware, and I installed some kind of activator. Everything would be fine, but a few months after logging in, the system began to show a black screen and then log out. I was able to recover using the recovery system by booting into safe mode.It all ended with the automatic download of the update to 8.1, which unobtrusively said that I had half an hour to close all the docks and finish the job. And then it will reboot itself and install. Well, okay, I am a lover of progress and everything new. The update has installed. But after logging in - the same problem: black screen and logout. The activator is not compatible with the update.
I solved the problem by restoring Windows files (console command sfc) and removing the activator. It was also a non-trivial task; I had to analyze the installation scripts and fiddle around in the console. Because I didn’t have rights to delete the WAC folder in the root of the disk, despite my account having administrator rights.
I restored the system's functionality, but the system remained inactive. This was annoying: the activation window popped up every few hours. Well, the build number in the lower right corner of the desktop seems to hint: well, buy me already, you rogue, which hurts the SSV (sense of self-importance).
That's when I decided to figure out the system. After all, I bought Windows with a laptop, why can’t I work normally? I spent the whole day doing all this, which is why I decided to write this post here - it will probably save someone time.
How should I do it?
- Find the “original” activation key that came with your laptop.
- Determine the correct edition of Windows 8.
- Download the installation image of this particular edition. x86 and x64 versions are interchangeable, that is, the key from one will also fit the second (tested with several installations of Windows 7 and 8).
- If you are lucky enough to have Windows 8 Single Language pre-installed on your laptop, finding a suitable image will be more difficult. But there is a work round, read below.
I also note that if you have not changed the computer’s drive, there is often a recovery partition on it. Probably, in this case, it will be fastest to boot and restore the system from it.
Another option is to buy a recovery disk from the manufacturer. Many people sell what it looks like - I don’t know, because... The Asus support site said that the image is temporarily unavailable for my serial number. Some kind of good man I tried to post on the root tracker images of HDD partitions from the same laptop as mine, but it (the distribution, not the person) was closed “at the request of the copyright holder.”
How to find out the key of installed Windows?
The easiest way, while you still have a working system, is to look at its edition and key, for example, using Belarc Advisor.If you have already uninstalled the “native” system, as was the case in my case, you need to look at the key in the BIOS.
How to find out the Windows key if it is hardwired into the BIOS?
For example, using the RW Everything utility. It needs to be downloaded, installed and launched. Then:- Click on the ACPI button.
- Select the MSDM tab.
- The bottom line Data will contain the Windows key hardwired into your BIOS.
Which version of Windows is your key suitable for?
The easiest way to answer this question is if you have the ability to run a native system. Then just open the system properties in the Control Panel (Control Panel\All Control Panel Items\System) and look at what is written in the Windows Edition section.
After watching, write it down in a safe place so you don't lose it. I didn’t write it down, and it was a shame.
The fact is that having only the key in hand, I did not find a way to determine the appropriate edition of Windows for it. If anyone knows how to do this, please write.
I selected for a long time and painfully (like mice and a cactus), starting the installation from different images, until I remembered that it was Single Language. The problem with this edition is that its installation image is not very widespread. I was only able to download an image of the same edition, but Windows 8.1. During installation, additional difficulties arose, which are described below.
How to install Windows 8.1 Single Language if there is a key to the same edition, but version 8.0?
So, your laptop came with the specified edition of Windows 8.0 Single Language. Her (or rather, your) problem is that finding the correct installation disk image is very problematic. I managed to find only one torrent, and I even downloaded about 70%, but then, as luck would have it, the seeders left. But I wanted to close the question, after all, I need a laptop for work.Luckily it was found Windows image 8.1 Single Language. Many people know that Microsoft updates 8 to 8.1 for free. So, the key for 8 is also suitable for installing the same edition 8.1? No matter how it is! The installer will happily tell you that your key is no good, give us another one.
In this case, the following workround will work:
- Write down on paper a key that is only suitable for installation, for example, from here. The key will only allow you to install the system; you will not be able to activate it with it. But we don’t need this, we bought Windows with a laptop.
- After installation, specify your real key in the system properties.
- Get a normal activated Windows 8.1.
Or maybe buy a new Windows 8.1 key?..
At some stage, I had such a desire. Then the installer will automatically download the required image. But I failed to do this. The page on the Microsoft website redirected to “Download the update from 8 to 8.1.” And when I clicked “buy” in the system properties, I was told that in my country (Belarus) you cannot buy via the Internet, go to resellers.Overall, it's good that I got what I paid for. As numerous searches have shown, many, happy and not so happy, owners of a laptop of my model have encountered the same problem.
I hope my experience will be useful and help someone save time!
Upd: They also wrote about reinstalling pre-installed Win 8. Unlike the author, I managed to install and then activate 8.1 right away. But I completely agree with his conclusions about the simplicity of the installation and activation procedure.
Tags: Add tags
Hello friends, in this article we decided to tell you how to restore laptop to factory settings. Let's start with the manufacturer Toshiba (who is interested, you can read a separate article -), the second we will consider the Sony laptop, the third HP pavilion. Separate articles are written for laptops, and,. Well, then we will try to supplement the article with information on products from other manufacturers; judging by your letters, this topic is of interest to many of our readers.
- Good day, I wanted to ask you how to restore a laptop to its original factory settings? I know that these settings are in a hidden section hard drive, but I carelessly deleted this partition and now when I try to roll back to factory settings I get an error. I have not created recovery DVDs and in general, I have never had the opportunity to restore a laptop to factory settings. What is the way out of my situation?
- Hello admin, please explain what I should do. A Toshiba laptop, it has a hidden partition, also a C: drive and a D: drive. I didn’t touch the hidden partition, but on drive D: I deleted everything, and now I can’t roll back to factory settings, they say Toshiba laptops use a hidden partition and some other folder HDD RECOVERY, which is located on the disk, to restore factory settings D:. What should I do now?
- I bought a Toshiba laptop, the instructions for the laptop say, if you want to roll back to factory settings, press the F8 key, the recovery program will start. I pressed it, but Additional download options are launched and that’s it... And then what to do? And another question, when you first started it, a message appeared - We recommend that you create a resuscitator media on a USB flash drive or DVDs, using the Recovery program, it will help you restore the contents of the computer to the original factory state, even in the event of serious damage to the computer. Explain how to use this resuscitator media in case of problems?
- Hello, tell me how to restore a Hewlett-Packard (HP) laptop to factory settings if the laptop does not boot at all. When loading Windows exits with an error.
- Admin, answer this question. All laptop manufacturers equip them with a special RECOVERY program, located in a hidden section. Using this program, you can roll back the laptop to factory settings in case of serious problems with the operating system. Question – Is there any alternative to this program?
How to restore a laptop to factory settings
When does the thought of restoring our laptop to factory settings occur to us? That’s right, when we no longer understand what’s going on with it, and most importantly, the laptop itself doesn’t understand what’s happening to it, because of the dozens of unnecessary partitions created on it, four installed operating systems, thousands of different programs and three antiviruses.
- Note: Before performing a factory reset, you can copy all data from the C: drive and desktop using .
Many users may notice that in such a situation you can reinstall Windows with all programs, drivers and everything. But I, in turn, will notice restore laptop to factory settings, for an inexperienced user, much easier. Then you won’t have to worry about finding and installing drivers for all devices, you’ll just need to install it again necessary programs that's all. The only thing that confuses many people in this situation is that many have never tried restoring the laptop to factory settings even once in their lives. To introduce you to this restoration is the purpose of our article; I hope after reading it, you will have a better idea of how this can be done.
I have to restore factory settings on various laptops quite often and I want to say that the recovery mechanism itself is almost the same on all laptops, but of course there are always nuances that are better to know in advance.
First rule. During a factory reset, the AC adapter must be connected to the laptop at all times.
You reboot the laptop and press a certain key on the keyboard when loading, then the factory reset program starts, this is where you need to be careful. The factory reset program may offer you the option of restoring just the C: drive or restoring the entire HDD. If you select drive C:, then only it will be restored to factory settings, and the remaining partitions with your data will remain untouched. If you choose to restore the entire hard drive to factory settings, then all the partitions you created, with all your files, will be deleted and your laptop will be in the same condition as at the time of purchase.
Where is the laptop factory reset program located?
Usually in a hidden section of the laptop, which is called the “Recovery Partition,” the volume is up to 20-plus gigabytes. You can see it if you go to Computer Management->Disk Management. It is advisable not to delete this partition, otherwise you will not be able to restore the laptop to factory settings.
Owners of a Toshiba laptop need to know that in addition to the hidden RECOVERY partition, they also have a HDD RECOVERY folder located on the D: drive; this cannot be deleted either.
Note: Friends, if the hidden partitions on your laptop are not deleted, but the factory reset program is not working, read our article -.
Why create laptop recovery DVDs?
As soon as we bought the laptop and turned it on, on the screen, immediately after the working Windows desktop, a service window from the laptop manufacturer appears asking you to create laptop recovery DVDs. That is, we will create this same hidden partition with factory settings, but on DVDs. This is done in case the hidden section of the laptop, for some reason (usually due to the user’s fault), becomes damaged or is deleted completely.
To create recovery DVDs, you usually need 3 blank CDs. If there are serious problems with your laptop, for example, you cannot load the operating system at all, and your hidden partition has been deleted, we can restore the laptop to its factory state using previously created recovery DVDs.
Hotkeys for restoring laptops to factory settings
ASUS – When the ASUS splash screen appears, press F9
Acer - Alt+F10
HP pavilion - when turning on the laptop, press the esc key. Enter the start menu, then press the F11 key
Samsung - F4
Sony vaio - F10. New Sony VAIO laptops use a special button Assist, try pressing it when loading. Loading VAIO Care, select from the menu Start troubleshooting (Recovery) -> Select keyboard layout Russian -> Diagnostics -> VAIO Recovery Tools -> Windows 8 -> Run the Recovery Wizard(System recovery in step-by-step mode).

Toshiba - F8 or on the latest models 0 or even sometimes you need to press Fn+0
Packard Bell - F10
Dell inspiron - when the dell splash screen appears, press Ctrl+F11
Fujitsu Siemens - F8
LG-F11
Lenovo-F11
So, first we restore the Toshiba laptop to factory settings, press F8 when loading (if you have one of the latest models of Toshiba laptop, then immediately when you turn on the laptop, press and hold 0), a window appears Additional download options. Choose Troubleshooting your computer and press Enter.

Selecting language settings.


We select the Toshiba HDD RECOVERY recovery tool or it may be called Toshiba Recovery Wizard.

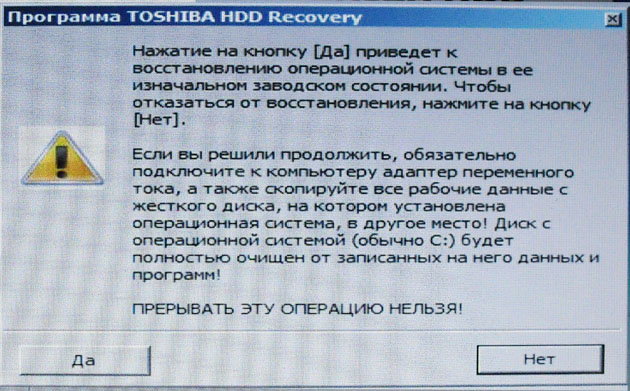
In the next window, we are warned that drive C: will be restored to its original state, that is, everything will be deleted from it and its state will be restored to the state at the time of purchase of the laptop, drive D: will remain untouched.


You cannot interrupt the operation, so make sure that the AC adapter is connected to the laptop. Click Yes and start the process of restoring the laptop to its original factory state.
A factory reset process is in progress.


The software and drivers are being installed.


Choose a username and password for your account. We set the date and time, they are usually correct by default. If you wish, you can register your laptop to extend the warranty.

First launch of Windows. That's all
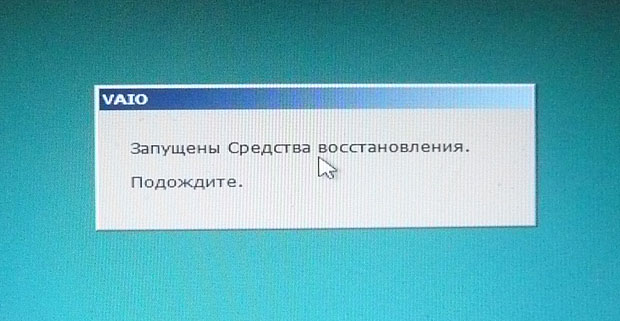
How to factory reset a Sony laptop
Press the F10 key when loading and enter the Manager Windows boot, select using the keyboard Launching VAIO Recovery Center.

A window appears in front of us, in which we can familiarize ourselves with the recovery options.
For example, we choose Recover drive C: and in the next window we read information about what will be restored.


Disk C: is restored to its factory state, everything is reinstalled software, but not software installed after purchasing the computer, it will have to be installed again. This program deletes all files on the C: drive, but does not affect files on other partitions.

If you and I choose Completely restore the system, then everything on the C: drive and all other partitions will be deleted. After recovery, all disk space will be occupied by drive C:


How to restore an HP laptop to factory settings
If the laptop does not boot at all due to system errors and you want to restore its original settings, then, in order not to lose your data, you can boot it from any Live CD, then transfer important files to a portable hard drive, then restore the factory settings, since Restoring factory settings will delete all your data from your laptop.
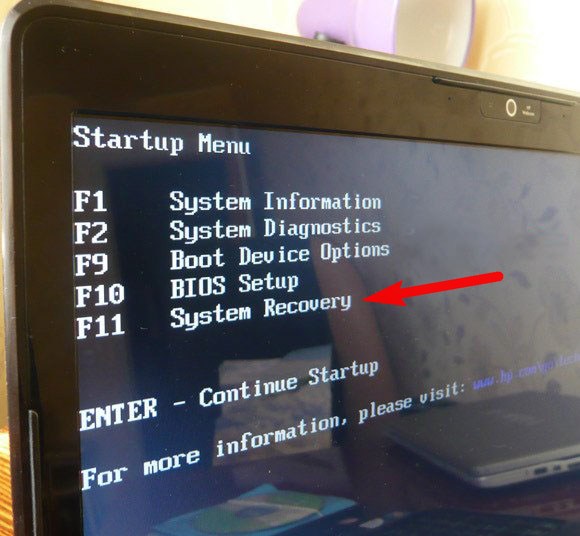
Press the key when turning on the laptop Esc.

We enter the boot menu, as we see, the F11 key is responsible for restoring factory settings - System Recovery. Press the F11 key.
A window appears HP Recovery Manager. Here we need the item “ Restoring the system to its original condition when shipped from the manufacturer».

Click on “ Restore without creating a backup copy files" and click Next.

Now you need to disconnect all external devices: printer, scanner, mouse, click Next and the process of restoring the HP laptop to factory settings will begin.
Is there an alternative to the laptop's built-in factory reset program? Yes there are, these are programs and and they have much more opportunities.
Hello admin! I have a new laptop with Windows 8.1, without a hidden partition with factory settings, I deleted this partition a long time ago, but then I regretted it. There is a desire to independently create such a partition with a backup reference image of Windows 8.1, so that, if necessary, I can roll back to this image containing all the software I need. Question! Tell me how, using the tools built into Windows 8.1, I can create a backup image of Win 8.1 with all installed programs and link it to the system recovery environment so that I can roll back to this image using one button - Push-Button Reset Overview?
How to create your own partition with factory settings or how, using the tools built into Windows 8.1, create a backup image of Windows 8.1 on a laptop and link it to the system recovery environment
Hello friends! Today is a very entertaining article for computer enthusiasts, in which I will tell you about one unknown secret Windows recovery 8.1.
Create a reference image of Windows 8.1, containing all the programs you need, You can do this not only on a new laptop, but also on a regular computer. Install Windows 8.1 on your laptop, then install all the necessary programs into the system, then create an image of Windows (in a way that I will show you), then link it to the system recovery environment and roll back to this image in the event of a severe system failure, you can roll back when the system at the very least it functions and loads, and also in the case when Windows does not load at all. Details later in the article.
Many readers may ask the question: "What is Reset Windows with one button - Push-Button Reset Overview ?
We all know that in Windows 8.1, when systemic problems(which cannot be eliminated), there is a way to return the computer to its original state - Push-Button Reset Overview, i.e. Resetting Windows with one button, you will need an installation one, in a nutshell I will remind you how this is done. Insert the installation disk with Windows 8.1 into the drive, then go to
Options

Update and recovery

Recovery


After this, Windows is reset to its original state, as a result the user loses everything installed programs and settings, as well as personal data on the drive (C:), but the operating system takes on its original appearance. Let me remind you that to restore, Windows 8.1 takes backup files from the installation distribution, which you must have inserted into the drive.
Experienced users will notice that you can use the utility built into the system and create a recovery image in advance, and if necessary, roll back to it, in this case some part of the user data will remain intact! I note that in this case, most user settings and all installed applications are still lost.
To save all programs installed in the operating system, I suggest creating a complete image file of Windows 8.1 in WIM format and placing it on a specially created hard drive partition. Next, you need to bind the WIM image to the Windows 8.1 recovery environment, that is, upon return computer to its original state - Push-Button Reset Overview (one-button reset), the Win 8.1 operating system will use for recovery not the Windows 8.1 distribution files, but the one we created Windows 8.1 image file! In this case all your programs installed on the C: drive will remain safe and sound. If necessary, you can update the install.wim image file over time.
So, let's go. We have a new laptop with a UEFI BIOS and Windows 8.1 installed on it.
The programs we need are installed in the operating system.

First of all, we check whether our recovery environment is enabled.
Open a command prompt as administrator and enter the command:
reagentc /info (program REAgentC.exe Used to configure the Windows Recovery Environment boot image and one-button reset recovery image, and to administer recovery options and settings. In our case, the REAgentC program shows that the recovery environment is turned on and, as expected, is located on the first hidden partition (Good recovery partition, volume 300 MB), but the recovery image and its location are not indicated, which means that recovery using one buttons - Push-Button Reset Overview will be used DVD- Windows disk 8.1).
Note: if in your case the recovery environment is turned off - Disabled, then go to the very end of the article and read the necessary information).
In our case everything is fine.
Windows Recovery Environment Status: Enabled
Windows Recovery Environment Location: \\?\GLOBALROOT\device\hardd
isk0\partition1\Recovery\WindowsRE
Boot Configuration Data ID: 222a737e-019e-11e6-bc4d-aabece8a
bcca
Recovery image location:
Recovery image index: 0
Custom image location:
Custom image index: 0

Disk management.
We deleted the hidden partition with factory settings and will now create it again.
We create a regular partition at the end of the hard drive, a size of 20 GB, drive letter (E:) will be enough for me.

Go to the drive (E:) and create a folder on it: Recoveryimage

After that, we boot into Special boot options.
Options
Change computer settings
Update and recovery
Recovery
Special download options
Reboot now

Diagnostics

Extra options

Command line

Select our account

If you have a password, enter it and click Continue.

A command prompt window opens.
Enter the commands:
diskpart
lis vol (we determine the drive letters, we see that the operating system is installed on the C: drive, and the recovery partition we created has the letter D: instead of E:)
exit (exit diskpart),

enter the command:
Dism /Capture-Image /ImageFile:D:\ recoveryimage\install.wim /CaptureDir:C:\ /Name:"Windows"
install.wim: is the name of the WIM disk image (C:) with Windows 8.1.
D:\recoveryimage- the location where the WIM image is saved.
C:\- section with installed Windows 8.1 .
Operation progress 100%. The system image has been created.

Enter more commands
cd /d C:\windows\system32 (with this command we enter the directory C:\windows\system32)
reagentc /info (the recovery environment is enabled, but the image and its location are not specified)
reagentc /setosimage /path D:\Recoveryimage /index 1 /target C:\windows(this command binds the recovery image we created install.wim located on disk D:\ in folder recoveryimage to the system recovery environment (RE), now to restore using one button - Push-Button Reset Overview this will be used image file install.wim.
C:\Windows\System32>reagentc /setosimage /path D:\recoveryimage /index 1 /target
C:\Windows
Directory specified: \\?\GLOBALROOT\device\harddisk0\partition5\recoveryimage
REAGENTC.EXE: Operation completed successfully.
All this can be checked again with the command reagentc /info
C:\Windows\System32>reagentc /info
Windows Recovery Environment configuration information and
system reset:
Windows Recovery Environment Status: Enabled
Windows Recovery Environment Location: \\?\GLOBALROOT\device\hardd
isk0\partition1\Recovery\WindowsRE
Boot Configuration Data ID: 222a737e-019e-11e6-bc4d-aabece8a
bcca
Recovery image location: \\?\GLOBALROOT\device\harddisk0\pa
rtition5\recoveryimage
Recovery image index: 1
Custom image location:
Custom image index: 0
REAGENTC.EXE: Operation completed successfully.

Resetting your computer to its original state
Friends, now to return the computer to its original state - Push-Button Reset Overview (one-button reset of Windows), you do not need an installation distribution with Windows 8.1, since we have reprogrammed the recovery environment and now to return the computer to its original state, the file we created will be used -recovery image install.wim located on disk D:\ in the recoveryimage folder.
Options
Change computer settings
Update and recovery
Recovery
Removing all data and reinstalling Windows
Resetting your computer to its original state
Important Note: Many users delete together with the factory settings (15-20 GB), also
Windows 8 is a reliable, convenient and stable operating system. However, even it is susceptible to virus attacks, and may also stop loading due to any user actions. In addition, untested programs may cause certain errors. In this regard, the question arises, how to restore Windows 8 on a laptop?
Of course, the solution may be to reinstall operating system. However, what if you bought a laptop with a pre-installed OS? After all, it is official, and, of course, you do not have a disk to reinstall Windows. In addition, to install the operating system you must have certain knowledge. And it’s much easier to perform a restore than a reinstallation.
How to restore Windows8
First of all, it is worth noting that there are several methods for restoring Windows 8 on a laptop:
- Before loading the operating system, press a special key.
- Launch the built-in utility that is provided on the laptop.
- Launch the built-in Windows recovery tools.
- Recovering from .
It is worth noting that the first method allows you to perform a recovery even if Windows 8 does not boot. The second method is a special program provided by the laptop developer. If you bought a laptop with a pre-installed operating system, then a special utility should already be installed. In addition, there must be created and starting point. If such a program is not installed, then it can be installed from the disk that comes with the kit. You will also have to create a backup of the OS.
The last option is to launch the built-in Windows 8 recovery tools. It is worth noting that when installing the OS, a restore point is created, which can later be changed. You can . For example, immediately after installing a new operating system and configuring it. This will allow you to roll back the system to the state at which you created the backup. So, let's look at all the options in more detail.
System Restore in Windows 8. How to create a restore point on Windows 8: Video
Running recovery before booting the operating system
It is worth noting that if the boot attempt is unsuccessful, you will be automatically prompted to run Windows 8 recovery on your laptop. The fact is that, as mentioned above, when installing the OS, a backup copy is created automatically. In addition, the manufacturer also took care of restoration. Every modern laptop has a special section called “Recovery”. It contains a backup copy of Windows.
To run the built-in function you just need to press the corresponding button when loading. These are different buttons on every laptop. On some models there is a separate key, on others it may be F9 or any other button on the keyboard. You can find this out in the user manual. So, after pressing the corresponding key, just follow the prompts on the screen. The system will do everything automatically.
Built-in Windows recovery tools
Everything here is extremely simple. Press the Windows key combination + X and select "System". In the window that appears, in the left menu, find and open the “Protection” item. Then all you have to do is click the “Restore” button. As you can see, everything is extremely simple.
In order for this method to work, we need immediately after Windows installations 8 and installing all drivers. You can create a copy in the above menu. Instead of the “Restore” button, we should click “Create”. This function is at the very bottom of the menu. Once clicked, follow the on-screen prompts.

Windows 8 System Recovery Tools: Video
Restoring Windows 8 from an installation disk or flash drive
Another way to restore Windows 8 on a laptop is to create a boot disk or flash drive. To do this we will have to create boot disk or flash drive. It is worth noting that disks are used less and less every year, and today there are laptops that do not have a laser drive for reading CDs or DVDs. So we'll look at how to create bootable USB flash drive and use it to restore Windows 8. In this case, creating a disk is performed in the same way.
Restoring Windows 8 from an installation disk or flash drive: Video
So, first we need the UltraISO program. In addition, we will need. All this can be easily downloaded on the Internet. After installing the program, launch it and insert the flash drive into the USB port. The application is divided into four windows. In the lower left menu, you need to select the directory (folder) in which the desired image is located and select it. In the lower right menu, open the image by double-clicking with the left mouse button.

An open image will appear in the upper windows. Now at the very top, find and click the “Boot” button. Select "Burn hard disk image". 
In the window that appears, in the “Disk Drive” line, select your memory drive to which the image will be saved, and click the “Burn” button. The system will warn you that the flash drive will be formatted and all data will be deleted. We agree with this. That's it, wait until the system writes the image.

After that, reboot the computer and . Here you need to enter the “Boot” section. Next, select the “Boot Device Priority” item and set “JetFlash” in the “1st boot device” section. This means that the operating system will be loaded from the flash drive. Save the settings and restart the computer. As a rule, everything happens automatically, but in some cases you will have to press “Enter” to boot Windows from the memory drive. After downloading all the necessary files, you can choose one of the options:
- Recovery.
- Installing a new OS.
Read the on-screen prompts carefully and follow them.
How to perform a system restore on Windows 8. System recovery tools: Video
This article discusses steps that can be used to restore Windows 8.1 without deleting user data.
If computer malfunctions cannot be resolved using conventional methods, there is only one radical solution left - reinstalling the operating system. Many users are frightened by the prospect of reinstalling the system.
In Windows 8.1, the problem of reinstalling the operating system is almost solved. Of course, the operating system will not do everything for you, but many users who previously called specialists or experienced friends to reinstall the operating system will now be able to do it themselves. The fact is that in Windows 8, Windows 8.1 a new reset function has appeared, which allows you to quickly, in just a few clicks, restore the operating system or return it to its original state.
In the event of serious system failures that cannot be resolved using conventional methods, you can restore the operating system while preserving your personal files, Accounts and contacts. To do this, you need to reset the operating system. We will need a Windows 8.1 installation disk or a bootable USB flash drive with Windows 8.1
Press the key combination + I in the panel that opens Options click Change computer settings

A window will open Computer settings, select Update and recovery

In the window Update and recovery press Recovery


We wait a little

If your computer does not have an active Windows 8.1 recovery partition, the system will display a warning. You will need a Windows 8.1 installation disc or a bootable USB flash drive with Windows 8.1

Insert the Windows 8.1 installation disc or bootable USB flash drive with Windows 8.1. An update wizard window will open, which lists the consequences of the update, namely:
● Your files and personalization settings will not change.
● Your computer settings will be restored to their default values.
● Windows Store apps will be retained.
● Applications you installed from drives or websites will be removed.
● A list of deleted applications will be saved on your desktop.
If you accept the terms listed above, click the button Further


The computer will restart, after which the system recovery process will begin.
System recovery may take some time. The recovery time can range from several minutes to several tens of minutes (depending on the speed of the computer).
The recovery is completely automatic. Your presence at the computer is not required. Once the recovery process is complete and rebooted, your computer is ready to use. All you have to do is install programs that were removed as a result of system recovery. All your accounts and passwords will remain intact, so use your old password to log in.