Cloning a hard drive to a smaller drive. How to clone to a smaller hard drive? Cloning the source disk to the target disk
The bottleneck in laptop performance is usually a 2.5-inch hard drive with a speed of 5600 rpm. Therefore, there is no better upgrade for a laptop than replacing its mechanical drive (HDD) with a solid state drive (SSD). The task is not trivial, but for the average user it raises many questions. If the thought of reinstalling Windows and all your programs and then fine-tuning them makes you confused, don't worry. After reading this article, and after an hour of work replacing the disk, you will be able to enjoy the positive results of the upgrade.
Checking your laptop before upgrading to SSD
The process of upgrading a laptop to replace the hard drive with an SSD is quite simple. You just need to remove the HDD installed in your laptop and replace it with an SSD. If your laptop has a removable bottom panel, then you are the luckiest of all. If you have an Ultrabook or your laptop does not have a removable bottom panel (for example, it may be sealed), then the process of removing the hard drive will be somewhat more complicated. As a rule, you can always find the correct way to replace the hard drive in your laptop's manual. Sometimes removing a hard drive can be very difficult, but I am sure that such laptops already have an SSD installed. Laptops where you can't simply remove the back panel are unlikely to be low-end or mid-range laptops. Most likely this is a premium level, which in most cases does not need such an upgrade.
Removing the back cover of the laptop
For all other cases, the process of removing the back panel and removing the hard drive from the depths of the laptop should not raise any questions. Let me touch on a little theory about what you might need to remove a disk.
What do we need
SSD. Well, first of all, you need the SSD drive itself with the correct form factor for your laptop. The SSD must be of sufficient capacity in case you want to clone your current HDD. I advise you to choose a disk with a capacity of 250 GB, or better yet 500 GB, if the price tag of 10,000 rubles is not scary. For most people, 250 GB on a laptop should be enough to handle all tasks. You should not assume that this volume is enough for you to store your personal video archive or music collection. A laptop is not for this purpose.
Adapter for connecting HDD/SSD to the laptop. If you want to clone your hard drive, then there is no way to do without an external adapter. Suitable for this:
- Adapter for SSD/HDD 2.5" to CD/DVD drive;
- External adapter adapter controller for connecting HDD/SSD hard drives and CD/DVD optical drives. USB 2.0;
- Adapter for connecting HDD/SSD SATA III to USB ports 3.1.
Such an adapter will be useful not only for connecting an SSD and organizing the cloning process, but will also turn your current hard drive into external storage, for example, for saving a personal video archive or for backup.
Small Phillips screwdriver to remove the back cover of the laptop and free the hard drive, and then attach the SSD.
Separate external hard drive(optional). You may need a hard drive of the same capacity or larger to provide storage for folders that will not fit on an SSD. It can also store a full system backup just in case something goes wrong.
Preparing your HDD for cloning
We'll do a little preparatory work on the current disk while it is not yet removed.
1. Make a full system backup. Creating a system image backup in Windows 10 is done as follows. In the control panel, open the section System and security, then open the section Backup and Restore. Follow the link on the left Creating a system image. Decide where you will store the image and go through all the steps of the wizard.
 Creating a system image
2. Moving large folders. Most likely, your hard drive is larger in volume than a brand new SSD. Therefore, we move large folders that contain photos, videos, games and personal documents to an external drive or other location to try to leave as much disk space as possible for cloning to the SSD. I usually copy to the hard drives of a computer, which has much larger hard drive capacities than a laptop. If you do not have a computer or an adapter with an external drive, then I advise you to copy it to network drives on the Internet, for example to Google Drive or.
3. Delete unnecessary files. Extra space that will be taken up installed programs, we don't need it. If you can easily reinstall them on the SSD in the future, then feel free to remove them from the HDD. Large files that you no longer need, and they are lying around simply because there is room, are also better to delete. The cloning operation will be much faster. Additionally, I recommend cleaning the system from unnecessary system garbage and temporary files free program CCleaner.
Connecting the SSD
Now we are ready to connect the SSD to the laptop for the first time to carry out the cloning process.
1. Connect the SSD to the adapter. Depending on the type of adapter, install the SSD into the CD/DVD adapter case or connect it to a USB-SATA adapter, and then connect it to the laptop.
 Connecting the SSD to the USB adapter
2. Initializing SSD. If Windows does not display the new drive letter in Explorer after installing the driver, open Control Panel and run the snap-in Disk Management. In the snap Disk Management You should see the SSD as new disk under your current drive. If it is not initialized, right-click on the drive and select Initialize disk.
 Initializing SSD
3. Resizing the current disk partition. We will need to reduce the size of the current disk if it is larger than the SSD. Let's bring it to an equal or smaller size. In the snap Disk Management check the primary partition of your current drive (usually drive C:, or another with installed system Windows) so that its size is no larger than the size of the SSD. If this is not the case, then you need to compress it. Right-click on the operating system partition and select Shrink Tom. A window will open to compress the current drive. Click Compress.
 Compress C:
This operation will resize the primary partition so that the freed area on the disk remains as unallocated space. But there is no need to worry about unused space; during the cloning process, we will change the partition size and include this unallocated space in the SSD volume.
After all operations, you need to restart the laptop.
Clone HDD - 3 ways
Finally, the time has come for the most important operation, for which we have already gone through so much.
Selecting a disk cloning program.
Here we have several ways.
1 way
To do this, I use the EaseUS Todo Backup Free utility, which is free for personal use, has a user-friendly interface, and also optimizes migration to SSD. Download the utility and run it. Select a button Clone, we specify the source and destination disk, then follow the wizard’s instructions and get a copy of the hard disk on the SSD.
 EaseUS Todo Backup Free
Please note that you must check the option Optimize for SSD when selecting the target disk. This ensures that the sectors are aligned on your SSD and increases your chances of booting from the SSD after the cloning process.
On the next window, you can compare the source disk with the SSD. As you can see below, EaseUs automatically configures for different sizes disks is the unallocated space on the current disk.
 Starting the cloning process
Click the button Proceed, and then turn off the laptop when the operation is complete.
Method 2
Since the release of the Windows 7 operating system, a built-in utility has appeared that can be used to clone the system to a new disk. We have already made a system image; in the chapter I described the process of creating a system image. Then you need to select the link Create a system repair disk.
 Create a system repair disk
We need this disk to download the System Restore Wizard. Once the recovery disk is ready, we change the HDD to an SSD (we'll look at this process in the next section) and boot from the recovery disk. Select the image that was created earlier and indicate that we are restoring the current disk. After this operation, you will have the HDD disk copied to your SSD.
3 way
I would like to offer a utility that is a whole combine for operations on copying disks and partitions - Macrium Reflect. The capabilities of the free version are enough for us, so we go to the official website and download the utility. If you want to get acquainted with all the capabilities of the utility, then right on the website there is a comparative table of versions and their capabilities.
We launch the downloaded agent and start downloading WinPE components.
 Agent Macrium Reflect
After installation, launch the program window and create a system image or clone the disk, depending on whether you have an adapter for connecting external hard drives and an additional hard drive of the size discussed above. If there is, then clone the current disk to the new SSD. If not, then create a disk image and restore it to the SSD.
 Macrium Reflect
To perform all these operations we will need to create a recovery disk in the Macrium Reflect application itself. It's very easy to do. In the application menu select Other Task - Create Rescue Media. This will open the disk creation wizard, in which you need to perform all the steps step by step and create a disk with WinPE on board. This disk will allow you to boot and restore the system from the image.
 Rescue Media Wizard
Replacing HDD with SSD
1. Turn off the laptop and remove the back panel. Turn off your laptop, and then unplug the power cable and other connected cables, including the SSD. Then unscrew the back panel of the laptop and remove it to access the hard drive.
2. Unscrew the screws that secure the disk. You need to remove 2 or 4 screws before the drive can be removed.
3. Raise the hard drive to 45 degrees and pull it out on yourself.
4. Install an SSD in its place and put the laptop back together.
Checking boot from SSD
Moment of truth: Turn on your laptop. It should load an order of magnitude faster and at the same time you will see all the contents of the desktop as before the upgrade. Moreover, all heavy applications should now load almost instantly.
If you received a death screen or screen maintenance, select Diagnostics – Additional options – Boot Options. If after this the system does not boot, then the disk was cloned unsuccessfully, try repeating all the operations again.
Now connect your storage with the archive folders created in step and copy everything back. At the same time, you will be pleasantly surprised at the copying speed.
Hello admin. I want to clone the Windows 8.1 operating system from a regular hard drive to an SSD in Acronis True Image 2015, I think this method is much simpler than all others, first I specified the Source disk, then the Destination disk and that’s it. The capacity of a 500 GB hard drive is naturally larger than the capacity of a 120 GB solid state drive, but in the cloning settings you can exclude unnecessary disks, folders, and even just files?
Of course, I can do everything myself, but I’m afraid, since I have little experience working with the Acronis True Image program, and I can see that you’re just messing around with it!
How to clone the Windows 7, 8, 8.1 operating system from a regular hard drive to an SSD solid-state drive (drive sizes vary) using Acronis True Image 2015
Hello friends! If you often work with Acronis True Image, you probably noticed that in the program settings there is an option called Cloning, and as our reader correctly noted, this option is very finely configurable.
As an example, I suggest you clone my Windows 8.1 from a regular 250 GB hard drive to a 120 GB SSD. A simple 250 GB hard drive is almost filled with files and naturally all the information from it will not physically fit on the SSD, but when cloning we can exclude unnecessary folders, files and even entire disks, as a result of the cloned information there will be exactly 120 GB of information, that is, as much as SSD capacity. But we need to do everything correctly, because the Windows 8.1 operating system cloned onto another hard drive should start for us!
First, let's connect the SSD solid-state drive to the system unit as a second device.
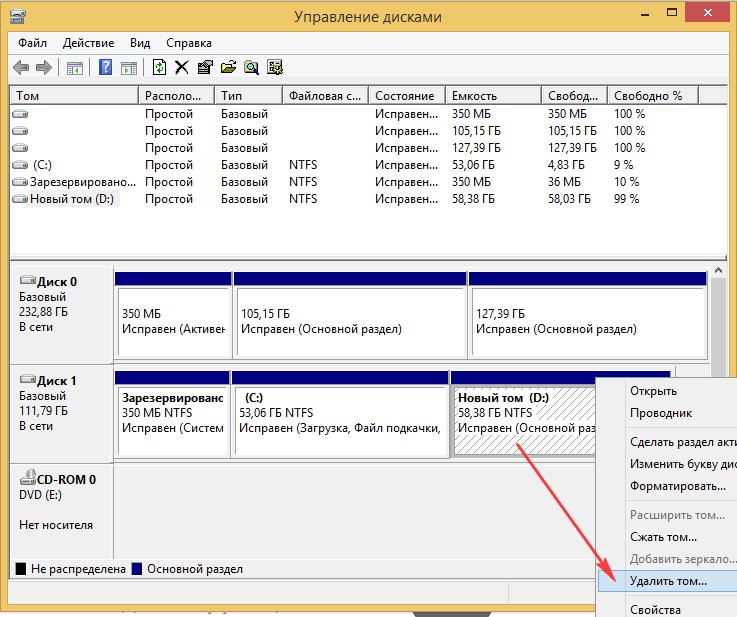
For the success of this serious operation, you must be well versed in Disk Management; pay attention to this window on my computer and you will immediately understand what’s what.
Disk 0
A simple SATA hard drive with a capacity of 250 GB.
1 . The first hidden section (we will clone) System Reserved, has a capacity of 350 MB. The main purpose of the hidden partition is to store files Windows boot 8.1. If you have Windows 7 installed, then this partition will be 100 MB in size.
2 . The second partition has the letter (C:) (we will clone) Volume 105 GB, Windows 8.1 operating system installed.
3 . The third section under the letter (E:) volume 127 GB, with data files: music, movies, etc., occupied by 100 GB. We can't clone this partition completely, we'll just exclude large files when cloning. Or we can completely exclude this partition from the cloning operation and instead, at the end of the process, an empty partition is formed on the SSD.

Disc 1. Solid state drive SSD, when cloning all information on it will be deleted
Acronis True Image 2015
For cloning, it is better to use the Acronis True Image 2015 boot disk, since this version works without errors with SSD solid-state drives and has UEFI support. It is better not to install Acronis True Image on Windows and work with boot disk this program, this way you will avoid many mistakes.
A bootable USB flash drive with Acronis True Image 2015 can be made in the program itself or using this article of ours .
So, we boot from a disk or flash drive with the Acronis True Image program. Who doesn’t know how to boot from a disk or flash drive, read our article - .
For example, I enter boot menu your computer from the motherboard ASUS board Often pressing the Delete key when turning it on, then selecting the “Boot Menu” and in it selecting the drive or flash drive.

In the main window of Acronis True Image 15, select
Tools and Utilities

Disk cloning


With the left mouse, select the Source disk (the disk from which you want to clone the Win 8.1 operating system), in our case a simple hard disk 3 MAXTOR STM 3250310AS and click Next.

Select with the left mouse the Target disk (the disk on which you want to clone the Win 8.1 operating system), in our case a solid-state drive SSD Silicon Power and Beyond

Acronis displays a warning "The selected target hard drive contains partitions on which data can be stored. Click OK to confirm deleting all partitions on the target hard drive." Click OK and Next.

Window Exclude by files and folders.
In this window, Acronis True Image 15 tells us that in order to clone information from the Source disk to the Target disk, we need to exclude 23.72 GB of files on the Source disk. You cannot exclude files from the first section (System Reserved) because it contains Windows 8.1 download files. It is also undesirable to excludefiles from disk with installed Windows 8.1. Disk with installed operating system Windows system 8.1 is assigned the letter (D:), if you click on it with the left mouse, the operating system files will open.


This means we will exclude files from disk (E:).
Attention : Friends, you can simply exclude this entire drive (E:) from cloning, as a result Disk C: will be cloned onto the solid-state drive.(System Reserved) containing download filesoperating systemand another disk (D:) containing Windows files 8.1, but you can choose a more complicated option. Let's open the disk(E:) and select an unnecessary file or folder on it. For example, on this disk the virtual hard disk NewVirtualDisk1.vdi has been an eyesore for me for a long time, I haven’t needed it for a long time and its capacity is about 50 GB, let’s exclude it from cloning and mark this virtual disk tick. Program

As you can see, after excluding the file, we still have 30 GB of free space left. Click Next

If you click Proceed now, the cloning process will begin exactly as shown in this window.
Before - what is available on solid state drive now all this will be deleted.
After - what will be on the SSD after cloning, that is, two small partitions.
I want to say that I personally do not need this state of affairs. I need a hidden partition on the SSD disk (Reserved by the system) containing the operating system boot files and another disk (D:) containing the files of Windows 8.1 itself

So I'll go back to the window Excluding files and mark the entire disk with a tick
(E:). Acronis True Image 15 starts re-calculating the space for cloning.

Friends, pay attention to the disk (E:), it will be created early, since this is a drive cloning operation, but the disk (E:) will be completely empty. After cloning, we will simply delete it in Disk Management, and the resulting unallocated space will be attached to the C: drive, that’s all.
Get started. The cloning process begins.


The Disk Cloning operation has completed successfully.

We restart the computer and enter the boot menu, select the SSD solid-state drive to boot and boot from it.

Cloned Windows 8.1 boots perfectly. Activation from Windows did not work. We go to Disk Management and see this picture.
The drive letters have disappeared from partitions on a simple hard drive, but you can simply assign them and that’s it.
As intended during cloning, the SSD has three partitions. The first one contains the operating system boot files. Second drive C: with cloned Windows 8.1. Third disk D: completely empty.


We remove the D: drive and attach the unallocated space to the C: drive.


I would be glad if I could help.
With Solid State Hard Disks (SSD) being smaller in size then the old mechanical hard disks (HDD), it can be difficult to clone the disk. Especially with manufacturers having recovery partitions can make this more difficult. I have come across software which can only clone to Hard Disks the same size or smaller. There are few softwares which can clone to a smaller hard disk drives.
Important Note: If the size of your data on your old hard disk is greater than the total size of your new hard disk then you will have to delete some data.
In order to clone the HDD from a larger HDD to a smaller HDD (e.g. SSD), you will require 2 peices of software:
- Partitioning Software
- Cloning Software (which supports cloning from large HDD to a small HDD).
Partition Master Free
Partition master free by EaseUS is a free utility software for partitioning. This software is easy to use and allows to do most of the tasks required with hard disk volumes and partitions. Partion master free only works with basic disks. It allows to resize, move, merge and split partitions. It supports MBR, GPT and RAID disks. The software can be installed on XP, 7, 8 and 8.1. It works on both 32-bit and 64-bit platforms. If you have a dynamic disk then you will need to download the trial version of Partition Master Professional. Checking the type of disk (basic or dynamic) can be done in disk management by running diskmgmt.msc from Windows Search.
Disk Copy Home
Disk Copy Home by EaseUS is a disk or partition cloning tool. It enables sector level cloning which makes sure that the destination hard disk is exactly the same as the original. Disk Copy Home only allows the cloning of basic disks. Disk Copy Home runs at boot and requires a USB drive. Disk Copy Home is a free software. If you require cloning dynamic disks then Todo Backup Workstation is . Todo Backup Workstation is not free but does have a trial. Downloading Disk Copy Home or a trial of Todo Backup Workstation requires leaving your email and download link will be emailed to you.
Steps to cloning a larger hard disk drive onto a smaller hard disk drive
I have used the above softwares many times and they excel in ease of use and reliablity, and therefore reccomend them to anyone with similar cloning tasks.
With solid state hard drives (SSD) being smaller in size than older mechanical hard drives (HDD), it can be difficult to clone the drive. Especially with manufacturers having recovery partitions this can make this more difficult. I came through software, which can only clone hard drives of the same size or smaller. There are several software that can clone to smaller hard drives.
Important Note: If the size of your data on your old hard drive is larger than the total size of your new hard drive, then you will have to delete some data.
In order to clone a hard drive from a larger HDD to a smaller HDD (e.g. SSD), you will need 2 Peices of software:
- Markup Software
- Cloning software (which supports cloning from large HDD to small HDD).
Partition Master Free
Partition Master free PEACE is a free partitioning utility. This program is easy to use and allows you to do most of the tasks needed with the volume of hard drives and partitions. Partion Wizard works for free only with basic disks. This allows you to change the size, movement, combine and separate partitions. It supports MBR, GPT and RAID disks. The software can be installed on XP, 7, 8 and 8.1. It runs on both 32-bit and 64-bit platforms. If you have a dynamic disk, then you will need to download the trial version of Partition Master Professional. Checking the disk type (basic or dynamic) can be done in disk management by running diskmgmt.msc from Windows Search.
Disk Copy Home
Disk Copy Home REST is a disk or partition cloning tool. This allows sector-level cloning which ensures that the destination hard drive is exactly the same as the original. Disk Copy Home only allows cloning of basic disks. Disk Copy Home starts at system boot and requires a USB drive. Disk Copy Home is free software. If you require cloning dynamic disks, then Todo Backup Workstation is the . Todo Backup Workstation is not free, but there is a trial available. Downloading Disk Copy at Home or a trial version of Todo Backup Workstation requires leaving your email and a link to download the file emailed to you.
Steps to clone a larger hard drive to a smaller hard drive
- Remove all unnessary data from the source hard drive
- Make sure the source hard drive data is smaller than the target hard drive size
- Use Partition Master Free or Professional. Heat shrink sections with the right sizes. Additionally, any partitions you want to keep should be placed at the beginning of the disk by dragging parttions. When you're ready, click on apply and the software will perform the tasks you just installed.

- Now you are ready for cloning. Use Disk Copy Home or Todo Backup Workstation. Please note the software clone will copy from the beginning of the disk. Otherwise, partitions at the end of the source disk that do not fit on the destination disk will be discarded.
Disk cloning, also known as disk imaging, is the practice of copying the entire contents of a hard drive or partition, including the file structure and system files, in order to move or restore the data on the drive. Cloned disks are often written to a single file, a disk image, that represents the entire disk. This disk image can be used for many purposes, including transferring data to a larger hard drive or restoring an unstable system with a blank disk image.
Libraries, schools and cyber cafes often restore their computers using a cloned disk image to easily manage and protect large numbers of machines. The practice of creating a disk image can create some problems, but many programs provide features to compensate for this.
When operating systems and backup copy the contents of a disk from one location to another, they often ignore some files, change the data in some way, or do not preserve all the attributes of the files on the disk. In many cases this is actually useful for the user. When you back up a folder to an external hard drive, for example, the date and time the file was last modified may reflect the time of the last backup rather than when the original file was modified. When it is necessary to create an exact copy of a disk, many users may turn to disk cloning software.
Disk cloning software creates bit by bits to copy onto the disk, which means every last piece of data is saved. The data can be written to a second disk or saved as a disk image file. The disk image file can be used to transfer data to one or more new hard drives, or to reinstall it onto the original drive. For example, unstable system can be rolled back to the point where it still functions using a cloned disk image.
Organizations with a large number computers can use disk cloning to deploy a standardized set of applications and data on different computers. They can also use this technique to apply updates and security patches to all their computers at once. For example, in libraries, schools and institutions, computers are often restored from a cloned disk image to destroy any viruses or other unwanted software that scanners might load. Disk cloning can also be used in conjunction with disk wiping, the practice of securely wiping the disk, removing any personal data, and returning the machine to its original state.
Creating exact duplicates of a hard drive can have disadvantages. Computers running Microsoft® Windows® are assigned a unique security identifier (SID) when they first install the operating system. Disk cloning will copy the computer's unique SID; if this cloned image is used on multiple computers on a network, security may be compromised. When cloning a disk, drivers for a specific set of hardware are also copied, which can cause problems when the target system has different settings. Some disk cloning applications provide features to overcome these problems, so potential customers should be sure to evaluate their own needs before purchasing such software.