How to make a small trash can. Do-it-yourself garbage cans and trash cans in your garden plot
Buying a lot of country accessories involves serious waste, but today we are learning to save and making some of them with our own hands. Garbage bins, trash cans and ashtrays for the dacha from improvised means - it’s not as difficult as it might seem!
Of course, many are already accustomed to using an old bucket instead of a trash can, and a small glass jar instead of an ashtray. It is quite possible that it is convenient and inexpensive, but such devices do not have any appearance, or rather, they spoil many of our achievements in design and decoration with their too simple appearance. That is why we decided to find a way to correct the situation and tried some hand-made work on ourselves, thereby learning how to make trash cans and ashtrays for the dacha with our own hands. Everything is very simple, and now we will tell you how to do such interesting things yourself without a lot of money and time.
Trash can made of plastic bottles
You can make a garbage can for use in your country house from a variety of available materials, but we were most interested in the production from plastic bottles, which can be considered a free building component. That’s right, because there are plenty of bottles at every dacha; they remain after water and drinks, after large gatherings, and there is no point in throwing them away.

The first thing we need for production is a metal frame, which can be made from wire, aluminum plates and even a metal profile for drywall. By and large, we will need only 2-3 identical elements of an oval, round or rectangular shape to construct the base, top of the tank and the middle jumper from them. Having adjusted all sizes and shapes, you can proceed to the next stage.
For this we need 2-4 pieces of reinforcement or the previously mentioned profile. These metal elements are necessary to fasten the main parts together and make racks. You can choose reinforcement and tie it with ovals or circles with wire, or you can bend the U-shaped profile for drywall into one plane, and connect the posts from the profile to the main parts with clamps or even rivets.

When the frame of the homemade trash can is ready, we proceed to the final stage - we build the walls of the bin from plastic bottles.
So, for this we need steel wire, a nail, a mounting knife and pliers. First of all, we measure the pieces of wire according to the height of the tank and cut them taking into account the attachment to the upper, middle and lower parts of the structure. The length of each piece should be 20-30 cm greater than the height of the future tank.
Next, use pliers to clamp the wire on the bottom of the tank, throw several turns on the frame, put 1-2 bottles on the wire, make a hole in them with a nail, make several turns of fastening on the middle part of the frame, again a couple of bottles and now fastening to the upper part.
It is very advisable to think about the size, shape and color of the bottles in advance to avoid chaos. You can define a uniform pattern using bottles of the same volume and color, or you can transform the craft a little by choosing bright bottles.
Consistent fastening of the bottles and good tension of the wire, a tight fit of the bottles one to another vertically and in rows will ensure the high quality of the homemade garbage can. Of course, after production it is worth remembering that it is not intended for heavy waste and burning debris.

These bins can be created with or without a bottom, but today most of these bins and bins are created without a bottom so that they do not have to be turned over during cleaning. It will be enough to simply lift them.
A small urn made from an old bucket or barrel
Used tanks for liquid and bulk products should not be immediately disposed of in a landfill, because they can also serve well within the perimeter of a summer cottage. As an example, we would like to give old buckets and barrels, which can be easily converted into trash cans and small trash cans.
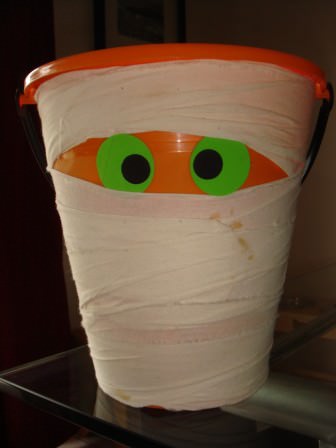
Any old bucket that is not too dilapidated, or a barrel that is not rotten, can become a garbage container in the gazebo, approx. summer kitchen and so on. To do this, we won’t have to upgrade much, but just adjust the tank to size, perhaps patch up the old holes a little, repaint it in a cheerful color and install it where necessary.
Buckets can serve almost immediately, but barrels often have to be trimmed a little, since they are too big size. After carrying out the simplest reconstruction work, you can upholster the tank with building materials - plastic, wood, thick cardboard, after applying patches of tin or aluminum sheet. That’s it, now it’s just painting in the desired color or a bright pattern to match the design style of the location.
DIY country ashtrays
Ashtrays in the country can be of two types - tabletop and floor-mounted.
Making a table ashtray
Each craftsman makes tabletop ashtrays in his own way in the country - he pours them from plaster, clay and other materials, carves them from wood or bamboo, cooks them or rivets them from metal. We offer the simplest, almost minute option, which many already know about. This is a beer can ashtray.
To make it, you will need an empty and clean tin of beer or soda. Its top should be carefully cut off with a knife, then, also carefully, but with scissors, the can should be dissolved vertically into a certain number of strips, leaving a little depth in the lower part, just a few centimeters. Now you need to wrap the strips down, rolling them into a kind of roll, and that’s it - the tabletop ashtray is ready.

Making a floor ashtray
With a floor-mounted ashtray for a summer house, things are a little more complicated, but not that much. You can use an old milk can or even a piece of a large-diameter stainless steel ventilation pipe to make it. With a can it’s a little easier, because you just need to throw a removable fine mesh over it, say, from an old construction sieve, and that’s it. Next, only a kind of decor, and the ashtray goes to its place workplace. You will have to tinker with the pipe, since it will need to be attached to the bottom. But here also ingenuity comes to the rescue, and we simply place an old bucket inside or its carefully cut bottom, which, resting its edges on the inner circumference of the pipe, becomes the bottom. Now the grid is on top part And decorative ornaments.

When working with metal forms and parts that need to be cut, we recommend that you be extremely careful and take every precaution necessary measures safety, as unpleasant injuries may occur.
How to make an ashtray for a summer house with your own hands (video)
As you can see, there is nothing supernatural in the manufacture of such accessories, and therefore, as soon as you have a free minute or an urgent need for a trash can, trash can or ashtray in the country, you can immediately begin production and complete the project within an hour or two.
Garbage cans, trash cans, ashtrays. You can’t immediately tell that these are essential items. But imagine yourself cozy Vacation home It is impossible without such familiar and unnoticeable parts of the interior.
The easiest way to get a trash can or trash can is to buy it at your nearest store. This is the path of the lazy. Isn't it better to make a trash can yourself? And it's not even about saving. A little patience and imagination, and your suburban area will be decorated not with a standard, nondescript bucket, but with a real masterpiece.
Do you need to make trash cans and trash cans yourself?
Garbage cans, photos of which are posted below, will decorate any country house:
Self-made trash cans and trash cans have a number of advantages:
- Saving Money. Even if buying a trash can or regular trash can doesn’t put a big dent in your budget. A little saving won't hurt.
- Such products are more beautiful and brighter than store-bought ones. They are individual, unique, and fit perfectly into the interior.
- Their creation develops imagination, gives pleasure and joy in the process of creation.
- The ability to make trash bins and trash cans, the size, color, shape and style of which are ideal for a specific location.

Garbage Bin Decoration
The easiest way to get an original trash can is to purchase an inexpensive factory-made bin and decorate it. All you need for this is acrylic paints, a brush and a little imagination.
You don't even need special artistic talent to decorate a tank. There are many simple patterns, which everyone can do. For example, geometric patterns. Select a sketch according to your abilities and desires and move forward to your goal.
- Garbage can from a barrel. If the household has an old unnecessary barrel, there is no need to buy a garbage container. Get it repaired. Decorate to your liking. Install in convenient location. The problem with the trash container has been resolved.

- Garbage cans made from plastic bottles. To make a garbage can with your own hands, any materials at hand are suitable. For example, old plastic bottles. This is a wonderful material that constantly accumulates in any home.
Tip: To get beautiful and neat trash cans, choose plastic bottles of the same shape. Moreover, they can be either the same color or multi-colored.
Having prepared a sufficient amount of the main “building material”, proceed directly to the manufacture of a garbage can:
- Make the base, middle and top of the future trash can. Take 3 elements of any convenient shape. It can be a rectangle, circle or oval. They can be made from large-section wire or aluminum plates. In extreme cases, even a metal profile for drywall will do. Try to keep all three elements the same size and shape.
- Make a frame for the tank. To do this, take from 2 to 4 pieces of reinforcement or metal profile of the same length. The length of one piece of reinforcement is the height of the future tank. Use reinforcement or profile as side posts. Attach the bottom, middle and top of the tank to the posts. Wire, clamps or rivets can be used for fastening.
Tip: The height of the tank should be a multiple of the height of one plastic bottle.

Build the walls of the tank using previously prepared plastic bottles:
- Slice steel wire into pieces, the length of which is 30 cm greater than the height of the tank.
- Make holes in the center of the bottom and lid of all plastic bottles. Use a nail or awl.
- Using pliers, secure the end of the wire to the bottom of the frame. To be safe, make 2-3 turns.
- Place one or more plastic bottles on the wire. The number of bottles depends on the expected height of the tank. At correct calculations, the neck of the top bottle touches the middle of the frame.
- Fasten the wire to the middle part of the frame, making 2-3 turns.
- Place the required number of plastic bottles on the wire.
- Securely fasten the wire to the top of the frame. Use pliers to secure.
- Repeat the above procedures until you have equipped the entire frame with bottles.
- Try to pull the wire carefully. Adjacent bottles should fit very tightly against each other.
- When using multi-colored bottles, try to achieve a harmonious pattern when placing them. This could be an alternation of bottles - a white stripe, a brown stripe. It is possible to make the bottom of the tank one color and the top another. Don't be shy, show your imagination.
- The trash can is ready. Of course, it is not intended for burning waste and heavy debris.
Typically, such tanks have no bottom. There is no need to turn it over for cleaning, just tilt it slightly.
If you think it’s inconvenient, build the bottom in any convenient way:
- Tightly braid the lower horizontal part of the frame with wire. The bottom will not be solid. The smaller the weaving pitch, the smaller the debris it will hold.
- Cut the bottom from any material. It can be aluminum or steel sheet. It will even do moisture resistant plywood. The option of using thick cardboard is also possible. In this case, the tank must be installed in a place protected from moisture. Drill holes around the bottom perimeter. Attach the bottom to the bottom of the frame with wire.
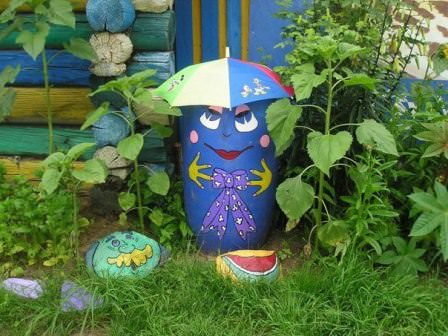
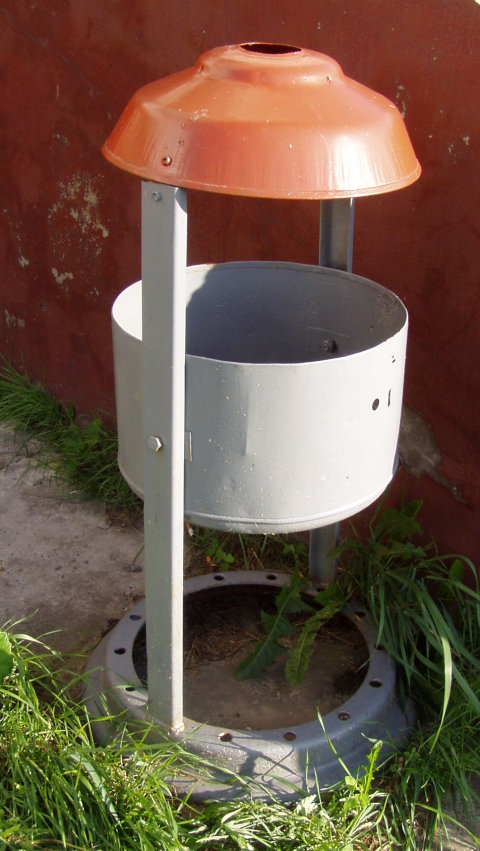
Excellent urn made from a barrel or bucket
Do not rush to throw away an old bucket or barrel that has served its purpose. These would make a great urn. If the starting material is an old bucket:
- Modernizing an old, but complete bucket for an urn is very simple. All you have to do is buy bright colors and decorate it as you wish.
- If the bucket is rusty, thoroughly clean off the rust. Place a patch of aluminum or tin over the hole. Cover the outside of the bucket, and if necessary, the inside, with self-adhesive tape of one neutral shade. To decorate the urn, use pieces of multi-colored self-adhesive tape or paint.

How to make an urn from a used barrel:
- Trim the barrel to the desired size.
- Remove rust and patch holes.
- Beat the barrel with any building material. It can be wood, plywood, plastic, thick cardboard.
- Paint the resulting urn. Feel free to fantasize.
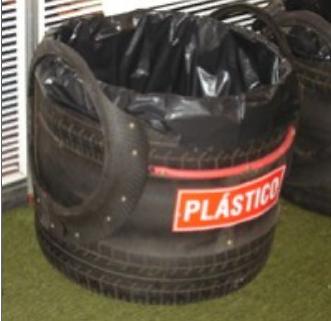
Bin made from old car tires
A wonderful urn is made from old ones. car tires. Even if you don’t have your own car, any station Maintenance will happily provide them to everyone who wants them, and completely free of charge. Making a tire bin is very easy. It won't take much time:
- Take 2-3 old car tires.
- Clean them thoroughly to remove dirt and grime.

- Rinse the tires with water and dry.
- Fasten the tires together from the inside using metal staples.
- Mask the joints on the outside. A piece of a car camera would work well.
- Paint the urn with any bright colors.
- Since this type of trash can has no bottom, use garbage bags.
Tip: It is advisable to use garbage bags for any trash can design. This will make cleaning easier and eliminate the need to wash the bin.
Urn with lid
Often the urn is installed in an open area. In this case, it is advisable to protect its contents from rain. Make an urn with a lid:
- Take the disk from the old wheel. It makes a great, stable base for an urn.
- Using aluminum strips or a metal profile, connect the disk to a regular bucket. Use bolts or screws to connect. The bucket is attached in such a way that the strips or profile protrude above its upper edge by at least 10 cm.
- Attach the lid to the top of the structure. This can be a lid from a bucket or any pan of the appropriate diameter.

DIY ashtray
One type of urn is an ashtray. Ashtrays, both tabletop and floor-mounted, are an indispensable attribute of any private home. Even if the owner does not smoke, an ashtray will not hurt. It successfully performs the functions of a miniature urn. In addition, not all guests lead a healthy lifestyle. Install floor ashtrays near the barbecue, at the entrance to the gazebo.
What are tabletop ashtrays made from? Wood and plastic, gypsum, clay, metal. The fastest and easiest way to make an ashtray is to use a regular beer can:
- Take an empty soda or beer can.
- Wash it thoroughly.
- Using a sharp knife, cut off the top of the can. Trim the edges.
- Using scissors, make vertical cuts towards the bottom of the jar. The cut should not reach the bottom by 2-3 cm. The width of each strip is about 1-1.5 cm.
- Roll each strip down into a roll or bend them, intertwining them together.
- The simplest desktop ashtray is ready.

DIY floor ashtray:
- An old milk can or a piece of ventilation pipe is perfect for making a floor ashtray.
- Cover the can with a fine mesh and decorate. Install in in the right place and start using it.
- You will have to tinker a little longer with cutting the pipe. Place an old bucket inside the pipe or use the bottom of it. Cover the pipe with a fine removable mesh and decorate. The ashtray is ready for use.
Tip: When working with metals that need to be cut, be very careful. There is a very high risk of injury.

Trash bin made from plastic bottles!
You may need trash cans everywhere and always. They must be located in any area where there are people, so that the area remains clean and free of clutter. Garbage bins can be purchased, or you can make your own from plastic bottles.
Required Materials for a Garbage Bin
In order to make a decent-sized garbage can from plastic bottles, you will need these same plastic bottles. And there should be quite a lot of them. In principle, everything is visible in the photographs. Of course, this is just an example. If necessary, you can make the trash can larger or smaller based on your specific needs.

In addition to plastic bottles, you will also need thick wire or a metal rod, as well as thinner strong wire in order to connect the structure together.
The tool you should prepare in advance is a burner or soldering iron for making holes in plastic bottles, pliers and a knife (scissors).
It is better to wash the bottles well first, remove any remaining drinks and remove the factory labels from them.

As for the sizes of plastic bottles, you can use different ones. The main thing is that all plastic bottles for the trash can are the same size in each level (ring).
Step one: preparing plastic bottles
Properly washed and dried plastic bottles need to be prepared. First of all, unscrew the caps from them. Then, holes are made in them (the lids) for wire or a metal rod. This can be done different ways. For example, you can solder holes using a soldering iron or burner, or you can drill them with a drill. Choose the simplest one and affordable way for now.

Larger holes are cut in the bottoms of plastic bottles so that the neck of the next bottle fits into them. This can also be done in several ways. For example, using a sharp knife.

Step two: collect plastic bottles in sections
Now you need to assemble “pillars” for the trash can from plastic bottles. The caps are screwed onto the bottles again, then they are placed on a thick wire or rod in groups of four (this also depends on the height of the bottles and the required size of the garbage tank).
In this case, the neck of each subsequent bottle is tightly inserted into the hole made in the bottom of the previous plastic bottle. When the required number of sections is ready, you can begin assembling a garbage tank from plastic bottles.

Step three: assembling waste bins from plastic bottles
So, now you need to make metal rings that will determine the volume and shape of the future garbage can. You can make the rings yourself or find suitable ones. All rings must be the same size.
Plastic bottle tankLike every gardener, I know how convenient it is to have a garbage collection container on hand on your property. At any dacha, as in an ordinary house, always remain pretty large quantities plastic bottles for water and other drinks. So I thought - why not use them as a material to create garbage cans. In addition to the fact that such containers will turn out to be very cheap, they will also look really original, so they will perfectly decorate my area.
Of course, such homemade urns are endowed with undeniable advantages. For starters, this tank will help save my budget. Also, the product will look much more interesting than its store-bought counterpart. In addition, a plastic urn is not at all afraid of bad weather, and it is also very convenient for transportation and movement, because it is light in weight.
Tools and materials that I will need to create such a trash can: plastic bottles, which should be the same size (you can take multi-colored ones and alternate them to make an interesting pattern); steel wire with a diameter of 3 mm and 6 mm; knife for installation; an awl (nail), which can be replaced with a drill, and pliers.
Step 1. I remove all existing labels from the pre-prepared bottles.
Having determined the center of each cover, I make holes in them using a drill or awl, the diameter of which will allow a wire with a smaller diameter to be threaded through. Now I turn the bottle around to the other side and make a fairly large hole in the bottom, because you need to place the neck of another bottle in it.
Step 2. I make “columns” that will become the basis for creating an urn.
To do this, I take a thin wire and cut it into pieces, the length of which will exceed the height of the tank being made by 30 cm. I string 4 bottles onto each such piece. You need to carefully ensure that the neck of each subsequent bottle fits tightly into the hole that I made in the bottom of the previous one. So, I continue this process until I have the required number of “columns”.
Step 3. In the next step I will assemble the frame for the urn using large diameter wire.
It is this frame that will give the structure the correct shape and also make it truly durable. Using pliers, I make 3 rings of wire with the same diameter. They will be secured at the base, top and middle of the urn. The volume of the tank will depend on the diameter of such a ring. Then I need to cut another 2-4 pieces from the thick wire, their length should be 20 cm greater than the height of the future urn - I use them to make the frame. Using thin wire I will secure these cuts to the rings; for this it is worth making 2-3 turns using pliers so that the structure is as strong as possible.
Step 4. Now it's time to return to the "columns".
I'll attach them to the frame using thin wire, but don't forget that it needs to be stretched well during the process. If there are ready-made multi-colored “columns”, then they can be alternated, for example, creating multi-colored stripes on the urn.
As a rule, such tanks do not have a bottom, because this makes it easier to remove debris from them. But still, I can give the trash can a bottom, which can be done in two ways:
- I can tightly braid the bottom of a trash can using wire. In this case, the bottom will have a mesh structure, but if I make the weaving step tight enough, then even fairly small debris will not fall out of the tank.
- I can also make the bottom from almost any material that I have on hand: sheet metal, aluminum, a piece of plywood with moisture-resistant qualities, or polycarbonate. In this case, I will first cut out the workpiece, then drill holes in it around the perimeter and attach it to the frame using wire.
In order for such a trash can to turn out to be of sufficient quality, I need to ensure that the bottles are fixed at the same level, the wire tension is sufficient, and also that the bottles fit tightly to each other both horizontally and vertically. But still, I must remember that you should not throw burning matches or heavy waste into such a container.
Typically, a summer cottage plot is made up of various garden buildings and small architectural forms that complement the landscape design of the area. Oddly enough, most owners of their summer cottages forget about such a useful element as a trash can. An urn is not only a container used to collect various garbage, but also a small architectural form, correct design which will uniquely decorate the garden area. In addition, the urn is an indicator of the culture of the owners, which emphasizes the attitude not only to the garden, but also, in general, to environment. Now we’ll talk about how to make a garbage can with your own hands!
Should I buy an urn or make it myself?

If you do not have creative thinking and imagination, but still want to equip your summer cottage with a couple of beautifully decorated urns, you can buy them at any specialized store. Today, manufacturers of garden sculptures provide consumers with the following types of urns:
- Metal (chrome) - suitable for arranging city streets, entrances to shops, office buildings, banks, etc. Country cottage area It is recommended to install chrome-plated trash cans only in high-tech style.
- Metal (forged) - this type of trash can is also suitable for arranging parks, city gardens and streets. For a dacha, forged urns are a very good option, because... their appearance is always original and striking. The disadvantage of forged metal urns is their high price.
- Concrete - this type of urns making the right choice external pattern will suit an antique garden. Their advantage is high durability and luxurious appearance. The disadvantage is the high cost and weight (it is difficult to move a concrete urn from place to place).
- Plastic bins are the most economical option for waste bins. Due to its low price and wide range of color shades, it is popular among summer residents. The disadvantage of plastic bins is that they are cheap. appearance, which very often worsens the overall composition of the garden plot.
- Wooden urns - products made of wood with engraving and varnishing will decorate very luxuriously garden plot, giving it elegance. The problem with wooden urns is low durability, although if the wood is treated with antiseptic agents in advance, this drawback fades into the background.
DIY trash can: original ideas for creation and design
Creating an urn with your own hands has the following advantages:
- You save money
- You increase your level of creating fakes with your own hands
- Creating an urn with your own hands brings pleasure and develops imagination
- You can make an urn of the appropriate size, shape, color, style
As you can see, the benefits of creating an urn with your own hands are significant, so this work makes sense. In order to inspire you to create an urn, we will present you with several original ideas:
Idea No. 1 – Urn made from car tires
Creating an urn from car tires will take very little time.
First, we look for used tires (at least 2), wash them from dirt and dry them. After this, we fasten them together with metal staples (from the inside) and close the outer joint with a piece of an inner tube or something suitable. In the end, we paint the finished product with bright paint and install the urn in a suitable place, preferably on.
Idea No. 2 – Urn made from scrap materials
To make an urn with your own hands, anything can be suitable - a wooden barrel, a plastic or metal bucket, an air filter from a truck, etc. The main thing is to decorate the base with suitable material. To do this, you can use wooden pickets mounted on glue, polyurethane foam, from which you can later cut out shapes, as well as regular paint.
We will provide you with the most interesting photos examples of bins made from improvised means:


Idea No. 3 – Bin with a lid
To prevent rainwater from getting into the trash can, and to make the process of removing garbage from the bin faster and easier, it is recommended to add a small canopy and stands with a rotating axis to tip the container to the standard trash can design.
In this example, we will provide you with an urn design made from the following materials:
- Car disk 1 pc.
- Frame street lamp 2 pcs.
- Bolts and nuts 2 sets
- Metal channel 40*20 mm 2 pcs.
Also, to create this urn we will need welding machine, wrenches for bolts and nuts of the appropriate size, paint, brush.
A photo example of this urn will replace all the necessary explanations for creating an urn:
So we have provided the most original options do-it-yourself trash cans for your dacha. We wish you more creative ideas and we recommend that you read the article on how to do it yourself!

