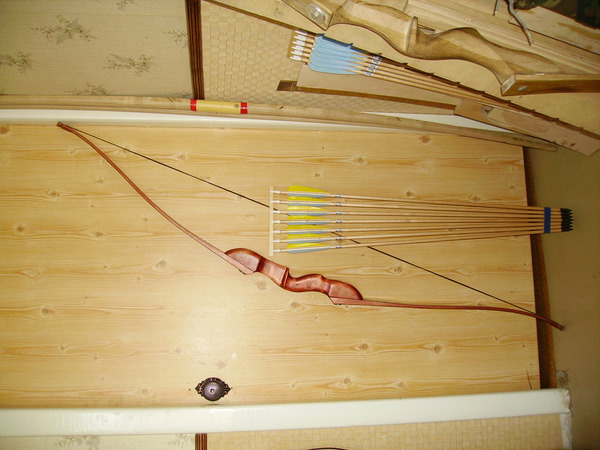
How to make a bow and arrow with your own hands at home. Step-by-step instructions for making a bow and arrows How to make arrows in taiga conditions
Making onions is a process that requires precise adherence to technology. Only in this case can you count on a good result. With a well-made bow, you can shoot arrows precisely at the target, and it must be powerful enough to hit the game that will eventually become the hunter's prey.
First of all, those who already have experience in hunting with such weapons should undertake making it with their own hands, but with the right approach to the matter, anyone can cope with the task. Let's look at how to make a bow for hunting with your own hands, using materials and tools that are available to everyone.
Varieties of bows
The main parts of such a weapon are the arc and the bowstring. By design, bows can be divided into two main groups:
- simple - for these models the arc is made of one material - wood or PVC;
- compound, or composite - the arches of such bows are made of several materials.
According to the form they are distinguished:
- classic bows - such an arc hunting weapons has one bend, when bent it has a D-shaped appearance;
- recursive - their arc bends three times and has an M-shape.
Bows can also be divided into simple and collapsible. The arches of the former are made from a single piece of material, while those of the latter consist of several parts.
From natural materials To make composite arches, wood can be used for the middle part, horn for the inner part, as well as tendons that are attached to the outer side. This three-part design provides the weapon with good elasticity, flexibility and power.
Today, in the manufacture of industrially produced collapsible bows, high-strength modern materials with optimal properties are used - fiberglass and carbon fiber, aluminum and magnesium alloys, and so on.
The design of such a weapon can be quite complex, but making it yourself at home is a task that requires some experience, as well as a lot of time and effort.
It’s better to make a simple one-piece bow with your own hands. With the right approach to business and adherence to technology, its accuracy and power will be sufficient for hunting.
Tools and materials
To make such a bow you will need a minimum set of tools:
- hacksaw;
- plane;
 To give the arc the desired bend, it is better to use a special slipway. You can also make it yourself from a board and several bars.
To make a simple non-separable bow with your own hands you need:
- wood or polyvinyl chloride tube to make an arc;
- strong rope, rawhide tape, wire, thick fishing line for making a bowstring;
- thick rope or other suitable material for the handle.
When drawing the bow, the shoulders should bend, but the bowstring practically does not stretch.. The arrow is sent to the target precisely due to the force of the weapon’s arc, which straightens at the moment of the shot.
How to make a bow from wood?
Let's look at how to make a hunting bow from wood. The best material For this purpose, yew is considered - it was from it that the best examples of such weapons were made in the Middle Ages. However, it is difficult to obtain such a tree, so other species are usually used instead. It can be:
- hazel;
- juniper;
- Rowan;
- ash;
- larch;
- cedar.
A good bow rod should:
- not have cracks, it is also better to select rods without knots, but the presence of a small amount of them on the surface is not critical, the main thing is not to try to cut them out when processing the rod;
- have a length from a meter to one and a half meters;
- be dry;
- be direct.
 To make a bow, you can also use several thin rods of the same length, but they must be securely fastened by tightening them in several places with electrical tape or other suitable material. This option is suitable if you need to quickly make a bow on the go from what you can find on hand.
Wood harvesting
It is better to harvest wood to make a hunting bow with your own hands in winter, at a temperature of -10 degrees or slightly lower. If you look for a suitable rod in the fall, you won’t have to wander through the snowdrifts in search. It is necessary to cut it, the length of the rod should be several tens of centimeters greater than the expected length of the bow. This is necessary, since when drying, the ends of the rod may crack.
Before making a bow, the wood must be dried for a long time, on average three months is enough. A room with room temperature in which the rod needs to be hung is suitable for this.
In this case, there is no need to remove the bark, but it is better to paint or coat the ends with varnish, which will not allow moisture to evaporate, then the future arc will dry evenly along the entire length. A rod that has a slight curvature can be straightened over steam.
In camping conditions, drying can be quickly done using a fire; the main thing is to do it carefully, do not put the wood too close to the fire and not overdry it. Such onions will be more fragile and less durable than those dried at room temperature.

Making a bow from a wooden rod
When the rod is dried, it must be processed with a plane, and the shoulders should become flat, not cylindrical. The bow of a simple takedown bow is not made from a single piece of wood or PVC, but from two separate arms that are attached to the top and bottom of the handle. In this case, the handle is easiest to make from a wooden block or cylinder of suitable thickness. At the same time, in the central part they can be sharpened, making a comfortable grip under the arm.
If you plan to make a simple bow with an arc from a single piece of wood, and not with two separate arms, the rod in the middle should be left round in cross-section.
It is important that the arms have the same length, width and thickness, only in this case the force on them will be distributed evenly, and the bow will hit accurately.
Then the workpiece must be given the desired shape - in the form of a simple arc or M-shaped. To do this, the wood is heated over steam and temporarily fixed in a special slipway, which will fix the desired shape. Such a device can be made from a board by attaching several bars to it. You need to keep the onion in the slipway for about a week.
When the arc is ready, you need to make notches at its end and secure the bowstring. It is also necessary to braid the handle. To obtain a reliable installation, the fixation points of the bowstring and the handle must be glued.
Making a bow from skis
Skis are a material that is excellent for making a bow arc, which often does not even need to be processed. Therefore, if there is a suitable pair available that is unsuitable for use, there is no need to prepare rods or look for another material. You can use both wooden and plastic skis; the second option is preferable.
To make a bow, you need to saw off two ends of the skis of suitable length, which will be the shoulders, and attach them to the handle. The handle itself can also be made from skis by fastening scraps of the required length in several layers and processing them so that a comfortable grip is obtained. After this, you just need to attach the string, and the bow is ready for use.
 The optimal length of the finished product is about 1.3 m. If a bow made from skis exceeds the length of 1.4-1.5 m, its power will be insufficient, since such a long arc cannot impart sufficient momentum to the arrow. Also, the shoulders should be narrow - so in order to make an arc from wide skis, they must be sharpened on both edges.
Making a composite bow, each limb of which must be made not from one material, but from several different ones, is a more complex process. However, such weapons are made according to the same principles as simple homemade bow for hunting. If you approach the matter correctly, a bow made with your own hands will hit powerfully and accurately, and it will last for quite a long time.
Great article dedicated to this interesting topic like arrows with your own hands. In it we will show in detail and step by step, with examples and explanations, how to make good, high-quality arrows at home and with your own hands. This material clearly shows all the subtleties of manufacturing; it will be understandable to both an adult and a child.
Arrows - the basis of a shot
All my life I thought that in art the most important thing is the artist, and not, for example, his brush. Many photographers took their pictures with expensive cameras, but they took truly stunning pictures with the simplest digital point-and-shoot cameras. With experience, all a photographer needs is the camera itself. But archery does not fit this rule.
If earlier I believed that success depended 90% on the archer, now my opinion has changed dramatically, and I believe that success still depends on the bow and arrows, and only a little on the archer himself. For example, if you give a shooting master a bad bow and crooked arrows, he is unlikely to achieve serious success. Therefore, arrows must be made thoroughly, despite the fact that they very often break, get lost, and so on. But still, do not forget that arrows are consumables.
To make a shaft you will need:
- 10 mm glazing bead without knots, smooth, square. It happens that round so-called dowels are already on sale, in which case take them without hesitation! Most often, the material for making such dowels is pine, which is quite suitable for us. It happens that the glazing beads are glued together from several parts, the same ones will do, but if possible, then unravel the board into glazing beads yourself, you will get the smooth, homogeneous blank material that you can find.
If you cannot do this yourself, then go to a carpentry workshop and pay for the services of a carpenter who will do it for you. Read about how to choose the optimal arrow length for a particular person on our website in the article section.
The best material for glazing beads is birch. It has its drawbacks in the form of the hardness of the species of this tree itself (it will affect the difficulty of processing), unlike pine, for example, but this is the most ideal option, the glazing beads will be excellent. By the way, the Mongols made their arrows from birch, and they knew a lot about weapons, even a lot. In order to make arrows for a bow you will need the following tools.
For the shaft:
- File
- Metal saw
- Drill (screwdriver)
- Jigsaw (or wood saw)
- Sanding paper different sizes grains and files.
For plumage:
- Pattern for fletching (so that all the feathers on the arrows are the same)
- A4 paper,
- Scissors
- Pencil
- Ballpoint pen
- Ruler
- Eraser
- Aluminum tape (foil, one side of which is sticky, with a protective strip)
- Colored tape (it is advisable to use bright colors so as not to lose your bow arrow in the grass).
To make a safe tip we will need:
- Insulating tape
- Stationery knife
- Aluminum tape
- Five-kopeck coin
- Material for softening (foam rubber is best for this, but you can take a travel mat for example)
- Fabric (10x10 cm is enough).
To make a combat tip we will need:
- Metal scissors,
- Vise
- Pliers
- Tin (almost anything will do, the most easily accessible are tin cans)
- File
- Knitting wire
Shaft
I advise you to make as many arrows as possible, and not to be lazy. This is especially true for those who participate in historical reconstructions; usually you can get by with 40 pcs. This will be enough to avoid saving arrows while shooting. Let's get started, we have a glazing bead and first we need to cut it into pieces of the required length (choose the length of the arrow according to your dimensions and add 30mm).
Rounding. We take a plane (manual or electric) in our hands and chamfer the glazing bead, do not overdo it in this matter, the task is to give our square an octagonal cross-section, it is very important that the knives (or blade) of the plane are very sharp, this will greatly facilitate the process of making arrows with your own hands. If your plane is electric, then I advise you to simply buy new knives for it; if the plane is manual, then sharpen the blade yourself and then adjust it. In any case, sharpened knives will remove wood very carefully, and you will get very high-quality arrows for your bow.
For example, we gave 40 glazing beads the required octagonal shape. Now we take 1 arrow blank and insert one end into the screwdriver (for this we needed a reserve in size so as not to spoil the arrow). Now we take a rough sandpaper in the second hand (use safety precautions to avoid all kinds of injuries), turn on the screwdriver and start sanding the workpiece. After this, take a medium skin (skin with a medium grain) and repeat the same process, at the very end take a fine skin (with the finest grain) and process the workpiece one last time, until it is perfectly smooth. Next, do the same with the remaining arrows.
We grind the glazing bead.
We begin to make a cut for the bowstring, this is a very important point. We make a cut, for example, with a hacksaw for metal, strictly perpendicular to the workpiece, to a depth of about 7mm. Next, we take the needle file in our hands and begin to widen the cut with it, rounding the corners in parallel.
Now, using a round file at a distance of 1.5 cm from the heel of the arrow, we make 2 dimples, or you can remove 2 mm in depth and 20 mm in length with a special spatula for wood carving (see figure), we do this operation with all the blanks for the arrows.
Read a detailed and complete article. After reading it, you can easily make it at home, it won’t take much time.

We make a cut for the bowstring.
Protecting our homemade arrows for onions. We choose a tinting (giving a certain color) antiseptic in the store (from fungus, from blue stains and other diseases of wood). The color doesn't matter, choose it to your taste. Believe me, coating a bow arrow will do its job and add durability to it.
Let's start fletching the arrow
Remember, to make the arrows fly faster, make the feather smaller; if the arrows are heavy, make the feather wider. Also, if the feather is closer to the heel, then shooting will be more accurate; the further from the heel, the faster the arrow will fly. The shape can be given in different ways (this is a matter of taste), the most optimal fletching length for arrows is 8-10 cm with a maximum width of 2 cm. In order for all the plumage to be the same, we need to make a pattern. For this task, for example, plywood or a piece of metal, or thick cardboard will do. The color of the plumage is also important than brighter color- the easier it will be for you to find the arrow.

Pattern for plumage.
We mark the paper along 4 cm. As a result, we will get 4 strips of 30cm each. We take aluminum tape (its width is 5 cm) and make markings on it to make stripes 1 cm wide and 32 cm long.

Mark a sheet of paper.
Everything is cut with scissors.

We cut with scissors.
We lay the strip of cut paper on two strips of aluminum tape so that the tape protrudes 5 mm, then fasten it with narrow tape.

Paper on aluminum tape.
Very carefully and carefully we glue colored tape on top, 5 cm wide, the width of our workpiece is also 50 mm. It is important that no bubbles appear on the surface.

Attach colored tape.
This is what it should look like:

It will turn out like this.
We bend the aluminum strips.

We bend the strips.
We fix it with narrow tape

Secure with tape.
Attach colored tape.

Colored tape.
We cut off the unnecessary narrow tape with scissors.

Cut off the tape.
We smooth the surface thoroughly to ensure complete adhesion of the tape.

Smooth it out.
Using a pattern, we outline four feathers.

Let's circle.
Cut out the feathers.
Cut out feathers.
What should happen.
Whatever happens.
Remove the protective strip and glue the first feather, do not forget to monitor the parallelism.

Removing the protective film.
Glue 2 more feathers with an angle between the feathers of 120 degrees.
Feathers at an angle.
Wrap 1cm wide (with tension) with aluminum tape before and after the plumage.

Wrapped plumage.
This is what it looks like.

Finished plumage.
You already know almost everything about the topic of how to make arrows for a bow.
Let's move on to the tips.
If you are making a bow and arrow for yourself, then you may not need arrowheads at all. But if you still need them, then we will consider several options for their manufacture. The first option is safe arrows, they have a soft pad instead of a tip - such arrows are much safer than arrows with a combat tip. The second manufacturing option is arrows with a combat tip, I immediately warn you that they become truly dangerous and can pose a threat to others, so remember about safety precautions and shoot them only in special places.
Safety tip
I have already described what we need to make it above in the article. Here is a photo.

We wrap the end of the arrow with electrical tape so that 2 mm of tape protrudes from the edge.

We wrap the end of the arrow.
Look how it should be.

We secure the coin as follows.

Coin mount.
Strips of electrical tape, 8 cm long, crosswise (2 pcs.).

We attach this tightly to the arrow.

We attach it to the arrow.
It is necessary to additionally secure the coin.
Additional fixation.
We secure the strip of soft material with electrical tape.
A hunting bow is the most affordable weapon that is not so difficult to make with your own hands. Its advantage over the purchased one is in cost, and also in the fact that it can be made “for yourself”, taking into account individual characteristics. The only thing that needs to be taken into account when making a bow for shooting with your own hands is compliance with the maximum tension force of the string, established by law value no more than 40 kg/s. You can learn more about how to make a hunting bow with your own hands.
Homemade bow
Before you make a bow with your own hands, you need to prepare the material. Wood for making archery weapons must have such characteristics as strength, flexibility, and elasticity. The material for the workpiece must be straight, even, without knots or any damage. In principle, any tree is suitable for making a bow: birch, oak, apple, juniper, maple, hazel, ash, elm, yew or teak.
The branch for harvesting must be cut down in winter, at sub-zero temperatures, so that the tree sap is preserved inside. The length of the workpiece should be the required length of the future onion, plus 30 cm for cracks during drying at each end, the occurrence of which is very likely. The bark is not removed from a cut branch. Its ends are coated with oil paint to avoid internal defects in the wood when it dries, which should occur evenly.
After this, the workpiece is left to dry for up to five months in an upright position at room temperature. In this case, the surrounding air should not be too dry, otherwise the workpiece will be deformed.
How to make a hunting bow with your own hands
After making the initial blank, you need to determine the natural bend of the wooden bow. This is necessary in order to make it convenient to use the weapon in the future. To determine this bend, you need to press one end to the ground while holding the other end with your hand. The frame will turn to its natural side.
 Make a bow with your own hands, diagram
 It is necessary to make a future hunting bow from a round blank. The width of the bow frame is usually 3 cm. It is better to cut off excess wood with a knife, while simultaneously checking for knots and other defects.
Since a simple bow consists of a solid frame, it is worth shaping its bends while processing it with a knife. Using a knife and a plane, its side and front parts are formed. The ratio of the width of the frame and the width of the shoulders should be 3/2. The size of the shoulders should be the same so that they are not inferior in elasticity to each other. At this stage of work, do not bend the bow to prevent its deformation.
Next you need to form the bend of the bow. For this, the water steaming method is used. In particular, the arms of the bow are steamed to give them the desired bend shape. To do this, the bow is fixed with special stocks (wooden blocks) in the desired position of the arms and treated with hot water steam. In this fixed position, the weapon dries for about one week. After this, the stocks are removed, and places for the bowstring are cut out at the ends of the arms.
It should be noted that all this time the bark was not removed from the onion. After steaming it begins to peel off. It must be carefully removed without damaging the wood fibers. The remaining bark is removed with sandpaper, and the surface is covered with fat, hot wax, varnish or paint.
There is another option for how to bend a bow:
- It is necessary to make a special board with cuts, which is attached perpendicular to the center of the frame.
- Both ends of the bow are connected with a thread.
- The thread clings to one of the cuts on the board to bend it according to the required radius.
Manipulations should be carried out slowly, because sharp bending may damage the wood fibers.
Making a bowstring
It is better to make a bowstring from multi-layered rope. The bowstring for hunting must be durable, made from several threads of Kevlar, nylon, lavsan, fishing cord in reels, and other artificial threads. A thin strip of rawhide, 3mm thick, will also work. The main requirement for a bowstring thread is strength, resistance to abrasion and stretching. It should be shorter than the length between the limbs of the bow to keep it in a tight position at all times. First, it is attached to one notch of the shoulder, tightened with a knot to the bow, then stretched to the other end and tightened there. A correctly tensioned bowstring should be 15 cm from the middle of the frame of the hunting bow.
Making arrows
Arrows should be of such length that it is proportional to the length of the bow and the maximum tension of the bowstring. In practice, this means that when the bowstring is taut, the arrow tip should protrude several centimeters beyond the frame of the weapon. The diameter of the arrow should be approximately 6mm, the shaft should be perfectly straight. The materials for making arrows are spruce, pine, birch - for hunting small game and birds, as well as ash, hornbeam, oak, and other heavy and dense species for hunting wild animals. You can chop them from logs, use boards, glazing beads, or wooden square slats. Then they need to be shaped into cylinders and sanded so that the surface is smooth. The smoother the surface of the arrow, the more accurate its flight will be. In the end part you need to make a small slot for the bowstring in accordance with its diameter.
The shape of the arrowhead is made depending on the type of prey. If hunting is intended for a bird, the tip is made pointed. If you plan to hunt larger game, the tip is made of stone or triangular metal.
The arrow will also need to be fletched. The simplest one is from bird feathers, but it can be made from other materials - plastic, paper, etc.
Compound bow

A hunting bow may have a composite design, i.e. consist of two or three parts. It is easier to find material for such a workpiece than for a simple one. Typically, a composite structure consists of a central frame to which are attached two arms (“horns”) that end in string mounts. For normal shooting, they are made the same size, but for shooting from the knee, the lower shoulder should be made shorter than the upper one.
To make the arms of a composite bow, you should choose bird cherry that grows near a pond. The workpieces are cleaned of bark, dried in a dark place, even better, on fresh air. After cutting out the main parts, the workpiece can be dried in the sun.
The component parts are glued together; in camping conditions this can be done using fish glue (made from crushed fish bones). The frame is impregnated with resin and fat, and the joints with the shoulders are tightened with animal tendons (you can use fishing line, strong rope), and again soaked in fat. When all the parts are glued into a single structure, the onion is processed with a sharp knife. To give even greater strength and durability, the surface of the onion is covered with boiled birch bark, glued along the fibers.
Archery can be classified as one of those activities that almost every person can master. This is a very unusual, yet accessible hobby, but at the same time it is a prestigious and fashionable hobby all over the world.
For many centuries, people have continued to practice archery. Once necessary for hunting, today it is also used for sports and entertainment. But few people thought, looking at this weapon, that it has practically not changed since our ancestors invented it. This is the same bowstring stretched on an elastic rod and pointed arrows.
Buying a sporting bow can be quite expensive, and not everyone who wants to buy one is an athletes or hunter. Perhaps this is your hobby in your free time from work, you want to pick up arrows and try to hit the target, or maybe you want to get a bow for your child and play Indians with him. In this case, the best solution would be to make your own bow and arrows. This is a truly exciting and creative process, no less interesting than the shooting itself. In addition, an undeniable advantage of a homemade bow will be the ability to save your budget from a serious blow. So, let's figure out how to make a bow and arrow with your own hands.
Materials for making your own bow
The bow itself can be made from various available materials:
- Tree. The most popular and, perhaps, reliable option for self-made. A bow made from wood will be strong and durable. The best species are considered to be ash and white acacia; you can also use maple, oak or poplar. At the same time, the stick should not have knots, shoots, cracks or other defects. Can not use conifers trees.
- PVC pipe. Another material that can be used to realize your idea.
- An unusual, but quite suitable material can be ordinary skis. To be more precise, the upper sections of the bow arms are made from skis.
- Plywood, just like skis, can be an option for bow limbs.
- Even an old car spring can be used for shooting.
- For a small toy, you can use, oddly enough, ordinary paper.
The next element of the bow is the string. It is important to understand that the choice should be on a durable, elastic material that can withstand high pressure. Suitable options for her:
- Polypropylene rope
- Nylon thread or cord
- Nylon thread
- Twine or regular thin fishing line
- Thin climbing sling
Of course, we can’t forget about the arrow! Best choice The material for its manufacture will be wood. As a rule, these are birch and pine branches, slats or boards. Processing birch is somewhat more difficult, but the result is better.
The arrow tip must be made sharp so that it can pierce the target. For a simple option, a nail wrapped in wire may work. For a more serious approach, use a thin steel tip.
Don't forget to glue feathers or make grooves for your fingers at the end of the arrow.
What do you need to know before you start?
Even if you are making a bow and arrow for fun or as a gift for a child, there are certain dimensions that you should consider:
The classic version of the bow consists of:
- The main part, i.e. the handle
- Shoulders
- Bowstring
After production, the bow must be provided proper care. Don’t be alarmed, maintenance is simple and won’t take much time:
- Onions should be stored upright.
- The bowstring is put on only when shooting, and then immediately removed. Before shooting, you need to “spring” the bow and string in order to develop it.
- The bow cannot be overstretched.
- Store only in a dry place, preferably with a case.
DIY bow and arrows made of wood
Wood is perhaps the best and most affordable option for making a bow. To do this you will need:
- Drill
- Axe
- Jigsaw
- Metal scissors
- Sandpaper
- Regular file and file for working with wood and metal
- Slipway
- Plane
To make a bow you will need time and patience.
- First we need to find a branch that matches the parameters. This is best done on a frosty day. It is important that the selected branch has as few growths and small shoots as possible, and the length is at least 180 cm.
- There is no need to touch the bark. And the sawn ends need to be coated with oil impregnation for wood or a special varnish.
- Leave the base of the future onion to dry for a couple of months, placing it vertically in a room with a temperature of 20 to 28 degrees.
- It is necessary to give the workpiece a rectangular shape; this can be done using a well-sharpened knife and a sharp ax.
- Steam both sides of the onion at the same time over boiling water.
- To give it a bend, we place the freshly steamed workpiece in a slipway for two weeks.
- When placed in the slipway, the bark should come off, but if this does not happen, then at this stage, carefully peel it off with a knife.
- Cover the product with wax.
- We make notches for the bowstring only after drying.

We need to pull the string onto our future bow. It's not at all difficult to make. You will need the following materials:
- Silk or nylon (No. 10) thread
- PVA glue
- Rubber glue
- Moisture protection, e.g. wax
- Board
- Thick nails
You need to take two short round pegs with a thickness of 20 mm or more. On a board whose dimensions are 200*40*40, in accordance with the distance of the bowstring, we drill two holes and install pegs. The next step is to wind the thread for the future bowstring onto the spool. Wrap a thread around the pegs, which will be used as a base. 3 turns are enough. Tie the ends of the thread tightly and coat with PVA.
Spread rubber glue directly onto the nylon thread, and coat it with PVA when winding. Make the winding as tight as possible. Make loops at the ends to pull the string over the shoulders of the bow.
Before you pull the string directly onto the shoulders of the bow, bend it slightly 15 times. This will allow the product to get used to the movement.
You can't do without arrows either. Since we are making onions with our own hands, let’s look at how they are made. At a minimum, we need 4 arrows.
You will need for the future arrow:
- Slats or boards about 3 cm wide and 85 cm long

Manufacturing process:
- Using a plane, narrow the workpiece (slat or board) to 1.5 cm.
- Saw it into 1.5 cm squares on each side.
- Using sandpaper or a grinding machine, give it a round shape with a diameter of no more than 8 mm.
- We can also attach feathers. Crows are best suited for this. Cut the feather in half and tie it to the end of the arrow using thread.
- It is better to buy a tip in a special store. You can make it yourself by cutting it out of a thin sheet of iron or by attaching a sharp nail with strong fishing line.

Homemade bow from PVC pipe
Despite the fact that wood is the most suitable and affordable material option for a bow, it can also be made from PVC pipe. Making a wooden bow takes a long time, but working with a pipe will require much less.
You will need:
- PVC pipe
- Construction hair dryer
- Metal knife
- Whetstones
- Molding board
- Slipway
Manufacturing process:
- First, you need to select a pipe.
Please note that we require PVC pipe, not PP or PE.
- Mark the center in the middle of the future onion and set aside 6 cm from it in each direction. This will be the handle.
- Also, you need two blocks as high as a pipe.

- Now you need to heat one limb of the bow using a heat gun until it becomes evenly soft.
- Lay the molding board and secure with clamps.
It is important to remember that the board rests on blocks near the handle.
- The board is removed after the pipe has cooled.
- The same thing is repeated with the other shoulder.
- Next you should move on to forming the handle. It also heats up and forms in a plane perpendicular to the compressed shoulders.
The handle should be shaped to fit the palm so that it is comfortable to hold.
- You can't do without a bowstring. Therefore, the next step is to attach the bowstring. From the very edge at the end of the shoulder, retreat about 8 cm. Heat and bend at an angle of 60 degrees.
- After cooling, cut out the “holder” for the bowstring.
- We do the same with the second shoulder.
- For the bowstring, you can use polypropylene rope.
It is still better to choose wood as a material for arrows. To make them you will need planks or slats with a diameter of up to 15 mm. The making of arrows is discussed in detail in the previous version of the wooden bow. *****Instead of bird feathers, you can use reinforced tape***** !FIGURE 43 - “Arrow feathering”!

DIY bow from old skis
Skis- an excellent material for making onions. They have their undeniable advantages: already prepared curved ends, while the bend of the shoulders is the same.
To work you need:
- Bolts, nuts
- Thick wooden block
- Nylon thread or some other low-stretch material
- Drill
- Scarring
- Hacksaw
- Hammer
- Chisel
- File
- Sandpaper
- You may need a band saw and plane
Work process:
- First you need to make a handle template. It is important to understand that it is necessary to take into account the place for gripping by hand and the presence of flat surfaces at a slight angle for attaching skis.
- We transfer the finished template to a block and carefully cut out the future handle.
- Skis can be very long and not the right size for the bow. Therefore, according to the parameters given at the beginning of the article, the length of the bow is calculated, and the extra piece from the length of the skis is cut off.
- The shoulders made from skis are attached using bolts.
- Next, you need to cut out the recesses for the bowstring. The edges must be rounded, otherwise the bowstring may rub against them.
- If the selected thread is too thin, it is advisable to intertwine it. This will give it additional density and extend its service life.
- Arrows are made similarly to previous versions of the bow.
That's all, the bow from old skis is ready for shooting.
DIY bow and arrows from rebar
To do this you need the following:
- Fiberglass reinforcement with a diameter of 8 mm and length
- Profile pipe 20 cm long, with a cross section of 20*25 mm
- Plywood, 40 mm thick
- Steel cable for bowstring, diameter 1 mm
- Furniture bolts
- Clamps
- Thick thread
- Heat shrink tubes for decoration, you can do without them
Manufacturing process:
- For each arm, it is necessary to prepare two pieces of reinforcement 50 cm long and one 70 cm long.
- Fold the reinforcement together so that there is a long piece in the middle and wrap tightly with synthetic thread.
It is important to do this along the entire length so that the pieces of reinforcement become a single whole.

- Then you need to saturate the shoulders of the future bow with epoxy resin.
- For beauty, you can prepare a heat shrink tube. Put it on your shoulder and blow it with a hairdryer. Do the same with the second shoulder. It is possible that this may cause a slight decrease in the elasticity of the shoulders, and this procedure does not provide anything other than a decorative function.
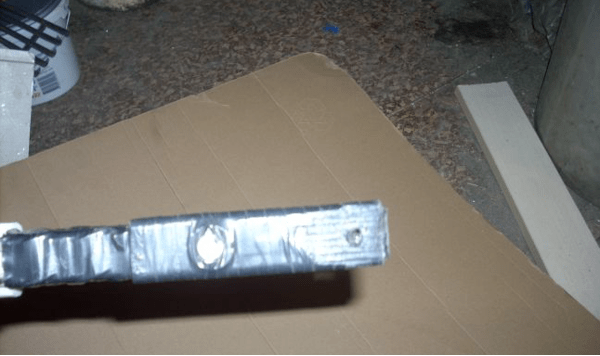
- Then you need to cut profile pipe along. Measure the middle, and after making cuts, fold it in half. Next, you need to drill holes and, using bolts, compress the resulting boxes. The picture shows what should happen in the end.
- Without delaying your shoulders, you can immediately make holders for the bowstring. To do this, just step back 1 cm from the edge of the shoulders, wrap the wire and reinforce it with electrical tape. You will get a kind of tubercle for fastening.
- It is better to make the handle from wood.
Do not use softwood as it will not withstand the load. Oak will do. Or you can get by with plywood at least 4 cm thick.
- Cut out a handle blank according to the template you selected on the Internet. Sand and paint.
- Using furniture bolts, connect the arms and handle of the future bow.
Then you need to move on to making the bowstring. It can be made from a steel cable with a diameter of 1 mm. Secure the loops using crimps, and stretch the shrink film over the entire length of the cable.

Arrows can be made from window beads and tape. Using a plane, plan the glazing bead and use tape to make feathering. Instead of a tip, it will be enough to sharpen the arrow and dip it in paint. This bow cannot be used for hunting or professional shooting. But it's perfect for outdoor fun!
Homemade bow from a car spring
If a car spring is suitable for creating a crossbow, then why not try using it as a material for a homemade bow? Anything can be at hand, and you shouldn’t neglect it.
To work, you will need a car spring, for example, from an old Lada or Muscovite, and a sharpening machine.
- The spring needs to be ground off. The narrower it is, the more pliable the bow will be. At the same time, it is necessary to ensure that the arms of the bow are the same.
- The handle can be made of paralon. To do this, you need to cut a piece of foam and tape it to the spring using electrical tape.
- Toward the ends, the arms of the future bow need to be narrowed even more using a sharpening machine, and shallow notches for the bowstring must be made.

Now let's move on to making arrows. This requires thin reinforcement. It must be ground down, but in such a way that it does not lose its elasticity and does not bend. On one side the arrow is sharpened a little sharper, and on the other side a plastic feather is attached. A linen cord is suitable for the bowstring.
A bow made from a car spring is very tight and may not be suitable for everyone. But it will be an excellent tool for developing arm strength.
When using this version of a homemade bow, do not forget to wear thick gloves so as not to injure your hands.
Homemade paper bow
This option also has a right to exist if you have paper at hand and a desire to shoot. Of course, it is not suitable for hunting, but it is suitable for fun.
You will need:
- Paper
- Scissors
- Pen refills
- Scotch
- Rope
- Cocktail straws
How to make a paper bow:
- Cut a square shape from a piece of paper.
- Take 2 identical pen rods.
- Wrap one of the rods in square paper. Then, twisting the workpiece from the corner, make sure that the paper fits tightly. Secure with tape. Do the same with the second rod.
- Gently wrap the paper not all the way. There should be a couple of cm left free. It is necessary to squeeze these ends so that they become flat.
- Place them on top of each other and secure tightly with electrical tape.
- For the bowstring we attach an elastic rope.
For arrows, you can use cocktail tubes, wrapping them in the same way with electrical tape.
That's all. Paper bow and shells are ready!

It doesn't matter what kind of bow you want to make. Whether it's Elvish, Asian, short or whatever, it's important to stick to the basic rules and then everything will work out!
The bow is one of the few ancient types of weapons that have survived to this day practically unchanged. Today, the scope of use of bows is quite wide. They are used in hunting, sports and just for fun. Due to the simplicity of the design, many people are interested in how to make a bow with their own hands. And if you want to end up not with a craft of dubious quality, but with a real weapon, then you should approach the manufacturing process with all seriousness.
A bow is a throwing weapon designed to fire special arrows. The shooting process is extremely simple and requires the shooter to lay the arrow, tension and release the bowstring. Thus, the energy accumulated in the bent arc of the gun is transferred to the arrow, which hits the target.
Despite the simplicity of the bow design, shooting from such a weapon requires a number of specific skills:
- First of all, the shooter must have sufficient strength to pull the bowstring.
- Classic and traditional models do not have a sight. In addition, the aiming process is somewhat complicated by the need to keep the bowstring taut.
- Carrying out a shot from a bow requires a number of actions, ranging from correct placement arrows on the arc and ending with the release of the bowstring. Without precision in actions, there can be no talk of any targeting in this case.
The next stage in the development of this weapon is the crossbow, which arose around the 4th century BC. e. It does not require physical strength or special skills from the shooter. However, the bow has a simpler design and high rate of fire, so it was not forgotten even with the advent of firearms.
Design features and types of bows
 The designs of homemade bows are solid and collapsible
 Before you make a bow with your own hands, you need to get acquainted with the features of its structure. The modern bow has three main elements:
- The shoulders, thanks to which the energy transferred to the arrow during the shot is accumulated.
- Handle. Necessary for conveniently holding the weapon when shooting.
- Bowstring. One of the main structural elements, as a result of tension, energy is transferred to the shoulders and boom.
These are the basic elements that are present in all modern bow designs. In addition to them, the weapon can be equipped with a shelf that serves to support the arrow, various types sights, a system of blocks that increase the efficiency of such weapons.
At the moment there are many varieties of bows. Let's consider the main ones:
- In appearance, such weapons can be simple or composite. In the first case, the body of the bow consists of a flexible stick that bends into an arc. Composite structures assume the presence of a base to which the shoulders are attached. They are usually reinforced with horny plates, which are connected to each other using a special adhesive composition.
- The shape is possible in straight and curved models. Very popular are recursive models, the shoulders of which have a reverse bend. Thanks to the effective distribution of bowstring tension energy, the speed of an arrow fired from such models increases significantly.
- Regarding the material of manufacture, there are wooden, metal, fiberglass and combined models. Metal structures are usually welded from lightweight hollow pipes.
- Upon finding the arrow. The most popular are central bows, in which the arrow is located in the middle - that is, on the longitudinal axis of the bow. Peripheral designs involve placing the boom to the left of the upper arm.
- Regarding the design, a distinction is made between solid and collapsible bows. The latter is characterized by removable shoulders, due to which the shooter can change the characteristics of his weapon depending on the need. Considered the most modern compound bow or compound. Its design includes many parts, and blocks take part in the process of tensioning the boom.
- Regarding the method of application, there are hunting, sports, combat, etc. models.
Onion making technology
 Skis can be used as bow arms
 To make your own bow, you can use the following materials:
- Tree. This is the most common option, allowing you to make your own bow model with excellent shooting characteristics.
- Thick cardboard. Allows you not only to make a mock-up of a bow, but also to create a compact working model. Naturally, such an item will not be a weapon, but it can be used to understand the basics of the functioning of such weapons.
- PVC pipes. Some PVC pipes are thick enough to make a bow for target shooting.
- Skis. Top part skis can be used as shoulders.
- Plywood. With sufficient density it can also be used to make shoulders.
Wood harvesting and processing
Since the classic bow model is made of wood, the features of making weapons from this particular material will be discussed below. In order for the final product to have truly high performance, several important conditions must be met:
- Wood harvesting is carried out on a cold, frosty day. You should cut down a large, strong branch, the length of which reaches 180 cm. The diameter of the branch should be 10-12 cm. It is advisable to pay attention to growths and knots - their number should be minimal.
- There is no need to remove the bark. The ends of the branch are coated with a special oil impregnation or wood paint.
- We install the workpiece vertically. In this state, it should dry for 2-3 months at a temperature within 20-28 degrees.
- Using a well-sharpened knife and a sharp ax, you need to give the workpiece a rectangular shape.
- Next, you should thoroughly steam the shoulders of the future onion, holding the workpiece over boiling water for 10-15 minutes. It is recommended to steam both shoulders at the same time.
- The steamed workpiece is placed in the slipway for two weeks. During this period, the bark should come off on its own. If this does not happen, you need to carefully scrape it off using a sharp knife.
- The wood is treated with wax. After it is completely dry, it is necessary to make notches intended to secure the bowstring.
Now we should talk about each of the stages separately.
About wood structure
 It is better to choose a wooden blank for a bow from birch, ash, hazel or oak
 Before you make a hunting bow with your own hands, you need to understand the structure of wood. If you do not take into account the characteristics of the material, then it will not be possible to produce a well-balanced weapon with sufficient power and reliability.
Taking a closer look at the workpiece, you can identify two types of wooden structure:
- Dark inner rings. This part of the plant is already dried. These areas are characterized by maximum hardness.
- The lighter layers are called sapwood. They are characterized by lower density and more elasticity.
The surface of the bow that faces the archer is called the belly. It is this that compresses when the bowstring is pulled. The back part is the back of the bow, which stretches when shooting.
For long-term use of the implement, it is necessary to create an ideal balance between old wood fibers and sapwood. Thus, the bow should have a light “back” and an elastic “belly”, which will provide the necessary rigidity.
First stage
After drying the material, you should begin to work. First of all, you should carefully inspect the workpiece. The part that has thinner annual rings is selected for work. Most often we are talking about the north side. In this place, the wood has a denser structure, and therefore the bow will be more sharp.
The workpiece is sawn or split in half. If the trunk is knotty, it is better to saw it, since splitting can lead to damage to the workpiece.
After longitudinally dividing the workpiece, it should be kept suspended for some time. In this case, many craftsmen suspend the load from the lower edge of the workpiece.
Forming a bow
 The size of the ski bow is best made within 120-140 cm
 When creating a bow, you must complete the following steps:
- First of all, mark the middle of the workpiece. This is where the arrow will be inserted.
- We determine the dimensions of the handle by making the final markings.
- Now you can start creating the base of the bow. To do this, use a plane or knife to remove excess layers of wood from the back of the weapon. Gradually moving away from the handle to the sides, you should form the required thickness of the shoulders.
It is very important to ensure uniform flexion of the shoulders. To do this, remove the same amount of excess wood from them.
How to determine the optimal shoulder thickness?
The limbs of a bow are its main element. Therefore, they should be worked out as carefully as possible. For this, a special bowstring with many loops is used. They are located at a distance of 2-3 cm from each other.
Initially, the shoulders will be difficult to bend. They should be checked with the outermost loops of the bowstring. Gradually cutting off excess layers of wood, you should move on to the next loops, thereby achieving a gradual increase in tension. This is done until your bow takes the desired shape.
It is also very important to check the evenness of the arch of the bow back. It should be understood that even if you have achieved visual identity of the shoulders, they may still bend unevenly due to the different structure of the wood. Therefore, precise fine-tuning is necessary. To do this, it is best to use a file, gradually grinding down those parts of the structure where there is unevenness in the bend.
Knots should be cut after the workpiece has completely dried and finished. Otherwise, the structure may crack, which will make it unsuitable for further use.
Even in the final stages of onion making, knot removal should be done very carefully. To do this, it is advisable to use a well-sharpened knife. It is better to leave small protrusions, which are subsequently sealed with sandpaper. This way you can make a pretty good homemade bow for hunting.
Making the handle
 The finished handle can be coated with ship's varnish or stain
 After the rough marking of the handle has been made, it is necessary to carefully study it. To do this, grab it with your hand and outline the boundaries. Next, you should carve a kind of transition from the handle to the shoulders. It is best to cover the handle itself with soft cloth or leather, which will ensure ease of use.
What to make a bowstring from?
The following materials are suitable for making a bowstring:
- nylon thread or lace;
- fishing line;
- polypropylene rope;
- leg-split;
- climbing sling made of Kevlar, which can be purchased at sports stores;
- lavsan thread;
- nylon
Advice! To make the most durable bowstring, it is best to use synthetic threads.
Features of making arrows
 The smaller the plumage, the faster the arrows fly; the heavier the arrow, the wider the plumage.
 The best material for making arrows is birch or pine wood. The first one is more different complex process processing, however, allows you to get a shaft of better quality.
You can make arrows from thin branches, wooden slats or boards. The first option is preferable, since it is the least labor-intensive and allows you to obtain final products of truly high quality. In this case, the preparation of material is carried out in the same way as for the body of the bow. Before making an arrow, the raw material should be dried for at least a month by hanging it vertically. Next, the bark is removed from the workpiece, defects are carefully cut off, after which it is cleaned with sandpaper.
All that remains is to make the tip and plumage. The easiest option for making a tip is to use a nail, securing it with copper wire. However, this option is not suitable for serious purposes. To get a really high-quality arrow, the tip is cut from thin sheet steel, no more than 2 mm thick.

