How to split a file in an archive. How to split a large file into several parts? Combining separated files into one
And it is known that too large size file may become an obstacle to performing certain types of tasks. For example, problems may arise when transferring such files over the Internet or recording onto optical media, and inconveniences may also arise when moving or copying them. In such cases, splitting one large file into several parts can help. The simplest, but not the most convenient way“cutting” a file into pieces involves using a regular archiver. The disadvantage of this approach is the mandatory presence of an archiver that supports packaging without compression. True, this method also has its own positive aspects, take, for example, the same ability to protect data with a password. Still, to split large files it is better to use special utilities.

Convenient and easy to use program for splitting and merging files. It is free, has a simple, Russified interface, and has good operating speed. Supports two main modes of operation - separation with the creation of self-adhesive parts and separation with the creation of a batch file. To combine individual parts, it is not necessary to have the program on another computer. In the first case, a stand-alone exe file is used for merging; in the second, a regular batch file is used. The part size can be set manually in bytes. Unfortunately, Cutter cannot split files larger than 2 GB and this is its main drawback. The utility is available for download on the developer's website cutter22.chat.ru

Unlike the previous program, SplitFiles easily copes with files larger than 2 GB. There is support for the Russian language. The size of the parts can be set in bytes, kilobytes, megabytes and gigabytes. Integration into the Explorer context menu, deletion of the source file upon completion of the splitting operation, and the use of ZIP compression are supported. There are two main modes of operation - separation with the creation of a batch file and simple separation. In the second case, to build the file on another computer, you will need to install SplitFiles. You can download the utility on the developer’s website www.altarsoft.com. During installation, it may load third-party software, for example, Yandex elements.

According to the developers, HJSplit is capable of splitting files larger than 100 GB. The utility is lightweight, does not require installation, and is supported by various operating systems, that is, it is multi-platform. When dividing, the size can be specified in kilobytes and megabytes.

HJSplit works somewhat slower than SplitFiles and Cutter. The utility does not have the ability to create batch files and self-adhesive blocks. Among the additional features, it is worth noting the comparison of files, as well as the calculation of checksums using the MD5 algorithm. HJSplit has a simple modular interface on English. You can download the program from the official website

A simple program for separating files with a colorful, customizable graphical interface. When splitting a file, you can specify the size of the parts in bytes, megabytes, or kilobytes, or simply specify the number of blocks into which the object should be split. It has good speed and can easily handle large files.
Unfortunately, you will also have to use WinMend File Splitter to combine the parts. During the division process, the utility creates a bat file, which in theory should be used to combine blocks, but for some reason it does not work. The inability to glue parts together without the need to install the utility is its main disadvantage. Also, the program does not support the Russian language. You can download this separator from the developer’s website www.winmend.com

A portable free utility with an aggressive name. Designed for separating and gluing large files. The utility features a minimalist interface with Russian language support and the ability to select the format for the collected file. But most interesting feature Piranja is an assembly of a file from its parts located in different sections or folders hard drive. You can download the program from the website diskette.info. The main disadvantage of Piranja is the lack of the ability to create batch files for automatic gluing. Piranja is also not suitable for separating files whose type is not listed in the list of supported formats. The utility will cut and assemble the file without any problems, but after assembling and assigning the original extension, opening such a file may fail with an error.
When archiving files using WinRAR, you can change several options for creating an archive, including splitting it into parts. Let's show it with an example.
Select any files on your computer, right-click on them and click on “ Add to archive...", as shown in the screenshot below.
A window with archiving parameters settings should open in front of you. In its lower left area, find the inscription “ Divide into volumes of size».

Here you can choose what size parts your archive will be divided into. You can enter your number and select a unit of measurement (byte, kilobyte, megabyte or gigabyte), or select one of the most popular values from the drop-down window - 5 MB, 100 MB, 700 MB, etc.

For example, we will choose 5 MB. To start archiving with division, click “ OK».

In the folder next to the original files, if you did not change the folder to save this archive in the archiving options, parts of your split archive will appear.

All volumes will be of the selected size except the last one - there will be so much left. For example, if the whole archive “weighs” 17 MB, then it can be divided into 4 parts, choosing the size of each 5 MB. In this case, the latter will be 2 MB in size (17-5-5-5=2).
Progress does not stand still, and along with the increase in the volume of hard drives for computers, the volume of files and programs that users install increases. Program archives, system backup image files and virtual disks are also increasing, and sometimes in order to save them, you have to divide such files into parts.
In this article you will find tips and detailed instructions, how to split a file into parts and how to restore it later using four different programs.
In what cases might you need to split a file into parts?
When the volume of hard drives amounts to terabytes, it seems that there is no point in splitting the file into parts; there is enough space as it is. And that files of 15-30 gigabytes can be written entirely without splitting them.
But this is far from true; it may take much more to split the file into parts smaller size, even a file of 800 megabytes will need to be divided under certain conditions.
Let's consider options when you may need to divide a file into parts.
To burn it to a CD or DVD.
Suppose you have a large file, for example some kind of program, and you need to save it on a CD, but the entire file will not fit on it. In this case, it can be divided into several files, adjusting their size to the disk space, and the data can be written to several disks.
For example, I will say that ISO image The DriverPack Solution 15 version of the driver set weighs about 12 GB and it will not be possible to burn it even onto a DVD with a capacity of 8.5 GB; it will have to be divided into several parts.
To write a file to external media with the FAT32 file system.
Do you have an external hard drive, which is formatted in FAT32 and you don't want to change its file system because your TV only sees this drive format, but you really need to save a large file on it.
The problem with the FAT32 format is that it does not understand files larger than four gigabytes and cannot be written to it.
If you try to copy a file larger than 4 GB to a FAT32 drive, you will see an error message.
Alternatively, you can divide such a drive into two logical drives and leave one of them in FAT32 format, and format the other in NTFS format and easily write large files to it.
But if you don't want to share your drive, then you will have to split the file and write it in parts for storage, and restore it before using it.
To place your files online with the possibility of further downloading.
Some cloud storage services have restrictions on the maximum size of an uploaded file, and if you want to upload a larger file, then you will also have to share it or upgrade to a more expensive tariff plan.
If you use file hosting services to exchange files, then they also have restrictions on the size of the downloaded file and one large file will have to be divided into several parts.
In fact, there is nothing scary or complicated about the fact that files need to be divided; the main thing is to use the right programs for this. Below you will see an overview of four of them and detailed description, how to split and collect files using them, and you can choose which one suits you best.
How to use the Total Commander manager to split a file into parts and how to restore it later.
Total Commander is one of the most popular file managers and with its help you can quickly split a file into several parts and then quickly assemble it.
For this operation, you need to open the directory with the file that you will share in one panel of the manager, and in another panel open the directory where you are going to save the final result, since Total Commander writes a new file to the adjacent panel.

Then select the file using the mouse or keyboard and open the “Files” item in the program menu and select “Split file” at the bottom of it.

A small window will open in which you will need to indicate the size of the parts into which it will be divided.
The sizes that the manager offers by default are already outdated; they were relevant during the period of popularity of floppy disks, ZIP disks and CD-R drives.
If you are not satisfied with these sizes, you can split the file into any size you specify.
To do this, simply enter the numbers you need in the “Part Size” window and specify the unit of measurement, for example mb if you want to split the file in megabytes.
The maximum number of parts into which a file can be divided is 999. When you decide on the size, click the “Ok” button.
The numbers you enter are saved in the program settings, so the next time you split the file, you will not need to enter them again, but simply select right size from the list.
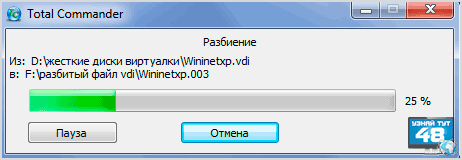
The next window will show the process of dividing the file, its name and path. If desired, this process can be paused or canceled.

After the operation is successfully completed, you will see a message about this.
To assemble the file, also open two manager panels, one will contain parts of the broken file, and the other will contain the directory where it will be assembled.

In order to assemble a file, select one of two files, it can be a file with the “crc” extension or the very first file with the “001” extension. If you select any other file, it will not be collected.
Then or follow the path:
Files – Collect Files
or simply double-click on one of these files.

After this, a window will open where you will see the name of the file being collected and the destination path; if everything is correct, click the “Ok” button.

In the next window you will see an indication of the ongoing process, where you can pause or cancel this operation.

After successfully completing the file build, you will see a message about this.
If you use this file manager all the time, then you don't need to install another program to split the file and then restore it, which is very convenient.
The fast and convenient 7-Zip archiver can not only unpack an archive, but also split the file into parts and restore it back. You can do this in two different ways.
In the first option, you immediately split the file into parts.
In the second option, you create an archive, which in turn can be divided into several parts and locked with a password, which can be useful.
First option.
Open an archiver window and open the directory with the file you want to change.

Right-click on the file and select “Split File” from the menu that opens.
Or follow the path in the top menu of the program:
File – Split File

In a new window you need to select a size for one part of the volume. By default, there are options for all popular media, which will allow you to easily split the file into the parts you need.
But if you wish, you can also specify your size for one part of the volume; to do this, you just need to write it in a special window.
If you need to divide the volume into megabytes, then at the end of the number put the Latin letter m, and if in kilobytes, then put the Latin letter k.
This archiver does not have a reasonable limit on the number of parts into which a file can be divided; it calmly began to break the file for me into 4,500,000 parts, only before that it asked if I had gone crazy.
When you have decided on the size of one part, click on the “OK” button to continue the operation.

In a new window, you will see information about the execution of the scheduled operation, which you can cancel, pause, or send to the background.

In order to assemble the file back, open it in the archiver and selecting the first part of your volume, right-click on it and select “Combine files” in the menu that opens.

Then specify the directory where you want to merge them and click on the “OK” button to begin the operation of merging your file.
Second option.
In the second option, we create an archive of the file and when creating it, we indicate how many parts it needs to be divided into. There are two ways to create an archive in 7-Zip.

In the first case, right-click on the file and select “Add to archive” in the context menu.

In the second case, open the file that you need to add to the archive in the program and, having selected it, click on the “Add” button in the top menu of the program.

In both cases, a window will open where you can configure the parameters of your archive.
- In the “Archive” line you will need to indicate the path where your archive will be saved.
- In the “Archive format” line you need to indicate in what format your file will be saved.
- If you just need to split it, then you don’t have to compress it and specify this in the “Compression level” parameter.
- In the “Encryption” section, you can specify a password for your archive so that third parties cannot restore it without you.
- In the “Split volumes by size” section, you will need to indicate the size of one part, which contains all popular drive formats and the size for reading a file in FAT32 format. Here you can also indicate your option.
When all settings are made, click the “OK” button.

After this, you will see a window with information about archiving the file.
In order to restore a broken file and put it back together, you just need to extract your files from the archive and you can also do this in two ways.

In the first case, you need to open the directory with the archive either in the Windows file manager or in the 7-Zip archiver and select the first part, right-click on it, select “7-Zip” in the context menu, and then one of the items “Unpack.”
- If you select “Unpack”, then you will be asked to select a location to unpack the archive. You can specify any drive or directory to save your files.
- If you select “Extract here”, then the archive will be extracted to the current directory.
- When you select “Extract to Folder Name”, the archive will be extracted to the created folder in the current directory.

In the second option, you need to open the file with the archive in the 7-Zip program and, having selected its first file, click on the “Extract” button in the top menu of the program, this is analogous to the “Extract” item in the first option.

The following window will appear when you select the “Unpack” menu item or click on the “Extract” button; here you will need to specify the directory where the archive will be unpacked and, if necessary, enter the password for it. Then click on the “OK” button.

After which you will see a window indicating the progress of the operation, where you can pause or cancel it, and also send this operation to the background.
The archiver must be installed on every computer, you can even use its portable version, and if you do not use the Total Commander file manager, then the files can be divided into parts using the free 7-Zip archiver.
Using the popular WinRar archiver, you can also split a file into parts and then restore it.
Unlike the previous archiver, in WinRar you can split a file only when creating an archive. There are several ways to add files to the WinRar archiver archive.

The simplest one is to right-click on the file and select “Add to archive” in the context menu. If you have not installed WinRar on Windows and are using the portable version, then you will not have such an option and one of the following options will suit you.

Open the file in the program and, having selected it, click on the “Add” button in the top menu of the archiver.

Or in the top menu of the program, click on “Commands” and go to the menu under “Add files to archive”

You can also select the “Add files to archive” item by right-clicking on a file opened in the program.
If you often work with this archiver, then the easiest way to do this is using hotkeys. Open the program and selecting required file, press the ALT+A key combination and a window will open to add the file to the archive.

In this window we need the “General” tab. Here you will need to make a few settings to properly split the file into in the right place on your hard drive.
- In the “Archive name” section, you need to click on the “Browse” button and select the location where your files and their name will be saved;
- In the “Archive format” section you will need to indicate in what format you want to save your archive. Saving an archive in RAR format will take three times longer than saving in ZIP format; this should be taken into account if the speed of creating an archive is important to you;
- In the “Compression method” section, you can specify that the files do not need to be compressed, since you just want to split them, but this is all at your discretion;
- In the “Split volumes by size” section, you need to specify the size of one volume for your archive. Here are the sizes for CD and DVD drives, as well as the maximum volume size for file system FAT32, but you can specify any size you like. To do this, simply write the desired number and indicate the unit of measurement in megabytes (MB).
- If you need to set a password for your archive, you can do this by clicking on the appropriate button.
- When all settings are made, click on the “OK” button.

After this, a window will appear where you will see information about how much time has passed and remains to create the archive. Here you can cancel the operation, pause it, or send it to the background.
In order to collect the broken files into one, you simply need to extract them from the archive. And this can also be done in several ways.

The fastest way is to right-click on the file in the file manager and select one of the “Extract...” options in the context menu.

In the next option, you need to open the archive in the program and select the file with the archive extension, for example zip or the file with the first number, click on the “Extract” button in the top menu of the program.

When you select the directory option, a window will open where you can specify the directory for your files. This can be done if you specify the path to unpack the files in the right section or create a new folder.
Using the image of your local drives on the right side of the window, you can quickly specify where to extract files. To do this, open the desired directory directly in this window and the path to it will be indicated at the top of the window. Then click on the “OK” button.

In a new window you will see information about extracting the file from the archive.
WinRar is a paid application and the trial period is forty days. If you like this archiver and you work with it constantly, then you can also use it to divide files into parts.
If you do not use this archiver for its intended purpose, then it makes sense to turn your attention to other applications that are distributed free of charge.
How to split and join files using File Splitter & Joiner.
The File Splitter & Joiner program was created specifically to divide files into parts and then restore them back.
This is a free application, distributed in two versions, with an installation file and in a portable version. But after installing this application once, you can save the directory with it and not install it again, it will work fine as is.
There will be no problems installing the program, it works great for everyone Windows versions. If you see an error message when installing the program in Windows 7 and higher, then run the installation file in compatibility mode for Windows XP.
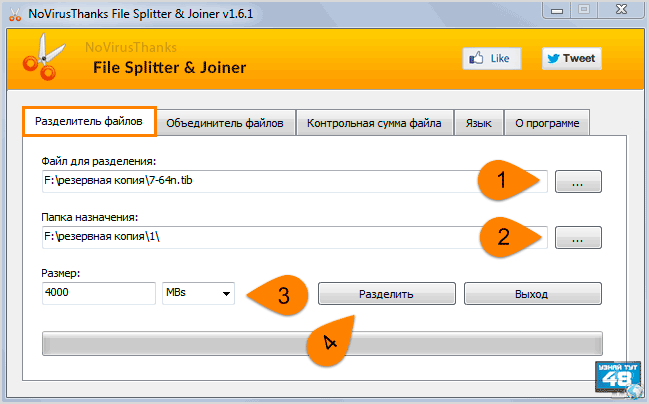
To split a file, open the program and go to the “File Separator” tab.
Here you need to take a few simple steps to process the file:
In order to combine files, go to the “File Combiner” tab, where you also need to take a few simple steps to assemble the file back:
- In the “Files to be merged” section, indicate the first part of the file that you want to merge;
- In the “Destination folder” section, specify the destination folder for the finished file;
- Then click the “Merge” button to restore the file;

After this, the program will quickly collect all parts of the file into one and notify you about it.
As you can see, this is a very easy-to-use program that can quickly split and reassemble files.
If you have one of the programs described above installed, then there is no point in installing this program, but you can use its portable version in any case. In this case, it will not be superfluous and should be stored on every computer.
You can download all the programs that are described in this article from the link below.
Good luck!
- Total Commander program – http://www.ghisler.com/852a.php
- Archiver 7-Zip – http://www.7-zip.org/
- WinRar archiver:
official website - http://www.rarlab.com/
Russian version – http://www.win-rar.ru/download/ - File Splitter & Joiner program – http://www.novirusthanks.org/products/file-splitter-joiner/
Computer programs are becoming more complex, movies are getting better quality, and games are getting better graphics. All this leads to the fact that file sizes increase, and if a film in a small resolution of 360p or 720p can be transferred from computer to computer without problems, then when the resolution reached 4K, this became more difficult to do. In such a situation, it is necessary to split the file into parts and then join it back together. There are several ways to do this, but first of all, we suggest dealing with situations in which you may need to split the file into several parts.
Why split the file into parts?
With the advent of external hard drives, many people no longer need to split large files into parts. Large files can be easily downloaded to a spacious external storage device, and then transferred from it to another computer. But there are situations in which it is necessary to split the file into several parts, and here are just a few of them:

We have listed only three of the most common situations in which you may need to split a large file into several parts. In highly specialized areas, there may be other reasons, for example, you may need to split the file to provide additional security and the inability to access it without combining all parts into one. We propose to consider two of the most simple ways splitting a large file into several parts.

The most common and easiest way to split a file into several parts is to use the WinRar archiver program. This method is the simplest, since the WinRar program is installed on most computers, and it is not difficult to assemble a divided file in parts, as well as to “cut” it. Please note that the instructions below require installed program WinRar.
To split a file into parts in WinRar you need to:

How to combine files divided into parts in WinRar:

As you can see, the process of splitting a file into parts using WinRar is quite simple. Its advantages include archiving of selected files, that is, after breaking into parts they weigh less than the original object. This allows you to split the file into fewer parts.
How to split a file into parts using Total Commander?
![]() No less famous program than WinRar among experienced computer users is Total Commander. The program is used for various purposes, including working with files and folders on a computer. It allows you to easily split a file into parts by clicking a few buttons.
No less famous program than WinRar among experienced computer users is Total Commander. The program is used for various purposes, including working with files and folders on a computer. It allows you to easily split a file into parts by clicking a few buttons.
To split a file into parts in Total Commander:

How to merge files split into parts in Total Commander:

Unlike WinRar, Total Commander does not archive files, which means that parts of a file will take up approximately the same amount of space as a separate object. However, Total Commander has one serious advantage - it is much faster than WinRar at dividing files into parts and putting them together, which is useful when working with large amounts of information.