How to partition a hard drive. How to partition a hard drive on a laptop
At Windows installation a hard drive is traditionally divided into at least two partitions - a smaller system partition with the letter C and a larger user partition with the letter D. This division was not just invented because of someone’s whim, it has important practical value. Firstly, partitioning the hard drive in Windows 7/10 allows you to save the user’s personal files when reinstalling the system, otherwise they would be destroyed during formatting; secondly, it’s just more convenient to work with data, not to mention the fact that This significantly reduces the risk of accidentally deleting system files.
However, some computers and laptops with pre-installed installed system have only one partition - the system one, not counting the “System Reserved” area. In such cases, the user has to create additional volumes on the disk himself. This procedure is very simple, however, for beginners it can still cause certain difficulties, especially when it comes to partitioning the partition with the installed system. So how to properly partition a hard drive without losing data?
There are three main ways to partition a hard drive into volumes: using the standard disk management snap-in, using a command line utility Diskpart and with the help of third-party programs created specifically for these purposes. The first method has a number of limitations, the second may seem complicated, the most convenient is the third, using third-party software, but not all such programs are free. Let's consider all three options.
Using Disk Management
So, you have a computer that has only one volume on its disk, not counting the reserved area. First, let's look at how to split a hard drive into two partitions using the built-in Disk Management snap-in. By pressing Win + X Call the context menu of the Start button and select “Disk Management” from it.
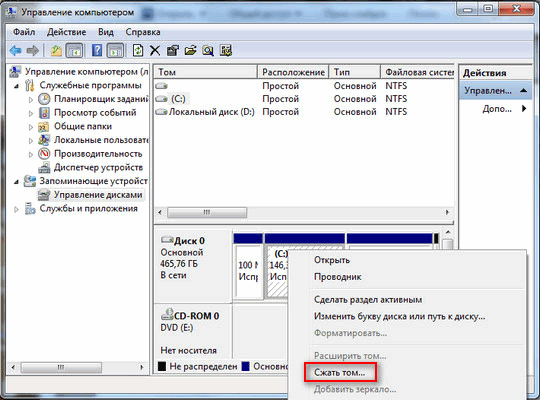
In the window that opens, right-click on the area of the system partition with the letter C and select the “Shrink Volume” option from the menu.

After the volume is polled for allocated space, specify the size of the new partition in megabytes in the “Size of compressed space” field and click “Compress”.

As a result, you will get unallocated space highlighted in black. Right-click on it, select “Create simple volume” and follow the wizard’s instructions.

During the creation of the partition, you will be asked to specify the volume size, assign a letter, select a file system (NTFS is needed) and assign a label, that is, the name of the volume displayed in Explorer.


After clicking the “Finish” button, the section will be created.


Partitioning a hard drive in Diskpart
Now let's look at how to divide a hard drive into 2 parts in Windows 7/10 using another standard tool - a console utility Diskpart. Unlike Disk Management, which has a graphical interface, it has a large set of functionality, in addition, you can partition a disk into partitions in Diskpart from under bootable media even on a non-working system. So, open as administrator command line or PowerShell console and run the following commands sequentially:
diskpart
list volume
select volume 1
shrink desired=102600
list disk
select disk 0
The first command launches the Diskpart utility itself, the second command displays a list of partitions available on the physical disk, the third selects the partition number corresponding to drive C, the fourth compresses it to the specified size in megabytes. The fifth command displays a list of all physical disks, the sixth command selects the disk to be partitioned (if there is only one on the PC, its ID will be 0).

Let's continue.
create partition primary
format fs=ntfs quick
assign letter=G
exit
The seventh team creates new section, eighth – formats it into a file NTFS system, the ninth command assigns the specified letter to the new volume, the tenth command ends Diskpart.

As you can see, the algorithm of actions has much in common with how the partition was created through the built-in Disk Management snap-in. Now, if you go to the “This PC” section, you will see a new logical partition there.
Dividing a disk into parts in Acronis Disk Director
You can also use third-party tools to create custom disk volumes. One of them is Acronis Disk Director– a powerful program for partitioning your hard drive and more. The procedure for partitioning a hard drive in this program is very simple. After launching the application, select the disk to be shared with the mouse and select “Split Volume” from the operations menu on the left.

A dialog box will open in which, using the slider, set the size of the new partition.

If on original disk There are user files, you can transfer them to the new volume being created, however, this can be done later in Explorer. But system files cannot be transferred, otherwise Windows may not boot. After setting the procedure parameters, click first “OK” and then “Apply pending operations”.


If the system asks you to reboot, give it permission. The program will do the rest itself, you just need to wait for the operation to complete.
How to partition a hard drive in Paragon Hard Disk Manager
Another powerful program for working with disks and partitions. It also has its own wizard for disk partitioning. After launching the application, switch to the “Partition Operations” tab in the main menu and click on the “Partition Wizard” link.


At the next stage, the program will ask you to decide on the size of the new partition. Use the marking slider or enter the desired size manually. Assign a letter to the volume, click Next and confirm the operation.


Clicking “Finish” completes the wizard.

Now, to apply the planned action, click on the button of the same name on the left side of the Paragon Hard Disk Manager window and once again confirm your intentions to partition the disk.

After this, the re-partitioning procedure will start. If the disk is a system disk, you will need to restart the computer.

Disk partitioning in AOMEI Partition Assistant Standard Edition
And finally, let's see how to partition a hard drive into free program AOMEI Partition Assistant Standard Edition. There is no separate partitioning wizard in this program; repartitioning is performed in two stages. First you need to get some free space. Right-click on the shared disk and select “Change partition size” from the menu.

Drag the slider to set new size section and click "OK".

As a result, unoccupied space will be created. Select it with the mouse and select the “Create section” option in the menu on the left.

In the window that opens, if necessary, adjust the layout parameters (you can change the size, letter, file system type and partition type) and click “OK”.

Now, to start the staking procedure, click the “Apply” button.

Since you are working with the system disk, you will need to restart the computer.

All of the above methods allow you to partition a hard drive without losing data, however, when performing this procedure, especially using third-party software, you should be careful, since the risk of losing information, although very small, is still present.
How to divide it yourself HDD on Windows? Basic requirements: it must be simple, fast and secure.
The simplest, so to speak, standard method is to partition the hard drive using the operating system itself. The main advantage is that everything is done in Windows Explorer. Below I will demonstrate how to do this using Windows 7 as an example.
I believe that most users are familiar with the situation when, when buying a new laptop or computer, there is only one drive C in the system. And now we will analyze all the issues that arise in this situation, having first laughed at ourselves a little with the help of artificial intelligence technology.
Why do you need to divide (partition) your hard drive?
In fact, there are enough reasons: from banal convenience to safety. Imagine that you will have an operating system, which means that your Drive C will be completely formatted.
Of course, it’s good if you have time to transfer important files to another medium in advance, but what if not? For example, after a virus attack. In other words, is it worth the risk of storing all your data in one place?
It would be correct to divide your hard drive into several partitions (two or more) in advance, where operating system and other software will be stored on one disk (Disk C:), and most important information, such as photos, videos, documents - on another drive (for example, let it be drive F:).
How to split (split) a hard drive into two partitions
Let's get started: Start → Computer → Management, or right-click on the My Computer icon → Management → Disk Management.
We have a typical picture that is typical for most new computers and laptops - there is only one drive C. The second partition is System Reserved. It is hidden and its main purpose is to store files Windows boot. You don't need to touch this section
Also, here you will see all the information about the hard drive that is connected to your computer. Using Windows 7's built-in disk management capabilities, you can perform a number of tasks:
– divide the hard drive in Windows 7 into two (or more) partitions;
– increase the size of existing volumes;
– compress Volumes, attach and delete.
As you can see, the built-in disk management functionality in Windows is comparable to the capabilities of a number of paid programs.
In the below picture you can see that I have one hard drive which is 250 GB in size → Disk 0. The drive has two partitions.
Let me remind you that you can create only four partitions on a disk with MBR recording. Three main ones (they are marked in dark blue) and the fourth is additional, also logical. This is especially true for laptops, which often have hidden partitions for storing an image of the operating system, special utilities, drivers, etc.
Using Disk 0 (i.e., the main hard drive) as an example, we will carry out all operations. By the way, before partitioning your hard drive, I strongly recommend defragmenting it. Let's see how to do this.
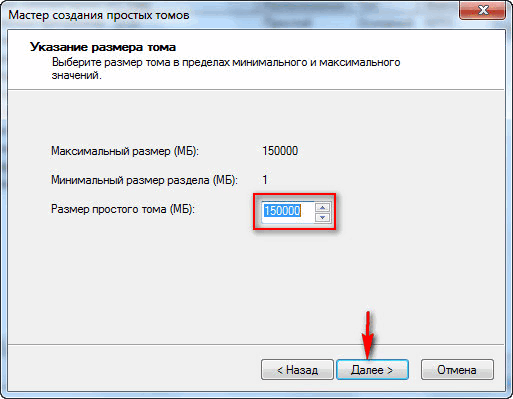
Let's start dividing a volume (Disk C) with a size of 249.9 GB into two parts. Right-click the volume and select the “Shrink volume” item in the drop-down menu.
We get the answer: Available space for compression → 200449 MB. Be very careful as performing this operation again may cause some difficulties.
We indicate how much we will compress: The size of the compressed space. I indicate the size as 150,000 MB (of course, you will have your own numbers), which equals 146 GB. The size of the compressed space is the size that you take from Drive C for the new partition.
Of course, a lot depends on the overall size of your hard drive and how much software and games you will install in the future, but approximate size Disk C after compression should not be less than 60 GB. Usually 60 - 150 GB are left for Disk C.
Note that "Total size after compression" automatically changed the setting to 105,898 MB, or almost 103 GB.
As I said above, “Size of compressed space” is the size of your future drive (F:), and “Total size after compression” is the size of drive C after compression. For example, if your hard drive is 500 GB in size, then 100–150 GB is enough for drive C, and the rest (400–350 GB) can be allocated to drive (F:).
Now all we have to do is click “Compress”. After a short process, unallocated space appeared, which is what we will convert into a simple volume. Hover your mouse over the unallocated space, then right-click and select “Create simple volume” from the drop-down menu.
The wizard for creating a simple volume will start, just click “Next” and agree.
Now you can assign any letter to your future drive (take, for example, the letter F:).
But here I strongly advise you to choose the NTFS file system. Despite the terrible inscription: “Formatting a partition,” your data that is now on Drive C is not in danger, since we are creating and formatting a new volume.
As promised, our new volume F:

The computer hard drive is a means of storing system and user data in particular. Sometimes, it is necessary to divide information into some large sections to avoid confusion. It is recommended to install the system on one partition, and user files, programs, etc. save to others. When purchasing a new PC, most often the hard drive is not divided into local disks (partitions), so you need to carry out this operation yourself. Let's look at how to properly partition a hard drive. For example, we will use Windows 7, which is the most stable among current versions (Windows 8, 10).
Before you begin the process of partitioning your disk, we recommend that you familiarize yourself with the following tips:
- For the OS, allocate at least 50-60 GB of free space, otherwise you will not see normal system operation. Of course, if you have a hard drive of 100-200 GB, then allocating that much space is too troublesome, but for systems starting from the “seven” you need enough memory.
- It is also better to take care of the path for saving files for the browser and torrent client; it is better to set the path for uploading files for them not on the system drive (by default), but on another more capacious partition. You should also understand that desktop content takes up space on the system disk.
- If you have a hard drive up to 1 TB, divide it into 3 partitions, if from 1 TB to 2 TB, divide it into 4 partitions, and more than 4 TB into 5 partitions. This is explained by the fact that when downloading large files to the hard drive, optimal division will allow it to be written correctly.
- Do not use all available memory on your hard drive. It is necessary to leave some space “in reserve” to restore damaged clusters.
If you follow these tips, you can set up partitioning your hard drive once and not worry about it again until you decide to expand the memory on your computer.
How to partition a hard drive in Windows 7?
To partition the hard drive, we will use a standard operating system tool Windows systems. It's called "Disk Management". To open this utility, you need to do the following:
Now let's move on to how to partition a hard drive in Windows 7. The instructions are as follows:

How to partition a hard drive in Windows 8, 10
Using Windows 7 as an example, we looked at the partitioning process. There will be nothing fundamentally new in the “eight” and “ten”, so you can use this procedure for this system as well. The only exception is that we will slightly adjust the tips to complete the task correctly:
- For the system disk, leave (add) at least 70-80 GB of information. Starting with “seven”, the system writes information about the current state to the local disk so that you can use system recovery if necessary. In addition, after many updates (including up to 8.1, 10), large files are formed that are protected by the system;
- Divide the disk into several partitions, do not leave 2 partitions. This will make it more convenient for you to handle files that are recorded on your hard drive, logically structuring them into sections.
How to partition a hard drive in Windows 7, 8, 10 using third-party programs
What to do if you don’t trust the standard tool for working with local disks? We suggest using a third-party application Partition Wizard. This application is free, does not require much space and is stable. Of course, its functionality is far from Acronis Disk Director, but it will be just right for partitioning a hard drive.
So, first download it and then install it in comfortable spot on your computer. When the program is installed, run it and wait until it loads the necessary information about your system and hard drive.
An unallocated partition will be designated as "Unallocated". Right-click on it and click "Create".
When you run this command, you will need to provide the following information in the next window:
- Section title;
- Partition type (for example, logical);
- Drive letter;
- File system type;
- Volume.
Please note that in the case of the program that is built into the system - “Disk Management”, these operations are performed in different windows, but here, for convenience, everything happens in one window. For example, we created a new “Test” section with 400 GB on board. After creation, file system looks like this:

This process can be repeated as many times as you like until you run out of free unallocated space. Please note that it is very important to leave very little free space so as not to damage the hard drive. To create another new partition, simply repeat the instructions. Don't forget to save your progress using the Apply button.

As you can see, the process of dividing a disk into partitions is not complicated, but very simple if you approach the issue with instructions from our website.
This article talks about how you can divide your hard drive into partitions without using third-party programs. And also the reverse process of deleting an unnecessary section or sections.
Hard disk partitioning involves creating several logical disks on one physical disk, which are defined by the operating system as separate physical disks.
What is it for?
The main thing for security is that the majority of virus attacks are directed specifically at the system disk, where the operating system is usually installed.
If you have to reinstall the OS, then drive “C” will be formatted, which means that all your data that is there will be lost.
But not all users agree on the need to split the hard drive into sections; there are many discussions on this issue on the Internet, and opinions are divided.
But the purpose of this article is not to impose your personal idea, but to show how to partition a hard drive, and whether he needs it is up to everyone to decide for himself.
On my own behalf, I can add that having two disks on one of which is the system, and on the other all my files: photos, music, games, etc. create for me certain convenience and order on the computer.
How to properly partition a hard drive
To do this, we will use the basic Windows utility.
In or on, move the cursor over the computer by right-clicking. In the context menu that appears, select the Management tab.

In the window that opens, find the Disk Management item.

In the next window we can see all the disks that are on this computer, including service ones that are not used by the user in any way and are usually hidden.
I show with my example, it may differ for someone, in any case, we do not pay attention to them, but right-click on the “C” drive and select Shrink Volume in the context menu.

We wait some time until compression processing takes place and available space is determined.

After this, a window will appear where you will need to select the size; for example, I chose 1500 MB, which is equal to about 1.5 GB, then click the compress button. Leave about 100 gigabytes on “C”, provided you don’t install anything on this system drive. (note the size is indicated in megabytes, 1 GB = 1024 MB)

After that I had an unallocated area of 1.46 GB. Right-clicking on it, I select “Create a simple volume”.

Here just click Next.

Here, too, we leave everything as is, click Next.

Assign any letter, Next.

And here we leave everything as it is.

To complete the procedure, click Finish.

And finally, a new volume has been created!

We go into my computer and see if there is a new disk. If it is not there, it will definitely appear after a reboot.

How to delete a partition on a hard drive?
Knowing how you can divide a hard drive into partitions, let's look at the reverse deletion process. Since my “C” drive was already divided earlier, and I don’t need another partition, I’ll delete it.
We go back to the computer management program, right-click on the created disk, and in the window that pops up, select the Delete volume tab.

We agree.

Now right-click on the “C” drive and select the Expand Volume tab.

Click next.

We don’t change anything, just click Next.

Click Finish.

That's all, in a few steps we returned to the original state!
As you can see, there is nothing complicated; any user can divide a hard drive into partitions without resorting to outside help, as well as in the reverse process.
Dear friends, today I want to tell you how break hard windows disk 7 into sections without formatting it. Each time I clicked on the computer icon I saw that there were hard drives “C” and “D”; I will not dwell on removable media. The standard situation is when on drive “C” we have, and on drive “D”, those who take care of their documents, we store photos, videos, films, music files and, of course, install various programs and games there. Those who installed the operating system on their computer themselves, during installation they saw that you were asked to format the hard drive and configure the hard drive, that is .
It would seem then that there is nothing complicated, formatted “C”, you want to break it into sections, but you want to install the whole system. But this is “C”, but what about “D”? You can’t create a partition without formatting, but I’m not going to format it either, I have data collected on it for almost a whole year.
Why did he give up this section anyway? I started looking on the Internet for information on how I could split the “D” drive without losing data. There are a lot of articles - format and break them up. Or split without formatting using this, this, and this program. In general, everything is as usual.
I won’t burden you with unnecessary information, but will describe it in detail, with pictures. how to partition windows 7 hard drive into sections without formatting it.
Go to the “Start” menu and enter “Computer Management” in the search bar. Select the “Computer Management” tab. A window will open in which you need to click on “Disk Management”.

In the window that opens, right-click on the disk you want to partition. In the window that pops up, click on the line “Compress volume”.
Scanning of free space will begin.

A window with settings will open, that is, you will see how much maximum space you can take from the disk (most likely “D”; you won’t be compressing the volume on drive “C”, where the operating system is located) for the disk you are creating. Feel free to exhibit maximum value(without going beyond the limits suggested to you), if compression is not possible, then reduce the volume for compressing the partition. Do not be afraid - on the partitioned disk, in addition to your files, after these actions there will also be a lot of free space. Click the “Compress” button.

You will see that there is free space. Right-click on it in the “Create simple volume” window that opens. The “Create Simple Volume Wizard” will open. Click “Next”.

Here set the maximum value proposed to you that you have chosen. Click "Next".
Here you will be asked to assign a drive letter. Select the partition letter and click Next.

After selecting a letter, you need to format the created partition. The “Master...” will do all this himself. All that remains is to click “Finish”.

Reboot the computer. All! You have a new partition (new volume). . If you don't like the name of the section you created - " New volume", then right-click on it and click "Rename". Just remove the “New Volume” label. The computer will then call it “Local Disk” by adding the letter you assigned.

Well, that's all, now you know how to partition windows 7 hard drive simply and easily. Good luck to all!!!