How to partition a hard drive. How to partition a disk with Windows installed without losing data
Partitioning a hard drive using Windows 7
 Partitioning the C:\ drive in Win7
When purchasing a new computer or laptop with pre-installed operating system Windows 7, many users are faced with the problem of dividing their hard drive into several partitions.
Partitioning the hard drive into several partitions is important both from the point of view of ease of use of the system interface and the ability to save data after reinstalling or restoring the operating system.

Main partition C:\
As you know, when you reinstall the operating system, all data located on the C:\ drive is lost, while the data on the remaining partitions of the hard drive remains intact. All important files can be easily used even after the system is restored.
Partitioning a hard drive is also convenient because programs and applications are installed on the system partition C:\. If the C:\ drive is the only one, then when you add all kinds of files and folders to it, confusion arises between system files and regular folders added by the user. In this case, it is easy to get confused in the files and inadvertently delete some important system file. Therefore, partitioning the hard drive is necessary.
In order to split a hard drive in Windows 7 into several partitions (logical drives), many use specialized programs, like Partition Magic and the like. Using such programs, you can split a disk into several partitions. But Windows 7 provides the ability to split it using system utilities. In this case, the need for third-party programs completely disappears.
To partition a hard drive in Windows 7, you need to go to the computer control panel.
You can do this in two ways:

It is clear that the first method is simpler.
In the “Disk Management” tab you can view all the information on our HDD and its partitions. In addition to the main C:\ partition, there is a possibility of finding a hidden recovery partition.

Main partition C:\ and hidden recovery partition
The recovery partition is used to store information to restore the operating system in the event of a serious failure when the system does not boot. It is not indicated by a letter. It is worth noting that the amount of memory occupied by recovery files can reach several gigabytes (usually about 15GB). Also, in addition to it, there is a section on the disk System Reserved , volume 100 megabytes. These sections are official, since they are not used by the user in any way and serve for the normal functioning of the operating system.
So, let's turn our attention to the C:\ drive, which is to be divided into sections - additional logical drives.
In order to split it, right-click on the conventional image of the disk. In the drop-down menu, select “ Shrink Volume…”.

Item "Compress volume..."

After the request is completed, a window will appear in which the compression parameters will be indicated. If the disk has not been partitioned before, then by default the utility will offer to split it approximately in half. If the HDD initially had a memory capacity of, for example, 1.8 Terabytes, then after division two sections are formed with a capacity of approximately 900 Gigabytes each.
The window that appears indicates the size of the C:\ volume before compression (in megabytes) and the size of the compressed space. The size of the compressed space is the amount of memory of the new partition that will be created. The total size after compression is the size of the C:\ volume after compression. It will be slightly larger than the newly created one. As already mentioned, the system will offer to divide the available memory approximately in half.

If you have the desire and confidence in your abilities, you can indicate your numbers and divide the disk according to your needs. In any case, it will be possible to carry out the reverse procedure - volume expansion and return everything to its previous state.
After familiarizing yourself with the separation parameters, click the “Compress” button. After a short process, another partition with the inscription “Unallocated” will appear on the HDD.

The item "Create a simple volume..."

The “Create a Simple Volume Wizard” will launch. Click “Next”. The “Specify volume size” window will appear – click “Next” again. In the next window, select the letter of the new volume in the “ Assign a drive letter" You can choose any letter you like.

Assigning a letter for the new partition
Confirm your choice and specify the file system in a new window. In point " Format this volume as follows:” specify the file system NTFS , leave the cluster size at default. Put a tick in the checkbox “ Quick formatting” and click “Next”. A window will appear with all the specified parameters. If everything is correct, then click the “Done” button.

If you are not satisfied with the default parameters set by the system, then, of course, you can set your own. But in most cases this is not required.
After a few seconds new section The HDD will be formatted, a letter will be given to it and in the field symbol The message “Good (Logical Disk)” will appear. Now the C:\ drive will be divided into two.

New HDD partition - New volume(E:)
If desired, you can change the name of the new section, and instead of “ New volume”, give another. You can do this in several ways:
1 .In the computer control panel in the disk management window, select the one whose name we want to change. Right-click and select " Properties". In the name field, enter a new name and confirm by clicking OK.
If you have a solid-state drive (SSD) installed in your system instead of an HDD, then the separation technique is similar.
There is a need to divide it into several sections. This process is called partitioning hard drive. In this article we will talk about how to partition a hard drive from the Windows operating system or using a boot disk.
Partitioning your hard drive can solve several common problems. First, disk partitioning makes working with files easier. Immediately after purchase, your disk will have one large partition. If you install Windows directly on this partition, the disk will be a complete mess of files. The operating system, programs, games, documents, movies, music and other files will all be located on one disk. Finding the necessary files in such a situation will become much more difficult. If you create separate sections for the operating system and your documents, then folder navigation and search the required document will not be difficult for you.
Secondly, partitioning the disk into partitions partially solves the problem with the limited length of the file name. In NTFS, the maximum file path length is 255 characters. Therefore, if you nest many folders inside each other, sooner or later there will come a time when you will see a message that the file name length has reached the limit.
Third, partitioning your disk protects your data. If you store all your data on the same partition as the operating system, then if you reinstall the operating system, you will lose all information. Of course, before installing the operating system, files can be transferred to disk, but this is a very troublesome process.
How to partition a hard drive from a Windows installation disk
If you have just connected a new hard drive and want to install Windows on it, then the most convenient way to partition the disk is using . Insert the Windows disc into your computer's drive and start the installation process.
The installation process must reach the partition selection stage. In this window, you can split the disk into partitions; to do this, click on the “Disk Settings” link.
After clicking on the “Disk Setup” link, you will see a list of actions that you can perform with your disk. In order to split a disk into two or more partitions, you must first delete the old partition. Therefore, click on the “Delete” link.


After this, you can create new sections; to do this, click on the “Create” link.


After creating the partition, you will see a proposal to create an additional partition for system files. Click “OK”.

That's it, one partition has been created. In order to finish partitioning the disk, you need to allocate unallocated space on the disk and create another partition.

As a result, you should get something like this.

Partition 1 is an additional partition for system files, partition 2 is your partition for the operating system, and partition 3 is a partition for your files. Select Partition 2 and continue installing the Windows operating system.
Partitioning a hard drive from a boot disk
If the operating system has not yet been installed, and the disk partition from the Windows installation disk does not suit you, then you can use a boot disk with free program Partition Wizard. An image of this boot disk can be used.
Burn this disk image to an optical disc and boot your computer from it. After the computer boots, a menu will open in front of you, in which you need to select “Boot from Partition Wisard Boot Disk”

After this, the Partition Wizard program will start launching. In a few seconds the program will load and you can start working.

The interface of the Partition Wizard program on the boot disk is no different from the Partition Wizard interface for Windows OS. Below we will look at the process of partitioning a disk using the Partition Wizard program for Windows.
How to partition a hard drive in Windows
Like boot disk, Partition Wizard for Windows is completely free. You can download it from and install it on your computer.
After launching the Partition Wizard program, we need to find a new broken disk, it is indicated by a gray stripe and the inscription “Unallocated”. Right-click on the new disk and select “Create”.

After this, a window will open in which you need to enter the settings for the new section. At the top of the window, enter the name of the new partition, select the file system and the letter that will designate the new partition. At the bottom of the window you need to specify the size of the new partition. Moreover, here you have the opportunity to specify the amount of unallocated free space that will be left before and after the partition. In addition, you can specify the partition size using the slider. In this case, you do not have to manually enter the exact size of the new partition.

For example, we entered the following data:
- Section name: Test
- Partition type: Logical
- Section letter: E
- Cluster Size: Default
- Partition size: 400 GB
Save the result using the “OK” button. After that, we got a new partition with a size of 400 GB.

In order to finish partitioning the disk, you need to create one or more new partitions on the remaining free space. This can be done by repeating the partition creation procedure.
After partitioning the hard drive is completed, the result must be saved using the “Apply” button, which is located on the program panel.
How to partition a hard drive without using third-party programs
It should be noted that in order to partition a disk from the Windows operating system, it is not at all necessary to install special programs, such as Partition Wizard. The Windows operating system has a very convenient tool called Disk Management. In order to open the Disk Management window, you need to open the Start menu (or the Start screen if you are using Windows 8) and enter the command “diskmgmt.msc” in the search bar.

Of course, Disk Management is not comparable in its capabilities to specialized programs. But, in many cases, the capabilities of this tool are sufficient.
Using the Disk Management tool, you can perform the following operations with disks: creating and deleting partitions, formatting partitions, creating dynamic disks, changing the drive letter, shrinking the volume, enabling the Active Disk function. You can read more about the capabilities of this tool in our article about.
After purchasing a computer or during installation of the operating system, users can split the hard drive into several partitions or leave it unchanged.
Thanks to this, you can conveniently sort all information and files without the risk of losing them in the event of a virus attack or operating system failure.
Next, we will look at how to divide a hard drive (HDD or SSD) into several partitions using built-in and third-party Windows tools.
Additionally, we will figure out how to do this on MAC OS X and Linux (using Ubuntu as an example).
Why do you need to partition your hard drive?
Read also:TOP 15 Programs for Windows disk defragmentation: choosing the best utility
After you succeed in dividing the disk into two or more, then during installation Windows any version will be asked to select the system partition on which the operating system will be installed.
Having chosen the one you need, Windows will prompt you to select one of the available file system formats:
- FAT is one of the first, and therefore outdated. You should only choose if you plan to work with earlier versions of Windows (95, 98, etc.). This way you can avoid various application compatibility problems. It has a lower file copying speed and does not allow you to work with files larger than 4 GB.
- NTFS is a modern file system format. Compatibility issues may occur when working with Windows 9.x (if the format is selected for the system drive). It features faster operation and reliability. Allows you to work with files of any size, without any restrictions.
If you wish, you can format each partition with different file systems to evaluate the quality and speed of their work.
During installation of Windows 7, 8, 10
Read also: TOP 3 Simple ways to clear RAM on a computer or laptop running Windows 7/10
The easiest way split the disk into parts during installation of the operating system. Then you won't have to copy necessary files, make room.
The method is suitable for partitioning a disk during installation of versions 7, 8 and 10 of Windows.
1 Insert the CD or bootable USB flash drive with the operating system image, restart the computer and wait for the Windows installation wizard to appear.

3 Buttons for creating and deleting partitions will become available. Before you partition your hard drive, you need to get rid of old volumes. Therefore, first click on the unnecessary sections on the screen and click “Delete”. If you see only one, then there is no need to delete anything. Once the excess sections are erased, you can begin partitioning.

Along with deleting the partition, all information stored on it will be erased. Therefore, before doing this, make sure that you have copied all the necessary information from it.
4 If you did everything correctly, then there will be one available line on the screen in the list of available drives "Unoccupied space" Click on it and below, in the toolbar, select “Create” and in the field that opens, enter the desired partition for the new volume in MB. After this, click “Apply”.

5 Create the desired number of new partitions in a similar way.
After this, do not forget to specify the drive on which the operating system will be installed and click “Next”.

As soon as the program finishes, opening “My Computer” you will see the created partitions.
During installation of Windows XP
Read also: Errors when loading Windows (XP/7/8/10): We deal with the most common ones
Despite the fact that Microsoft has officially stopped supporting XP and releasing updates for it, many continue to use this version of the operating system.
Disk partitioning during XP installation is slightly different from the method for seven or ten.
1 Before partitioning your hard drive on Windows XP, you will have to delete existing partitions. To do this, select the unnecessary volume using the arrows on the keyboard, and then press the “D” button. Confirm the action by pressing the Enter key.

2 After this the line will appear "Unallocated area". We will create the necessary partitions from this disk space. To do this, press “C” on your keyboard and then “Enter”.

3 A new window will appear where you can enter the desired disk size in MB (the maximum and minimum available are indicated in the line above). Confirm your actions by pressing the Enter key.

In the same way, create the required number of partitions, then continue and complete the installation of the operating system.
Dividing a disk via the command line
Since Windows 7 can be divided into 2 disks using system tools, it is most logical to use them without resorting to third-party software.
Although it also has its advantages (about them in another section of the article).
To start it "Disk Management"(it is through this program that we will do everything) click on the “My Computer” icon with the right menu button, and then select “Manage” in the context menu.
If for some reason this cannot be done, then use another method. Open "Control Panel"- "Administration"(easy to find via the search form).
Find and open in the list "Computer Management". Then select from the menu on the left "Storage Devices" - "Disk Management".

After opening the utility, you will see a list of available volumes, their location, type and file system used. You only need to divide those where the letter is indicated (C, D, E, etc.).
Volume "Reserved by the system" It won't be possible to break it into parts, because... it is hidden and is needed solely to store files necessary to boot the operating system.
Using the utility you can:
- divide the HDD or SSD into two or more partitions;
- delete an unnecessary volume and give its memory to another;
- change (reduce, increase) the sizes of existing volumes;
- rename sections, etc.
To immediately launch the program for editing drives, open the “Run” utility (shortcut keys “Windows + R”) and enter “diskmgmt.msc” (without quotes) and then press the “Ok” or “Enter” button.

Divide the disk into two
Before you start dividing the volume (in our case, this is drive C), you need to compress it. To do this, select it in the list, and then right-click on it and select “Shrink Volume”.
The program will begin analyzing the space available for compression, after which it will prompt you to manually enter the size in MB that will be allocated for the new volume.
Please enter this information as carefully as possible. If you enter incorrect information the first time, it will be much more difficult to repeat this operation to correct it.
If you share the system disk (on which Windows is installed), then try to leave at least 60 GB on it. For comfortable operation of the computer, there should always be free space on it (10-20% of the total capacity).

Once you decide on the size, click on the “Shrink” button and wait for the operation to complete. After this, “Unallocated space” will appear opposite the selected one, exactly what we just selected.

Creating a new volume
- Having decided on the size, click “Next”, after which the utility will prompt you to select a letter for the new drive (only those available for selection will be in the drop-down list). Here you can connect the volume as an empty NTFS folder.
- Next, you will be asked to format the future drive using one of the file systems available for selection. We recommend choosing NTFS, and leave the rest of the indicators at default. Despite the terrible threat that all information will be deleted from the partition, feel free to agree and start formatting (after all, we are creating a new partition with nothing on it).

After this, the Create Simple Volume Wizard will complete its work and display brief information regarding the new disk.
Now, after opening “My Computer”, you will see the partition you just created, which can be used to install programs and store files.
Using third party software
Read also:The computer does not see the hard drive - what to do?
In some versions of Windows, the system utility for creating new volumes may work slightly differently.
Therefore, you have to use third-party software that supports working with HDD and SSD.
In addition, unofficial programs have a more understandable and “friendly” interface, making it easier for untrained users to work with sections.

Today we will look at how to partition a Windows 10 disk using the completely free and Russified program AOMEI Partition Assistant.
You can find and download it from the official website of the developer.
- Launch the program. In the window that opens, you will see a list of available disks, partitions, volumes and their short description(including removable hard ones).
- Right-click on the disk you plan to partition and select from the context menu "Split partition".
- A new window will open, where in the field “ New size“You will need to indicate the capacity of the future drive (should not exceed the volume from the “Original size” field). Enter the information and click “OK” to move to the next step.

This method is much faster and easier than using system tools because the program automatically reserves Right place and compresses the volume.
File system by default - NTFS, so if you want to format the future disk in FAT 32, then at the stage Section divisions you will need to click on the button Advanced settings then specify the desired parameters.
How to partition a hard drive yourself in Windows? Basic requirements: it must be simple, fast and secure.
The simplest, so to speak, standard method is to partition the hard drive using the operating system itself. The main advantage is that everything is done in Windows Explorer. Below I will demonstrate how to do this using Windows 7 as an example.
I believe that most users are familiar with the situation when, when buying a new laptop or computer, there is only one drive C in the system. And now we will analyze all the questions that arise in this situation, having first laughed at ourselves a little with the help of artificial intelligence technology.
Why do you need to divide (partition) your hard drive?
In fact, there are enough reasons: from banal convenience to safety. Imagine that you will have an operating system, which means that your Drive C will be completely formatted.
Of course, it’s good if you have time to transfer important files to another medium in advance, but what if not? For example, after a virus attack. In other words, is it worth the risk of storing all your data in one place?
It would be correct to divide your hard drive in advance into several partitions (two or more), where the operating system and other software will be stored on one drive (Drive C:), and most important information, such as photos, videos, documents - on another drive (for example, let it be drive F:).
How to split (split) a hard drive into two partitions
Let's get started: Start → Computer → Management, or right-click on the My Computer icon → Management → Disk Management.
We have a typical picture that is typical for most new computers and laptops - there is only one drive C. The second partition is System Reserved. It is hidden and its main purpose is to store files Windows boot. You don't need to touch this section
Also, here you will see all the information about the hard drive that is connected to your computer. Using Windows 7's built-in disk management capabilities, you can perform a number of tasks:
– divide the hard drive in Windows 7 into two (or more) partitions;
– increase the size of existing volumes;
– compress Volumes, attach and delete.
As you can see, the built-in disk management functionality in Windows is comparable to the capabilities of a number of paid programs.
In the below picture you can see that I have one hard drive which is 250 GB in size → Disk 0. The drive has two partitions.
Let me remind you that you can create only four partitions on a disk with MBR recording. Three main ones (they are marked in dark blue) and the fourth is additional, also logical. This is especially true for laptops, which often have hidden partitions for storing an image of the operating system, special utilities, drivers, etc.
Using Disk 0 (i.e., the main hard drive) as an example, we will carry out all operations. By the way, before partitioning your hard drive, I strongly recommend defragmenting it. Let's see how to do this.
Let's start dividing a volume (Disk C) with a size of 249.9 GB into two parts. Right-click the volume and select the “Shrink volume” item in the drop-down menu.
We get the answer: Available space for compression → 200449 MB. Be very careful as performing this operation again may cause some difficulties.
We indicate how much we will compress: The size of the compressed space. I indicate the size as 150,000 MB (of course, you will have your own numbers), which equals 146 GB. The size of the compressed space is the size that you take from Drive C for the new partition.
Of course, a lot depends on the overall size of your hard drive and how much software and games you end up installing, but approximate size Disk C after compression should not be less than 60 GB. Usually 60 - 150 GB are left for Disk C.
Note that "Total size after compression" automatically changed the setting to 105,898 MB, or almost 103 GB.
As I said above, “Size of compressed space” is the size of your future drive (F:), and “Total size after compression” is the size of drive C after compression. For example, if your hard drive is 500 GB in size, then 100–150 GB is enough for drive C, and the rest (400–350 GB) can be allocated to drive (F:).
Now all we have to do is click “Compress”. After a short process, unallocated space appeared, which is what we will convert into a simple volume. Hover your mouse over the unallocated space, then right-click and select “Create simple volume” from the drop-down menu.
The wizard for creating a simple volume will start, just click “Next” and agree.
Now you can assign any letter to your future drive (take, for example, the letter F:).
But here I strongly advise you to select a file NTFS system. Despite the terrible inscription: “Formatting a partition,” your data that is now on Drive C is not in danger, since we are creating and formatting a new volume.
As promised, our new volume F:

Why is it necessary to share a hard drive in Windows? First of all, for the security of your personal data. When a hard drive has only one partition, then all the files that are on this drive: programs, documents, photos, files of the Windows OS itself are stored in one place.
Now imagine that the system fails. All your personal files (photos, documents) will most likely be lost. It is much more correct when system files and user files are stored separately from each other.
Physically, they will still remain on the same hard drive, but will be on different partitions. There may be several sections. One, as a rule, is allocated for the operating system and programs (system partition), the other (or others) for user files.
One of the simplest and available ways- partition the hard drive when Windows installation. We discussed how to do this in great detail and with a specific example in . What to do if the system is already installed and there are user files in it, how to partition the disk in such cases?
How to share a disk with installed system Windows without data loss
Today we will look at how to divide a hard drive into two or more partitions with an already installed OS. And it doesn’t matter at all what edition of Windows you use. This method will be relevant for any version, be it Windows 7 or Windows 10. In addition, if you already have two partitions, but need to create a third, both methods described below are also suitable.
Essentially, our task comes down to “pinch off” some part, say 200 GB, from a large partition (and in our case this is the only partition - system drive C), and make a separate partition from it.
This can be done in several ways, including using the Windows operating system itself, which has a special Disk Management tool. This method requires a minimum of effort and in most cases solves the problem without third-party software. Let's start with him.
Before you begin partitioning a hard drive with installed Windows system, you need to take some precautions. If there are important files on the system, copy them to external storage media (flash drive, external hard drive) in advance.
How to divide a hard drive into two or more partitions? Method 1 - using Windows
Let's use the Disk Management tool. In Windows 10, just right-click on the icon My computer, select item Control - Disk Management.
In other versions of Windows, this tool can be found using a regular search or using a hotkey combination Win+R, and enter the command diskmgmt.msc.

We see the Disk Management window, which displays the user’s disk, which in this case has a size of 465.76 GB (Disk 0). Almost all of the HDD space is allocated to one partition - Disk C. There is also a partition (500 MB) that is reserved by the operating system at the installation stage.

In our case, 465 GB (the entire hard drive) for one system disk is not an affordable luxury, so we will “pinch off” the maximum possible (as much as the system will allow) number of GB from it and make a new partition from this free space.
As a rule, about 100-150 GB are allocated for the system disk. It all depends on the individual user. 100 GB is quite enough if Windows and the most necessary software are installed on the system disk. If you plan to install modern games in addition to the system and software, then a size of 100 GB will clearly not be enough.
Before performing any operation on a specific hard drive partition, do not forget to select it. Just click on it with the left mouse button and the section will be selected. Only then proceed with the operation.
Let's move on to practice. Let’s select the partition from which we want to “pinch off” space. Right-click on the selected partition and select the command Shrink Volume.

All sizes are in megabytes, please be careful. In a specific example, the maximum number of MB that the system “allows” to be compressed is 237.656 MB (232.09 GB). This means that after compression we will get Disk C with a size of 232 GB and Disk D with a size of 238782 MB (233 GB). Not the best best option. If you are not satisfied with it, and you need to “pinch off” more than what the system offers, then you will have to use third-party software, but more on that later.
![]()
When all calculations are completed and the sizes of future partitions are set, click OK(or click Enter). We have a new unrecognized partition (200 GB). Don't rush to exit Disk Management. The procedure for dividing the disk into two partitions has not yet been completed. Select a new partition (200 GB), and right-click and select Create a simple volume.

Launch Create Simple Volume Wizard. In principle, everything else is simple, you just need to follow the instructions of the master himself. Check out the screenshots. You are required to give the future partition a letter (in my case it is D) and a file system - NFTS.


Let's see what happened. We have one hard drive and divided it into two partitions: system Disk C (265 GB) and New Volume D (200 GB) for storing personal data. By the way, the new volume is now displayed in Windows Explorer.

Now you know how to divide your hard drive into two or more partitions using Windows. If you are satisfied with this method, and it coped with your task, then you can stop there. However, if you are looking for a more optimal option, and, for example, you need to “pinch off” a larger size than the system itself offers, we use third-party software. True, first we need to return the hard drive to its original state.
Let's delete the created partition and return it to the system disk. We highlight New volume and right-click on the item Delete volume.

Read the warning and click OK. We get 200 GB that are not distributed.


Carefully check all the numbers and click Further.

We have returned to the original state, when the system has one hard drive and it is almost entirely dedicated to one partition (system).
How to divide a hard drive into two or more partitions? Method 2 - Partition Master Free
It's time to move to third-party software. There is a lot of choice here. There are paid and free options. I recommend stopping at . Why? Time-tested, intuitive interface, free. Unlike the Disk Management tool that Windows offers, Partition Master allows you to shrink a disk partition as long as physically possible.

The official website of the program is www.partition-tool.com. Go to the website and select the Products - Partition Master Free - section in the top menu Download.
Since the program is free, during its installation you will be prompted to install additional unwanted programs. Many free products work great and perform their tasks perfectly, but since they are free, developers try to somehow make money from them. Be careful and timely uncheck the checkboxes offering promotional products.
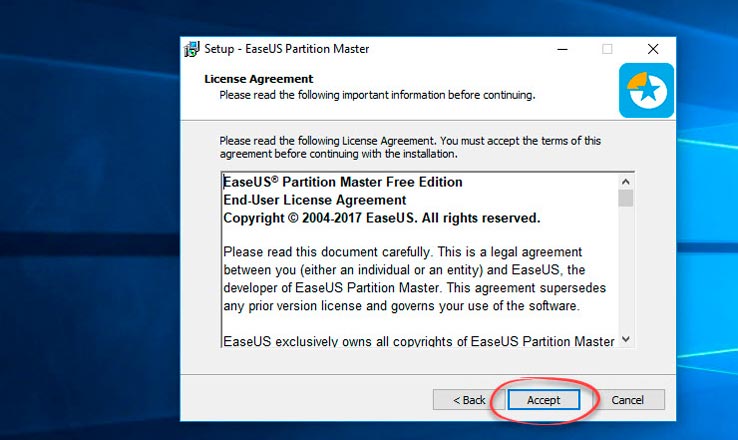
1. Start installing the downloaded program. Select the language English and press OK.
2. In the next window, we agree that we will use this software only for your family, check the box and click OK.
3. In the next window (at your discretion) leave only one checkbox - Create a desktop icon(create a desktop icon) and click NEXT.
Installing Partition Master Free in screenshots. Click


5. In the next window, enter your Name And Email. You can enter fictitious data.
6. After installation, click Finish.
The program should start. The interface is completely English language, but it is quite simple and using these instructions, dividing a disk in Partition Master Free will not be difficult.
The main program window displays Disk C, which is what you want to split. Its main information is also presented here: file system (NFTS), size - actual (465.27 GB) and used (17.10 GB). Pay attention to the graphic scale of the disk, which is located at the bottom of the window. You can work and execute commands using both options. With a graphic scale, this is a little easier and clearer.

Select the section (left click) that you want to divide (from which you need to pinch off a place), and select (Resize) from the drop-down list of commands.

In the window that appears, grab and move the special slider. It is responsible for the set size of the future partition. We indicate how many GB we need to pinch off. In this case, 322.242 MB (or 314.69 GB) was selected for the new partition.
Pay attention to the bottom of the window. While moving the slider, you, in real time, see how your Disk C will change after compression, and how much will be allocated for the new partition.
I set the size of the new partition to 314 GB, and the size of Drive C will become 150 GB. After that, click OK.

An unrecognized partition (314 GB) appeared. Now we need to make a partition out of this unrecognized space.
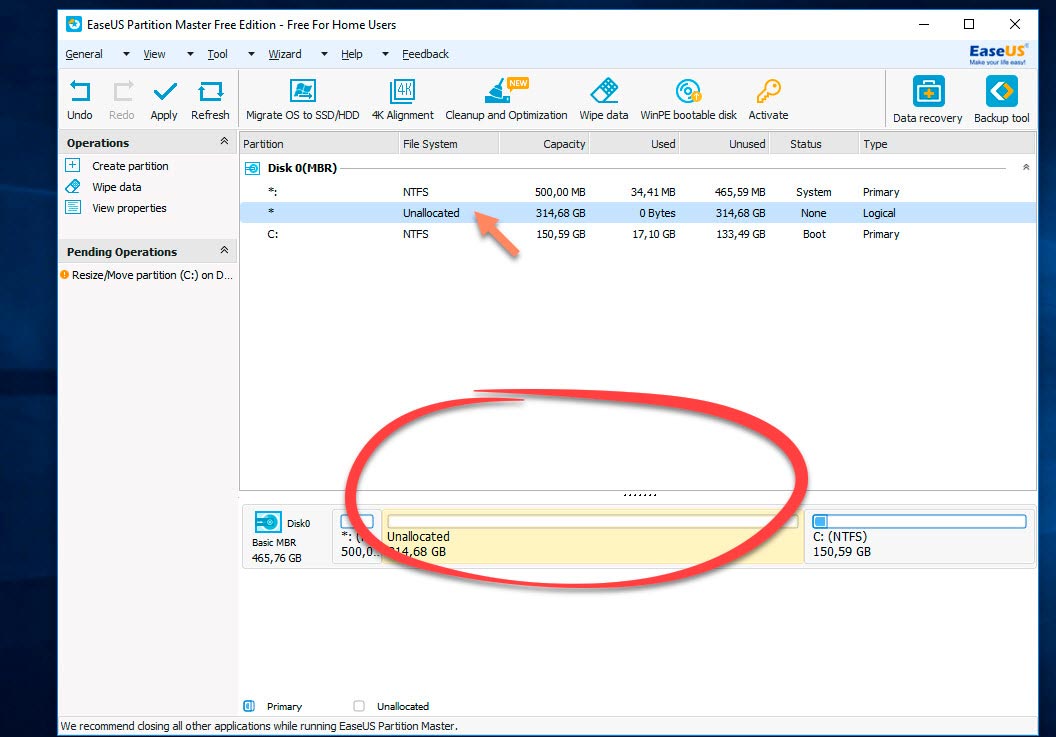
Click on it with the mouse and select the command (Create section) from the drop-down menu.

In a new window, I am prompted to enter a partition label and give it a name (Partition Label). Let's say I call it Multimedia. Next, you need to specify the partition letter (Drive Letter). Don't forget about the point Optimizefor SSD, but only if you have SSD drive. If you are using a regular hard drive, then do not check this item. File System - NFTS. Click OK.

Let's see what happened. System Disk C for which we allocated approximately 150 GB and a section for storing files (Multimedia). This is not the final result yet, but rather a sketch. For the program to perform all operations, you need to click on the button Apply in the top menu.

A pop-up window will appear containing information about the operations that will now be performed. Click YES and the program will begin executing them. The computer will restart and start in download mode. Wait for the operation to complete.

After the process is completed, a window will appear with information that two operations were successfully completed. If you open File Explorer, you can see the new partition created.

Now system files and user files will be stored separately. The task has been completed. As you can see, both described methods work and allow you to partition the disk without losing data. Which one to choose is up to everyone to decide for themselves. I hope this article was useful and helped you finally understand this issue.
If you are building a computer and are looking for the best prices for components, then option number one is computeruniverse.ru. Time-tested German store. Coupon for 5% euro discount - FWXENXI. Happy building!