How to draw a running man from 2nd person. How to learn to draw a person - step-by-step instructions

The question of how to draw a person step by step for beginners occupies absolutely everyone who has picked up a pencil. A beginning artist is often disappointed when he sees the results of his own efforts. They usually diverge greatly from what we really wanted to achieve. Many people at this stage give up trying to learn how to draw correctly. However, if you still have not abandoned your intention, you need to change your approach to business. The popular question of how to draw a full-length person must be answered on a systematic basis. In drawing, the most important thing is step-by-step and consistency. For many this will sound very unexpected, but before you draw anything, you need to think carefully. Well, this applies primarily to such a very complex subject as the human figure.
Convincing drawing
Each drawing begins with a competent layout, that is, placing the future picture on a plane. This is done with light pencil strokes, which indicate the extreme points of the figure being drawn. In each drawing it is necessary to highlight a certain compositional semantic center. One of the key rules of composition is that a given compositional center should not coincide with the geometric one. The drawing on the plane should occupy approximately three-quarters of the surface, while leaving free space at the edges. Further, in order for a person to look convincing, his figure must be constructed in strict compliance with the laws and proportions of anatomy. And what is also important, she must stand firmly on her feet, or sit on some kind of support - so that this does not violate the laws of balance in any way. The proportions of the human figure change depending on age. In an adult, the head occupies approximately one-seventh of the height.

How to draw a figure
Experienced artists have been working on this for many years. In modern art universities, plastic anatomy is studied in detail. Her course is tailored for artists. When studying it, they carefully study all the muscles and bones present in the human body, their interaction and articulation. Such skills and knowledge are needed to properly build the human figure. True, when faced with the task of depicting a person in full height for the first time, it will be enough to correctly take the proportional relationships between all the individual parts of the body to the figure as a whole. And also understand the general design basis muscular system and skeleton. When constructing the torso of a human figure, it is necessary to outline the axial lines, hip and shoulder girdles, and various joints. When making a figure, first of all remember balance. The figure must stand firmly on its feet. To ensure this requirement, many artists have a proven technique - a vertical line from the jugular cavity (a small depression between the collarbones under the human chin), drawn onto the plane, should not go beyond the plane of the feet. And then the most important thing is to carefully check the proportions of the limbs, head and torso, and build the entire figure step by step.

Generalization of the drawing
When making a construction and working on various details, it is important to stop in time and observe the measure. From the analysis of individual details, it is necessary to gradually move on to a generalization of the figure as a whole. This is usually done with sweeping, wide strokes. Nudity should not be depicted often. However, an artist needs basic knowledge of plastic anatomy in any case. Without them, it is simply impossible to correctly figure out how to draw a dressed person. When depicting a figure in a certain spatial perspective, one must see and imagine it through and through. In particular, it is necessary to pay attention to the patterns by which folds on clothing are formed. This is an extremely important element in drawing the figure. They can emphasize movement or stability. Having outlined the general contours, gradually give all the details volume. Model the shape with chiaroscuro. Much attention When constructing, it is necessary to pay attention to shading. The stroke is the most important element in the arsenal of any graphic artist. Much depends on the force of its pressure, direction and length. The culture of shading is always developed gradually.

Perspective
Competent construction of any spatial figure, including a person, on a plane is simply impossible without understanding all the laws of linear perspective. You need to understand it and understand that all parallel planes and lines have a vanishing point on the horizon. There are no parallel planes in the human figure, but she easily fits into them. Perspective construction of a figure must be done only after its position relative to the horizon is understood. The horizon line should be the first in the drawing. 

Step by step example
Do you want to learn how to draw a full-length person step by step? We have prepared this lesson for you. We will draw a person with a pencil and in clothes. This guy is wearing a shirt and jeans.
We begin to draw a full-length person step by step.
First, let's draw a vertical line on a piece of paper, leaving a little space at the top and bottom. If a man's head and legs rest against the edges of the sheet, it will not be beautiful. According to the rules of composition, it is necessary to leave space around the figure. Now we will divide the vertical line into 6 equal segments and make another small segment at the bottom. Here, in the future, we will draw our guy's shoes. Why do we divide a straight line into so many segments? The fact is that the height of an average person fits approximately 6-7 heads. Since we want to draw a proportional person, we will need these marks.

Now we have the lines of the shoulders and pelvis. Thus, we have outlined the approximate location of the shoulder and hip joints. Pay attention to which specific segment they are depicted on. If you make a mistake here, the person will end up disproportionate. The joints on the right are located slightly further from the center line than the left. Why? The fact is that our person’s posture is quite relaxed. He's out of line. Therefore, the figure will not be perfectly symmetrical. You may have noticed that we have almost no room left for the neck: the man we are drawing tilted his head forward slightly, thereby covering his neck.

We mark the places where our knees and elbows are. Again, don’t forget to pay attention to where these circles are located relative to our small segments and relative to the center line. We also depict the ankle joints in circles. As you can guess from the name, these are the joints that connect the foot and lower leg. Connect the circles with lines. A man will keep his hands in his jeans pockets. Therefore, we draw lines from the elbows to the pelvis. If you still have difficulty drawing fingers, then you can simplify the drawing by making your hands invisible, as in this case.

Next we use temporary construction lines. Now, using the eraser, we erase these lines. More precisely, we make them less noticeable so that they are not so noticeable. At the end of drawing, you will need to erase them completely, but for now we need these lines in order to better navigate the drawing. We begin to mark the contours of the body - torso, legs, top line of trousers. We suggest at this stage to outline the line of the eyes, the chin, as well as the border of hair growth - the place where the forehead ends and the hairstyle begins. Let's outline the neck with you. When drawing, focus on the midline of the body and our construction lines. Look carefully at what distance from the midline the right side of the neck is, and at what distance the left side is.

We continue to draw the human body in full height. Now we add the outlines of the arms and boots. On the face we mark the lines of the nose and lips. Draw a man's ear. In order to draw the ear in the right place, be guided by the line of the eyes and the midline of the body.
At this stage, some elements of clothing begin to appear - pockets on jeans, a belt.

To depict a person in clothes, it is worth remembering that the fabric always forms folds. Our man is dressed in modern clothes. We begin to draw folds on the jeans. We depict the details of the belt and the collar of the shirt. Hands hidden in pockets. However, the thumbs stick out. You need to draw them. We also mark with curved lines the place where the jeans end - the length of the trousers.

At this stage, the drawing becomes more and more attractive due to the drawing of details - folds on the shirt and jeans. On the shirt, folds form at the elbows, on the sleeves, as well as above the belt and slightly on the chest. On jeans, the folds are clearly visible at the knees, as well as at the bottom of the legs. Please note that the fabric does not wrinkle randomly. The fold pattern has a certain rhythm. Try to draw it believably. Draw the soles of the shoes. All these little details will make your drawing more interesting. In order for the drawing to turn out beautiful, you need to pay attention to the elements of clothing and shoes.

Now we can finally completely erase the construction lines on the human body. Your drawing should now look something like this. Let's continue with the details. Any jeans have a characteristic facing - the edges of such trousers are hemmed in a special way: pay attention to the double line along the line of the pockets and along the bottom. And buttons appeared on the shirt.

How to draw a guy in full height? Of course, you should pay attention to his face and hairstyle. Let's make the lower jaw a little square - this will add masculinity to the guy's image. Let's draw the outline of the head. The man has wavy hair. However, nothing prevents you from making him bald or with a different hairstyle.

It's time to draw the face. We outlined the lines of the eyes, nose and lips. Important Note: All these lines should be parallel to each other. Otherwise, your face will turn out slanted and crooked. In order to emphasize a smile, you need to draw folds from the wings of the nose to the corners of the lips. To add liveliness to the eyes, you need to leave small white highlights next to the pupils. Don't forget about eyebrows - they make your face more expressive. Add a couple of curved lines to your hairstyle so that your hair doesn't look boring.

That's all. You have read to the end the lesson on how to draw a full-length person. We got a nice young man. Try it. We believe that everything will work out for you too!
Learn to draw a woman in clothes proportionally and beautifully in a static pose or in motion.
If you want to improve your drawing skills and learn how to draw the female body, figure, arms and legs of a woman, be sure to read this article! Master classes have been selected for you with step by step photos different levels of difficulty.
How to beautifully draw a human figure of a woman in full-length clothes step by step with a pencil for beginners and children?
A woman is often the first thing a small child tries to draw. He wants to portray his mother! The children's drawing is only schematic. On it the body is an oval, the head is a circle, the arms and legs are “sticks” or “sausages”, and the hair is a simple hatching. Of course, such drawings are touching. But if your child has reached school age and clearly shows interest in drawing, try with him to learn how to draw a full-length woman, no longer schematically, but in compliance with proportions and technique.
IMPORTANT: If you want you or your child to really draw women beautifully, you cannot do without studying anatomy. It must be remembered that the drawing will be proportional if we take the head as the unit of measurement. So, a woman’s height should be equal to 7-8 heads. And in order for the curves of a woman’s body to be smooth and beautiful, you should carefully study the woman’s skeleton and her naked body.
Draw with junior schoolboy? Then, of course, everything will be simpler; there will be no need to go into anatomical details.
Let the child draw an oval, tapering downward. This will be a blank for the head. From the center of the oval you need to draw a straight line two heads long - the axis of the body.


Since the woman in the drawing will be wearing clothes, more precisely, a dress, there is no need to draw hips and legs. Draw a quarter circle divided into three segments.


Focusing on the axis, draw a trapezoid with a smaller base downwards, this will be the torso. On both sides of the larger base, draw semicircles - blanks for the sleeves of the dress.


Detail the drawing - draw the woman’s hairstyle.


Draw the woman's hands. The length of the forearms should be equal to one and a half heads, the hands - 1 head.


Add legs to the woman's drawing and detail her dress.

Remove the auxiliary lines. Draw in facial features as desired.


How to draw a woman's body in clothes with a pencil?
When starting to draw a woman’s body, do not be lazy to study her skeleton and nude images. Try to mentally or on a piece of paper divide the body into basic shapes, mainly triangles.
Imagine your torso in the form of two triangles, connected at the waist level by their vertices. These triangles can be the same since, basically, the width of a woman's hips is equal to the width of her shoulders.


Afterwards, the female figure should be streamlined, since, unlike the male figure, it has more smooth curves.
The next possible difficulty is drawing a woman's breast. Imagine that you are sculpting from plasticine. Stick two identical semicircles to the torso of your figure, smooth them out on top. It will turn out something like the picture below.

 Drawing a woman's breasts can be difficult.
 Convey the movements of the female body by moving the axis line.

Now try to draw a portrait of a woman from the waist up.
Draw an oval - a blank for the head, as well as straight lines - the axis of the body, the axes of the arms and legs. Try to maintain proportions. Use small circles to mark the places where the joints will be.

 Woman's torso in pencil: step 1.
 Draw the contours of the woman's body and hairstyle.


In the picture, the woman will be wearing a tight-fitting dress; mark its boundaries. Add some jewelry to the woman - a bracelet on her wrist. Draw the hair, let it be a little messy, as if it were blowing in the wind.

Draw the woman's face, detail her dress. Add shadows using shading. Erase the auxiliary lines.


VIDEO: How to draw a female body?
How to draw a woman's hands in clothes with a pencil?
Women's hands are especially difficult to draw. They need to be smooth and graceful, with long, thin fingers.


IMPORTANT: If you depict a woman in clothes, it will be easier for you - you will only have to draw the hands and parts of the forearms. The rest you will hide under the sleeves of your clothes.
Try to depict the woman's hands in several positions at once.
- Schematically outline the hands in the form of ovals, and the forearms in the form of straight lines.
- Starting from the ovals, draw the fingers. Remember that a woman's middle finger is the longest.
Detail the contours of the hands. No straight lines! - Draw the nail plates and folds of skin in the areas where the phalanges meet.
- Delete the auxiliary lines.
- Make the shadows with very abrupt shading; they should not be too dark.
- If you draw a woman's hands with the backs facing forward, Special attention pay attention to your fingertips. They can be rounded or slightly elongated. Draw the nails with a sharp pencil, and with thicker lines draw the folds of the skin in the areas where the phalanges of the fingers meet.
- Using the same principle, draw the woman’s hands in other positions.
 Woman's hands with pencil: step 1.
 Woman's hands with pencil: step 2.
 Woman's hands with pencil: step 3.
 Woman's hands with pencil: step 4.
 Woman's hands with pencil: step 5.
 Woman's hands in pencil: step 6.
  Woman's hands in pencil: step 7.
  Woman's hands in pencil: step 8.
 Woman's hands in pencil: step 9.
  Woman's hands in pencil: step 10.
 Woman's hands in pencil: step 11.
 How to draw a woman's legs in clothes with a pencil?
A woman's legs are also more rounded than a man's. To draw them:
- draw her hips in the form of a triangle lying on the base
- draw dots in the corners of the triangle - a schematic representation of the hip joints
- from these points, draw straight lines, the axes of the legs (they should not be parallel, make them a little closer at the bottom)
- Divide the lines roughly in half, draw dots to mark the kneecaps
- outline the contours of the legs, remembering that a woman’s thighs are denser than her lower legs
- draw the kneecaps
- designate the feet as trapezoids with large bases at the bottom (if the feet are turned straight)
- detail the feet and draw the toes


How to draw a person, a woman in clothes, in motion with a pencil?
When you have practiced a little and feel more confident, start drawing female figure in clothes in a static position or in motion.
In the first picture, a woman will be standing in a dress.
- Draw an oval for the head. Divide the oval into jagged left and right halves with a vertical line to determine the center of the face. Separate the oval in the upper and lower halves with a horizontal line to maintain the proportions of the face. Draw a horizontal line for the hairline. Divide the area below this into three equal parts. The first line below the hairline is for the eyebrows, and the next line shows the position of the tip of the nose. The ears will be located on either side of the head between the eyebrows and nose.
- Draw two small ovals - sketches of the ears. Use curved lines above and below the ears to outline the hairstyle. Add ovals for a hat sketch. Extend the curved lines below the hat for the neck and shoulders. Draw straight lines for the bodice. Use short flowing lines to form the chin, right elbow, wrist and ankles. Draw curved and wavy lines to outline the skirt.
- Draw the hair using shading. Add a slightly curved line below the edge of the hat. Outline the ears, eyes, mouth. Draw a V-shape for the neckline. Draw the straps of the sundress using straight lines. Detail the sundress - draw the bodice and folds on the skirt. Draw the woman's legs and the shoes on them. Draw bracelets on one or both of the woman's hands.
- Draw the eyes, mouth and nose. Detail the dress, add shadows. Erase the auxiliary lines.
 Woman in full-length clothing: steps 1-2.
 Woman in full-length clothing: steps 3-4.
  Woman in full length clothes in pencil.
 Now draw a woman in a pantsuit in motion.
- Draw a straight line, divide it into 8 identical segments - this makes it easier to maintain the proportions of the body. The head will be equal to the length of one of these segments.
- Draw an oval for the head, make markings on it for correct location eyes, nose and mouth.
- Draw the frame of the female body using straight lines, triangles and circles. Give him the desired pose.
- Using smooth lines, draw the contours of the woman’s body.
- Move on to drawing the clothes. Since it fits the figure, there is no need to add much volume.
- Draw the woman's face and hair.
- Draw a scarf on the woman’s neck.
- Detail the clothes. Draw folds and shadows on it.
- Draw shoes - sandals with heels. If desired, draw the woman's accessories, such as a bag.
- Erase all unnecessary lines with an eraser.


Hello, dear friends!
Today we have an interesting, simple and not boring topic. We will learn how to draw a person in motion using a very simple and reliable method.
Simple rule
“Everything ingenious is simple”, this proverb is perfect for characterizing the most accurate and correct method of constructing a human figure in motion. The essence of this method is that we initially begin to build a person from lines “stick, stick cucumber, it turned out to be a little man”, and then we add a certain body shape to this simplified skeleton.
Here's a simple example:
Stages of creating drawings of funny characters
Small clarification: the very first line on your sheet should reflect the pose, the action of the person(bending, tilting, posture). If necessary, guides for arms or legs can be added to this line.

Drawing a person in motion is interesting; there is always something to learn and something to strive for. Standing, sitting, moving, a person must maintain balance, balance the weight of his body so as not to fall.
There are two main centers of mass that have to be constantly balanced: mass of the torso and pelvis. The head is usually held straight, and the arms and legs help maintain balance and serve as supports.
Drawing a person's nose
To stand upright, people tilt their chest slightly back and their pelvis forward. This is especially clearly visible if you look at the figure in profile.
Now we need to define one term that will be useful to us today: Jugular fossa - This is a depression on the collarbone, it is marked with a red dot in further illustrations for this article. In fact, the jugular fossa is the center of gravity of the human body.
In a straight stance, everything is simple, the weight of the body is evenly distributed on both supports - the legs, and the jugular fossa is located directly above the fulcrum.

Pay attention to how the vertical line runs from the jugular fossa to the support when looking at the person in profile. It also divides the body mass into two equal parts, although in this position it is not as clearly visible as in the front view.
One leg stand
If a person stands leaning on only one leg, the center of gravity shifts to this support. The jugular fossa will be directly above the supporting leg. In this position, the mass is distributed differently, taking into account the fact that the supporting leg supports most body gravity.
Drawing a parrot

In drawings and paintings, there is often much more emphasis on the supporting leg, and much less emphasis on the other leg. Thus, emphasizing the support and balance of the figure.
Additional support
If you need to depict a person leaning on something, keep in mind that in this position center of gravity will be located between two supports.
For example, consider the figure below:

How to draw beautiful eyes
In a sitting position
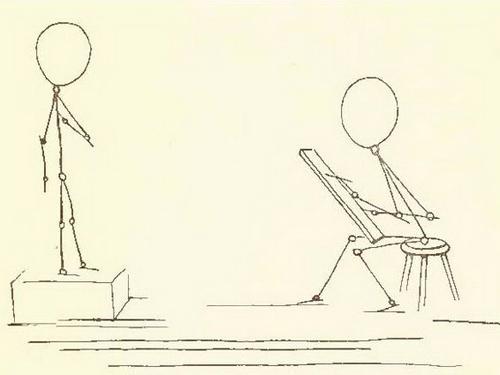
When a person sits, the main support point is the pelvis.

Let's look at the illustration, the support points are highlighted in green:
- To maintain balance while sitting and leaning forward, you need an additional point of support for your torso. For example, a table or elbows on your knees.
- If you want to lean back, you will have to lean on the back of a chair, sofa, or put your arms back, resting on your palms.
- Another example: while sitting, balance can be maintained with both hands, one stretched forward to the knee, the other back, instead of the back of the chair.
Loaded
A person carrying any additional weight must take such a position that the weight of his body and the load are in balance.
The reference point in this case will be located between the jugular fossa and the center of mass of the load, and will coincide with the supports (legs).
Let's look at the illustration: the center of gravity of the human body is marked in red, the center of gravity of the load in blue, the point of balance and support in green.

The heavier the burden, the more the person carrying it must bend. The person leans in the direction opposite to where his load is located.
In fact, there are a huge number of examples, these are the first and brightest that came to my mind.
Drawing a person's face
Body in motion
Walking
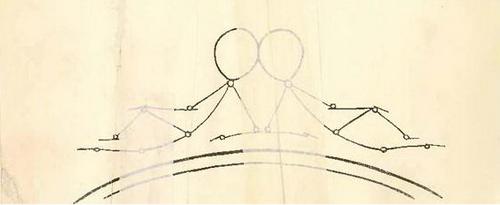
To describe walking in a simplified way, it is pumping from side to side, or a controlled fall. Hands in motion help maintain balance. Legs are supports that change alternately. When walking, the pelvis and chest tilt in opposite directions.

Run
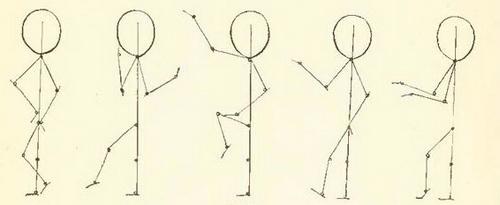
How to draw a running man? To create even greater dynamics of movement and run forward quickly, a person is forced to tilt his torso forward. Since the center of gravity (torso and jugular fossa) is tilted forward, a person can either fall or substitute support (leg). This is how we run, throwing our torso forward and placing our supports (legs), and our arms help us move faster with their movements.

In the illustration: the center of gravity is marked in red, the direction of movement is marked with a blue arrow, and the supporting leg is marked in green. The faster you need to move forward (run), the more you need to throw your center of gravity forward, the wider your step becomes, and the more sweeping your arm movements become.
Drawing a person's face in profile
Dynamic movement of the torso and arms
To create a drawing of a person in some pronounced dynamic movement, you need to subordinate the entire body of the character to this movement. In such cases, the center of gravity shifts greatly in the direction of movement, and the whole body must be placed on very reliable supports - legs widely spaced.
For example:

To balance when the torso and arms are very mobile, it is tedious to find a good point of support, but it is better to play it safe and stand confidently on both legs.
The dream of most people is to learn how to draw beautifully; doing it with a pencil requires special skill. To learn how to portray a person, that is, a portrait, you need to know a couple of techniques and gain experience. In general, there is no difficulty, the main thing is not to be lazy. Don’t be afraid to seem like a ridiculous student, you are just learning and striving for creative success.
How to learn to draw a person with a pencil step by step
When you start working on your hobby, you need to take a little theory into account. If you want to depict a person, you need to take into account and understand his proportions. Without following them, the drawing will turn out to be less realistic and funny. First, study a medium-sized figure, this will provide a base on which you can build proportions in the future. Use the head as a unit of measurement for the relative sizes of other body parts. For example, to make it more clear, the average height of the person depicted is seven or eight heads. A man, of course, has a different figure from a woman, and also, children have their own outlines, not similar to adults. But this is regarding general points, but in general, the proportions may not correspond to reality; in a pencil drawing, it is important to understand the mood of the person being portrayed, character and expression.

How to learn to draw a person with a pencil for beginners
If you are just learning to draw, this is not a problem; it is even interesting to start and discover something new for yourself. Try to perform movements in one line without fear of making a mistake. You can depict a person different ways, most suitable for a beginner in this matter, it is better to disassemble the drawing in parts. Probably many remember how at school, or in kindergarten taught to draw sticks, circles, connecting them together. This is partly correct to avoid severe distortion of real body parts.
- Build a rectangle on paper, and in the middle of it, draw a straight strip, slightly longer than the figure itself.

- Above the quadrangle, the oval shape of the shoulders, in the lower area, draw a dotted line for the future clothes.
- Now the oval of the head, try not to make it too small, and draw the neck below.
- All figures can be depicted carelessly for now, since they perform only an auxiliary function and will be removed later.
- Then draw a couple of circles in the area of the arms, legs, this is part of the elbows and knees.
- And now move your arms from your shoulders to the corresponding section of the leg with the knees.
- Actually, the outline of our little man is ready, all that remains is to carefully erase the auxiliary lines and give the most realistic look.
- An important part of the drawing is the person’s face and outline, not forgetting about the details and clothing. Draw folds of clothing and shadows in the direction of light. Namely, if it falls on the left, then a shadow is depicted on the right.
- All these actions are aimed at the primary technique of depicting a portrait; after you are as close to reality as possible, hone your skills in depicting people, move on to studying portraits of faces. It’s always easier to draw people, animals, landscapes by breaking down the actions into several steps. This technique is used not only by beginning artists, but also by experienced and confident ones.

How to learn to draw a person's face with a pencil
Having become familiar with the stages of depicting a full-length portrait of a person, his figure, and contour, you can move on to a more complex level. As with the physique, the face in a portrait is depicted in parts. If you want to draw only one face, not full-length, then immediately determine its location. To begin, take a well-sharpened thin pencil of medium hardness. This will make it easier to work with the sketches, and by the way, do not erase them until you are firmly convinced of the transition to thicker contours. When working with a portrait of a face, the most important thing is accuracy in proportions than with the body. The face is always slightly pointed at the bottom and more rounded at the top. And as with any hobby, practice, practice more. Focus on a specific person and hone your skills.

How to learn to draw a portrait of people with a pencil
For example, let’s take a girl’s face, her face shape is oval. In general, girls are always more interesting to draw; there is more expressiveness in the eyes and a variety of shapes. Everything, as usual, is drawn as an elongated circle, separated by dotted lines. The vertical one goes in the middle, and there should be several horizontal ones.

The first divides the face slightly lower than half, the second the other part. So that you understand, the meaning of these lines is to show the approximate location of the nose - a vertical line, eyes, lips - these are horizontal. But you can’t put too much pressure on the pencil; the outline will be erased as soon as you reach the proportionality of your face. Using light movements, draw the parts of the nose below the lips. Then the most important thing in a portrait is the element of sketching the mirror of the soul. Their location is slightly above the bridge of the nose, its outer edges indicate where they will go inner corners. There is one fact that perhaps not everyone knows, that the distance between the eyes is equal to the size of one eye. Consider the shape of the person being portrayed and try to get closer to it. You should start drawing eyebrows from the inside, the point closest to the nose. And accordingly, don’t forget about eyelashes. To make an even mouth, draw an auxiliary cone-shaped contour from the outer corners of the eyes to the area of the intended lips.
How to learn to draw a person with a pencil from scratch
Always use auxiliary lines; for an artist from scratch, their help is inevitable. Start with simple and banal drawings, everything comes with experience. If you decide to draw only people’s faces for now, in order to give them more specificity, remember about the cheekbones, the shape of the chin, and wrinkles. Always pay special attention to the part of the eyes; it is necessary to convey the person’s gaze, his emotions, and mood at the moment. To do this, you need to learn how to draw the general outlines of the eye structure:
- If you make a mistake with the shape of the eye, the resemblance to the painting will be lost. Therefore, try to determine the eye lines as accurately as possible.

- Afterwards, the pupils are drawn; they are always black, in the form of a small dot in the middle of the eye.
- From the pupil, for realism, draw small veins, two, three highlights, and slightly darken the upper part.
- Eyelashes are drawn on the upper eyelid thicker and longer, but slightly different sizes. Otherwise they will look like they have been pasted on.
Using a simple pencil, add shadows and blend them, this will give volume to the image and the illusion of movement, and the whole drawing is ready. Try to practice as often and as much as possible to hone your acquired skills.
Learning to draw with a pencil - video lessons
Drawing is a very labor-intensive process. For some it is easy, but for others it is difficult. The most difficult thing in drawing people is not a portrait at all, but an image in motion. on the move, you will find out right now. Displaying the correct body proportions on a piece of paper is not an easy task. To do this correctly, it is best to watch the person's actual movements or have someone pose for you in the desired position. The most difficult thing in drawing a person in motion is the position of his shoulders, neck, hands and feet. Drawing the correct placement of the knees and elbows can also be difficult. If at the moment it is not possible to observe the person’s movements in reality, try watching your movements in the mirror or turn on the video. You can also watch people on TV, especially if it is a sports channel.
in move?
Our recommendations will help you draw a person in motion step by step. Please pay close attention to every tip in this article.
Drawing a person's position with thin lines
The first step is to make sketches. Step back a few centimeters from the top, bottom and along the edges of the sheet so that the person you draw is strictly in the center. Draw a circle or oval where the head will be located. In the drawings presented by us, the sketches of the image of a person do not have shoulders. Pay attention to the last picture. It is better to indicate the position of the shoulders right away. The sketch lines should be barely visible; you will erase them later. It is enough that these lines are visible to you. Don't press too hard on the pencil.
The line coming from the head will reflect the position of the person’s body. The lines on the sides should follow the position of the hands. The bottom lines repeat the position of the legs. Pay attention to how your knees and elbows are bent in your sketches.
Drawing a person in motion
You can draw a person in motion with a pencil by making all the necessary sketches. Using them we begin to draw the smallest details, namely: the muscles of the foot, thighs, calves, head, shoulders, etc. The person should not turn out to be too thin, pay attention to this. Imagine that all the sketches are the skeleton of your person. The body line is the spine, and the remaining lines are the bones. Your task, roughly speaking, is to outline them with meat.
You can make additional sketches that will reflect the thickness of the person’s body and the position of his palms. It is better to indicate all the bends of the bones with large dots. Namely: in the shoulders, elbows, knees, hip area. The palm can be denoted by an oval, just like people in motion using sketches, you now know.
Next, begin to draw the entire human body. Draw the back, torso, muscles on the arms and legs, taking into account the actual parameters of the human body. Draw the palm and fingers. Don't forget about small details, such as the navel, collarbone and so on.

Drawing the head
We already have an idea, we need to familiarize ourselves with the information on how to depict a head. Whatever position a person is in, in order for him to look natural, it is necessary to draw his details. This is a rather complex question, because achieving a portrait likeness is not at all easy. However, we will try to give general recommendations.
If the head is positioned in profile and not in full face, then this causes certain difficulties for a novice artist. The fact is that drawing a face in profile is much more difficult. It is necessary to correctly draw the lines of the nose, chin, and forehead. It is important to have an idea of This will help to correctly draw all the details of the head. In some cases, it is quite possible to depict a face schematically without drawing every feature.
Coloring the drawing
A man in motion is drawn in pencil. All that remains is to add bright colors and give the picture a more animated look. Choose the right color to paint the person’s skin. If you use gouache, dilute several colors to a flesh tone; beige tones work well. When experimenting with choosing colors for human skin, mix white, brown and pink. Do not dilute paints or gouache big amount water, as this may warp the paper you were drawing on. To paint small details, use brushes with narrow bristles. The best option for painting are brushes made from natural wool.
All other details can be painted in any color you like. The main thing is to do this thoughtfully and carefully so as not to spoil the drawing.
We figured out how to draw people in motion. Your task is to make the most of the knowledge gained after reading this article. Develop your skills, be observant. All this will help you achieve success in the art of drawing with pencil and other media.

