DIY bunker feeder for chickens: how to make different designs. How to make a chicken feeder: drawings, dimensions, examples from wood, plastic bottles and pipes Feeders for laying hens at home
Reading time ≈ 15 minutes
Every summer resident should know that a do-it-yourself chicken feeder will be useful on the farm, and its production will not hit your pocket. We will present you photos and original ideas below, and the chickens will be satisfied with the product. After all, they provide a very important product from our diet - eggs. And their meat is also famous for its taste. And self-grown birds have not only tasty, but also healthy meat. Such a bird is unpretentious, but still, you will have to work hard on arranging a chicken coop for breeding it.
Homemade chicken feeder
In order for chickens to give a lot of eggs, you need to follow some rules for their maintenance. For example, they are very hectic birds, so place them in a quiet and peaceful place. Plus, proper nutrition is important. And to make it convenient and comfortable for them to eat, they need a feeder for chickens. Of course, buying such an item is not difficult. But such a purchase is not always possible due to the high cost of the product. Yes, and made personally will suit your requirements as much as possible. There may be many options. But let's talk about the most affordable and popular.
Experts distinguish three types of structures:
- tray feeder - consist of flat containers that have small sides. They are needed so that the birds do not scatter food. This option is best used for feeding small chickens;
- grooved feeder - another turntable is attached to the tray. It can be replaced with a restrictive grille that is easy to remove. Also, the tray itself can be divided into several compartments. This separation is convenient when feeding various kinds of feed. Often these types of products are taken out of the cage. So it's pretty easy to maintain them;
- bunker feeder - used for feeding dry feed. Such a design consists of a bunker in which it places enough feed or grain to provide a complete diet for a certain time (for example, a day) and a tray. Feed flows evenly into the tray, depending on how the feed is eaten. With this use, the food will always be clean and dry, because the hopper itself is securely closed.

Chicken feeding
Preparatory work
For making, you can take a variety of materials, including those that are easy to find in every yard. All available materials will do - boxes, wooden boards, pipes and even plastic bottles. But farmers will always be faced with the question of how to mix feed? After all, the use of several for individual feeds will take up a lot of free space. But everything is much simpler than it seems. This secret will be revealed a little later.

The location of the feeder on the street
The structure must cope with the main function - to deliver grain. For full functionality, it is necessary to properly prepare before the construction itself. The first step is to outline the parameters of the future design. The choice of location is also important. This is important for both indoor and outdoor feeders. The main criterion is the freedom of approach and access to food for each bird. It is important that during feeding, the chickens do not crowd and do not interfere. Therefore, when calculating the parameters, consider the number of animals.
When choosing an option for construction, do not forget about the right diet. The fact is that chickens should receive both dry and wet food (mash). The best option for dry food is a bunker feeder. It is most often made in a cylindrical shape, and grain replenishment occurs automatically. But for wet types of food, it is better to choose flute or tray feeders.
Of course, the construction of the tray and the bunker have different technologies and the use of materials will be different. But with today's tools, the process has become much easier. So even a beginner in this business can easily build a simple feeder on their own. The main thing is to follow the given recommendations. Consider the main options that are easy to execute and most popular among farmers. Detailed instructions for each type are included.
Important! When creating a structure for feeding chickens, you need to follow this principle: create maximum stability and the feed should not spill out of it. In case of non-compliance with this rule, there will be an extra waste of food and a lack of sanitation standards.
Option 1. Chopping board feeder
To get an unusual do-it-yourself chicken feeder, look at the photo. And this and other original ideas will help you create your own unique version. For equipment of this type of grain supply, you need to take the following materials and tools:
- cutting board;
- small plastic cup
- funnel;
- transparent rubber hose;
- electric drill.
The manufacture of the feeder is as follows.
- You need to take a plastic funnel and circle its outer contour on the board itself in the center.
- On the intended circle with an electric drill, make a lot of holes. But too much is not needed so that the feed comes in a little bit.
- The diameter of the hose must match the spout of the funnel. They need to be connected to each other. To make the connection as strong and reliable as possible, you can take suitable fastening elements (clamp).
- Closer to the bottom of the plastic container, you need to make a hole. Its size must match the hose so that it can enter and hold firmly.
- The free end of the rubber hose must be passed through the hole made in the cup. If the connection density is not enough, then use a sealant. Just apply it to the edges of the hole and the hose, or rather its outer part.
- After everything is dry, you need to attach the socket of the funnel to the board itself. Here also use sealant around the contour.
- The funnel should lie exactly along the contour made. Hold it until the sealant is completely dry.
- The hose must be connected at one end to a plastic cup, and at the other end to the spout of the funnel. It should be on the bottom side of the board. The feeder is ready!
Important: The feed will be supplied from the watering can through the hose into the cup itself. Pay special attention to the stability of such a feeder, because the birds will sit on the board and can turn it over.

Chopping board feeder
Option 2. Design based on plastic bottles
Many store water in case of a power outage or for other household needs. Storage most often takes place in affordable plastic containers. We can say that such containers already exist in every home. It is plastic bottles that can be taken as the basis for creating a bird feeder.

Finished product for feeding
The creation of such an option for feeding chickens involves the use of two containers and is carried out according to the following algorithm:
- You need to cut the bottle into two parts. After that, make holes at the bottom, how exactly to do this, look at the photo. The size of such holes should be made slightly larger than the head of the chicken. So they can easily slip it in and eat.
- In the second container, it is necessary to cut out the bottom and place it with the neck down so that it fits inside the cut made earlier. The result should be a small gap of a few centimeters between the bottom itself and the inserted neck.
- Grain is poured inside. From above it must be closed with something. The feeder is ready to use.

bottle cut in half
The only caveat is that if it rains or there are other adverse conditions outside, the feeder must be moved indoors. But if you use it in the room itself, then this type will be very successful.
Such a chicken feeder can also be built with your own hands, but from ordinary plastic bottles. So the whole structure will have smaller dimensions, as in the photo. But for feathered babies, there are other original ideas.

Chicken feeder
Option 3. Wooden feeder with drawings
The option below is very convenient, because you do not need to constantly monitor the amount of feed and add it. This is one of the varieties of the bunker feeder. How to make such a feeder, see below. The process is not difficult. The main thing is to follow the recommendations and the sequence of work.
To build a wooden feeder, you will need the following building materials and equipment:
- high strength plywood (pieces can be) or wooden canvas;
- drills and electric drill;
- hand saw or electric jigsaw;
- loops (pair);
- sandpaper;
- screwdriver;
- tape measure and marker.

Wooden variant drawing
- After you have decided on the drawing, you need to transfer the necessary markup of future parts to the tree. In our case, the parameters of the elements are as follows:
- bottom - 290 x 170 mm;
- side walls (2 pcs.) - height 400 mm, while the width of the upper edge is 240 mm, and the lower edge is 290 mm;
- front wall (rectangle - 2 pcs.) - 280 x 290 mm and 700 x 290 mm;
- back wall - 400 x 290 mm;
- cover - 260 x 290 mm.
- According to the drawn markup, it is necessary to cut out the details.
- Using an electric drill, make holes for fastening with fasteners.
- The entire surface must be treated with sandpaper. So you make the feeder not only smooth, but also safe for the birds themselves.
- Using screws, it is necessary to assemble the entire structure together. To fasten securely, you can use a screwdriver. When assembling, you need to position and attach the walls at an angle of 15 degrees.
- Using the hinges, install the cover to the side walls.

wooden feeder
- After that, it is worth treating the feeder with a special agent with an antiseptic effect.
It is worth refraining from using paints and varnishes, because this can scare away birds.
Important: The whole building has impressive dimensions, but at the same time very comfortable. With such a feeder, the grain will always be dry and clean. We can say that this option is an automatic feeder, because dry food will be fed gradually. Of the minuses, one can single out large labor costs. But the result will please you.
Option 4. Bunker-type feeder from a plastic bucket
Such a feeder also belongs to the category of automatic ones, because you almost do not have to intervene in the process of feeding your farm. It's pretty easy to make, so don't pay big bucks at the store and try to make it yourself.

Bunker feeder
Consumables for the construction:
- plastic bucket;
- animal bowl divided into sections.

sectional bowl
- Initially, you need to make holes in the bottom of the bucket for food to enter.
- Using self-tapping screws, you need to attach the bucket to the bowl.
- Pour dry food into the bucket to the top and close the lid.

Ready-made feeder from a plastic bucket
The undeniable advantage of this option is its versatility and simplicity. This feeder can be installed anywhere. It can even be hung up. The grain will flow as it is eaten. So that the excess will not spill out of the feeder, which ensures cleanliness in the yard or chicken coop. The feed supply is provided by pressure, which is formed from its own weight.

Hopper type feeder for small chickens
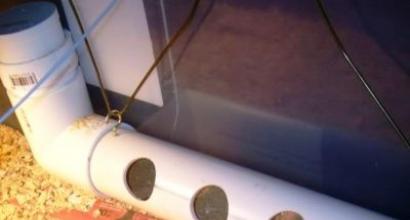
Option 5. Pipe feeders (PVC)
This type of product is quite simple to manufacture. And the cost of such construction is minimal. PVC pipes are very common and their price is low, so everyone can afford it. But, despite the simplicity, there are several design options for such feeders. Which one should you choose? Assess your actual conditions of keeping birds and their number.
Method 1. With the creation of cutouts.
For such a product you will need:
- PVC pipes (2 pcs.) 400 and 600 mm long;
- plug (2 pcs.);
- connection elbow.

Cut-out plastic pipe construction
The long pipe will have a horizontal arrangement. Its function is to directly feed the birds. A short plastic pipe will be installed in a vertical position. She will feed the feed into a horizontal pipe.
First you need to make holes in a long pipe. Often one large hole is made so that the chickens have full access to the feed.
- Take a pipe 600 mm long and mark the holes. Each has a diameter of 70 mm. Keep a distance of 7 cm between them. After that, you need to make holes in accordance with the markings. If the farm is large, then you can place holes on both sides of the pipe. So, more birds can come at a time. Also, the holes may not be round, but oval.
- The plug must be put on one end of the pipe.
- On the reverse side, you need to insert the pipe into the connecting elbow. And after that, another pipe is inserted into the knee.

Feeder inside the chicken coop
The feeder must be attached in the house so that it does not turn over. Fasteners are best placed in several places.
From above, you need to install another plug, after falling asleep food. This will prevent debris and dirt from getting into the grain. This design allows backfilling every couple of days.
Method 2. Using a tee.
In this case, you need to stock up on the following materials:
- plastic pipe (3 pcs.) 700, 200 and 100 mm long;
- plugs (2 pcs.);
- tee at 45 degrees.

PVC feeder with tee
- Put a cap on a 200 mm pipe. This pipe will be the bottom of the whole structure.
- On the other side of the same pipe, put on a tee. The side knee should look up.
- 100 mm pipe must be put on the third elbow of the installed tee.
- The longest pipe is installed in the free elbow of the tee.
The collection of the feeder is carried out according to the drawing

Drawing of a feeder with a tee
As with the option described above, the top of the feeder should always be capped to keep the food clean for the hens.
If you have planned to have chickens and have already built a chicken coop for them, then it's time to think about DIY chicken feeder.
It is very easy to make a chicken feeder with your own hands, since you can use a variety of materials to create it. Let's take a look at the most simple ways to make a chicken feeder with your own hands.
Where to start?
 Do-it-yourself chicken feeder make from anything. To do this, you can use boards, boxes, pipes and even plastic bottles.
However, regardless of the material chosen, there will be a problem - mixing the feed. If you make several feeders at once, they will take up a lot of space.
Despite this, there is still a way out of this situation, which will be discussed a little later.
Before you start making a chicken feeder with your own hands, you must first decide on the size And choice of location on which the future structure will stand. Regardless of whether the feeder will be in the chicken coop or on the street, it should be freely accessible. Hens or chicks must not interfere with each other while feeding.
In addition, do not forget that chickens need not only dry, but also wet food. For the first case, bunker feeders for chickens in the form of a cylinder, in which the feed is poured automatically, can be excellent. Best for wet food trough-shaped feeders, on top of which a turntable made of timber is installed.
 Of course, the process of making a do-it-yourself trough is different from the process of making a bunker feeder. There is also a significant difference in labor costs.
However, modern equipment and materials greatly simplify the process so that no difficulties arise.
Let's take a closer look at how you can make feeders for chickens or chickens with your own hands. from improvised materials.
DIY cutting board feeder
To make such an unusual chicken feeder you will need the following materials:
- Cutting board;
- Funnel;
- Small plastic cup;
- Rubber hose;
- Electric drill.
To make a cutting board feeder, follow these steps:
- The outer contours of the funnel must be circled on the board. Try to do everything as accurately as possible;
- Inside the resulting drawn circle, it is necessary to drill many holes with a drill. At the same time, it is important not to overdo it so that the feed supply is limited;
- Next, you need to take a pre-prepared transparent hose and connect it to the end of the funnel. If the hose does not fit tightly on the funnel, then you can use additional fasteners, for example, a clamp;
- Take a plastic cup and make a hole in the side at the very bottom with such a diameter that the end of the hose fits tightly into it and holds well in it;
- Take the other end of the hose and insert it into the hole. If the hose is not held tightly in the hole, then its edges and the outer surface of the hose must be treated with a sealant;
- After that, it is necessary to glue the socket of the funnel to the board. It is necessary to process the contour of the circle with a sealant;
- A funnel is superimposed on the circle and held in this position until the sealant is completely dry;
- Connect one end of the hose to the bowl and the other to the funnel that is glued to the board. The funnel should be at the bottom of the cutting board.
The chicken feeder is ready. You can add grain. It is worth paying attention to the fact that the board must be stable, as chickens or hens will sit on it.
 The bunker design can be considered automatic, since human participation in feeding chickens or hens will be minimal here.
Bunker feeder can be purchased ready-made in the store, but its cost will be rather big. The design can also be done with your own hands. The procedure for making a bunker feeder for chickens is very simple.
For the manufacture will need the following materials:
- plastic bucket;
- Sectional bowl for animals.
Step-by-step instructions for making a bunker feeder for chickens and hens:
- In the lower part of the plastic bucket, make small holes around the entire diameter in the amount of 6-7 pieces (depending on the number of sections in the bowl), through which the food will spill out;
- Attach the sectional bowl to the bottom of the plastic bucket with screws;
- Fill a plastic bucket with chicken or chick food and close the lid.
The main advantage of such a hopper feeder is that it can be installed almost anywhere. The convenience of this design lies in the fact that the food, as it is consumed, will automatically flow into the bowl under the influence of its own weight.
Do-it-yourself plastic bottle feeder
 Nowadays, water is often stored in plastic containers. Such containers, perhaps, can be found in every home and they can be used to make do-it-yourself chicken feeders.
Step-by-step instructions for making a feeder for chickens or hens from a plastic bottle:
- Cut a plastic bottle in half. In the lower half of the bottle, it is necessary to make vertical holes of such a size that a chicken head passes into it;
- Take the second bottle and cut the bottom in it, place it upside down inside the prepared cut. Thus, a few centimeters should remain between the neck and the bottom;
- Pour grain or other food inside and close the bottle with something on top.
The only disadvantage of this design is that it will have to be moved indoors during bad weather, and such a feeder is ideal for a chicken coop.
For chickens, you can make the same feeder, but smaller. At the same time, the manufacturing technology will remain the same.
 A chicken feeder can also be made independently and from ordinary boards. First you need to prepare the following improvised materials:
- Thick plywood or wood;
- Electric drill, drills;
- Loops, 2 pcs;
- Sandpaper;
- Saw;
- Screwdriver;
- Simple pencil;
- Roulette.
- First you need to create a drawing, which is then transferred to the tree. Dimensions of the necessary elements: bottom - 29x17 cm, sides - height 40 cm with an upper edge of 20 cm and a lower edge of 20 cm, front walls - 28x29 cm and 70x29 cm, top cover - 26x29 cm, back wall - 40x29 cm;
- After all the elements are transferred to the boards, they must be carefully cut;
- In some places, make holes for screws with a drill;
- All wood surfaces must be treated with sandpaper so that they are safe for chickens and chickens;
- Using screws and a screwdriver, connect all the cut out elements to each other into one structure. To achieve maximum density, you can use a clamp. It is worth paying attention to the fact that the back and front walls should be attached at an angle of 15 degrees;
- Using hinges, attach the cover to the back of the side walls;
- It is desirable to treat the finished structure with an antiseptic. It is strictly forbidden to use varnishes and paints.
The finished wood feeder is roomy and comfortable. At the same time, the feed is well protected from moisture and will be fed automatically. The only drawback of this design is the labor cost.
Also, using wooden boards or pieces of thick plywood, you can easily make feeders in the form of a small trough. This design will be convenient for those who have a large number of chickens and a canopy from the weather.
Necessary improvised materials:
- Pieces of boards or thick plywood;
- Hammer;
- Screws or nails;
- Saw;
- Simple pencil;
- Paper;
- Ruler.
Step by step instructions for making:
- First you need to make a drawing on paper, according to which the future design will be made. In this case, it is necessary to accurately determine all the elements, their dimensions and the places where the fasteners will be installed. This stage is the most responsible, so you should avoid mistakes and inconsistencies;
- The drawing is transferred to the tree. The dimensions of the elements should be as follows: bottom - 15x100 cm, side walls - 8x100 cm, beam - 2x3x100 cm, end walls 15 cm wide and equal to the height of the long side + bottom thickness. The most difficult stage in the manufacture of such a feeder is cutting out the end walls;
- Based on the drawn up drawing, it is necessary to cut out all the constituent elements. It is worth paying attention to the fact that the bottom should be quite thick and heavy so that the chickens cannot turn over the finished feeder. The height of the side walls should be comfortable for the birds;
- All cut out elements must be connected to each other so that there are no gaps, as food can spill out through them. The finished structure does not require additional processing.
The main advantage of such a feeder is its durability and strength. In addition, it can be used for both dry and wet food. The only drawback is that the design needs minimal maintenance.
A chicken feeder is one of the most important devices with which birds are provided with a uniform and constant supply of food and do not need the constant presence of a person. The feeder is a construction of a container for a supply of food and a container.
From it, chickens eat and drink water when they need it. They can be connected directly or through a pipe, hose.
The feeder for chickens must meet the following parameters:
- easy to use - easy to clean and disinfect, fill with food;
- should not have difficulty accessing food - there should be enough space for all birds;
- the feeder should have an adequate supply of food, preferably double (this applies only to dry food;
- should be suitable for the age characteristics of the bird and its breed;
- should be used rationally - the bird should not be able to scatter it or spoil it with excrement - for this, there should be sides, covers, turntables in the feeder.
What can you buy?
In specialized stores, you can buy simple or more complex designs. It all depends on the preferences of the owner, as well as on the number of chickens.
IMPORTANT! When choosing a feeder, be careful - the kit may not include a container for the supply of feed.
The simplest for 500-1500 rubles, modern devices cost at least 5-6 times more. But the latter will be equipped with a timer and a feed scatter function.
Such feeders are made from various materials: one made of ABS plastic will cost from 6,500 rubles, and made of powdered steel - already from 8,500 rubles.
Such models are much cheaper, but you will have to select the container yourself. Expensive ones may have a capacity of about 20 liters.
They provide proper and sufficient nutrition for a large number of chickens, but if there are few of them, such an adaptation will be a waste of money.
Pros and cons of homemade
You can make a chicken feeder yourself, because:
- It takes very little time and effort.
- Any improvised means can become for the feeder: trimmings of plastic pipes, buckets, bottles, pieces of wood or plywood, containers from CDs, and so on.
- Made feeders are always cheaper than store-bought counterparts - the materials used do not need to be bought specifically, you can choose from those that you already have.
- The device is easy to clean, so there will be less dirt in the chicken coop.
- They won't go hungry even if you have to leave them unattended for a week.
- You will be able to choose just such a shape and set of functions of the feeder that is right for you.
ATTENTION! Do not use glassware for feeders. They are convenient to clean, but such devices can be dangerous for chickens.
For self-production, all existing types are suitable.
There are homemade feeders and disadvantages:

Kinds
IMPORTANT! In the options below for designs from various improvised materials, process the holes with high quality so that the chickens do not get hurt.
Depending on the source material, there are types of feeders:

Photo


How to do?
Before making a feeder, answer a few questions - determine its size and location, what kind of food the birds will receive in it. When calculating the size, keep in mind that each should account for at least 10 cm of the width of the feeder if it is straight, or 2.5 cm when it is round. Think about how to secure the container in place.
The hens should not be able to knock it off, and you yourself should be able to easily remove it for cleaning or moving to a new place. The type of feed strongly influences the choice of design for the feeder.
REFERENCE! For a wet mash, do not use wooden feeders, as they will be difficult to clean. And for dry food, such as grains, they are considered an excellent option.
from wood
For a wooden feeder you will need the following tools and materials:
- thick plywood or wooden boards;
- suitable drills;
- screws;
- hacksaw;
- drawing marker or ruler.
You can make a wooden feeder in seven steps:

IMPORTANT! Do not use varnish or paint to cover the product, they can harm the chickens.
By changing the dimensions of the parts to larger or smaller according to your needs, you will get a feeder that is ideally suited to your poultry house.
The video clearly shows how easy it is to build a wooden chicken feeder.
two-storey
These large structures can be used for feeding both dry and wet food. For it, you will need wooden boards and plywood, self-tapping screws, a saw, hinges. A two-story feeder begins with the manufacture of the lower tier:

From cutting board:
To build the design of their cutting board, you need:
- cutting board;
- cup;
- funnel;
- with transparent walls;
- sealant with drills.
To make a cutting board structure, you need:
- Attach the funnel with the wide part to the board and circle with a pencil.
- Within the boundaries of the resulting circle, drill through holes in random order.
- Apply sealant along the contour of the pencil line and glue the funnel. Hold the funnel in place until the sealant sets.
- In a plastic cup at the bottom, drill a round hole large enough to fit the hose tightly into it.
- Assemble the feeder: put one end of the hose on the spout of the watering can, and thread the other through the hole on the cup. If there is a gap between the cup and the hose, fill it with sealant.
- Secure the board so the chickens can't knock it over.
Now you can use it.
suspended
 For a hanging board you will need a plastic bottle or bucket(read how to make a feeder from a plastic bottle). For example, from under milk, a knife and a rope for hanging. On the bottle, 5 cm from the bottom, a hole is made of such a size that the head of the chicken passes through.
A rope is tied to the neck and the finished structure is hung at a height convenient for the birds.
Also, a bunker feeder from a plastic bucket can act as a hanging one, if it is hung by the handle. From a plastic bucket. For a hanging feeder you will need:
- a bucket with a tight-fitting lid with a volume of 5 to 10 liters;
- a tray divided into sections, with a diameter of 20-30 cm more than a bucket;
- nuts.
How to make a hanging feeder:
- At the bottom of the plastic bucket, use a cutter to make semicircular holes 4-5 cm wide. Their number must match the number of sections on the pallet.
- Attach the bottom pan to the bucket with screws and nuts.
- Fill the product with food and cover with a lid.
IMPORTANT! To prevent food from stagnating in the center of the bucket, reinforce something cone-shaped inside, such as the cut off top of the bottle. Food will evenly pour over it.
From the canister
For the feeder from the canister you will need:
- plastic canister;
- wide pipe 10-15 cm high.
Instructions for making a feeder from a canister:

Video on how to make an excellent feeder for chickens from a canister.
From the CD case
For a CD container you will need:
- container;
- plate;
The procedure for making a feeder from compact discs:
- Clean and dry the container. In its lower part, make 3-4 holes 2 * 2 cm.
- Fill the container with food, cover with a bowl.
- Turn the structure over and put it in the right place.
The importance of proper feeding of laying hens
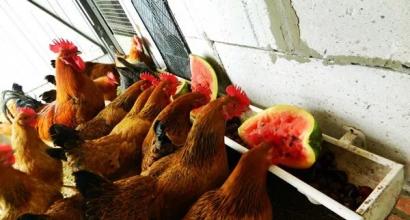
Health, activity, weight gain by chickens, the number of eggs they lay, the quality of meat - all this depends on the quality of feeding the bird. Animals should receive a complete diet in the proper amount, food in the feeder should not spoil. The bird should receive food without difficulty and not be injured at the same time.
Conclusion
There are many types of feeders on the market, but by making it yourself, you definitely won’t go wrong. You will not only make a design that will suit your number of chickens, but also save a lot.