Do-it-yourself pool at the dacha from scrap materials. How to make a pool from what you have
Long gone are the days when a swimming pool on a plot of land was considered a sign of luxury and prosperity. In the modern world, any family can afford such a water feature, regardless of financial resources and the size of the dacha. Older generations visited country estates with the aim of growing healthy vegetables and fruits; now these goals are fading into the background.
Dachas become a place of relaxation and pleasant time with family and friends. Accordingly, there is a desire to improve and decorate your site, to equip it with all possible benefits for a cozy and comfortable stay.


What is it needed for?
A swimming pool can be not only a delight for eyes strained by city landscapes, but also an excellent way to relieve fatigue and improve the health of the body as a whole. Water helps to calm down and relieve nervous tension, resulting in better sleep. After a swim in the mini-pool, a healthy appetite appears; the workouts involve almost all muscle groups, while minimizing the load on the musculoskeletal system.
In addition, an artificial pond is a good supply of water for watering the garden, of course, if chemicals are not used to clean it.
There will be more advantages than disadvantages from building a pool on the site, and some negative aspects, for example, material costs, can be reduced by building the structure on your own.

Selecting a location
In order for the pool to not only please the eye and relieve fatigue, but also require less maintenance, you should seriously consider the issue of choosing a place under the pond. First you need to decide which pool is suitable for your site. If you can be content with temporary structures, for example, an inflatable analogue or a frame one, choose a sunny place close to the water supply so as not to have to pull the hose to fill it.
If the size of the dacha allows, you can build a permanent pool. Of course, construction will take more time, but the satisfaction from the work done will be many times greater. In addition, inflatable and frame analogues have a significant drawback - even with the most careful handling, the former tend to tear, and the latter tend to decay.


So if your choice is a permanent pool, pay attention to its location. Choose a site away from both tall and short trees, because the roots of large plants are attracted to moisture and can damage the foundation of your structure. Not to mention that their crowns shade the place and interfere with the heating of the water. And small branches and leaves constantly fall from low ones, so cleaning will have to be done frequently.
For owners of clay plots, nature itself hints at building a swimming pool: clay does not allow water to pass through, which is very important in case of accidental damage to the base. The slope of the ground and the wind will help determine the location of the drain. It is better to arrange a pond along a constant wind direction, this will make it easier to keep it clean.

Materials
Human imagination knows no bounds. Country pools are made from all kinds of materials: from old tires to custom-made bowls. Some examples can be given.
Craftsmen use tires from large household and construction equipment. The tire should be washed and painted to your taste; the bottom should be made, for example, from an old rubber pool or poster. The base for a frame homemade pool is constructed from wooden pallets. The mesh is used as a material for the pit, and stones are laid on top of it. This option is suitable for a decorative pond as a decoration for the site.
Somebody even uses plastic bottles for construction, using them instead of bricks. Of course, you will need a lot of this material for a good pool. So this method will be used by those who have accumulated a lot of plastic. Or you can buy bottles in bulk.


Ponds for swimming are also built from concrete rings. The disadvantages of this construction are that the rings are heavy, meaning additional costs will be required for their delivery and installation. But such pools are distinguished by their strength and long service life.
Those who have chosen to build a stationary pool need to decide what raw materials to use for lining the inner bowl. It can be tiles or mosaics, polypropylene, PVC film or fiberglass.
It is important to mention that stationary pools can be divided according to the method of their installation into partially and completely in-ground. Making a pool using available materials is not at all difficult. It can also be built from building blocks. If, of course, you have the necessary skills in construction.


Preparatory work
The first thing to do when a place for a pool is chosen is to clean the area. It is necessary to remove debris and foreign structures that may interfere with construction. After this, all vegetation is removed from the site, any holes or depressions are removed and any unevenness is filled with earth or sand and compacted. Thus, the construction site is leveled.
Be sure to decide on the shape and size of the pool. Do you need space for swimming or will it be a family-friendly place with a splash pad for the kids? Depending on the purpose of the reservoir, determine its depth. Safe space for younger family members is limited to half a meter, the optimal depth for adults is at least one and a half meters, and for trampoline lovers it’s worth adding another meter.

Preparatory work includes developing a plan and creating a drawing of the pool. The plan must show the laid pipes, indicate the dimensions of the bowl and draw the placement of devices for moving and purifying water.
So, the location, shape and purpose of the pool have been determined. The area has been cleaned and prepared. You can start marking the area to create a pit for the bowl.
If you have a purchased container, or “bathtub” for the pool, you can mark the place along its edges. Turn the container over and place it in your favorite area. Mark the boundaries of the reservoir with stakes and rope. If there is no “bathtub”, measure the edges using a tape measure. Next we dig a pit.


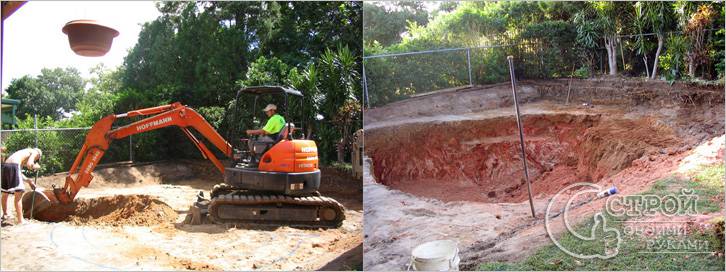
You can create a pit manually or using construction equipment (which, of course, will require additional material costs). Make sure that the walls are at a slope of at least 20 degrees. The size of the pit for the finished bowl should be larger in size.
The depth needs to be increased by several tens of centimeters (for example, 30) for waterproofing. Digging a pit is not at all difficult. When the foundation pit is ready, you can begin construction directly.


Manufacturing step by step
We offer for consideration the step-by-step production of several types of pools: a frame outdoor pool made of wooden pallets, a pond made of plastic (polypropylene or fiberglass) container and a monolithic concrete structure.
So, the cheapest option is a frame pool made of wooden pallets. The basic material can be purchased at construction bases or stores, or you can accumulate it in your barn. If you feel sorry for throwing away good pallets, but you can’t sell or give them away, feel free to put them to use.


Materials and tools you will need:
- PVC film;
- means that protect wood from decay processes;
- a pipe of the required diameter and length for draining water;
- shovels;
- buckets and basins for bulk materials;
- hammer, screwdriver;
- hacksaw;
- sandpaper;
- plane;
- roulette.

So, all the necessary preparations are completed, you can begin construction:
- Walk over the wooden blanks a couple of times with impregnation agents (antiseptic or antifungal solution)
- Pallets allow you to choose the shape of the pool depending on their location. Based on this, dig a niche up to 30 centimeters deep; along the perimeter, the hole should be slightly wider than the perimeter of the pallets.
- Place crushed stone or small stone at the bottom to a height of 15 centimeters and distribute it evenly.
- Inside the pit, assemble a base from pallets. To connect wooden equipment, use self-tapping screws, small boards or corners.


- If necessary, make a hole for the drain pipe and insert it with the drain facing out.
- Secure the structure with tie straps.
- Wedges in the form of bars will provide additional strength. Drive them outside the pool at a distance of 40 centimeters from each other.
- Pour cement 10-15 centimeters high inside the frame and level it.


- After pouring the concrete, leave it for two weeks. Once done, cover the inside with PVC film and secure it over the top edge of the pool.
- You can make the cladding based on your preferences, for example, using PVC panels or other materials that are resistant to getting wet.
- Remember that the concrete will dry completely only in a month, so postpone the ceremonial filling of the reservoir until then.
The next type of composite pool requires more careful and labor-intensive work, but it is much more like the beautiful pictures from glossy magazines.
Let's consider two options for installing a plastic bowl: using wooden formwork and strengthening the sides with cement.


Installation of formwork:
- As in the previous case, it all starts with digging a pit. Dig a hole of the required depth, around the perimeter larger than the width of the formwork boards.
- You need to fill in a drainage layer of sand and level it. To make the bottom more dense, it is recommended to fill the sand with water.
- While the water dries, assemble boards from boards to the size of the pit. Be sure to treat wooden parts with an antiseptic.
- Lower and install wooden walls in the hole.
- Place the PVC bowl inside the wooden rig.
- If there are gaps between the shields and the earthen walls, they must be filled with earth and compacted thoroughly.
- Compact the soil around the pool. Next, you can safely fill your man-made pond with water.


Strengthening the bowl with cement:
- Dig a pit, following the same rules as used in previous cases.
- Strengthen the bottom with a concrete base up to 20 centimeters thick.
- Prop the container from the inside and partially fill it with water.
- After this, pour cement between the bowl and the ground.
- A month after the concrete has completely hardened, you can refine the edges of the pool.

If you want to have a solid and durable water feature in your garden plot, and are also patient and full of energy, start building a monolithic concrete pool:
- Carrying out preparatory work: drawing up a plan, cleaning the site, marking the territory, digging a pit.
- Place a drainage layer of crushed stone, gravel, small stone and sand at the bottom. The layers of stone and sand must be equal in thickness and at least 15 centimeters. Carefully level each layer.
- Spread two layers of roofing felt on top of the waterproofing. Its edges should extend to the surface no less than 20 centimeters.
- Build in the necessary structures for draining water.
- Make a sheathing of reinforcement over the roofing felt.

- After this, proceed to concreting. The ideal option is to pour concrete at once. But for an inexperienced master this is too labor-intensive a task. Therefore, first fill the bottom with a slight slope of a couple of degrees towards the drain hole.
- When the pool floor has hardened, proceed to the walls. Make the formwork at a distance of at least 40 centimeters from the earthen walls.
- If you decide to fill the pool in two approaches, remember that the reinforcement should also be done twice. The second layer of reinforcement is laid to strengthen the vertical and horizontal parts of the reservoir, that is, the bottom and walls.
- Treat the concrete surface with waterproofing material. If the walls are uneven, plaster them. Be sure to use reinforcing mesh for this.
- Finish the inside of the pool. To do this, you can use PVC film, mosaic or tile. The decorative layer will serve as another protection for concrete from the destructive effects of water.

Water purification system
One of the factors that stops a person from building a pool on the site is that the container itself and the water have to be cleaned at certain intervals. It is important to note that modern technologies can significantly simplify this process, so you should not deny yourself the pleasure of soaking up some refreshing water on a hot summer day and dismiss the idea of beautifying your summer cottage with an attractive body of water.
Pollution can be divided into two types: material and bacterial. An open-air pool will not avoid small debris or garden accessories from getting into it. But even a roof over it does not guarantee its crystal purity. The entry of bacteria and microbes into the water provokes flowering and the appearance of a slippery coating., such oily stains on the surface, not to mention the unpleasant musty stench or rotting smell from natural debris. If you heat such water, the smell will be even worse.
A cover, if we are talking about small bodies of water, or a film that can be spread over the surface when the pool is not in use can protect a country pool from leaves and other objects.


Using a net, the pool should be cleaned of debris daily or once at a time convenient for the owner. If an unpleasant coating forms on the walls, use a brush. However, these actions will not protect against the influence of small organisms, so water should be purified in other ways.
It is best to completely change the water every 1-2 weeks. To avoid wasting precious liquid, you can water your garden with warm water. This product is good for small pools that fill and warm up quickly.

For large containers, other methods are used: filters, electrophysical disinfection and chemical treatment.
Filters can be divided into three types: sand, cartridge and diatomite. The latter use several layers of cleaning and are able to clean the pool down to the smallest particles. Cartridge ones are often placed in medium-sized containers, while sand ones, working on the basis of coarse sand, remove contaminants up to 20 microns.

Electrophysical purification is the use of ozonizer devices and systems that saturate water with silver ions. In addition, this also includes ultraviolet equipment that disinfects the water, ridding it of germs and mold.
Pool owners do not like to resort to chemical cleaning due to the high risk of drug overdose. It requires care and scrupulousness. However Chlorine perfectly disinfects water and helps get rid of blooms., despite the fact that large amounts of it can lead to poisoning and damage to the skin and mucous membranes. Bromine reagents have a low odor, unlike chlorine. Active oxygen is the safest and at the same time effective cleaning agent from a number of chemicals. It is added to the water after filling the pool according to the instructions, based on the total volume of liquid.

Finishing
Finishing a pool is a matter of taste, and sometimes financial capabilities. You can use PVC film, mosaic tiles on a mesh, just tiles and special acrylic paint with added color. It should be remembered that when gluing mosaics you need to use glue that can withstand temperature changes.
Mosaics or tiles that are laid with glue serve as an additional means of protecting the pool walls from moisture. Water bends the walls of the pool with its weight, so laying the tiles should be done with some difference from the classical method. A little more distance is left between the tiles in order to avoid deformation and cracks in the material.
A swimming pool at the dacha is a great opportunity to take a swim on a hot summer day after hard work in the garden, and for the kids it will be just paradise. But it is not always possible to buy an expensive plastic or inflatable pool. You can make a small pool with your own hands simply from scrap materials such as tires, pallets, containers, bathtubs that you can find in your yard or you can get them completely free.
Available materials: advantages and disadvantages
There is a large number of different materials from which you can make yourself in a short time a comfortable country pool, where not only children, but also their parents can splash in the summer. And for this you will not need to spend a lot of money and purchase expensive tools, as in the case of building a stationary concrete pool.
From tires
If you have the opportunity to find or ask your friend a tractor driver for an old unnecessary tire, then you can make an excellent pool at your dacha in which all family members can swim.
The old tire will serve as the frame (sides) for the pool, and the bottom will need to be filled with concrete, about 15 centimeters thick. It is necessary to pour concrete not only inside, but also outside for more waterproofing. It will also be necessary to install a tap to drain the water and provide a cleaning facility (filter) for the pool. In a week you will be able to use this pool without any problems.
But there are both advantages and disadvantages of this material for constructing a pool.
| Advantages of pool tires | Disadvantages of pool tires |
| There is no need to look for materials to construct the sides | Small size. Adults will not be able to swim or dive |
| The round and waterproof tire is a ready-made container | You can only swim in a sitting position |
| A thick layer of rubber will reliably hold water | Suitable for only one or two adults and a maximum of three children |
| The rubber frame can be easily decorated (painted, covered with stone or tiles) | Often the specific smell of rubber and machine oils remains for a long time |
| Not afraid of water pressure | |
| High degree of reliability and durability |
From wooden pallets
Wooden pallets have long been used to make garden furniture and can now be used to build a swimming pool. Their sizes and shapes allow the construction of walls (sides) for a reservoir. In order to make a good round structure, you will need to take 9 pallets. Then the pool can freely accommodate about 6 people.
| Advantages | Flaws |
| High sides allow you to fill the pool with more water | The wooden structure requires additional reinforcement with textile tie straps or stops |
| Climbing ladder and slide can be installed | The pool must be covered with facing material |
| There is no need to dig a deep round pit | The wooden frame must be treated with antiseptics and antifungal agents |
| Easy to install and dismantle if necessary | Before adding water, regularly check the integrity of the trays and tighten the belts |
| Wood is an environmentally friendly material | |
| Easy to replace any section |
From plastic bottles
Plastic bottles have long been a popular building material for summer residents. These are convenient and practical products from which you can build a fairly high and strong round, oval, square or rectangular pool wall structure using cement mortar.
Meanwhile, there are a number of advantages and disadvantages of plastic bottles as a material for constructing a swimming pool.
From a cast iron bath
Very often, when making renovations in an apartment, we throw away old cast iron or steel bathtubs, which can now be useful in the country and not only for collecting rainwater. From such a bathroom you can make a small pool for children who can splash in warm water while relaxing in the country. To build such a pool, you only need the bathtub itself, a certain amount of sand and decorative finishing materials at hand.
From the container
If you have an empty container at your dacha in which you previously stored your tools, now it can easily become a beautiful and deep pool. But if you decide to make such a pond at your dacha, and the container is not available, then you can always purchase it at an affordable price from a shipping company.
| Advantages | Flaws |
| Affordable price | Metal is susceptible to corrosion (if improperly processed) |
| Minimum costs and time for construction | The need for waterproofing |
| Long service life of metal structure | Difficulty in transporting a large container |
| Does not deform during the entire period of operation | Attracting additional labor |
| Can withstand high water pressure | Additional costs for materials |
| Minimum costs for excavation work (a shallow pit will be required) | |
| Easy to insert communications (all pipes can be connected to the frame without welding) | |
| Mobility and ease of use (can be easily dismantled if necessary) | |
| Withstands high water pressure | |
| Large degree of spaciousness |
From reinforced concrete rings
Reinforced concrete rings, from which wells are constructed, and sewer systems are perfect for constructing a small pool on a personal plot. The height of the standard ring is 90 cm, so the depth of the pool will be quite sufficient for children and adults, and the maximum diameter is 2 meters. The round ring is already a ready-made structure for the pool walls, but in order to create a leak-proof reservoir, you will need to additionally purchase geotextiles, concrete mortar and sand.
From gabions
Gabions are stones placed in a special metal mesh. Since the mesh can have a variety of geometric shapes, the pool can be made according to your wishes. Such a pool will look great on a personal plot and, moreover, will not require additional decoration.
How to make a pool from a tire with your own hands
Calculation of required materials
In order to make a sufficiently voluminous pool from a tire, we recommend paying attention to Belaz truck tires. The diameter of this tire ranges from 1.62 to 3.575 meters, and the width from 49.8 to 114 centimeters. If you need to choose the right size, you can use a special table.
- In order to find out the volume of the future pool, we need to make some simple calculations using the formula V=π·r 2 ·h, where V denotes the volume of a round reservoir; the number π is a constant that is equal to 3.14; r - radius of the circle; h - tire height. We need to find out the radius of the circle. To do this, we divide the diameter value by two: 3.575:2 = 1.7875 mm.
- Then we substitute our numbers and get the volume of the structure: 3.14 x 1.7875 2 x 1.149 = 11.4371 m 3. We get a round number of 11.438 m 3.
- In order to make the base of the pool, we will need to purchase sand and cement mortar. The sand cushion and concrete bottom must be at least 15 cm thick, so we need to calculate the amount of these materials.
- Sand: 3.14x3.1951x0.15=1.504 m3. We will need a little more cement mortar, so we need to add 2 more buckets to this volume.
As a finishing material, we can take oil paint of various colors, which we will use to paint the outer frame of the pool. Or you can decorate it with small natural stones.
List of tools
- A good, sharp, large knife (preferably a hunting knife).
- Shovels and bayonet.
- Large containers for cement mortar, sand and water.
- Concrete mixer (or a special construction container for preparing concrete mortar).
- Level.
- A tape measure of at least 5 meters.
Stages of work
- Using a knife, we make a deep cut on one side of the tire. And in order for us to get an even cut, we need to walk the knife exactly along the marked circles of the tire. We do not recommend using a grinder, since during operation the rubber will melt and stick to the cutting wheel, and it will also crumble badly.
- We determine a place for the pool and clear it well. We remove unnecessary plants and debris, and then pour a layer of sand and compact it well. You can moisten the sand a little and then it will keep its shape. We need to make a layer of sand of 15 centimeters so that the diameter of the pillow is 15–20 centimeters larger than the diameter of the tire.
- We pour the prepared concrete solution on top of the pillow to create a layer of about 15 centimeters. We place a tire on top of the solution and pour two buckets of solution inside it.
- We now leave our pool for about a week to allow the concrete to harden well.
- After this, we can take waterproof paint and paint the inside (walls) of the pool so that they are not black, but, for example, blue, turquoise or green to match the color of the water. We can decorate the outer walls of the tire to suit our taste: paint it with oil paint, cover it with pieces of broken tiles like a mosaic, cover it with small stones, etc.
How and what to paint
If you decide to paint a tire pool, you can use nitro paint, enamel, oil paint or aerosol for painting cars.
Video: how to make a pool from a large tire
Such a pool does not require special operating conditions, since truck tires are designed to operate even in the most severe weather conditions and at any temperature. Therefore, the pool will serve you for many years.
Periodically, its inner and outer parts, as well as the bottom, will have to be repainted, since even the most waterproof paint will eventually begin to crack and peel.
Construction of a reservoir from pallets (pallets)
Calculation of required materials
Pallets will be an excellent solution for a country pool. From these we will build the walls of the structure and the more pallets we take, the larger and rounder our pool will be.
- In order to calculate the volume of a reservoir, we will use the mathematical formula S=A
2 -a 2, where "A" is the side of the square that contains the octagon, and "a" is the side of the octagon. Therefore, “a” will be 1.2 meters long for the side of the pallet.
- First, we find the value of “A” using the formula below:
- The result from the root is 1.41421356. Next, using this formula we find the fraction and it turns out to be 0.8485281. Then we substitute our numbers into the formula to calculate side “A”: 1.2 + 2x0.8485281 = 2.8970562 m.
- We calculate the area of the structure: S=A 2 -a 2 and we get 2.8970562 2 – 1.2 2 =8.3929346–1.44=6.9529346m2. Now we round up our figure and get 6.95 m 2.
- Having all the values, we calculate the volume of the pool using the formula V=S base xh, where “h” is the height of the structure, which is 0.9 meters. We get 6.95x0.9 = 6.255 m3.
Tools
- Large shovels of various types.
- Big hammer.
- Electric or cordless screwdriver.
- Concrete mixer.
- Buckets for sand, water and concrete.
- Gravel or crushed stone (the amount is calculated based on the diameter of the pool).
- Electric jigsaw.
- Sander or sandpaper.
- Minimum 10 meter tape measure.
- Stakes and strong cord.
- Square.
- Rule (level) and plumb.
- Marker or pencil.
- Large pliers.
- Wood planer.
- Hardware.
Stages of work
- First, we treat all pallets with antiseptic and antifungal agents and special impregnations, since the wood will be in close proximity to water.
- For the pool sections we take 120x90 cm pallets. From them we will create an octagonal-shaped structure.
- Using shovels, we dig a round pit so that our diameter is slightly larger than the size of the future reservoir.
- We level the bottom of the hole well and fill it with crushed stone or gravel - a layer of 20 centimeters.
- Inside the pit we assemble a frame from pallets (8 pieces). Before this, we lay thick polyethylene at the bottom of the pit. We place the pallets as a solid part inside the structure.
- We connect all the elements with boards that are nailed or screwed along the perimeter of the sides of the frame. We reinforce the joints with wooden blocks using a screwdriver and self-tapping screws.
- We make holes in the frame of the required diameter to install a good drainage system.
- After assembling the entire frame, we must firmly secure it with two secure tie straps in a circle at the top and bottom of the pool.
- We insert plastic pipes into the holes prepared in advance for supplying and draining water.
- In order to further strengthen our frame, we drive wooden pegs into the distance between the pallets and the walls of the pit.
- We fill the bottom of the pool with 10 mm of concrete solution and leave it for 5–7 days for it to completely harden.
- After the concrete has dried, we begin waterproofing work. To do this, we take a thick polyethylene film and lay it over the entire inner surface of the pool. We secure it with tape to the sides.
- We can decorate the outer sides of the pool frame with OSB, chipboard or fiberboard, as they will help hide all the unaesthetic elements of the pallet fastenings. You can also quickly and inexpensively decorate the frame with ordinary rolls of reeds, bamboo, etc. fastened together.
Video: DIY pool made from pallets
Nuances of care and operation
It is necessary to carefully care for such a pool. Regularly check the plastic film for cuts or other damage that could allow water to leak through. Over time, even a small leak from a small hole will damage the wooden frame (mold, rot will appear, the wood will swell, etc.).
Periodically, you will need to drain the water and thoroughly wash the pool of sand, dirt and other debris. If you don't have good filters, you will have to change the water often, and this is very expensive, so it is best to purchase a good water purification device once. You can even use a homemade sand filter, which is the most common among summer residents who make their own pools.
Also, once a year or several years, if necessary, it will be necessary to re-treat the wooden parts of the pool with special impregnations.
Swimming pool at the dacha made of PVC bottles
Calculation of materials
Plastic bottles have already become an almost integral attribute of summer residents, as they use them to make many different items for their summer cottage: furniture, fences for flower beds and front gardens, hotbeds and greenhouses, including swimming pools.

Tools for work
- Shovels (you can order a small excavator).
- Electric screwdriver.
- Concrete mixer.
- Bucket for garbage, water and solution.
- Minimum 10 meter tape measure.
- Pegs and strong cord.
- Large corner.
- Level (rule) and plumb.
- Marker or pencil.
- Hardware (nails and screws).
Construction stages
- We choose a flat area and clear it well. Such a pool will stand perfectly on a slab foundation.
- We dig a flat pit measuring 4x2 meters and 15 centimeters deep.
- We level the bottom of the pit and compact it well. We pour sand (slightly moistened) on top and distribute it evenly around the entire perimeter, and then compress it to a layer of 15 cm. We also fill in a small layer of gravel.
- We make formwork from wide boards, and to prevent the frame from falling apart, we hammer wedges into the ground from the outer sides.
- We make a lattice from reinforcement (diameter 8 mm) in order to strengthen the base. We tighten the connecting points of the rods with wire. The grid cell is approximately 10x10 cm, and its area is 8 square meters.
- We lay such a frame made of reinforcement on the bottom so that it does not come into contact with the sand. And for this we install a small support made of broken bricks. And then we put the frame on top.
- We supply the necessary pipes for supplying and draining water.
- We pour the concrete solution and level it well with a special tool (a rule or just a flat board).
- Let the solution harden for 5–7 days.
- Then we move on to laying walls from PVC bottles and for this we mark out the geometry of the pool.
- We fill each bottle with sand and screw on the lid. Then we apply a wide strip of solution to the marking.
- From reinforcement (diameter 0.3 mm) we make a frame that will serve as a connecting element between rows of plastic bottles.
- We place the bottles very tightly next to each other on the cement mortar, and fill the resulting gaps between them with cement. After we have laid the first row, we fill it with cement and lay a frame of reinforcement.
- We remove the formwork and begin masonry with bottles until we have a wall of the required height. If our pool is round, then in the center of the structure we install a homemade compass in the form of a metal pin with a horizontal crossbar, which will help you not deviate from the radius.
- We leave our walls for 5-7 days so that the cement mortar is completely dry. After this we begin to plaster the walls. We cover the inner surface of the pool with bitumen as waterproofing.
- Next we begin finishing work. We take a plastic film, which is necessary for arranging the interior of the pool. We lay it well, stretch it, cut off the excess, and weld the joints and carefully treat them with special glue or sealant.
- Now you can decorate the area around the pool at your own discretion.
Care and operation
In order to keep the water in the pool clean, it is necessary to install appropriate filters.
Who among the owners of dachas or country cottages does not dream of having their own swimming pool on the site? And don’t think that this is an extremely expensive structure that requires a lot of effort during construction and operation. With minimal skills in working with building materials and some expenses, you can build an inexpensive pool.
In this article we will tell you how to make a pool at your dacha with your own hands from various materials (concrete, frame, film), and also demonstrate video and photos.
Pools may vary. For some, an inflatable container installed in a suitable place and filled with water from a hose will be enough. If you want to build a solid stationary reservoir that can last for many years, you will have to work.
First of all, you need to choose a suitable location. It should be kept away from beds and trees. The less debris that falls into the water, the less maintenance effort will be required. In addition, you need to think about the water supply and drainage. It is better to choose a simple shape of the pool, without sharp corners: in the form of an oval, circle, square or rectangle.
The simplest and cheapest way to install a pool is to cover the hole in the ground with a special film. However, this structure cannot be called reliable and durable. More often, owners prefer to build pools from concrete or polymer materials.
A frame pool is considered a fairly simple structure, quite suitable for independent construction. Its peculiarity is its design, which consists of a frame “skeleton” made of metal pipes. The bowl is lined with three layers of PVC film. Inside it has a special mesh made of nylon, which gives the material additional tensile strength. The metal frame holds the water pressure.
It is placed with some depression in the ground or simply on the surface. The area for the pool must be prepared: remove all vegetation, and level the bottom of the shallow pit and fill it with sand or gravel. In some cases, even a concrete pad is poured.
Then the entire surface is lined with heat and waterproofing. Penofol or folitep are best suited here. These are modern thermal insulation materials made of foamed polyethylene covered with aluminum foil. The mats are laid end to end and the seams are taped with construction tape.
After this, the pool itself is assembled according to the instructions included with the kit. The only necessary tool for the job is a screwdriver.
Concrete
When constructing a concrete pool, work also begins with digging a pit. In this case, the entire bowl is sunk into the ground. When calculating the dimensions of the pit, do not forget to add approximately 0.4 m to the wall thickness. The shape of the pit should follow the contours of the pool itself. The optimal depth can be considered 1.4 m. To make the recess as reliable as possible, its walls need to be given a slight slope to the outer sides, about 5°.

The finished pit of the desired shape must be carefully leveled, the soil compacted and a sand cushion about 30 cm thick laid on the bottom. Then the pool is waterproofed, everything is covered with a waterproofing material (roofing felt with bitumen mastic) in several layers and the formwork is installed. Liquid concrete is poured into the gap between the wooden panels and the earthen wall. Additionally, the walls are reinforced with double metal mesh. It simultaneously counteracts the water pressure in the pool and the ground pressure.

Note! Concrete grade – no less than M350.
The bottom of the future pool is also reinforced with mesh and filled with a layer of concrete of at least 20 cm. When the solution hardens, the formwork is removed and the entire surface is rubbed with “cement laitance” - a liquid solution of cement and water without adding sand. This process is also called ironing. It allows you to remove microcracks on the frozen surface and prevent their occurrence in the future.

At the final stage, the walls and floor of the pool bowl are finished with a decorative coating. Usually these are ceramic tiles. However, it is first necessary to install a ladder, nozzles, waterfalls and underwater lights, equipment that makes it easier to maintain the pool.
We invite you to see a photo report of the construction of a concrete pool:


Film pool

Due to its versatility of use, PVC film is widely used for arranging swimming pools. It is used:
- to create a pool in the ground;
- for arranging frame pools;
- for sealing the concrete base of the pool bowl;
- as a repair kit for an old pool.
Note! PVC film has a thickness of 0.5–2 mm. The thinnest one is suitable only for small pools with minimal load. It is best to use a film no thinner than 1.5 mm with a reinforcing layer of fabric.
Pool in the ground

If you want to make a pool quickly and relatively inexpensively, then in this case you can dig a pit with gently sloping walls, which will be the base of the pool. Carefully remove plant roots and compact the soil. Make sure that there are no sharp stones left anywhere, as they can damage the canvas.
The entire bottom of the pool is covered with sifted sand, in a layer of at least 3 cm, and leveled. You can lay a layer of mineral wool as a thermal insulation material, but it is better to spread roofing felt, as it is not afraid of moisture. Spread a non-woven cloth over this cake and only then a film. After this, you can weld the seams.
Note! Before you start welding the seams, you need to practice on scraps of material so as not to spoil the fabric intended for sealing the pool.
In order to secure the edges of the sheet, you can use a special mounting angle to which the film is welded. A simpler option is to dig in the edges of the film. In this case, a decorative stone edging is often made around the pool.
Concrete pool

We will not dwell in detail on creating the design of the pool itself - it should be a reinforced container. The main advantage of using PVC film is that it does not require waterproofing. If the surface is not perfectly smooth, then it would be correct to use a substrate, which can be geotextiles or the same roofing felt. The actions with the film are similar when arranging a pool in the ground.
All that remains is to choose a method for attaching the film to the edges of the pool (it is better if it is a special mounting corner) and you can use the product.
Repairing an old swimming pool

It is no secret that a permanent pool can lose its tightness or even crack over time. If the crack is constantly expanding, then no sealing, even applying liquid rubber, will help. In this case, you can, just like for a concrete pool, use PVC film, having previously sealed the cracks and leveled the base.
Polypropylene
A polypropylene pool also requires a pit and pouring a concrete bowl. The polymer allows you to solve the main problem when constructing swimming pools - providing reliable waterproofing. Polypropylene is an extremely durable material and can take any shape. Pools from it are made in two ways:
- buy a ready-made bowl of the desired size and shape;
- sheet polypropylene is purchased and a bowl is made from it.
Note! The cost of both methods is approximately the same.
Welding of sheets is carried out using a thermal welding machine - an extruder.

After installing the polypropylene bowl and installing all communications, concrete is poured on top again and decorative material is laid.
It is polypropylene pools that are most suitable for installation in a summer cottage. They are not afraid of temperature changes and weather vagaries.
Video
The full range of work on installing a polypropylene pool is presented below:
See how PVC film for swimming pools is welded:
Photo
Below in the photo you can see various options for the construction and design of a pool:


Spring has come, and all our thoughts are about the dacha, country house and garden plot. I don't want to spend the summer in a stuffy city. And I also don’t want to fry in the sun without a pond near the dacha. Thoughts arise about how nice it would be to have your own pool at the dacha, so as not to waste time traveling to the nearest body of water. It has long been known that swimming pools on private plots are not some kind of luxury or something very expensive. Therefore, owners of country real estate are reasonably thinking about how to make a swimming pool at their dacha with their own hands, in order to save money and provide themselves with a good summer vacation. In addition, you can consider a number of budget options for ready-made pools, which, as a rule, require installation and assembly in the autumn. Therefore, it is still more convenient to have your own pond near a country house. Are you planning a pool at your dacha? Find out how to inexpensively make a swimming pool at your dacha with your own hands.
Cost of ready-made pool options:
Before you start building a homemade pool at your dacha, you need to decide what kind of reservoir you need:
- Form;
- Its location;
- Seasonal or permanent;
- Design in accordance with the site and buildings;
- Volume, depth.
To do this, you need to know that all pools are divided:
- Stationary;
- Portable.
If you want reliable swimming pools for your dacha that will last for years, then one that should fit harmoniously into your garden plot and delight you not only during the hot summer, but all year round. , is a temporary option, then you can easily purchase such a pool at any specialized store, and in the fall you can simply dismantle it and put it away in the basement or garage.
If you continue to worry about the question, how to make and build a swimming pool at the dacha , then you should know that all country pools are divided into main groups:
- Frame;
- Pit pits.
If you need a deep pool for your dacha, then the pit option will be just right, because you choose the depth yourself. How to make a pit at your dacha yourself - read below.
Frame swimming pool for a summer residence It is assembled from parts into a single bowl and can be installed both on the ground and in a slightly buried state. Also, frame pools are often used as the surface of pit pools - dug one and a half to two meters deep into the ground. Pit pools are uniquely stationary and are built to last by digging a pit and filling it with concrete. They are more economical and do not require additional investments.
ADVICE!Frame pools for summer cottages are very reliable and stable, and have a long service life. They come in all sizes: they can have a depth of up to 2 meters, and a volume of up to 250 cubic meters. Such volumes allow you to dive, swim on the mattress and even play.
When you definitely decided to make a pool with our own hands at the dacha , then you need to decide what material you plan to make it from, the main options:
- Polymer (polypropylene);
- Made from composite materials;
- With a concrete base.
Plastic pools for summer cottages are in great demand among those who want to build a pool with their own hands at the dacha. Main advantages:
- Budgeting;
- Environmental friendliness;
- Ease of installation;
- Huge color variety.
Polypropylene pools are considered the highest quality and most reliable in operation. Pools made of composite materials have increased tightness and light weight. Therefore, how to make a pool with your own hands at the dacha and what to make it from - you decide for yourself, depending on your priorities and goals.
How to make a pool with your own hands at the dacha - step-by-step instructions

As an example, let's consider the most cost-effective project that will require only your skills and strength - a pit pool with a concrete base. If you need dacha deep pool – then the pitted version will be just right, because you choose the depth yourself.
Preparatory process
Before you start building a concrete pool, you must have:
- Pool project;
- Exact location;
- Exact dimensions that match the available space on your site.
- Construction Materials:
- Concrete grade M350-M400, frost resistance index F200, water resistance W6. For the concrete pool bowl, heavy concrete with plasticizers and hydrophobic additives is used.
- Cement grade 400.
- Sand of medium granulation.
- Fiber fiber.
- Plasticizer.
- Reinforcement (rigid - rolled I-beams, channels, angles, flexible - individual rods of smooth and periodic profile, welded or knitted meshes and frames). Depending on the design of your pool, you can use steel reinforcement or composite (polymer). For the formwork and the area around the pool, reinforcement of wood origin (bamboo) is suitable.
5. Tools: trowel, meter, level and plumb line, shovel, construction tape, sharp knife, hacksaw, container for mixing concrete, construction mixer.
ADVICE!It is not necessary to mix the concrete solution yourself; you can order a ready-made mixture. This will be faster and more efficient, since you will not have to measure proportions and calculate the volume of the required concrete components.
Construction

Considering the volume of your pool and choosing a location, proceed:
- To dig a pit. Please note that the minimum pool area is 16 square meters. meters. The deep pool of the dacha requires a pit 2-2.5 meters deep. Increase by 50 cm all dimensions from the pool design (length, height, width) - this will be the size of your pit.
- We strengthen the bottom of the pit. Pour sand - 30-40 cm, tamp it, cover it with roofing felt - 2-3 layers, seal it with mastic, put a layer of crushed stone, fill it with hydroconcrete.
- After the bottom has dried, we begin to concrete the walls of the pit. For this:
- We install formwork and reinforcing wall.
- We pour concrete into the space between the ground and the formwork. We take into account the water supply system - pipe outlet. Also places to install steps for descent.
- We wait for the concrete to set, then we remove the formwork and wipe the concrete walls with a concrete-water solution in a ratio of 1:3.
- If your project includes concrete steps to descend into the pool, proceed to concreting them.
Finishing work
When the concrete bowl is ready, you need to make a choice on the finishing material. Often, owners of swimming pools in their country houses use finishing tiles to cover the concrete surface of the pit. As a rule, tiles that are least susceptible to slipping are placed on the bottom to avoid injury hazards.
You can also use frame pools made of polypropylene, plastic, and composite materials. All additional frames will require additional financial investments, so in order to save money, you can line the pool with more economical materials. But if you want a beautiful design and durability of your newly built pool, then you can invest in polypropylene or composite materials. Which are different:
- Water resistance;
- Tightness;
- The beauty and variety of colors and shades;
- Durable in use.
It is desirable that the entire recreation area around the DIY pool be in the same style and in the style of the general interior of the site. For beauty, lighting is often used, which is installed in the form of surface and underwater spotlights. All this will add additional charm to a self-built country pool.