DIY built-in wardrobe made from various materials. Stages of making a built-in wardrobe with your own hands, everything in detail How built-in wardrobes are made
6648 0 0
How to make a cabinet in a niche with your own hands in 5 steps and without helpers
Looking at the built-in furniture, most owners think that self-assembly of such beauty is impossible. However, when the home master receives sensible instructions, he changes his mind. Let us step by step figure out how to make a cabinet in a niche with your own hands, and in order to quickly understand the technology, we will break the whole process into 5 steps.
Planning is the key to success
The beauty of built-in furniture is that it doesn’t matter what kind of structure you are going to install. Whether the cabinet will occupy the niche completely, partially, or a corner layout is planned, in any case, the sequence of actions is similar.
- Material selection– this is the first thing you need to decide. If the floor is concrete, then there is not much difference, you can take what you like, but for wooden floors you need to choose light panels. Plus, recently such a characteristic as environmental cleanliness has come to the fore;
- Preparing the niche itself– this point is not relevant for every owner, but you still need to know some subtleties;
- Cabinet Layout– there are enough beautiful diagrams with dimensions on the network, but you need to rely on the practical benefits and feasibility of arranging a particular section;

- Doors– as practice shows, in sliding wardrobes sliding doors are the most important component, moreover, they take up at least half of the budget;
- Material cutting and installation– if all the previous points were completed efficiently, then assembling the cabinet will take a maximum of 2–3 days.
From a practical point of view, it is easiest to build furniture into a niche, because you already have a ready-made box, all that remains is to fill it and mount the facade.
Step No. 1: subtleties of material selection
| Illustrations | Recommendations |
 |
Tree.
Natural wood is not suitable for a built-in wardrobe. Different humidity inside and outside will cause the board to begin to crack; in addition, the structure becomes massive and heavy. Assembly of such furniture is available only to professionals and the price is fantastic. But it is better to assemble the supporting frame from wooden blocks. They are easier to work with than metal profiles. |
 |
Drywall.
It is possible to assemble plasterboard shelves in a niche. But gypsum boards themselves are fragile, plus they still need to be puttied and painted. I'm not even talking about how much time and effort it will take to assemble and cover the frame. Drywall is good for partitions and small shelves; this material is not suitable for a serious cabinet. |
 |
laminated chipboard. Laminated chipboard has been used for the manufacture of budget furniture for a long time. But about 10 - 15 years ago, information appeared that formaldehyde was used in the production of chipboard, and therefore the furniture was harmful. True, manufacturers claim that the laminated finish blocks formaldehyde fumes and judging by the fact that furniture continues to be produced, this is true. |
 |
Fibreboard, MDF and HDF.
All these are wood-fiber boards, only fiberboard comes with low solid density, MDF with medium density and HDF with high density. The prices for these slabs follow the same sequence. Since the cabinet is built-in, the density does not play a big role for us, the main thing is that the thickness of the slab is at least 16 mm. In general, this direction is considered the best for a sliding wardrobe. |
 |
Plywood.
It is excellent for making furniture; it is strong, reliable and durable, but thick laminated plywood is an order of magnitude more expensive than MDF or chipboard, so it is rarely used. |
 |
Furniture board.
This is natural wood. The panels are glued together from planks of inexpensive wood, after which they are lined with veneer or thin plywood. The material suits us, the boards are cheaper than solid wood, but more expensive than MDF |
 |
Tempered glass.
At the moment, the most popular material for arranging facades. The only disadvantage of tempered glass is its high price.
|
Step #2: preparing a niche
If the niche is covered with wallpaper and it holds tightly, then you can leave everything as is and continue working. It is advisable to remove old wallpaper, spray the wall with water and scrape off the wallpaper with a spatula; there are removers for wallpaper that sticks too tightly.
- Cover the niche with new wallpaper. It is best to take non-woven or fiberglass wallpaper for painting; they are durable and will last in the closet for as long as you like. This method is good if you have scraps of such wallpaper left from the last renovation; it is not profitable to buy a large, solid roll;
- If you don’t want to mess with wallpaper, then cover a clean wall with PVA glue diluted with water, and when the soil is dry, paint it with acrylic enamel. Instead of acrylic, you can take something cheaper, for example, oil paint, but it will stink and take a long time to dry.
Step No. 3: layout, diagrams and dimensions
A competent layout has simple laws, based on which you can easily distribute sections and zones in your closet:

- Small and frequently used items are placed at eye level, that is, underwear, shirts, blouses, socks, stockings, etc.;
- Valuable small items and things that require careful storage are distributed in drawers;
- Bed linen is sent to the upper shelves or to a separate section, but in no case to the lower one;
- Sections of outerwear and shirts with suits are located separately;
- The bottom is reserved for shoes and household items, such as a vacuum cleaner, ironing board, etc.

There are also laws to determine the dimensions of sections:
- The height of open shelves for things starts from 300 mm, it is advisable to make the width at least 500 mm;
- According to furniture standards, the height of the outerwear section is 1600 mm, but this is not a dogma, it can be made smaller;
- The minimum height of drawers is 100 mm, the width is the same as that of the shelves.

Step No. 4: facade door block
Here we need to decide on the width of the door leaves and the type of sliding mechanism.
Calculation of sashes
The recommended maximum for the width of the door leaf is 700 mm, it is not advisable to do more, less is possible. The thing is that the larger the area of the sash, the heavier it is, and accordingly, the higher the load on the supporting rail. Plus, the wide doors cover a large area and the cabinet is inconvenient to use.
We have at least 2 sashes, each one runs on its own guides, but it is impossible to make them exactly end-to-end according to the size of the opening; the normal overlap is 30–50 mm. Here you also need to take into account that the leaf consists of a door leaf and metal profiles framing this leaf; the thickness of different profile models is 20–50 mm.

The calculation scheme is approximately as follows:
- Measure the frontal distance between the extreme points;
- Divide this distance by the number of sashes;
- Now add 2–2.5 cm to the resulting width of each sash for the overlap;
- Next, if you subtract the thickness of the framing door profiles and sealing tape from the total width of the leaf, you will get the net width of the leaf;
- When calculating the height of the sash, we focus on the passport data of the mechanism. There, in order to get the net height of the leaf, you need to subtract from the total height of the niche, the dimensions of the roller mechanism at the top and bottom, plus subtract the thickness of the guides and the door profile.

Types of rail mechanisms
The most popular mechanisms now are those with a lower support roller. In other words, a pair of rollers are installed at the bottom of the door leaf, which ride along grooves in the guide profile. There are also grooves and rollers on top, located on the upper edge of the leaf, moving along them, holding the doors in a vertical position.
This model works well on a concrete base; it is not advisable to install this mechanism on wooden floors. Sooner or later, under the weight of the cabinet, the floor will sag and problems with the doors will begin, plus debris is constantly collecting in the lower grooves.

Designs with top suspension of the sashes have 2 varieties. A top rail with two hooks under the doors is considered cheaper, but less reliable. This rail is rigidly attached to the ceiling and shutters with rollers are hung on it.
Installation of fittings is not difficult and the sashes can be hung quickly. The problem is that if you press this door a little, it will fly off the guides. In general, these arrangements are not suitable for families with small children.

The monorail is recognized as the most reliable system in this niche. Here, each block has 2 paired rollers and this entire system moves inside a metal profile pipe. The monorail can even withstand the weight of heavy wooden doors, but it also has its disadvantages.
- Complex installation - first the rollers are inserted into the profile, then the profile is attached to the ceiling and after that the doors are hung from the roller blocks. It is very problematic to do this alone and without experience;
- Monorail prices are 2–3 times higher than competitors;
- The guide profile needs to be covered with something;
- The roller blocks must be adjusted after installation.

Step No. 5: cutting material and assembly
From experience, it is better to make homemade sliding wardrobes either from laminated chipboard, or from laminated or veneered MDF, they have the best price-quality ratio.
A few words about cutting
I don’t recommend cutting slabs at home, even if you have a good tool. The fact is that you will not be able to laminate the ends of the house efficiently (tested). In furniture companies, the cutting and finishing service is not expensive.
By the way, transporting large laminated boards is a troublesome task, so it is better to order both the material and cutting from a furniture workshop. They buy goods in bulk, so the price difference will be acceptable.

Assembling the structure
It is better to start assembly from the inside of the cabinet. You have a diagram, the slabs are cut to size, then you buy furniture corners and use self-tapping screws or confirmants to screw the entire structure together.

A “cage” of shelves is attached to the back and side walls of the niche at several points with dowel-nails; there is nowhere for it to go in the niche, so you shouldn’t mount it too rigidly. First, vertical racks are installed, then shelves, drawers, etc. are gradually hung on them from bottom to top. Can be assembled in blocks.

After assembling the cabinet filling, you can move on to the most important procedure - installing the lower and upper guides. They are set strictly horizontally, according to the level, even the slightest distortion is not allowed here, otherwise the doors will move on their own. Don't rely on adjusting the rollers, it won't work.

If the floors are very crooked and you do not want to level them with a screed, then you can install a wooden beam with a thickness of 50 mm and attach a support guide rail to it. Set the level with pads. You can also adjust from above using wedges. Then all this “beauty” will have to be covered with decorative overlays.

Now all that remains is to assemble the door leaves, insert them into the guides and adjust the rollers to perfection. Some systems use door stops. There is no point in listing all the types of stoppers, so when purchasing accessories, simply clarify this issue with the seller.

Conclusion
The technology described above is universal, in this case we were talking about furniture built into a niche, but you can also install a free-standing or corner wardrobe in the same way. There are several more editing options in the video in this article. If you have any questions, write in the comments, I will try to help.

Nowadays, all interior designers suggest saving the area of rooms so that there is space and free space. An excellent solution for this is built-in furniture, such as a wardrobe. Quite a profitable solution not only in terms of space savings, but also from a financial perspective.
A built-in wardrobe, in contrast to a conventional design, has a number of significant advantages. It holds much more things, less material is needed for manufacturing, due to which the cost of such a design is much lower. In addition, space is saved and space is freed up for other things. Basically two types of arrangement are used:

Installing a built-in wardrobe requires precise measurements. Due to the tight-fitting design, installation problems may occur due to improperly aligned surfaces or measurement errors.
How to design a façade for a built-in wardrobe?
There are many materials on the modern market from which you can make a beautiful façade for a built-in wardrobe. Since the dimensions of such a design are usually quite large, you can think about a special design, for example, decorating the doors in an unusual way. Here you can show your imagination and come up with a personal sketch, or find something you like from the already proposed options:
- Mirror. The most common option for visually increasing the area of a room using additional funds. This solution is perfect for those who are faced with the problem of saving extra space. Mirrors can be placed either the full height of the door or used to decorate a small part of it. Designers also advise not to overuse this material and limit yourself to decorating one door in this way, and make the second one from a different material or decorate it in some special way. Drawings can be used as additional elements. They can be grooved or sandblasted. Both are distinguished by their special grace and create a gentle and romantic atmosphere. Thanks to modern technologies, you can not be afraid to experiment with shapes, since it is possible to create a design of any complexity and even any color. Sandblasting patterns can be used not only as individual elements, but also as decoration for the entire surface of the mirror. Such an unusual solution – matting the mirrors – will add an element of mystery and sophistication to the style of the room;

- Film. Can be combined with any other material, is easy to use and does not require special care. If glass is used as the main material, it is recommended to glue the film on the back side so that it is less exposed to external influences. The modern market offers a wide range of films for decorating built-in wardrobes. You can use both matte and glossy or shiny materials. This diversity allows you to create special compositions of various shapes and types, as well as colors;
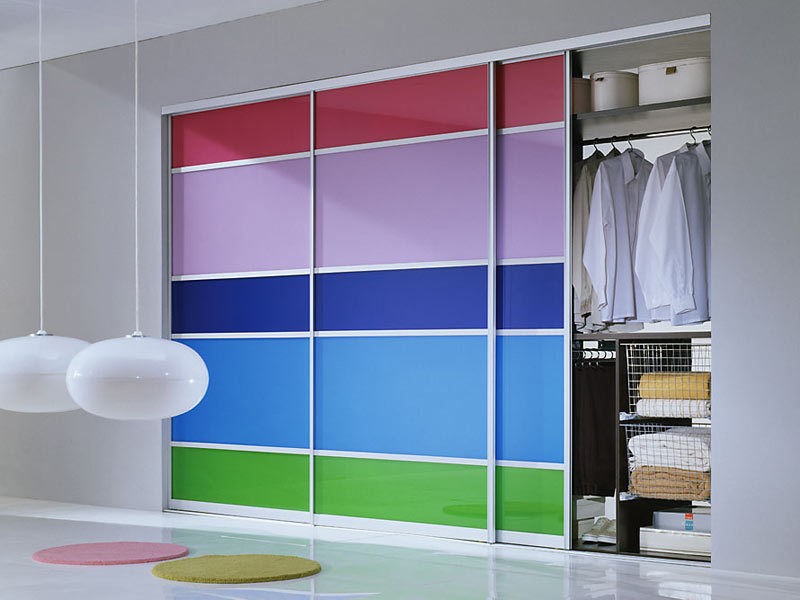
- Photo facade. An unusual solution for cabinet design that is gaining popularity. Thanks to the use of photography to decorate the facade, not only the cabinet itself acquires an element of uniqueness and exclusivity, but also the entire room as a whole. Using photography, you can create a special atmosphere by placing a picture of a sandy beach, or, conversely, a tropical jungle on the front of the cabinet. Many people now use urban motifs in their design, placing a panorama of the metropolis as a photo facade. You can select individual elements, such as household items, people, animals, birds, plants and much more. An excellent solution for those who like to stand out and surprise;

- Acrylic. Goes well with a mirror surface. Acrylic is characterized by a high degree of resistance to light. Never loses its shine, even after years of use. Always looks presentable and catchy. You can choose bright colors and arrange them, creating a special design or pattern. For decoration, you can place unusual elements in the glass melt, for example, unusual stones or simple glass beads, beautiful flowers or fragrant plants, colorful leaves or green algae and much more;

- Tree. For those who prefer a more restrained and classic style, it is proposed to use wood as a material for the cabinet facade. The most commonly used materials are bamboo or rattan. This material costs a lot due to its natural origin. But natural wood will look great in an eco-style interior. It’s quite a fashionable trend now to be closer to nature, taking a break from the bustle of the city and at the same time paying tribute to the surrounding beauty. If it is not possible to purchase natural wood, then you can opt for chipboard or MDF. These fiberboards look no less presentable, but are much cheaper;

- Leather. The designers offer a rather unusual solution for those who want to decorate the cabinet facade in a special way. It would seem that leather is not the most suitable option for this, but if you look in more detail, you can find a lot of advantages from such a solution. Leather is a very practical and durable material, i.e. There is no need to worry that over time it will lose its presentable appearance and will look completely different from how it did when it was first used. For the cabinet facade, designers suggest using soft artificial leather. It can be used to sheathe the entire facing side, or just a separate part of it. Such a delicate material will give the room a feeling of coziness and comfort, without resonating at all with other interior items.

To decorate the facade of a built-in wardrobe, you can also use various accessories and decorative elements. However, it is important to remember that any design should not harm the main function of the cabinet - storing things within easy reach. Therefore, the doors should open easily and freely.
What can be placed in a built-in wardrobe?
Usually there is a lot of space in such a closet, so you can distribute it wisely, leaving space for all the necessary and necessary things. The main elements that can be in the closet:

It is best to divide the closet into three levels, where mezzanines with rarely used things will be located at the top, clothes will be located just below, and shoes will be stored on the lower tier. You should not place heavy objects on the very top, since under strong pressure the structure may not withstand it, break and collapse.
How to make a built-in wardrobe yourself?
After the location, material for the facade, as well as the internal filling of the cabinet have been chosen, you can begin to develop a drawing. It is best to opt for something simple and at the same time practical. It is necessary to make a drawing based on the size of the room itself. Each apartment may have its own flaws associated with the curvature of the walls and floor, so it is necessary to constantly adjust and measure the load-bearing elements so that, in the end, everything turns out smooth and beautiful. 
Since a built-in wardrobe is different from a regular one, it requires a special approach. Mounting to the wall can be using brackets or regular baseboards. True, the second option may not look very neat and stand out, but it costs much less. 
Doors can be hung in three ways: using top and bottom rails, as well as a monorail. The best option is the bottom design. It's easy and simple to do, and it's inexpensive. The rollers should also be chosen very carefully so that they are strong and can support the entire weight of the door. It is imperative to install stoppers for the doors so that they do not hit the cabinet every time they are used. 
If you follow all these rules, you can quickly and easily make a built-in wardrobe yourself. It's important to remember that there are no one-size-fits-all instructions here. Each design is individual, taking into account the characteristics of the room itself. You can use generally accepted basic rules and apply them to your project.
Detailed instructions on how to make a built-in wardrobe for a niche from gypsum fiber sheet. And what is the difference between gypsum board and gypsum board?
All the details about the location of the built-in wardrobe, the design of its facade, and the internal contents will help you make a similar structure yourself. The main thing is to follow some rules and follow safety precautions so that the manufacturing process brings only pleasure.
The layout of old apartments usually could not do without niches. Looking at this, one useful and interesting thought comes to mind - a closet. You can make such a built-in wardrobe with your own hands.
Such a space is most often located in the corridor, less often in the bedroom. No furniture can be placed there - neither a sofa, nor an armchair. But the shelves just beg to be, but they could also be closed with a door, or maybe even a sliding one. This is how the wardrobe appears on its own. What is needed for this, and where is the best place to start? Let's talk about this.

Materials
The set of tools that you will need in the future will depend on your current choice. Drawings for making a built-in wardrobe will also depend on the material chosen.

When it comes to materials, the first thing that comes to mind is wood. This is an excellent material for furniture, but not the best solution for a built-in wardrobe. This is because such a cabinet is mounted to a blank wall, most often. This increases the humidity levels inside the cabinet, and when the door is opened, the moisture levels outside and inside mix. All this negatively affects wood.


This can be solved by choosing it. You need to pay attention to high-quality wood, with straight layers, in which there will be no cracks or knots.

Such wood must also be thoroughly impregnated with emulsion or drying oil. Otherwise, the walls and shelves may swell, which will negatively affect the overall integrity of the structure.

Speaking about materials for a built-in wardrobe, it is worth remembering simple fiberboard. The material is familiar, fits perfectly, there are a huge number of options for making structures from it. You should not take thin sheets, they quickly degrade.

I also haven’t talked about the lining and plasterboard construction. In the case of the first option, there will still be a need for wood, which again will need to be further processed, otherwise moisture will not allow you to enjoy the cabinet for a long time.

In the second case, forget it. The material is quite heavy, but does not differ in strength. Structures made from it turn out to be unreliable, and vertically installed parts soon begin to lose their shape. It can work when decorating the interior or exterior of a cabinet, in particular if there is a fireplace or stove nearby.

I did not mention consumables such as screws, dowels, guides and the like. Here everything will depend more on your preferences when planning your closet.

Separately, I would like to say that you should not save much, especially on the back wall. If you are making a closet in place of a niche, then you can use the wall as the back of the closet.


If you plan to store things in it, it is better to take a few more sheets of the base material and cover the back with them. At a minimum, aesthetically this will be a huge plus. In addition, after assembling the cabinet, you are unlikely to redo anything in it in the coming years. Save wisely.

Blueprints
To more clearly and clearly understand how to make a built-in wardrobe with your own hands, you need to take care of the drawings. You can make them yourself, or you can search the Internet for ready-made options. The second method is more interesting because you can find a very similar version of how you want your closet to look, and then simply adjust it to suit your needs and capabilities.

In this regard, you can make the internal structure simpler by removing some fittings, or you can change it. In general, everything will depend on the overall dimensions of the connector that is available to you for the cabinet.

During calculations, take into account the small error that may occur during the installation stage. Leave room for guides under the doors if you decide to use the option with a sliding wardrobe.

If you have problems with drawings and calculations, it is better to use ready-made ones, or find a master who can make them for you. Having them at your disposal will make the preparation and assembly processes much easier and more enjoyable. Instructions with descriptions for built-in cabinets can be ordered from any workshop that works with furniture.


If you have not previously worked with furniture assembly, it is better not to rush with the facade, and in particular with complex structures for it. There are many features in this process that can easily be missed in the calculations. If you already have a drawing, then it is better to call a specialist who will help you install the front part.

Installation
By this moment, you should have all the components of the future cabinet ready. Depending on the size of the cabinet and the complexity of its internal structure, there can be a lot of parts. Check that everything is in place and check the sizes of identical parts again.

Installing built-in wardrobes is not a very quick task, and therefore there is no need to rush. The peculiarity is that, in fact, such a cabinet will not have its own frame. The main parts will be built into a niche, for example, after which the remaining parts will be installed on their basis.

The first step is to install the false panel, after which attach the door guides. After this, you can begin installing the cabinet interior. Since the walls, floor and top of the cabinet are already there, installing the structure should not cause any problems.

The final stage of installation will be the doors. By installing them on the guides, you can disinfect the cabinet and clean it of debris. This completes the installation. Next you need to add fittings, if provided, and you can start using the cabinet.


Photos of built-in wardrobes with your own hands


Old apartments from the 50s to the 80s in most cases require a variety of niches. This space can be used in different ways. Some create niches with shelves, others break down walls and remodel. We are interested in a practical and visually aesthetic way to transform an unsuccessful apartment layout. To do this, you can make a built-in closet that will accommodate a lot of things and create coziness. Let's figure out how to make a built-in wardrobe with your own hands.
Convenience of a built-in wardrobe
Every family has a set of things that are a pity to throw away or, due to seasonality, are simply not needed at the moment. Some organize a warehouse for such things on the balcony, where there is already little space. Take a closer look at the space in your apartment; perhaps there is a place for a built-in wardrobe that will help cope with this problem.
The good thing about a built-in wardrobe is that it covers the entire space from floor to ceiling, making it useful. On the top shelves you can put away things that you rarely use.
With the right approach, the exterior can be given originality and sophistication. This is clearly demonstrated by the photo posted in the article. You can make a built-in wardrobe with your own hands in any style. If you want to imitate a wall, then the cabinet doors need to be decorated with materials identical to the wall.
If the area allows you to separate more space from the wall, then the built-in wardrobe can be turned into a dressing room. In this case, it is necessary to place the shelves around the perimeter and take care of the light.
To organize a built-in wardrobe with your own hands you will not need a lot of material, since in most cases there are no walls. Their role is played by the walls of the room. The only difficulty may be installing the door mechanism. After choosing the type of mechanism, you need to understand the principle of its operation and the stages of assembly. Any parts for different doors can be found in specialized stores, so it is quite possible to assemble the structure yourself.
Cabinet design and tool preparation
To choose a suitable project, you need to decide on the location for the built-in wardrobe. If there is a niche, then the cabinet can be made in the form of an imitation for the wall. When placing a niche in the corridor, it is better to use a mirror surface for the cabinet. A mirror in the hallway will not only play its primary role, but will also help to visually increase the space.
Another interesting idea for decorating the surface of a wardrobe is photo wallpaper. The choice of plot depends on the design of the room. Photo wallpapers depicting the ocean and the beach will fit perfectly into the Mediterranean style. For classical styles, such as Provence, Renaissance, antique-themed photo wallpapers are suitable. You can choose wallpaper in the form of a window with any landscape.

To create a project, you need to take measurements of the location of the future cabinet. Draw on a piece of paper a clear plan for the location of the shelves indicating the dimensions.
If the project has been selected, you can begin preparing the material and tools. When making a built-in swing wardrobe with your own hands or a sliding wardrobe from chipboard, plasterboard or wood, you will need the following tools:
- jigsaw;
- screwdriver;
- drill;
- stationery knife;
- level;
- roulette;
- marking pencil;
- self-tapping screws, euro-screws, nails, corners;
- hammer;
- perforator;
- PVA glue.
To assemble a built-in cabinet, you must have the skills to use the listed tools, otherwise there is a possibility of traumatic situations or damage to the material.
Necessary furniture fittings
For the full functioning of the built-in wardrobe, you will need some elements of furniture fittings. The shelves are fixed using corners and shelf holders; you may need a hanger bar.
The most important part of a built-in wardrobe is the door. The fittings will vary depending on the type of door structure.
If you are installing sliding doors, you will need the following for installation:
- upper and lower frame for doors;
- upper and lower rollers;
- silicone rubber seal;
- Schlegel.
To make built-in home cabinets with your own hands, you will need door hinges and handles. You can get by with such fittings in the case of a classic swing design.
Accordion-shaped cabinet doors are less popular due to their fragility. Such doors are usually made of plastic, less often of wood or glass. The presence of a large number of moving elements makes accordion doors less reliable. To make such doors you will need:
- upper and lower guide profiles;
- loops of different types;
- furniture wheels;
- pens.
Don't skimp on accessories. The durability of the built-in wardrobe design directly depends on the quality of the assembly elements.

Drywall is a very convenient material for making built-in furniture. With its help you can create incredibly beautiful interior elements. Among the positive characteristics of drywall, the following can be noted:
- availability of material, low price;
- environmentally friendly material;
- convenient to use, easy to process;
- compatible with almost all types of exterior finishing: paint, plaster, tiles, etc.;
- not flammable
Along with the positive features of drywall, there are also some disadvantages:
- gypsum is a brittle material;
- Use only for built-in furniture.
A strong impact can damage the drywall surface. It is precisely because of the fragility of the material that only stationary built-in furniture is made from plasterboard, which cannot be moved to another place without complete dismantling.
The first stage of building a plasterboard cabinet will be the construction of a frame using a metal profile or boards. Use a hammer drill and dowels in places where they are attached to the walls. Walls may be uneven, so ensure proper installation using plumb lines and a level. After installing the frame, we cover the structure with plasterboard. In areas with heavy loads, a double layer of sheets can be used.
The surface of the drywall must be treated with putty. This is done using reinforcing mesh or tape. Then we glue the perforated corners and putty the entire surface. For finishing, use the option that suits you.
We install doors on the finished frame. Massive and heavy hanging structures are not suitable for such a cabinet, so we choose a lightweight option with minimal weight.
Built-in wardrobe made of chipboard

Chipboard is a chipboard, a popular type of material for making furniture. Supplied in sheet form. The sheet consists of compressed wood shavings. Laminated chipboards are used to make furniture. They are covered with a thick film that protects the inner layer from moisture and destruction. Lamination creates a wide variety of designs and colors.
If you decide to use chipboard, then it will be easier to order the necessary parts from a specialized organization. There they will not only cut the sheets to the required sizes, but will also trim the edges of the slab with braid. All that remains is to install the parts. When cutting yourself, be careful with the dimensions. To finish the edges with braid, you can use a regular iron.
Before assembly, make all the necessary holes for fasteners. To fix chipboard sheets, you can use euroscrews. Their length can be 5-6 cm and width about 4-5 mm. The holes for euroscrews should be 1-2 mm smaller than their diameter; this connection principle will give the most durable fastening of the sheets. The cabinet frame does not need to be assembled on site. You can install the structure in modules, it will be more convenient.
Chipboard sheets also have weaknesses. Pay attention to them to avoid mistakes.
- Cheaper types of chipboard emit formaldehyde into the environment, which is harmful to health. Choose sheets under the E1 brand, they are more environmentally friendly.
- Chipboard sheets are not intended for fine processing.
- If the tape is installed poorly, gaps may form. Exposure to moisture can deform the open edge. This occurs due to the ability of the wood chip layer to absorb water.
Corner cabinet made of plasterboard

The principle of construction from plasterboard is the same for all types of cabinets. Making a built-in corner cabinet with your own hands differs only in the way it is designed. If you decide on an unusual project for a radius wardrobe, then it is better to use drywall.
Such a plate is capable of creating rounded surfaces. In this case, you can consider a corner cabinet in the form of a quarter circle. Such designs look original and unusual.
To give the door a rounded shape, it is necessary to carry out some manipulations with the drywall board.
- From available materials, build a fixing base in which the sheet of drywall will dry.
- Using a stationery knife, make holes on the surface of the cardboard in a checkerboard pattern 1-2 cm long at a distance of 5-7 cm from each other.
- Place the slab on the fixing base.
- Wet the towel and place it on a sheet of drywall so that the entire area of the sheet is covered. As the sheet gets wet, it will begin to sag.
- Leave the sheet in a curved state until completely dry. Do the same with the second sheet.
This way you will get two curved doors for the corner wardrobe. Select suitable fittings for them and carry out installation. Do not forget about treating the surface of the sheets. For a do-it-yourself built-in wardrobe made of plasterboard, you can use glass doors, which are made to order.
Built-in wardrobe in a niche
If you are the happy owner of a Soviet "Khrushchev" building and have not yet had time to remodel it, then the space can be transformed by building a cabinet into a niche with your own hands.
Great place for a built-in wardrobe. There is no need to build side bases; it will be enough to install a frame for attaching the guides at the top and bottom, make slats on the sides and places for shelves. The central structure of a system of drawers and shelves will be installed on the floor and held on the sides with fasteners.
Some apartments have very deep niches. They can be converted into walk-in closets. To separate the dressing area, the best option would be sliding doors. Fill the interior space with shelves along three walls. Don’t be afraid to make shelves right up to the ceiling, they will come in handy too. You can put things there that you use very rarely and do not need to constantly take them out.
Not all of the niche space can be used for a cabinet. Make a partition and decorate half of the niche in the form of shelves for books or flowers. A mirrored door will hide the built-in wardrobe and increase the space of the room. Arranging a built-in wardrobe in the bedroom with your own hands in the niche area can create the impression of an extension of the wall. This way you will get rid of the clutter of objects in the space of the room.
Built-in wardrobe in the hallway

If your hallway is large and spacious, then the built-in wardrobe will fit well into the decor and will not create the impression of reducing the space. In Soviet "Khrushchev" apartments, you can use niches that are typical for the corridors of these apartments.
The principle of arranging a built-in wardrobe in a hallway with your own hands is standard. In the case of a corridor, attention must be paid to the design of the cabinet doors and their practicality. Remember that the door will open several times a day. The door mechanism must be of high quality and durable. For their surface, it is better to choose an easy-to-clean and wear-resistant material. Street dirt can get onto the doors from your shoes; frequent cleaning should not cause wear on the surface.
If we talk about arranging shelves, then it should be noted that the closet in the hallway differs in its structure from other types. Arrange drawers at the bottom of the closet. It will be convenient to store in them shoes that are currently unnecessary for other seasons. To store winter clothes during the warm season, you will need a place for hangers. Before creating a closet layout, analyze the things that need to be put in it, then you will understand what kind of shelves you will need.
It is better to make the door of the built-in wardrobe completely mirrored. This way you will have the opportunity to show off and look in the mirror before going out.
More often than not, homeowners try to make the most of the space in their home. The living area, which is located on the top tier, is located directly under the roof. There are inconveniences with the layout of such rooms due to the irregular shape of the walls and the presence of slopes. It is not possible to install purchased cabinets around the perimeter, so we have to look for other ways of arrangement.
Where the roof slope is located, the ceiling has an inclined shape. This place is convenient to use for a built-in wardrobe.

If there are windows, it doesn't matter. Make openings for them, as shown in the photo. A DIY built-in wardrobe will help transform the space into useful space, and the surface of the drawers will become a window sill.
Finally
How to make a built-in wardrobe with your own hands without the ability to handle carpentry equipment? Very simple. Order patterns in the required sizes and start assembling. An exclusive built-in wardrobe based on an individual project will not only be a practical decoration for your apartment, but also a source of pride.
The problem of lack of free space is familiar to everyone. A lot of things, all of which are important and necessary from the point of view of the owners, are usually found in closets that take up a lot of space in small apartments.
Where can we find a way out of this situation? The solution is simple - install a wardrobe, and the appearance of your home will completely change. How to make, build and assemble a built-in wardrobe with your own hands? Do you want a built-in dressing room, hallway or bedroom? This article will help you do it yourself.

The problem of lack of free space is familiar to everyone. Where can we find a way out of this situation? The solution is simple - install a wardrobe, and the appearance of your home will completely change.
What are the benefits of built-in wardrobes (in the hallway or bedroom)?
- most often it is installed in a niche of the room, thus saving precious centimeters of living space (this is very important, especially if the apartment is small);
- Due to its design, it can accommodate a large number of things. It is much more spacious than ordinary bulky cabinets;
- The main component of such a closet is sliding doors. Thanks to them, the wardrobe can stand very close to the sofa and there will never be any discomfort when opening and closing the doors;
- has a wonderful appearance. Depending on personal preferences, this type of furniture can be made truly unique: it is decorated with mirrors, drawings, etc.;
- often performs by zoning the area of the room;
- there is no empty space between it and the wall, which is usually an additional dust collector;
- Safes, sockets and switches are often placed inside it, without spoiling the appearance of the walls of the apartment.
When deciding to have such a miracle at home, it is better to make a wardrobe yourself, because the cost of it in the store will not be affordable for everyone (from 13,000 to 300,000 rubles).
What type of wardrobe is better to choose?

Depending on the presence or absence of cabinet walls, this type of furniture has several types. Complete absence of side walls, top and bottom. They are completely replaced by the walls, floor and ceiling of the room (read how to properly plaster a ceiling). The shelves in such a cabinet are attached directly to the walls.
Let's consider features of this model:
- the costs of manufacturing such furniture are minimal, because you only need to purchase chipboard for shelves;
- have a large internal volume.
Among the disadvantages, it should only be noted that such a built-in wardrobe model is considered absolutely non-transportable. It will not be possible to move her to any other apartment.
- Partial or complete presence of walls. The total cost of such a cabinet will be slightly higher than that of the previously reviewed models. However, they have one significant advantage - the ability to transport and install in another place (sometimes used as ordinary cabinets).
All types of built-in wardrobes can have doors or be without them. It depends on the personal preferences of each individual person.
Secrets to choosing the right height and width
Width of built-in wardrobe depends on the size of the niche in which it will be located. When deciding how many doors you will need (their maximum width is 90 cm), special attention should be paid to the guides along which the wheels will move. Their size does not exceed 4 m or 5 m (this depends on the manufacturer).
If the width of the recess in the wall is greater, then a chipboard partition will have to be installed between the guides. This must be done because metal joints will quickly deteriorate the condition of the door wheels.
Visually, it will never be noticeable that the cabinet consists of several parts. Everyone will close the sliding doors.
The smallest width of such furniture should not be less than 100 cm. This is explained by the fact that doors that are too narrow do not have good stability. If you still cannot do without a small wardrobe, you need to think about replacing the wheels in the guides with hinged mechanisms.

The height of the built-in wardrobe depends on whether there is a suspended ceiling in the room or not. Depending on this condition, this type of furniture has some varieties.
Height depends on the height of the niche:
- if it is small (up to 200 cm), then it will not be possible to make the furniture different;
- in the case when the height of the room is within 280 cm, then the cabinet is made up to the ceiling, because the traditional size of chipboard sheets is 278 cm;
- if you need to make the cabinet tall, then place a mezzanine on its upper part or extend the side walls of the entire structure. The mezzanine has its own doors with individual guides.
- The maximum height should not exceed 4 m.
In addition, the height of the built-in wardrobe depends on whether or not there is a suspended ceiling in the room (read how to wash a stretch ceiling without streaks). Depending on this condition, this type of furniture has several varieties:
- if the cabinet has a wooden top cover that is not screwed to the ceiling and the distance between them is within a few centimeters, the product is made up to the ceiling;
- in some cases, the top furniture rail can be mounted directly to the ceiling. This can be done if you screw a wooden beam onto a concrete base before installing the stretch ceiling. The cabinet guide is screwed directly to it with self-tapping screws. In this case, there will not be the slightest gap between the furniture and the ceiling;
- the furniture does not reach the ceiling, but the intermediate distance is covered with a decorative wooden or plastic strip;
- built-in wardrobe below the ceiling 50 cm or more. In this case, the gap is not closed by a mezzanine.
Step-by-step guide: making a built-in wardrobe
Preparatory stage
First of all, you need to take care of the condition of the niche in which the future structure will be located. To do this, it is cleaned of old finishing materials and the surface is well leveled (find out about this).
If the wardrobe does not have walls at all, then the surface of the recess in the wall can be painted in any color or covered with new wallpaper.
In the case where the furniture is mounted with side, top, bottom and rear walls, the niche must be absolutely flat. You can check this using plumb lines and levels. It is also necessary to measure the diagonals of the recess: from the upper right corner to the lower left and vice versa.
They must be absolutely the same. Cement mortar or plaster will help correct all errors. This is done in order to avoid distortions in the wardrobe.
After completing all preparatory work, it is necessary to perform drawing of the future cabinet. In this case, be sure to take into account the number, size and location of shelves. Only in this case will it be possible to make it truly convenient for all family members.
Having determined the width of the built-in wardrobe, you need to mark the places where the guides will be attached along which the sliding doors will move.
Then the materials are selected. It is necessary to think about what the doors will be made of. If they are of poor quality, there is a possibility that they will be difficult to open. Preference should be given to laminated chipboard with a thickness of 0.8 cm.
Its average cost is 190 rubles. for 1 m2. When calculating the width of the required canvas, remember that one part must overlap the other by at least 50 mm.
You can also use glass doors, but their cost starts from 20,000 rubles. They are really durable because they are made from very strong, thick glass.
It is possible to prevent cracking of such material by covering it with a special reinforcing film. It will not be possible to install rollers on this type of sliding door without the help of a professional.
The assembly process can only begin when all visible parts of the chipboard have a beautiful edge.
Required Tools for assembly:
- drill;
- roulette;
- screwdriver;
- hammer;
- construction corner;
- hex wrench;
- pencil.
Preparing the walls

Assemble the entire structure. If there are shelves, make sure that they do not extend beyond the cabinet.
- Using a tape measure and a pencil, make markings along which the cabinet will be assembled;
- put marks for shelves;
- on all planes make holes through with an 8 mm drill, at the ends with a 5 mm drill (the depth should not exceed 0.6 cm);
- assemble the entire structure. If there are shelves, make sure that they do not extend beyond the cabinet (this will interfere with the doors);
- insert stoppers for canvases into the lower guide;
- screw the upper and lower guides to the niche with self-tapping screws (parallel to each other);
- for the stability of the canvases, screw at least two rollers on top and bottom;
- insert the doors into the guides.
If there is no additional wardrobe, it is inserted into a recess in the wall and leveled using a level. You can screw furniture to the walls using dowels and screws.
Installation of a built-in wardrobe

For reliability, the structure is attached to the niche with dowels and screws.
- make markings on the wall (location of shelves);
- screw the metal corners to the walls with self-tapping screws (this is the base for the shelves);
- secure the shelves to the corners;
- connect the lower, upper and side parts to each other;
- for reliability, the structure is attached to the niche with dowels and screws;
- install guides to the lid and bottom of the cabinet;
- Attach the rollers to the doors and insert them into the guides.
Sometimes after installing the doors, a small gap appears between her and the wall. A hexagon will help fix this. They need to tighten the bolt that secures the lower rollers.
How can you tell if a wardrobe is assembled correctly?
The following indicators will help determine this:
- Complete absence of gaps between the doors and the wall.
- The door leaves move freely along the guides.
- All drawers (if any) open freely.
- The canvases have an overlap.
- The gap between the rod for hanging things on it (if there is one) and the back wall of the cabinet (or niche) should be at least 23 cm.
Having made a drawing and diagram of the cabinet and ordered materials, you can, of course, entrust the assembly work to a professional. However, you need to take into account that the cost of his services will cost approximately 3500-9000 rubles.
That is why, if you invite an assistant home, you can install the entire structure, the frame for the built-in wardrobe, yourself. The main thing is to maintain all the verticals and horizontals already at the initial stages, which will ensure the correct position of the entire built-in wardrobe and the excellent operation of its doors.
Video instruction