A magnificent orchid made of foamiran: a wonderful addition to the interior. Master class orchid from foamiran by Irina Zvereva Orchid from Thomas MK and templates
The orchid can rightfully be considered one of the most exquisite and sophisticated ornamental plants. The flower has earned the love of many fans thanks to its unusual structure and variety of shades. If there are no living beautiful orchids in the house, you can easily make one from artificial materials. Foamiran orchids do not require daily care, but they bring a lot of pleasure to their owner.

Little tricks for creating an orchid
Orchid – unusual plant, having a structure that differs from other, familiar colors. It has two side petals, three sepals and a petal in the center of the flower, reminiscent of baby lips. Color ranges from white to deep purple and dark red. The most attractive in its beauty is the cymbidium - this subspecies of flower can be made of artificial material, for example, plastic suede. Such a flower is no different from a living plant; it will decorate the interior of any room.
The main advantages of foamiran are the following qualities:
- plasticity - the material easily stretches and changes when heated;
- it can be easily cut with scissors;
- finished products can be washed well with plain water;
- foamiran is environmentally friendly;
- the variety of shades makes it possible to create flowers that are as similar as possible to living orchids.
- Foamiran can be purchased at any store that sells craft supplies.

Making a pattern for a future orchid
There is probably no person who doesn’t like orchids. These colorful flowers of unusual shape are considered to be a symbol of the tropics.
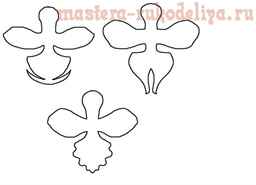
Orchid petals vary depending on the type of plant. To create a pattern you will need:
- flower core;
- "sponges";
- petals (five pieces);
- stamens and styles (for some subspecies).
The most common variety is phalaenopsis; the flower size of this plant ranges from 5 to 15 cm. You can make a stencil of just one petal and the middle (sponges) to assemble the phalaenopsis from plastic suede. Even a beginner can easily make a template for an orchid; you just need to listen to the advice of professional craftswomen.
To make a pattern for a Cattleya orchid, you will have to additionally create two various types petals, and in the case of cymbidium, you will need a template for the middle of the flower.
Templates (stencils) are prepared from thick cardboard or very thick paper. First, choose the type of flower, then make templates and transfer them to sheets of plastic suede.
The main stages of making cymbidium from foamiran
Before collecting a cymbidium flower, you need to prepare a column, a tongue and five petals. You can use your own imagination, use the ideas of other craftswomen, or use the following recommendations:
- Draw a vertical line 6 cm long, then at a height of 3 cm you need to draw a transverse line perpendicular to the vertical one and mark 1.5 cm on it in both directions. Connect the resulting points with a smooth line - you get a leaf.
- For the column template, you need to draw a rectangle, the width of which will be 1 cm, and the height will be 6.5 cm. The corners are smoothly rounded and an incision 3 cm deep is made on one side.
- To create the tongue you need to draw a heart and a circle. The width of the heart is 4.5 cm, the height is 3 cm. The radius of the circle is no more than 1.5 cm, and the circle is placed above the heart so that the figures touch each other. Trace the outline of the resulting figure - that’s it, the tongue is ready.
The finished stencils are placed on foamiran plates, traced along the contour with a special stick (knitting needle) and then the details for the future flower are cut out. The color of the cymbidium can be any; everything here depends only on the imagination of the master. Most often, the most striking element of an orchid is the “lip”; the remaining petals can be tinted using pencils or acrylic paints. And now we invite you to familiarize yourself with a step-by-step master class on creating a delicate lilac orchid branch.
How to make an orchid sprig from foamiran?
In this master class we will make an orchid sprig from foamiran. It will decorate your room and complement the flowers that have already faded.
To create it you will need:
- green, lilac foamiran;
- purple pastel;
- damp foam sponge;
- awl;
- scissors;
- thin and thick wire;
- black beads;
- iron;
- foil;
- glue gun

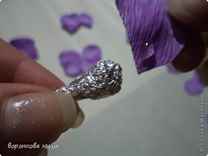
We cut out the templates for the orchid, which are given above in the article. Choose the color of foamiran that you like best, and to tint the middle, take a darker shade of art pastel. For one flower we prepare one blank of each template. We trace all the templates using an awl or a toothpick. We outline petal number 2 once, and then its mirror image opposite. That is, you should get a double part that is connected in the middle.
Let's make two unopened buds: one from green, the smallest, and the second, a little larger, lilac.


Using purple art pastels, we will completely shade the middle of the orchid under No. 1. Template No. 2 will be shaded only in the center, shading closer to the edge of the petals. We will also tint the blanks for the buds. First you need to moisten the foam sponge, apply pastel to it and then paint the foamiran. After this, let the paint dry.


Let's give each piece a shape. Heat up the iron and lay out petal No. 1 for about five seconds. At the same time, constantly press down on the middle and the foamiran will begin to bend. Drop the petal onto the table. In the same way we prepare the fom for the buds.

In the remaining blanks, we process each petal separately. Apply to the iron for 2 seconds, stretch the middle with the fingers of both hands.

Let's start assembling the orchid branch. We cut the wire 15-20 cm long, string one bead, which we place in the middle, and twist the ends of the wire under the bead.

We pierce the wire at the top point of part No. 1. Then we pierce the center of the remaining petals. You can fix each layer with super glue.


For the buds, we will make drop-shaped foil blanks of such a size that they fit in the petals.

We pierce the middle with an awl and thread the wire. We connect the ends under the wide base of the drop.

We collect the buds, glue all the petals in a circle to completely cover the foil.

We wrap the stems of orchid flowers with green tape. Then we collect the twig starting from the smallest bud, to which we attach a thicker wire. We gradually move down the branch, distributing the flowers evenly.


This is how easy it is to make an orchid sprig with your own hands.


An artificial orchid, just like a living flower, fits perfectly into any interior; it looks natural in flower pot, being a worthy decoration of any window sill. The only disadvantage of such a product is the impact sun rays, under their influence the petals may lose their color.
Orchid for gift decoration
As you know, foamiran makes very beautiful hair accessories or interior flowers. But few people thought that any gift could be decorated with such flowers. Today we suggest making a delicate orchid for gift wrapping.

Materials and tools:
- - orchid template;
- — silk foamiran (iveri color);
- - Iranian yellow foamiran;
- - bright yellow silk foamiran;
- — pastel blue, turquoise, yellow;
- - acrylic red paint;
- - gold acrylic paint;
- - needle;
- - sponge;
- - scissors;
- - brush;
- - acrylic varnish;
- — mold of orchid petals;
- - instant glue;
- - iron.
We cut out all the details of the orchid from thick paper - there should be three templates. For orientation, a pattern of an orchid is presented on a piece of notebook paper and all dimensions are indicated.

We attach the templates to the foamiran, trace and cut out the details.

We tint the details of the petals with blue and turquoise pastels, starting to make strokes from the center to the edges.

Apply yellow pastel.

We tint the middle with blue and yellow pastels. Paint the cut blue.

We cut out a mini-strip of 0.5x1 cm from bright yellow fom and make a fringe on both sides.
Dipping the tip of the needle into red paint, we draw rays and dots.

Fold the mini-piece in half and glue it in the middle, without touching the fringe.
Let's return to tinting the petals - enhancing the blue color (in the center). Shade the pastel with a sponge.

We tint the back side of all parts in the same way as the front side, but not so brightly.
After heating the petal on the iron, apply it to the mold and press it with your fingers. We repeat this process with all the petals separately. Place the center on the iron. We wait until the part heats up, takes a convex shape and flies away from the iron.

We form a wave at the edges of the petals. We heat a small area and stretch it with our fingers.

Let's go through blue pastels again. By tinting according to the created texture, we prevent paint from penetrating deep into the surface. This way we get a beautiful marble pattern.

Cover with varnish. Apply varnish to the center piece on each side. Let's dry it.

Apply a drop of gold paint to the sponge and blend it along the petals and the middle (on both sides).

We glue the yellow fringe into the part that will be the center of the orchid. Glue the two main parts with the petals (in the middle).

Glue the finished center to the petals.

We wrap the gift and decorate it a delicate flower orchids.


Foamiran orchid in the interior
A phalaenopsis or cymbidium in a glass vase will look very delicate; a white orchid looks especially sophisticated and delicate - such a flower, made of plastic suede, is quite difficult to distinguish from a living plant. A black orchid branch goes best with white and gray shades.
An artificial orchid made from foamiran is suitable for decorating a hair hoop, hairpin or brooch. It can be attached to a wedding boutonniere or added a small branch to a wedding bouquet.
Many people consider the orchid a symbol of beauty, love, tenderness and perfection. A flower created with your own hands can be a kind of talisman for its owner. Today you can cope with such a task without any problems thanks to numerous master classes from professional needlewomen.
You can make a lot of beautiful flowers with your own hands from different material. It can be plastic bottles, leather, foamiran, satin ribbon etc. Flowers made from any material are very beautiful and unusual. In addition, they will serve you for a very long time and will delight you with their beauty. Today we will look at two interesting master classes on making orchids from foamiran. The author of this master class is Irina Zvereva. Look at what a beautiful orchid Irina made with her own hands and shared with us the manufacturing process.
To make an orchid you will need:
* Foamiran of the desired color.
* Orchid petal patterns.
* Dry pastel.
* Scissors.
* Iron.
* Cotton swab.
* Thermal gun.
How to make an orchid with your own hands:
To make an orchid we need templates. These are the templates we will use during our work. We draw templates on paper or thick cardboard and use them to apply patterns to the foamiran. Foamirn by color choose which one you like best. Then we cut out our blanks. Photos of templates can be either reduced or enlarged, depending on the size of the flower you need.


We carefully apply the edges of the petals to a hot iron and use our fingers to stretch them a little. This is how we process two parts. You should get a slight waviness of the petals.


We wrap the top of the stick with foamiran and then divide it in the middle so that we have a line left.

The photo shows what the middle of the cotton swab should look like. Next, we begin to collect our flower. First, glue the tinted petal around the center.

Then glue the next double petal.

We still have three petals left. First, glue one petal on top, and then two on the bottom. You should end up with an orchid like in the photo.


Look how beautiful orchids Irina turned out.

You can make it from ready-made orchids beautiful jewelry or simply use for interior decoration.


We thank Irina for a fascinating master class on making an orchid with your own hands from foamiran.

Master class - DIY orchid
Target="_blank">http://mnogo-idei.com/wp-content/uploads/2014/06/getImage7-300x212.jpg 300w" width="500" />
Target="_blank">http://mnogo-idei.com/wp-content/uploads/2014/06/getImage-116-224x300.jpg 224w" width="500" />
To make an orchid we will need:
- Foamiran of the desired color.
- Thermal gun.
- Molds.
- Pastel in the right colors.
- Brush.
- Hair fixation spray.
Method for making an orchid from foamiran:
To make a flower, we need patterns; we draw orchid petals on a piece of paper. To make one flower we need 6 petals.
Target="_blank">http://mnogo-idei.com/wp-content/uploads/2014/06/getImage-210-300x224.jpg 300w" width="500" />
We will also need these molds to make an orchid.
Target="_blank">http://mnogo-idei.com/wp-content/uploads/2014/06/getImage-36-300x199.jpg 300w" width="500" />
Cut out the required number of petals.
Target="_blank">http://mnogo-idei.com/wp-content/uploads/2014/06/getImage-45-300x199.jpg 300w" width="500" />
We heat them on the iron and immediately, before the petal has cooled down, use a mold to add texture to the petals.
Target="_blank">http://mnogo-idei.com/wp-content/uploads/2014/06/getImage-56-300x199.jpg 300w" width="500" />
Target="_blank">http://mnogo-idei.com/wp-content/uploads/2014/06/getImage-65-300x199.jpg 300w" width="500" />
We heat the core and give it this shape.
Target="_blank">http://mnogo-idei.com/wp-content/uploads/2014/06/getImage-73-300x199.jpg 300w" width="500" />
Here are the finished petals for making an orchid.
Target="_blank">http://mnogo-idei.com/wp-content/uploads/2014/06/getImage-82-300x199.jpg 300w" width="500" />
We trim the petals a little, but this is optional. Olga thinks it will be prettier this way.
Target="_blank">http://mnogo-idei.com/wp-content/uploads/2014/06/getImage-92-300x199.jpg 300w" width="500" />
Target="_blank">http://mnogo-idei.com/wp-content/uploads/2014/06/getImage-102-300x199.jpg 300w" width="500" />
These are the petals we should get for the orchid.
Target="_blank">http://mnogo-idei.com/wp-content/uploads/2014/06/getImage-115-300x199.jpg 300w" width="500" />
Target="_blank">http://mnogo-idei.com/wp-content/uploads/2014/06/getImage-122-300x199.jpg 300w" width="500" />
Target="_blank">http://mnogo-idei.com/wp-content/uploads/2014/06/getImage-133-300x199.jpg 300w" width="500" />
Target="_blank">http://mnogo-idei.com/wp-content/uploads/2014/06/getImage-142-300x199.jpg 300w" width="500" />
Select the shades you need and tint the base and edges of the petals.
Target="_blank">http://mnogo-idei.com/wp-content/uploads/2014/06/getImage-152-300x199.jpg 300w" width="500" />
This is how it should work! At the end of the work, we fix the pastel with hairspray so that it does not crumble or get dirty! Also, after varnishing, the colors will become a little brighter and more saturated!
Target="_blank">http://mnogo-idei.com/wp-content/uploads/2014/06/getImage-162-300x199.jpg 300w" width="500" />
Target="_blank">http://mnogo-idei.com/wp-content/uploads/2014/06/getImage-172-300x199.jpg 300w" width="500" />
We use decorative wire for ease of assembly. Then we remove it.
Target="_blank">http://mnogo-idei.com/wp-content/uploads/2014/06/getImage-182-300x199.jpg 300w" width="500" />
This is the kind of petal you should get for making an orchid.
Target="_blank">http://mnogo-idei.com/wp-content/uploads/2014/06/getImage-193-300x199.jpg 300w" width="500" />
Then glue the two petals together.
Target="_blank">http://mnogo-idei.com/wp-content/uploads/2014/06/getImage-201-300x199.jpg 300w" width="500" />
Then three petals together.
Target="_blank">http://mnogo-idei.com/wp-content/uploads/2014/06/getImage-212-300x199.jpg 300w" width="500" />
Now we glue the fourth petal; it does not need to be glued at the base.
Target="_blank">http://mnogo-idei.com/wp-content/uploads/2014/06/getImage-222-300x199.jpg 300w" width="500" />
Opposite it we glue the fifth and last petal.
Target="_blank">http://mnogo-idei.com/wp-content/uploads/2014/06/getImage-232-300x199.jpg 300w" width="500" />
We glue the center in the middle of the flower and this is what we get.
Target="_blank">http://mnogo-idei.com/wp-content/uploads/2014/06/getImage-241-300x199.jpg 300w" width="500" />
Target="_blank">http://mnogo-idei.com/wp-content/uploads/2014/06/getImage-251-300x199.jpg 300w" width="500" />
Target="_blank">http://mnogo-idei.com/wp-content/uploads/2014/06/getImage-261-300x199.jpg 300w" width="500" />
We take a thin brush and, using it and acrylic paint, decorate the core of the flower.
Target="_blank">http://mnogo-idei.com/wp-content/uploads/2014/06/getImage-271-300x199.jpg 300w" width="500" />
Target="_blank">http://mnogo-idei.com/wp-content/uploads/2014/06/getImage-281-199x300.jpg 199w" width="500" />
Your DIY orchid from foamiran is ready.
Target="_blank">http://mnogo-idei.com/wp-content/uploads/2014/06/getImage-29-300x199.jpg 300w" width="500" />
You can do a lot beautiful orchids, which can become a decoration for your interior or a hair decoration.
Target="_blank">http://mnogo-idei.com/wp-content/uploads/2014/06/getImage-301-300x199.jpg 300w" width="500" />
Olga made a beautiful panel of orchids and roses with her own hands.
Target="_blank">http://mnogo-idei.com/wp-content/uploads/2014/06/getImage-312-217x300.jpg 217w" width="500" />
Target="_blank">http://mnogo-idei.com/wp-content/uploads/2014/06/getImage-341-199x300.jpg 199w" width="500" />
The flowers are made of plastic suede without the use of special tools. Products made from this material are durable and easy to use.
And to make a twig we need to prepare the materials:
- - yellow plastic suede.
- - scissors.
- - wire.
- - rod ballpoint pen without paste.
- - acrylic paints.
- - lighter.
- - thin artistic brush.
- - sticky floral tape.
- - “Moment” glue.
- - foil.
- - paper tape.

Using the prepared templates, we trace and cut out the necessary parts from the selected suede. Don't forget that there are two flowers on the branch.

Then, in turn, each petal needs to be processed three times. First, use a rod to draw veins along the entire length of the petals. Next, take yellow paint and cover the front side a little, and the pressed stripes will be clearly visible. And for the third treatment, let's take a lighter. Should be warmed up in small areas edges of the petals and immediately use your hands to guide the curve of the edge towards the face of the petal.

Now let's move on to the middle of the flower. Using the template, cut from the selected suede the required part. Prepare a thin brush and red acrylic. You can take a picture of the desired orchid. And try to try to repeat a similar drawing with paint. We paint on both sides of our blank with a brush.


Next we move on to heat treatment of the same workpiece. Let's start with the central round part. Using a lighter, carefully heat the edge and make a small bend, repeating this several times.

Then we heat the area in the middle of the workpiece from the wrong side and use our finger to make an indentation on the wrong side as well.


All that remains is to tilt the small side circles towards the center. We use a lighter, heat the parts and tilt them in the desired direction.

There was a small unfinished area left on this part. This is the place to which we will attach the tongue. It also needs to be tilted slightly towards the center of the part. The workpiece turned out to be of a complex shape.

Let's move on to the part that will serve as the tongue in the flower. First, paint the rounded side with a red tone, on one side.

We direct the heat from the lighter from below and round this part and bend it into a semicircle.

Two parts of the center of the flower are ready.

All that remains is to glue the bottom edge of the tongue to the prepared place.

Now we will make the stamen. We cut off a small strip of suede and take a wire 8 cm long. We wrap the wire itself with adhesive floral tape.

Glue the yellow strip to the edge in the shape of a barrel.

And so, all the details of the orchid are ready. Let's move on to assembling the flower. First we glue the stamen, pierce it with wire under the base of the tongue. We glue the stamen, and the wire itself will serve as the stem of the flower.

We warm the bottom of all the petals with a lighter and slightly tilt the edge downwards, away from the front side.

Next we attach the two upper side petals. We place them horizontally relative to our middle, on its wrong side, near the wire.

Next we glue the top petal and only then place the two lower side petals. We glue all the parts at the bent bottom edges and place them around the wire. All petals should not be pressed tightly together. But if you get an unsightly edge on the reverse side, then it is better to cover it with a small circle of suede.

Don't forget that there will be two flowers on the branch. And we move on to making one bud. Cut a strip of yellow suede 1 cm wide and six cm long. Divide it into 3 parts and round two corners on one side. We get three long petal shapes. Then top part We tint these blanks green. We wrap a small piece of wire with tape and attach a small ball of foil on top. The petals should be slightly higher than the foil part.

Then we simply glue all the petals in a circle onto the foil. The bud is ready.
A peony made from plastic foamiran is a rather lush, beautiful bud that even a novice craftsman can make.
To carry out MK we will need the following types of materials:
- Porous foamiran. To make the craft as realistic as possible, purchase material with a thickness of no more than 1 mm. We will need dark green, dark pink and light pink canvas.
- Fixation tape, which can be light green or green.
- Water-based acrylic paints. To make the artificial flower interesting and as realistic as possible, purchase dark pink, marsh and yellow shades of paint.
- Volumetric thick wire that will bend well, with a diameter of 1-1.5 mm. It will be needed to form the stem. For the leaves you need a small piece of floral or thin wire.
- A set of art brushes, as well as foam rubber from which you need to make a small sponge (or sponge).
- Nail scissors and a standard glue gun. You can use any manicure tool that can easily cut foamiran.
- A beautiful mother-of-pearl stone, a voluminous bead or a piece of foil from which the core of the bud will be formed.
We also need a pattern that can be printed or hand drawn. With its help we will form the petals and components of our bud. When everything you need is on the table, you can begin to create a peony step by step.
- Cutting the component parts of the flower according to our pattern.
- A – 10 light pink petals;
- B – 10 petals of a light pink shade and 5 blanks of a dark pink color;
- C – 10 parts of a light pink shade;
- D – 5 dark pink petals;
- E – 5 dark pink parts;
- Z – 3 leaves of a dark green hue;
- M – 6 sheets of dark green color;
- K and L – 5 dark green sepals;
- F – a blank in the form of a sun with rays, from which we will form an interesting core with imitation of stamens.We cut out a pattern from the existing image, transfer it to light pink foamiran and cut out a circle. After that, cut the rays with sharp ends.

- Tinting leaves and petals
Using acrylic paint, we lightly tint the petals of our peony, trying to get the effect of a non-uniform color (either darker towards the edge of the petal, or darker closer to the base). To do this we need a small brush with which we paint all the petals on both sides.

The second stage is the creation of “living” leaves. For this we also use the technique of manual tinting. We paint our foamiran leaves on one side only with darker green paint, and then draw the central veins in the center of the trefoil, distributing the paint from the center to the edges of the workpiece.

- Corrugation of leaves and petals
The initial stage will be corrugating the petals B. We fold the workpiece in small folds according to the “accordion” principle.

- Flower assembly
We prepare the base on which many peony petals will be fixed. To do this, we form a dense ball from foil, the diameter of which should not exceed 1.5 cm. If you decide to use a bead, then make sure that it has a wide enough hole. We pierce a hole in the foil ball, pour glue into it and immediately thread the prepared wire into the hole.

We string the workpiece G onto the wire and tie all the upper parts with a thread, placing them above the bead.
We dip the tips of the stamens in yellow acrylic paint, and then attach 10 petals A to them using a glue gun.
We fix the petals B, folded like an accordion at the base, so that small folds are obtained. In this way we secure 10 light pink and 5 dark pink petals.
Next next to each other we glue 5 petals C, and behind them, in a checkerboard pattern, 5 more of the same blanks.
The pre-final stage will be gluing five petals D in a checkerboard pattern in relation to the previous ones.
And the creation of the final row of the 5 largest petals of E.
We fix the sepals and begin to collect leaves as shown in the photo.
Decorate the hairpin with a lush poppy
A red foamiran poppy is a great way to decorate any hair accessory or diversify a flower bouquet consisting of wild plants.

To create it we will need:- dense foamiran in black, green and red shades;
- acrylic paint (red and white);
- bright pastels and a sponge for tinting;
- simple threads, a piece of foil, an iron and curly scissors;
- automatic hairpin without decorations;
- glue, a manicure stick or wooden toothpick, and phlox powder.
When all the materials are ready, you can start the master class. To do this, follow the instructions below.
We draw paper templates by hand in the amount of 8-16 pieces. We need 4 small blanks - 5.5 * 4.5 cm, as well as 4 large ones - 7.5 * 5.5 cm.

We cut out a strip of black foamiran and process one side to create a fringe.
We make the base from a ball of foil, the diameter of the workpiece is approximately 1.7-2 cm.
We tint our petals on one side using a sponge.
Smooth out sharp corners with curly scissors.
Lightly touching our petal with a sponge, apply white paint on one side to the bottom of the petal.
We cut out a circle from green foamiran, put a ball of foil in the middle and begin to form a poppy head. We tie the ball with thread as shown in the photo.
Cut off the excess thread. We turn the ends over (turn them inside out) and glue them. You can lightly tint the core, first with red and then with white paint.
We begin assembling the flower by gluing the fringe.
We form poppy petals by heating the material on an iron set to “silk-wool” mode. We fold the warm pieces like an accordion, twist them and stretch out the middle a little. We do this with all the petals.
We paint the fringe a little white. We begin to glue the petals overlapping, forming rows. First there are 4 petals in one row.
Then we glue the large petals below the first row by about 1-2 mm, also slightly overlapping.
We cut out the leaves and apply texture to them, tinting with paint and shading it with a sponge on both sides.

Glue the leaves by sprinkling them with phlox powder.
The flower is ready. Now all we have to do is glue it to the automatic hairpin using a hole punch or glue. You can do your hair!
One of the most luxurious and majestic flowers is, of course, the orchid. The beauty of this flower leaves no one indifferent, which is why many needlewomen try to convey the beauty and stateliness of this flower with the help of artificial materials and often use foamiran for this.


In this article we offer you step-by-step master class and video tutorials on how to make this flower.

If you have a great desire to make such a flower yourself, then stock up on materials for work and go ahead!
To work on creating an orchid you will need:
- foamiran of different colors,
- glue,
- scissors,
- iron,
- foil,
- corrugated paper,
- floral wire,
- pastel pencils,
- floral tape.
Orchid from foamiran: master class
Following MK's tips, our orchid will be little different from a real flower. But before you get started, it’s best to prepare orchid patterns; they will be very easy to cut into according to the template:

Stages of work
We cut a sheet of foamiran of the main color, i.e. the color of future petals, into equal squares with a side of 4 cm, plus cut out 1 rectangle with dimensions of 4x2 cm.

From these blanks we make the petals of the future flower, using a ready-made pattern or drawing by hand on a sheet of paper:

Using pastel pencils, we tint the edges and core of each petal, giving them visual volume:

When all the petals are tinted, we move on to the stage of adding texture. To do this, we will need an iron, with which we will need to heat the petal wrapped in corrugated paper.


Please note that it is advisable to use 1 strip of paper per 1 petal to maintain a clear texture pattern.
After heating, roll the petal in paper into a tight tube and twist it. Keep in mind that these manipulations must be done quickly enough, before the petal cools down.

After we unfold the workpiece, the leaf should take on a new shape:

We bring the shape of each petal to perfection by slightly stretching and pressing on it:

The result should be something like this:

Let's move on to forming the core of the flower. For this we need foil and wire.

A piece of foil needs to be rolled into a small ball, then stretched out a little, giving it an oval shape, and secured to the end of the wire:

We begin to glue the orchid petals to this core.
The petals need to be glued very carefully and evenly so that they do not move apart:

Glue the second row of petals as in the photo :

The result should be a flower template like this:

Let's move on to decorating the wire-stem of the flower. To do this, take tape (you can buy it at a flower or craft store) and wrap it around the entire stem. It is best to wrap it in 2 layers so that the work looks more neat, hiding all the nuances of creating a flower: 
After this, we begin to make the elegant core of the orchid flower. You can use ready-made templates or show your imagination:
Using the template, we cut out a figurine from Thomas and decorate it acrylic paints or a marker. In the place where the cross is, you need to drip a little glue:

Glue a petal of the same color on top of this blank:

And again we drip a little glue to fix the shape of the core:

To make this workpiece look natural and realistic, we heat its edges with an iron, so they curl up a little:


We glue the resulting core into the middle of the workpiece with the petals:

Since there are usually 4-5 flowers on one orchid branch, we should have several blanks:

We connect the finished flowers on the wire to each other using tape. The result is a thick stem that matches a real flower.

As a finishing touch, glue a small bead into the very center. The orchid is ready:

Well, as a bonus - several detailed videos lessons on how to make orchids from foamiran.
A selection of videos on the topic of the article