Laying wave slate with your own hands: the procedure for preparatory and installation work for laying slate in several ways. How to cover a hipped roof with slate? What is the slope of a slate roof?
The construction market is flooded with roofing materials for every taste and budget, which we had not heard of a couple of decades ago. At a time when stores did not have such abundance, slate came to the aid of summer residents under construction. It is too early to “retire” this accessible, inexpensive material, since it is difficult to find an equivalent alternative among materials in the same price category. If you want to cut the cost of building a roof with your own hands in half, read this article on how to properly cover a roof with slate.
Slate is a sheet roofing material with a wavy or flat surface, which is made from asbestos cement by molding. Unpainted slate is light gray, but manufacturers add pigments to it, painting it in different colors. In the assortment of construction stores you will find slate sheets consisting of 6-8 waves, according to the standard, the length of which is 1.75 m. GOST for this type of construction product regulates the thickness of the material - it lies in the range of 5.8-7.5 mm for different types of sheets . Before covering your roof with slate, get to know its advantages:
- Convenience and ease of installation with your own hands. Even a person without construction experience can lay slate. This does not require special skills or expensive tools. You can cut the sheets using a regular hacksaw or grinder, and fix them with slate nails or self-tapping screws.
- Reliability. Do-it-yourself slate roofing is a reliable way to protect the attic from moisture, cold and wind. This material is not afraid of hail or falling branches from nearby trees, because they will not harm it.
- Fire resistance. The fireproof qualities of asbestos cement are another reason to use it as a roof covering, because the chimneys of heating appliances, fireplaces and stoves lead to it. Slate roofing is especially relevant for baths, the chimney pipes of which are heated to a temperature of 750-850 degrees.
- Long service life. If, before covering the roof with slate, you treat the rafter system with a fire retardant and antiseptic, then the service life of the structure will reach 40-50 years.
- Affordable price. Average cost of 1 sq. m of slate roofing, taking into account the price of fasteners and waterproofing, is 200-250 rubles, if you do the work yourself. If you involve a hired team of professional roofers in the process, costs will increase by 50%. But even with the cost of paying workers, it is half cheaper than laying corrugated sheets, metal tiles or ondulin.


Dimensions and weights of different types of slate sheets
Important! Slate has two special features that need to be treated with attention: despite its heavy weight, it is a fairly fragile material. Therefore, when purchasing, be sure to check the integrity of the sheet, make sure that there is a paper spacer between them. For ease of work at the construction site, prepare a level place for unloading and storage in advance by spreading film there.
Requirements for the rafter system
Before covering the roof with slate, the roof rafter system should be properly prepared. The fact is that this roofing material has a significant weight compared to modern analogues. The weight of one sheet can reach 30-35 kg, and this is a serious load for the elements of the supporting frame. When creating a roof project, follow these rules:

Requirements for lathing and rafter system
- To make rafter legs, use boards with a section of 60x150 mm or thicker. The best option is considered to be the highest quality boards 100x150 mm, the humidity of which is not higher than 15-16%.
- To make the sheathing, use coniferous wood blocks measuring 6x6 cm, which will not break under the weight of slate sheets.
- If you nail the sheathing yourself, make sure that each layer of slate is supported by two or more pieces.
- The distance from the edge of the sheet to the nearest sheathing bar should not be less than 150 mm.
Note! The angle of the roof slopes is of great importance. Manufacturers recommend laying slate on roofs with a slope of 22 degrees or more. For single-pitched and gable roofs, slate is used, even if the angle is 5-15 degrees. However, the smaller the angle, the denser the sheathing should be. For the minimum permitted values, a solid base made of moisture-resistant plywood is used.
Calculation of material quantity
Before covering the roof with slate, you should calculate how much material is required. To estimate the required number of sheets, so as not to overpay for unnecessary balances, perform the calculations as follows:
- Take a tape measure and measure the length of the roof along the eaves. If the roof is still in the project, then take this value from the drawing. Divide the length of the eave overhang by the width of the slate sheet you will use. By increasing this figure by 10% and rounding up to whole numbers, you will get the number of sheets in one tier of the layout.
- Measure or find out from the design documentation the length of the roof from the ridge to the edge of the eaves. To calculate the required number of rows, divide this value by the length of the sheet and add 13%. The surcharge compensates for the overlap between the sheets.
- By multiplying the number of sheets in one row by the number of tiers, we determine how much material is required to cover the slope. If the roof has two symmetrical slopes, the result is doubled.
Layout of slate on the surface of the slope
Note! In case the sheet is damaged during cutting with your own hands or during transportation, it is better to have a supply of material, 10% is enough. Asbestos dust generated when cutting slate is dangerous to the lungs, so you should only work in a respirator moistened with water.
Installation principles
The junction of the four corners, which is formed as a result of laying slate, is the main difficulty of installation. To avoid pieces of material breaking off, deformation, and water or wind entering this vulnerable area, there are two proven methods:

Important! Asbestos cement, from which most types of slate are made, changes size with changes in humidity and temperature. Therefore, in order to prevent damage to the integrity of the sheet, holes with a larger diameter than the size of the screw or nail are drilled at the fastening points. The fasteners are not screwed in all the way, leaving a gap that compensates for fluctuations during heating.

The process of installing painted slate on a gable roof sheathing
Video instruction
 Asbestos-cement slate is one of the most popular roofing materials. The main advantages of this material include resistance to temperature changes, strength, frost resistance, and resistance to ultraviolet exposure.
This material is also easy to work with, so you can cover the roof of a building yourself without involving additional labor.
Advantages of slate
Today, slate is one of the most popular roofing materials. In the production of this material, modern technologies and the latest equipment are used. Due to this, the slate acquired a more attractive appearance, and also became stronger and more durable.

Wave slate has the following advantages:
- Low cost;
- Strength;
- Moisture resistance;
- Ease of installation;
- Non-flammability;
- Resistance to low temperatures and exposure to sunlight;
- Long service life;
Slate differs from other roofing materials in that it is very convenient to work with. Therefore, you can install the slate yourself, without involving paid labor.
Also important advantages of slate are high quality and low cost.
This roofing material can be used to cover any roof: gable, single-pitched, hipped or hipped.
However, it is better to lay wave slate on a roof whose slope is more than 35 degrees. In this case, the likelihood of snow accumulation will be lower.
Before covering the roof with slate with your own hands, you need to study the basic nuances of installing roofing material. In this case, the roof will have a long service life.
Types and characteristics of slate
Slate production is a simple process. For its manufacture, a mixture of asbestos and cement is used. When asbestos is mixed with cement, a rigid reinforcing mesh is formed.
Today there are also ondulin and metal slate. For the production of ondulin, glass fiber and cellulose impregnated with bitumen are used.

metal slate
Asbestos-cement slate is most often used in roofing.
This material has a low cost, and the service life of the roofing covering is from 35 to 40 years.
As a rule, domestic material is used for roofing. Sheets can have six, seven or eight waves. The thickness and width of slate sheets depends on the number of waves. The thickness of the six-wave sheets is 5.6 and 7 millimeters, and the width is 1125 millimeters. Seven- and eight-wave slate sheets have a width of 1130 and 980 millimeters, and a thickness of 5.8 millimeters. The distance between the bottom and the crest, as well as the wave pitch, can vary.
Required Tools
To perform installation work you will need the following tools:
- level;
- roulette;
- screwdriver or drill;
- twine;
- hammer;
- grinder or hacksaw;
- pencil.
Preparation for installation
Laying slate sheets on the roof of a house with your own hands is carried out in several stages:
- Calculation of the roof area, as well as the required amount of building material. Also at this stage, the purchase of material and its delivery are carried out.
- Manufacturing of sheathing for roofing;
- Installation of a waterproofing layer;
- Laying roofing material.
The installation of slate must be taken very seriously, since the service life of the building's roof depends on it.
To correctly calculate the amount of slate, it is necessary to calculate the usable area of the sheets, which differs from the actual area. When calculating the usable area, it is necessary to subtract the amount of horizontal and vertical overlaps from the actual area.
When calculating the number of sheets, you should also take into account the scrap and waste that remains after cutting the material. You also need to take into account that the sheets can break if used incorrectly.
Methods for laying slate on a roof
There are two ways to lay slate on a roof. The “take-off” method is the simplest, due to which it has become most widespread. The essence of this method is that the next roofing sheet should overlap the previous one by one wave.

slate installation methods
As mentioned above, the main advantage of this method is the ease of installation. Laying slate "in a run" has several disadvantages. When using this method, the edge at the edge of the roof is not very smooth, due to which the entire appearance of the roof is spoiled. Therefore, the edge must be trimmed. Also, the disadvantages of this installation method include increased consumption of roofing material.
The next method is that the slate sheets are completely combined with each other vertically. This is achieved by filing adjacent corners. For example, when laying roofing material from left to right, trimming should begin at the point where the second slate sheet from the bottom row meets the first sheet from the top row.
When using this method, the consumption of roofing material is minimized. However, this method is more labor-intensive compared to the first.
Installing the sheathing
For the manufacture of sheathing, only high-quality wood should be used. It should be well dried. The material should not contain a large number of knots, since in this case it will not be able to withstand heavy loads.

asbestos-cement slate lathing
Requirements for roof sheathing:
- made from boards at least 15 millimeters thick. For these purposes, you can use a sanded unedged board. It must be laid in a checkerboard pattern or in a running pattern in increments of 200 millimeters. You can also use timber with a cross section of 50×50 millimeters. When choosing the distance between the bars, you should focus on the length of the roofing sheet. However, it should be taken into account that each sheet of slate must be placed on at least three supports;
- in the areas of installation of chimneys, junctions of slopes and other technological pipes, additional contouring should be done with lathing;
- To increase the waterproofing properties of the roof, it is advisable to install a waterproofing layer.
Before covering the roof with slate with your own hands, you need to install the rafter legs. Then a layer of waterproofing is laid on them, which prevents water and condensation from penetrating under the slate covering and entering the attic.
Previously, roofing felt was used as a waterproofing material. However, today there are a large number of insulating materials that have high technical characteristics.
Slate fastening
Slate sheets are secured using screws, self-tapping screws or nails. Screws used to fasten slate must have large heads with rubber seals. It is advisable to pre-drill holes at the location of the fasteners. Slate sheets must be secured to the crest of the wave.

attaching slate to sheathing
The first nail must be driven into the lower part of the sheet, namely into the second overlapped slate wave. In this case, it is necessary to make an indent from the edge of approximately 120-150 millimeters. The second nail should be driven in after installing the top sheet of slate into the second wave diagonally. This method is considered the most reliable and economical. A large number of fastening points can cause rapid failure of the roofing material.
How to lay slate correctly
To trim unnecessary parts of slate, you should use a hacksaw or grinder. To prevent the corners from breaking off, the work must be done carefully.

According to the installation instructions, it is advisable to start installation from the lower left corner of the roof. Then you need to move along the cornice, gradually rising to the ridge. You need to lay the first row along a pre-tensioned twine. Then the roof overhang will be even.
When laying slate sheets, it is necessary to overlap horizontally and vertically. Vertical rows should have an overlap of 20 to 25 centimeters. The simplest method of laying is that each new row must be offset by four waves, i.e. installation of sheets is carried out in a checkerboard pattern.
To do this, every second row should start with a cut sheet consisting of 4 waves.
To fix the slate sheets, you need to make holes in them. Then install self-tapping screws, special nails or screws into these holes.
The diameter of the hole should be a couple of millimeters larger than the diameter of the nail. Do not drive nails without making a hole in the slate sheet as this will cause the roofing material to break.
The fasteners must have a special rubber gasket. The fasteners must securely fasten the slate sheets to the sheathing. However, they should not go all the way in.
Eight-wave slate should be fixed in waves 2 and 6, and seven-wave slate in waves 2 and 5. The interval between fasteners should be approximately 10 cm.
Video on how to properly cover a roof with slate:
Proper installation of slate also includes work on the construction of the roof ridge. A wooden beam is installed on this roof element and two sheathing beams are fixed along its entire length on both sides.

slate roof ridge
Upon completion of laying the slate sheets, the brackets necessary for installing portable walking bridges on the slopes, as well as the ridge beam, are installed on the beam installed on the ridge. The upper edge of the ridge beam is rounded and then covered along the entire length with rolled material. Next, the ridge parts are installed.
First, the longer ridge element (KPO-1) is installed. It should be positioned with a wide socket towards the pediment. Then it is covered with a ridge element (KPO-2) from the side of the adjacent roof slope. Next, the holes for fasteners are marked. Through both ridge elements, 2 holes are made along the longitudinal axis of the wave.
They also drill 2 holes on the flat flaps of the ridge elements. These holes must be made in such a way that they pass through the crests of the slate sheets.
The roof slope is covered with wedges (oblique parts of sheets) at the point of contact with the rib. Their dimensions should be determined during the work. These elements should be fastened close to the rib beam. They are fixed using nails or screws.
Next, you need to attach a piece of rolled material to the edge of the sheathing. The width of the segment should be 35 cm. Then KPO skates are mounted in pairs from bottom to top. The method of fastening is the same as on the skate.
Slate painting
As you know, over time, slate roofing becomes covered with moss and becomes gray-green in color. Such a roof can ruin the appearance of the entire building. In this case, slate is often painted.

Before painting slate, you need to stock up on the following tools and materials:
- Bulgarian;
- metal brush;
- drill;
- glasses;
- spray;
- respirator or regular mask;
- paint (enamel or acrylic);
- antiseptic for construction;
- brushes;
- primer.
The slate painting process can be divided into the following stages:
- thorough cleaning of slate;
- treating the roofing with an antiseptic;
- the roof surface is covered with a primer;
- the first layer of paint is applied to the slate;
- a second layer of paint is applied to the roofing surface.
When painting slate, remember that the first layer is the main one. When applying it, two-thirds of all paint is consumed. After applying the first coat of paint, you need to make sure that there are no missing areas, unpainted corners or ends on the roof. You also need to carefully paint all hard-to-reach areas of the roof.
Apply a second coat of paint to the slate only after the first layer has dried. This layer plays a very important role and should not be neglected. The second coat of paint gives the slate roof a uniform color. Also, when applying the finishing layer, you can remove stains remaining after applying the first layer. When applying the second layer to the roof, a third of all paint is consumed.
How to cover a roof with slate: installation features
Laying slate on a roof is not particularly difficult if you first familiarize yourself with the work technology and prepare the necessary tools and fasteners.

Main characteristics of slate
Despite the emergence of new roofing materials, the popularity of traditional asbestos-cement slate remains quite high. This is explained by the affordable cost of the material, the ability to install the roofing with your own hands, without the use of specialized tools. Classic slate is suitable for simple single-pitched and double-pitched roofs; it can be used to cover a hipped or hipped roof.
Slate is highly resistant to static loads, resistant to aggressive environments, and is easy to process. The disadvantages include the rather large weight of the material - when installing it yourself, you need to attract one or two assistants to lift the slate sheets onto the roof without the risk of damaging them.
When considering the question of how to cover a roof with slate, it should be noted that this material is best used for laying on roofs with simple geometry. It is best if the roof has a slope of up to 20° or more than 35°, since in this case the likelihood of snow accumulation in winter is reduced.
The technology for laying covering on a pitched roof involves the installation of slate sheets that comply with GOST 30340-95. It could be slate :
- six-wave (sheet thickness 5/6/7 mm, width 1125 mm);
- seven-wave (sheet thickness 5 – 8 mm, width 980 mm);
- eight-wave (sheet thickness 5 – 8 mm, width 1130 mm).
The length of any type of slate sheet is 1750 mm .

When choosing slate, you need to pay attention to its markings, which indicate the height and pitch of the wave. The arrangement of sheets of material on the roof should be developed taking into account these parameters. The wider the wave pitch, the larger the area of material spent on vertical overlap. Selecting slate and the method of laying it is based on the size and configuration of the roof slopes.
When determining how to cover a roof with slate, you need to take into account the drainage system. If the gutter for collecting precipitation is supposed to be located under the roof overhang, it is enough to lay the outermost row with an overhang of 200-250 mm relative to the wall of the building. If water from the roof will drain directly onto the ground, the overhang should be at least 400 mm.
Slate rafter system
Before you install the roofing yourself, you should make sure that the rafter system is suitable for laying slate. This material belongs to the heavy category, so the roof frame design must be designed for high loads, which include:
- total weight of the roofing pie;
- atmospheric loads;
- the weight of people installing, maintaining or repairing the roof.
If the roof is designed for metal tiles, ondulin or other lightweight materials, it may be necessary to reduce the installation pitch of the rafter legs or use struts to increase the rigidity of the wooden trusses. Particular attention should be paid to the roof frame if slate is intended to be used to cover an old soft roof.

The minimum cross-section of rafters for a slate roof is 50×180 mm, the sheathing is made of 60×60 mm bars or unedged boards 15-25 mm thick. The pitch of the board sheathing should be 200 - 1000 mm. When using sheathing made of bars, it should be taken into account that each sheet must be supported by at least three horizontal jumpers. A 60×120 m beam or a 60×150 mm board is mounted in the ridge part.
To properly lay slate, the sheathing must be made of dry lumber that does not have deformations.
If you plan to install a chimney or exhaust pipe on the roof, you need to make a special sheathing for the structures before laying the roofing. The arrangement of the drainage system should be completed before laying the roofing. On the bottom row of the sheathing it is necessary to fill a strip of metal about 300 mm wide and 2-3 mm thick, which will prevent the destruction of the lower edge of the roof under load. The metal strip should be waterproofed on both sides, and holes should be made for roofing fasteners.
How to cover a roof with slate?
If you are going to install a slate covering with your own hands for the first time, you should know that this material allows you to attach no more than two layers at one point. Thus, the installation scheme should be well thought out at the roof design stage .
The sheets must be mounted with a horizontal overlap in one or two waves. A single wave overlap is most often used if it is necessary to cover a fairly steep slope with a small snow load. An overlap of two waves is required for flat slopes; this design is much more reliable, but the total cost of the coating with such installation increases, especially with a large wave pitch. Vertically, the top sheet must overlap the bottom sheet by at least 200 mm .

The installation technology requires starting installation from one of the lower corners of the slope and continuing along the eaves overhang. The slate should be laid taking into account the wind rose: the overlap should be located on the leeward side. It is recommended to lay the first row of sheets along a pre-tensioned rope so that the overhang is neat and even. To avoid combining more than two layers of slate at one point, various installation options are used. The most popular methods are staggered installation (with offset) and without offset.
The staggered installation is popular due to its simplicity. In this case, the new row is laid with an offset relative to the bottom one. Thanks to this, it is possible to avoid the overlap of waves and no more than two sheets of slate are joined at any point. When installing with offset, it is necessary to trim the outer sheets and trim the top edge of the last row on the roof slope.
Staggered laying is ideal for installing eight-wave slate - just offset in four waves and use halves of cut sheets to start each odd row. The offset lines in this installation option are arranged aesthetically, in a checkerboard pattern.
If you lay slate without displacement, you can save roofing material, but this is a more labor-intensive option, which should be taken into account when starting installation yourself. In this case, it is necessary to trim the corners to the width of the wave and 120-140 mm in height. To lay the covering elements from left to right, the lower corner of each sheet of the top row is trimmed from the side covering the previous slate sheet of the horizontal row.

The question of how to cover a roof with slate is directly related to the choice of fasteners and the method of their installation. Slate nails, self-tapping screws and self-tapping screws are characterized by an enlarged head and are installed using a special rubber gasket, which ensures the tightness of the fastening point. The fasteners should not be driven in or screwed in all the way .
To avoid damage to slate sheets during installation, it is recommended to mark and drill holes in them for fasteners in advance. The holes should have a diameter 2-3 mm larger than the diameter of the nail or screw.
The slate is attached to the roof only at the crest of the wave. The first attachment point is located in the lower part in the second (overlapping) wave with a distance of 120-150 mm from the edge. The second attachment point is diagonally from the first, and the attachment at the top in the second wave is carried out after laying the overlapping slate roofing sheet.

After installing the covering with your own hands, you should install special ridge elements made of asbestos cement, arrange all abutments and joints, ensuring reliable waterproofing.
Safety rules and maintaining the integrity of slate
When working on the roof, not only installation technology must be observed, but also safety precautions. It is necessary to use safety cables and ropes. If the height of the building exceeds 6 meters, fencing should be provided. To carefully lift the slate sheet, it is recommended to use a nylon cable and a pulley system. If you need to cover a low building, assistants can supply the material.
Walk on the installed surface carefully. In order to freely walk on a slate roof during its repair or maintenance, it is necessary to install wooden ladders to distribute the load.

Compliance with safety precautions implies the use of protective equipment when working with asbestos-cement material: when drilling and cutting slate sheets, use a respirator correctly to protect the respiratory tract from harmful dust.
How to cover a roof with slate - the main points
The popularity of a roof made of asbestos-cement corrugated sheets is explained by its long service life, low cost, practicality, simple installation, and even more modern products, for example, metal slate for roofing, cannot replace these products in the building materials market. Wavy slate sheets cover buildings for various purposes.
Creating lathing for asbestos cement sheets
Laying slate on the roof is done on a strong and properly executed base, which is a slate lathing. made of wooden blocks with a cross-section of 60 millimeters by 60.

They are laid out in this way before covering the roof with slate so that they alternate in height: for odd elements it should be 60 millimeters, and for
even - 63 millimeters. Since the bars have the same dimensions, wooden planks of 3 mm thickness are built onto even parts. This arrangement of the sheathing ensures a tight fit of the sheets in areas of overlap.
First, the sheathing bars are installed in increments of 530 millimeters in the direction from the eaves to the ridge, using screws, nails or anti-wind staples. The base for this roofing material is made in such a way that it is possible to install a whole number of sheets in two directions - longitudinal and transverse. If this condition cannot be met, then the penultimate sheets located in the transverse rows, before attaching the slate to the roof, are cut off at the gable overhang, and those located in the longitudinal direction - at the ridge.
The main points of laying slate
When creating a slate roof with your own hands, you should not forget that the outer side of the sheets must be smooth. They are laid out like this:
- the sheets are fastened in the transverse direction from right to left, while ensuring an overlap of one wave size;
- in the longitudinal direction, the slate is mounted from bottom to top, thereby obtaining a 140-mm overlap of the row of roofing material laid below.

Before covering the roof with slate with your own hands, you need to familiarize yourself with the methods of laying it.
Today, there are two options for arranging sheets relative to each other:
- by shifting the longitudinal edges one wave relatively below the laid slate. One to three waves are cut off from a certain number of sheets that cover the surface of the roof from the eaves to the ridge along the edge of the roof;
- alignment of longitudinal edges in all sheets laid above. In this case, they provide for cutting off the corners of the material while simultaneously ensuring straight lines of joints (read: “How much slate is needed for a roof”).
Installation procedure for slate roofing
They begin installing a slate roof by checking the asbestos-cement sheets for compliance with the declared dimensions and looking for defective products (more details: “Size of slate sheets and its varieties”). Then the corners or longitudinal strips are cut.

You must follow the rules on how to lift slate onto the roof. The sheets are transferred one by one to the roof and secured.
The sequence of actions for installing the roofing is as follows:
- start laying from the lower right corner of the slope, rows of sheets follow one after another with the necessary overlap, as shown in the photo;
- holes for fasteners are drilled before covering the roof with slate using an electric or hand drill, and the diameter of the drill should exceed the diameter of the nails or screws by 2 millimeters;
- fastening elements are used together with metal or rubber washers, lubricated with a composition based on natural drying oil. They are inserted into the prepared hole, and then driven into the block with hammer blows. In this case, nails with a prefabricated head, the size of which is 4 by 100 millimeters, and washers with a diameter of 18 millimeters are used. Drive the nails in until excess grease appears from under the washer. Experts recommend lubricating the nail heads with the same composition, and after drying, painting them to match the color of the slate sheets.
Laying slate on the roof, detailed video:
Installation of a ridge on a slate roof
The technological process, which provides for how to properly cover a roof with slate, includes work on arranging the roof ridge on the roof. A wooden block is mounted on this element and 2 sheathing beams are attached to both sides along its entire length.

After completing the covering of the slopes with asbestos-cement sheets, brackets are mounted on the wooden beam installed on the ridge for attaching portable walking bridges and a ridge beam to them. Its top edge is rounded before covering the roof with slate for the ridge. The block along its entire length is covered with rolled material. Only after this they begin to lay the ridge slate.
Installing a roof ridge on a pitched slate roof is not difficult. First, the KPO1 ridge is installed with a wide bell to the pediment. From the side of the adjacent slope it is covered with a KPO2 ridge. Then mark the holes for the fasteners. Drill 2 holes along the longitudinal axis of the wave through both skates. It is also necessary to make two more holes on the flat flaps of the ordinary skates so that they simultaneously pass through the crests of the waves on the slate sheets for the main covering.
The roof slope at the junction with the rib is covered with wedges (as the oblique parts of the sheets are called), their dimensions are determined directly during the work. These elements are mounted close to the rib beam and secured in a similar way to slate using screws or nails.

A piece of rolled material 35 centimeters wide is attached to the edge of the sheathing and then KPO skates are laid in pairs from bottom to top. The mounting method is the same as on the skate.
You need to know not only how to properly cover a roof with slate, but also how to carry out preventive measures that will ensure a long service life of the coating. Information regarding troubleshooting and repair work on roofs made of asbestos-cement sheets would be helpful.
Slate painting
After completing the installation of a slate roof, painting of its surface is required, since this material is produced and sold in gray color. Applying acrylic paint will significantly improve the appearance of the roof and extend its durability, as it is resistant to precipitation (more details: “Painting slate - characteristics of the material”).

After painting the slate, a protective layer appears on it, which prevents the destruction of the material and prevents it from absorbing water. In addition, the frost resistance of asbestos-cement sheets increases. Also, a layer of paint will protect against the appearance of moss and lichens on the roof surface.
Slate roof repair
Often, during operation, cracks and chips appear on sheets of material, and the question arises of how to repair a slate roof correctly so that leaks of the roofing covering do not appear during precipitation (read also: “How to repair slate”).
In this case, damage can be eliminated by applying putty:
- chalk and drying oil are used to prepare the putty solution;
- areas with defects are coated with putty and bitumen mastic is applied to the cracks. After it has dried, it is painted over with oil paint.
The above method allows you to eliminate small cracks, but if they are large, then they are recommended to be eliminated by gluing fabric patches. But before repairing a slate roof using this method, it is necessary to clean and prime the areas with drying oil. To apply the patches, use thick oil paint. They should be slightly larger in size than the damaged areas - about 2-3 centimeters.
If there are holes in the slate, cement mortar is used to eliminate them, which is made with sand in a 1:1 ratio. The applied composition is smoothed, primed, then completely dried and painted.

If none of the methods helps, then you should replace the damaged asbestos-cement sheet with a new product. First of all, the element with the defect must be removed; to do this, loosen the fastenings on the adjacent sheets of slate by partially removing the fasteners. All nails are removed from the damaged roofing product using a nail puller (read also the article: “What is the size of slate”).
To install a new element in place, one worker lifts the weakened roofing components located from the installation site on the sides and top, while the second person places it on the edge of the sheet located on the side and moves it towards the ridge. The new product is then placed under a sheet secured on top of it. Loose nails are returned to their original position. Thus, the repair can be considered complete and the roof will no longer leak.
How to properly cover a roof with slate with your own hands?

Despite the variety of roofing materials, slate still remains one of the most popular coatings. Affordable, durable and reliable material can significantly reduce home expenses, especially if you know how to lay slate on the roof with your own hands.
Properties of slate
Slate is a sheet roofing covering with a wavy or smooth surface, made from asbestos cement by molding. An unpainted sheet has a light gray tint, but manufacturers add various dyes to the composition, so you can find sheets of any tone. The product range is wide: sheets of 6, 7, 8 waves are offered for sale, the length of which, in accordance with the standards, is 1.75 m, thickness 5.8-7.5 mm - depending on the type of sheet.
The advantages of the material include:
- Simplicity and ease of installation with your own hands. A person without special roofing skills can cover a roof with slate. You will need a grinder or a hacksaw, special fasteners and a little patience.
- The reliability of the material is ensured by the production process; the sheets are not afraid of natural and climatic influences, falling debris and branches.
- The sheets are fire-resistant due to the asbestos cement included in the material. That is why slate roofing is especially relevant for bathhouses, the chimney pipes of which heat up to 800 degrees or more.
- A long service life (up to 50 years) allows you to do light restoration work on the roof, without capital investment in repairs.
- The affordable price complements the positive qualities of the material.
With all the advantages, there are disadvantages: a significant mass of sheets and asbestos is a rather harmful product for humans. But there are many more advantages, which is why slate roofing remains one of the most popular in private construction.
Important! It should be remembered that this is a fragile material and therefore requires especially careful inspection of the elements upon purchase, careful transportation and storage.
The easiest and fastest way to install a simple slate roof with your own hands with slopes of no more than 35°. On this slope, less water and snow deposits accumulate. There are several varieties of roofing material in 6, 7, 8 waves, the selection is carried out depending on the marking (height, wave pitch). The layout of sheets on the roof is based on these parameters; with an expanded wave pitch, more material is spent on the vertical overlap.
When choosing sheets, look at the characteristics of wave slate:
Brand according to GOST, sheet dimensions
Weight of one sheet (kg)
Important! When determining how to cover a roof with slate with your own hands, the drainage system is taken into account. If the gutter is located under the overhang of the roofing carpet, the outermost row is laid with an overhang of at least 250 mm from the wall panel of the building. When water flows from the roof directly to the ground, the overhang should be at least 400 mm.
Calculation of material quantity

Laying slate on the roof requires a preliminary calculation of the purchase volume. The calculations are carried out as follows:
- The length of the roof is measured along the overhang of the eaves (can be taken from the drawing). The indicator is divided by the width of the sheet, the figure is increased by 10% and rounded up - you get one (first) tier of roofing carpet.
- The length of the roof from the ridge to the overhang is divided by the length of the sheet plus 13% (this is the overlap) - the required number of rows is obtained.
- All that remains is to multiply the amount of material in one row by the number of tiers and, as a result, the required volume of material purchases. If the roof has two slopes, the result is doubled.
Important! In case the sheets are damaged during transportation or installation, it is better to have some supply of material (approximately 10%). When working with the roofing product, you should only wear a respirator dampened with water, as asbestos dust is very dangerous to the lungs.
Rafter system and slate sheathing

Before covering the roof, the rafter system and sheathing are prepared. The large weight of the sheets implies strong support; it is worth taking note of the advice of roofers:
- For rafter legs, take boards with a cross-section of 60x150 mm, standard 100x150 mm with a moisture content of no more than 15%.
- The lathing is made from softwood timber measuring 60x60 mm.
- The sheathing step is made in such a way that each sheet of slate rests on two bars.
- The intermediate distance from the edge of the sheet to the bar (nearest) of the sheathing should not be lower than 150 mm.
- Near chimneys, junction points of slopes, and other pipes, additional contouring is performed with lathing.
- A layer of waterproofing wouldn't hurt.
So, before laying the slate with your own hands begins, a rafter system is installed, a sheathing is placed on it, a layer of waterproofing, and only then the sheet roofing material.
Important! The angle of the slope is of great importance. If the indicator is less than 22°, manufacturers do not recommend using slate; shed roofs can be covered with a slope of 5-15°. The smaller the angle of inclination, the denser the sheathing becomes! With minimal slopes, a continuous type of sheathing is made of waterproof plywood.
Slate fasteners

The slate sheet is secured with screws, self-tapping screws or special nails. Screws and self-tapping screws must have large heads with a rubber cap. Before screwing in the fasteners, it is advisable to mark the holes. Sheets of roofing material are attached at the highest point of the wave.
We do this: the first nail is driven into the bottom of the sheet - this is the second overlapped wave. The distance from the edge is no more than 150 mm. The second nail is driven in after the top sheet is attached into the second overlapped wave diagonally. This method of fastening is considered the most reliable and economical. Too many nails can cause rapid deterioration of the material, but you cannot skimp on fasteners - the required number of fasteners is 20 pcs.
Installation of roofing material

The most difficult stage is the junction of the four corners. To prevent slate deformation and corner chipping, there are two options:
- Laying slate “in a running start”. To do it right, the sheet of the second tier is cut into 1-2 waves to match the joints. The method is good for wide and short slopes, this minimizes costs. This option is also applicable if a home craftsman undertakes to lay slate on the roof for the first time - it is impossible to make a mistake here.
- A slate roof can be made by cutting the corners of the sheet. For this, a template is made with dimensions of 130 mm horizontally and 20-140 mm vertically. If you lay slate in the classic version with one wave overlapping, then the corner of the first and last sheet is not trimmed. The remaining sheets are cut at 1-2 corners, depending on their location in the masonry.
Advice! In order not to deform the sheets of roofing material, it is better to trim with a hacksaw.
- The installation technology requires starting the roof covering from the lower left corner, gradually moving along the eaves and rising to the ridge. The very first row needs to be made along the twine in order to maintain the evenness of the layout and overhang.
- To properly cover a roof with slate with your own hands, you need to make vertical and horizontal overlaps. The vertical is 20-25 cm, but the task will be simplified by shifting each row by 4 waves - that is, the roof is laid in a checkerboard pattern. To avoid mistakes, place a sheet cut into 4 waves at the beginning of each new row.
- The fasteners must have a rubber gasket and securely fasten the sheets to the roof, but do not put pressure on the wave or go in all the way.
Advice! The asbestos-cement component in the material deforms when changing humidity and temperature conditions, changing the dimensional gradations of the sheet. To minimize risks, holes with a slightly larger diameter (+0.1-0.2 cm) are drilled at the material attachment points. The fasteners are firmly seated, leaving these mini-gaps as compensators for vibrations during heating/cooling.
Important! Slate sheets in 8 waves are fixed on the 2nd and 6th waves, in 7 waves on the 2nd and 5th waves. The interval between fasteners is approximately 100 mm.
Having understood how to properly cover a roof with slate, you should decide on the lining of the ridge element. Cut it this way:
- Mount a wooden block along the entire length of the ridge, fix the sheathing beams on both sides.
- As soon as the installation of the sheets on the slopes is completed, install brackets designed for installation of portable bridges and the ridge beam on the ridge beams.
- The upper edge of the beam on the ridge is rounded, now we cover the entire length with rolled material and then install the ridge parts:
- The first to be mounted is the long element KPO-1, located with a wide socket towards the pediment;
- then place the second ridge element KPO-2 on top, placing it on the side of the adjacent roof slope;
- if you have already made markings for fasteners earlier, then repeat, but through both ridge elements along a pair of holes on the longitudinal axis of the wave;
- drill 2 holes on the flat flap elements of the ridge sheets so that they pass through the crest of the slate sheet wave.
- The roof is covered with wedges (oblique parts of sheet material) at the point of contact with the rib, the dimensions are determined locally, but the fastening must be close to the rib beam, we use screws or nails.
All that remains is to fasten a piece of rolled material covering the joints to the edge of the sheathing, and the width of the piece should be at least 40 cm. And at the end, mount the KPO ridges in pairs, starting from the bottom, the fastening method is the same as on the ridge. If you have any questions about how slate is laid on a roof or ridge, you should watch a video from professionals.
It is worth noting that a person who has laid slate at least once in his life can handle the job quickly and without any problems. And to make the house beautiful, the sheets can always be painted in a bright color or choose a shade to match the wall panels. The main thing to remember is: the first layer of paint is the main one; a third of the total volume of the paint composition is spent on it; subsequent layers need to be applied only as the previous ones dry.
Sources:

Slate has long been used as a roofing material, and it has not lost its popularity today, especially since everyone can handle roofing work on their own if you know how to cover a roof with slate.
The main advantages and disadvantages of slate
The advantages of this roofing material include:
- non-flammability,
- ease of installation,
- strength and cheapness,
- long service life (35–40 years).
A slate roof fits any building design, looks beautiful and lasts a long time.
Flaws:
- relatively large weight: more powerful rafter structures should be made,
- fragility: may break if transported or handled carelessly.
Types and sizes of corrugated slate sheets for roofing
Slate sheets are produced in 6, 7 and 8 wave. The standard sheet length is 1750 mm, the width depends on the number of waves and is shown in the figure, thickness from 5.8 to 7.5 mm, wave pitch 150 or 200 mm.

The height of the ridge (wave) is 40 mm for 7 and 8-wave sheets and 54 mm for 6-wave sheets.
Features of rafter systems for slate roofs Reinforced sheathing
The slate is fastened to the roof using lathing, for which a 60x60 mm block and rafter boards 60 mm or more thick are used. This is explained by the increased load of roofing material on the rafter system. The distance between the sheathing bars is made such that the slate sheet lies on at least two of them with a margin of 15 cm on each side.
The smaller the slope angle, the stronger the sheathing
For slate roofs, a slope angle of at least 22° is recommended. For single-pitch and gable roofs, the angles of inclination may be smaller, but reinforced sheathing is required. The principle of reinforcement for different slope angles is shown in the figure. A vapor barrier is placed under the slate, especially if it is planned to insulate the roof.
Important! Before laying slate, all wooden structures must be treated 1-2 times with an antiseptic with fire-retardant properties. This will protect them from rotting, fire and extend their service life.

How to determine the amount of slate for a roof
When planning to do the work yourself, it is important to correctly calculate the amount of slate for the roof so that there is enough material and there is no unnecessary waste. For a person familiar with the basics of geometry, such calculations will not be difficult. For a roof with one or two slopes, you will need to measure the width and length of the house, and the angle of inclination of the slope.
A simpler calculation of slate based on roof dimensions is done like this:
- determine the size of the roof along the eaves, divide the resulting distance by the size of the sheet width and add 10% to obtain the number of sheets in one row;
- measure the distance along the slope from the ridge to the cornice and divide it by the height of the slate sheet, get the number of rows, increase the result by 13% for the overlap;
- the resulting numbers of rows and sheets in one row are multiplied and the number of slate sheets per slope is obtained. If the roof is gable, the result obtained is doubled.
For hipped roofs, the area of the slopes is calculated geometrically (the area of the triangle and the area of the trapezoid, as shown in the figure), divided by the area of the slate sheet and added 15%.
Important! When buying slate, you should pay attention to its integrity. Sheets of slate should be covered with paper or film. Sheets should be stored on a flat, horizontal surface, protected from moisture and sunlight.

Preparatory work for roof installation
Before you begin work on installing a slate roof, prepare all the necessary tools and a flat area on which you will cut the sheets and drill holes in them. The area should be such that the sheet can be approached from any side.
Tools and equipment
To install a slate roof you will need: a hammer, slate nails or self-tapping screws, a drill, a grinder or a hacksaw, a respirator, paint for painting the cuts, a stepladder, a ladder, ropes, metal hooks.
How to lift slate onto a roof
Those who plan to do their own roofing often have the question of how to lift slate onto the roof. This is done using a rope and two hooks. The sheet is hooked from below with two hooks to which a rope is tied. The rope along with the slate sheet is pulled onto the roof. You can feed the sheets by hand using a stepladder if the work is performed by two or three people.
Preparing slate sheets
Before laying slate on the roof, if necessary, unpainted sheets can be impregnated with a water-repellent composition or painted with acrylic, water-dispersion or alkyd paint. The paint closes microcracks, makes the slate smoother, and snow rolls off it more easily in winter.
Depending on the ambient temperature, slate is subject to deformation, so there should be a small gap between the nail and the asbestos cement. It is made by drilling holes in the ridge of slate 2-3 mm larger in diameter than the nail. You can drill these holes at the place where the sheets are laid, if it is more convenient.
Laying slate on the roof, how to do it correctly with your own hands
The drain is installed before the roofing work begins. Slate sheets begin to be laid from the bottom row.
How to lay slate on a roof
- In order for the sheets to lie flat, a cord is pulled along the cornice at a distance of 15 cm from the edge and the sheets are leveled along the cord;
- lay the roofing material staggered with an overlap of 1–2 waves, sheet on sheet, 15–20 cm row on row (the size depends on the angle of inclination of the slope). The laying order is as follows: first the bottom 3–4 canvases, then above them 2–3 second rows, above the second row - 1–2 canvases of the third row, then to each row, starting from the bottom, add one canvas;
- The overlaps of the slate waves should be in the prevailing direction of the wind, so that the wind does not blow under the slate and does not try to lift it.
The sheets are cut with a hacksaw or grinder. The sections are painted over to prevent the asbestos from crumbling.
Attention! You need to wear a respirator when drilling and sawing slate sheets, especially if you use a drill and grinder. It is recommended to pre-wet the cutting area. Asbestos cement dust is harmful to health.

How and with what to attach slate to the roof
Attaching sheets of roofing material to the sheathing is an important stage on which both the strength of the roof and the integrity of the slate itself depend during operation. It is necessary to keep in mind seasonal deformations and movements of rafter systems and slate, increased loads on the roof in winter.
Slate nails and screws
The slate on the roof is fastened to the sheathing using slate steel nails with a head of 14 mm in diameter or self-tapping screws. The nail head and slate are separated by a metal washer and a gasket made of rubber or other elastic material.

How to nail slate sheets
The slate is nailed with a regular hammer. The nails are inserted into a pre-drilled hole and driven in not all the way, but so that the slate does not move. 8-wave slate is driven into the 2nd and 6th waves from the joint, 7-wave slate into the 2nd and 5th, respectively. The sheet is nailed vertically in two places to the sheathing. The distance from the nail to the edge of the canvas is at least 15 cm. Continue this way until the ridge.
Important! It is not recommended to bend nails from the side of the sheathing if they are long. It is better to cut them to the desired length.
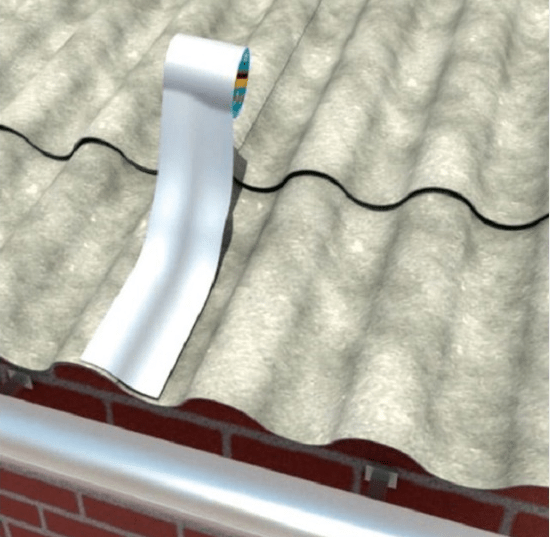
Installation of connections to the chimney
If the house has a stove, it is necessary to install a chimney pipe on the roof. For a chimney on the roof slope, the connection is arranged differently depending on whether there is waterproofing or not. If there is waterproofing, a junction made of a steel sheet is installed under the slate and film, and if it is absent, it is made in such a way that the upper edge of the steel sheet is under the slate, and the lower edge along the slope is above it. The connection device diagram is shown in the figure.

Roof ridge installation
The installation of the ridge is the final stage of roof installation. The ridge protects the roof from water, provides ventilation, and is a decorative element of the roof.
The ridge of a slate roof is made of galvanized steel or ready-made ridge elements to match the color of the sheets. Cut out a sheet of galvanized steel of the required width and bend it on a sheet bending machine or by hand so that the bend angle is slightly less than the angle between the sheets of slopes. The same nails are used to fasten the ridge. How to install the skate correctly is shown in the figure.

How much does it cost to cover a slate roof?
Installing a slate roof is not a difficult task; it can be done by those who are familiar with a hammer and a hacksaw and have enough time to work. Wave slate costs 170-260 rubles. per sheet, which ranges from 90 to 135 rubles/m2. On average, taking into account fastening materials and waterproofing, the price of a do-it-yourself roof will cost about 200 rubles/m2.
When you don’t have enough time to cover the roof with slate yourself, you can hire a team. The cost of laying slate will range from 150 to 300 rubles/m2. If you need to install a rafter system, heat, steam, waterproofing, lay slate, then the work will cost from 700 to 800 rubles/m2.
Provided that the work is carried out consistently and carefully, slate roofing will serve for a long time and reliably.
- How to make a lightning rod in a private house
- How to make a lightning rod
- The roof of the top floor balcony is leaking
- Roof insulation with foam plastic
For the last half century, laying slate roofing has rightly been considered one of the inexpensive and reliable ways to equip the roof structure of any type of building, from a garage to a five-story house. Often, residents of apartment buildings have abandoned roll bitumen waterproofing and are looking for a way to cover the roof with slate, fully understanding the advantages of asbestos-cement sheets. A properly constructed slate roof will last five times longer than the best waterproofing made from roofing felt and resin melted in bitumen.
Composition, size and shape of the material
In accordance with the requirements of GOST 30340-95, asbestos-cement slate sheet is produced in the form of a precipitated and hardened mixture of cement and asbestos fiber in several dimensional options:
- Six-wave slate sheet, with a height and wavelength of 54 mm and 200 mm, respectively. The thickness of the regular sheet is 6 mm, for the reinforced version - 7.5 mm. Dimensions along the edge - 1125x1750 mm;
- An eight-wave sheet with a wave size of 40x150 mm is made with a thickness of 5 mm, with a width and height of the material of 1130x1750 mm. The reduced seven-wave version differs from the eight-wave material only in its reduced width to 930 mm.
The technology for production and installation of all three dimensional types of slate roofing material is practically the same. More durable 6-wave slate is recommended for use for slopes of large width, at small angles of inclination. It is recommended to cover roofs with a slope of at least 27 degrees with slate with a wave height of 40 mm. More flat slopes are covered with reinforced six-wave slate material, but, in any case, the minimum angle of inclination of the roof should be at least 5-7 degrees.
Is it worth covering the roof with slate covering, advantages and disadvantages
Strict anti-asbestos campaigns have led to a drop in demand for slate roofing. In addition, many alternative options for roofing materials have appeared that have a more impressive appearance, which can be used to cover even weak and light roof rafters. But, nevertheless, laying slate on a roof is used today in the same way as it was 20 years ago, when the choice of material was limited.
In practice, a properly covered slate roof is a very good solution, not inferior to metal and bitumen coatings:
- Slate does not burn, does not deform in extreme heat or in winter frosts, and accordingly, the surface of the roof slope laid with slate sheets will remain perfectly flat, without sagging or swelling;
- A coating made of slate sheets does not sweat bitumen like flexible tiles, does not rust or flap in the wind like corrugated sheets or metal tiles, and does not fly out of the laid rows from snow and wind like clay tiles;
- The rigidity of slate sheets is several times higher than any modern roofing material, except, perhaps, ceramic tiles. This means that if you cover the roof correctly, the rigidity of the roofing pie with sheathing and rafters will only increase, which means that the risk of destruction of the rafters and struts of the wooden frame is reduced to a minimum.
Most importantly, to cover a slate roof, you only need a couple of people on the roof and one assistant below, on the ground. In practice, there are many examples of how a physically strong person can lay slate on a roof alone, for example, for small sloping roofs of garages and sheds. The main thing in this matter is to understand and understand how to properly cover a roof with slate and, of course, carefully lift the material onto the roof.

The main disadvantages of slate are the significant weight of one sheet and the relative fragility of the material, so it is much more convenient to cover the roof with three people. If, when lifting onto the roof or unloading, a slate sheet was accidentally dropped on the ground, it is no longer possible to cover it with such material, even if there are no external chips or cracks, the sheet will still collapse from moisture frozen in a microcrack.
How fragile slate is can be easily judged by the consequences of repairing and covering the roofs of multi-story buildings with slate. Before covering the roof with slate, workers carefully remove and discard the old slate sheets. The chipped and cracked ones are thrown down, and the whole ones are packaged and winched to the ground. Knowledgeable summer residents prefer to make the roof of sheds and outbuildings from old 6-wave slate, which stood for twenty years on the roof of a Khrushchev building. Such material costs mere pennies, and it can be used to lay the roof of any structure, from a dog house to a summer house, without particularly worrying about the strength of the slate roof.
For your information! Asbestos-cement slate is the only roofing material that becomes stronger over time.
It is better to cover residential buildings with 6-wave material, especially on flat areas of the roof. The roof of a garage, barn, or garden house can be covered from any material, but 7- and 8-wave slate usually requires more careful handling due to the small thickness of the sheet. Before buying material, choose the right way to cover the roof with slate; the appearance of the roof, the labor intensity and durability of the roof depend on this.
Slate laying technology
In the fairly simple question of how to cover a roof with slate, there are many pitfalls and nuances that affect the appearance and durability of the future roof. First of all, you need to decide how to lay the slate. There are three options for covering the roof:
- Longitudinal laying of sheets without bandaging horizontal rows. In this case, a beautiful and even, monotonous relief of the roof covering is obtained;
- Classic chess pattern for bandaging rows. Covering in this way is easier, the strength and resistance of the laid covering to wind and precipitation increases, but at the same time the amount of waste increases;
- Slate sheets can be laid with each next row offset by one or two waves. As a result, a stepped or zigzag pattern of overlap lines is formed on the roof.
For your information! Roofing with slate with bandaged rows is easier and faster, the roof is stiffer and denser.
Many of the craftsmen who repair utility roofs love this method for the opportunity to save material, use scraps, and even repair the roofing without nails at all. Often, instead of the required four fastening points, such roofers deliberately fasten the sheet with just one nail driven into the upper part of the slate. Only the top and side strips of slate material are fixed, as expected, with four fasteners. The remaining sheets are pressed against the sheathing under their own weight.
Laying slate with bandaging rows
Roofing made from individual sheets is always very sensitive to gusts of wind, both frontal and frontal, so you always start laying slate material from the leeward side, moving to the windward side, as in the figure.
The first row of slate is covered across the entire width of the roof. To do this, first calculate the layout according to the number of sheets of slate, based on the rule - 20 cm for vertical overlap and one wave for overlap of horizontal rows. The slate sheets of the first row must be laid with a horizontal overlap in two waves, guided by a pre-tensioned cord along the lower edge. After the edges are aligned, the row is nailed with four nails into each sheet. For 7 and 8 wave material, nails are struck at the crest of the second and fifth or second and sixth waves, respectively.
For a thick six-wave sheet, it can be overlapped into one wave, and the fastening can be installed along the overlap wave.
Before laying down the first sheet of an even row, it is cut into two waves, the rest of the material is laid out in the usual order. If you plan to cover it with slate with a checkerboard profile, then the sheet is cut into two halves, which usually complete the rows at the ends.
On short slopes, they usually lay slate immediately in a full horizontal row, nail the sheets, and only then proceed to laying out the next row.

To make it more convenient to cover the sheathing without the risk of sheets shifting, an installation ladder is pre-made. Essentially, this is a wooden or metal ladder with end stops, with the help of which the ladder clings to the sheathing.

For long and wide slopes, they usually prefer to cover two or three rows at once, this simplifies the work and reduces the need to move the ladder along the roof slope.
Installation of slate in vertical rows
The main difference between this method and the above option is that it is necessary to cover without moving the material in horizontal rows. In this case, the slate joint line is obtained by sheets located on the same vertical line. At the intersection of the lines of horizontal and vertical overlap of the rows, a “sandwich” of four layers of slate is obtained, through which rain and melt water penetrates very well.
In such cases, before covering the material on the sheathing, it is cut at the corners according to the diagram below. Thus, two pieces are removed from the “sandwich”, and a regular overlap is formed from two slates, the bottom one and the top one.
Master roofers, before starting to cover the roof, prefer to measure and cut the sheets while still on the ground. Trimming is done using a special jig made of boards. In this case, there is less risk of damage to the material. For non-professionals, it is best to trim the corner already on the roof, as in the video:
A grinder with a metal cutting disc for stone is best suited for cutting slate. After trimming and leveling, the joints should be installed with a gap of no more than 7 mm, otherwise the seam will need to be covered with a protective layer of bitumen mastic or sealant.
To arrange the ridge unit, a standard scheme is used.
In the area where the slate adjoins the ridge beam, before laying the slate sheet, a pair of horizontal slats or beams with a cross-section of 60x60 mm are stuffed. The top row of slate must be covered so that the distance from the top edge of the slate to the beam on the ridge is 15-20 mm, no more. Next, steel hooks are placed on the beam in increments of 60-70 cm, onto which the ladder can be hooked. After this, a second beam is placed on the beam, ridge sheets are laid overlapping, which are nailed with slate nails with rubber washers.
The area where the slate adjoins the head or body of the chimney is preliminarily covered with sheet roll waterproofing laid under the slate in the area of the abutment line. The outer surface of the pipe is covered with asbestos-cement corners according to the diagram below.

Features of fastening and building slate
How to fasten slate? Fastening slate sheets can be done in two ways - with special nails with a wide head or construction screws. An ordinary nail with a small head, no matter how carefully the master fastens it, cannot withstand the load from vibrations of the sheet and breaks out of the body of the material. For areas with strong winds, it is recommended to cover the roof with a checkerboard pattern and secure the sheets with self-tapping screws and a silicone washer. Before attaching the slate to the roof, mark the location of the sheathing boards on the gables so that when driving a nail you won’t miss the wood. Sometimes a stretched cord is used to align the nailing line, but most often the places for fasteners are chalked onto the slate.
Be sure to drill a hole in the wave under the nail with a diameter 2-3 mm larger than the diameter of the nail. In this case, it is important that the nail is not driven in completely, with a gap of 0.5-1 mm, so that the wooden roof frame does not break the slate.
Sometimes you have to repair the slate on the roof or increase the rows when adding an additional room, as in the video;
To replace or add a row, it is necessary to remove the nails securing the broken sheet and the roof overhang of the side and top overlapping rows. This can be done using a nail puller, a wire loop and a wide board. After this, we pull out and replace the damaged material with new one, or cover the attached room with additional rows.
A small crack in the material can be repaired with sealant, bitumen mastic or tape.

Conclusion
The use of special polyester paints allows you to make a gray slate covering bright and no less attractive than a roof made of corrugated sheets or ondulin. In addition, if you cover the surface with high-quality paint, you can prevent leaching of the asbestos-cement surface, the adhesion and growth of moss, and reduce the risk of cracks. As a result, the durability of a slate roof can be extended by at least 5-10 years in a simple way.
Although traditional asbestos-cement slate cannot be classified as an innovative material - it is being replaced by more modern coatings, and in many European countries it has been completely abandoned, in the Russian market it does not lose its former popularity, as it is quite durable and reliable. In this regard, the question is how to properly lay wave slate with your own hands , is still of interest to homeowners. Moreover, this material can easily be transformed by painting it in the chosen color, which will be in harmony with the color of the facade. Therefore, slate can be used not only for covering country houses or outbuildings, but also for full-fledged residential buildings.
However, in order for the slate to serve for more than fifty years, as the manufacturer promises, it must be laid correctly, that is, some nuances of this process must be taken into account. First of all, it must be said that slate is not as universal a material as many people think, since it is mainly suitable for covering single- and double-pitched roofs with a slope of at least 15 degrees. If you plan to lay this covering on a flatter slope, you will have to install a sheathing under the covering according to special rules, reliable membrane or roofing material waterproofing, and also increase the mutual overlap of the sheets.
Types of slate and its sizes
Slate was originally a roofing material made from cement mortar and asbestos fibers, which act as a reinforcing component that gives the sheets durability and strength.

Since the wave version of the sheets has higher mechanical strength, rigidity, and is more resistant to external influences, this form was taken as the basis for the manufacture of roofing sheets from other materials, such as ceramic plastic, cellulose fibers with bitumen impregnation, various types of polymers and sheet metal. Therefore, these materials also began to be called, with reference to the material of their manufacture.
Asbestos cement slate

The current GOST defines several standard parameters of traditional asbestos-cement wave slate, differing both in the number of waves and in the length of the sheets. But in practice, material with a length of 1750 mm is most often used, as it is the most convenient to use. In turn, it is also divided into several types.
- The six-wave sheet has dimensions of 1750 × 1125 mm and a thickness of 6 or 7.5 mm. Its weight is respectively 26 or 35 kg. The wave pitch is 200 mm, and its height is 54 mm. Such sheets are considered the most durable of all asbestos-cement wave slate options, so they are most often used to cover industrial buildings.
- The seven-wave sheets have dimensions of 1750×980 mm, a thickness of 5.8 mm and a weight of 23.2 kg. The wave pitch and height are already smaller - 150 and 40 mm
- The eight-wave version is a sheet measuring 1750×1130 mm, thickness 5.2÷5.8 mm, weighing 23÷26 kg. The step and height of the wave are the same as for the seven-wave one. It is this type of slate that is most often used in residential construction.

Infrequently, but still, sheets of a more “modest” format are also used - 1200 mm long, 680 mm wide, with the same 40 mm wave as eight-wave slate, and weighing only 9 kg.
In the technical documentation you may find letter designations for wave slate parameters. To figure this out, you should pay attention to the diagram below, where: B – width; L – sheet length; S – distance between wave crests; t—slate thickness; h – height of the ordinary wave; h1 and h2 are the height of the overlapping waves.

GOST also established a standard marking for wave slate in the form of a fractional value: the numerator is the height, and the denominator is the wave pitch, for example, 54/200 or 40/150.
Before purchasing this material and proceeding with its installation, you should have an idea of its positive qualities and existing disadvantages.
- The advantages of asbestos-cement slate include:
- relatively affordable cost of the material;
— sufficiently high strength, thanks to the reinforcement and characteristic shape of the sheets;
— ease of processing and roofing work;
— good noise absorption;
- low thermal conductivity - the roof will not heat up in the sun as much as one covered, for example, with metal corrugated sheets or metal tiles;
- non-flammability of the material.
- The disadvantages of such slate are its following properties:
— fragility under point and impact loads;
- hygroscopicity of the material - it can become saturated with moisture;
— possibility of fracture due to sudden temperature changes;
- quite heavy weight compared to other types of roofing coverings, which complicates transportation and lifting of sheets to a height;
— gradual decrease in strength under the influence of ultraviolet rays and wind (weathering);
— an asbestos-cement surface with high air humidity becomes a favorable environment for the appearance of colonies of moss and lichen;
— asbestos-cement slate is not an environmentally friendly material, mainly due to the content of asbestos fibers in its composition, which is why European countries decided to ban products containing asbestos.

In fairness, it should be noted that the carcinogenic properties of this roofing coating are too exaggerated. And in order to reduce the amount of asbestos dust that appears during weathering, as well as to protect the roof from the appearance and development of moss, fungi and lichens, it should be painted or covered with drying oil every 4-5 years.
Modern varieties of slate
In recent years, new types of slate made from various materials have appeared on the market, and they are quite worthy of attention.
Ondulin

Ondulin, which is also called bitumen slate or Euroslate, began to be produced in Europe when the technology of reinforcing bitumen with cellulose fibers appeared, which hold together, impart rigidity and prevent cracking of the coating due to temperature changes.
Today, the choice of roofing materials is simply amazing in its diversity, but despite this, slate still occupies one of the leading places. So owners of private houses will probably be interested in how slate is laid on the roof.
Slate roofing - types of materials and their features
The most common option is corrugated asbestos cement sheets, which cover most houses. Their advantages include: resistance to temperature changes, fire resistance, fairly long life, ease of processing. The disadvantages of such slate are increased fragility, it is very easy to damage even with a slight blow, and large weight, which significantly complicates roofing work. In addition, there is an opinion that the asbestos contained in it is harmful to health, but studies have not confirmed this.
There is also so-called asbestos-free paper slate. It is inferior to its brother in terms of resistance to mechanical loads. However, its durability, moisture resistance, lightness and flexibility make it possible to use it, unlike its asbestos counterpart, even on roofs with a fairly weak frame. For the roofing of industrial premises, it will be important to familiarize yourself with how to cover the roof with slate made of plastic or metal. They are distinguished by good wear resistance, lightness, strength characteristics and environmental safety. In addition, their color range can satisfy the needs of even the most demanding consumers.
Laying slate on the roof - methods
There are two main methods for laying slate on a roof. The easiest and therefore most common method is the “take-off” method. Its essence is that each subsequent sheet overlaps the previous one by one wave. As mentioned above, its main advantage is ease of installation. As for the disadvantages, firstly, it is the increased consumption of material. Secondly, there will be a not very smooth edge on the edge of the roof, which will spoil the whole look, so it needs to be trimmed.
The next way to lay slate on a roof is to, by filing adjacent corners, achieve complete alignment of the sheets with each other vertically. So, for example, if you lay slate from left to right, then trimming should begin at the junction of the second sheet of the bottom row and the first, located in the top row. This method will allow you to reduce the consumption of roofing material to a minimum, but you will have to work diligently, since the method requires much more labor than the first.
How to put slate on a roof - features of the process
In order for a slate roof installed by yourself to serve you for a long time, you must take into account some points, and it does not matter which flooring method was chosen. First of all, you should use only special galvanized fasteners; their role may well be nails, self-tapping screws and self-tapping screws. At the same time, given the fragility of the material, it is better to have a pre-required diameter at the fastening site.
You can also moisten the cut line with water before sawing, this will make the process easier. And in order to avoid unwanted breakage of the sheet, you should not put too much pressure on the tool you will be cutting with.
The installation of a slate roof also requires the presence of sheathing. It must be quite reliable, so for its installation, wooden blocks with a cross-section of 60x60 mm are used, as well as special linings. The step should be no more than 75 cm, or rather, it should be such that there are at least three beams under each sheet. It is very important that the wood is well dried, otherwise during the natural decrease in its moisture content the mounting holes will expand.
In addition, the width of the overlap also depends on the terrain, namely, if the house is located somewhere in nature, and tall trees grow around it, then it is better to increase this parameter, both vertically and horizontally. And all because falling leaves can get under the roofing material, and this is fraught with its premature destruction. Also, all the debris that gets under the edges of the slate will swell, absorbing moisture, which will lead to the formation of unwanted cracks, the roof will begin to leak, and it will need urgent repairs.
How to lay slate on a roof - do-it-yourself installation
In order for the roof to be sufficiently reliable, it is not enough to choose high-quality material; you should also pay attention to the question of how to properly cover the roof with slate with your own hands.
How to lay slate on a roof with your own hands - step-by-step diagram
Step 1: Selecting Material
Basically, domestic material is used. The number of its waves can be from 6 to 8, and depending on this it has different thickness and width. The first parameter for six-wave sheets is 5, 6 and 7 mm, and the second is 1125 mm. The width of the eight- and seven-wave slate will be 1130 or 980 mm, while the thickness will be 5.8 mm. In addition, parameters such as wave pitch and the distance between the crest and the bottom may also be different.
You must pay attention to all this when making calculations and purchasing material. If roofing a roof with slate with your own hands is carried out using the “running start” method, then the wider the wave, the greater the consumption will be due to the increase in the overlap area. You also need to pay enough attention to the quality of the slate; defects are not allowed on the sheets. The slightest chips, cracks and other imperfections should be a reason to replace defective copies.
Step 3: Installation
Having chosen the “running start” method, it would be more appropriate to use an eight-wave sheet. How to cover a roof with slate in this case it will result in significant savings in material. The sheets must be cut in half using a grinder or a hacksaw. The number of such halves should correspond to the number of odd rows, since they will begin them. Each even row should be assembled from whole products. We fasten the half in the first row, and then there are whole sheets with an overlap in one wave. The next row (second) consists entirely of whole slate. Thanks to this technology, the junction of the sheets of the previous row will overlap the middle of the sheet located in the next line.
The question of how to lay slate on the roof without displacement is also relevant, even taking into account the fact that this technology is more labor-intensive. It consists in . So, for example, when laying from left to right, you need to file the lower corners of the sheets in the top row by 130 mm along the wavelength and by 100 mm in its width. After fitting, each sheet is fixed with appropriate fasteners; do not forget about the special gasket for the head. And to make the house pleasing to the eye, you can paint the slate in any color, thereby adding originality and uniqueness to your building.
Slate is an inexpensive, durable and affordable roofing material. Its popularity is also due to the fact that installing slate is simple and accessible even to a beginner. However, before you start laying it, it would be useful to study how to properly lay slate on the roof so as not to get into trouble.
In this article
About the advantages and disadvantages
Slate is a roofing material in the form of sheets with a wavy or flat surface. It is made using asbestos cement molding. Natural slate is light gray in color, however, manufacturers can give it any color by adding various pigments. According to GOST, the thickness ranges from 5.8 to 7.5 mm, and the sheets themselves can be six-, seven- or eight-wave.
Slate has the following advantages:
- Easy installation;
- Fire resistance;
- Affordable price;
- Strength;
- Durability. The service life can be 30-40 years.
- Versatility: suitable for any home design.

The material is not without its drawbacks, namely:
- Quite a significant weight, which necessitates the need for stronger rafter structures;
- Fragility. If transported or handled carelessly, the sheet may break.
Before laying slate, you should consider that this material is best suited for roofs of simple shape. It is preferable that the slope angle be up to 20 or more than 35 degrees, which prevents the accumulation of snow in winter.
Features of the rafter system during installation
Before laying slate, you need to carefully prepare the rafter system. One sheet weighs 30-35 kg, which leads to a serious load on the frame. 
When making a rafter system, you need to follow several rules:
- For rafter legs, you need to use a board with dimensions of 60*150 mm or larger. The best option is boards with a cross section of 100*150 mm and a humidity of no more than 16%.
- The sheathing should be made from softwood bars with dimensions of 60*60 mm. These bars will be able to support the weight of the slate sheet.
- It is necessary to ensure that each layer of slate rests on at least two bars.
- The edge of the sheet should not be further than 15 cm from the edge of the sheet.
When laying it should be remembered that the smaller the angle of inclination, the stronger the sheathing should be.

How to lay slate
If you are laying slate for the first time, you should remember that you can attach no more than two layers of material at one point. Based on this, you need to think carefully about the installation scheme at the roof design stage.
You also need to decide on the required amount of material. For this there is the following scheme:
- Measure the length of the roof along the eaves overhang. You can take this value from the drawing. Divide the length of the overhang by the width of the sheet. Increase the resulting figure by 10%. By rounding the resulting number up, you will get the required number of sheets for laying one tier.
- Measure the length from the ridge to the edge of the overhang. To determine the number of rows, you need to divide the resulting length by the length of the slate sheet and add 13%. Such an allowance allows you to compensate for the overlap of sheets.
- Multiply the number of sheets in a row by the number of tiers. This way you will determine the required amount of slate to cover the slope.
According to the requirements of the installation technology, the installation of slate should begin from the bottom corner of the slope and continue along the eaves overhang. When laying, you should take into account the wind rose, placing the overlap on the leeward side.

It is recommended to lay the first row using a stretched rope, which allows you to achieve an even and neat overhang. To avoid combining several layers of slate at one point, various installation options are used. The most popular of them are installation “staggered” and without displacement. Let's take a closer look at them.
Installation "staggered" is very simple to perform. With this laying method, each new row is laid offset with respect to the bottom one. This avoids coincident wave overlaps. When carrying out such installation, it is necessary to trim the outer sheets and align the upper edge on the last row of the roof slope. Slate laid in this way can serve for a long time. 
Offset installation saves roofing material, but is more labor-intensive. With this method of laying slate, the corners should be cut to the width of the wave and 12-14 cm in height. To install the covering elements from left to right, you need to trim the bottom corner of each sheet of the top row from the side that covers the sheet of the horizontal row.
Fastening slate sheets
Let's start selecting fasteners. We advise you to carefully read the description of the correct procedure for fastening slate. Slate installation is carried out using slate nails, self-tapping screws and self-tapping screws, which have an enlarged head and are installed using a special rubber gasket that ensures the tightness of the fastening.

Do not fasten until it stops. Marking and drilling holes in the slate in advance will help avoid damage to it. The diameter of the holes should be a couple of millimeters larger than the diameter of the fastener.
Fastening is carried out only along the wave crest. The attachment point should be located at the bottom of the second overlapped wave, 12-15 cm away from the edge.
The second point should be located diagonally from the first; fastening to the second wave should be done only after laying the covering roofing sheet.
When installing slate sheets, do not forget about compliance with safety precautions. Safety cables and ropes should be used. If the height of the building is significant, a fence must be built. When fastening sheets, you need to use protective equipment that protects the respiratory system from asbestos-cement dust.
We hope that our step-by-step instructions will help you install slate correctly and safely.