Coffee topiary step by step. Coffee trees (40 photos): how to create a topiary with your own hands
Making something beautiful with your own hands is a natural need of literally every woman. She has watched more than one MK (master class), and she could give more than one MK herself. For beginning craftswomen, one of the most rewarding topics can be coffee topiaries. These are souvenir trees made from coffee beans, sometimes with the addition of ribbons, simple to make, but very beautiful and fragrant. After looking through the photo gallery, you will see that making such a miracle with your own hands is certainly not difficult. The composition can always be supplemented with flowers, ribbons, braid, and beads. And if you decide to make a money tree, a souvenir dollar will also come in handy, and sometimes a real dollar.
It’s better to learn from something simple and universal, so that when you decide to complicate the product, the instructions are clear to you. Simple coffee topiary is almost always the same master class, explaining the work step by step.
So, to make such a coffee tree, you will need:
- Directly coffee beans;
- Glue (ideally a glue gun);
- Base ball;
- Stick for the trunk;
- Plaster or alabaster;
- Water;
- Paints, brush;
- Paper napkins;
- Flower pot;
- Decor at your discretion.

MK begins with the fact that you prepare the base ball. It’s good if you already have a foam blank and don’t have to make it specially. But if there is none, then take a newspaper, make a ball out of it, and tie it with threads to make a ball.
In order not to bother with newspapers, you can take a simple small children's ball - this is quite a basis. But if you take a ball, then don’t wait, the grains will stick to the glue directly onto the rubber. That’s why you’ll need paper napkins to tightly cover the ball. Remember the old MK, how papier-mâché was made in childhood, so the principle is the same - glue, paper, many layers and good drying.
It takes about an hour and a half for a ball covered with napkins to dry. During this time, select the beans from which you will make the crown of the coffee tree.

How to make coffee topiary with your own hands: step-by-step instructions
When the ball is dry, it needs to be painted over. The ideal color is brown, like coffee beans. This must be done so that the whole story does not look like a “hack” due to treacherous gaps. It would be nice if the paint was acrylic.
DIY coffee tree step by step:
- The base is applied to the glue in two layers. By the way, about glue. Don’t overthink it, ordinary PVA glue will cope with this task. Silicate glue has not been used in handicrafts for a long time, and more powerful glue can make the process irreversible. Because PVA glue, period.
- Divide the grains into two parts. Those that are worse and smaller will go to the bottom layer. And from the most beautiful ones you need to make an elegant top layer. Using a glue gun, firmly glue the grains to each other so that there are no gaps.
- When the crown is ready, you can make the trunk. Wrap the stem stick with a satin ribbon, preferably in a pastel shade. Or light chocolate or golden. Each MK recommends its own barrel decor. Look at a few photos, which coffee tree seems more interesting to you, and then copy the decor of the trunk.
- The pot can also be decorated with ribbon, but if you need a more complicated story, you can draw inspiration from the same photos. You can even turn a coffee cup into a pot for a tree, decorating the top layer in the cup with grains, golden sparkles and coins with your own hands. Sometimes the same souvenir dollar (or maybe not a souvenir one) is placed at the base of the tree, which means it is already a money tree. The trunk is installed in plaster or alabaster, poured into a pot.

Sometimes grains and poppies are combined. It turns out to be an interesting combination when coffee beans imitate poppy seeds. The poppies themselves are made from red fabric. Both in the photo and in reality, such coffee topiaries look very convincing: bright, beautiful flowers and a coffee aroma. And at the base of such a topiary you can also put the same dollar.
DIY coffee topiary (video master class)
Topiary made of coffee and twine, photo
Topiary made from twine and coffee beans is also popular. In this case, you need to make a flower from twine, the core of which will be coffee beans.

MK for making a flower from twine:
- Take a regular cardboard paper tray. You need protruding parts that will make up the base of the flower. Cut off this bulge, make a winding of twine, quite dense.
- The easiest way to fix the twine is with a heat gun. Set the resulting “nuts” aside.
- Next, the master class involves creating flowers. Cut the twine into pieces. To make one flower, you need five large petals and four small ones. The petals are connected with hot glue. Then they are glued to the base, first large and then small.
- In the middle of the second row of petals, this MK suggests gluing coffee beans.
- The flower is planted into the prepared “nut” and thus adheres to the crown. Gaps are eliminated by fixing coffee beans.

This, of course, is not the only twine topiary master class. It can be done in another way, and sometimes they simply wrap a tree trunk with twine. In the photo you can see other decor options. Don't forget about the same symbolic dollar at the base.
Heart-shaped topiary made from coffee beans (video master class)
Topiary made of coffee and satin ribbons
You can create a beautiful wedding topiary with your own hands from satin ribbons and coffee beans. Such a tree can have one crown, that is, one flower made of ribbons. But more often, master classes offer a whole inflorescence, from three to ten flowers, which will decorate a wedding table, for example.
Decide for yourself how many flowers to make, look in the photo gallery to see which option seems more attractive to you.
If we talk about mini MK, then the flower is made very simply:
- The core is based on large coffee beans;
- Ribbon petals frame these grains;
- Everything is fixed with a glue gun;
- You can use a small Christmas ball as a base ball (this is what master classes on this topic “love” in this case).

You can simply build a flower from ribbons, or you can attach leaves from the same years at the base of the flower. Wedding topiary is all about delicate, soft colors, so a set of cream ribbons will come in handy.
Such an original topiary as the coffee gentleman is also popular. And you can easily make it with your own hands, because in essence it is the same tree - only with handles and a hat. His handles are made from wire, which is pasted over using papier-mâché. This process is slow, but there is nothing complicated. You need to make sure that the gentleman can bend his arms and fingers.
It would be great if such a coffee citizen had an elegant top hat on his head and a flower in his hand. Take a look at the photo: their decor options may be different. A hat made from the same ribbons, or a flower made from ribbons. More interesting is the master class, which suggests using a dollar as the basis for a hat and flower.

A gentleman really turns out to be more representative if he has a dollar on his top hat, and even a dollar in his hand in the form of a flower. By the way, make the flower with your own hands according to the origami model. You can also find photo instructions that show other flower options based on the dollar or other souvenir currency.
By the way, such a coffee gentleman is also a great wedding gift. And the same dollar, or rather, an envelope with such bills, only real ones, such a tree can hold with its own hands.
Topiary “floating cup of coffee” (video master class)
Topiary is a beautiful gift, an original sign of attention to those who love coffee and cannot resist everything associated with this noble and aromatic drink. Successful work and good fate for your tree, may it bring good luck!
Coffee topiary (photo)


Fragrant coffee topiary will not leave anyone indifferent: such decor will decorate a living room, kitchen, office or public place. This is a great homemade gift that even a beginner can handle. With some skill and preliminary preparation, the process takes no more than 2-3 hours. We'll tell you all about topiary made from coffee beans: what are its features, how to make it yourself, what interesting options there are.
Types of coffee topiary
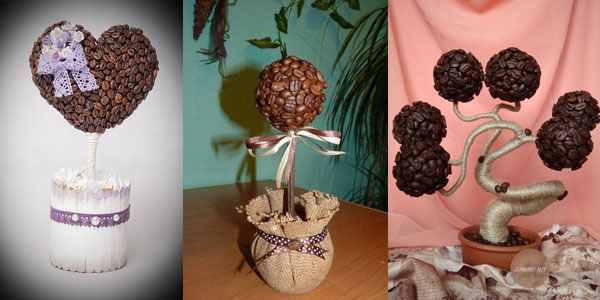
In general, topiary is the art of curly pruning trees and shrubs, resulting in a topiary - a tree with a round crown, a bush in the shape of an animal or a heart, etc. The first topiaries from coffee beans were made in the shape of a round tree on a stem-leg. Then the fantasy took a step further, other variations of geometric shapes appeared, but the name stuck.

- Volumetric heart;

- Star;

- Floating cup;

- Flower;

- Products on a stand;

- Hanging;

- Round balls for decoration.

There are many master classes on the Internet on making topiary from coffee beans with your own hands, and you can be inspired by various implementations, repeat a beautiful product, or come up with something of your own.
We talk about how you can make an unusual topiary from coffee beans and decorate it in various ways.
- Before gluing the grains, do not forget to treat the surface so that the background does not show through. This can be done with brown gouache, but it’s better with finely ground coffee, it will give off an additional aroma and it will look noble. You can also use it to treat the stand stick itself.
- As a base, you can choose a cup, a mini coffee pot or milk jug, a decorative bucket or a flower pot (but you need to seal the hole in the bottom). You can place the cup on a saucer and glue it so that the product does not turn over.
- The stick-trunk is usually wrapped with double-sided tape, and a decorative tape is wrapped around it. The thinner the ribbon, the more elegant everything looks. Coarse twine is also used.
- As decoration for topiary made from coffee beans, you can use spices, dried orange slices, star anise (star anise), and white beans for a mosaic pattern.
- The base is usually filled with plaster or alabaster - they harden quickly and hold firmly. If you have a massive top, you can add heavy stones to the plaster so that the entire structure is stable and does not tip over.
- Try to choose beans of the same variety and roast. That is, it is better to take not a mixture of Arabica and Robusta, but one thing, and optimally - in a large package, so that the difference in shades is minimal. Arabica is used more often, as it has beautiful beans with a pleasant aroma. But Robusta is more round, which is sometimes more practical.
- Experts recommend gluing grains onto topiary in 2 layers. This way the bottom one shines through under the top one, the composition seems deeper and becomes more interesting. The first layer is usually glued with the middle strip down, the second, outer layer, with the strip up.
- The most beautiful grains are selected for the top part. The ones at the bottom are less noticeable and can accommodate beans with slight color defects. If you glue in two layers, sort the grains in advance, choosing the best ones for the outer surface, which will be visible.
- You can glue not only with the plane of the grain, but also with one edge so that they stick out as if perpendicular. This is more complex and painstaking work, but the result is more impressive.
- Coffee bean topiary can be themed. For example, double, for a couple, or wedding, with appropriate decor, or Easter, or Christmas. It all depends only on your imagination.
Many people are concerned about the question: is it worth covering coffee bean topiary with varnish? Finished with a glossy shine and easier to care for. But the varnish kills all the aroma of the beans. So it's up to you to decide.

Let's consider a simple decor option that even a schoolchild can handle - the classic topiary made from coffee beans “Tree of Happiness”. On average, the work takes up to three hours if you prepare everything you need in advance.
You will need:
- The basis for the figure. For example, a foam ball. Sold in craft stores, sometimes can be found in flower or construction stores.
- Leg-trunk. As an option - an ordinary strong twig, and even if it is not perfectly smooth, it is even more interesting. You may need to strip it of bark.
- The base is, for example, a cup.
- Plaster or alabaster.
- Fabric tape and double-sided tape for wrapping the leg.
- Coffee beans.
- Brown gouache. As a last resort - black. Or ground coffee. What you will use to cover the base.
- Glue. You can use PVA, but assembly is better. It is better not to use a hot gun. Superglue can come in handy, so grab some.
Let's start making topiary from coffee beans:
- Make a hole in the base so that the leg fits about a third of the ball's diameter.
- Paint the base and set aside to dry.
- Sort through the grains, decide how many layers you will glue them into.
- Starting at the top, apply a little glue to the area and attach the grains.
You should not apply glue to the entire ball at once, and then sprinkle it with grains or roll them in them. This speeds up the process, but the result looks sloppy.
You can place a bowl of water next to it, lightly wet your finger so that the grain sticks to it, and then transfer it to the base.
- When you get to the bottom edge, leave a small area around the hole for the stick.
- Wrap the stick first with tape, then with tape.
- Apply glue to the stick and a little into the hole, insert the leg, let it dry a little.
- Add the rest of the grains.
- Pour as much water into the base as you need. Mix in plaster or alabaster, insert the leg of the structure, and hold until it hardens evenly.
- When everything is dry, decorate the alabaster (you can stick on grains).
- Using superlay, glue spices and decor. Tie decorative ribbons.

It is better to let the product dry for a day and then hand it over. If any of the grains fall off, attach them with superglue.
This is a much more complex level of coffee bean topiary, and it is better to take on this type of decor when you already have more experience. The whole difficulty is to fix the cup so that its center of gravity does not extend beyond the saucer. The base of the “flowing” grains is usually made of wire, which is glued with instant glue. Sometimes it is wrapped in fabric, sometimes polyurethane foam is used. There are many options, it’s worth carefully studying all the nuances. And it’s better to try for the first time on cheaper dishes, so as not to spoil the one intended for the composition, and make sure that everything sticks well.

Don't start making large flying cups with spilling grains. Try it with little ones, it will be easier and more accurate.
Conclusions:
- You can make a topiary from coffee beans with your own hands in 2-3 hours.
- Usually a round ball or a voluminous heart is chosen for the shape. Any shape you find at a craft store will do.
- The flying cup is a rather complex topiary, but it can also be made at home.
- For decoration you can use ribbons, bows, spices, grains, figurines and much more.
- If you do not varnish the product, it will emit a subtle, pleasant aroma. But varnished ones are easier to wipe off dust.
Topiary is a wonderful decorative fantasy tree of happiness that can be made from different materials. It will perfectly decorate any interior. For coffee lovers, I suggest making a fragrant coffee topiary.
To create a simple coffee topiary we will need:

— coffee beans (Arabica variety);
- glue gun;
- ball - base;
- stick - trunk;
— Alabaster – a mixture for plastering;
- water;
- PVA glue, brush;
- paints, brush;
- paper napkins;
- flower pot;
— pink and beige satin ribbons;
- beads for decoration.
Preparing the base - the ball
For the crown of the topiary, I chose a simple rubber children's ball. I've had it on my radar for a long time; children grow up and toys become unnecessary. So a ball of suitable size came in handy. I managed to connect the base and the stick for the barrel together without the help of glue. It fit the size of the ball hole perfectly.
You can use other bases, such as a store-bought styrofoam ball or a plastic kiddie pool ball. Or you can make it yourself, from old newspapers.

Preparing the base
It is quite difficult to combine coffee beans with a rubber base, so we will glue our ball using ordinary napkins and PVA glue using the papier-mâché method. Instead of napkins, you can use regular newspaper. In this case, we will use white paper napkins.

We tear the napkins into small pieces and cover the ball with them. Let it dry for about an hour to an hour and a half.

Paint the resulting structure with brown paint to match the color of coffee beans. This is necessary so that the gaps between the grains are not so visible. You can choose any paint, but it is better to take acrylic.

Gluing coffee beans
Now we begin the most difficult and painstaking part of the work: gluing the coffee beans. You will need to paste the base in two layers. Therefore, we divide all available grains into two parts: small, uneven grains will go to the bottom layer. We will leave the most beautiful, strong and flat grains of the correct shape for the final layer.

Glue the grains using a glue gun. Press them closer together, try to leave as little space between them as possible. Place the second layer of grains as carefully as possible, try not to use a lot of glue so that there is no glare.

Place the first layer of coffee beans with the convex side up, and the second layer down. The main part of the work is done.
Decorating the topiary trunk
Carefully wrap the topiary stick with a beige satin ribbon. In order for the tape to hold firmly, it can be secured with drops of glue along the edges.

Pot decor:
To decorate the pot, take a pink satin ribbon and wrap it around the middle around the perimeter. Add to it a rose made from ribbon. It is done very simply - by folding the tape.

Installing a topiary
In a separate bowl, dilute the solution mixture (I still have Alabaster at home after renovation) to the consistency of thin sour cream. Place the tree in a pot and fill it with solution.
The solution will not set immediately, so you will have to hold the topiary for several minutes. Let the product dry.

Final decoration of the finished product

After the solution has dried, coat the top with a layer of PVA and place coffee beans on it.

Decorate the topiary as you like, there are no restrictions. I glued coffee beans to the pot and tied a satin bow on the trunk of the tree.
So our amazing tree of happiness is ready. You shouldn’t dream about happiness, take it and create it with your own hands. Such a tree will fill your home with the amazing aroma of coffee, make it more comfortable, and become an interesting addition to the decor.
Try it! Creative success to all!
We bring to your attention a master class in which we will tell you how to make a tree of happiness with your own hands.
Tools and materials Time: 4 hours Difficulty: 4/10
- crown base;
- flower pot;
- coffee beans;
- glue gun;
- gypsum;
- decorative decorations.
We present to your attention a selection that contains the 3 best techniques for creating a coffee tree. All of them are described and illustrated in great detail. Get inspired and create!
Tree of happiness made from coffee beans “Vanilla Topiary”

We will need:
1) Coffee beans
2) Skewers for shish kebab
3) Ball for the Christmas tree
5) Scissors
6) An empty jar of cream (or something else, the main thing is that the shape is similar)
7) Burlap
8) Elastic band
10) Instant coffee
11) Ribbons (optional)
1) Remove the tip from the Christmas tree toy
2) Take several kebab skewers and stick them into the ball
3) Glue the coffee beans to the ball. We do this gradually. First one side - wait until it dries, then the other. You can glue several layers

4) Take burlap and cut out a circle

5) Wrap the resulting circle around the cream jar, securing it with an elastic band

6) Fill the jar with plaster and insert the wood
7) When the plaster is dry, cover it with instant coffee

8) Decorate with various ribbons


This is the simplest topiary, let's move on to more complex ones.
Coffee tree "Love Heart"

We will need:
2) Pencil/felt-tip pen/pen
3) Scissors
4) Wire
6) Cotton swabs
7) Thick thread
8) Coffee beans
9) Tin can
10) Wooden ice cream sticks
11) Jute rope
12) White and brown paint
13) Foam rubber
14) Various accessories for decoration (optional)
1) Fold a piece of paper in half and draw half a heart

2) Unfold and cut out. This is what the heart should look like:

3) Take 2 pieces of wire and wrap it with paper. For better fixation, lubricate with glue
4) Bend in half

5) Glue the wrapped wires to the heart

6) To make the heart more voluminous, seal it with cotton swabs in two layers


7) Wrap it well with threads, give it a smooth shape

8) After the heart has become streamlined, paint it with brown paint

9) Be patient and cover with coffee beans

10) Take a tin can and spread it with glue

11) Glue on wooden ice cream sticks


12) After the glue has dried, cover our pot with white paint
13) Take our heart and wrap the trunk with jute rope


14) Insert the barrel into the foam blank and place it in the pot

15) Decorate the coffee heart with various accessories and get an excellent craft!


In this video there is a similar tree:
Coffee tree "Parisian baobab"

We will need:
1) Coffee beans
2) Foam plastic
3) Knitting threads
4) Superglue
5) Wire
6) Masking tape
7) Pliers
9) Linen cord
How to do:
1) Make small balls from polystyrene foam

2) Wrap it well with thread. The resulting balls are:

3-6) Take reliable glue (Moment is perfect) and carefully glue the coffee beans. Leave a small area empty for planting on twigs


7) Using wire and masking tape, we make a tree frame

8) Trying it on for the potty

9) Using pliers and a knife, expose the ends of the frame

10) Wrap the entire frame with masking tape

11-12) When the entire frame is covered with masking tape, wrap it with linen cord. To hold it tighter, sometimes we lubricate it with glue.


13) Place the coffee balls on the frame. After that, we add grains to the empty areas

14) Fill the pot with gypsum and plant the tree

15) When the plaster dries, sprinkle the base of the decorative tree with coffee beans

16) Let's move on to the most time-consuming point. Cover all the coffee balls with another layer. This time "facing" to the top


The coffee tree is ready!
You have a question: “Why is there “Decorative accessories” in “we will need”?” This is for those who want to add even more individuality to the product. You can decorate with anything. Turn on your imagination and start getting creative!
How to make a coffee tree at home
Living indoor plants require careful and careful care, therefore, today designers are increasingly using artificial trees to decorate the interior. This decorative element will succinctly fit into the interiors of offices, cafes and apartments. A coffee tree can not only add zest to the atmosphere, but also become an excellent gift.

To make a tree from coffee beans you will need:
- Knitting
Styrofoam ball (you can also make a ball yourself from threads)
- PVA and super glue
- pot
- wooden stick
- wire
- coffee beans
- ribbon, tulle, beads

Stages of work - manufacturing instructions.
- Preparing the ball (tree crown). Choose the shape for the future tree. It can be round, triangular, heart-shaped or consist of small balls. It is best to use polystyrene foam as a base. If this material is not available, you can make a ball yourself from cotton threads. Lubricate the round balloon with PVA and wrap it tightly with thread, while wetting each layer with glue. The product must be completely dry. The ball is pierced and removed from the middle of the resulting workpiece.
- If using a foam ball, wrap it with brown thread to create a rough surface for the coffee beans to stick well.
- Mark the area where the tree trunk will be so as not to fill it with grains.
- Glue the grains with the divided side to the ball, and the smooth side will remain on top. Use PVA.
- To prevent the grains from falling off, leave the ball to dry for 30-40 minutes after covering half the surface.
- When the first layer has completely dried (within several hours), you can begin the second. Now we fill the gaps with grains and glue them with the smooth side so that the division is on the outside.
- After the ball has dried, insert a wooden stick into the designated area for the barrel and cover the gaps with coffee beans.
- Plant the tree in the prepared pot. Instead of soil, take gypsum, diluted with cold water to a thick porridge. Leave the wood in plaster to dry overnight.
- Start decorating using ribbons, beads, tulle and others. If you want to get a tree with a curved structure, you can use wire as a trunk, which is best wrapped with green or brown thread.

