Homemade heater made from heated film floor. Do-it-yourself heater: technology for assembling simple and effective structures
Today we will look at a number of heater designs for topical situations in life. People need devices everywhere:
- in the cellar;
- Outdoors;
- in aquarium;
- in the garage and in the country house.
Let's consider how to make a heater with your own hands, from what elements. We would like to express our gratitude to the enthusiasts and professionals who posted ingenious heater designs on forums and websites. All that remains is to analyze the ideas and summarize what we saw.
Oil heater for garage
If you have an old, unwanted car radiator lying on the ground, great. Suspended from central heating, made of sheet iron, will do. To make your own oil heater, you will need oil. A technical one will do; better yet, one used specifically for elevated temperatures. For example, to cool the engine. Look for transformer oil - this oil is designed to withstand extreme factors.
Criteria! The oil tank does not reach 80 degrees Celsius. The average value is 60. When choosing oil, look at the coefficient of thermal expansion.
You should start with the frame. We take a sealed radiator to work; it’s easy to guess that the structure weighs a lot. To make the frame of the oil heater, corners are useful for constructing a frame mounted on wheels. It is difficult to propose a specific design; preferably one suitable for transportation. The corners are fastened by welding.
In the bottom of the radiator there are a pair of holes for heating elements. Borrow heating elements from old appliances or buy them at the market from traders. The oil heater is equipped with a pump designed to pump the working fluid through the heating elements. To operate it you will need an electric motor.
The number of heating elements in an oil heater is selected based on the required power of the device. The pump is installed without touching the heating elements. The jet stream is directed along the heating elements. The oil heater is completely sealed. We will weld the joints, or in extreme cases, solder them. For emergency oil drainage, provide a screw cap. Install the pressure relief valve. This will protect the radiator from damage.
The heating elements are electrically connected in parallel, the maximum network power of 230 V is selected. To regulate the temperature of the oil heater, add switches to the design. After testing the assembled product, mount the radiator on the frame, and seal the electric motor and switch in the box. Don't forget about grounding: the garage is not a place where you should neglect basic safety rules.
The resulting device will not allow the owner to freeze. Now let's look at how to make a heater for vegetables and other food in the cellar.
Cellar
Frozen potatoes turn black and lose their taste; they simply cannot be stored. A small homemade heater will prevent the products from freezing.

The author of the invention recommends using the power part from a voltage stabilizer on the KREN12A microcircuit. The power transistor and a pair of resistors are tightly mounted on a radiator made of sheet aluminum. The point is to transfer maximum heat to the metal. The resistors are mounted on a special heat-conducting gel. For example, the product lubricates the contact pad of processors in personal computers.
It is possible not to use a PCB substrate, making electrical connections with copper. For reliability, glue the latter onto an aluminum plate, and the homemade heater is ready. Power supply is 25 VDC.
According to the author, the transistor quickly heats up to 75 degrees Celsius. Resistors, prudently mounted on a special gel, also heat up. The temperature of the homemade heater reaches 50 degrees. When placed under a potato tray, the heat generated is enough to prevent agricultural produce from freezing.
For home
When it's cold at home, you can make a homemade heater from an old computer power supply. The cooler must be in good working order; as a last resort, to create a homemade heater, replace the broken fan. The idea of the product: replace the getinaks printed circuit board with a substrate made of non-foil PCB, to which strips for winding a nichrome spiral are attached.
The current heats the coils of wire, the fan blows a warm stream over the structure, and the owner enjoys the warmth.
So let's get started. It is logical to start by calculating the power and buy or cut the required amount of nichrome wire. For a homemade heater, it is better to provide two separate spirals so that the temperature can be regulated.
For the frame, PCB without foil will be used, in which holes are drilled for the wire. It is proposed to install three strips in parallel. The arrangement of holes in a homemade heater corresponds to the principle of presence. It’s difficult to give advice; it’s easier to decide locally what to drill and where.

Using small metal corners, the strips are placed on the substrate, parallel and at equal distances. Now let's wind the spiral of a homemade heater. Do not touch the body or structural parts other than the slats. To power the cooler, you will have to invent something like a rectifier made of diodes, a capacitor and a small transformer.
The spiral is connected directly to 220 V AC. The resulting device is added with switches for the coils and will begin to blow warm air at the owner. Of course, the structure burns oxygen, and in addition it will smell scorched. Created exclusively for unplanned cold weather.
Fishing
A portable ceramic infrared gas heater is expensive, and in addition, fishermen carry their belongings on themselves. For carrying, an iron box is traditionally used, which is either rolled on a sleigh or placed on the back. Who wants to carry a 27 liter gas cylinder in addition to a 1.5 kg heater.
Some enthusiasts suggest making a tent heater with your own hands from a gas burner for cooking. The size together with the container is slightly larger than a Dichlorvos bottle. Naturally, you will take the small device with you fishing.
The author of the invention suggests using a strainer, a small piece of stainless steel mesh, and steel plates for fastening. The idea is based on the operating principle of light gas infrared heaters. The gas burns, heats the grid, which radiates heat to the sides. The author shows that this design is much more efficient than a store-bought cooking burner when it comes to heating.
A cylindrical nozzle is assembled for the torch. The sidewall is curved from a piece of mesh stainless steel, the bottom and roof are made of steel. Each round plate is equipped with four grips along the edges. As a result, not a circle is cut out of the sheet, but rather a gear with teeth.
When assembled, the design resembles a car filter in shape. A hole is cut in the bottom for the fire of the burner, and a tea strainer is placed upside down on the curved teeth. It is possible that we would attach a similar strainer to the roof to increase the radiating surface, but the author, when creating his own gas heater, did not do this.
How to attach the created “filter” to the burner, everyone will decide for themselves. It's time to start eliminating freezing of gas in the cylinder:
- Thick copper wire wrapped around a heated mesh and gas container helps little. Maybe things will go better if you insulate the top with a sock or fireproof penofol.
- The author suggested using a copper busbar instead of wire. The thermal conductivity, of course, is much higher than that of a single core, so things went smoothly. The bus is a piece of copper strip. One end is attached to a hot mesh, the other to a cylinder.
Obviously, you need to stock up on an additional cylinder for the device. In case the first one is not enough. The design will not interfere with those who travel by car.
Aquarium
It is enough to pour a brine solution into a U-shaped tube and attach plugs with carbon electrodes threaded through both ends to get a homemade aquarium heater. The brine conducts electric current, simultaneously heating up and transferring heat to the walls of the flask. The power is selected by changing the salt concentration. The level of the solution must not be allowed to rise above the surface of the water.
The need for comfortable warmth increases in the off-season and with the onset of cold weather. But not all homeowners have the opportunity to purchase reliable factory-made heating equipment, the cost of which is often inflated. In this case, an alternative option is a homemade heater made from available materials, which can easily cope with the task.
Basic requirements for a homemade heater
Any type of heating equipment for the home, regardless of design features and manufacturing complexity, must meet the basic requirements:
- Simplicity and accessibility in assembly.
- Safety and reliability in operation.
- Efficiency in energy consumption.
- High productivity and working power.
- Affordable cost of structural elements and materials.
- Ergonomics and ease of transportation.
- Durability and practicality.
Among the existing heaters, the most efficient and productive are: infrared, quartz and ceramic emitters, and electric convector.
Advantages of homemade devices
Homemade appliances for heating a city apartment, country house or cottage have significant advantages over factory-made products. They are as follows:
- Possibility of manufacturing from accessible and cheap materials, which leads to a reduction in the cost of the finished device.
- Simple and compact design that can be used in various rooms.
- Ease of use and transportation.
- High efficiency with silent operation of structural elements.
- Self-assembled quality.
Today, infrared heaters are available for self-production, which are the safest and most efficient to use. If more powerful equipment is required, then you can assemble an oil radiator, an alcohol heater, a heat gun, a battery-powered and gas-powered device.
Making your own infrared heater
Modern IR emitters for heating homes are reliable, practical and have good efficiency. Such devices emit infrared radiation, which, without interacting with air, contributes to the rapid heating of various surfaces in the room. Thus, they effectively convert electricity into thermal energy.
The most affordable option for home assembly is an economical film heater, the basis of which is a heating film.
To work, you will need to prepare the following materials and tools:
- two identical pieces of glass,
- aluminum foil,
- sealant,
- paraffin candle,
- epoxy resin glue,
- electrical cord with plug,
- candle holder,
- soot cleaning sticks,
- sponge for cleaning glass surfaces.
The infrared heater is assembled with your own hands according to the following scheme:
- The glass is thoroughly cleaned of dirt and degreased.
- A conductive base for the heater is assembled. Using a candle, soot is applied to the back side of the glass blanks, acting as a kind of current conductor. Before starting the procedure, the workpieces are slightly cooled.
- Along the perimeter of the workpieces, the surface is cleared of soot using chopsticks to obtain an even edge 0.5 cm wide.
- Strips are cut out of foil with a width equal to the area of the conductive glass base. They will be used as conductive electrodes.
- One workpiece is placed on a flat surface with the smoked side up, and a thin layer of glue is applied around the perimeter. Foil strips are applied to the glued surface with a slight shift beyond the edges of the workpiece.
- It is covered with a second piece on top, and, accordingly, the smoked side down is pressed to set the glue. All joints are carefully treated with sealant.
- Checking the power of the finished structure. If the power indicator does not exceed 100 W per 1 sq. m of room, then the heater is connected to the network using a conductive wire and plug.
A multimeter measures the resistance of the heater's conductive base. To calculate power, use a simple formula: N = U×U/R, where
N – power, U – mains voltage (220 volts), R – resistance.
For example, R – 20 Ohm, then N = 220×220/20. The result is 2420 W. This power is enough to heat a room of 25 square meters. m.
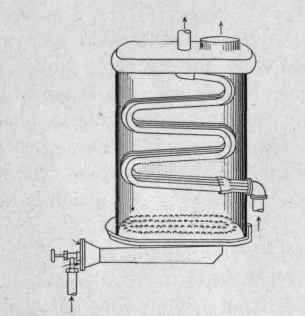
Making your own oil heater
A homemade oil heater is distinguished by functionality, safety and reliability. A similar device can be used to heat residential and technical premises.
Structurally, the device consists of a sealed metal housing filled with a coolant – industrial oil.
To make a powerful heater from a battery yourself, you will need the following materials:
- used battery,
- tubular heater,
- technical oil,
- heating temperature regulator,
- 2-core current-carrying cord with plug,
- electric pump with a power of 2.5 kW,
- metal corners,
- tubes that can withstand heating temperatures up to 160 degrees.
All work is carried out using a welding machine and an electric drill.
The technology for manufacturing and assembling an oil heater involves the following steps:
- Manufacturing a rectangular frame of the required size for mounting the device. The corners are cut into pieces of the required length and welded together into a rectangular structure. At the bottom, legs are welded to each corner.
- Holes are made in the prepared container for installing heating elements. The holes should be located at the bottom of the device. An additional hole in the top of the container will be required to fill the coolant. A grinder or welding is used for cutting.
- Installation of the electric pump on metal plates welded to the heater body.
- Heat-resistant tubes are used to fix the pump. They are welded to the body and connected to the pump using shut-off valves.
- Fixing heaters to bolted connections in the holes provided for this.
- A fitting with an external thread is welded onto the inlet hole for the coolant to install a protective cover. A simple version of the cap can be made from a piece of pipe with an internal thread, which is screwed onto the fitting from above. A rectangular metal plug is welded onto the other end of the pipe to prevent oil from spilling out.
- The container is checked for leaks by creating a slight internal pressure.
- Connecting heaters in parallel to increase the heat output of the heater.
- Installation and connection of the thermostat, as well as a current-carrying cable with a plug. Mounting the container on a prepared frame and additional grounding. Filling coolant into the radiator.
DIY gas heater assembly
No less popular for home use is a homemade, economical heater without electricity, powered by gas. Such a device provides heating of the room due to infrared radiation and air convection.
To make a gas heater, you need to prepare the following materials:
- gas burner and shut-off valve,
- hemispherical sieve,
- galvanized sheet steel,
- metal mesh.
The assembly diagram of the heating device is as follows:
- A pair of round blanks are cut from galvanized steel, the diameter of which is equal to the diameter of the sieve with small protrusions.
- A gas burner is bolted to one workpiece. Next, the projections are bent in the opposite direction from the installed burner. A sieve is screwed to them so as to close the burner. In this case, the sieve is used as a heat dissipator.
- The metal mesh is bent into the shape of a cylinder and fixed to the projections so as to close the sieve with the burner. Fastening elements can be metal rivets. Visually, the device looks like a cylinder with a burner installed inside, and a sieve and mesh on top of it.
- The top of the cylinder is closed with a second steel blank with a bend and a protrusion outward. Next, the upper part of the structure is fixed to them.
- The finished heater is connected with a gas hose to a cylinder or a centralized gas supply line.
Homemade heat gun
Another option for equipment that you can assemble yourself is an electric heater similar to a heat gun.
To make a home heat gun you will need:
- metal cylindrical container (bucket, cut cylinder),
- heating element - a spiral from an electric stove,
- metal grate,
- fan,
- conductive wires,
- switch.
The heat gun is assembled as follows:
- Using a grinder, the bottom part of the structure of the prepared cylindrical container is cut off. This results in a through workpiece.
- The grid is cut to the diameter of the container. The spiral is fixed on the grid so that the diameter of the installation is smaller than the diameter of the container.
- Horizontal rectangular holes are made on the sides of the container to insert a grid with a fixed spiral. Thus, the spiral is positioned 3 cm from the edge of the container.
- From the spiral, conductive wires are led out of the walls of the container through special insulators. A circuit breaker with additional insulation is fixed on the outside of the container wall.
- A fan is installed on the opposite side of the grille, which is securely fixed to the walls with self-tapping screws. The device is connected to the machine.
- Holes are made along the edges of the body for mounting supports secured with nuts. The finished structure should be as stable as possible.
- Test run of the finished heater. First, the fan turns on, then power is supplied to the coil.
Constructing a home electric heater with your own hands from improvised materials, the cost of which is low, is not particularly difficult, so even a novice master can cope with such a task.
During the cold season, the need for heat sources for local heating increases. Why this happens is a topic for another conversation, but one way or another, every autumn, the demand for heaters, which are used to heat homes and industrial premises, increases sharply. Many craftsmen prefer to do them with their own hands, especially since there is nothing complicated in this matter.
Is it possible to make a heater with your own hands?
 In fact, a homemade heater is not such a complex design, and making it at home is not that difficult. This does not require a lot of tools or any scarce materials.
How to make a heater with your own hands for your home: options
Below we will look at several ways to make a heater with your own hands.
Homemade thermal film
 The design of this homemade product will be based on two plates of ordinary window glass. These are two rectangles measuring 40*60 mm each. That is, the area of each of them lies within 25 square meters. cm.
To carry out the work you will need:
- two-core copper wire;
- tester;
- paraffin candle;
- block of wood;
- pliers;
- sealant;
- epoxy resin based adhesive;
- cotton napkin;
- hygiene sticks.
Sequence of operations as follows:
- Cleaning glass plates using a cloth. Dust is removed from the surface, degreased and dried.
- Light a candle and use grip-type pliers to smoke the glass. The main thing at this stage is to obtain an even layer of carbon deposits. The side covered with soot will act as a conductive part. This operation must be repeated several times to obtain a uniform layer.
- After the glasses have cooled, the edges of each of them are cleaned of carbon deposits. To do this, using a hygiene stick, remove carbon deposits around the entire perimeter.
- Foil 5 mm wide is applied to the cleaned layer. The foil acts as terminals. The same operation is carried out with the second plate.
- A layer of glue is applied to the part that remains covered with soot, on top of which a previously prepared piece of foil is placed. The strips serve as contacts, which are needed to connect the conductor.
- The parts are joined together at the joints and lubricated with sealant.
- The assembled structure is placed on a wooden block and connected to a 12 V network.
The design is ready for use.
Heater made from leftover heated floors
 Among homeowners both in the city and beyond, warm floors made of film have gained wide popularity. If, after laying a heated floor, there is waste from this film left in your home, then it can be used to make a homemade heater. To heat a room of 4 square meters. m, one sq. m is quite enough. m of film. This heater can be installed either in the house or in the garage.
Preparation of materials. To ensure the work of creating a heater, it is necessary to prepare the following set of materials and tools:
- foil film, it is used as a substrate for underfloor heating film;
- copper wire with a cross section of 0.75 sq. mm;
- thermal regulator;
- bitumen tape.
Sequence of operations for manufacturing a heater from thermal film as follows:
- After you have collected everything you need, you can begin cutting out the sheet of film.
- Preparing the wire to connect it to the film. To do this, you need to remove the insulation from one end, bend the cleaned end in half and twist it into a bundle and then crimp it with pliers.
- A terminal is placed on the prepared harness.
- Connecting the clamp with the wire to the edge of the thermal film.
- Insulation of connected ends using bitumen tape.
Either before starting work, or after assembling the “Warm” sheet, a socket must be installed on the free end of the wire.
ATTENTION!
SUCH A “WARM” SHEET OPERATES WITH A VOLTAGE OF 220 VOLTS, SO WHEN INSTALLING AND OPERATING IT IS NECESSARY TO PROVIDE ALL SAFETY MEASURES.
We make a fan heater from what is at hand
 In fact, you can find a lot of interesting things in the household that can be used to make a small power heater. To do this, you can use mineral water cans, you can make a thermal panel and much more. There are models made on the basis of a wire heating element, for example, nichrome.
How to make a powerful heater with your own hands
By the way, you can make more “serious” heaters with your own hands; they can be used not only to heat a garage, but are also enough to maintain heat in a small workshop.
Making your own oil heater
 The oil heater has high efficiency, is quite simple to manufacture and is safe to operate. Its operation is based on the following principle: oil is poured into a sealed housing. Inside the housing there are heating elements that heat the oil moving inside the container.
To make such a design you will need:
- Heating element - 1 kW based on 1 sq. m.
- A sealed housing, the design of which completely eliminates liquid leakage, most often it is a welded structure. The composition, which includes plugged pipes.
- Pure and technical oil. Its volume is 85% of the internal volume of the case.
- Control and automation equipment, their range is determined by the power parameters of the heater.
The order of work looks like this:
- A sketch of the system is drawn up; it should reflect the linear dimensions of the sections and basic thermal calculations. Based on this sketch, you can draw up a list of materials needed to create the structure.
- The purchased pipes are cut to size and plugged, and subsequently heating elements will be installed in them. It makes sense to invite a specialist to carry out welding work.
- The design must include a neck for filling oil and a tap for draining oil; it is installed at the lowest point of the structure (register)
- After the register is welded, it is advisable to test it for leaks; to perform this work, it is necessary to use a pressure testing pump. As leaks are identified, they must be completely repaired.
- Install heating elements in pre-prepared places and then you can check the functionality.
Homemade infrared heater
 As an option, you can consider such an option as a “warm panel”. To do this you will need dry glue, graphite powder, a sheet of plastic and an electrical cord. Briefly, the idea is as follows: graphite powder is mixed with glue. The adhesive is the binding agent and the graphite is the high resistance conductor. Once the mixture is ready, it can be applied to a sheet of plastic and, following the precautions, make all the necessary connections. The operating temperature of this mixture is 65 degrees.
While the mixture is still in a liquid state, it must be poured into a mold made of wooden beams and after drying, connect the wires and test the operation of the device.
Rules for using homemade heaters
It is advisable that homemade heaters be equipped with automation, which will reduce the likelihood of overheating and fire of the device.
The article will look at an example of how you can make the simplest heater using available materials. Of course, this is just a sample showing the principle of operation of the device, the process of its assembly, and so on. But based on the described scheme, you can assemble a more powerful option, with which you can heat a garage or house without any problems.
The device operates directly from a 220 Volt network, no power supplies are required.
Materials and tools for creating a heater:
- two pieces of glass (you can cut whatever you need);
- some aluminum foil;
- an ordinary candle;
- sealant, glue, etc.;
- a cotton swab or any other similar item;
- a piece of wire with a plug (two wires);
- it is advisable to have a multimeter;
- soldering iron.

Heater manufacturing process:
Step one. We create an analogue of thermal film
First, the glass must be thoroughly washed and cleaned; there should be no traces of dirt or grease on it. Next, take an ordinary candle, light it, and use it to thoroughly smoke one half of the glass. In total, the author moved the glass back about 4 times so that it was well smoked. You also need to take at least three pauses before “smoking”. That is, smoke the glass the first time, then the second time and again the third time. The more smoked the glass is, the more the heater will heat up.
Step two. Assembly of the structure
Now you need to take a cotton swab and carefully collect excess pieces of soot on the glass. In total, you need to clean a distance of about 0.5 cm along the edge. Next, you need to take the foil and cut out two electrodes from it; their width should be the same as the width of the remaining soot on the glass.
Now you can assemble the device. Electrodes are placed on the soot, and glue is applied along the edges of the glass. Now you need to carefully press the halves together and let the glue dry. That's all, the heater is ready.

Step three. Heater tests
As a result of testing a homemade heater, it was possible to determine that it has a resistance of 40 kOhm. The thicker the soot layer, the lower the resistance and the higher the temperature, and vice versa. As a result, the calculated power of the sample was about 1.2 W.
When the heater was turned on, it began to heat up very slowly, and at the 40th minute its temperature reached 37 C degrees. The temperature did not rise higher, apparently this is the turning point at which a balance was reached between heating and heat transfer.
As a result, the device works normally and a larger sample can be collected. By the way, the pattern of soot can be varied; it does not necessarily have to be a stripe. Thus, you can make any picture that will warm you up just as well. In any case, this is just a sample and there are still many ways to improve the system.
The main thing is safety.
When is a homemade heater needed for a home, cottage or garage? Ordinary people are pushed to make heating devices with their own hands by the lack of centralized heating (in the case of a garage or country house). For a home, homemade heating equipment will be needed during construction work or in the autumn-spring period, when the centralized heat supply is either not yet turned on or has already been stopped. By the way, this is the best time to do it.
People make a home heater with their own hands in order to save on the purchase of factory-made equipment, the price of which can be very high. However, regardless of the reasons why homemade heating devices are made, all work must be carried out professionally and in strict accordance with government regulations on the safe operation of such equipment.
The right homemade heater for the home
Regardless of the type of heating equipment manufactured and the type of energy carrier used, the equipment must meet the following requirements:
- be easy to manufacture;
- have a low cost of structural materials and elements;
- have high productivity;
- sufficient power;
- be safe to use;
- be economically profitable in terms of energy production and consumption;
- as compact as possible;
- simple and easy to use.
Any factory-made heater can boast of safety, economy and efficiency. Homemade equipment is characterized by increased power, productivity, and ease of use, but safety is a controversial issue. That is why any homemade heater for the home needs to be checked before mass use.
Efficient infrared emitter
Any infrared emitter that is used to heat a room is characterized by efficiency and high efficiency. All this is achieved thanks to a unique operating principle. Waves in the infrared spectrum do not interact with air, but increase the surface temperature of objects in the room.
They subsequently transfer thermal energy to the air. Thus, the maximum of radiant energy turns into thermal energy. It is precisely because of their high efficiency and efficiency, and also because of the low cost of structural elements, that infrared heaters are increasingly being made independently by ordinary people.
IR emitter based on graphite dust.

Epoxy adhesive.
operating in the infrared spectrum, can be made from the following elements:
- graphite crushed to dust;
- epoxy adhesive;
- two equal-sized pieces of transparent plastic or glass;
- wire with plug;
- copper terminals;
- thermostat (optional);
- wooden frame, comparable to pieces of plastic;
- brush.

Crushed graphite.
First, prepare the work surface. To do this, take two pieces of glass of the same size, for example 1 m by 1 m. The material is cleaned of contaminants: paint residue, greasy hand marks. Alcohol will come in handy here. After the surfaces have dried, they proceed to preparing the heating element.
The heating element here is graphite dust. It is a conductor of electric current with high resistance. When connected to the power supply, the graphite dust will begin to heat up. Having reached a sufficient temperature, it will begin to emit infrared waves and we get a DIY IR heater for the home. But first, our conductor needs to be secured to the working surface. To do this, you need to mix carbon powder with the adhesive until a homogeneous mass is formed.

Homemade room heater.
Using a brush, we make tracks from a mixture of graphite and epoxy onto the surface of previously cleaned glass. This is done in a zigzag manner. The loops of each zigzag should not reach the edge of the glass by 5 cm, while the graphite strip should end and begin on one side. In this case, there is no need to make indentations from the edge of the glass. Terminals for connecting electricity will be attached to these places.
We place the glass on top of each other with the sides on which graphite is applied, and fasten them with glue. For greater reliability, we place the resulting workpiece in a wooden frame. Copper terminals and a wire are attached to the exit points of the graphite conductor on different sides of the glass to connect the device to the electrical network. Next, homemade room heaters need to be dried for 1 day. You can connect a thermostat in the chain. This will simplify the operation of the equipment.
What are the advantages of the resulting device? It is made from improvised materials, and therefore has a low cost. It heats up no higher than 60°C, and therefore you cannot get burned on its surface. The glass surface can be decorated at your discretion with film with a variety of designs, which will not violate the integrity of the interior composition. Do you want to make homemade gas heaters for your home? The video will help solve this problem.
Film IR heating device. To fully heat a medium-sized room, it is recommended to use ready-made film materials capable of emitting infrared waves. They are abundantly present in the modern market.
When buying film material, you need to pay attention to the composition of its heating element. The latter must not contain lead. It is dangerous to health. A quality product must be accompanied by a quality certificate.
Required structural elements:

Preparing the wall surface for a homemade heater for an apartment begins with fastening the thermal insulation. Its thickness should be at least 5 cm. To do this, remove the protective film from the self-adhesive layer and attach the polystyrene to the surface with the foil facing up. In this case, the material must be pressed tightly against the wall. An hour after completion of work, you can proceed to the next stage.
Sheets of IR film are connected to each other in series. Glue is applied to the back side of the material using a spatula. All this is attached to previously installed polystyrene. It will take 2 hours to securely fix the heater. Next, a cord with a plug and a thermostat are attached to the film. The final stage is decoration. To do this, the prepared fabric is attached over the film using decorative corners.
Making an oil heater with your own hands

Homemade register with heating element and air vent.
Firstly, the container for the future radiator must be absolutely sealed. Otherwise, the coolant will leak out, which will lead to overheating of the heating element (heating element). Therefore, you need to master some techniques for properly welding metal. We talked about them in the article about.
Secondly, the coolant here should be mineral oil, if possible transformer oil. It should fill the heater tank to 85%. The rest of the space is left for air. It is necessary to prevent water hammer. Thirdly, in the case of using a cast iron tank for the heater, a steel heating element is used. For a stainless steel tank, a copper heating element is suitable. Magnesium anodes cannot be used in this system.

Use a sketch.
Source materials:
- old, cast iron radiator or steel pipes with a diameter of 15 cm, pipes with a diameter of 7 cm;
- transformer oil;
- thermostat;
- two-core cord with a plug at the end;
- pump up to 2.5 kW.
You will have to work using a welding machine, a drill, a set of drills and electrodes. Pliers will come in handy. Making an oil heater for

The heating element is inserted into the lower end.
Do-it-yourself apartments begin with preparing the tank. If you took an old cast-iron battery, it must be disassembled into sections and thoroughly cleaned of dirt and rust, and be sure to degrease the inner surface. If you need a heater of increased power, then prepare a welded structure from prepared pipes, where pipes of larger diameter are located horizontally.
Pipes of smaller diameter serve as bridges between the main ones. The coolant will circulate through them. You need to remember that in the lower pipe you need to leave a hole for installing the heating element. If there are several heating elements, they are located on different sides of the tank and should not touch. A hole is also left for the pump. The heating element is securely fastened with bolts. The hole for it can be made with a grinder or autogens.
If a do-it-yourself room heater turns out to be voluminous and natural circulation of coolant in it is impossible, resort to the help of a pump. It is located at the bottom of the equipment. The pump should not come into contact with the heating element.
After installation of structural elements, the equipment is checked for leaks. If the result is satisfactory, then the coolant is filled. The drain hole is securely sealed with a plug. The equipment is connected to the electrical network in parallel. The circuit is supplemented with a bimetallic thermostat made from a regular iron. Before the first start-up, the installation is grounded. Homemade oil heaters for the home: the video will explain in detail about their design and installation rules:
Advantages of homemade heaters
A do-it-yourself dacha heater and homemade heating devices for the home have one undeniable advantage over their factory-made counterparts. The first ones are made from improvised means, and therefore their cost is low. On the other hand, homemade equipment must be made in strict accordance with the rules for the safe operation of electrical and gas appliances. Today you can make your own IR heaters, which are considered the most effective and inexpensive. If you need a device with increased power, you can make an oil radiator at home. There are schemes for making home convectors and portable stoves for tents.