Homemade antennas: outdoor, home. DIY antennas DMV antenna drawing
Good afternoon, V.Yu.
The visitor in the latest posts with experience on FM radio antennas is me. The antenna turned out to be easy to manufacture and I decided to repeat it for FM reception and compare it with previously made ones, by ear, instrumentation, and ease of use. The goal was to obtain a signal with a minimum of interference for high-quality radio sound in stereo mode. I made two antennas. The first one is made of wire 3 mm thick. The second is made of metal-plastic. Made from metal plastic it turned out to be a little better in terms of the level of received signals. By ear - less low frequencies, more high frequencies and distinctness of each instrument in the orchestra.
Measurement method - there is a receiver with a signal level indicator in decibels. We number the FM stations and look at the level of the received signal from the station in dB, then we sum up all the values. We obtain the numerical value of the antenna based on the received signal level parameter. All antennas were placed under the same directional conditions. A wire on a window 303 cm long in the form of a rectangle with a gap on the larger side of 2 cm (51 cm x 102 cm) - has a value of 491 dB, a directional loop phased loop antenna made of wire - 459 dB, the same one made of metal - 485 dB. As can be seen from the presented values, a metal-plastic antenna is comparable to a full-size frame equal to the wavelength of the middle FM range.
Now on to the manufacturing technology. It is somewhat different from yours and is made without soldering. The base is a rail (30 x 6 x 3 cm). Remained from renovation (2 pieces). Wire antenna - circumference 75 cm (quarter wave mid FM range). Two circles of the same length. We take a light self-tapping screw (not dark - it has a cone head) with a flat head for a Phillips screwdriver. We make a hole in the rail with a drill or other method so that the wire enters the hole with little resistance. You can slightly bend the ends of the wire for this purpose. We insert the two ends of the loop into the hole in the rail and do not connect them to each other (leave 5 mm between the ends of the loop). We do the same with the second loop at the other end of the rail. The distance from the end of the rail is 1 cm. We screw the screws on top of the rail so that the end of the screw fits into the loop wire at the end. This ensures contact of the coax with the frame. We screw the central core of the coaxial and the braiding on different sides of the frame under the self-tapping screws. For example, the central core is on the left, and the braid is on the right in the direction from the beginning of the rail to its end. We lay the coaxial between the frames and attach it to the screws (screw it under the screw head). The second loop is also attached and the ends of the coaxial are secured under the screws securing the second loop. The descent is in the form of a coaxial - I got a length of 7.5 meters, we fasten it under the screws of one of the frames (the central core is on the left, and the braid is on the right. We tighten everything - the screws ensure contact of the wires with each other with the head, and contact with the loop with the end. The distance between with self-tapping screws - 2 cm We connect the other end of the coaxial cable to the receiver through the connector you need.That's it - the antenna is ready.
Metal-plastic differs in manufacturability. 20 mm pipe, also after repair. Bent into a ring without any problems. The length of the loop is 75 - 1.5 cm (as recommended in the article) = 73.5 cm. Attaching the loop to the rail is also a self-tapping screw, but of a larger size so that it goes through the metal-plastic and is well secured to the wood, by 10-15 mm. There is a distance of 1 cm between the ends of one loop. The screws from the end of the loop are still at a distance of 0.5 cm. We get a distance of 2 cm between the screws of one loop. We lay a piece of plastic between the loops and fasten it with screws to the rail, so that the coax can be inserted inside. We connect the coax in the same way as in the first case to the ends of the loop, the central core and the braid. We ground the tube between the antenna loops (connect it to the braid). We insert a piece of coax into the pipe between the loops, connect the c.z. and braid. We also connect the reduction coaxial to the self-tapping screws of one of the loops (central ring and braid). We first clean the ends of the loops from vinyl to aluminum so that the head of the screw presses the wires to the aluminum and at the same time secures the loop to the wooden batten.
With all respect, Andrew
1. Do-it-yourself UHF television antenna
1.
Ring-coaxial cable RK75, 530 mm long.
2.
Loop-coaxial cable RK75, 175 mm long.
3.
To the antenna.
Assembly:
To assemble this antenna, you don’t even have to go shopping.
To do this, you need to take an RK75 antenna cable 530 mm long (for the ring) and 175 mm long. (for loop).
Connect as shown in the figure.
Secure it to a sheet of plywood (plexiglass) using wire clamps.
Direct to telecentre.
Here is a UHF antenna that will work no worse than a purchased one.
2. Do-it-yourself UHF television antenna “Narodnaya”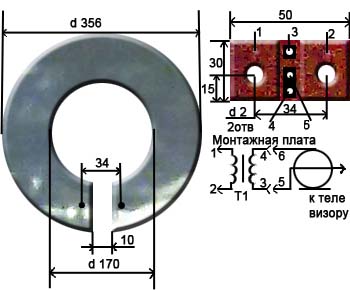
The antenna is an aluminum disk with an outer diameter of 356mm and an inner diameter of 170mm. and 1mm thick, in which a 10mm wide cut was made.
A printed circuit board made of glass lite 1mm thick is installed in place of the cut. This board has two holes for mounting with M3 screws.
The leads of the matching transformer T1 are soldered to the printed circuit board attached to the antenna.
For a transformer, it is best to use a ring core with an outer diameter of 6...10mm and an inner diameter of 3...7mm. and thickness 2...3mm.
The transformer windings are covered with a single-layer insulated wire with a diameter of 0.2...0.25 mm. and have the same number of turns, from 2 to 3 turns. The length of the coil bends is 20mm.
With such a transformer, reception in the meter and decimeter range is possible at a distance of 25...30 km. At a distance of up to 50 km. The antenna works satisfactorily only on decimeter channels.
Without a transformer, the distance of reliable reception is halved.
However, there is a circuit that allows you to get similar results without a transformer; for this you need to assemble the following circuit: 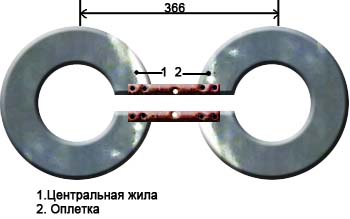
3. Do-it-yourself log-periodic television antenna (UHF).
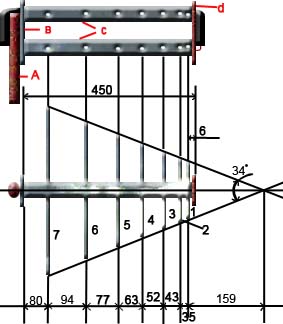

A. Mast
IN. Metal plate (dimensions 87x30x5)
WITH. metal tubes d 16…19mm
D. textolite plate (dimensions 87x30x5)
E. braid
F. coaxial cable
G. central core
7,6,5,4,3,2,1. vibrators
Assembly
1. Take two metal tubes 450 mm long and 16...19 mm in diameter.
2. Make two plates measuring 87x30x5mm. (one is made of metal, the other is made of textolite), drill holes in them, as shown in the pictures.
3. Secure the tubes in the plates (to the metal plate by soldering, and to the textolite plate using screws screwed from the ends of the plate with a diameter of 2.5 mm.
4. In metal tubes, along their length, at the distances indicated in the figure, drill holes with a diameter of 3.3 mm. and cut the M4 thread.
5. Screw 14 directors made from a rod with a diameter of 5 mm into the holes. At one end of each rod, cut an M4 thread to a length of 10mm.
The lengths of the directors, taking into account the part of the length of the threaded end, according to the vibrator number (see figure), are given in the table:
Vibrator No.…..length in mm…..number of pieces
1…………………………..107………………..2
2…………………………..129………………..2
3…………………………..155………………..2
4…………………………..186………………..2
5…………………………..225………………..2
6…………………………..272………………..2
7…………………………..330………………..2
6. Place the coaxial cable in one of the tubes and solder it according to the figure. Paint the solder ends with paint.
7. Attach the antenna to the mast.
Antenna from user Evgen:
1. Take two EMPTY jars - for channels 21 to 41, 0.5 l is better, for channels 42 - 69 - 0.33 l.
2. Fasten them in any convenient way (electrical tape, adhesive tape, rope, glue, etc.) on a solid piece of dielectric (rail, stick, piece of plywood - it is better to paint or varnish the wood, textolite, getinax, etc.) onto at a distance of 10 - 15 mm from each other.
3. We make 2.5 - 4 mm holes in each jar along the edges (as many screws, washers, nuts can be found) and with the help of these we attach the central core of the cable to one jar, and the braid to the other. You can attach any balancing device, but you can do without it.
The receiving distance depends on the installation location of this design (outside is better) and the power of the transmitter.
The holes are on those edges where the jars are closer to each other. And it’s more convenient to first fasten the cable (and the balancing device - if you’re lazy), and then the jars to the supporting structure.
In our age, digital television has a large coverage area and is actively developing, while analog television will soon simply disappear as a species. Based on this, I suggest you make a simple antenna for receiving digital television that will receive a signal no worse than factory models, and sometimes even better.
We will make an antenna using the example of the so-called “eight”; it can be used both without a reflector and with it. If the signal source is far from you, then it is better to add a reflector; using it, signal reception will be better and more stable, the main thing is to know where the tower is installed and point it at it.
For the manufacture of the antenna, you can use any conductive material with a suitable cross-section (aluminum wire, pipe, profile, angle, bus, etc.), but as practice has shown, it is best to use copper wire with a cross-section of at least 6 mm2 (the thicker the better the reception ), and it is also easy to bend, solder or align if necessary.
Antenna manufacturing
To make the antenna, take a piece of wire 112 mm long and bend it in this order: make the first section 13 cm + 1 cm for the loop (for connection strength). We make the second and third 14 cm each, the fourth and fifth will be 13 cm each, the sixth and seventh will be 14 cm each, and the last eighth will be 13 cm + 1 cm stiffening loop.

The ends of the wire must be twisted into loops and soldered well, this place will be the contact for connecting the cable, where to solder the central core of the cable does not matter.

Don’t be afraid to make a mistake or get shortchanged, we don’t make an antenna that meets all standards, we need a simple and working one, so to speak, a surrogate, but reliable. I personally couldn’t handle the size, without a reflector, I used a 50 Ohm cable, not 75 Ohm, but with a thick braid. Nevertheless, the antenna works quite well. Below I will write what length of the sides of the square should be exactly for your signal transmitting tower (at what frequency it transmits) and how to calculate it.
To make this design rigid, you can use a regular cap from a twenty-liter bottle and fill the soldering areas with plastic glue from a gun, this will make better contact and it will not be possible to accidentally tear off the cable.

The result is this design and, as you can see, it can be installed anywhere, cornice, curtain, window frame, etc.
P.s. In order to find out at what frequency the television tower closest to you is transmitting and in which direction to point the antenna you made, just go to the office. website of the Russian television and radio broadcasting networks and follow the instructions, everything is simple there.
Once you find out the frequency of the transmitter, use an online calculator (finding it on the Internet is not a problem) to calculate the length of the sides of a square, everything is also simple there, insert the received data, and get the result.
The simplest antenna for digital television. Do it yourself.
It is already a fait accompli - analogue terrestrial television is ending its glorious history in Russia. It was replaced by digital TV broadcasting. This is generally good, the quality of the TV picture is significantly higher. Today I will tell you how to make a simple antenna with good characteristics yourself.
A few memories. At school I took part in a radio club, it was led by specialists from SONIIR, the guys were very professional, and passed on their knowledge to young people. And at that time, the first television channel alternative to state broadcasting appeared in our city. They played all sorts of films there that were shown in video stores at that time. Well, of course, we’ll teach you, tell us how to make an antenna, so that it’s simple and really good. Well, without thinking twice, the antenna was designed, manufactured and tested, showing excellent results. And actually, when the question arose about an antenna for digital TV, I had no doubts about the design of the antenna.

To make the antenna, ordinary copper wire is used; the thicker the diameter, the stronger the product. The design is shown above. I think there shouldn't be any manufacturing issues. An additional advantage is that the characteristic impedance of the antenna matches the characteristic impedance of the cable and no additional matching elements are required.
A simple modification to your home indoor antenna!

So you have purchased digital set-top box for TV. It's time to start using it - but what if you don't have the right one at your disposal? outdoor antenna? No problem - take it simple room and add to it... amplifier! How to connect them correctly - read on!
Why does this work?

The effect of noise on the image in analog and digital signal versions
With an old analog signal, connecting an amplifier to a simple antenna didn't give any results– along with the useful signal, the noise increased and the picture was still snowy And intermittent. But digital channels are completely another thing! In order to extract a useful signal, a small difference with noise is enough for the receiver. If you amplify even a noisy indoor antenna signal, it will the level is enough so that digital channels are extracted And deciphered.
How to do it?

You will need a simple signal amplifier(adapter with antenna plug) and itself indoor antenna. Connect the antenna plug to the amplifier input. The output of the amplifier is accordingly connected to the TV.
Experiment with antenna position- and everything will work. Turn on the set-top box, insert the amplifier adapter into the socket and turn on the setting - after a while the set-top box will find up to 30 channels with clear images– and all this without an outdoor antenna! Agree, very convenient!
Happy editing and interesting TV shows!
Digital TV antenna in 15 minutes
Many of us have at least once in our lives encountered a situation where, despite having a TV, we have a complete lack of antenna or cable television. And the most annoying thing is that there is a TV tower over there, and the TV shows weather phenomena in the form of snow. And the radio waves themselves do not want to fly into the antenna socket and move electrons.
Part of the population, brought up under the vigilant gaze of the all-seeing eye of the party, will undoubtedly rush headlong to fulfill their civic duty as a consumer to the nearest supermarket of household appliances, where the cunning gaze of a consultant will immediately single you out as the object of a 100% scam. - Why? - you doubt, going through files in your head in search of knowledge about antennas...
So for those who didn’t find anything, I’ll explain. They will forcefully sell you an antenna “specially designed for digital television broadcasting” and without it, your TV will in no way be able to provide a high-quality image. Some particularly zealous consultants will argue that she even takes a companion. (A consultant, like a traffic cop, has the skills of psychological influence and from the first words recognizes the level of your competence.) The price of such a “cool” antenna can be above 1,500 rubles. It looks something like this:

Let's take a closer look at what's what here. Two telescopic active elements of a symmetrical vibrator for receiving meter waves (very few channels work in this range, and digital ones do not work at all). By extending or retracting these tubes, you tune the antenna into resonance with the carrier frequency of a particular TV channel, and both elements must be the same length. The black “donut” is a UHF antenna (there is just a broken wire ring inside). This antenna is not precisely tuned to any UHF channel, but has average characteristics, that is, it does not catch well, but on all channels. Inside the stand there are matching transformers and, if there is a power cord, then an amplifier, the gain of which is changed by the regulator. This amplifier is the most useless thing in this entire structure. Let me explain. When the TV tower is within sight (10 - 15 km), the power of the useful signal will already be enough for reliable reception, and if further, such a broadband antenna will also receive interference, which will also be amplified by the amplifier. In such remote places it is necessary to take care of an external antenna.
As for receiving a digital signal, the antenna doesn’t care what signal it receives: digital, analog, or all frequency-modulated. All necessary transformations take place on the TV.
And here a self-respecting citizen will certainly have seditious thoughts:
– the Chinese, under the guise of high technology, are selling us two tubes and one wire (the rest is non-functional) – they are lying;
– sellers who sell a penny item at exorbitant prices also lie, assigning non-existent functions to it;
– the authorities, which allow them to openly deceive their citizens, also apparently have their noses in the dust.
Therefore, I urge you to hit the world bourgeois consumer goods with high-quality homemade goods.
If you have a TV cable with a plug, as well as a piece of wire 125 cm long and at least 1 mm in diameter from any metal, you can build a high-quality UHF antenna in about 15 minutes. Unless, of course, you add design delights.
So, armed with pliers, if possible a soldering iron and a tricky Russian word, we bend a wire like this (see Fig. 3-4), with sides 13-15 cm. The ends of the wire can be soldered, or you can simply twist it at the upper or lower corner. The figure shows where the central core and cable braid are soldered. Make sure that the thin braid wires do not come into contact with the central core. The distance between points “a” and “b” should be 1.2 -1.5 cm, the angles should preferably be straight and everything should be in the same plane. By the way, the structure can be made from metal tape. The wider the tape, the wider the frequency range, but the lower the gain, which in the wire version will be approximately 8.5 decibels (for a Chinese trinket, about 4). Connect the antenna to the TV, install it vertically and perpendicular to its plane to the direction of the repeater.

If everything is done correctly, then everything will work right away and you can think about the design. For it is said: functionality is the forerunner of design.
Having done such a thing, you will suddenly feel how your self-esteem has risen and this will not go unnoticed by your spouse or girlfriend. And the saved money can be spent on a family romantic dinner, because in the eyes of your spouse (friend) you will become a genius, at least until the first scattered socks.
I will be glad if my writing gives rise to wise thoughts that will move me towards the path of technical assault.
In this article you will learn how to make an antenna for digital TV with your own hands. Types of antennas, advantages and disadvantages of these types of antennas. We will also look at the simplest types of DVB T2 antennas: from tin cans, a decimeter antenna, a Kharchenko antenna, from a coaxial cable and a double and triple square.
An era is coming when all television companies begin to work in the new format of digital television. But analog TVs are installed in almost every home and continue to work properly, and what to do if the receiver was purchased not so long ago, but there is no money for new equipment.
This problem can be solved quite simply by connecting a DVB-T set-top box and a special antenna to the TV to catch the signal. You don’t have to buy it in a store, but make it yourself using publicly available materials.
Types of antennas for digital television
To receive digital television signals, you need a good antenna capable of receiving a UHF signal. Such devices differ from meter ones in their small size. If we consider the way the devices are arranged, they can be divided into three categories:
- indoor;
- street;
- hybrid.
Before you go shopping for a structure, you need to determine how far away the tower is from your home. If it is not far away, and the windows of the apartment face exactly in its direction, then you can safely purchase a room option.
On a note! Each manufacturer of such devices has several assembly options that can be selected for specific parameters based on personal preferences.
Advantages and disadvantages of all types
All types of antennas have both positive and negative characteristics, which are worth studying before purchasing a device.
Advantages of indoor antennas:
- affordable cost;
- ease of connection;
- small dimensions;
- using an amplifier can supply a good quality signal to the receiver.
Flaws indoor antennas:
- you will have to look for an individual location for each channel;
- image instability due to frequent signal interruptions;
- it is impossible to configure many channels;
- sensitivity to external factors;
- if the tower is located far away, then its productivity is reduced to zero.
This option is perfect in a country house or in an apartment only if the broadcasting tower is very close.

Indoor antenna made of coaxial cable to amplify the signal
Positive factors of external devices:
- the ability to configure all channels at the same time;
- high reliability;
- receives a good signal and amplifies it when positioned correctly;
- is relatively inexpensive.
Minuses:
- has significant dimensions;
- you need to prepare the mast;
- A TV cable is not always included in the package;
- An assistant is required when installing on the roof.
But, despite these shortcomings, these devices remain the most popular in dachas and villages, as they have proven themselves to be excellent.

DIY outdoor TV antenna in the shape of a butterfly
Hybrid types of antennas have many more positive aspects:
- excellent signal reception at any distance from the transmitter;
- thanks to them, you can tune in to all the channels available in a given area at once.
The only downsides are the complexity of installation and the fairly high cost.
At the moment, many home craftsmen prefer to make antennas for receiving digital signals with their own hands. If you approach this process wisely and apply a little perseverance and patience, you can independently assemble a structure that will be in no way inferior to a purchased device.
DIY DVB T2 antennas
TV transmitters are capable of propagating their waves over a distance of no more than 60 km, while ensuring a low signal propagation power from the top of the television tower. Therefore, high technical requirements are imposed on the installation of all components of a digital receiver. The antenna itself must have the following design features:
- precise, careful manufacturing, which can eliminate all losses of electrical signal power;
- the direction of the device must coincide with the electromagnetic waves that come from the transmission center;
- match in type of polarity;
- have protection from extraneous signals coming from other devices.
Antenna made from beer (tin) cans
From empty beer cans you can make a simple decimeter antenna that will catch the signal well while in the room. Before you begin installation, you should prepare everything you need:
- two empty beer cans up to 1 liter;
- coaxial cable (RK75);
- antenna plug;
- self-tapping screws;
- insulating tape;
- an element for attaching cans - this can be a polypropylene pipe or a wooden stick;
- knife, screwdriver and wire cutters;
- ruler and file.

Once everything is ready, we proceed to assembly according to a certain algorithm:
- Carefully, so as not to dent, make holes in the bottom of each jar using a screwdriver or an awl;
- screw a self-tapping screw into each hole;
- clean the ends of the wire from all contaminants with a file and trim with a knife;
- Twist a ring on each wire, not forgetting about the braiding, and put it on the screws. The ideal solution would be to solder the wire. If you don’t have the necessary tool, you can simply insulate it with electrical tape or tape;
- the cans are attached to the pipe using tape, at a distance of 7.5 cm from each other (determined experimentally);
- then put the antenna plug on the free end;
- install the antenna in a place where the signal is received in the desired format.
Important! If you plan to install such a device outdoors, then you should take care to protect it from wind and rain. The most optimal solution in this situation would be to use plastic bottles in which tin cans are placed, having previously cut off the necks and bottom.
Just 30 minutes of time is enough to make such an antenna yourself, without the use of special devices and tools. At the same time, it will freely receive up to 15 digital channels.
Below is a video instruction on how to assemble an antenna from beer cans:
UHF antenna
A similar TV antenna is mounted from a simple 75-ohm cable and a regular connector:
- The cable is stripped at one end and a plug is installed on it.
- Step back 2 cm from the connector and put a mark from which the length of the future device will be measured.
- Remove excess wire using wire cutters.
- Two centimeters from the edge of the connector, a mark is placed from which the length of the future antenna should be measured.
- The excess part of the cable is bitten off.
- Where the mark was previously placed, an incision is made in the insulation and the entire braid is removed. Only the internal insulation should remain on the cable itself.
- The finished part of the wire that has been cleaned should be bent at a right angle.
- Connect the antenna to the TV and start searching for channels in the “Manual settings” section.
On a note! If the tower distributing the TV signal is located 15 km from the antenna, then it will freely receive digital channels without amplification. Otherwise, you can't do without an amplifier.
Antenna Kharchenko
This broadband system in the form of a zigzag was invented by engineer K. P. Kharchenko in 61 of the last century. It is excellent for receiving digital signals.
For assembly you will need:
- copper wire up to 5 mm in cross-section;
- regular antenna cable for 75;
- insulating tape;
- soldering equipment;
- plug;
- fastener
Assembly algorithm:
- For the base on which the structure will be attached, you can use a regular plywood sheet with the required parameters.
- First of all, the frame itself is mounted; to do this, a meter-long wire needs to be bent in the shape of two rhombuses, which are located in series. The sides of the structure are 13.5 cm
- The diamonds are secured using a loop, which is formed from the free end of the wire.
- In order for the structure to acquire a closed contour, the ends should be soldered at the intersection.
- Then strip the cable, twist it into a tight bundle and solder it to the intersection of the diamonds. It is important that the braid and core should not touch each other.
- An antenna plug is installed on the second end of the cable and soldered so that the braid is on the side exit of the plug, and the core is in the central part.
If the antenna is installed outdoors, the plywood base should be varnished or painted, and all soldered areas should be reliably insulated. Once all preparations are completed, you can secure the structure - it is ready for use.
Watch the video below and you will learn how to make a Kharchenko antenna at home:
Antenna double and triple square
This device is used in dachas and villages; it allows you to receive even the weakest signals from towers, especially if done correctly.
Fact! The number of frames is determined based on the signal quality. If you want to make it optimal, you can build 2-3 and even 5 if the tower is very far away.
For assembly, prepare the following:
- brass or copper wire with a cross-section of at least 5 mm;
- television cable;
- plug;
- wire cutters and knife;
- soldering accessories;
- tube on which the antenna will be attached:
- fasteners.
Manufacturing instructions:
- top arrow - will connect all frames exactly in the middle of one side. Made from wire;
- the lower boom is made of wood or any material that does not transmit a signal;
- the central part of the frames should be at the same level;
- all frames are sent by the center strictly to the repeater;
- The lower boom must be installed in such a way that the ends of the frames do not touch each other:
- the mast on which the device will be installed must be wooden;
- build 2 or 3 squares - the first is the largest, the last is the smallest:
- connect them with the upper and lower arrow;
- solder the TV cable to the antenna;
- attach a plug to the opposite end of the cable;
- install the device on the mast using fasteners and lift it to the desired height.
To catch a good signal, it is enough to slowly rotate the structure around its axis.
Watch the video below and you will learn how to make a double and triple square antenna with your own hands:
From coaxial cable
This is a fairly simple option for making a TV signal catcher with your own hands. Before you begin installation, you should prepare:
- RK75 coaxial cable;
- plywood;
- plug;
- matching apparatus;
- wire cutters, knife;
- ruler, pencil;
- sticky tape.
The manufacturing algorithm consists of the following steps:
- prepare a cable 53 cm long;
- strip both ends, while the braid should be wrapped in a tight bundle and kept separate from the core;
- twist the structure into a ring shape and secure it with tape on a piece of plywood so that there is at least 2 cm between the ends;
- Now it’s time to make a matching device from a piece of similar cable 1.75 m long. The ends are stripped in the first case. A plug is soldered on one side;
- connect the other end to the antenna.
Watch the video on how to make an antenna from coaxial cable for digital television below:
Finally
Assembling an antenna for receiving digital broadcasts is not difficult. The selection describes the simplest and most inexpensive devices that any home craftsman can install in a few minutes. But if there is no desire to do this work, and there are funds, then you can always install a special satellite structure that will work without interruption in any situation. But you should understand that for such television you will have to pay a monthly subscription fee.
Gradually, everyone is abandoning analogue television, giving preference to digital broadcasting. The largest providers are also restructuring to work with a newer, modern format. The era of analogue TV is gradually coming to an end.
In order for previously installed home antenna devices to complete their resource, it is enough to connect a DVB-T receiver to the TV, as a result, digital signals will be received correctly.
You can make an antenna for digital television with your own hands, so there is absolutely no need to go to the store and spend extra money. You don’t need any special skills or equipment; you can create the necessary design using available tools.
Now we will answer in detail the question of how to make an antenna for digital TV. We will carefully analyze the process, select the optimal material, and also carry out all the necessary calculations. Nevertheless, first we will deal with the theoretical nuances.
Regardless of the signal format, it is transmitted from the tower emitters. Reception of the wave channel is provided by the antenna device. To receive a digital signal, you will need a sinusoidal device with the highest possible frequency, which is measured in MHz.
When an electromagnetic wave passes through the surface of the receiving beams of the antenna, a V-voltage is induced in it. Each wave contributes to the formation of a different potential, marking it with its characteristic sign.

Under the influence of an induced voltage, an electrical current flows in a closed receiving circuit with resistance R. It is gradually growing. Processing is carried out by the TV circuit, the picture is displayed on the monitor, and the sound is broadcast through the speakers.
You won't be able to connect digital broadcasting using a regular indoor antenna. Firstly, you will need an intermediate link that will provide decoding of information - a DVB-T receiver. Secondly, you should use a UHF antenna or Turkin antenna for DVB.

Antenna figure eight
How to make such an antenna with your own hands? First you need to prepare the material. Then carry out the appropriate calculations. At the final stage, assemble the structure and connect it to the TV. Nothing complicated. Every user can cope with this task.

Materials for antenna assembly
Making an antenna for digital television is not difficult. The list of materials used will vary depending on the type of antenna device. For example, if you wish, you can make it even from the most ordinary beer cans.
To produce a good and simple TV antenna for digital channels, you will need copper or aluminum wire with a thickness of 2 to 5 millimeters. In general, it will take only 1 hour to create such a design. You also need to use:
- handset;
- corner;
- copper or aluminum strip.
You will definitely need a tool that will allow you to bend the frames to the required shape. To bend the wire, use a hammer after securing the material in a vice.

You can make your own antenna not only from wire, but also from cable (coaxial). Choose a plug that matches the connector on your TV. Naturally, you also need to fix the structure; the bracket is made from scrap materials.
As for the cable, it must be taken with a resistance in the range of 50-75 Ohms. Particular attention should be paid to insulation if the device will be placed outdoors.
The specifics of fastening are determined in accordance with where the structure will be located. For example, residents of multi-storey buildings will be able to make their own antenna for digital TV and hang it like a home antenna, i.e. on the curtains. To do this, you will need large pins that will serve as a fastening element.

However, if you want to place the created device on the roof, then you need to make a bracket. To do this you will need a file, a soldering iron and a needle file.
We've sorted out the spiral antenna, but you can also make another design - a double square. It is made from copper, brass or aluminum tubes. Wire 3-6 mm thick is less commonly used. In general, the choice of material is determined in accordance with the MF band and the number of channels.

Double square - two frames that are connected by an upper and lower arrow. The small frame is a vibrator, and the large one is a reflector. To achieve maximum gain, increase the number of frames to three. The third square is the director.
The mast must be made of wood. At least its upper part. Please note that it should start at a distance of one and a half meters from the level of the frames.
So, step by step instructions:
- Take the coaxial cable and strip it from both ends.
- One end will be attached to the antenna, the wire should stick out 2 cm.
- The screen and braid are twisted into a bundle.
- We get two conductors.
- Solder the plug to the second edge of the cable. A distance of 1 cm is sufficient. If you use a crimped metal plug, you can skip further steps.
- Tin and make 2 more conductors.
- Wipe the solder joints of the plug with alcohol.
- Place the plastic part of the plug onto the wire.
- A single core is soldered to the central input of the plug.
- A multi-core harness is soldered to the side entrance of the plug.
- Crimp the grip around the insulation.
- Screw on the plastic tip or fill it with glue.
Calculation
To set up digital television reception, it is absolutely not necessary to calculate the wavelength. Just try to make a broadband design. As a result, you will be able to receive the maximum number of signals. To achieve this result, add additional elements to the T2 antenna with your own hands. It is about them that will be discussed further.

The calculation of an antenna for digital TV is based on determining the signal transmission wave. Divide this value by 4 to get the required side of the square. To determine the distance between the two components of the device, make the outer sides of the rhombuses a little longer, therefore, the inner sides, on the contrary, should be shorter.
If you don’t want to calculate the dimensions of the antenna yourself, use ready-made drawings:
- The inner side of the rectangle is 13 cm.
- The outer side of the rectangle is 14 cm.
The difference is the distance between the squares; by the way, they should not be connected under any circumstances; the extreme sections provide the necessary maneuver for folding the loop. It is to this that the coaxial antenna wire is attached.
Antenna manufacturing
If we calculate the entire length, we will end up with a value of 112 centimeters. Cut the wire or any other material that you plan to use, take a ruler and pliers, and begin to bend the structure. The angle should be 90 degrees. If the sides do not match in length, it’s okay, a small error is acceptable.

Initial data for making an antenna for digital TV:
- The first element is 13 centimeters and 1 centimeter per loop, by the way, it can be bent right away.
- Two elements of 14 centimeters each.
- Two are 13 centimeters each, but there must be a turn in the opposite direction; here a bend is created to another square.
- Two more sections of 14 centimeters each.
- The last one is identical to the first one.
The antenna frame for digital TV is ready. If you did everything correctly, then between the 2 halves there is a gap of several centimeters in the middle. Naturally, there may be minor differences. After this, the loops and bend areas must be cleaned until no metal is visible. Processing is carried out with fine-grain sandpaper. We connect the loops and crimp them with pliers to fix their position.
The design itself is ready, but in order for the antenna made for T2 to function correctly, the cable must be processed. We start with double-sided stripping of the wire. One edge will connect directly to the antenna. You need to strip the cable in this area so that the cord sticks out about two centimeters. If you get a little more, you can simply cut off the rest later.

We twist the screen and cable braid into a bundle, as a result we get 2 conductors - a central core and a twisted element of several braided wires. All this needs to be tinned.
Using a soldering station, solder the plug to the second edge of the cable. A centimeter length is quite enough, small errors are acceptable. According to the principle described earlier, you need to make a pair of conductors and tin them.
The plug is placed in those areas where soldering will be carried out in the future; first wipe it with alcohol or a special solvent. Then, using a file or emery, we clean it. Place the plastic plug element onto the cord. Now start soldering. Attach a core to the central entrance, and a multi-core braid to the side entrance. Crimp the grip around the insulation.

Screw on the plastic tip; some experts even fill it with glue or a special sealant to strengthen the fixation. While the fixing base is still wet, quickly assemble the plug by screwing on the plastic part, and then remove excess glue or sealant. As a result, it will be possible to maximize the service life of the plug. The homemade product has been created, it's time to connect it.
Connection
Connect the cable and the frame of the homemade DVB T2 antenna. It is absolutely not necessary to bind to any specific channel, so solder the cord in the middle. As a result, a broadband antenna will be created that will receive the maximum number of TV channels. Solder the second split end of the wire to the other two sides again in the middle, previously you stripped them and also tinned them. To extend the reception range, do not solder the cable from the bottom.
When the structure is assembled, it must be checked. We connect the tuner and turn on the TV. If digital television receives, for example, you managed to set up 20 channels, you need to finally complete the assembly. Fill the areas where soldering was carried out with sealant.

However, if there are very few active channels or there is some interference, then you need to find a place where there will be an optimal signal. If there are no positive changes, change the antenna cable. To simplify the testing process as much as possible, use telephone wire, it is quite cheap. Solder the plug and frames to it. If the signal quality has improved, then the problem is really in the cable. A digital set-top box will broadcast channels even if noodles are used, but as practice shows, its service life is extremely limited.
To protect the cable connection areas and antenna frames from precipitation and other atmospheric influences, wrap the solder joints with ordinary insulating tape. However, this is not a permanent solution. A more effective option is to install heat-shrinkable tubing on the soldering areas, which will ensure proper insulation.

An alternative option with maximum reliability is glue or sealant. The fact is that these substances do not conduct current. Be sure to make a housing for the antenna; an ordinary plastic cover will do for this. If necessary, make indentations so that the frame “settles down”; do not forget about the cord outlet. Pour in the sealant and wait for it to dry. Everything is ready, we connect the equipment and enjoy digital TV.
Double or triple square for weaker signal
The TV antenna is used in villages, dachas and in areas that are located on the border of the coverage area of television towers. The device allows you to receive even a very weak signal. If you do everything correctly, the power of the TV signal will increase noticeably.
A double or triple square has only one drawback - you need to direct the structure to the signal source with maximum accuracy. Therefore, if you do not know where exactly the tower is, difficulties will arise.

The number of frames determines the signal quality. Therefore, if you are outside the coverage area, you don’t have to limit yourself to 2-3 frames, you can make 5. Do not open the antenna with varnish or paint it. This negatively affects the quality of signal reception.
What are the strengths of the design? First of all, the quality of reception. Even if you are far from the repeater, the signal will be clear. However, it will be possible to achieve a positive result only if the user correctly determines the dimensions of the frames and matching device.
Materials
To make an antenna for digital TV yourself, you need to prepare materials that will later be used to make the structure. The antenna is made from metal tubes or wire:
- 1-5 meter channel - copper, brass, aluminum tubes 10-20 millimeters thick;
- 6-12 meter channel channel - copper, brass, aluminum tubes 8-15 millimeters thick;
- decimeter range - copper, brass wire with a thickness of 3 to 5 millimeters.

Double square - 2 frames, which are connected by a pair of arrows (upper and lower). The smallest frame is the so-called vibrator, and the largest is the reflector. A device with three frames will have a higher TV signal gain. The third square is usually called the director.
Instructions for creating a T2 antenna:
- The top arrow (made of metal) must connect the middles of all frames.
- The lower boom is made using electrically insulating materials: wood, textolite.
- Arrange all the frames so that their centers are on the same line.
- The direct line should be sent to the repeater.
- The vibrator must be open circuit. Its edges are fixed to a PCB plate.
- If you made frames from metal tubes, then the edges should be flattened and holes should be made in them to fix the lower boom.
- The mast must be made of wood, or at least its upper part.

Size calculation
The calculation of an antenna for digital TV will directly depend on the range - meter or decimeter. The dimensions of the antenna with three frames are characterized by a large distance between the ends of the vibrator. You need to leave more distance - 50 millimeters.

The tables show the dimensions of two-element loop antennas. Meter range:
|
Channel numbers |
||||||||||||
UHF:
Size of three-element antennas. Meter range:
|
Channel numbers |
||||||||||||
UHF:
Vibrator connection
Considering the fact that the frame is symmetrical, and the connection is made to an asymmetrical antenna cable, you need to use a matching device. The best option is a short-circuited loop. It is made from pieces of coaxial cable. The left segment is a feeder, and the right one is usually called a train. In the place where the feeder and cable will be connected, we fix the cable, which is subsequently connected to the TV.
What should be the length of these segments? The calculation is carried out in accordance with the wavelength of the received TV signal.

At one end you need to cut the cable, removing the aluminum screen. The braid must be twisted into a tight rope. We cut off the central conductor down to the insulation. The feeder also needs to be cut. Remove the screen, made of aluminum, and then twist the braid. However, we leave the central conductor.
The further assembly process is carried out as follows:
- Solder the cable braid and feeder conductor to the left edge of the vibrator.
- The feeder braid needs to be soldered to the right edge of the vibrator.
- A metal jumper connects the cable braid to the lower end of the feeder. These elements can also be fastened with metal wire. The main thing is that there is proper contact with the braid.
- The braid determines not only the electrical connection, but also the distance between the sections of the matching device.
- If there is no metal wire and jumper, then twist the braided lower part of the cable into a bundle, after first removing the screen and removing the insulation. To ensure proper contact, you need to solder the wire harnesses using solder that melts easily.
- The cable pieces should be parallel to each other. Distance – 50 millimeters (small error is acceptable). To secure the distance, special clamps made of electrical insulating materials are used. You can also attach the matching device to the textolite plate.
- The cable that is inserted into the TV socket should be soldered to the feeder (to the bottom). The braids are interconnected, like the central conductors.
To reduce the number of connecting elements, the feeder and cable connected to the TV can be made one. Remove the insulation where the feeder ends. This is done in order to install the jumper.

A matching device is a mandatory element that helps prevent interference. It will be especially useful if the signal transmitter (TV tower) is located at a great distance.
Butterfly antenna
The TV antenna can also be made in the shape of a butterfly. Such a device will be in no way inferior to a decimeter antenna. There is absolutely no need to do everything from scratch. It is much easier to convert a regular grille into a digital one for T2 tuning. To make it yourself, follow these simple instructions:
- Take a small board that will become the basis of the future antenna.
- Cut 8 wires, each 37.5 centimeters long.
- The middle of all wires must be stripped about 2 centimeters.
- Bend the wires until they form a V shape. The distance between the wires should be 7.5 centimeters.
- Cut 2 more wires, each of them should be 22 centimeters long.
- Strip the wires where they will be attached to the antenna base (board).
- Place the screws along the base of the antenna, and then connect the V-shaped elements with two wires.
- Connect the antenna and cable using the special plug.

Every user can create such a device. You don't have to buy anything. The antenna is made from improvised materials.
From coaxial cable
You can actually make a TV antenna manually using a cable:
- Cut approximately 530 millimeters of cable.
- Strip the cable on both sides, fastening the braid into a bundle and exposing the central core.
- Twist the cable into a ring or diamond shape and secure it with tape to the plywood. The distance between the cable rings should be 2 centimeters.
- Cut a piece of coaxial cable - 175 centimeters. Make a horseshoe-shaped matching device out of it. To do this, you need to strip the wire from both ends, as you did in the process of making rings.
- Prepare the antenna cable. The plug is put on one side, and the other is stripped. It is necessary to remove the central core and braid.
- Align the ring and matching device with the antenna cable.

As a base, you can use not only plywood, but also plexiglass.
Antenna made from tin cans
To make a simple TV antenna for digital channels you will need a cable, a couple of aluminum or tin cans, and a small plastic pipe. A wooden plank can also be used as a base.
Remember that the antenna can only be created from aluminum or tin cans. Plastic or glass will not work. The main requirement is smooth, not ribbed, internal walls. Anyone can install such a device with their own hands in just a few minutes.
- Rinse well and then dry the jars.
- The end of the coaxial cable must be cut.
- Remove the insulation from the center core.
- Twist the braid.
- Once you have 2 wires, attach them to the jars.
- If you have a soldering iron on hand, solder the conductors. They can also be secured with self-tapping screws with flat heads. Twist a loop at the ends of the conductors, and insert a self-tapping screw with a washer into it, then secure it to the can.
- Pre-clean the metal, you need to take fine-grained sandpaper and remove plaque, as well as paint.
- Attach the jars to a plastic pipe or wooden strip.
- The distance is calculated individually.
- Connect the cable to the TV and try tuning the channels.

This is an emergency solution to the problem. Don’t be under any illusions; at best, several channels will be available in good quality. The final result directly depends on how far away the TV tower is, how “clean” the corridor is, and also how well the antenna is made.
Now you know how to make an antenna for tuning digital channels using improvised means.
Note.