Fish made from plastic bottle caps. Crafts made from plastic corks
Recently, folk craftsmen have been making crafts from various waste materials. Crafts made from plastic bottle caps are especially popular. They look bright and attractive, are not afraid of moisture and sunlight, so they are perfect for decorating a summer cottage. You can also involve children in creativity; they will really like this activity.
Making crafts with children
Plastic corks are an excellent material for children's creativity.. They can be glued, strung on a fishing line and decorated, resulting in the appearance of funny figures, panels and decorative items.
 First, you can try making an alphabet magnet for your refrigerator. Using glue, you need to fix the magnet on the surface of the lid, and on a sheet of paper draw circles equal to the diameter of the lid. Write letters inside each circle, cut out circles and glue them inside the lid. This will create a useful and fun alphabet. The child will play with homemade magnets and at the same time become familiar with letters. In the same way, you can do arithmetic typing by writing numbers instead of letters.
Another type of craft made from bottle caps is applique. A fish aquarium made of lids looks unusual . You will need:
- Lids of different colors and sizes.
- Colored paper.
- Blue or light blue cardboard.
- Plastic eyes. If you don’t have any ready-made ones, you can draw them with a felt-tip pen or cut them out of paper.
 You need to cut out triangles from colored paper, they will serve as the tails of the fish. Then stick them on blue cardboard in any order. Secure the plugs to the tails with glue or double-sided tape. Place ready-made eyes on the lids (or draw them with a marker). Cut out algae of various sizes and shapes from green paper. Paint on the bubbles with white paint to make the fish look as if they were alive. The child needs to be given room for imagination: make pebbles for the bottom or depict an underwater castle.
Children can make simple animal figurines, flat puppets, and silhouettes of characters they know.
This is easy to do: you need to glue two or three lids together, fix them on a cardboard base and decorate. There is another way that you can make from corks: they can be collected on a fishing line, like beads, to obtain three-dimensional figures of insects and animals.
 Boys will love designing a robot A. To do this you will need colored caps, cord and an awl. First you need to make holes in the center of the lids. To make the legs, fasten the four lids in the center, placing them on top of each other. Also make a second leg. You need to start assembling the arms from the edge of the lid, then place three pieces one on top of the other and pass the cord through the center.
Next, proceed to the robot body: place two lids on edges, and place a flat one between them. Assemble another similar design. Secure both parts with a cord and hide the knots under the caps. For the head, connect the two caps in the center with a cord. A wonderful DIY toy is ready!
Robots can be decorated using mosaics, chocolate egg packaging and plastic boxes. It all depends on the imagination of the young designer.
If there are a lot of traffic jams, then you can try to make a mosaic. You will need: corks, glue gun or screws, sketch of the drawing. First of all, you need to decide on the surface on which the sketch of the future composition will be placed. If it is a wooden surface, then you can use glue. The corks are glued one by one to the surface in accordance with the pattern. If you need to attach it from the back side, it is better to use screws. A similar mosaic can be placed on the facade of a house or on a fence, or decorate a gazebo or bathhouse.
 When attaching plugs to a concrete or brick wall, you will need a special compound. This could be cement, a plaster composition, or a base for laying tiles. The corks are glued gradually, filling the entire surface in small sections.
You can also cut out some shape from plywood and use glue to fix the lids on it according to the sketch of the picture. It will be interesting to decorate the garden with such figures, giving it a cheerful and unusual look. Garden paths lined with corks look original. For this you will need:
- A large number of corks of different sizes and colors.
- Construction adhesive.
- Cement.
- Sand.
- Boards for formwork.
The first thing you need to do is determine the location and size of the path. It is worth applying markings according to which the traffic jams are planned to be laid out. You need to dig a trench about 10 cm deep, level the soil, and make formwork around the entire perimeter of the trench. Then pour sand halfway up. It is worth preparing the solution for pouring in advance: combine sand and cement in a ratio of 1:4, gradually adding some of the glue.
You need to pour cement onto the path in small portions and then press the plugs into it in accordance with the picture. You need to carefully monitor the depth of indentation: it should be the same, the cement should reach the top of the plug. Next, you should wait for the cement to completely harden; if there are traces of mortar left on the surface, remove it with a stiff brush. Then disassemble the formwork. A bright garden decoration is ready! If desired, the path can be supplemented with curbs.
Useful things from caps
Useful household items can also be made from plastic caps. For example, at the dacha, original curtains made from lids will look beautiful and creative. To make them you will need:

Make holes opposite each other on each lid so that the cord runs through the middle. The lowest one is attached with a knot or bead or button. All the following elements of the thread are held on it. Attach the finished thread to the rail in accordance with the picture. Continue assembling the curtain to the desired size and according to the diagram. Fasten the finished curtain in the doorway.
Another interesting idea of what can be made from bottle caps. Make a massage mat that will help cope with nervous tension received during the day. Good for foot and back massage.
You will need a lot of lids, strong fishing line and awl. First you need to choose the future rug pattern. Use an awl to make four holes in the sides of the corks, using the principle of a cross. Then lay out a pattern from them and begin to place them on the fishing line one by one. After this, the covers of the outermost row are strung on a fishing line through opposite holes. In this order, assemble all subsequent rows. Give the mat the correct shape, tighten the fishing line if necessary. Tie knots on the fishing line and set the ends on fire or break off. Using a similar method, you can make coasters for cold dishes or make a rug for the hallway.
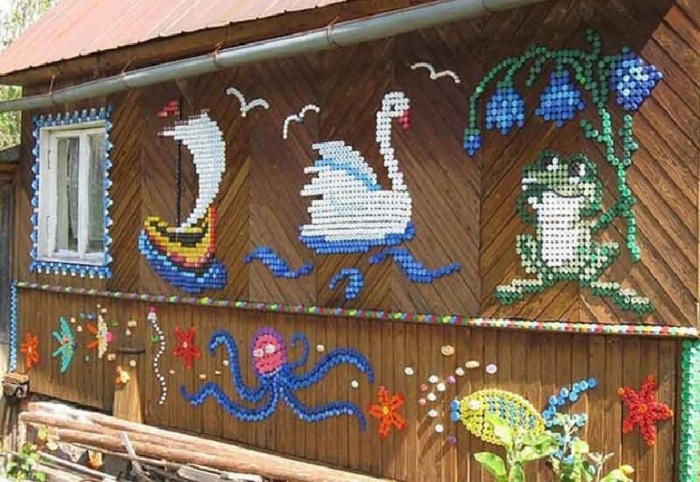
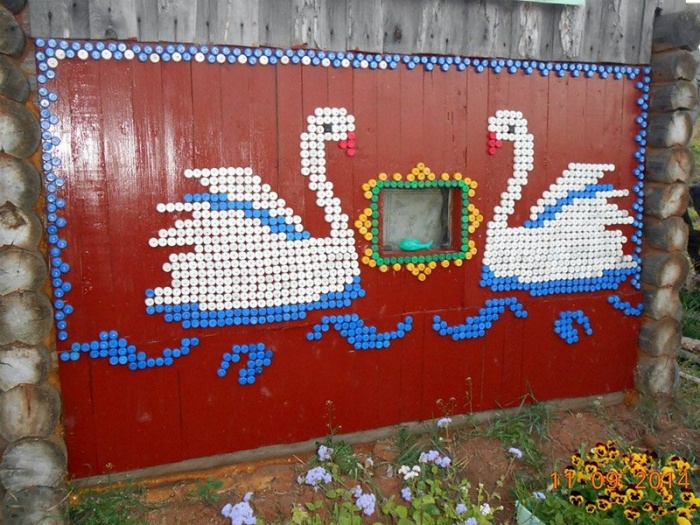
The skill of folk craftsmen knows no bounds. Some create masterpieces from plastic containers, while others' creativity is based on making paintings from plastic bottle caps. The places where original crafts are used are different: the walls of houses, fences and even paths. Various technologies for creating funny images will help you choose the appropriate option for your own needlework from corks.
Mosaic art
The everyday use of plastic bottles in everyday life serves as a source of ideas for their subsequent use. But assembling empty containers for crafts is much easier than finding the right number of corks. The process can take a long time, so most craftsmen involve their entire immediate circle in collecting plastic bottle caps, including family, friends, co-workers and neighbors.

Comment! It is better to select a pattern for the panel in advance in order to determine the need for the color scheme of the corks and their quantity before the collection begins.
For beginners, it is better to start with simple patterns, where a low level of complexity is combined with small size patterns. Having mastered one technology, you can try to design the next picture in a different way.

Making mosaics has several directions. Depending on the location of the design, the methods of forming pictures from corks also differ. Creating an independent mosaic that is not tied to a specific surface will require painstakingness and skill.
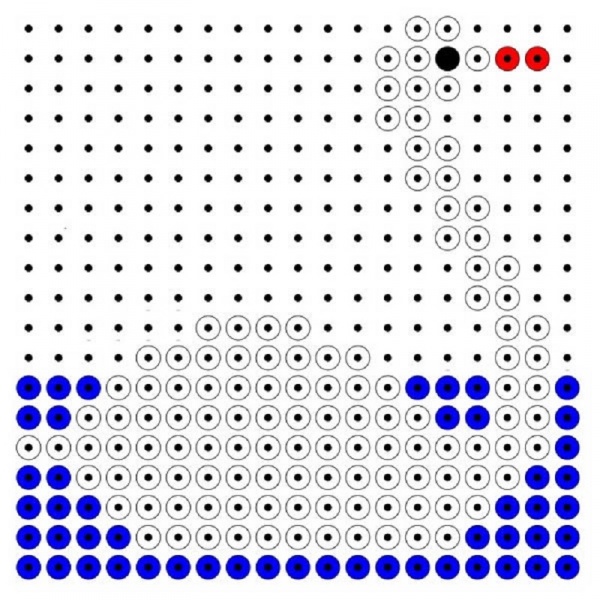
The main stages of creating a mosaic based on plastic bottle caps are as follows:
- As a sample, a diagram of the painting is applied on cardboard of appropriate sizes. For these purposes, a ready-made cross stitch pattern may be useful.
- The corks are pre-sorted by color.
- Based on the sketch, the caps of plastic bottles are connected to each other with glue intended for plastic.
This technology is not widely used. It is much more practical to attach the plugs to the surface. Various simple paintings are demonstrated by the following photos:
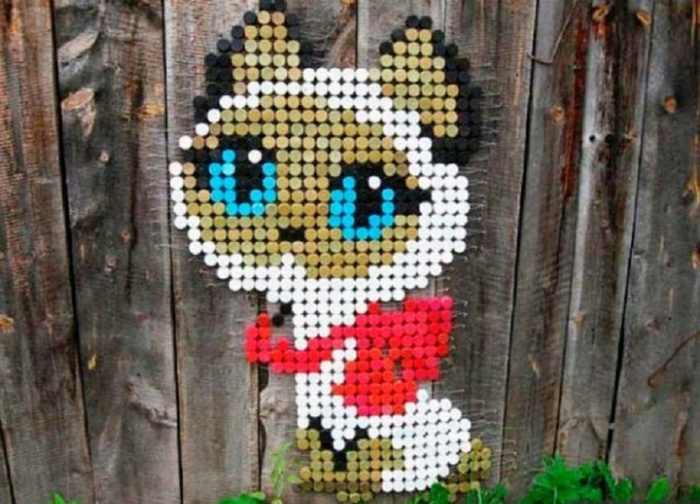

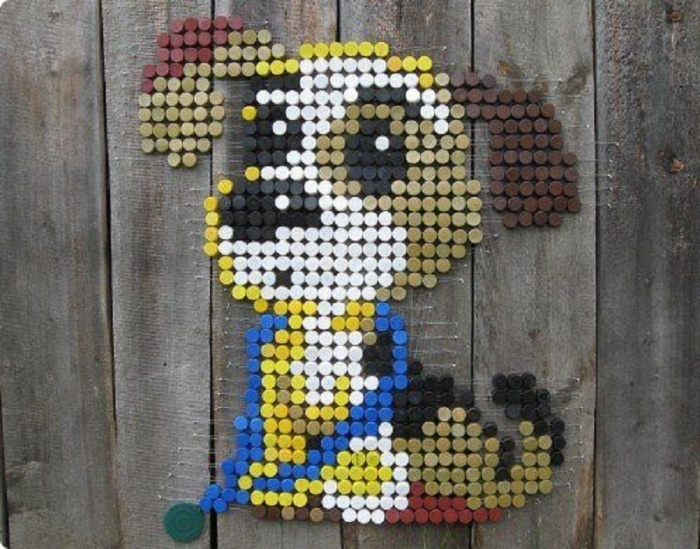
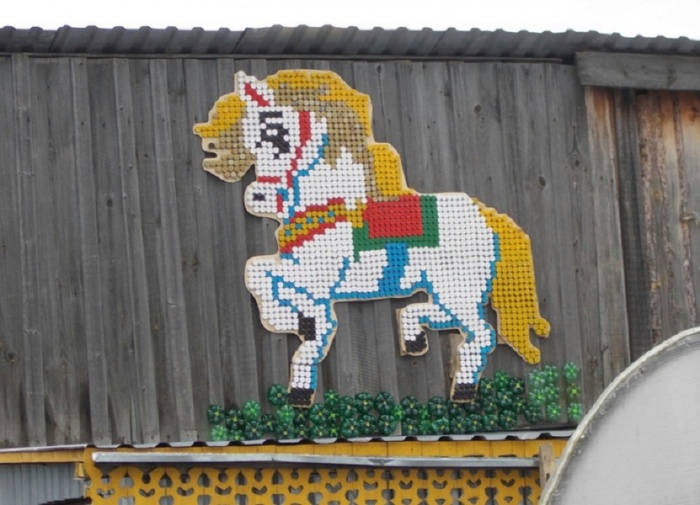
Wall or fence decoration
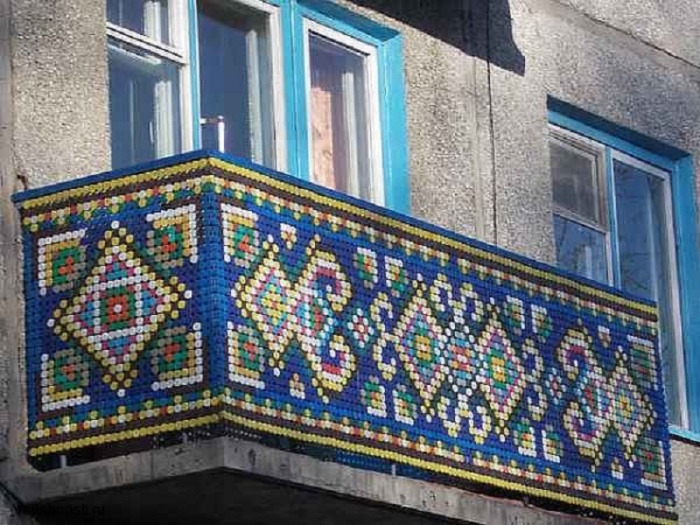
A wooden house or fence is an ideal surface for a painting of lids. If access to the place where it is planned to place the panel is difficult, the mosaic is decorated on plywood and then fixed to the desired area. A striking example is the design of a balcony railing.
Summer cottages are the most popular for decorating with cork paintings. All images can be divided into two groups: an ornament repeating after a certain interval or full-fledged drawings. The process consists of the following steps:
- Depending on the size and complexity of the image, the diagram is drawn on cardboard or the sketch is applied directly to the surface to be designed. The outlines are made with colored paints that match the palette of the painting.
- Fastening is carried out with nails, the length of which corresponds to the height of the plugs and the thickness of the plywood or boards.
- Caps from plastic bottles can be fixed to the wall from the outside or inside.
Attention! If the corks are driven to the bottom, the recesses will quickly become clogged and spoil the attractiveness of the painting. Regular cleaning of the surface can be a solution to the problem, but it is much more practical to secure plastic bottle caps upside down.

There are several other reasons why plugs are fixed upside down:
- In case of reverse fixation, you will need to select a miniature hammer that can fit inside the lid, or the nails will remain sticking out, which will not add aesthetics to the picture.
- A correctly laid out picture can be further decorated by covering the seams and voids with tinted mortar. The appearance of the mosaic will improve significantly.

You can decorate not only a wooden surface with a picture of corks. If you want to decorate a brick wall, you turn to a different fixation technology. The most common option is to use an adhesive mixture to attach the tiles. A cement composition identical to plaster will help save money. The solution is applied to a small section of the wall, after which the plugs are attached in accordance with the existing sketch. It is important to maintain proportions and make the composition of the correct consistency, otherwise the caps from plastic bottles will move before the hardening process begins.

If your design plans include a large picture, you will have to wait an extremely long time for a complete set of caps to be assembled, so it is better to order new caps of the desired color from the base. Pictures of plastic bottle caps are shown below:


Useful rugs
You can build an original picture not only on the surface of the wall. Rugs woven from plastic bottle caps are practical. This craft perfectly massages a tired back, successfully relieving muscle tension. And stomping on a mat made from the corks of a plastic bottle with your feet will be good for your health. After all, the feet contain nerve endings leading to all internal organs. To work you will need:
- A simple diagram of the picture. Usually a geometric pattern is chosen.
- Corks from plastic bottles in the desired color scheme.
- Awl and fishing line.

Algorithm of actions:
- All lids are pierced at four points according to the principle of a cross.
- The pattern of the picture is laid out from the corks.
- Each row is strung on two rows of fishing line.
- You can collect rows separately or string them all sequentially onto a fishing line with a snake.
- Then the rows of plugs are pulled together, the excess ends of the fishing line are cut off.


Original tracks
Another non-traditional area of application for plastic plugs is the design of garden paths.
Attention! Paths made from bottle caps are characterized by slipping in winter. Therefore, it is better to decorate with original paintings those places in the summer cottage where movement in the cold is not expected.
Materials for creating floor paintings:
- multi-colored plastic bottle caps;
- sand and cement;
- construction adhesive;
- boards for formwork.
Design technology:
- The future path with the painting is marked on the site.
- If grass grows on the surface, the soil layer is removed. A trench 10 cm deep is being prepared.
- Formwork is installed along the perimeter of the trench, which is secured with pegs from the outside.
- Gravel or coarse sand is poured halfway up the trench height as a drainage cushion.
- In addition to sand and cement, glue is added to concrete. The resulting consistency of the solution for the painting made from plastic bottle caps should easily pour out of the container.
- Having filled a small area of the trench, the covers are pressed in a certain order to form the selected pattern of the picture. The plugs are recessed almost to the very bottom; their height should be the same.
- It remains to wait for the solution to dry completely. The duration depends on weather conditions. Remains of cement are removed from the painting from the lids with a hard-bristled brush.
At the final stage of designing the track, the formwork is removed from the traffic jams. A photo will help you admire the results of other people’s work:


As you can see, there are many options for designing paintings from plastic bottle parts. By choosing the appropriate method, you can transform the design of your summer cottage with minimal investment.
Metal caps from bottles of beer, mineral water and carbonated drinks are an excellent material for crafts and decoration of various surfaces. A number of features make them a more convenient, beautiful and versatile creative material than plastic lids. Firstly, the metal can be bent, curved and used with a soldering iron, and secondly, the corrugated edges of the lid themselves look very interesting. We offer some interesting ideas on what crafts you can make from bottle caps for your interior.
Methods of decorating surfaces with lids
If you have managed to collect dozens or even hundreds of metal lids, pay attention to this project - inlaying any surface. You can decorate with lids an old coffee table or bedside table, a tray or drawer for things, a tabletop of a dining table or kitchen, the surface of a chest of drawers or a closet, even lay out a mosaic of lids on a wall or floor! The result may exceed all expectations!
The appearance of the finished inlaid surface depends on the chosen method of attaching the lids, as well as on the color scheme and laid out pattern. Let's look at the main ways to decorate surfaces with metal bottle caps.
Place on glue
The most obvious and frequently used method is to attach the lids to glue or liquid nails. With this method, the caps protrude above the main surface, creating a voluminous corrugated pattern. For gluing, use high-quality thick glue, liquid nails or polyurethane foam. Make sure that the adhesive mass does not protrude beyond the edges of the caps and at the same time securely fixes each one. If desired, the entire surface can then be covered with varnish.

In terms of the design of the surface inlaid with lids, you can completely trust your imagination. No rules or restrictions. Try using original caps with the names of drinks, spray painting them in a specific color, or manually applying a design with acrylic paints. You can also lay out any pattern, ornament or image from the caps, like a mosaic. On a large scale, such decor with metal lids will look very impressive!

The adhesive gluing method is used for decorative tables, mirror frames, furniture walls, that is, for surfaces that will not be used frequently, such as dining tables or floors. For them, it is better to choose the second method, which will be discussed below.
Place on glue and rub seams
If you want to decorate the tabletop of a dining or work table, the floor or the “apron” above the working kitchen area with lids, then it is advisable to fill the space between the lids with grout to prevent the accumulation of dust, grease and dirt. To do this, glue the lids in the same way in the chosen order, let the glue dry and then fill the space between the lids with grout or primer using a rubber spatula. It is very important to keep the caps of the lids clean, so at the same time as grouting, clean the lids with a damp sponge.


There are options when cement mortar is used to lay the caps on the floor area. While the poured cement has not yet completely dried, the caps are carefully pressed into the solution. This method is quite labor-intensive, requiring you to act quickly with a confident hand and without hesitation. After complete drying, the surface is varnished.

Fill with epoxy resin (acrylic water)
This method is suitable for surfaces with edges, such as a tray, drawer or countertop with a recess. Epoxy resin (acrylic water) can be used as a fixative and grout for the lids. Since this chemical solution is liquid, we need sides. Place the caps on the surface, and then fill the mosaic with epoxy mortar according to the instructions for it. It’s very convenient and quick, because you don’t need to glue each lid, or then rub the seams between them.

By the way, almost the same effect can be achieved if a sheet of glass is placed on top of the lids, this is especially true for countertops.

Nailing
The lids can simply be nailed to a wooden surface with small nails. The nail cap will spoil the design a little, but in principle it can become the highlight and unifying element of all the caps. As an option, the lids can be pre-painted in a single color, then the middle in the form of a nail head will look natural and harmonious. To bend the lid itself when driving a nail, place a piece of plywood and a nut of a suitable height under each.

Ways to connect caps together in crafts
Metal bottle caps can be used not only to decorate surfaces in the interior, but also to make individual crafts - decorations, magnets, coasters and toys. How to assemble the caps into a single structure?
Holes and wire
Use a thin nail or drill to make holes in the embossed sides, and then connect the caps to each other using wire or fishing line.

Soldering iron
You can use a soldering iron and solder to securely connect the caps.

Adhesive and fasteners
Some crafts, such as jewelry, require the use of special parts. They can either be soldered to the lid or glued with super glue suitable for metal surfaces.

Bend, bend, straighten
Unlike plastic ones, metal lids can be bent in half, bent into a spherical shape, or completely straightened with a hammer. It is easy to use these blanks to make decorations, costume jewelry, Christmas tree decorations and other decorative elements.


Decor and crafts from bottle caps
Now let's see what original crafts and decor can be made from the caps.
Tables


Chairs


Floor and walls


Other crafts made from bottle caps


Why throw away something that will still be useful? You can make excellent crafts from bottle caps for the garden and at home with your own hands. There are many options for using old household items in your home. And they talk not only about ordinary, but also seemingly completely unnecessary objects. For example, you can make interesting crafts using old tires, unnecessary bottles, and even create a whole creative idea using bottle caps.


Bottle Cap Craft Ideas
Since there are a wide variety of caps available in terms of color and sometimes shape, different uses can be considered. Here are a few of them.

There are all kinds of other ideas, and in fact there are a lot of them. The lids can be used in any decor of almost all items. And if you’ve already collected a bunch of caps, you probably still have the bottles themselves.
Read also:
1. Crafts from plastic bottles for the garden.
2. DIY greenhouse made from plastic bottles.
3. Birds and animals made from plastic bottles - craft ideas.
How to make crafts from bottle caps
There are several important points that are worth knowing before proceeding directly to the crafts from the lids themselves.

Use the material to decorate objects made of wood and brick. Remember that you can post any drawing you like. And it will look quite intriguing and beautiful.
Bottle cap decor options
An interesting fact is that crafts made from lids can be not only flat in shape, but also voluminous. Ask how? Yes, very simple! With their help, you can lay out any animal or, for example, a cartoon character in three-dimensional form.
You can use these other options for decorating your home and garden:

Panel, mosaic, painting made from plastic bottle caps
One of the largest projects that can be done using lids is mosaics and paintings. They usually decorate the walls of a building or fence. The most important point will be the correctly selected pattern and colors of the caps.


Progress:

Following the rules for drawing, you will need to go through everything step by step.
Read also: what else can you use to make a mosaic with your own hands and a mosaic in landscape design - there are also ideas for crafts from lids and corks.
Rules for creating a picture from caps
There are several unspoken rules that must be followed if we want to get the desired result.

Master class “Rug made of lids for relaxation”
Using bottle caps you can not only create interesting decorations for your home and garden, but also quite useful things directly for health and relaxation. We will talk about a mat, when walking on which the whole body benefits and relaxes. This is due to the fact that a person’s feet have a large number of nerve endings that need to be relaxed from time to time.


Materials that will be needed for work:
- Lids.
- Fishing line.
- Awl.
Progress:

Photos of crafts made from plastic bottle caps


Here our unique thing is ready. Use it every day for at least a few minutes and very soon you will get results that everyone will envy.
One of the interesting and sought-after materials for creativity is ordinary corks from different bottles.
The main material will be corks:
- Wine, champagne bottles.
- Plastic.
- Iron.

The advantage of this material is that it is accessible to everyone and costs absolutely nothing. On the Internet you can find many photos of crafts from corks and make a variety of things.


Crafts made from plastic corks
Plastic bottle caps are usually thrown into the trash. But, having collected a large number of them, you can make many objects, from the simplest refrigerator magnets to large paintings and carpets.

Magnet
You will need a magnet, glue, markers, and cork. First you need to degrease the cork and glue a magnet in the middle. On the outside we draw funny emoticons. Using threads, you can attach a hairstyle to the smiley.

You can also make them in the form of cherries; you use two red corks and make leaves from wire. Very fast and not difficult.

Painting
Mosaics and paintings require more plastic plugs. You can depict anything, you just need to glue the corks together. Entire carpets are collected in the same way.

Path in the garden
Many people use corks to decorate the outside of their home, yard and garden. One of the options for fake corks for the garden is a path. You will need a large number of multi-colored plugs; they are laid on cement. Such paths look very impressive.


But you need to remember that in winter they become very slippery. The chairs, made of a metal frame and decorated with plastic corks, will stand outside all summer.

Crafts from wine corks
From wine corks you can make:
- Pictures and letters 3 D.
- Handle to the cabinet.
- Chandelier.
- Photo frame.
- Animals.
- Hangers.


Picture frame
The frame is very simple to manufacture; minimal plugs are required. Take the base from an old photograph. Cut the corks in half, coat the frame with glue and glue the corks. A stylish and interesting frame for a photo card is ready.


Letters
You can make large phrases or initials. The corks can be folded in any way you like; whole, alternate with cut ones, you just need to glue them onto the previously cut workpiece. This is an exclusive home decor.

Chandelier
The center of attention will always be a chandelier made of wine corks. It's easy to make; all you need is a fan grille, rope and a light bulb socket. Screw the cartridge into the fan mesh and use a rope to make pendants from the corks. They can be attached in several levels, each longer than the previous one, but with fewer plugs.

Crafts made from champagne corks
You can make decorative items, the same as fakes, from wine corks, for example, elements of a furniture set.

Furniture
One of the unusual, but quite common ways to use corks in the interior is to design or decorate objects.

You can create chairs, tables, baskets, you just need to fasten the corks together. The only negative is that you need to collect a lot of this material.

Models of chairs, like other interior items, can be varied, with internal or external main ones for durability.


Interior elements
You can decorate anything, tabletops, coffee tables, the surface of a chest of drawers, small shelves, and other cabinet furniture.


In the kitchen you can find many cork devices; they are not afraid of hot weather and are suitable as a stand for pots and pans. Will serve perfectly as a knife handle.

A bathroom rug would be practical; the corks are not afraid of water and do not absorb it.

Plinths made from wine corks, window sills, and steps will be original.

Jewelry made from various materials is very elegant. Corks from champagne and wine bottles are very useful in their creation.

It's easy to create an original brooch, pendant, earrings, ring. To do this, you need to buy the necessary accessories in advance. A whole cork is suitable for a pendant; for earrings, it should be cut into the desired shape.


Candlestick
You will need scented candles and glass vessels. Place the candle in a small vessel, put it in another, picking it up twice as large. Fill the space between them with wine corks. Or glue the corks around the vessel and tie them with a beautiful ribbon.

Do-it-yourself fakes made from corks can be varied, you just need the availability of materials and your own imagination.

Photos of crafts made from corks