Solutions, adhesives and mastics for tile work. How to lay façade tiles using glue and self-tapping screws. What can tiles be attached to?
Bathroom renovations are rarely complete without replacing the tiles, especially if they have already served for 10-20 years. But, as usual, the question arises: to hire a master or do everything yourself. If you have a proven, tried-and-true tiler in mind and a certain amount of money (usually they ask for the same amount of work as the materials cost), you can hire him. Otherwise, try laying the tiles yourself. If the walls are at least relatively smooth, everything should work out without any particular difficulties. But just before laying tiles on the wall, carefully study the technology.
It starts, as usual, with choosing a tile. Just pay attention not only to her external data. You will definitely need to check its geometry, otherwise it will be difficult to work with it. If you are laying tiles for the first time, any curvature will greatly complicate the task. So, let's check:

From experience, it is worth saying that ideal parameters are extremely difficult to find. If you like it externally, there are no cobwebs of cracks or glaze defects on the surface, the edges are even, the dimensions are the same, you can take it despite some non-linearity (first point). Otherwise, you will be tired of running around the shops. What you shouldn’t do is buy tiles “to order”. How can you control its quality if you already pay for it? Take only what you hold in your hands.
What are the tiles placed on?
Previously, tiles were laid on a cement-sand mixture, to which PVA glue or Bustilat was added. You can, of course, do it this way, but it will be more difficult. For more comfortable work, use ready-made compounds; they are also called “tile adhesive” because they contain adhesive components, which is why they sometimes say that tiles are “glued” to walls. Compositions come in two types:
- in buckets - mastics, ready for use;
- in bags - dry mixtures that require dilution with water.
Professionals mainly use dry mixtures. If necessary, they can be used to correct an imperfect wall, making the layer a little thicker or thinner. Another plus: they retain their plasticity longer, which allows adjustments to be made some time later. They work with mastic on an ideal wall and there can be no deviations here: the layer is too thin.

When choosing a tile adhesive, you can choose it for specific tasks. So there are compositions that contain additives that increase the water-repellent properties of a wall or floor. This is important in the kitchen and bathroom. There are frost-resistant ones, which will be useful if you place them in an unheated room or outside. You can find glue that has bactericidal properties: it will prevent fungi and mold from developing, which is in demand in damp rooms.
Preparatory work
Before laying tiles on the wall, a number of preparatory measures are carried out. This is a long and unpleasant process, but it is extremely undesirable to skip it: not every master, let alone beginners, can lay tiles properly on uneven, unprepared walls.
Leveling the surface
First of all, the old coating and anything that may fall off is removed from the walls. If there are greasy stains, remove them, or simply cut off part of the plaster along with the absorbed oil. The walls are tapped with a wooden hammer, determining by the sound whether there are voids. They occur if the plaster has peeled off, but has not yet been blown out. If you stick a tile on such an area, everything will collapse under its weight. That’s why you do all these places yourself.

A flat plank is applied to the cleaned base and an assessment is made of how smooth or crooked the walls are. If the wall surface is very convex or curved, it is better to correct everything with plaster to a level. Then laying tiles on the wall will be very simple. If the walls are relatively flat, only indentations that are too large are leveled: irregularities (protrusions or holes) that are more than 5 mm. Protrusions need to be cut off, holes need to be filled plaster mixture, widen the cracks, moisten them and also cover them with plaster.
We prime
It is advisable to treat the prepared wall with a primer. “Betonokontakt” or another composition with similar characteristics is best suited for these purposes. It penetrates to a fairly large thickness deep into the wall, connecting all the particles. After drying, the surface becomes rough, and tile adhesive “sticks” to it very well.

How to start
There are several possible starting points. To put it quite simply, you can lay out the first row right from the corner, following the floor line. But the first row will become level and without problems only if the floor is perfectly level, without any deviations. Otherwise, you will be trimming the tiles to somehow get vertical joints. As a result of these prunings, the second and all subsequent rows can “walk”. The work will be very hard and unpleasant. Therefore, it is better to spend time and mark the wall, finding the “start” points.
Wall marking

If you don't really care about the small pieces of tile that have to be placed in the corners and at the top, under the ceiling, you can skip this step. But if you want all the tiles to lie symmetrically, before laying the tiles on the wall, you will have to do the layout:

If it turns out that only narrow strips remain at both ends, it is advisable to redo the layout. If the middle was located in the center of the wall, try laying it out from the seam, and vice versa. It should come out better.
When placing tiles in height, the situation is slightly different. In some cases, the seam is made at a certain level. In the bathroom this is often the edge of the installed bathtub. If there are no such requirements, you can do the same: find the center, arrange (draw on the wall) the position of the tiles relative to it. This way you will find how to trim the tiles of the top and bottom rows.

There is another way to arrange it vertically: mark the first tile from the ceiling, and so on to the bottom. In this case, only the bottom row will have to be trimmed. This is not entirely correct, but the consumption of tiles is slightly less.
In any case, when calculating how to lay tiles on the wall, mark the level where the first row ends. This usually serves as a starting point. This is where the laying of tiles begins.
Start line
Based on the layout results, you have a line where the first row ends. It is at this height that a flat bar is nailed. Resting the tile on it, place the starting row, and all subsequent rows on it. The last row to be installed is the first row, into which the tiles will have to be cut.

Profiles for working with drywall are usually used as a support strip, but a flat dry block can also be used. At a given height, it is attached to the wall with self-tapping screws or dowels (depending on the wall material). To lay tiles on the wall with your own hands without problems, you need to fasten them often enough so that there is no sagging. Be sure to check that it is installed horizontally. There shouldn't be even the slightest deviation.
How to lay tiles on a wall
The technology for laying tiles on the wall is simple. It consists of several simple steps:

A few nuances about the complete process. First, the outer whole tiles (those that do not need to be trimmed) are glued to the marked places on the installed plank. When laying out, you noted their position. It is very important to set them correctly. To do this, each is checked with a level in the vertical and horizontal planes. If the geometry of the tile is ideal, you can also check the verticality/horizontalness along the edges. Then they take a long level or an even bar with a shorter level and check how evenly one beacon bar is set relative to the other. They must be in the same plane. Then, using this bar, they check whether each subsequent tile is positioned correctly.
Description is one thing, but seeing everything with your own eyes is another. The video demonstrates the technology; after watching, you will understand exactly how to lay tiles on the wall.
Wall adhesive thickness
For those who are laying tiles on a wall for the first time, they may have questions about how thick the adhesive layer is needed. This value depends on how smooth the walls are. If they are ideal, you can apply the minimum layer allowed in the instructions for the composition. If the walls are only relatively flat, the “starting” layer can be 3-4 mm. Then, as necessary, it can slightly decrease or increase, correcting the unevenness of the wall.
There are several techniques for laying ceramic tiles. It is not always the case that glue is applied to both the tile and the wall. Some craftsmen apply the composition only to the wall, others - only to the tiles, some recommend dipping it in water before applying the glue, others do not do this. Choose the option that seems more correct to you. But it is more convenient for novice tilers when the mortar is on both the wall and the tile: it is easier to move and level it.
Manufacturers of tile adhesive advise applying it to the wall, removing excess with a notched trowel, but this means a perfectly flat base. Based on these recommendations, the cost of laying one square is calculated.

With other techniques, consumption increases by 50% or even 100%, since the wall has to be adjusted. But you should definitely listen to the prescribed sizes of the spatula teeth.
How to cut tiles
There are several ways. For small volumes and not very thick tiles, a manual tile cutter is suitable. This is a device consisting of a platform on which tiles are placed. Fusing pads are attached to the platform along which the cutter moves. The cutter moves with the help of a handle, ripping through the durable coating. A stop is usually installed on the same handle, with which the tiles are broken along the line drawn by the cutter.
Another way is with a grinder, but it is very noisy and dusty. Besides, you won’t be able to make a perfectly even cut, but it will work in case of an emergency.
If necessary, round holes are cut using a crown of a suitable diameter, which is put on a drill. During drilling, to ensure that there is as little dust as possible, the work area is constantly watered with water. The result is a perfect hole and everything looks decent.

If you need to cut a strip that is too thin, you won’t be able to do it with a tile cutter: it simply won’t break off. Then, after drawing a line with a cutting disk or rod (for some companies, the cutting element is made in the form of a rod), the thin edge is broken off. In general, there are special tongs for this, but it works well with pliers.

If the edge turns out to be very uneven, it can be smoothed out a little with a file or sandpaper attached to a block.
Decoration of corners
If the tiles are laid evenly, the internal corners do not raise any questions. Difficulties may arise only with the installation of crosses. Just turn them so that they are not in the way or break off the protruding parts. In general, they join neatly in the corners, and the final seam is formed using grout.
There are also profiles for internal corners. They are matched to the tone of the grout, installed in the corner, leveled, and then attached to self-tapping screws or dowels. When laying tiles in a corner, the tiles rest on them. This results in a finished fillet seam.

External corners are more difficult. If you simply join the tiles, overlapping the edges, it turns out ugly. To properly shape the outer corner, you have to cut the edge at 45°.

This can be done using a professional tile cutter. But not everyone has such equipment. Then you will have to work with a grinder. The first cut, at approximately the desired angle, is made with a smooth diamond disc. There should be no slits or holes in it, and the spraying should also be even.

It turns out not very smooth, and the outer edge is quite thick. But this is only Preliminary processing. We bring the cut to the required parameters using a grinding attachment with the same disc. See the video for more details.
If you don’t want to bother with such trimming, there is another option - to decorate the corner with a special plastic corner.

Another video about how you can arrange junctions and seams when laying tiles.
To make laying wall tiles with your own hands completely clear, watch another video tutorial.
When finishing a kitchen apron with ceramic tiles, the technology is practically no different from that described above. There is simply no need to calculate the number of vertical rows. The “start” location is determined by the height of the tabletop: it should start 5-10 cm above the edge of the tile. Attach the bar at the required level, align it exactly with the horizon, and you are ready to begin.

An apron in the kitchen is usually made on the work wall. If it is not one wall, but two or three, you can start from one of the corners.

If it is laid out from small-sized tiles, the undercuts may not be very noticeable. If you want to do everything symmetrically, repeat the layout and start from the center, as described above.
The bathroom is the face of the whole house; guests inevitably end up there. Therefore, it should look presentable. There are no trifles in this matter: the floor, ceiling, walls must be covered not only with practical, but also with beautiful material that is easy to maintain and maintain. As an option, along with large-sized ceramic tiles, builders began to use mosaic tiles.
Traditionally, mosaic is considered a high-class material, and previously not many could afford to use it for renovation. The main difficulty was laying many small tiles, but now this problem has been solved. Mosaic on a mesh that combines individual particles into easy-to-install blocks allows you to attach the material quickly and without special effort. But before you go to the store, it’s worth learning more about the types of mosaic tiles, their purpose and the nuances of installation.
Mosaic tiles in the interior
Features of the material and its varieties
The mosaic consists of small (1x1 cm) fragments finishing materials, located at regular intervals and forming a single picture. In the case under consideration, these elements are fixed on a flexible metal mesh. This material can be used for cladding floors and walls, as a covering for kitchen furniture, and even for decorating facades and garden paths.
According to the type of surface, mosaic can be glossy or matte. Gloss is easier to maintain and is more often used for walls in rooms with high humidity (bathroom, kitchen), while matte tiles, which have anti-slip properties, are more suitable for flooring.
Another criterion that affects the appearance, technical characteristics and cost of the mosaic is the material of manufacture. On sale are mosaics from:

What should the surface be coated with?
Unlike ordinary tiles, mosaics are placed not just on a flat, but on a perfectly smooth surface, otherwise, due to the flexible mesh base that follows any unevenness, the pattern will be spoiled and the edges will not meet. Therefore, the technology for laying mosaic tiles requires careful preparation of the base.
 Filling small irregularities on walls
 First, the walls or floor are cleaned of old coating and dust. Then they are checked by level for the presence of height differences. To make it easier to eliminate unevenness, use the following technique - thickly rub chalk on an even strip of suitable size and, pressing well, move it along the walls or floor. In places where there is no chalk left, there are depressions that need to be filled with plaster or concrete mixture(if mosaic is being laid on the floor). In case of serious flaws and cracks, it is more rational and easier to level the walls with plasterboard, not forgetting to sand the joints and screw heads.
The prepared surface is dust-free and treated with a deep penetration primer. This will improve adhesion, providing better adhesion between the materials. After the composition has dried, you can proceed to the installation of the mosaic.
How to choose the right adhesive for mosaic tiles?
 Glue
Glue Some types of mosaics are very sensitive to adhesives, so you need to choose an adhesive based on the specific material you plan to work with. Laying mosaics on a mesh is done using the following compounds:
- Standard glue. It consists of sand, Portland cement and modifying additives. Suitable for laying opaque tiles on standard surfaces.
- Polymer composition. Polymer components provide reliable adhesion, making the adhesive suitable for cladding surfaces of complex shapes.
- The glue is white. It includes the same components as the standard one, the only difference is the white color, supported by special components. Laying glass mosaics is carried out only with this solution.
- Homemade solution. The necessary ingredients are water, cement and fine, well-sifted sand. All components are mixed to a medium-thick consistency using a drill with a special attachment. The cost of such glue will be low, but it is better to use it for concrete or stone mosaics.
If you have to work with a wooden surface or drywall, the glue must be selected individually. In particular, for wood cladding it is recommended to add PVA to standard adhesives.
Mosaic laying technology
The question of how to properly glue mosaic tiles on a grid is of interest to many novice tilers. You should start by laying out the mosaic fragments in the chosen order on a horizontal surface. For the convenience of further work, the tiles should be numbered. However, if your mosaic does not have a specific pattern, this stage can be neglected.
 Glue distribution
 Laying mosaic tiles begins with the most visible area. This is necessary to make it easier to disguise the places where the material was trimmed. It is advisable to think through the laying scheme and location of the cuts in advance. If the pattern and size of the surface requires cutting only along the seam, you can divide the mesh with ordinary scissors-nippers, and to carefully cut the tile itself you will have to use a glass cutter.
The adhesive composition is applied to the surface to be coated in small portions, taking into account that it takes about 15 minutes to dry. The solution is spread with a notched trowel (tooth height 6-8 mm), a tile is applied to it and leveled. The result is checked by level. In order for the mosaic to stand up well, you cannot press it with your hands; instead, the laid tiles are rolled with a rubber roller. If you are laying tiles on a kitchen “apron”, before starting work, its lower border is outlined with a line and a metal profile is attached along it, on which the material will rest.
 The material is carefully pressed with a roller
 Pay attention to the distance between the sheets; it should coincide with the spaces between the individual tile fragments. If visible ends of the mesh remain at the joints of walls or other surfaces after trimming, they can be hidden under a decorative border. Having finished laying, clean the mosaic covering using fresh glue - remove excess solution with a damp sponge. Then the surface is wiped dry and left to dry for 2-3 days.
Grouting joints
Laying mosaic tiles with your own hands is completed by cleaning the seams. To do this you will need a grout mixture. There are compositions based on cement, latex and epoxy. When choosing, be guided by the operating conditions of the tile; if it will be exposed to thermal stress and chemicals, you should use grout with the addition of epoxy resin. But keep in mind that its use will require preliminary protective treatment of the mosaic with wax.
 Grouting joints with white compound
 The color of the grout is no less important. It sets off the mosaic pattern and, if chosen poorly, can ruin the whole picture. To ensure the right color combination, compare the grout to a small piece of your tile when purchasing.
The selected mixture is diluted with water, following the instructions on the package. If you are using grout with a water-repellent effect, then in the process of preparing the solution you cannot do without a drill with a mixing attachment. It is recommended to apply the solution with a rubber spatula. The work will go faster if you use a spatula measuring 15-20 cm.
 The finishing touch is cleaning the coating from excess grout
 The grout mixture dries in 10-15 minutes, after which the excess composition is removed by wiping the surface of the mosaic with a damp sponge in a circular motion. Frequently washing the sponge will prevent streaks from appearing on the tiles. The installation of the mosaic is completed; all that remains is to let the coating dry.
is a creative process where attention to detail will never be superfluous. When choosing a wall covering material, consider the conditions under which it will be used, as well as how the tiles combine with the floor, ceiling and other elements. Pay special attention to textiles. It’s good if it repeats the color and pattern fragments of the selected coating.
Let's summarize. With careful attention to detail and the use of the necessary tools, the technology of laying mosaics on a grid does not pose a problem even for a non-professional. So maybe you should show a little diligence and imagination and decorate the interior of your home with a mosaic pattern?
Tiles and stone often serve as surface finishes. Their durability largely depends on the quality of installation. In this, materials that are invisible to the eye play a big role - these are leveling mixtures, a well-designed base, adhesive and waterproofing solutions.
It is very important to choose a suitable means on which the tiles will be attached. Therefore, let’s talk about the types of floor fasteners in more detail.
Adhesives are divided into two groups according to the conditions of their use. The first group is adhesives for exterior use. They are made specifically for the street, taking into account the climate and various influences on them. And the second group is adhesives for interior spaces with more mild conditions applications.
In addition, there are special adhesives that, depending on the conditions, are used in a particular room. For example, there are adhesives for swimming pools, because... the substance is constantly in contact with water; for individual enterprises where contact with any substances may occur; for special heated floors, because There is no constant temperature there for many other rooms either. All these adhesives were developed for specific conditions of use.
Separately, we can highlight adhesives that are used to attach heavy slabs, for example, stone or ceramic. In such cases, the glue must be very strong, frost-resistant, and resistant to water and heat treatment. When using such glue, you do not need to use additional fasteners. There are adhesives that hold heavy loads, although they do not need to be applied to the entire surface, but only to 10% of the surface area.
If light stones or glass are used for cladding, then it is recommended to glue these materials with a special glue made from white cement. If you are laying natural stone or marble (thin-layer or moisture-sensitive), you need to use a special epoxy adhesive, otherwise they may become deformed. Epoxy glue is made without the use of water.
Instructions must be included with the glue. It will tell you what kind of work this glue is intended for.
Nowadays, glue most often includes a polymer-mineral composite. It usually consists of polymer additives and a cement-sand mixture.
The capabilities of the adhesive depend on the composition of the polymer additives. The more components, the more varied the adhesive's capabilities. For example, some polymers improve the ability of an adhesive to stick (adhesion). Another type of additive increases the ability of the glue to retain moisture, because if the glue does not hold it well, it can go into the cement, and it will begin to crumble. The last type of polymer controls elasticity. This is necessary if pressure arises in the tile or base or any changes begin to occur, the glue will reduce them.
This is how the polymers determine what the glue will be like: durable, waterproof, very strong. Which layer of glue should be applied primarily depends on the thickness of the tile itself. The glue layer can be 2-15 mm. If you apply the glue in a thin layer, it will dry evenly and last longer. But this method of work can only be used on a specifically prepared surface. The most important thing is that it should be very even. If not, then you will spend a lot more glue. And it won’t dry evenly, so it won’t be able to properly glue tiles or stones. So, before you start tiling, you need to carefully level the walls.
If the surface on which the lining is made strongly absorbs water, then it must be primed. The primer does not allow moisture to pass through and serves as an additional fastening. It is especially recommended to prime gypsum materials - plasterboard, gypsum fiber boards, plaster.
After priming and leveling the surface, you need to do waterproofing. This is especially important for rooms where air humidity is high. Also, thanks to waterproofing, cracks will not penetrate from the base to the tiles or stone.
Waterproofing takes place in two stages. First of all, you need to apply the tape at the junction of the floor and the walls or walls. This is to maintain the connection if the walls move a little. After this, you can cover it with a waterproofing layer. It is a mixture of various polymer substances. Having finished the work, you can begin finishing the walls or floor.
It only takes about 5-10 minutes to make the glue. It can only be used until it begins to harden. If the glue has hardened, it can no longer be diluted with water, because it is suitable for one-time use only. The shelf life of the glue is usually about 4-6 hours. But there are “short-life” adhesives; they can be used for up to 1-1.5 hours.
When choosing a cuisine, Moscow opens up a huge number of possibilities for you. Graceful and fundamental kitchen sets, made from environmentally friendly materials, will decorate your home and become reliable assistants in preparing your favorite dishes.
A fairly new facing material, in terms of performance indicators it belongs to one of the types. The tiles are made from cement with the addition of various fillers to change the appearance and improve physical performance; there are options made from gypsum. There is a huge selection on sale facade tiles with imitation brick or natural stone, clinker or original surface texture. The elements are fixed using already installed metal clamps; along the perimeter, the tiles are held together with a tongue-and-groove connection.

Like every material, new facade tiles have not only pros, but also cons. We will try to give an objective description from the point of view of builders and consumers.
Advantages of facade tiles with metal fasteners
Durability, environmental friendliness, weather resistance, relatively light weight, ease of installation - all types of facade tiles have these qualities. The real advantage of the described material over others is that installation is carried out without the use of cement-sand mixtures directly on a wooden load-bearing sheathing. Due to the fact that lathing can be installed on walls made of all materials, the scope of use is expanding. The absence of “wet” technologies makes it possible to carry out work at any time of the year. Of course, if there is no precipitation. The wide choice in appearance almost does not limit the possibilities of designers and architects in choosing the style of facade walls. Another advantage is that installation is simplified and work is completed faster. There is no need to carefully level the load-bearing surfaces, grind seams, etc.


Flaws
Unfortunately, they exist, and they are quite significant. The first is that cut pieces of facade tiles significantly lose the reliability of their fastening. The fact is that the tiles are fixed in only one or two places with self-tapping screws to the clamps, and along the rest of the perimeter there is a tongue-and-groove connection. When adjusting the tile to size, you have to cut it on the sides (one, two or three). The tenons and grooves are cut off; in these planes, the fixation of the tiles to each other is completely absent. We will tell you how to minimize these consequences in the installation instructions, but we immediately note that they cannot be called ideal.

The second is that the strength of upholstery with metal fastenings on a wooden sheathing is much lower than on glue. The glue is located over the entire surface of the tile and connects the facade walls with it into a single structure. Physical forces from the tiles are transferred to strong facade walls, which increases the mechanical strength of the cladding. Facade tiles with metal fasteners “sag” over the walls. As a result, only the tiles bear the load, and this significantly reduces the resistance of the finish to mechanical damage.

For facade finishing frame house using facade tiles with fasteners is just a godsend
The third drawback is that the tiles are fixed to wooden slats. Even thorough impregnation with modern antiseptics cannot protect them for a very long period of time. Lumber loses its original properties, fixation becomes unreliable, facade tiles begin to wobble. And this is the first sign of a violation of the integrity of the skin, which in the future can have dire consequences.


What to look for when choosing
The quality of finishing facades with tiles depends on two components: the professionalism of the builders and the integrity of the manufacturers. Facade tiles with metal fastening must fully comply with existing government regulations, technological processes cannot be violated.


As for the appearance, everything is simpler - choose those options that will create the desired design style. But what technical nuances should you pay close attention to?
- Linearity of surfaces. Place several tiles with their flat backs facing each other. If there are gaps or wobbles, you have low-quality material in your hands, do not buy it.
- Connect two tiles into a castle. The tenon should fit into the groove with a little effort; it’s not bad if a click is heard at the moment of a tight fit. If there is a gap between the tenon and the groove or they fit very tightly, these are signs of poor quality workmanship.
- pay attention to strength of fixation of metal clamp with tiles, what sheet steel it is made of. The thickness of the steel must be at least 0.4 mm, the zinc coating must be uniform and without gaps. There should be no cracks in the areas where the metal is poured into the tile material. If the gluer is paper-like in thickness and there are cracks along the edges of its joint, then such products were produced by unscrupulous companies.
Important! The price of tiles with metal fastening starts from 900 rubles/m2, which is significantly more expensive than ordinary cement analogues. For that kind of money, demand only high-quality materials. Along with flat elements, you should buy vertical and horizontal corners; the latter are used for finishing window and door openings. You should purchase a starting profile and screws.

Currently, many companies produce facade tiles with metal fastenings; each region of the country has its own leaders. We will provide a short list of trusted manufacturers; this data will help you make the right decision.
Table. The best manufacturers tiles with metal fastening.
| Company name | Description |
|---|---|
| GC "Global Group" | Present on the building materials market since 2011, it has modern production equipment. Technological facilities are located in Yekaterinburg, supplies are carried out to all regions of the country. |
| "PROFIST" | Located in Pervouralsk, Sverdlovsk region, it has six branches in various regions, including the central one. |
| "Kiriss façade" | The company specializes only in the production of tiles, its production base is in the Moscow region, and has a branch in Tver. |
| "Wall Materials Factory" | Head office in Yekaterinburg, tile production is carried out according to modern technologies, step-by-step quality control of goods has been introduced. |
| "Fastrot" | It has been producing products since 2004, has a wide range of tiles for various purposes, from paving to facing of the highest quality. |

This, of course, is not a complete list of enterprises that have earned the respect of consumers. The manufacturing technology for this type of tile is quite simple, which allows many companies to produce high-quality products without large investments.

Facade tiles with metal fasteners “Balkan stone”

Facade tiles “Canyon”
Technology for laying facade tiles with metal fasteners
The tiles can be laid both with simultaneous insulation of facade walls (recommended option) and during overhaul buildings. We will consider the first installation method; they are the ones used most often. Current energy prices are forcing homeowners to pay great attention heat saving indicators. In addition, recent laws at the federal level require adherence to state standards for minimizing heat loss.

Important! You need to start work by planning your actions, and the technology of laying tiles using clamps requires a special approach.
The distances between the tile clamps may not coincide with the dimensions of the insulation. This is an unpleasant situation. Before purchasing insulation materials, pay attention to their width. The fact is that you will have to attach a counter-lattice for the tiles to the lathing for the insulation. The width of the insulation starts from 60 cm; not all tiles have the same distances between the clamps, and this complicates the process of making lathing for fixing. If you cannot find suitable materials, then there are three options.


- The insulation boards will have to be cut in such a way that it is possible to fix the sheathing to the size of the tiles on the wooden planks between them. This is not a very successful method; the quality of insulation may decrease due to the appearance of cracks between the insulation and the slats. The fact is that making a perfectly even cut at home is very difficult. In addition, installation time increases and the amount of waste of expensive insulation increases.
- Lay the insulation not vertically, but horizontally, and make the sheathing for it in the same position. In this case, the slats for fixing the tiles are placed vertically. This solution is considered quite acceptable.
- The insulation slats are vertical, and the sheathing under the tiles is horizontal. And this solution to the problem does not cause any comments from professionals.

What to do in each specific case depends on many factors; make a decision yourself or seek advice from experienced builders.

Practical advice. If you are afraid of making a mistake with the marking of the sheathing for the tiles, then we recommend using boards approximately 10 cm wide and 2 cm thick instead of narrow slats. By the way, they also compensate for the inaccuracies of the tile itself. Different batches may have size deviations, and narrow slats do not allow them to be compensated; the position of the clamp may not coincide with the position of the slats.
Once these problems are resolved, measurements can be taken and the quantities of materials can be determined. Material calculations are made in the usual way with a quantity reserve of 5-8%. Accurately calculate linear meters of vertical and horizontal angles. These architectural elements need to be sealed only with special factory-made additional elements; it is difficult to make them yourself. You will have to cut the tiles by hand, the joint angle will be open, and there is a high probability of gaps forming in these places during minor vibrations of the structure.
The material cannot be considered new on the domestic construction market; it can be purchased from both domestic and foreign manufacturers. Clinker tiles for facades have the highest physical properties among all types of building materials. Read more in .

To work, you will need a grinder with a diamond blade, a drill, a screwdriver, a tape measure, and a hydraulic or laser level. It is better to make marks on the tiles with a felt-tip pen; on an uneven front surface, pencil lines are hardly noticeable. In addition, during sawing, dust from the disk makes them completely hidden - there is a high probability of getting a crooked cut. For example, let’s take the option of cladding a house with insulation. The insulation is made from pressed mineral wool, has water protection. All we have to do is install the vertical counter-lattice and mount the façade tiles with metal fasteners.

Step 1. Mark the position of the frame slats. We have already mentioned that it is better to use boards instead of slats - the increase in costs is small, and you can work calmly. If the markings for facade panels do not require such precision (the holes for fastening are located along the entire length), then in the case of tiles, very high demands are placed on accuracy.
Step 2. Start installing slats from the corners. It is better to attach a corner element and determine at what distance the first rail should be attached. Check its position not by plumb line - take measurements along the entire height. The walls of the house may have a slight slope and the distance from the corner will increase. And this will cause big problems during the installation of the tiles. Fix the counter batten slats to the sheathing slats with self-tapping screws or nails. Self-tapping screws are better; nails have an unpleasant feature: during a slight expansion/shrinkage of the wood, they are pulled out, which weakens the fastening force.

Step 3. Stretch a rope between the outer slats and fasten all the remaining slats along it in the marked places. Install additional slats near window and door openings. In these places, problems will certainly arise during plating, the solution to which we will discuss below.
Step 4. Mark the bottom horizontal line and try on the starting profile along it. The protruding parts of the vertical sheathing should be trimmed. Using self-tapping screws along the line, secure the starting profile. If there are no holes in it, then pre-drill them. The starting profile can be aluminum or galvanized sheet iron coated with durable powder paints to match the tiles. Make sure that the ends of the profile do not rest against the corner elements of the cladding and do not interfere with its precise installation. Check the horizontal position of the profile again.

Step 5. Take the first corner piece and place it in the corner. Pay attention to what position it is in - it’s not too late to correct the inaccuracies. Using a self-tapping screw approximately 1.5 cm long, secure the element through the clamp hole to the rail.


Step 6. Next, smooth flat tile elements are installed. Insert them into the tongue-and-groove joint until it stops; there should be no gaps between individual tiles (except in cases where they are made specifically for decorative purposes). Each tile is fixed with a clamp on the next strip.

Continue installing the cladding in the same way until there is room for two elements along the length of the opposite corner of the building.
Step 7 Install the second corner element and secure it.

Step 8 Now you need to do the most difficult work - accurately take the dimensions of the free area and cut off part of the tile according to them. We have already mentioned above that during cutting, the tongue-and-groove connection is removed, and the remaining parts of the tile are not securely fixed. Take dimensions with maximum accuracy; when cutting, you need to use a diamond disc for concrete (it has special slots for removing dust).

Diamond blade for concrete Baumesser Turbo Universal 230×22.2
Practical advice for cutting tiles.
- When cutting, it is much more expedient to make a small margin in size, and then accurately adjust it with constant fitting. We advise those who do not have solid experience in performing this type of work to do this.
- When marking, the lines will have to be applied from the front side, and the tile, depending on the type, may have a very uneven surface. To minimize the likelihood of errors, make at least three equally spaced marker points along the length of the tile, and then connect them with one line. If they do not lie at the same distance from the edges, then check where there are irregularities.
- Do not cut the tiles yourself; have an assistant hold them. Take special care in the corners - this is where chips most often appear.
- The disk is round, due to its configuration it is difficult to adjoin the lines of a right angle when cutting. Work carefully, do not go beyond the permissible length in these places, otherwise a noticeable gap will remain. It’s better to carefully break off the remaining few millimeters of the tile, and then carefully clean the right angle with the edge of the disk. In the same way, the dimensions of length and width are adjusted by the edge of the disk. This takes a lot of time, but with the advent of practical experience, the process will noticeably speed up.

Step 9 In most cases, the cut area has only one fixation unit - a spike on the upper plane. This is not enough for complete reliability. We recommend additionally fixing the tiles to wooden slats directly from the front surface. It is better to make holes in the seams, if there are none due to the design features of the material, then anywhere. The main thing is that it fits into the wooden slats. Screw a long self-tapping screw into the hole made; it is advisable to use rubber or plastic washers of the appropriate diameter. Then the hole is sealed with sealant matching the color of the tile and becomes almost invisible.
Practical advice. There is a way to make the hole completely invisible. To do this, you need to collect some of the small crumbs remaining after cutting the tiles and carefully press them into the upper surface of the sealant. In this case, the sealant must be fresh. Then use a small brush to carefully level the surface of the tile. This method can only be used if the tiles are the same color throughout their entire thickness. If only its surface is painted, then you will have to select the color of a purchased sealant or customize it yourself using mineral dyes.
Make the final decision on additional fixation yourself on site, taking into account all the features of the cladding. If you are sure that the cut tiles will sit firmly in place, then there is no need to drill anything. After installing the top row, check the reliability with your hands, press, shake, etc.

Step 9 In window and door openings top part tiles are cut to size taking into account the slope of the drain. Next, proceed to finishing the slopes, you need to use special ready-made corners, they are sold complete with tiles. This is the most difficult area facades. Each corner must be adjusted to the width of the slopes. Do the work very carefully, the ends of all corners should lie on the same line and rest against the frame of the window or door. Minor gaps will then be sealed with sealant. In the upper part, these corners are fixed using clamps, and for the side corners you will have to drill holes for separate screws. The holes, of course, are subsequently sealed.
Practical advice. If you have a whole number of tiles laid across the width of the opening, great, the architectural element can be left without additional finishing. And if the tiles had to be cut, then it is better to attach platbands to the window openings in the future. There are a huge variety of the latter on sale; choose the ones that suit you based on type, weight, and method of attachment.


The result of building cladding - before and after
Practitioners recommend finishing the basement parts of façade walls using the same algorithm. Reputable manufacturers produce a full set of tiles for various purposes, including basement tiles. If the blind area of the house is located horizontally, then the algorithm for finishing the base is no different from that described above. If there is a slope, then the first row of tiles along the entire length of the house must be cut at an angle, which makes the work much more complicated.
Video - Installation of tiles with metal fasteners
The exterior decoration of a house can be done in a variety of ways, from applying plastering materials to various methods of installing siding.
The choice of one type of finish or another depends on the capabilities of the owner, his aesthetic preferences or the availability of a certain material.
In addition, the choice is often based on the ability to perform the work independently.
In this regard, facade tiles are a material that has the widest range of possibilities.
Unlike siding or facade panels, which have a certain general technological installation sequence, facade tiles are available in many versions and do not have a uniform installation technique.
Depending on the design, it can be laid using traditional technology, or installed using methods similar to the siding installation technique. The main difference between facade tiles and other types of exterior finishing is the independent installation of each element, a wide variety of types, materials and appearance.
Types of facade tiles
Facade tiles are a material that has many different types of manufacturing and installation options.
Installation possible:
- For glue. The method is most similar to the methods of laying tiled coverings.
- For fastening materials (screws, clamps, etc.).
Can be used for the manufacture of facade cladding:
- Porcelain tiles, artificial stone.
- Cement mortar.
- Plastic (polypropylene, vinyl, etc.).
- Fiber cement compositions.
- Polymer sand.
- Basalt.
- Asbestos-cement, etc.
By type it differs into:
The main task of facade cladding is to form a protective coating for the house that can withstand external atmospheric manifestations and has high decorative qualities. There is a special attitude towards the appearance of the finish, since it is external effect- the first thing that catches your eye when looking at any house.
In this regard, facade tiles break all records - types of imitation stone or wooden surface she has the largest number. All design options used in the production of siding, facade panels and other cladding are used in the manufacture of facade tiles.
Accessories for facade tiles
The presence of components is not typical for all types of facade tiles. Many types of material are laid using conventional technology and do not require additional elements. This situation is typical for small material.
If the elements are quite large in size, then it will not be easy to do without specialized parts. Typically, corner profiles are made that make it possible to carefully line the outer (in some cases, inner) corners of the house.
In addition, fastening elements - clamps, mounting brackets, etc. can be used as component materials. For some types of material, manufacturers provide for the creation of a subsystem - a supporting structure for installation to form a ventilation facade.
At the same time, most types of tiles intended for dry installation are not strictly tied to the type of subsystem and can be installed on any planks - wooden or metal.
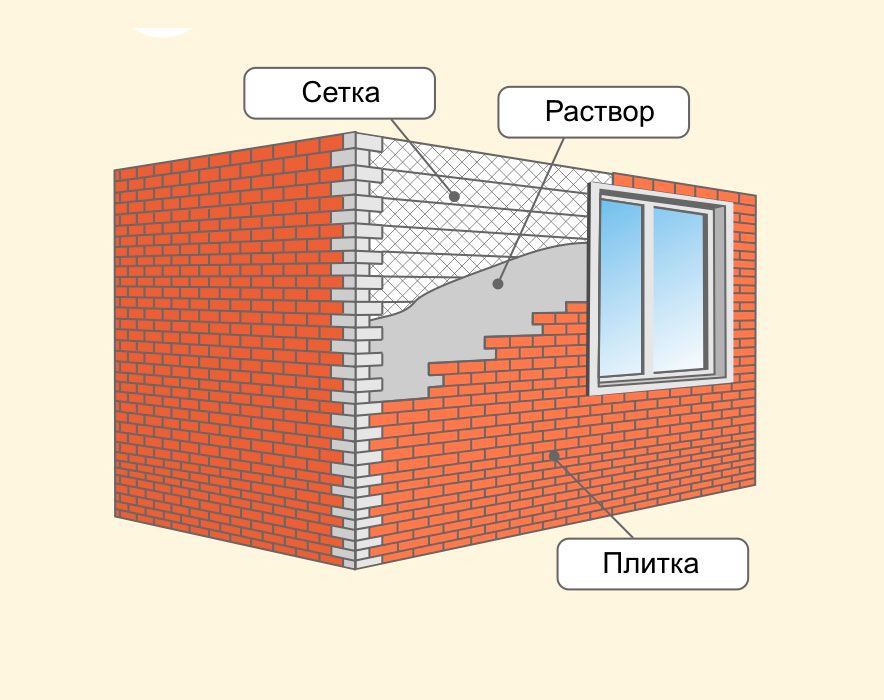
Plastering and surface reinforcement
Tiles that are installed with adhesive require a smooth and uniform base.
The walls of a house, especially if the building is older, may have a large number of different flaws - cracks, dents, peeling or crumbling areas.
In addition, external insulation can be installed on the wall surface, requiring a dense layer to be applied on top for laying the tiles.
The best base is considered to be a layer of plaster. If it is applied to a rigid base, then you can do without reinforcement, but if you are plastering relatively soft insulation, or the wall material is loose and prone to crumbling, then for the strength or resistance of the plaster to mechanical stress you will need to use a reinforcing mesh.
A metal or fiberglass mesh is used, which is installed on the insulation or on the wall and a layer of plaster is applied on top of it.
It is necessary to understand that the presence of a mesh does not prevent cracks from appearing or strengthens the wall material. The mesh serves to increase the strength of the plaster, without contributing to the strength of adhesion to wall materials. Therefore, on problem walls, before plastering, all weak areas should be removed as much as possible, after which a layer of deep penetration primer should be applied.
When plastering over insulation, first of all you need to apply a layer of mortar onto it with a notched trowel, lightly press the mesh into it, then, on top of it, apply another layer. Then the mesh will be inside the layer, which will allow it to perform its functions to the maximum extent.
Surface preparation
The wall surface should be cleared of all foreign objects attached to it - remove all lights, disconnect trims, gutters, brackets, air conditioners, etc. Then you should carefully inspect the wall, determining the quality of the surface, the condition of the material and the number of problem areas.
Existing cracks should be opened with a spatula to ensure their depth and to facilitate access to the plaster material. Delaminations or shedding must be removed as much as possible; the entire wall must be strong, without problem areas, and reliable.
After cleaning the wall, apply a double coat of primer with an intermediate drying period. It is recommended to pre-fill large potholes with mortar so that the subsequent layer is more even.
Surface marking
If you plan to install tiles on a subsystem, then preliminary marking of the surface will be required. It is necessary that the location of the sheathing strips corresponds to the tile attachment points. To do this, measure the distance between adjacent fastening elements vertically and horizontally and, taking into account the obtained values, apply markings on the wall with the resulting pitch.
When performing the operation, it is necessary to control the horizontal and vertical using a building level. If you plan to use corner profiles, then when marking you should take into account the features of their installation and ensure the appropriate arrangement of the strips.
Setting the initial (starting) bar
The tile starter strip serves as a reference line to ensure that the first (bottom) row is installed level and level. Since the design of the façade tiles does not have any lock connecting to the starting strip, an ordinary flat strip of any material is sufficient to support the bottom row; later it will still be removed.
Installation of the starting strip is carried out along a line drawn along the perimeter of the house strictly horizontally and corresponding to the bottom cut of the first row of tiles.
Methods of fixing tiles
Depending on the design, the method of fastening facade tiles may be different.:
- “Wet” method - using an adhesive composition. Specialized types of adhesives are used that are intended for tile materials (porcelain tiles, fiber cement, clinker, etc.).
- Fastening with self-tapping screws. It is possible to have a hidden fastening (hidden seam), or open with a visible fastening location.
- The use of various mechanical fasteners - for example, clamps. With this method, fixation is carried out using specialized devices that best match the material used in size and other indicators, but significant secrecy of the fasteners cannot be achieved - the clamps are visible on the surface of the tile. If the size is small, this spoils the overall appearance of the cladding.
- Facade tiles with metal fasteners.
Typically, each type of tile is designed for a specific installation method, which cannot be changed.
Preparation of the adhesive composition
To lay tiles, you should use specialized or, at a minimum, types of adhesives that are most suitable for their characteristics. It is sold in dry form and must be diluted with water to a certain consistency.
The thickness of the finished solution should be such that the glue can be applied freely, does not drain from the surface, but is not too viscous. There are a great variety of types of glue; to avoid possible errors, you should read the instructions for use on the packaging.
Accurate adherence to the instructions, adherence to the dilution ratio and the holding time of the composition before use increase the strength of the adhesive and its adhesion to the tile and base.
Tile laying technology
The tiles are laid from the bottom up in the direction corresponding to its design (especially if there is a hidden seam). The glue is applied with a notched trowel to the surface of the wall and to the tile, and the direction of the glue strips should be transverse - if the lines on the wall are horizontal, then on the tile they are vertical.
How to tile corners and openings
If there are appropriate corner profiles for the tiles, then they are used to decorate the outer corners of the house and window or door openings. If such elements are not provided, then the corners are formed in the same way as when applying ordinary tiles - by precise adjustment of the material and careful installation in the corners.
In any case, the outer corners are tiled first, then the window and door openings are decorated. If there are corner profiles, then the openings are formed with them, but if only tiles are used, then the slopes should first be faced, and the outer frame of the opening is made integral with the wall canvas.
Grouting joints
The seams between the tiles must be grouted, i.e. filling gaps to prevent water from entering wall materials. For grouting, the same types of adhesive are used that were used during installation, or special compositions for external use; the method of application depends on the type of tile and its design features.
At the same time, not all types of tiles need grouting, but only those that are installed with glue and have gaps. When applying grout, you must be careful as many types of grout are difficult to remove from the tile surface. It is recommended to remove excess glue immediately before it sets.
In this video you will learn how to lay facade tiles:
Conclusion
Using facade tiles is a more labor-intensive option for exterior finishing than, for example, installing siding, but as a result you can get your own version of the coating. Many options for choosing both material and pattern or color of the tiles make it possible to implement a variety of design ideas and create a strong decorative effect.
At the same time, the protective properties of the tiles, which provide protection from atmospheric moisture and the effects of temperature, make it possible to increase the service life of the walls of the house.
Country expert
Source: http://expert-dacha.pro/stroitelstvo/steny/otdelka-fasada/fasadnaja-plitka/ukladka.html
Decorative facade tiles - mounting on walls
Not all walls are suitable for gluing external tiles - it depends on the material of the wall and the insulation on it.
For some external walls or insulation, you may need, for example, facade tiles with metal fasteners.
In general, facade tiles for exterior decoration can be attached in a few ways - either glued to the surface, or screwed to the wall, or mounted in clamps on the frame.
And in any case, the determining factor when attaching the tiles will be exactly what kind of base is located under it. Based on the base material, the method of attaching the external decorative material, and the type itself, is selected decorative covering Same.
This means that you cannot, for example, install a ventilated porcelain stoneware façade on weak foundations precisely because of its weight. Likewise, you will not be able to install a wet plaster façade on the walls of an old wooden house due to the fact that over time such a facade will collapse - the foundation for it will be too fragile.
As usual, tiles are attached to foam plastic
Decorative facade tiles on foam plastic can be fixed in two ways - glued and fixed to the frame.
Let's immediately focus on frame version. Polystyrene foam is a flammable insulation material, no matter what foam manufacturers tell us. If the facade tiles on foam plastic are attached to the frame with a gap, then there may be a ventilation gap between the outer decorative coating and the insulation.
In the event of a fire, which is possible with this combination of “foam plastic – ventilation gap”, the fire will spread along the ventilation gap, covered on top with decorative tiles. It will be impossible to put out such a fire.
The only option when façade tiles on foam plastic can be attached to a frame is if the tiles are completely adjacent to the insulation and possible gluing of the foam-tile joint. In this option, there will be no air flow under the decorative coating along the insulation layer; starting a fire and maintaining combustion is impossible.
In the case when a classic wet facade is used, facade tiles on foam plastic are attached with glue directly to the plaster reinforcing mesh.
You will also have to attach the clinker tiles to the glue, since it is unlikely to be possible to secure them with clamps on the facade.
Fastening facade tiles with self-tapping screws
When façade tiles are installed on a frame made of wood or metal, or when they are mounted on old wooden walls from a log or timber, you can use self-tapping screws.
Not all façade tiles with self-tapping screws will stick to the wall. For example, it will not be possible to attach porcelain tiles or ceramic tiles. There are other ways to attach them.
But any lightweight decorative coating options - plastic or wooden - can be attached in just this way. Metal or vinyl facade tiles with self-tapping screws can be attached directly to the walls of an old wooden house, or you can use sheathing for such fastening.
If you need to fix heavy tiles - porcelain stoneware or ceramic facade - you will need metal fastenings.
Facade tiles with clamps
Porcelain stoneware facade tiles with metal fasteners - clamps - can be mounted on any walls that can bear the weight of the fastening system and the mounted facade. That is, any brick, concrete or wooden walls can be lined with this material using a metal frame system and brackets holding porcelain stoneware plates.
Ceramic facade tiles with fastening with clamps can also be attached to all types of walls. The only limitation here will be the ability of the load-bearing wall to withstand the weight of the hanging cladding material.
Independent production of facade tiles and fastenings
Can I make decorative facade tiles and fasteners for them myself? Of course yes. Previous materials on the site have already talked about how you can make artificial stone with your own hands. The technology for producing facade tiles independently will be approximately the same.
The technology for producing tiles for outdoor use will be discussed in the following materials on the site, but you can see how home-made façade tiles with metal fasteners will be installed right now.
The diagram shows facade tiles with metal fasteners, combined with insulation, and fixed to external wall at home - this will be the general “pie” of the wall:
As you can see, it is clamps that are used, but you can use a homemade version of them, but not self-tapping screws. Why? Because such facade tiles on self-tapping screws will not be able to adhere properly to the wall, even if the screws have wide heads. The material of the facing panels itself will not withstand.
Source: http://OnFasad.ru/fasadnaya-plitka-kreplenie/
Clamp for porcelain tiles when cladding facades and tiles in the interior
Natural stone has long been the most durable building material. It was used for cladding facades and interior decoration. The ornaments and mosaic designs took weeks to lay out and were very expensive.
Now, strong, durable porcelain tile panels can be laid on the floor and wall yourself. The panels are made from natural materials and are superior to natural stone in many respects. Clamp fastening will simplify the finishing of the facade.
The load on the foundation is less, since the specific gravity of porcelain tiles is lower than that of natural stone.
Clamp for porcelain tiles
Artificial stone made from natural ingredients
Porcelain stoneware cladding
The Italians were the first to create granite ceramics. They mixed quality clay used to make porcelain and stone chips. After firing, the result was a tile whose weight is less than that of natural stone, the texture is uniform, without pores. The density and strength significantly exceeded natural material.
For a long time, the main producers of porcelain stoneware were Italy and Spain. Nowadays, several campaigns in Russia are producing unique material. A lot of cladding products come from China. They offer slabs for ventilated facades and a large selection of porcelain stoneware panels at a budget price. But their products don't always have good reviews.
Porcelain tiles consist of natural ingredients:
- kaolin clay;
- granite chips;
- quartz sand;
- soda;
- dyes;
- plasticizers.
During the pressing process, moisture and air are removed, the pores are closed, and the density of the material becomes high and uniform. Firing gives porcelain stoneware hardness and abrasion resistance, reducing its specific gravity. Uniform coloring throughout the entire thickness allows you to restore decorative look floor when the surface is partially erased.
Depending on the place of application, there are different types of porcelain stoneware:
- façade;
- for outdoor work;
- floor tiles;
- wall covering;
- for swimming pools and bathrooms.
Facades are faced mainly with dense colored panels, the side size of which can be up to 600 mm. For platforms and paths, stone-like slabs and porcelain stoneware panels are used.
For interiors, porcelain stoneware can be used in the form of decorative slabs, mosaics and finished panels. Based on surface finish and texture, the following types of porcelain tiles are distinguished:
- for industrial premises and places with heavy traffic, durable technical porcelain stoneware is used;
- matte, without glaze;
- polished – imitates polished stone and is resistant to abrasion;
- glazed quickly wears off and loses its gloss, so it is used for walls;
- decorative like stone, brick and other materials is called structured;
- satin is processed to obtain a matte-velvety surface with mineral salts.
Depending on the application, a cladding with the required qualities is selected. All types of decorative porcelain tiles are moisture resistant and lightweight. The cost is significantly lower than that of natural stone. The texture is more uniform, wear resistance is higher.
Cladding of ventilated facades with porcelain stoneware
Porcelain tiles for ventilated facades
The fastening of the slabs on the facade is done using clamps, and on the plinth it can be glued directly to the wall. The light weight of the slabs makes it possible to clad multi-story buildings and houses with weak foundations. A ventilated façade allows the walls to breathe. Porcelain stoneware panels:
- protect the facade from moisture;
- block the wind from reaching the wall;
- reduce the temperature on the inside of the cladding;
- increase the frost resistance of the building;
- allow the walls to breathe;
- give the facade an original decorative look;
- increase the service life of the building.
Slab sizes can range from 200 to 600 mm. The low weight allows the builder to lift large slabs with his hands. The clasps, coated to match the color of the tiles, are almost invisible and do not spoil the decorative appearance of the external walls.
Facade cladding with porcelain stoneware can have an endless number of options. The panels are painted to resemble stone, brick, or wood. Single-color slabs of various tones are popular. They are easy to combine to create the image of a building.
Types of clamps for porcelain stoneware, their purpose
Clamp for porcelain tiles
Porcelain stoneware has a low weight relative to stone, but high hardness. Drilling holes in it is difficult because the tool instantly erases the dense texture of the panel. This may cause cracks and chips. Therefore, the ventilated facade has a clamp fastening.
A lathing is made under the porcelain tile cladding, just like on a regular ventilated façade. Clamps are installed on slats. Therefore, the pitch of the planks depends on the size and weight of the panels. The slabs for the ventilated facade have a thickness of 10 and 12 mm. Therefore, clasps are divided into two sizes. Each has clamps for all fastening points of porcelain stoneware:
- starting;
- private;
- angular;
- side.
When choosing fasteners for porcelain stoneware panels, pay attention to the thickness and weight of the panel the clamp is designed for, its coating, and color.
Facade finishing with porcelain stoneware
The starting clamp is placed on the lower beam and serves to stop and fix the lower row of panels. It has one clip facing up. When finishing is completed, the starting clamp is deployed and the upper edge of the slab of the last row is fixed.
An ordinary clamp is installed at the junction of the corners of the panels. It holds 2 plates simultaneously top row and fixes the lower ones. Therefore, 4 clamps are directed in pairs up and down.
When the size of porcelain stoneware is large, a side clamp is used for additional fixation. It is placed horizontally and vertically at an equal distance from the regular and starting clamps.
At protruding and internal corners, the lateral fixation of the panel is carried out by a corner clamp. Compact, with one clamp, it secures porcelain tiles, preventing them from moving to the side.
It is much easier to cladding a vertical façade using clamp fastenings. Installation is simplified and done faster. If a panel is damaged, it can be easily dismantled and replaced with another without affecting the adjacent ones. A ventilated facade made of porcelain stoneware is lightweight, beautiful in appearance, and has a service life of 50 years or more.
Porcelain tiles in the interior
Porcelain tiles in the interior
In the interior, porcelain stoneware is widely used for finishing walls and floors. Its high strength and moisture resistance allow you to beautifully line the pool. Light weight and a large selection of designs make the bath unique. Imitation marble gives the room a rich look.
Porcelain tile mosaics decorate kitchen backsplashes, walls and columns. The flexible base of the card allows you to finish curved surfaces. At the same time, the walls are protected from external damage.
The weight of artificial material is less than that of natural stone. The load on the house frame is less, the structural strength is higher.
The texture of porcelain stoneware slabs is dense, evenly colored, and if damaged, it is easy to restore the original appearance. It is enough to cover the tiles with transparent varnish.
Choose floor slabs with a rough surface, especially for areas where water may spill. The texture of this coating is dense. The surfaces are made textured and rough specifically to reduce slipping.
Advice! When choosing rough tiles, check their paintability. It can absorb dyes. This is important when contrasting grout and when laying on the floor in the kitchen and hallway. Grease and dirt may leave marks and may not wash off. Buy coverage in stores.
When laying panels, the surface must be carefully leveled. Distortions and voids will lead to destruction upon impact and will shorten the service life of the finish. The characteristics and areas of application of the panels must be indicated on the packaging. Otherwise, please refrain from purchasing.
The panel will transform any room.
In past centuries, the rich demonstrated their wealth by decorating their living rooms and halls with beautiful mosaics and ornaments. They were made of stone of different tones and even varieties. The craftsmen worked on this decoration for a long time. The cost of finishing was very high.
Now you can give your home a luxurious look even with your own hands. Porcelain stoneware panels are sold in construction stores for any choice. The decor often consists of several slabs. Their weight allows you to lift and lay the cladding on the wall and floor yourself, without lifting equipment.
The choice of designs, colors and sizes is unlimited. Floor panels imitate carpets and stone ornaments. The walls can be decorated with mosaic paintings. The thickness of the slab is 10 – 12 mm. The pattern is preserved throughout the entire depth of the tile. The dense texture allows you to maintain the wonderful appearance of the decor even after minor scratches and abrasion of the surface.
Using a variety of colors, textures and patterns, you can choose panels and other finishes to match the color of the furniture and the style of the interior. White marble will make the room light and rich.
Imitation tuff will create a warm mood. For stylish techno and hi-tech, choose porcelain tiles with chrome and mirror elements.
The luxurious furnishings of the Renaissance and the mood of the East will be conveyed by a panel with gilding in the design.
Porcelain tiles in the interior are a budget-friendly way to give your home a unique and luxurious look. You can make the cladding yourself and even create a design sketch yourself, taking into account your tastes.
Source: http://pootdelke.ru/plitka/klyammer.html
Installation of porcelain tiles on the facade: material characteristics
Porcelain stoneware is a fairly durable material and is also resistant to external influences.
The main advantage of porcelain stoneware is that it is durable. The shelf life of this material in the absence negative impact has no restrictions from the outside. The oldest samples of clay obtained by firing have been preserved for thousands of years. It is extremely difficult to damage such a surface.
Porcelain stoneware products are quite durable, wear-resistant, and almost impossible to scratch. Another plus is that porcelain tiles are moisture resistant and are not afraid of temperature changes. These factors do not have a negative effect on the material, so cracks do not appear on the tiles.
The only thing you need to pay special attention to is that porcelain stoneware outdoors cannot be laid on a mortar mixture with cement. In severe frosts, it can peel off, so tiles are laid on cement mortar only on the inside of the building.
When finishing facades, porcelain tiles are placed on a special high-strength adhesive or on a metal base.
Porcelain tiles do not lose their color even with wear, regardless of where they are installed (floor surface, facade, etc.). Porcelain tiles have a density of 2600-2700 kg/cubic. m. The material is fireproof, and when heated it does not lose its properties and does not change.
Types of facade tiles and their installation
When cladding the facade they can be used different kinds porcelain stoneware
When facing a façade with porcelain stoneware, many of its varieties can be used.
Ordinary technical porcelain tiles are visually perceived as natural granite. It may not sparkle with splendor, but these tiles are the most durable.
Read about the benefits of facade tiles and their installation on our portal.
But glazed porcelain tiles are coated with a special glaze and fired. Its surface is not only durable, but also beautiful. The glaze gives it a special shine.
Matte porcelain tiles have an unpolished surface.
When the tiles are polished, the result is polished porcelain tiles. This type of porcelain tile is most often used for finishing facades.
When the surface of porcelain stoneware is fired after applying mineral salts, it becomes matte, but shines a little. The tile becomes similar to satin (fabric), therefore porcelain stoneware obtained in this way is called satin.
We recommend that you read more about the types of porcelain stoneware for cladding building facades and get other answers to similar questions. The greatest demand is for facing slabs, which have a thickness of 10-14 mm
Decorative porcelain tiles come in different thicknesses (7-20 mm). The greatest demand is for facing slabs, which have a thickness of 10-14 mm. It looks elegant while maintaining high strength.
Let's sum up some results
Porcelain tiles are great for finishing works and has excellent performance characteristics
We have excellent material for finishing work, which has excellent performance characteristics. However, laying porcelain tiles has its own characteristics.
When installing it, you should take into account that porcelain stoneware is a heavy material, so placing the slab on cement mortar when decorating the façade of a building is prohibited. The standard method of laying facade tiles is to install them on a metal frame base. Ventilation in the frame eliminates excess moisture.
How to correctly install a porcelain stoneware slab on the facade of a house? The installation of porcelain tiles must be carried out sequentially
First, you should calculate the consumption of the materials used. For example, insulation (it can be mineral wool or basalt fiber) is calculated according to the area of the wall surface, without leaving any reserves.
The costs of the wind barrier, which also performs a waterproofing function, are calculated as follows: measure the area of the wall and add 10 percent for the overlap of the strips. To attach insulation boards, disc anchors (so-called construction mushrooms) will be required.
5-7 anchors are taken per sheet of mineral fiber. Choosing thickness insulation material, you need to take into account the climate. For the northern regions, a minimum thickness of 150 mm is recommended, and for the rest - 100 mm. Even if you live in an area with a hot climate, pay special attention to insulating your home.
The fact is that good thermal insulation does not let heat into the room. This way you can save on air conditioning.
How much porcelain tile will be required? How much and what kind of reinforcement do you need to purchase for the frame? The number of all parts depends on how complex the facade is. Approximate calculations of material consumption per 1 sq. m are made based on the area of the straight façade wall. Porcelain tiles - 1.05 m².
Fasteners for facade cladding (claymer): main - 3 pcs., starter - 1 pc. Mounting bracket for ventilation façade - 5 pieces. Dowel screws - 5 pieces. Main profiles: horizontal - 1.8 m, vertical - 2 meters. Intermediate vertical (“Z”-shaped) profile - 1.2 meters. 16 mm self-tapping screws - 8 pieces, 25 mm - 16.
Flat gaskets made of paronite - 5 pieces.
Step-by-step instruction
The facade area must be ventilated
First, mark the facade, then install the brackets for fastening. The vertical distance between them should be no more than 80 centimeters, and the horizontal step is equal to the sum of the installation seam and the width of the insulation board.
Preliminary fastening of the insulating material is carried out on two anchors. The insulation begins to be laid from the bottom. After laying, wind barrier strips are placed on the slab. They are attached from bottom to top horizontally with an overlap of 10 cm.
The main final fastening of the insulation is made through the wind barrier. Then the profile is plumbed. Each type of profile has its own mounting specifics. The facing material is secured to cladding clamps, and sometimes high-strength adhesive is used.
When carrying out installation work, you need to take into account the main thing: the façade area must be ventilated.
Final conclusions
The video shows the finishing of the facade with porcelain stoneware
One more comment from experts deserves attention. Porcelain tiles can only be laid on load-bearing walls with a strong foundation. For cladding the walls of a frame building, it is better to use other decorative building materials.

