Accessories for the router: rip fence, guides, compass, table, rings. Working with a hand router on wood Do-it-yourself parallel stop for a hand router
Any products made from natural wood are highly valued due to their environmental friendliness and uniqueness. To create real masterpieces from such natural material with your own hands, you need to have a hand router and have the necessary skills to use it.
In addition, additional accessories for the router are also important, allowing the production of parts of any complexity exactly as they were intended by the author. Homemade devices for such woodworking tools are fairly simple designs, the execution of which does not require special skills or material resources, the main thing is to have the desire. But thanks to their use, processing a variety of parts will become much easier.
Tool table
Milling table with stops
The very first necessary device that makes it possible to conveniently work with such hand tools is a milling table.
The simplest table design consists of a table top, which can be a sheet of chipboard or other similar material with holes for installing tools, as well as a guide that is attached to the table with clamps.
Having made ordinary legs, we get the main device for our hand tools - a table on which we can install any other devices.
Rip fence
 A similar device for a manual wood milling machine is often included in the equipment set. But there is always the opportunity to do it yourself. Why is this being done? The stop itself makes it possible to cut the material in a straight line. But it often happens that the cut needs to be made not straight, but, for example, arched.
In this case, it is advisable to make a milling stop, one of the sides of which will be straight, and the other will repeat the shape of the part. In this case, it will be possible to cut wood in different ways. Each master creates templates for such stops with his own hands “for himself”, depending on the purpose of using the milling machine.
Router guides

One of the main components of a manual wood carving machine is its guides. You can make them yourself from ordinary bars.
If one guide is used, it must be tightly attached to the base on which all necessary work will be carried out. To make the entire structure more reliable, while eliminating the possibility of the template shifting, it can be additionally secured with side stops.
If you use such a device for a manual machine, which we made with our own hands, you can always make additional grooves in several products.
Homemade guides are:
- T-shaped;
- On hinges, can be folded like a book;
- L-shaped.
The guides, which look like skis, are quite convenient to use. They can be used with any type of hand router, making work with wooden workpieces as precise and clean as possible.
Devices for processing bodies of revolution
 If, when working with such a machine, you have to process certain bodies of rotation, for example, balusters, pillars, and the like, then in this case the process of processing them with a manual milling cutter will become much easier when using another device. It consists of:
- housings;
- a movable carriage on which the tool itself is installed;
- disks with which you can set the required angle of rotation;
- screws that securely fasten the workpieces.
Using such a device, the products will rotate slowly, which will make the processing process more convenient. Thus, you can make a device with your own hands that will become a full-fledged replacement for a lathe.

Compass for router
Such devices for a manual milling machine ensure its movement along the required circle. The design of a self-made compass is very simple, it consists of a main part - a rod, which is attached at one end to the base of the tool, and a secondary part - a screw, which is inserted into the hole of a hand router.
A compass with two rods is more efficient in use. By making it from some transparent material, for example, plexiglass, a metric scale can be applied to the surface of the device, which will make its use even more convenient.
Using an angular lever with a scale, copying is carried out on the workpiece being processed. In this case, it will be possible to center the ring on the cutter with your own hands during work. The angle arm with support plate will ensure precise processing of the edges of the part. The design of such a device for working with hand tools consists of a set of probes, a support plate, and protection from chips.
Small extras
Usually, the set of the hand tool itself contains some minor devices that make it easy and convenient to work with parts of non-standard shape. You can always make such devices yourself or slightly improve existing ones to suit your needs and requirements.
Copy rings. Such accessories are ordinary round plates that determine the movement of the device along the workpiece that is installed on a table or other base. The diameter of such rings is selected depending on the diameter of the cutters.
The diameter of the template will also depend on the selected ring. They are selected in inverse proportion - if the diameter of the cutter is larger than the diameter of the ring, then the template is smaller than the finished product, and vice versa.
Devices for working with a manual machine on narrow surfaces will not allow the router to move to the sides, passing exactly in the center of the products.
Devices for creating spikes. Such accessories are most often used in the manufacture of furniture to create connecting tenons on parts.
How to make accessories for a wood router with your own hands?
Device - rip fence
This device, as a rule, is already sold along with the router. Therefore, there is no need to develop and create it independently. For reliable support of the processed material, this element is used. With it, the movement of the cutter becomes rectilinear relative to the base surface, which can be a table guide, slats or straight edge part .
This device makes it possible to quickly mill various grooves and process edges while firmly holding the material.
Guide rail
 If you need to make a straight cut with a router, then you cannot do without this device. To make it you will need any flat board, for example, you can use a piece of chipboard .
First you need to find out the distance from the edge of the milling base to the center of rotation, and it is always the same. To do this, you need to screw a guide to the unnecessary part of the material and make a test cut. Then you should measure the gap from the edge of the cut to the tire, to which the radius of the cutter is added. As a result, it will be possible to obtain the required value. For example, it is 59 mm, and the diameter of the groove cutter is 14 mm, that is , its radius is 7 mm .
Then you should draw a line for the cut, from which we retreat a distance of 52 mm (59-7), and draw another one. We fix the guide along it and make the cut.
Circle milling
Compasses are used for such purposes. With their help, the router can move around a circle. The simplest of them is a device consisting of a rod, one end of which is equipped with a screw with a pin, and the other is attached to the base of the tool. Of course, it is better to use a compass equipped with two rods.
In general, there are many proprietary and even homemade devices for a router for cutting circles, which differ from each other in ease of use and dimensions. Quite often, compasses have a mechanism changing the radius of the circle. As a rule, it is a screw with a pin at the end that moves along the groove of the router.
When it is necessary to mill a small circle, the pin should be located under the base of the tool. In these cases, other devices are also used, fixed at the bottom of the device base.
But you don’t have to buy a milling compass to cut out circles. Instead, you can use a rip fence. To do this, the device is attached to a groove on the sole. A screw is screwed into it, which is recommended to be equipped with a sleeve so that its diameter matches the size of the hole. That's it, the compass is done. The radius can be adjusted using the stop.
Devices for replication and copying
 To create a series of identical products use:
- Angle lever;
- Copy probes.
There is a scale on the angle lever, the division price of which is 1/10 mm. It allows you to center a stop ring under the cutter, which helps accurately reproduce the shape of the part on the workpiece during copying. It is often equipped with a chip guard and support plate for best edge finishing.
Using copy templates and rings
Copy rings are a round plate with a protruding edge that slides along the base surface along the template. This device provides an accurate path for the cutter to move. Basically, this element is installed on the base of the workbench. At the same time, there is Several methods for attaching it:
- Installation of special antennae in the holes on the sole;
- Screwing the ring into the threaded recess.
Using a template also allows you to achieve more efficient and accurate work. It is attached directly to the workpiece with double-sided tape, and then both parts of the device are pressed to the machine with clamps. Moreover, experienced milling operators advise checking how tightly the ring is pressed to the edge of the template.
In addition, with such a device you can not process the entire edge, but only the corners. Hence, procedure for processing material according to a template- an excellent option for cutting grooves for the product.
Dust removal devices
 Professional craftsmen, in order to ensure dust removal, specially buy a technical vacuum cleaner, which is connected through an adapter with a hose to the router. Moreover, it does not interfere with operating the tool, and the markings and place of processing of the product are always open for visual inspection.
It is very difficult to work without a suction unit. But not everyone decides to make such a purchase, since it is too burdensome in terms of money and, moreover, is not always justified. True, there is another solution; you can get rid of dust with a household vacuum cleaner.
Install between the milling machine and the vacuum cleaner hermetically sealed tank. It will catch the bulk of the dust. It is equipped with an additional hose, and a fabric mesh is inserted inside. Moreover, these designs can be purchased ready-made or made with your own hands. By the way, a homemade device will help a household vacuum cleaner to collect even large construction debris and wood dust.
Slot milling device
This device is used for processing longitudinal grooves on posts, balusters and other rotating bodies. The principle of its operation is as follows. A baluster is installed into the body and fixed. Using a locking screw and a disk, the workpiece is secured in a strictly defined position.
After which the carriage is set in motion and the milling a groove along the length of the product. Then the part is unlocked, rotated to the required angle, locked, and the next groove is created.
Instructions for wood carving with a router
Beginning craftsmen may find working with hand tools difficult because the process of operating them seems difficult. That is why, before you start milling, you need to familiarize yourself with the principle of its operation.
Router assembly
The first step is to check the mounting location of the cutter in the machine; as a rule, a collet chuck is used for this. First, you need to select the desired cutter that matches the size of the chuck. If necessary, you can replace it.
But when deep processing is necessary, an option with an extended shank is used, which is inserted into the chuck hole and secured with a key. This must be done carefully without applying force, otherwise you will overcrowd, which is not the norm for the correct operation of the router. Although it is worth trying to reach a good stop so that the cutter does not wobble. All that remains is to tighten the spindle lock and you can get to work.
After this, the router turns on, you need to get used to the sound and feel the start. It is often because of surprise that many people start getting married.
Depth selection
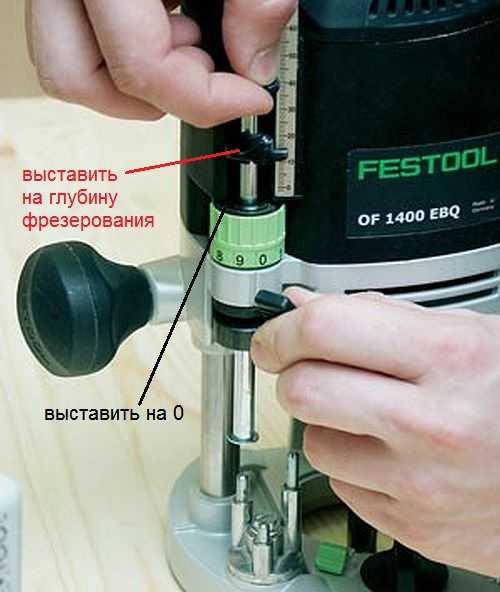
 In addition, you will need to install a milling depth limiter. First, the machine is applied to the product from the edge, while the cutter should not come into contact with the material. You will have to press on it until it reaches the required depth, after which position is fixed .
For a more accurate value, use a phased limiter. You can find out its pitch in the manual for the router. In this case, the regulator is rotated by the required number of degrees.
First of all, the required speed is determined. This is done according to the table in the instructions, based on the diameter of the cutter and the material being processed.
If you have never worked with a router before, then it is better to try your hand at a rough version. In addition, this will help you set the necessary parameters directly in processing mode .
It is also advisable to compare the results after moving the tool clockwise and counterclockwise, toward you and away from you. When milling a product around, the correct direction is counterclockwise, and on the flat side, on the contrary, away from you. Then you can start carving the main workpiece.
Homemade devices for a hand router. Learn how to use a hand router

Unforgivable Movie Mistakes You Probably Never Noticed There are probably very few people who don't enjoy watching movies. However, even in the best cinema there are mistakes that the viewer can notice.

7 Body Parts You Shouldn't Touch with Your Hands Think of your body as a temple: you can use it, but there are some sacred places that you shouldn't touch with your hands. Research showing.

Why do you need a tiny pocket on jeans? Everyone knows that there is a tiny pocket on jeans, but few have thought about why it might be needed. Interestingly, it was originally a place for storage.

How to look younger: the best haircuts for those over 30, 40, 50, 60 Girls in their 20s don’t worry about the shape and length of their hair. It seems that youth is created for experiments with appearance and daring curls. However, already last.

Top 10 Broke Stars It turns out that sometimes even the biggest fame ends in failure, as is the case with these celebrities.

What is it like to be a virgin at 30? I wonder what it’s like for women who didn’t have sex until almost middle age.
Milling accessories
To fully work with a hand router, in addition to the tool itself, the material and the corresponding set of cutters, you need to have one more component - accessories. In order for the cutter to be able to shape the workpiece in accordance with the master's plan - cutting the material exactly where it is required - it must be in a strictly defined position relative to the workpiece at every moment of time. Numerous accessories for a hand router are used to ensure this. Some of them - the most necessary ones - are included in the delivery package of the tool. Other devices for milling can be purchased or made by yourself. Moreover, homemade devices are so simple that to make them you can do without drawings, using only their drawings.
Rip fence
The most used device that comes with almost every router is a parallel stop, which ensures the straight movement of the cutter relative to the base surface. The latter can be the straight edge of a part, table or guide rail. The parallel stop can be used both for milling various grooves located on the face of the workpiece, and for processing edges.

Parallel stop for a manual router: 1 - stop, 2 - rod, 3 - base of the router, 4 - rod locking screw, 5 - fine adjustment screw, 6 - movable carriage, 7 - movable carriage locking screw, 8 - pads, 9 - screw stop locking.

Edge routing using the rip fence
To install the device in the working position, it is necessary to slide the rods 2 into the holes of the frame 3, ensuring the required distance between the supporting surface of the stop and the axis of the cutter, and fix them with the locking screw 4. To accurately position the cutter, you need to release the locking screw 9 and rotate the fine adjustment screw 5 set the cutter to the desired position. For some stop models, the dimensions of the supporting surface can be changed by moving or spreading the support pads 8.
If you add one simple part to the rip fence, then you can use it to mill not only straight, but also curved grooves, for example, to process a round workpiece. Moreover, the inner surface of the block located between the stop and the workpiece does not necessarily have to have a rounded shape that follows the edge of the workpiece. It can also be given a simpler shape (Figure “a”). In this case, the trajectory of the cutter will not change.

Stop for milling round surfaces
Of course, a regular rip fence, thanks to the notch in the center, will allow you to orient the router along a rounded edge, but the position of the router may not be stable enough.
Guide rail
The function of the guide bar is similar to that of a rip fence. Like the latter, it ensures strictly linear movement of the router. The main difference between them is that the tire can be installed at any angle to the edge of the part or table, thereby ensuring any direction of movement of the router in the horizontal plane. In addition, the tire may have elements that simplify certain operations, for example, milling holes located at the same distance from each other (with a certain pitch), etc.
The guide rail is attached to the table or workpiece using clamps or special clamps. The tire can be equipped with an adapter (shoe), which is connected to the base of the router by two rods. Sliding along the profile of the tire, the adapter sets the linear movement of the cutter.
Sometimes (if the distance of the tire from the router is too close), the supporting surfaces of the tire and the router may appear in different planes in height. To level them, some routers are equipped with retractable support legs, which change the position of the router in height.
Such a device is easy to make with your own hands. The simplest option is a long block secured to the workpiece with clamps. The design can be supplemented with side supports.
By placing a block on two or more aligned workpieces at once, grooves can be made in them in one pass.

Milling grooves on two workpieces at once
When using a block as a stop, it is inconvenient to place the block at a certain distance from the line of the future groove. The following two devices do not have this inconvenience. The first is made from boards and plywood fastened together. In this case, the distance from the edge of the stop (board) to the edge of the base (plywood) is equal to the distance from the cutter to the edge of the router base. But this condition is met only for a cutter of the same diameter. Thanks to this, the device quickly aligns along the edge of the future groove.

The following device can be used with cutters of different diameters, plus when milling, the router rests on its entire sole, and not half, as in the previous device.

Slot milling fixture

The stop is aligned along the edge of the hinged board and the center line of the groove. After fixing the stop, the folding board folds back, making room for the router. The width of the folding board, together with the gap between it and the stop (if there is one), should be equal to the distance from the center of the cutter to the edge of the router base. If you focus on the edge of the cutter and the edge of the future groove, then the device will only work with one diameter of the cutter.
When milling grooves across the grain, at the exit from the workpiece, when milling an open groove, cases of wood scuffing are not uncommon. The following devices will help to minimize scuffing: I press the fibers where the cutter exits, preventing them from splitting off from the workpiece.
Two boards, strictly perpendicular, are connected with screws. Different cutters are used on different sides of the stop so that the width of the groove in the fixture matches the width of the groove of the part being milled.
Another tool for routing open slots can be pressed harder against the workpiece, which further minimizes scuffing, but it only fits one diameter cutter. It consists of two L-shaped parts connected to the workpiece with clamps.

Slot milling attachment

Slot milling attachment
Copy rings and templates
The copying ring is a round plate with a protruding shoulder that slides along the template and provides the necessary trajectory of the cutter. The copying ring is attached to the base of the router in various ways: they screw it into a threaded hole (such rings are in the photo below), insert the antennae of the ring into special holes on the base, or screw it with screws.

Installing the copy ring
The diameter of the copy ring should be as close to the diameter of the cutter as possible, but the ring should not touch its cutting parts. If the diameter of the ring is larger than the diameter of the cutter, then the template must be smaller than the finished parts to compensate for the difference between the diameter of the cutter and the diameter of the copy ring.

Routing an edge using a template and a copy ring
The template is secured to the workpiece with double-sided tape, then both parts are pressed with clamps to the workbench. Once you have finished routing, check that the ring is pressed against the edge of the template throughout the entire operation.
You can make a template for processing not the entire edge, but only for rounding the corners. In this case, using the template shown below, you can make roundings of four different radii.

First you need to saw off the corner

In the figure above, a cutter with a bearing is used, but the template can also be used with a ring, only either the ring must exactly match the diameter of the cutter, or the stops must make it possible to move the template away from the edge by the difference in the radius of the cutter and the ring. This also applies to the simpler version shown below.

Template for rounding corners

Rounding a corner using a template
Templates are used not only for milling edges, but also grooves on the face.

Milling a groove using a template
The template can be adjustable.
Make accessories for the router yourself, or buy ready-made ones?
We will try to answer this question in our article.
For those who make wooden products on their own, a router (especially a manual one) is an indispensable assistant. The power tool itself, even if equipped with an excellent set of cutters, is completely useless without additional accessories. It is impossible to hold a working milling cutter within a given trajectory with your hands.
The rotating cutter will move chaotically, reacting to the vibrations of the tool and the structure of the material being processed. Even the owner of steel muscles and a hawk's eye will not be able to work with this tool without the use of guides and fixing devices.

This is what a wood router looks like
Basic devices are usually included with power tools, but they can only be used to perform simple tasks. More complex guides and templates have to be purchased for additional money, while many of them can be made by hand.
The main thing is to have an idea of how this device looks and works. There is no need to look for ready-made drawings and complex technical calculations. Any master knows better how to make this or that device. The efficiency and convenience of work will be higher, not to mention the savings.
Mechanical assistants for hand router
The most common device that is included in the basic kit.
Rip fence

Accessory - Rip fence
The design is so simple that making it yourself will not be difficult. A guide plane is selected relative to the line of passage of the cutter (in some cases this may be the smooth edge of the workpiece itself), along which the milling cutter moves. The stop can be any flat, oblong object connected to the tool with a fixed rod. For reliability, there can be two rods.
The surface of the guide must be smooth for free sliding. The stop needs to be calibrated.
To do this, a control groove is cut in the workpiece, the distance to it relative to the edge of the workpiece is measured, and the zero mark is fixed. By moving the stop along the rod, you can set any distance with high accuracy.
IMPORTANT! When using two rods, it is necessary to ensure their simultaneous fixation.
The rip fence is used for milling grooves and processing the edges of the product, including selecting a quarter. It is also possible to cut blanks of the same width. Compared to an electric jigsaw, the cut obtained with a milling cutter is smoother and of higher quality. Only the cutter should be of small diameter to save material.
The device can be used when processing rounded surfaces. To do this, a gasket with a cutout in the form of an obtuse angle is installed between the stop and the rounded end of the workpiece.
Guide rail
This device is no different in function from a rip fence, and is designed to ensure directed movement of the cutter along a given path.

A useful assistant when working with a router - a guide rail
The main difference is the ability to choose the angle of movement of the router. To do this, the guide is fixed on the surface to be treated using clamps or suction cups. You can make such a device yourself from a profile or corner of a suitable size. It's good to use an old curtain rod. The main thing is to ensure free movement of the carriage along the guide. For a more stable fixation, it is better to use not one, but two rods. If the width of the workpiece being processed is greater than the length of the rip fence bar, you cannot do without a guide bar.
Using such a device, you can mill grooves along a broken line or trim the edge of a product along a complex trajectory. To do this, the milling cutter stops at the break point, the fastening is given to the guide, which rotates at a given angle relative to the previous direction. In this case, the cutter remains in the workpiece, acting as an axis of rotation. The guide is then fixed again and milling continues in the new direction.
More advanced models have the ability to change the angle of inclination of the router relative to the vertical. This allows you to significantly expand the possibilities of using power tools.
Compass for router
The purpose of this device is clear from the name. Used for milling grooves in a circle or cutting out circles.

Want to make a perfect circle? You will need a compass for the router
The principle of operation is simple. A guide rod with a groove or a plate with calibrated holes is used as a compass leg, allowing you to cut circles of any diameter. A pin is fixed in the center of the proposed circle, around which the entire structure moves. But at the other end of the guide there is a router.
Factory compasses for a router can have a variety of designs. A rod with a support platform and a hinge (the design with two rods is more stable), a plate with a slot or calibrated holes.

Template for cutting circles
The main thing is to ensure reliable fixation of the central pin, otherwise the structure may shift due to vibration and the workpiece will be damaged.
You can make such a device yourself from any durable and smooth material, for example, textolite.

Homemade device for cutting circles
A carriage with a fixing device moves in a sawn groove; holes are provided for attaching the router.
There are also more complex devices for forming ovals. It is based on the same design as the compass, but instead of an axis of rotation, a support with a cross system of grooves is used. Moving along them, the virtual axis constantly shifts, resulting in the formation of a regular oval.

Device for cutting oval holes with a router
Using such a tool, you can make oval cuts both around the nozzle and next to it. The possibilities for choosing the path of movement of the cutter are practically unlimited.
Copy sleeve
Sometimes it becomes necessary to mill a complex pattern or replicate identical cutouts. For convenience and increased speed of work, pre-made templates are used. For example, a template is often used - a tenon cutter.

Copy sleeve or copy ring
Or it becomes necessary to cut several identical recesses for door hinges.
Copy rings are used to move the router along the contour of the template. The sleeve rests against the template, and the cutter exactly copies its profile.
IMPORTANT! The diameter of the copy sleeve is larger than the working diameter of the cutter.
Therefore, when making a template, an allowance is made for the difference in radius ( it is the radius, not the diameter!)
When the cutter moves inside the template, the cutout will be smaller. When moving outside the template - correspondingly more.
Standard copy rings are included with the router. However, it often becomes necessary to make such a device for a specific cutter diameter or an original template. Such work does not present any great difficulties. It is necessary to draw a drawing and order the product from a turner. In this case, it is necessary to ensure free passage of the cutter through the sleeve.
IMPORTANT! When installing the copy sleeve on the supporting surface of the router, it must be centered. For this purpose, special centering cones are used.

Installing a copy sleeve on a router
Templates for the router
These devices are rarely made for milling just one part. The exception is the restoration of a rare item or restoration of a complex structure for which a replacement cannot be found. In most cases, templates for a router are used for mass production of the same type:
- cutting recesses for door locks and hinges
- production of paneled door surfaces
- production of figured platbands
- cutting tenons for joining wooden products
- production of identical blanks for furniture production

Samples of templates of various shapes
With repeated use, the template quickly wears out and the accuracy of manufacturing parts decreases. Therefore, the template material must be durable and abrasion-resistant. Multilayer plywood and textolite have proven themselves well. More critical templates are made of metal.
Self-made templates are used everywhere. The main thing is to accurately determine the difference in size of the template and the finished part after processing.
IMPORTANT! There are no universal templates. Each matrix is made for a specific router, copy sleeve and the cutter itself.
Wood bits
Processing wooden surfaces and workpieces provides the widest creative possibilities for using a router. Professional carpenters and joiners use stationary machines, but you can literally work wonders with a hand router. For this purpose, there are wood attachments specially designed for high-quality processing of various types of material.

Various cutters (wood bits) for wood processing
With the help of such attachments, you can give any shape to the end surface of the workpiece, cut out an imitation panel on the plane of the door, make skirting boards, cornices, door frames, glazing beads and much more. Moreover, the same nozzle allows you to perform different shaped cuts depending on the angle of application.

An example of the different shapes that can be made using attachments
An experienced craftsman often makes his own cutters for each type of work. To do this, using a template, you need to sharpen each cutting edge of the cutter at the same angle. This is painstaking work, but you will receive a completely exclusive tool that meets your requirements.
However, industrially manufactured wood bits offer a fairly wide selection of shapes that satisfy the needs of most carpenters.
Special kits
Separately there are kits for performing special work - for example, a device for inserting hinges. The device is an individually made or customized template for this type of milling, equipped with specially designed fasteners that secure the tool at the end of the door leaf.

Homemade device for inserting loops
As a rule, such templates are made independently. Any highly specialized carpenter tries to have an individual set, especially if the work is carried out on the customer’s premises.
Hinge cutters
There are also standard accessories for hinges, in the form of special cutters. You don't need a template to work with them.

Door hinge cutter
When performing home renovation work, you can get by with simpler methods of cutting niches for hinges or grooves for a lock. It is enough to install a second parallel stop on the rods and then the router will be securely fastened to the end of the door leaf. This method is less convenient and is not suitable for mass production of doors, but for one-time work it will save money on purchasing a special kit.
Binding cutter set

A set of cutters specifically for a specific type of work
There are also sets of cutters, each of which cannot be used separately. In such sets, the sharpening of the tips is synchronized, and each subsequent cutter complements the work of the previous one. Let's take a bookbinding kit as an example.

Binding made by a set of cutters
It is by using all the cutters from the set that you can get a joint without gaps.
To increase the versatility of application, typesetting cutters are available.

Universal typesetting cutter
Several complementary cutting attachments are attached to the axis, the arrangement of which can be combined. At the same time, with one set you can perform work that requires several attachments.
Thus, using a variety of devices for a manual router, you can do complex woodworking with your own hands without using stationary milling machines. This issue is especially relevant when living in an apartment, when it is impossible to find a place to place the machine. And with the help of a hand router with a good set of attachments and additional accessories, you can organize a mini-workshop on the balcony. Only when working indoors, it is necessary to ensure removal of dust and sawdust.
Making wooden products at home is a good business, but first you need to buy specialized materials and equipment. A milling machine is a power tool, without which it is difficult to process wood, especially if there is no set of cutters available that allow you to create diverse and multifunctional products. It is important to choose the right model, which will be equipped with all the accessories.
There is nothing difficult in assembling a cutter yourself if you follow the step-by-step instructions. In addition, even a novice master will be able to equip the mechanism with all the necessary functions and auxiliary systems. For example, a holding system, without which it would be impossible to work. The movement of a rotating cutter is chaotic during the processing of wooden parts, which leads to strong vibration that a master cannot compensate for even with excellent physical training. Additional fixing and guiding devices are responsible for the secure installation of the device.
 When purchasing this equipment, all guides and fixing elements are included in its complex, but they perform only simple working movements, which are not enough for high-quality and beautiful processing of wooden products. Complex work processes require the purchase of additional holding templates, which cost a lot of money, but it is easy to make such wood router devices with your own hands.
Many specialists prefer to use drawings when assembling a restraint system, but this is wrong. It is better to initially understand the design of the machine and carry out independent calculations that will satisfy all the necessary requirements. At the same time, the efficiency and reliability of such structures will be better, and this is not to mention the knowledge of the design, which the master can repair independently at any time.
There is a wide variety of accessories that increase the functionality of a milling machine. Among them are:
- parallel stop;
- guide bar;
- compass;
- copy sleeve;
- templates;
- nozzles
The design of the rip fence for a router table is the simplest of all types of holding systems. Making it yourself will not be difficult if you first understand the principle of its operation.
 To begin with, select an object that will serve as an emphasis. This can be an oblong product that can easily be connected to a fixed rod. Next, select a guide plane along which the router constantly moves. In some cases, instead of a guide element, the flat side of the workpiece is chosen. This part must be smooth and even so that it can slide freely along it.
For normal movement of the cutter using the workpiece guide, a control groove is first made in it and the distance from the edge to the zero mark is measured. As a result, it is easy to move the stop along the bar, setting any acceptable distance, but it is important to remember that when working with two bars, they need to be fixed at the same time.
The rip fence is a unique attachment that is great for edging, quartering, or routing grooves. It is used to cut workpieces according to the width specified in the settings or process round-shaped parts. To process products with a rounded surface, a special gasket with an obtuse angle is installed between the stop and the end of the workpiece. Such a device is more useful than a jigsaw, which creates many defects and defects during operation. For example, when sawing wooden blanks to width with a jigsaw, the cut turns out to be crooked.
The principle of operation of the guide bar is similar to the thrust jig, but there are significant differences that make this mechanism more preferable for operation. The rip fence only performs directional movements, unlike the guide bar, which allows you to select the angle for processing wooden products.
 You can achieve the ability to choose the angle of movement of the cutter by installing a clamp or suction cups. It’s easy to make this option yourself using corners of a suitable size or profile. For example, an old curtain rod is perfect as a base. In this matter, the main thing is to create conditions for the free movement of the carriage in the direction of the guide and secure it stably by using two rods, and not one. Sometimes the width of the workpiece exceeds the parameters of the rip fence and therefore using a guide bar is the best option.
If work is required that requires milling grooves along a broken line or cutting an edge with a curved path, then a guide rail can easily cope with this. To do this, you need to stop the router at the breaking point, loosen the guide and turn the tire to the side at a given angle. During the process of changing the angle, the cutter remains in its place, representing the axis of rotation. Then the cutter is fixed again in the new specified position, and milling work continues.
There are also the most advanced models that can change the vertical direction. This method of processing wooden parts significantly expands functionality.
The purpose of the compass installed on a milling machine is known to many specialists in this field. With its help, circles can be easily cut from wooden blanks. The principle of its operation is similar to a simple compass, but there are some features.
The guide rod is one of the main elements that acts as a compass leg and has grooves or special plates with calibrated holes that allow you to reconfigure and set the desired diameter. The router guide is at the other end of the stud. The entire structure moves around a fixed pin, which stands in the center.
 Factory models differ only in the diameter adjustment device. To do this, use a hinge with two rods to increase the stability of the craft, support platforms, plates or calibration of holes.
You can assemble homemade equipment if you use any durable and smooth material. Many craftsmen use textolite for this. When assembling, you need to remember about the reliable fixation system, which helps to do the job with the highest quality. Cutting a circle is difficult and it is simply impossible to correct errors as a result. That is why vibration of the structure must be minimized to prevent the equipment from moving during the cutting process. To attach the cutter to the device, special holes must be provided and grooves for moving the carriage with a fixing device must be cut.
A compass on a cutter for cutting circles is the simplest model, the functionality of which can be easily expanded if you use a support with a cross groove system. This option allows you to cut ovals by constantly moving the grooves, which form an even figure. This tool cuts ovals next to and around the nozzle, all thanks to a wide choice of cutter paths.
 This element of the milling machine belongs to a new generation of systems that significantly simplify work and expand the functionality of the equipment. A copying sleeve is needed in cases where it is necessary to cut out a complex design on a workpiece or make the same cut on several products. In some cases, it is necessary to cut door hinges or similar parts into a piece of wood. For the convenience of performing such work, you need to learn in advance how to make a template for a router and only then begin its production. One of the most common patterns is the tenon cutter.
For precise movement of the cutter according to a given pattern, copy rings are used. The principle of operation is that the bushing creates support for the template, and the router copies it exactly during operation. When choosing the diameter of the copy sleeve, it is important to remember that it must be larger than the working diameter of the cutter. That is why craftsmen, when making templates, monitor the difference between their radii, and not their diameters. This is due to the fact that the router, while moving inside the template, will cut out a smaller pattern, and when working outside of it, the figures will be larger.
Having learned how to use a copying sleeve for a router, craftsmen receive a good assistant in processing various wooden parts.
Making templates
Many craftsmen use templates, especially when it comes to creating a series of wooden parts. It rarely happens that a template is used to cut out one part, but such cases do occur, for example, during restoration.
In most cases, such a device is used in production:

When making a template, it is important to initially select high-quality and durable material. Even taking into account the minimal contact of the machine router and the edge of the template, it is erased over time, and the drawings lose their original accuracy. Such problems can be easily avoided if you initially use durable materials:
- metal;
- textolite;
- multilayer plywood;
- some types of plastic.
Naturally, it will be difficult to prepare a metal template, but it will last for many years without deforming and maintaining the original dimensions and strokes of the design. It is better not to experiment with such a device and make a template specifically for the required part of the wooden product. There are no high-quality universal devices.
Attachments for woodworking
 Processing wooden workpieces gives wide scope for using a router. Professional carpenters and carpenters use automatic machines that perform specified functions accurately and quickly, but manual machines are also good at what they do. Some, with the help of tenoning parts or attachments, can create real miracles. In some cases, it is even possible to carve the parts needed to assemble the furniture.
Each attachment is designed for a specific type of wood and can easily give the end part any shape. With their help, skirting boards, panels, cornices, balusters and much more are made. An experienced craftsman with one nozzle is able to perform various patterns on the surface of the workpiece using different angles. In addition, specialists often make such devices for a hand router with their own hands.
Special kits
In the woodworking industry, kits designed for special applications are often found. These include, for example, the production of inserts for hinges. This kit is a manufactured, customizable template that is immediately equipped with fasteners for milling.
 Craftsmen make most of these parts themselves. It is enough to install a second stop jig on the rods and then a router will be securely attached to the end of the door leaf, which can easily be used to cut holes for hinges or a door lock. This method is useful, but inconvenient, so it is more suitable for one-time use.
Milling work is a great way to earn extra income by processing wooden blanks or just to while away your free time. These works require minimal investment, and most of the devices can be done with your own hands.
To fully work with a hand router, in addition to the tool itself, the material and the corresponding set of cutters, you must have one more component - fixtures. In order for the cutter to be able to shape the workpiece in accordance with the master's plan - cutting the material exactly where it is required - it must be in a strictly defined position relative to the workpiece at each moment of time. Numerous accessories for a hand router are used to ensure this. Some of them - the most necessary ones - are included in the scope of delivery of the tool. Other devices for milling can be purchased or made by yourself. Moreover, homemade devices are so simple that to make them you can do without drawings, using only their drawings.
Rip fence
The most used device that comes with almost every router is a parallel stop, which ensures the straight movement of the cutter relative to the base surface. The latter can be the straight edge of a part, table or guide rail. The parallel stop can be used both for milling various grooves located on the face of the workpiece, and for processing edges.Parallel stop for a manual router: 1 - stop, 2 - rod, 3 - base of the router, 4 - rod locking screw, 5 - fine adjustment screw, 6 - movable carriage, 7 - movable carriage locking screw, 8 - pads, 9 - screw stop locking.
To install the device in the working position, it is necessary to slide the rods 2 into the holes of the frame 3, ensuring the required distance between the supporting surface of the stop and the axis of the cutter, and fix them with the locking screw 4. To accurately position the cutter, you need to release the locking screw 9 and rotate the fine adjustment screw 5 set the cutter to the desired position. For some stop models, the dimensions of the supporting surface can be changed by moving or spreading the support pads 8.
If you add one simple part to the rip fence, then you can use it to mill not only straight, but also curved grooves, for example, to process a round workpiece. Moreover, the inner surface of the block located between the stop and the workpiece does not necessarily have to have a rounded shape that follows the edge of the workpiece. It can also be given a simpler shape (Figure “a”). In this case, the trajectory of the cutter will not change.
Of course, a regular rip fence, thanks to the notch in the center, will allow you to orient the router along a rounded edge, but the position of the router may not be stable enough.
The function of the guide bar is similar to that of a rip fence. Like the latter, it ensures strictly linear movement of the router. The main difference between them is that the tire can be installed at any angle to the edge of the part or table, thereby ensuring any direction of movement of the router in the horizontal plane. In addition, the tire may have elements that simplify certain operations, for example, milling holes located at the same distance from each other (with a certain pitch), etc.
The guide rail is attached to the table or workpiece using clamps or special clamps. The tire can be equipped with an adapter (shoe), which is connected to the base of the router by two rods. Sliding along the profile of the tire, the adapter sets the linear movement of the cutter.
Sometimes (if the distance of the tire from the router is too close), the supporting surfaces of the tire and the router may appear in different planes in height. To level them, some routers are equipped with retractable support legs, which change the position of the router in height.
Such a device is easy to make with your own hands. The simplest option is a long block secured to the workpiece with clamps. The design can be supplemented with side supports.

By placing a block on two or more aligned workpieces at once, grooves can be made in them in one pass.
When using a block as a stop, it is inconvenient to place the block at a certain distance from the line of the future groove. The following two devices do not have this inconvenience. The first is made from boards and plywood fastened together. In this case, the distance from the edge of the stop (board) to the edge of the base (plywood) is equal to the distance from the cutter to the edge of the router base. But this condition is met only for a cutter of the same diameter. Thanks to this, the device quickly aligns along the edge of the future groove.

The following device can be used with cutters of different diameters, plus when milling, the router rests on its entire sole, and not half, as in the previous device.


The stop is aligned along the edge of the hinged board and the center line of the groove. After fixing the stop, the folding board folds back, making room for the router. The width of the folding board, together with the gap between it and the stop (if there is one), should be equal to the distance from the center of the cutter to the edge of the router base. If you focus on the edge of the cutter and the edge of the future groove, then the device will only work with one diameter of the cutter.
When milling grooves across the grain, at the exit from the workpiece, when milling an open groove, cases of wood scuffing are not uncommon. The following devices will help to minimize scuffing: I press the fibers where the cutter exits, preventing them from splitting off from the workpiece.


Two boards, strictly perpendicular, are connected with screws. Different cutters are used on different sides of the stop so that the width of the groove in the fixture matches the width of the groove of the part being milled.
Another tool for routing open slots can be pressed harder against the workpiece, which further minimizes scuffing, but it only fits one diameter cutter. It consists of two L-shaped parts connected to the workpiece with clamps.
Copy rings and templates
The copying ring is a round plate with a protruding shoulder that slides along the template and provides the necessary trajectory of the cutter. The copying ring is attached to the base of the router in various ways: they screw it into a threaded hole (such rings are in the photo below), insert the antennae of the ring into special holes on the base, or screw it with screws.

The diameter of the copy ring should be as close to the diameter of the cutter as possible, but the ring should not touch its cutting parts. If the diameter of the ring is larger than the diameter of the cutter, then the template must be smaller than the finished parts to compensate for the difference between the diameter of the cutter and the diameter of the copy ring.
The template is secured to the workpiece with double-sided tape, then both parts are pressed with clamps to the workbench. Once you have finished routing, check that the ring is pressed against the edge of the template throughout the entire operation.
You can make a template for processing not the entire edge, but only for rounding the corners. In this case, using the template shown below, you can make roundings of four different radii.

In the figure above, a cutter with a bearing is used, but the template can also be used with a ring, only either the ring must exactly match the diameter of the cutter, or the stops must make it possible to move the template away from the edge by the difference in the radius of the cutter and the ring. This also applies to the simpler version shown below.


Templates are used not only for milling edges, but also grooves on the face.

The template can be adjustable.


Template routing is a great method for cutting out hinge grooves.


Tools for milling round and elliptical grooves
Compasses are designed to move the router around a circle. The simplest device of this type is a compass, consisting of one rod, one end of which is connected to the base of the router, and the second has a screw with a pin at the end, which is inserted into a hole that serves as the center of the circle along which the cutter moves. The radius of the circle is set by shifting the rod relative to the base of the router.
It is better, of course, for the compass to be made of two rods.

In general, compasses are a very common device. There are a large number of branded and homemade devices for circumferential milling, varying in size and ease of use. As a rule, compasses have a mechanism that ensures a change in the radius of the circle. It is usually made in the form of a screw with a pin at the end, moving along the groove of the device. The pin is inserted into the central hole of the part.


When it is necessary to mill a circle of small diameter, the pin must be located under the router base, and for such cases, other devices are used that are attached to the bottom of the router base.

Ensuring the movement of the cutter in a circle using a compass is quite simple. However, one often has to deal with the need to make elliptical contours - when inserting oval-shaped mirrors or glass, installing arched windows or doors, etc. The PE60 WEGOMA device (Germany) is designed for milling ellipses and circles.


It is a base in the form of a plate, attached to the surface using vacuum suction cups 1 or with screws if the nature of the surface does not allow it to be fixed using suction cups. Two shoes 2, moving along intersecting guides, ensure the movement of the milling cutter along an elliptical path. When milling a circle, only one shoe is used. The device kit includes two mounting rods and bracket 3, with the help of which the router is connected to the slab. The grooves on the bracket allow you to install the router so that its supporting surface and the base of the slab are in the same plane.
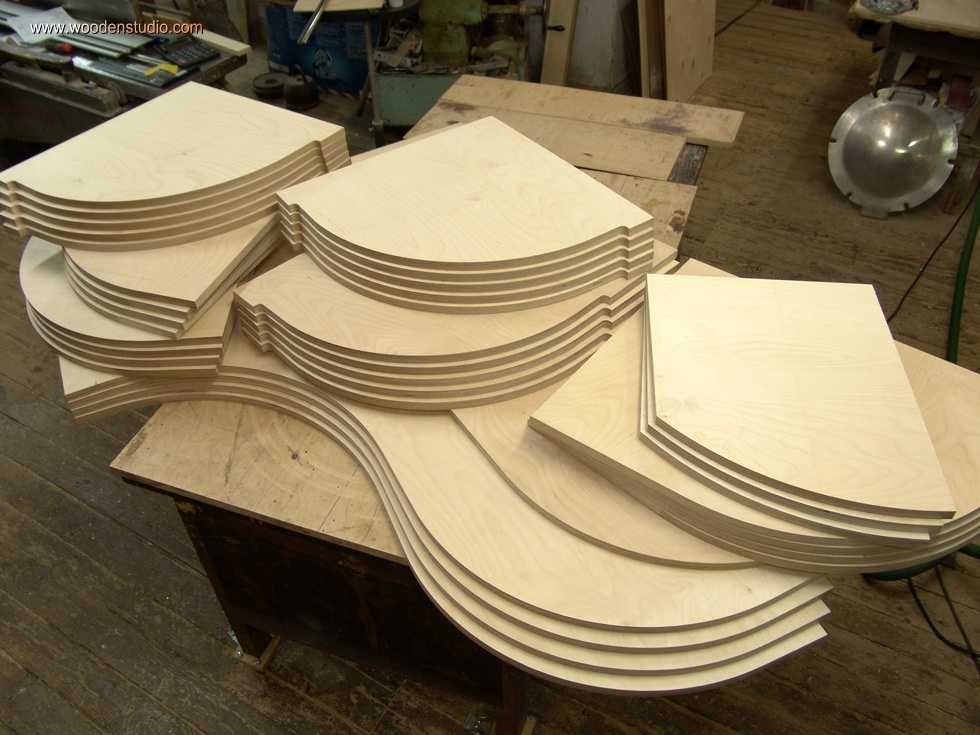
As can be seen from the photographs above, a router was used instead of a jigsaw or band saw, and due to the high speed of the cutter, the quality of the processed surface was much higher. Also, if you don’t have a hand-held circular saw, a router can replace it.
Devices for milling grooves on narrow surfaces
Grooves for locks and door hinges, in the absence of a router, are made using a chisel and an electric drill. This operation - especially when making a groove for an internal lock - takes a lot of time. Having a milling cutter and a special device, it can be completed several times faster. It is convenient to have a device that provides milling of slots in a wide range of sizes.To make grooves in the end, you can make a simple device in the form of a flat base attached to the base of the router. Its shape can be not only round (according to the shape of the base of the router), but also rectangular. On both sides you need to secure guide pins that will ensure the straight movement of the router. The main condition for their installation is that their axes are in line with the center of the cutter. If this condition is ensured, the groove will be located exactly in the center of the workpiece, regardless of its thickness. If you need to move the groove to one side or another from the center, you need to put a bushing with a certain wall thickness on one of the pins, as a result of which the groove will move to the side on which the pin with the bushing is located. When using a router with such a device, it must be guided in such a way that the pins are pressed on both sides to the side surfaces of the part.

If you attach a second rip fence to the router, you will also get a device for milling grooves in the edge.

But you can do without special devices. To ensure stability of the router on a narrow surface, boards are secured on both sides of the part, the surface of which should form a single plane with the surface being processed. When milling, the router is positioned using a rip fence.

You can make an improved version that increases the support area for the router.


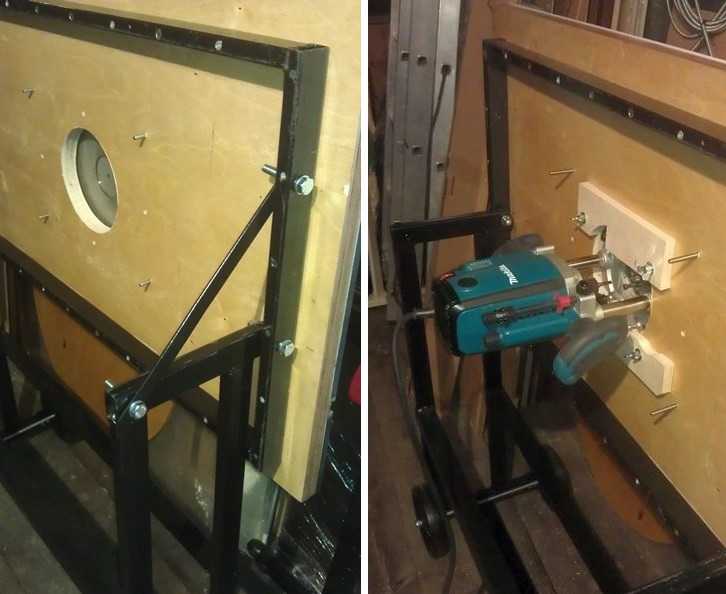
Device for processing balusters, pillars and other bodies of rotation
The variety of work that is performed with a manual milling cutter sometimes dictates the need to independently manufacture devices that facilitate the performance of certain operations. Branded devices are not able to cover the entire range of work, and they are quite expensive. Therefore, home-made devices for a router are very common among users who are interested in working with wood, and sometimes hand-made devices are either superior to branded analogues or have no branded analogues at all.Sometimes there is a need to mill various grooves in rotating bodies. In this case, the device shown below may be useful.


The device is used for milling longitudinal grooves (flutes) on balusters, posts, etc. It consists of a body 2, a movable carriage with an installed milling cutter 1, a disk for setting the angle of rotation 3. The device operates as follows. The baluster is placed in the body and secured there with screws 4. Rotation to the desired angle and fixation of the workpiece in a strictly defined position is ensured by disk 3 and locking screw 5. After fixing the part, the carriage with the router is set in motion (along the guide bars of the body), and the milling a groove along the length of the workpiece. Then the product is unlocked, rotated to the required angle, locked, and the next groove is made.
A similar device can be used instead of a lathe. The workpiece should be rotated slowly by an assistant or a simple drive, for example, from a drill or screwdriver, and excess material should be removed by a milling cutter moving along the guides.
Tools for milling tenons
Tenoning jigs are used to mill the profile of tenon joints. The manufacture of the latter requires great precision, which is almost impossible to achieve manually. Tenoning jigs allow you to quickly and easily profile even complex joints such as dovetails.
The figure below shows an industrial sample of a tenon-cutting device for making three types of joints - a dovetail (blind and through version) and a through joint with a straight tenon. The two mating parts are installed in the fixture with a certain shift relative to each other, controlled by pins 1 and 2, then they are processed. The exact trajectory of the cutter is determined by the shape of the groove in the template and the copying ring of the router, which slides along the edge of the template, repeating its shape.


When using the content of this site, you need to put active links to this site, visible to users and search robots.
Template for a manual router installed in a “table”.
More precisely, this is a homemade stop that can be used with a whole set of templates. The workpiece is installed into this stop along with the required template and clamped with cam eccentrics.
As we usually use a hand router when copying parts according to a template. The template is made from durable sheet material, such as MDF. The template is attached to the workpiece with self-tapping screws and the part is passed through with a router using a cutter with a support bearing, or a special copier ring, which is included in the standard set of accessories and is attached to the platform of the router itself.

Top to bottom, cam clamp, template, workpiece.

The device is assembled.
Such options have their advantages; you don’t need a table for a router. But with a large number of parts to be processed, it gets boring to twist the template every time. This method is convenient because the device you make can be used for a long time. And if you also make a set of the most popular templates for it, then time and labor costs will be significantly reduced. An unusual way of working.
The material for the base should be quite rigid; you can probably use plywood with a thickness of 10-12 mm. , but I think a 6-8 mm thick MDF board would be better. . The vertical wall and eccentrics are made of dense wood, oak, beech, or, in extreme cases, birch.

In fact, all parts except the base area can be made from 20 mm thick plywood. , but I think eccentrics made of plywood will be worse than those made of oak.

Holes are drilled on the vertical part for the bolt that secures the cams. The holes are made in vertical rows so that the eccentrics can be rearranged in height, depending on the thickness of the part and the template. The hole markings are in the figure. The thickness of the vertical oak part is 16-25 mm. .

When assembling, the parts are twisted with self-tapping screws, you can coat the joints with glue and the caps must be recessed. Here you need to keep in mind that during operation the base area may fall under the cutter, and sooner or later it will have to be changed. As for the vertical part, handles and eccentrics, they should last a long time. The cams are mounted on bolts with a diameter of 5 mm. . Instead of nuts, it is better to use wings so that they can be easily tightened by hand.

The handles hold the platform and the vertical part together; in addition, you use them to hold the device in use. Make such classic curly ones, or use a simpler option, it’s your choice.
Having a milling machine really simplifies the work of inserting hinges, forming complex holes, recesses, wood carving, etc. But this does not mean at all that it is necessary to have professional and expensive equipment: it is enough to have a simple manual device.
The only thing you need is to be able to basicly handle wood and use power tools. In addition, you need to have a desire, otherwise without this there will never be a result. Those who have no desire to work simply buy furniture or hire craftsmen to, for example, install a new door and cut locks. Any work, especially with power tools, requires certain knowledge, and especially safety precautions.

The milling device is designed for processing both wood and metal. With its help, it is possible to form recesses or holes of any configuration. This greatly simplifies tasks such as inserting hinges and inserting locks. Doing this with a chisel and an electric drill is not so easy, and it takes a lot of time.
There are stationary milling devices and portable (manual). Hand-held electric milling machines are considered universal devices, with the help of which, in the presence of attachments, it is possible to perform operations for various purposes; you just need to change the position of the part in relation to the device or vice versa.
Stationary devices are used in factories or factories where mass production of wood or metal products is established. Under such conditions, the cutting attachment is stationary, and the workpiece moves along the desired path. When using a hand tool, on the contrary, the part is fixed motionless and only then it is processed, although there are parts that require fixing a hand tool. This is provided for in the design, therefore, it is considered more universal. This is especially true when a large number of parts need to be processed, and it is not possible to use a stationary machine.
 A homemade milling machine is a horizontal platform with a hole in the center, to which a hand-held device is attached from below.
 There are many types of milling machines, but for use at home or for starting your own business, universal models are more suitable. As a rule, they are equipped with a set of cutters and various devices for performing various types of operations. The only thing is that if you have a manual milling cutter, simple operations can take much longer than when using a stationary machine.
Using a manual milling device it is possible to:
- Make grooves or recesses of any shape (curly, rectangular, combined).
- Drill through and non-through holes.
- Process ends and edges of any configuration.
- Cut out complex shaped parts.
- Apply drawings or patterns to the surface of parts.
- Copy parts if necessary.
 Copying parts is one of the functions of any electric milling machine.
 The presence of such functions makes it possible to simplify the production of the same type of furniture or the production of identical parts not related to furniture production. This is one of the main advantages of this tool. As a rule, to produce parts of the same type, it is necessary to install copying machines, which are designed to perform only one operation, which is not always profitable, especially in small enterprises.
Getting started and caring for the tool
To understand how this device works, you should familiarize yourself with its main parts and their purpose.
Composition and purpose of main components
A manual milling device consists of a metal body and a motor, which is located in the same body. A shaft protrudes from the housing, onto which various collets are placed, serving as adapters. They allow you to install cutters of various sizes. The cutter is inserted directly into the collet, which is secured with a special bolt or button, which is provided on some models.
 The main elements of a manual milling device and their purpose.
 The design of the milling device includes a metal platform, which has a rigid connection to the body. It is attached to the body by means of two rods. On the outside, the plate has a smooth coating that ensures smooth movement during operation.
The manual milling device has some characteristics that can be adjusted:
- Due to the handle and scale for adjusting the milling depth. Adjustment is carried out in 1/10 mm increments.
- By adjusting the rotation speed of the cutter.
At the initial stages, when mastering the tool, it is better to try to work at low or medium speeds. Although you should always remember that the higher the speed, the better the work. Especially if this concerns critical, visible areas that cannot be masked.
In addition to these levers, there is also a button to turn the product on and off, as well as a lock button. These elements are considered basic, ensuring high-quality and safe performance of work. There is also a parallel stop, which contributes to ease of use. It can be rigidly fixed or with the ability to adjust the shift of the working area away from the center.
Caring for a hand-held milling device

Usually, a factory product falls into the hands of a person tested and lubricated, so no additional measures should be taken. Only during its operation you need to monitor its cleanliness and serviceability. At the same time, it should be regularly cleaned of dust and the lubricant should be changed, if so written in the passport. Lubrication is especially necessary for moving parts. As an option, you can use aerosol lubricants, but you can also get by with regular ones, such as Litol. The use of thick lubricants is not recommended, as chips and dust stick to them. If aerosol lubricants are used, then this factor can be eliminated.
The sole, the smooth part of the body, also requires lubrication. Regular lubrication will ensure smooth movement.
Despite this, the purchased item should definitely be checked for quality of assembly and presence of lubricant.
Unfortunately, not all manufacturers, especially domestic ones, care about build quality. There are cases when, after the very first hours of operation, screws or screws are unscrewed from a product because they were not tightened properly.
Rotation speed adjustment
The operation of any tool is associated with certain conditions related, first of all, to the nature of the material being processed. It can be plywood, composite material or regular wood. Depending on this, the rotation speed on the electrical appliance is set. As a rule, the technical data sheet always indicates the operating parameters of the device, depending on the technical characteristics and characteristics of the surfaces being processed, as well as the cutters used.
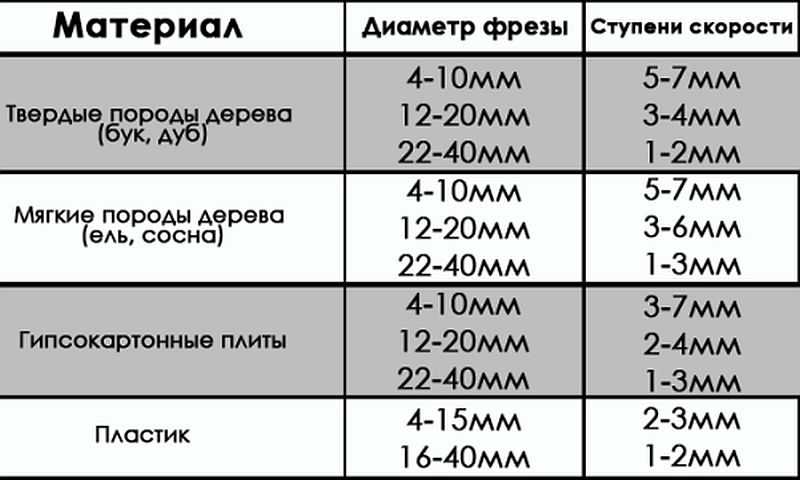 Indicators of processing speeds when using various cutters.
 Fixing the cutter
The first thing the work begins with is installing and securing the cutter. At the same time, you should adhere to the basic rule - all work is performed with the cord plug removed from the socket.
The cutter is installed according to certain marks, and if they are missing, then to a depth of no less than * the length of the cutter itself. How to install a cutter on a specific model can be found in the instructions, which must be included in the technical documents for the device. The fact is that each model may have its own design features and it is not possible to talk about this in the article.
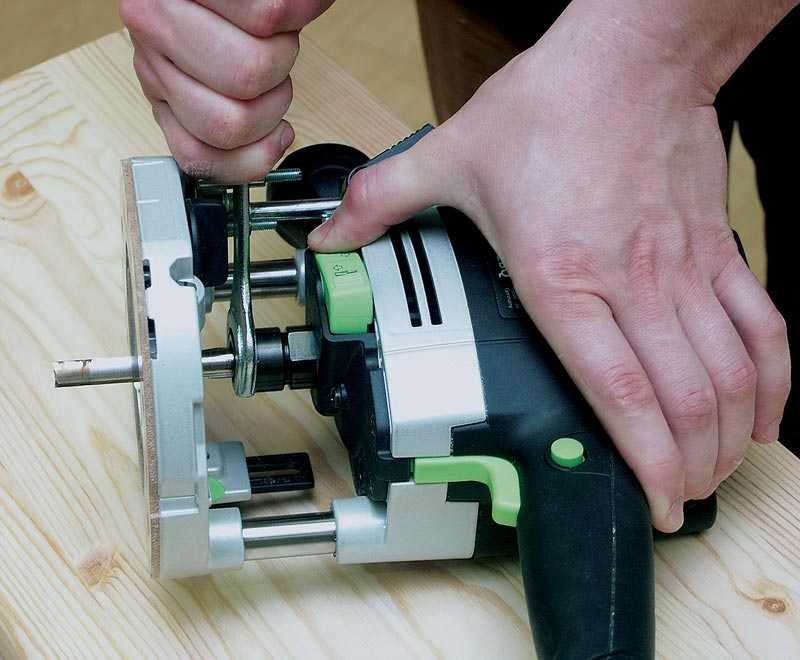 Installing the cutter on the device before starting work.
 There are both simple and more “advanced” models, as they say. Some models have a shaft rotation lock button, which makes installing the cutter easier. Some, especially expensive models, are equipped with ratchets. So it won’t be possible to specifically describe the process of installing the cutter, and it doesn’t make sense, since everyone who is familiar with the operation of such devices will figure it out in a moment.
Milling depth adjustment
Each model has its own maximum milling depth. At the same time, it is not always the maximum depth that is required, but a certain depth that is set before work. Even if maximum depth is required, in order not to overload the device, the milling process is divided into several stages, changing the milling depth in steps. For adjustment, special stops are provided - limiters. Structurally, they are made in the form of a disk located under the bar, on which stops of various lengths are fixed. The number of such legs can be from three to seven, and this does not mean that the more there are, the better. It is better if it is possible to adjust each of the legs, even if their number is minimal. To secure this stop in the optimal position, you should use a lock in the form of a flag.
The process for adjusting the milling depth is as follows:

 Thus, the workpiece is milled to a given depth.
 On high-quality, expensive models there is a wheel for precise adjustment of the milling depth.
 Using this wheel, you can more accurately set the depth without disturbing the previous setting.
 This wheel (green in the photo above) allows you to adjust the depth within small limits.
Milling cutters for hand milling tools

A milling cutter is a cutting tool that can have an intricately shaped cutting edge. As a rule, all cutters are designed for rotational movements and therefore have a cylindrical shape. The shank of the cutter, which is clamped in the collet, has the same shape. Some cutters are equipped with a thrust roller, so that the distance between the cutting surface and the material being processed remains constant.
Milling cutters are made only from high-quality metals and their alloys. If you need to process soft wood, then HSS cutters will do, and if you need to process hard wood, then it is better to use cutters made of harder HM alloys.
Each cutter has its own technical characteristics, which provide it with high-quality and long-lasting performance. The main indicator is the maximum speed of its rotation, which should never be overestimated, otherwise its breakdown is inevitable. If the cutter is dull, you should not try to sharpen it yourself. Sharpening of cutters is carried out using special, expensive equipment. After all, you need not only to sharpen the cutter, but also to maintain its shape, which is no less important. Therefore, if for some reason the cutter becomes dull, it will be cheaper to buy a new one.
The most popular cutters
There are cutters that are used in work more often than others. For example:

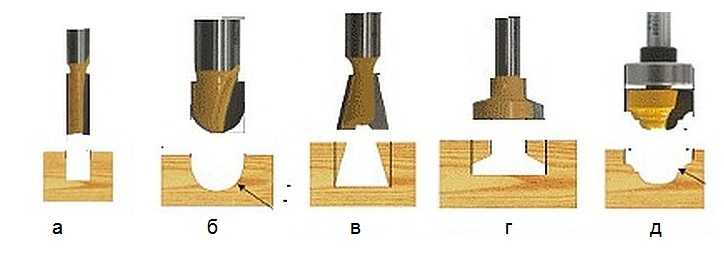 Groove molds are designed to create recesses in any location on the workpiece.
 There are cutters that are simple, monolithic, made from a single piece of metal, and there are typesetters. Set cutters consist of a shank, which serves as the basis for a set of cutting elements. By selecting cutting planes and installing them on the shank, using washers of various thicknesses, you can form an arbitrary relief on the surface of the workpiece.
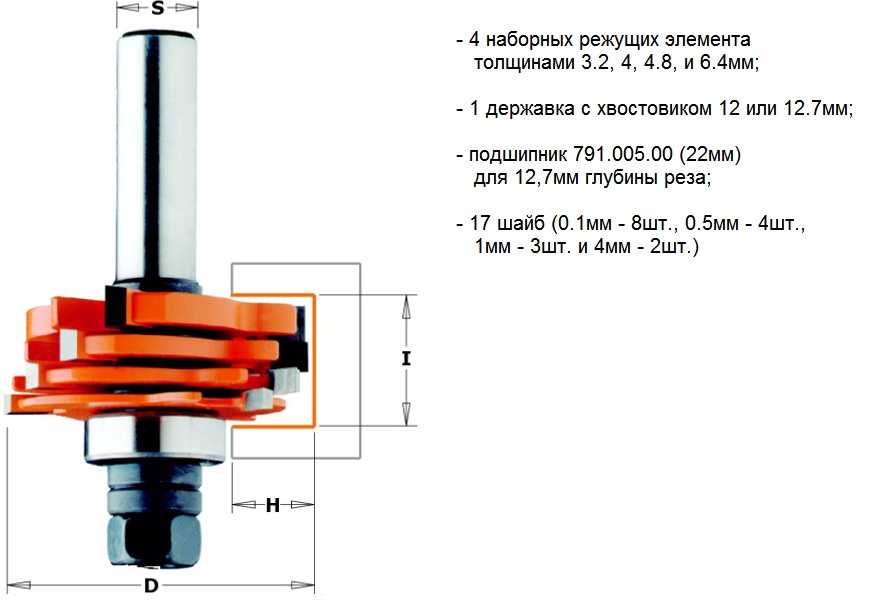 A set cutter is a set of cutting surfaces and washers that allows you to assemble a cutter of the desired shape.
 In fact, there are a lot of cutters and this is only a small fraction of what is produced. All cutters differ in the diameter of the shank, the diameter of the cutting surfaces, their height, the location of the knives, etc. As for manual milling equipment, it is enough to have a set of five of the most common cutters. If necessary, you can purchase them at any time.
Rules for working with hand milling tools
Working with power tools requires special rules, especially when there are rapidly rotating elements. In addition, as a result of work, chips are formed that fly in all directions. Despite the fact that most models are equipped with a protective shield, this does not fully protect against the flow of chips. Therefore, it is better to work with such a tool wearing safety glasses.
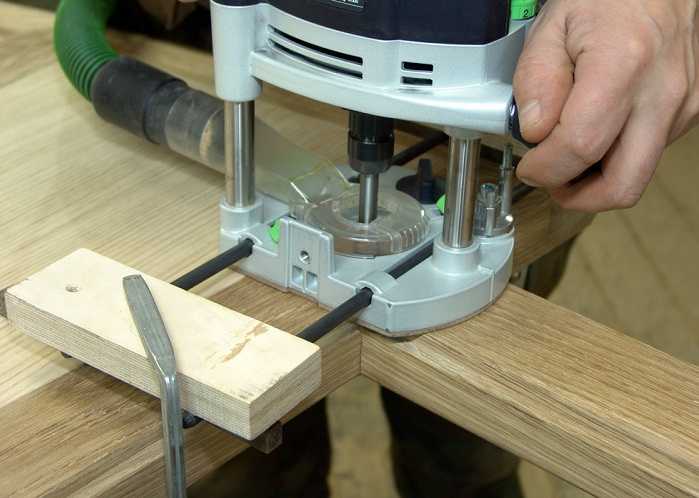 The photo shows a model where a vacuum cleaner is connected to remove chips.
 General requirements
If you follow the basic requirements for safe work with an electric hand router, the end result will please you with the quality of work and a safe outcome. These are the conditions:

The requirements are not very complex and quite feasible, but to ignore them means putting yourself in danger. And one more thing, no less important, is the ability to hold a milling tool in your hands and feel how it works. If serious vibrations are felt, then you need to stop and analyze the reasons. It is possible that the cutter is dull or there is a knot. Sometimes it is necessary to correctly set the rotation speed of the cutter. Here you can experiment: either add speed or reduce it.
Edge processing: using templates
It is better to process the edges of a wooden board using a surface planer. If this is not possible, then you can use a hand router, although this will take some time. These works are carried out both without a template and with a template. If there are no skills or very few of them, then it is better to use a template. For processing edges, straight edge cutters are used, both with one bearing at the end of the cutting part and with a bearing at the beginning (see photo).
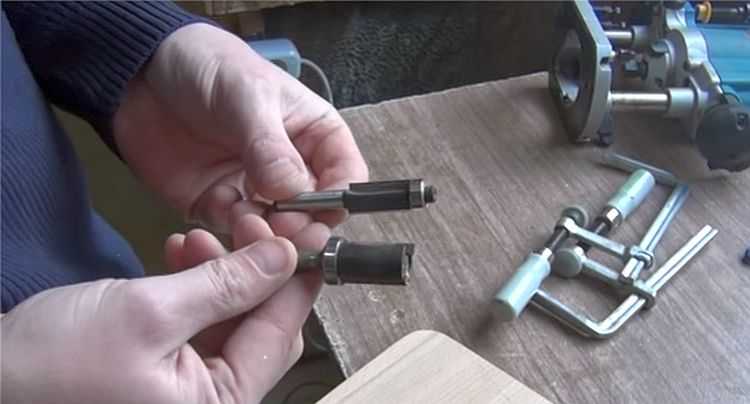 Edge cutters.
 You can use an already processed board or other flat object as a template. Moreover, the length of the template must be greater than the length of the workpiece, both at the beginning and at the end of the workpiece being processed. This will avoid unevenness at the beginning of the edge and at the end. The most important thing here is that the template or object acting as a template has a smooth and even surface. In addition, its thickness should not be greater than the gap located between the bearing and the cutting part.
The width of the part is less than the length of the cutting part
Moreover, the longer the cutting part, the more difficult it is to work with the tool, since more effort is required. In this regard, it is better to start working with cutters that have an average length of the cutting part. The operating principle for edge processing is as follows:
- The template is attached so that it is at the desired height and has a flat horizontal surface.
- The template is firmly mounted to a table or other surface.
- The cutter with the roller is installed so that the roller moves along the template, and the cutter (cutting part) moves along the workpiece. To do this, perform all the necessary manipulations with the template, workpiece and tool.
- The cutter is installed in the working position and clamped.
- After this, the tool turns on and moves along the template. In this case, you should decide on the speed of movement, which is determined by the depth of processing.
- The milling unit can be either pushed or pulled, depending on what is convenient for you.
After the first pass, you should stop and evaluate the quality of the work. If necessary, another pass can be made by adjusting the position of the tool. If the quality is satisfactory, then the clamps are removed, freeing the workpiece.
Using this approach, it is possible to remove a quarter along the edge or in some of its parts. This is done by setting the cutting edge so that it extends to the required depth into the part.
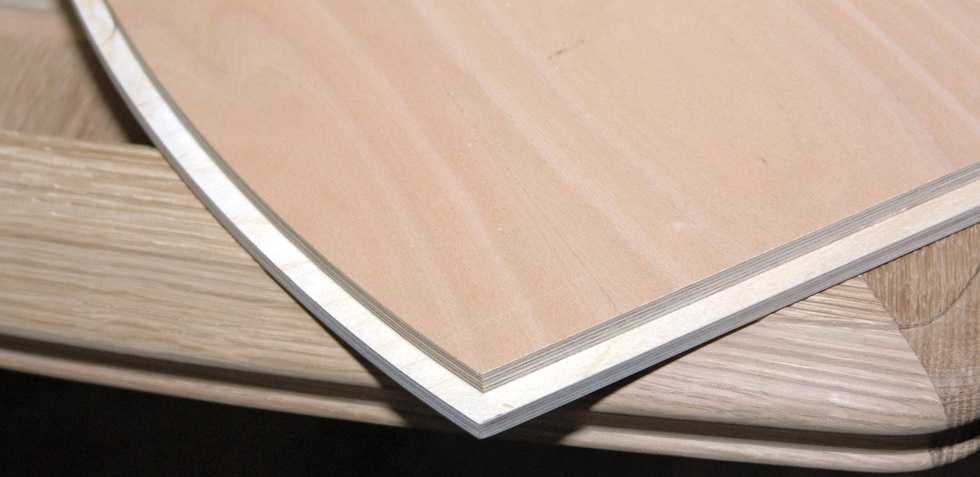 Quarter shot on a furniture façade.
 If you replace the cutter with a shaped one and move the guide, as well as use a stop, you can actually apply a longitudinal pattern to the part (pictured below).
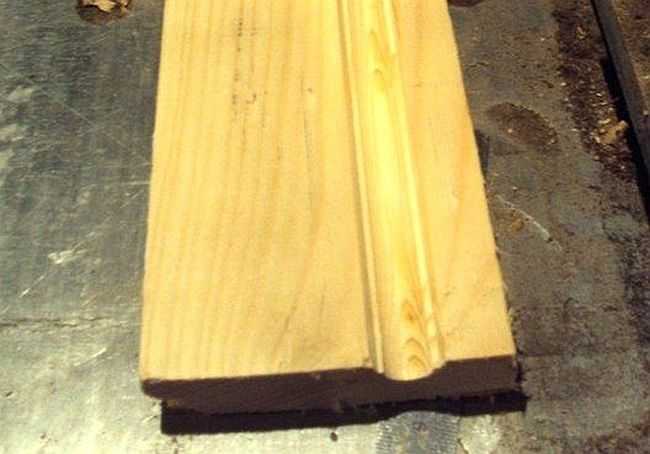 Applying a longitudinal figured pattern to the workpiece.
 If you use a similar milling technique (with a template), you can easily master the technique of working with wood in general. After some time, you can abandon the templates, since their installation takes a lot of useful time.
 How to make a straight edge without a template: you can’t do this without experience.
 The width of the part is greater than the length of the cutting part
Quite often, the thickness of the workpiece is greater than the length of the cutting part of the cutter. In this case proceed as follows:
- After the first pass, the template is removed and another pass is made. In this case, the template will be the already processed part. To do this, the bearing is guided along the machined surface. If the cutting part was again missing, then another pass will have to be made.
- For final processing, you should take a cutter with a bearing at the end, and the workpiece should be turned upside down, after which it is secured with clamps. As a result, the bearing will move along the machined surface. This approach makes it possible to process thick parts.
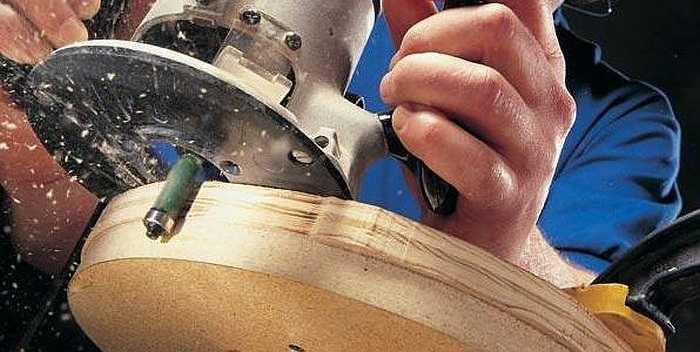 The bearing is guided along the machined surface, and the cutting edge processes the rest of the workpiece.
 In order to master the work of a hand milling tool, you will need a lot of rough blanks, which you don’t mind throwing away later. No one succeeded the first time. To achieve anything, you need to train hard.
Achieving Various Shaped Edges
If a figured edge is required, which is most likely necessary, then first pay attention to the condition of this edge. If it is uneven, then you will have to level it and only then begin to form a curved edge by selecting the appropriate cutter.
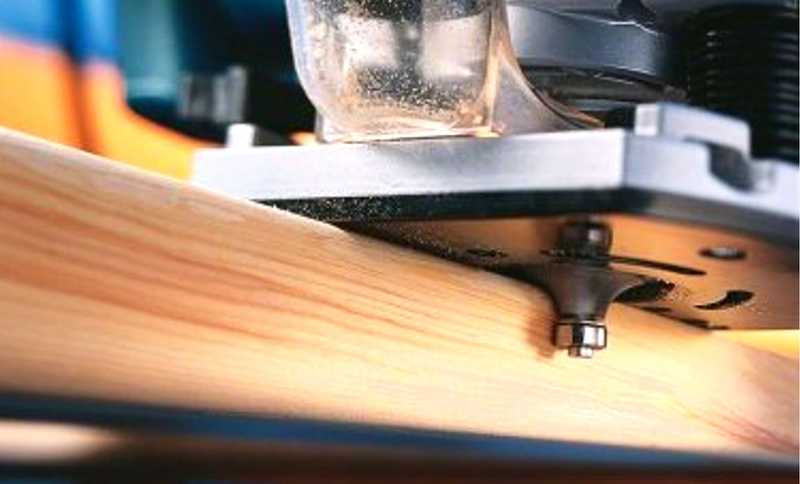 Rounded edge.
 It is necessary to prepare the surface so that the cutter does not copy the curvature along which the roller will move. In this case, a sequence of actions is needed, otherwise a positive result will not work.

