Step-by-step instructions for installing Windows XP from a flash drive to a netbook. Instructions for creating a bootable USB flash drive for Windows Windows 7 bootable USB flash drive for a netbook
Cast aside doubts, believe in your abilities, making a bootable USB flash drive for Windows 7, 8.1 or 10 is as easy as shelling pears, and you will definitely be convinced of this. There are several ways to create a bootable flash drive from iso, using different programs - simple and smart, humpbacked and crooked, which one to choose is up to you.
In this article I will try to show you a fairly simple method with 100% efficiency. Whether you like it or not, soon the world of optical drives will sink into oblivion and will never return; everyone without exception will have to learn how to create a bootable flash drive, and in my opinion it is better to do this before than after the OS crash. The thousand-times proven program for a bootable flash drive, Rufus USB, will help you realize your need.
How to make a bootable USB flash drive for Windows 7-8.1 correctly - detailed instructions.
So, correctly creating a bootable USB flash drive 7, 8.1 will require the following from you. Flash drive with a capacity from 4GB to 8GB (depending on the size of the iso image). Next you will need a good ISO image operating system, and note - not a shmurdyak reassembled by someone unknown, with a set of outdated programs, but a 100% working official Windows version 7 or 8.1 (whatever you like). It is this image that will save you from surprises, ensure error-free operation and updating of DirectX, drivers, etc., and allow you to make a high-quality bootable USB flash drive for 7, 8.1.
For those who have problems with the Windows iso image - the disk is scratched, the DVD drive is broken, is missing from the laptop initially, too lazy to create an image, etc., I suggest using the largest Russian-language torrent tracker and filling this gap. The Win 7 and Win 8.1 images are based on official Microsoft releases, with the addition of a small useful feature - for example, the Win 7 image contains all 32-bit and 64-bit versions from Starter to Ultimate, which, you see, is very convenient.
The second thing we really need is a program for creating a bootable Rufus flash drive. No installation required, just download and run. To avoid any surprises, the name of the folder with the program, the folder with the image and the path to them should not contain Russian letters; use the Latin alphabet - English.
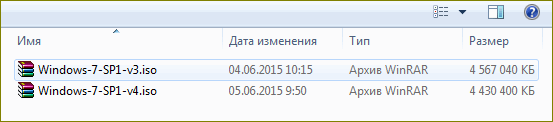
Next to the Rufus program folder, create another one with the intuitive name Windows-7 or Win-8. Open the file manager Total Commander(if you don’t know what this is, it’s time to learn how to operate files correctly) or an archiver WinRAR– unpack the archive with the program, transfer the Windows image from the downloads folder to the created folders.
It remains to voice the last cautionary phase - transferring and saving important information for you from a USB Flash drive to HDD. The first step in the process of creating a bootable Windows 7 USB flash drive will be formatting - cleaning and repartitioning the media.
Step one. We turn our attention to the desktop, double-click on the “Computer” shortcut, and right-click on the flash drive shortcut. In the menu that opens, left-click on “format”, then what to select and where to click is shown in the picture. We are waiting for completion, the preparatory process is complete, we are 100% ready to make a bootable Windows 7 USB flash drive correctly and the first time.
1. Open the folder with the Rufus program - launch it, in the program window that opens, find “Device” and point to the flash drive, if it is not picked up automatically.

2. The next item is “Partition scheme”, select “MBR for computers with BIOS or UEFI”. If you need to install an operating system on a hard drive with a capacity of more than 2000GB, use “GPT for computers with UEFI”.
3. “File system” - FAT32 can be used with images smaller than 4GB, images larger than 4GB require the use of the file system - NTFS.
4. We leave this item unchanged, the default “Cluster size” is 4096 bytes.
5. “ISO image” - click on the optical drive icon, select the ISO image of the required system in Explorer.
6. Raise your gaze a little higher, set a name that is clear to you for the “new volume label” - in English letters, Win-7 - for example.
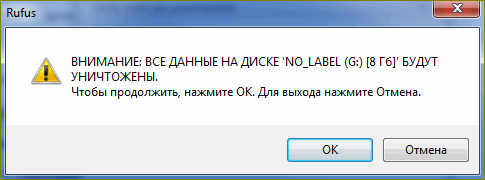
7. We check the correctness of the choice and the next action is to command Rufus to make a bootable flash drive 7, press the “Start” button. The program will issue a warning in Russian, click “OK” and leave the computer alone.
We take our playful hands and carry them to the kitchen, by force of will we force them to pour tea or coffee - we slowly enjoy the drink. This is a simple precaution; by not doing so, you will ensure the continuous creation of a bootable Windows flash drive; you will not be able to cause an error, overload the processor, stupefy the file subsystem, etc.
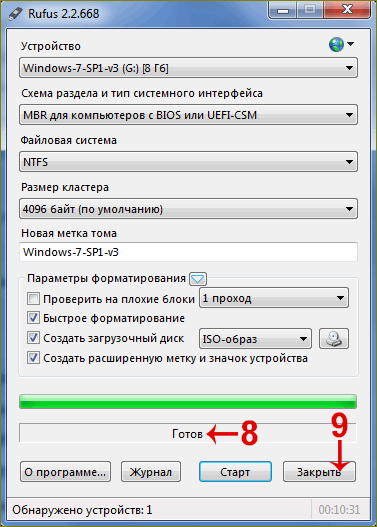
Depending on the speed characteristics of your PC, after 5-15 minutes you will see the inscription - 8 “Ready” - the bootable flash drive has been created, press nine - “Close”.
That’s actually the whole science, how to make an image of a bootable flash drive - you now know. As you can see, nothing extremely complicated or impossible, the main thing in this matter is to maintain a sequence of actions and you will definitely succeed.
How to make a flash drive bootable inBIOS.
To successfully install Windows from a flash drive, there is only one question left to answer - how to make a flash drive a boot disk in the BIOS? The question is important, because starting the installation differs from your usual order with a DVD disc, which leads to a common error and a surprised look.
For those who missed it, let me remind you that in the process of creating a flash drive, we selected the USB-HDD option. The bootable flash drive is recognized exactly as we called it, so look for the usual DVD activation in the BIOS section - First Boot Device- No need.
We place the installation flash drive in a free USB 2.0 connector, wait until the PC picks it up, and then reboot. During the system boot process, press Delete or F2 and enter the BIOS. Depending on the BIOS version, the name of the required Boot sector may differ, but the principle of operation will be the same. Open "Advanced BIOS Features".
Next, click on the “BootSeq & FloppySetup” section, find “Hard Disk Boot Priority”, go in and see the list of drives installed in your PC. Your bootable flash drive should be in the last place of honor - this is what needs to be corrected. To make a flash drive a boot disk, we need to move it to the top of the list - using the keyboard arrows (up and down), select the flash drive. Next, use the “+” keys and press until the installation flash drive becomes the first in the list. We complete the manipulations in the BIOS by pressing the “F10” (save) button.
In order to make the flash drive bootable in BIOS - UEFI, we find the same Boot sector – Loading, “Fixed Boot Order” opens before us and a sea of “Boot Option” under it - this is setting the system boot sequence. We look at “Boot Option #1” - as a rule, the hard drive or SSD is located there, the system queries it first and the operating system starts loading from there. Click on “Boot Option #1”, find and select the inscription “USB Key:” with the name of your flash drive.
Press “F10” - the installation of Windows 7 from the flash drive has begun, then we wait for the first reboot, go into the BIOS, return the hard drive to first place, and save. After the reboot, the installation will continue, if you missed this moment - refuse to install again, the PC will start to reboot, go to the BIOS - return the HDD to its place.
How to make the image of a bootable flash drive active in the BIOS - and now you know this. The likelihood that you won’t succeed is practically zero - and these are not just words - this has already been proven by more than tens of thousands of users. A little attention plus a sequence of actions - nothing more is required from you. No. 2 - .
Before installing the OS, I advise you to take a look at - I’m sure you will find something interesting for yourself. Well, after successfully installing the operating system, do not forget to tell your friends how to make a bootable Windows 7 USB flash drive correctly - it will be useful for everyone. Good luck!
Best wishes
Denker.
If you have a disk with an operating Windows system 7, you can create an ISO image of such a disc using programs such as UltraISO or Nero. You can also download a ready-made image of Windows 7 from the Internet, for example, from the Microsoft website.
To create a bootable USB flash drive for Windows 7, you will need a USB drive with a capacity of at least 4 GB. The flash drive should be formatted, and it is desirable that after formatting the flash drive has the NTFS file system.
Installing Windows 7 USB/DVD Download Tool
This official program from the developer of Windows 7 - Microsoft - allows you to quickly create bootable USB devices. You can download this program from the Microsoft website. To install the program, follow the installation assistant instructions. After running the program, in the Source file line, specify the path to the Windows 7 ISO image, click Next. The next step is to specify the type of media on which the system image will be written (USB) in the lower right corner of the program window. In the window that appears, select the required USB drive and click the Begin copying button. The program will issue a warning that all data on the media will be permanently deleted. Click Erase USB Device, after which the program will ask again about your intention to delete all files from the media being used, select “Yes”. As a result, the program will proceed to the process of copying the operating system image to a USB drive. Wait until the copying process completes. Until the program reports that the system image has been successfully copied to the flash drive, do not turn off the computer’s power and do not remove the USB drive.
Using a ready-made bootable USB flash drive
Modern netbooks in most cases do not treat USB devices as the primary boot device. In this regard, it is necessary to configure the BIOS of the netbook on which Windows 7 will be installed from a flash drive. To do this, turn on or restart the netbook and press the DEL or F2 key when starting the BIOS (the required key may differ depending on the BIOS manufacturer). When you press the required key, the main BIOS window will load. Go to the Boot tab, select the Hard Disk Drives line and press Enter. In the window that opens, highlight the line 1st Drive, press Enter and select a USB drive from the list. Press Esc to go back to the Boot window and go to the Boot Device Priority section. Here you should also specify the USB drive in the 1st Boot Device line. Save the BIOS settings and click Exit.
In this article we will demonstrate a solution to the difficulties that are usually encountered when installing Windows 7 (or other operating systems) on a netbook. For example, we took the ASUS Eee PC 1015pe netbook.
The main advantage of a netbook is its compactness and lightness. This is achieved thanks to the small screen size and lack of CD/DVD drive. The latter fact, in fact, makes it impossible to install the operating system in the usual way from the installation disk. However, fortunately, there are other means.
Creating a Windows 7 installation USB-Flash drive
Let's first of all take a point-by-point look at what we need to create a bootable/installation flash drive:
- USB flash drive
- Windows 7 x86/x64 installation disk or its ISO image
- WinSetupFromUSB 1.0 program
- Second computer or laptop
WITH USB flash drive, we hope everything is clear. If your netbook supports booting from SD cards, - you can write the Windows installer onto it. In our example, we used a USB flash drive.
It is better to have the original installation disk/image, i.e. DO NOT ASSEMBLE. You can easily find the original MSDN on the Internet Windows images. They are perfectly “treated”, and you can always find out exactly how on the Internet. PLEASE NOTE that before downloading the image, check processor capacity Your laptop. ASUS Eee PC, for example, is built on the basis 32-bit processor Intel Atom™ N550. For such processors, the name of the installation image must contain the label x86. For 64-bit processors - x64.
We will also definitely need a special program that will turn our flash drive or SD card into a bootable and installation one. In our example we used WinSetupFromUSB 1.0- the most optimal program in all respects.
And finally, we will definitely need a second computer in order to properly prepare the flash drive. We will perform all the actions described in the next section on it.
Step-by-step instructions for creating a bootable USB flash drive
Download the application, unpack it to any folder and run.
At the top of the window, click on the button "RMPrepUSB". In the window that opens, in the “3 BOOT OPTIONS” field, select the first item (as in the picture), in the “4 FILESYSTEM and OVERRIDES” field, specify the system NTFS, then click on the button Prepare Drive and wait until the procedure is completed.


After the flash drive has been prepared by the previous procedure, close the window RMPrepUSB. In the main program window in the field "Add to USB Disk" select line "Vista/7/Server 2008...". Next, paste Windows 7 installation disk into a computer drive or mount his image to virtual drive (). In the WinSetupFromUSB program window, in the line you select, specify the path to the installation files. In our example, we mounted a disk image onto a virtual DVD drive (disk G: in the screenshot).

Click on the button "GO" and wait until the files are copied.

After everything is ready, the following will appear on the flash drive: Windows installation files 7. Everything, ours installation flash drive and ready!

Booting from the installation USB-Flash drive on a netbook
The next important step is to boot correctly from the installation flash drive. By default, a netbook boots from the internal HDD. You can change this option in BIOS.
Before starting your netbook, make sure that flash drive inserted into USB port. Turn on the computer and at boot time click on the BIOS launch button. When loading you will see the following message: "Tap (key) for Setup" or “Press (key) to enter BIOS”. On ASUS laptops this is the key F2. On other netbooks, the BIOS can be launched using keys F10, Delete and etc.
So, in the BIOS we need a section "Boot"(loading). In the ASUS Eee PC BIOS, first of all, you need to set the boot order from storage devices (priorities for internal-external hard drives, flash drives, SD cards, etc.). Click on the option "Hard Disk Drives" and in the window that opens, first indicate your Flash card.


Return to the main window and on the tab "EXIT" select option "Save Changes & Exit"(“Save changes and exit”).
The next time you turn on the netbook, it will boot from our installation flash drive. You will see this window:
 This is the so-called bootloader, installed by the program WinSetupFromUSB to our flash drive. Select an item “Start Vista/Win7/Server 2008 Setup Or PE/Recovery ISO from partition...” and press ENTER.
Finally, you will see the long-awaited Windows installation window.

Conclusion
You can intuitively understand how to proceed next by following the prompts on the screen. However, let me remind you of one important detail. After all installation files have been copied, the computer will restart. Don't forget to remove the flash drive, otherwise the computer will boot from it again and you will again see the initial Windows installation window. If this does happen, don’t be alarmed. Just remove the flash drive from USB port and reboot your netbook. Windows installation will continue on its own.
As always, we hope that our article helped you. We are waiting for likes, reviews and comments!
Since almost no one uses CDs and DVDs these days, it is logical that it is best to burn the Windows image for further installation onto a USB drive. This approach is indeed much more convenient, because the flash drive itself is much smaller and is very convenient to store in your pocket. Therefore, we will analyze all the most efficient methods for creating bootable media for further installation of Windows.
For reference: creating bootable media means that an operating system image is written to it. From this very drive, the OS is subsequently installed on the computer. Previously, when reinstalling the system, we inserted a disk into the computer and installed it from it. Now you can use a regular USB drive for this.
To do this, you can use a proprietary software Microsoft, the already installed operating system or other programs. In any case, the creation process is not difficult at all. Even a novice user can cope with it.
All the methods described below assume that you already have a downloaded ISO image of the operating system on your computer, which you will write to a flash drive. So, if you haven't downloaded the OS yet, do so. You must also have suitable removable media. Its volume should be sufficient to accommodate the image you downloaded. At the same time, some files may still be stored on the drive; it is not necessary to delete them. All the same, during the recording process, all information will be irretrievably erased.
Method 1: Use UltraISO
There is a detailed description of this program on our website, so we will not describe how to use it. There is also a link where you can download it. To create a bootable USB flash drive using Ultra ISO, do the following:

If any problems or errors appear during recording, most likely the problem is in a damaged image. But if you downloaded the program from the official website, no difficulties should arise.
Method 2: Rufus
Another very convenient program that allows you to very quickly create bootable media. To use it, follow these steps:

It is worth saying that Rufus has other settings and recording options, but they can be left as they are originally. If you wish, you can check the box "Check for bad blocks" and indicate the number of passes. Thanks to this, after recording, the installation flash drive will be checked for damaged parts. If any are detected, the system will automatically correct them.
If you understand what MBR and GPT are, you can also indicate this feature of the future image under the inscription “Partition scheme and system interface type”. But doing all this is completely optional.
Method 3: Windows USB/DVD Download Tool
After the release of Windows 7, developers from Microsoft decided to create a special tool that allows you to make a bootable USB flash drive with an image of this operating system. This is how a program called . Over time, management decided that this utility could well provide recording for other operating systems. Today, this utility allows you to record Windows 7, Vista and XP. Therefore, for those who want to make media with Linux or another system other than Windows, this tool is not suitable.
To use it, follow these steps:

Method 4: Windows Installation Media Creation Tool
Microsoft specialists have also created a special tool that allows you to install on a computer or create a bootable USB flash drive with Windows 7, 8 and 10. The Windows Installation Media Creation Tool is most convenient for those who decide to record an image of one of these systems. To use the program, do the following:

In the same tool, but for Windows 10, this process will look slightly different. First, check the box next to the inscription "Create installation media for another computer". Click "Further".
But then everything is exactly the same as in the Windows Installation Media Creation Tool for version 8.1. As for the seventh version, the process there is no different from that shown above for 8.1.
Method 5: UNetbootin
This tool is intended for those who need to create a bootable Linux USB flash drive from Windows. To use it, do this:

Method 6: Universal USB Installer
Universal USB Installer allows you to burn images of Windows, Linux and other operating systems to drives. But it is best to use this tool for Ubuntu and other similar operating systems. To use this program, do the following:

To create a bootable flash drive, we will use programs from both a third-party manufacturer and the built-in Windows command interpreter. Each method is different and has its own specifics, but I think that a simple end user will be able to cope with creating a bootable flash drive using any of the proposed methods:
- how to make a bootable USB flash drive using command line
- how to make a bootable USB flash drive using UltraISO
- how to make a bootable USB flash drive using Windows programs 7 USB/DVD Download Tool
If you are interested in information about creating a bootable USB flash drive for the Linux operating system family, then you can read the information at this link “bootable USB flash drive for Linux”.
So, I propose to start creating a bootable flash drive in order, as defined in the above list, accordingly we proceed to the first method.
BOOT FLASH DRIVE using the command line (method I)
Next, we will use only those commands that we need when creating a bootable flash drive. Therefore, the figure below shows the sequential entry of commands to create a bootable USB flash drive. And please pay attention to the fact that the commands you enter are indicated by a red underline!
Graphical representation of command input on the command line
Now let's describe the previously entered commands:
DISKPART- launch the program, a text-mode command interpreter that allows you to manage objects (disks, partitions or volumes) using scripts or directly entering commands from the command line.
list disk- display a list of disk drives connected to a personal computer.
select disk 1- select disk number “1”, since in our case it is a removable flash drive.
clean- clears all data from removable media - flash drive.
create partition primary- create a primary partition.
select partition 1- select the created section.
active- make the section active.
format fs=NTFS- format the flash drive in the NTFS file system.
assign letter=T- if necessary, you can assign a letter for the flash drive in this way.
Exit- exit the DISKPART program.
BOOTABLE FLASH DRIVE CREATED!
NOTE: Once you have created a bootable USB flash drive, you need to transfer the operating system files to this removable media. Files must be transferred in unpacked form, do not under any circumstances simply add an operating system image, for example one *.ISO file, it WILL NOT WORK!!!
You can see the complete list of Diskpart program commands in the following table:
Table of commands of the "DISKPART" program
| TEAM | EXPLANATION |
| ACTIVE | - Mark the selected section as active. |
| ADD | - Adding a mirror to a simple volume. |
| ASSIGN | - Assign a name or mount point to the selected volume. |
| ATTRIBUTES | - Working with volume or disk attributes. |
| ATTACH | - Attaches a virtual disk file. |
| AUTOMOUNT | - Enable or disable automatic mounting of basic volumes. |
| BREAK | - Splitting the mirror set. |
| CLEAN | - Clear configuration information or all data on the disk. |
| COMPACT | - Attempts to reduce the physical size of the file. |
| CONVERT | - Convert disk formats. |
| CREATE | - Create a volume, partition or virtual disk. |
| DELETE | - Delete an object. |
| DETAIL | - View object parameters. |
| DETACH | - Detaches the virtual disk file. |
| EXIT | - Shutdown DiskPart. |
| EXTEND | - Expand volume. |
| EXPAND | - Increasing the maximum available space on the virtual disk. |
| FILESYSTEMS | - Display current and supported file systems for volume. |
| FORMAT | - Formatting a given volume or partition. |
| GPT | - Assigning attributes to the selected GPT partition. |
| HELP | - Display a list of commands. |
| IMPORT | - Import a disk group. |
| INACTIVE | - Marking the selected section as inactive. |
| LIST | - Display a list of objects. |
| MERGE | - Merging a child disk with its parents. |
| ONLINE | - Transferring an object marked as "offline" to the "online" state. |
| OFFLINE | - Transferring an object marked as “online” to the “offline” state. |
| RECOVER | - Update the status of all disks of the selected package. Attempting to rebuild disks of the wrong package and resynchronizing mirrored and RAID5 volumes with outdated plex or parity data. |
| R.E.M. | - Does not perform any actions. Used to comment scripts. |
| REMOVE | - Deleting a drive name or mount point. |
| REPAIR | - Recovering a RAID-5 volume with a failed member. |
| RESCAN | - Search for disks and volumes on your computer. |
| RETAIN | - Placing a service partition on a simple volume. |
| SAN | - Display or set the SAN policy for the currently loaded OS. |
| SELECT | - Setting focus on an object. |
| SETID | - Changing the partition type. |
| SHRINK | - Reduce the size of the selected volume. |
| UNIQUEID | - Display or set the GUID Partition Table (GPT) code or Master Boot Record (MBR) signature of the disk. |
BOOT FLASH DRIVE using the UltraISO program (II method)
The UltraISO program is designed for creating and editing disk images. When creating a bootable flash drive, we will use the built-in functions of this program.
Open the program with administrator rights, as shown in the figure:


Select the required operating system image to create a bootable flash drive, for example, the image is selected here Windows disk Vista:


A pop-up window appears where you need to make sure that the removable media, the image file to be recorded and the recording method are correctly specified (it must be set in USB-HDD+ mode) and click the “burn” button

After clicking the "Write" button, a "Hint" window will appear, prompting you to erase all information on the flash drive. Agree!

Then the data will be written to the flash drive...

And finally, after a certain time, the operating system image will be written to a newly created bootable USB flash drive for future installation.

BOOTABLE FLASH DRIVE IS MADE!
NOTE: Do not forget to set the BIOS input/output system to boot the primary device, that is, make sure that the computer boots from removable media - the bootable flash drive you created.
BOOT FLASH DRIVE using Windows7 USB/DVD Download Tool (III method)
The Windows7 USB/DVD Download Tool program created by Microsoft for burning operating system disk images to optical and removable media. When creating a bootable flash drive, we will sequentially follow all the instructions of the program.
First you need to download this program from the official Microsoft website. Then you need to install the program following the installer's instructions. After installing the program, a shortcut will appear on the desktop, as shown in the figure:
Run it with "Administrator rights", right-click on the shortcut and click on the line "Run as administrator". The program will start, click the "Browse" button and select the operating system image *.ISO

After you have selected the image of the system to be recorded, click “Next”, another window will appear where you will be asked to select the type of media - optical or removable. Since we have a removable storage device - a flash drive, select "USB device"

We select our removable media from the proposed list, i.e. flash drive and press the "Begin copying" button

After clicking the above button, the process of formatting the flash drive will begin...

After some time, the process of writing the disk image data to the flash drive will continue.

We wait some time for the image to be recorded, and eventually we will get 100%, and here we are The bootable flash drive is created!
NOTE: Do not forget to set the BIOS input/output system to boot the primary device, that is, make sure that the computer boots from removable media - the bootable flash drive you created.

