DIY mine detector at home. How to make a metal detector: a detailed description of the assembly
We will send the material to you by e-mail
You simply won't believe how many treasures lie literally under our feet. It is clear that we do not even suspect the presence of treasure until it responds with a squeak in the metal detector. Archaeologists, geological prospectors, prospectors and builders cannot imagine working without this tool. A professional tool is expensive, so if treasure hunting is a hobby for you, you will certainly think about how to make a metal detector with your own hands. Today the editors of the site offer to study some life hacks, working diagrams and proven instructions for making this device. It is not as difficult as it seems, and even if you are a beginner radio amateur, you will cope with the task without much effort.
Treasure hunting is a fascinating hobby that requires knowledge not only in history, but also in technology and electronics.
The operating principle of the device is based on the laws of physics, which make it possible to recognize objects at a distance. The action is directed and limited. The more expensive the metal detector, the greater the radius of its operation and the sensitivity of the detector. Complex models have a metal recognition function. Each type of metal interacts in its own way with the frequency of the search circuit, and the device compares the reaction with the standard and displays information for the operator on the display or sounds a sound signal.
In another popular design, the device analyzes the phase shift in the transmitting and receiving coils. When there are no metals in the detector's coverage area, the coil transmits a signal with a small amplitude. As you approach the search object, the amplitude increases. Thus, you can distinguish between non-ferrous and ferrous metals and detect voids in the ground. The structure of the metal detector is shown in the following diagram.
Parameters of metal detectors depending on purpose and technical device
Metal detectors for amateurs are the simplest dynamic type devices. The search head of the device must constantly move; this is the only way the desired signal can appear. If you stop moving, the signal will disappear. Such simple detectors are convenient because they do not require complex settings and allow you to exclude medium soils. Disadvantages include its low sensitivity and frequent false alarms in difficult areas.

Mid-range devices have better sensitivity. In the factory configuration, this device comes with several search heads of different sizes. Setting up the detector will require certain skills. Mid-range metal detectors are capable of recognizing metals.
Computerized devices are already professional instruments with a liquid crystal screen and pointer indication. The memory of its processor is loaded with programs capable of recognizing and distinguishing a signal and classifying each detected object. Professionals independently program devices for search conditions, eliminating unwanted triggers.
Gold detecting tools work not only on coins and jewelry in the ground, but also on native metal. It is not suitable for searching for small particles such as sand. It does not recognize them, especially if the soil is highly mineralized.

Depth detectors are designed to search for objects located at impressive depths. They can detect metal at a depth of up to 6 meters, while other models “pierce” only up to 3. Such devices recognize voids and other internal soil anomalies. Depth detectors operate on two coils, one is parallel to the ground surface, the other is perpendicular.
Stationary detectors are frames installed at particularly important protected sites. They detect any metal objects in people's bags and pockets that pass through the circuit.
What types of metal detectors can you make at home with your own hands?
Detectors are divided into 5 main types based on the principle of detecting the desired object.
Let's look at which metal detectors are suitable for making with your own hands at home:
| Type | Peculiarities | Is it suitable for making it yourself? |
|---|---|---|
| Reception and transmission | Works with two induction coils. In the absence of the desired object, the signal does not pass into the receiving coil. | Yes |
| Induction | Combines the functions of both coils. The signal is constant, changing when detecting the metal. | No, as a rule, difficulties arise in isolating the effective signal. |
| Based on frequency meter | The design of the device includes an LC generator that changes the frequency when metal objects are detected. Has low sensitivity. | Yes |
| With Q meter | Has an LC generator signal analyzer. Does not work well at low temperatures. | Yes |
| Pulse | Based on the transmission of eddy pulse currents. The signal changes its character depending on the type of metal detected. | Yes |
And now more about how to make a simple metal detector with your own hands using the example of the “Pirate” design.
Homemade metal detector “Pirate”: diagram and detailed description of the assembly
If you are just thinking about how to make a homemade metal detector, do not try to take on complex models. Start with a simple but effective "Pirate". The name was invented by the author of the homemade product from a combination of Pi (pulse) and Ra-t (radioscope). The name stuck, and the simple and clear assembly scheme was so loved by users that “Pirate” became one of the most popular homemade products in this area. Currently, there are already 4 modifications of the “Pirate” scheme. The metal detector is simply assembled with your own hands, without using any specific tools.
The only drawback of this device is that the DIY metal detector does not have a scheme for working with metal discrimination. But for a novice treasure hunter this is unimportant.

Parts for assembling a metal detector
To make the device you will need to purchase:
- ceramic capacitor - 1 nF;
- 2 film capacitors - 100 nF;
- electrolytic capacitors: 10 μF (16 V) – 2 pieces, 2200 μF (16 V) – 1 piece, 1 μF (16 V) – 2 pieces, 220 μF (16 V) – 1 piece;
- resistors - 7 pieces per 1; 1.6; 47; 62; 100; 120; 470 kOhm and 6 pieces for 10, 100, 150, 220, 470, 390 Ohm, 2 pieces for 2 Ohm;
- variable resistors - 3 pieces for 10 and 100 kOhm, 400 Ohm (1W);
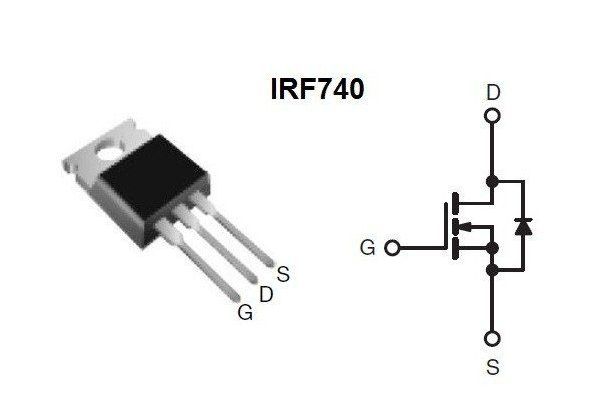
- transistors – 3 pieces, VS557, IRF740, VS547;
- 2 diodes 1N148;
- 2 microcircuits: K157UD2 and NE555.

You will also need a plastic pipe for the rod, 9V batteries or accumulators and a PEV wire with a diameter of 0.8 mm.
For your information! Many people are interested in how to make a metal detector from a phone with their own hands. Some developers even offer programs that can be downloaded to your phone and used for this purpose. Serious radio enthusiasts can only advise you to use some spare parts - for example, a headphone input or a battery, perhaps a board to create a microcircuit.
DIY metal detector circuits
The simplest “Pirate” scheme looks like this.

The board can be placed in the body of a pocket receiver or any conveniently sized plastic box; even simple junction boxes from an electrician’s arsenal are suitable.
Important point! To get rid of possible interference when touching the device regulators, all variable resistor housings are connected to the negative side of the board.
If you want to take your experiments further, here is a diagram for making a gold-oriented metal detector.

If you assembled the circuit correctly, the device will work properly. Possible problems with the microcircuit.
How to assemble a metal detector circuit board with your own hands
The metal detector circuit board circuit is quite simple. Conventionally, it can be divided into several blocks:
- search coil assembly;
- transistor sound amplifier;
- pulse generator;
- two-channel amplifier.
This is what it looks like.

The pulse generator is assembled on the NE555 timer. By selecting C1 and 2 and R2 and 3, the frequency is adjusted. The pulses obtained as a result of scanning are transmitted to transistor T1, and it transmits the signal to transistor T2. The audio frequency is amplified using the BC547 transistor to the collector, and headphones are connected.
For your information! You can make a metal detector with your own hands without microcircuits. On the Internet you will find many analog circuits using transistor oscillators. Such devices will detect metal at a depth of up to 20 centimeters in the ground and up to 30 centimeters in loose sand.
How to make a metal detector coil with your own hands
The coil is an important part of the device. It can be made from copper wire or twisted pair. More details in our master class.
Copper wire spool
| Illustration | Description of action |
|---|---|
 | Copper wire with a diameter of 0.5 mm is suitable for the coil. |
 | For winding, prepare a board with guides. The distance between the guides should be equal to the diameter of the base on which you will mount the reel. |
 | Wind the wire around the perimeter of the fastenings in 20-30 turns. |
 | Secure the winding with electrical tape in several places. |
 | Remove the winding from the base and give it a round shape. |
 | Choose a base that will hold its shape. This could be a plastic bucket lid or a wooden craft hoop. |
 | Connect the circuit to the device and test its operation. |
 | When assembled, a coil of wire may look like this. |
 | To test the operation of the device, pass metal objects over the coil at different heights. |
Twisted pair coil
| Illustration | Description of action |
|---|---|
 | Roll the wire into two coils as shown in the photo, leaving two ends of about 10 centimeters each. |
 | Strip the winding and free the wires for connection. |
 | Connect the wires as shown in the diagram. |
 | For better contact, solder the ends of the wires. |
 | Test the coil in the same manner as a copper wire coil. |
Advice! If you want to make a more powerful DIY coil for your metal detector, give it an elliptical shape.
Detailed instructions for setting up a DIY metal detector “Pirate”
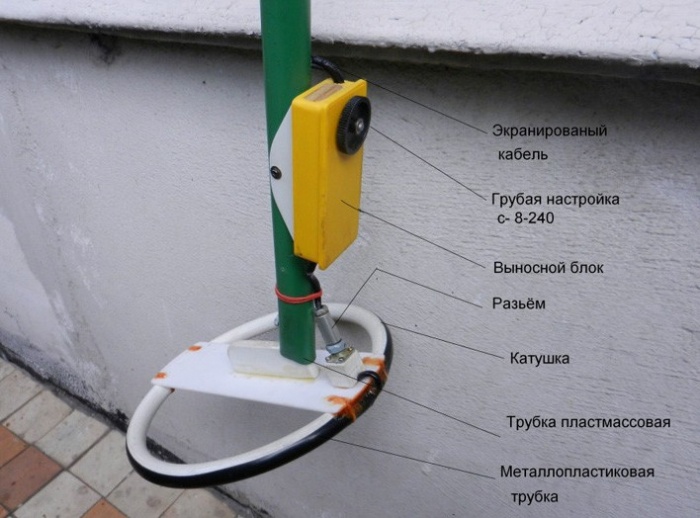
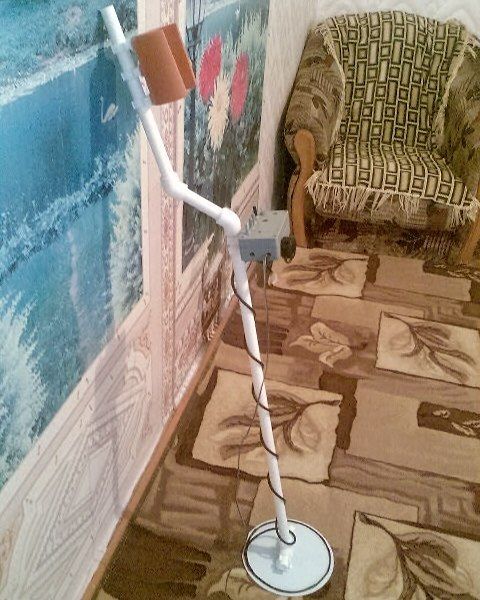
For final assembly of the device you will need a plastic pipe. The assembly diagram is simple. The sensitivity of the detector is adjusted using potentiometers. Achieve the result so that it recognizes a coin from a distance of 30 centimeters. He can “hear” large metal deposits a meter to one and a half meters away. “Pirate” does not recognize non-ferrous or ferrous metals underneath you, so you just have to dig, and it is possible that you will stumble upon an old trough, and not the desired treasure. But in this case, you can take it not by quality, but by quantity, because any metal can be taken to a recycling collection point.

What the assembled “Pirate” will look like is in the next video. It only remains to note that the construction kit for making this device can be purchased on the Internet. By the way, it comes with detailed instructions on how to make a metal detector yourself at home from kit parts.
Is it possible to make an underwater metal detector with your own hands?
Searching for underwater treasures is an exciting activity. The chances of finding something valuable are not that low, especially if you have some ideas of where to look. The “Pirate” we talked about can also cope with underwater searches. You just need to slightly modify it by making good insulation from moisture and replacing the sound alarm with an LED one. How it will work in this video.
A metal detector is an electronic device for searching and distinguishing metals, metal objects that can be hidden at different depths under a layer of sand, earth, in the walls of rooms and various structures.
Schematic diagrams of metal detectors made on transistors, microcircuits and microcontrollers are given. A factory-made metal detector is a fairly expensive device, so making a homemade metal detector yourself can save quite a bit of money.
The circuits of modern metal detectors can be built according to different operating principles; we list the most popular of them:
- Beat method (measuring changes in reference frequency);
- Induction balance at low frequencies;
- Induction balance on spaced coils;
- Pulse method.
Many novice radio amateurs and treasure hunters are wondering: how to make a metal detector yourself? It is advisable to start your acquaintance with assembling a simple metal detector circuit; this will allow you to understand the operation of such a device and gain first skills in searching for treasures and products made of multi-colored metals.
Now there is a fairly large selection of multimeters, at very different prices. Now the radio amateur can not be limited to the modest set of functions of the “legendary” M-838. For slightly more expensive, you can purchase a more modern device that is also capable of measuring the frequency of alternating current...
0 329 0
The metal detector is designed to detect a metal object (well cover, pipe section, hidden wiring). The metal detector consists of a parallel voltage stabilizer (transistors V1 V2) at a high frequency generator (about 100 kHz) on transistor V4, an RF vibration detector (V5) and...
13 5435 6
The metal detector allows you to detect any metal object at a distance of up to 20 cm. The detection range depends only on the area of the metal object. For those for whom this distance is not enough, for example treasure hunters, we can recommend increasing the size of the frame. This should also increase the detection depth. The schematic diagram of the metal detector is shown in the figure. The circuit is assembled using transistors operating in...
9 4988 1
Circuit diagram of a homemade beat metal detector, which is built on five microcircuits. Finds a 0.25mm coin at a depth of 5cm, a pistol at a depth of 10cm, and a metal helmet at 20cm. The schematic diagram of a beat metal detector is shown below. The circuit consists of the following components: a crystal oscillator, a measuring oscillator, a synchronous detector, a Schmidt trigger, an indication device...
11 5122 4
The circuit shown in the figure is a classic metal detector. The operation of the circuit is based on the principle of superheterodyne frequency conversion, which is usually used in a superheterodyne receiver. Schematic diagram of a metal detector with an integrated ULF; it uses two radio frequency generators, the frequencies of which are 5.5 MHz. The first radio frequency generator is assembled on a T1 transistor type BF494, frequency...
5 5118 2
This metal detector, despite the small number of parts and ease of manufacture, is quite sensitive. It can detect large metal objects, such as a heating battery, at a distance of up to 60 cm, while small ones, for example, a coin with a diameter of 25 mm, can be detected at a distance of 15 cm. The operating principle of the device is based on a change in frequency in the measuring generator under the influence of nearby metals and. ..
19 5048 0
A simple compact metal detector is needed to detect various metal objects (for example, pipes, wiring, nails, fittings) in walls under a layer of plaster. This device is completely autonomous, powered by a 9-volt Krona battery, consuming 4-5 mA from it. The metal detector has sufficient sensitivity to detect: pipes at a distance of 10-15 cm; wiring and nails at a distance of 5-10...
8 4915 0
Scheme of a small-sized, highly economical metal detector with good repeatability and high performance characteristics, using widely available and inexpensive parts. An analysis of most common circuits has shown that they are all powered from a source with a voltage of at least 9 V (that is, “Krona”), and this is both expensive and uneconomical. So, assembled on the K561LE5 chip...
18 5688 1
As a child, did you want to have a device that could be used to find metal objects and even treasure? Most children want to have such a unit. Fortunately, it exists. This is a conventional metal detector that allows you to detect various metals under a layer of soil and in other places. The principle is that it finds a material that differs in its magnetic or electrical properties from its environment. It is noteworthy that you can find not only metal objects and not only in the ground.
The metal detector is used by geologists, security services, the military, criminologists and construction workers. This is a very useful thing in the household. Is it possible to make a metal detector with your own hands? Yes, and this article will help you with this.
How does a metal detector work and what does it consist of?
In order to make such a device at home with your own hands, you need to understand the principle of its operation. How is it able to detect metal and signal it? It's all about electromagnetic induction. Metal detectors have their own circuit, consisting of:
- Transmitter of electromagnetic wave oscillations.
- Receiver.
- A special signal transmitting coil.
- Coil that receives the signal.
- Display devices.
- Discriminator (useful signal selection circuit).

Some operating units can be combined schematically and structurally. For example, both the receiver and the transmitter can operate on the same coil. Part of the receiver will immediately emit a positive signal and so on.
Now let’s take a closer look at the operating principle of the metal detector. Thanks to the coil, an EMF (electromagnetic field) of a certain structure begins to be created in the medium. In the case when an object that conducts electricity is within the range of this field, Foucault or eddy currents appear in it. They create the object’s own EMF. Now the original structure of the coil begins to become distorted. And when an object located in the ground does not conduct electricity, but has ferromagnetic properties, then due to shielding, the structure of the coil is also distorted. In both the first and second cases, the metal detector picks up the electromagnetic field from the object and converts it into a signal (acoustic or optical). You hear a certain sound and can see the signal on the screen.

Note! In general, for a metal detector to work, it is not necessary that the body conduct current; the ground does not. It is important that the magnetic and electrical properties of bodies differ.
This is how a metal detector system works. The principle is simple and effective. Now, let's take a closer look at how to make a metal detector with your own hands. The first thing you need is to prepare all the tools and materials.
Metal detector components
So, if you want to make a device, then you cannot do without special devices. This is still an electronic device that needs to be assembled from various components. What will be required? The set is as follows:
You can see other components in the diagram below.
Additionally, you will need a plastic box to mount the electronic circuit. Also prepare a plastic pipe to create a rod with a coil attached to it. Now you can get to work.
Assembling a metal detector with your own hands: creating a printed circuit board
The most difficult stage of work is the electronics. Everything here is subtle and complex. Therefore, it is rational to start with creating a working printed circuit board. There are only a few options for different boards. It all depends on the radioelements used to create it. There are boards operating on the NE555 chip and on transistors. Below you can see what these boards look like.
We assemble a metal detector with our own hands: installing electronic elements on the board
Further work will also not be easy. All electronic elements of the metal detector will have to be soldered and installed as shown in the diagram. In the photo you can see the capacitors. They are film-like and have high thermal stability. Due to them, the operation of the metal detector will be much more stable. This indicator is very useful, especially during the autumn period of using the device. After all, it gets quite cool outside then.
All that remains is to do the soldering. We will not describe the process itself, since the soldering technology should be known to everyone. To clearly understand how to perform all the work on the electronic part of the metal detector, we suggest that you additionally familiarize yourself with this video:
Assembling a metal detector with your own hands: power supply
In order for the device to receive current, you need to provide a power source of 9-12 V. It is worth noting that the metal detector consumes electricity quite voraciously. This is not surprising, since the device is quite powerful. If you think that one “Krona” (battery) will be enough, then this is not so. He won't work for long. You will need two or even three batteries connected in parallel. Alternatively, use one powerful battery. It will be cheaper since it can take a long time to discharge and charge.

Assembling a metal detector with your own hands: coil
Since we are making a pulsed metal detector, careful and precise assembly of the coil is not required. The normal diameter of the coil will be 19-20 cm. To do this, you will have to wind 25 turns. Once you have made the coil, wrap the top well with insulating tape. To increase the depth of detection of objects by the coil, wind the diameter of the send about 26-27 cm. In this case, you need to reduce the number of turns to 21-23. In this case, a wire Ø 0.5 mm is used.
Once you have wound the coil, you will need to mount it on the hard body of the metal detector. It is important that there is no metal on the body. Think and look for any case that will fit in size. The housing will perform a protective function. The coil will be protected from impacts on the ground during searches.
To make a tap from the coil, solder two wires Ø 0.5-0.75 mm to it. It is recommended to use 2 wires twisted together.
Assembling a metal detector with your own hands: setting up the device
When assembling a metal detector according to the diagram, you do not need to configure it. It already has maximum sensitivity. To fine-tune the metal detector, adjust the variable resistor R13 by twisting it slightly. Do this until you hear occasional clicks. In the case when this is achieved at the extreme position of the resistor, change the rating of the R12 device. Such a variable resistor should configure the metal detector to operate optimally in the middle position.
There is a special oscilloscope that allows you to measure the gate frequency of resistor T2. The pulse length should be 130-150 μs, and the optimal operating frequency should be 120-150 Hz.
To start the metal detector search process, you need to turn it on and wait about 20 seconds. Then it will stabilize. Now twist resistor R13 to adjust it. That's all, you can start your search using a simple metal detector.
Let's sum it up
Such detailed instructions will help you learn how to make a metal detector yourself. It is simple but fully capable of finding metal objects. More complex models of metal detectors require more effort and time.
Metal detectors or metal detectors are a diverse family of measuring instruments, the operation of which is based on differences in the electromagnetic radiation of objects.
Using a metal detector
Professional highly sensitive metal detectors are used in the daily work of various inspection points; they are used to conduct search and investigative activities of police and rescue services.

A huge army of amateur treasure hunters around the world practice long and leisurely hikes with metal detectors. Sometimes such entertainment brings income and even fame.

Nowadays, an industry of detector (recognition) devices has already been established for all occasions, differing not only in operating principles, but also in a wide range of prices and technical characteristics.
Simple magnetic detectors
The operating principle of the simplest metal detector is based on electromagnetic induction - the device contains an electromagnetic coil, which, due to oscillations and distortions of its field, detects nearby electrically conductive and iron-magnetic materials, creating an audio or visual signal.

The first experience of assembling a metal detector at home can be the beginning of a serious hobby: new design solutions and even inventions in this field of applied radio electronics are not excluded even at the amateur level.

The diagram shows the structure of a simple low-frequency magnetic detector.

Hundreds of different designs are used in the production of metal detectors. In order to implement one of them yourself, you will need to make a printed circuit board with your own hands, purchase the necessary coils, transistors, resistors, capacitors, etc., and assemble the device.

Metal detector made from improvised means
Another option is to assemble a metal detector from available materials; it is more suitable for humanists and novice technicians with a passion for finding treasures and lost artifacts.

During operation of such a homemade device, electromagnetic waves emitted by the calculator are caught on the AM band of the receiver.

An indicator of the location of an object in this device is the rotation of the electromagnetic field during re-emission, which changes the parameters of the sound signal. A photo of such a do-it-yourself metal detector can be found on the Internet and at the end of our material.

To use such a prefabricated version, you do not need a detailed diagram or assembly instructions, but compliance with certain requirements for the two main components of a homemade detector, namely a properly working calculator and a radio receiver.

Both devices must be from the cheapest category, the receiver must have an AM band and a magnetic antenna, and the calculator must emit pulsed radio interference during operation.

To work on the model, you will also need a suitable sized plastic box with an opening lid, like a book, which will become the body of the finder.

An old CD box is ideal for these purposes. To attach the parts you will need double-sided tape.

Metal detector assembly
- Securing the instruments inside the case: a strip of tape is attached to the back of the instruments, then the calculator is placed at the base of the box, the receiver is on the inside of the lid.
- Setting up the receiver: you need to turn on the receiver at maximum volume and select the upper position of the AM range, free from radio broadcasts and interference.
- Adjusting the calculator: when the calculator is turned on, the receiver should respond with a sharp noise, hum or wheezing; if this does not happen, you need to adjust the range.
- Fixing the position: we begin to smoothly close the box until the sound disappears or becomes more uniform and fix the box doors in this position, using a cube of foam plastic, rubber bands, etc.
- The metal detector is ready. If there is a product with electromagnetic radiation nearby, the receiver will sound an alarm.
By combining elements of other radio devices in a simple detector, you can observe the operating principle of metal detectors in action and enjoy your first search expedition.
Note!


Such a detector, assembled at home, can be tested to search for coins or metal construction debris lying in the surface layer of the earth in almost any area, on any open ground.

Photos of do-it-yourself metal detectors


Note!


Note!


There is probably no need to tell you what this electronic device is intended for. Everything is clear to everyone. These devices are used by sappers, at airports, in intelligence agencies, and in various institutions related to security in one way or another. But that is not all.
Metal detector in the 90s
These devices in the 90s of the twentieth century helped people not to die of hunger. During those difficult times, you could often see young people and others walking the streets with metal detectors. The device was used to search for metals and alloys. In particular, in cities near which large industries were located, it was possible to dig up real wealth with its help.
Basically, these guys made metal detectors with their own hands and looked for waste from metallurgical plants or native metals that remained in the bowels of the earth. The latter were used in the construction of routes. After all, many asphalt and dirt roads were covered with slag, and often in its composition one could find metal and an alloy of iron and manganese - ferromanganese. At the end of the 90s, it had already become quite expensive. In one day of such work on city and country roads one could earn as much as a factory worker earned in a week. Since many people were unemployed, this activity became especially popular. After all, this alloy is one of the components for creating steel of various grades at the same metallurgical plants.
Metal detectors today
Today, the topic of searching with the help of electronic devices is not so widely developed. However, these devices are still popular among certain groups of people. They wander through the places of former glory of valiant Soviet soldiers, trying to dig up something valuable from historical objects. For example, you can find coins from the time of the Patriotic War, German ones of course. And some people manage to dig up really valuable things. You just need to know where to look.
What can you really find?
Unless you pick up the device yourself and walk along the city roads or through memorable and historical places, you will hardly believe how many interesting objects the earth stores. And for this you should build a metal detector with your own hands.
Coins
Often you can dig them up. During the times of Ancient Rus', coins of the Arab East were used for trade. Then they used coins of Byzantine and Tatar production. Silver bullion is now found in the form of money.

Today in Crimea (and this is where well-preserved objects can be found) you can see people with these devices.
Crosses, icons, coils
Every self-respecting Christian wore a cross in Ancient Rus'. All crosses were different from each other, depending on the type and its purpose. You can often find so-called vests.
Buckles, buttons, various household items
This group of items is very numerous. Most of them have been used since the Bronze Age and are still used today. Often the objects were made of bronze, copper or iron.
Echoes of War
This is the most popular group of items that are searched for purposefully. They are especially popular among collectors. Enthusiasts are searching, getting them, and restoring them. Some end up in museums, some end up in your hands.
How to make a metal detector with your own hands
In the era of the popularity of ferromanganese and high prices for it, grimy young people did not shy away from digging in the ground to earn a little money. More often they purchased devices to search for their prey in numerous markets or from various specialists who, by chance, were fired from radio factories or TV repair shops. One way or another, these professionals assembled the metal detector with their own hands from radio components left in stores using various schemes and technologies. The guys often argued about who had the better and more technologically advanced device. After all, back then it was actually a working tool, and not a hobby device, as it is nowadays.
Those who had at least a little knowledge of electronics also made their own metal detectors. But these guys weren't interested in digging a metallurgical ingredient out of the ground. But it seems we have deviated from the topic.
Principle of operation
Before moving on to assembling various circuits, you need to look at the operating principle of these devices.

The operation of a metal detector is based on the principles of magnetic attraction. The device creates a magnetic field through one coil. The second receives return signals. Then, if found, it sends a return signal through an audible alarm. You can even make a special metal detector for non-ferrous metals with your own hands.
The larger the coil, the more sensitive the device will be. Although in modern devices, and especially in industrial models, the coil is small. But there are amplifiers on microcircuits.
Types
An ultra-low frequency finder is the simplest device. Every schoolchild knows how to make a metal detector with his own hands using an ultra-low frequency circuit. But this does not mean that such a seeker is ineffective. Just the opposite. With proper setup, you can achieve good results.
The pulse finder is a deeper device. With its help you can easily find jewelry, coins and other small items at great depths. Such schemes are popular among professional treasure hunters.
A device that operates on beats allows you to detect absolutely any metal object or mineral in the bowels of the earth at a depth of up to a meter. It is designed for certain types of alloys. This is a cheap device to assemble.
The radio detector is capable of detecting metals at a depth of up to a meter. It's easy to do. This is a suitable device for beginners, but is not popular among diggers.
A primitive metal detector using one transistor
If you still have a long-wave radio receiver in working condition at home, then even if you have little knowledge of electronics, you can assemble a metal detector attachment for this receiver.

To make a metal detector with your own hands, the diagram is drawn without much difficulty. The circuit diagram represents the most common LC generator, designed for frequencies in the region of 140 KHz. The coil for the device, which is used as an oscillating circuit, should contain 16 turns of the simplest insulated wire up to 0.5 mm in diameter. The coils must be laid on plywood of suitable sizes. Fix the resulting contour to the base using glue. This is how you usually make a coil for a metal detector with your own hands.
Required Parts
You can use absolutely any resistors and capacitors for this device. As a transistor, a low-power high-frequency one with reverse conductivity will suffice. This could be the popular and easily available KT315. Or KT3102 with any letter index.
To assemble this simple metal detector with your own hands, the circuit is assembled either by surface mounting or on a pre-prepared board made of getinax or textolite.
Setting up a simple metal detector
After the part is ready, we need to place it next to our coil. The device should have a comfortable handle. The radio receiver must be mounted on the finder handle, and then tuned to a frequency around 140 kHz. You will hear a squeak or squeak. If you bring the coil closer to a metal object, the sound in the headphones will change its tone.

Despite the fact that these are the simplest metal detectors in design and layout, making them with your own hands is elementary; the sensitivity of such devices makes it possible to work at depths of up to 200 mm.
High frequency finder
This assembly scheme is a little more complicated than the previous one. But also much more effective. Its difference is that there are two coils.
The first is the outer contour. A magnetic field is created directly in this coil. The second is the receiving circuit. This part is designed to receive, process, and amplify signals that come from the earth.
Making a deep metal detector with your own hands
First you need to assemble the so-called command block. To create it, an old computer, an equally old laptop or a radio will do. Then you need to find the highest frequency in the AM band. You need to make sure that there is no radio station on the frequency.
Search head
To assemble the search head, you need to cut two circles from thin plywood. One of them should have a diameter of about 15 cm, the second should be made a little smaller. This is done so that the rings can be inserted into each other. Then we need to cut out small pieces of wood so that our head rings are parallel.
After this, 10-15 turns of enameled wire with a cross-section of 0.25 mm from the outer circle should be removed from the plates. You also need to secure the resulting structure. For everything to work, you need to connect the head from the bottom and the detector from the top.

It's time to turn on our frequency. A faint tonal sound will be heard. It's better to use headphones.
Metal detector "Pirate"
Assembling the device is not difficult at all. The device circuit does not contain programmable microcircuits; it is easy to make and configure this metal detector with your own hands. Detailed instructions will help with this. Also, this scheme does not contain expensive or scarce parts. "Pirate" in its parameters can surpass foreign, quite expensive industrial analogues.
Options
For power supply you will need from 9 to 12 V. The current consumed by the device is up to 40 mA. Sensitivity will be up to 150 cm subject to large metal objects.
How is the element base for a metal detector made?
The “Pirate” type circuit consists of two nodes. This is a transmitting circuit, which consists of a pulse generator based on KR1006VI1 and a switch made from an IRF740 transistor. The receiver is made on the basis of the K157UD2 microcircuit and the VS547 transistor.

The coil should have 190 mm in diameter. The number of turns on the PEV wire is 0.5 - 25. The transistor in the circuit can be pulled out of an ordinary energy-saving light bulb or any charger for mobile phones. A correctly assembled “Pirate” metal detector with your own hands practically does not need to be configured.
"Terminator"
The device has good capabilities. For example, the device will detect a coin with a denomination of 5 Russian rubles from 25 cm. The finder will recognize a German military helmet from 80 cm. These values are given on the condition of a coil with a diameter of 240 mm. "Terminator" can recognize metals even at the maximum working depth.
It is worth saying that beginners are unlikely to be able to assemble a “Terminator” metal detector with their own hands. The device requires careful setup. Even experienced craftsmen sometimes make mistakes when assembling this circuit. The main thing here is not to rush.

In order to assemble the Terminator, you will need a multimeter, as well as an oscilloscope and an LC meter. They are not available to every person. However, you can try to create a special software and hardware complex based on a regular home personal computer.
Description
The terminator is a single-tone device that operates from pulsed beats. The finder is great for finding coins. Also, if you make a little modification, you can look for gold on the beaches, while completely ignoring any other metals. "Terminator" is also suitable for searching for any other objects from any alloys.
In conclusion
So, we found out how to make a “Pirate” metal detector with our own hands, and also looked at “Terminator”. As you can see, by devoting a minimal amount of free time and effort to the assembly, you can get a rather interesting, and most importantly, workable tool with which you can find ancient objects, and possibly expensive coins.

