Beautiful notebooks with your own hands. Beautiful DIY notebook: master class for beginners
Hello my friends :)
It so happened that in each master class there is a purely technical part of assembling a notebook, which is repeated from time to time. I noticed that I began to describe the assembly itself more superficially. Therefore, here I decided to describe this moment in as much detail as possible in order to provide a link to it and not distract you with the same block of work.
This master class is purely technical (more aimed at beginners).
I’ll say right away that I will not use pure A5 format, but with trimming. Namely about 140x200 mm. Be sure to measure your block before starting. I will give sizes with small allowances.
So, for work I will need:
6. Metal corners - so that fabric corners do not fray over time.
7. Paper for endpapers. I recommend using paper with a thickness of 140 g. Especially for you, I have developed many designs for the endpapers. I print them with pigment inks - they do not bleed, do not fade, and the paper turns out to be of archival quality. The texture of the paper is also not simple - it is rough to the touch, it has a micro-hard texture. The size is immediately ready for the endpaper (29x20cm).
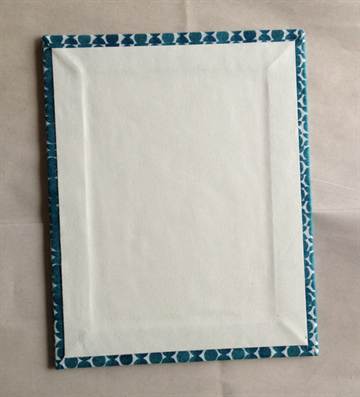
First, we prepare the fabric. On at this stage you need to sew on everything you have in mind. I sewed in the lace and stitched the fabrics together. If you use pictures, pendants, ribbons and other elements that need to be sewn on, now is the time.
I press down the seams on each side. First from below and above, then from the sides.
Making the base for the cover.
I apply it to the substrate
(size 34x21.5 cm)
base made of binding cardboard.
There should be a distance of about 3-4 mm between the spine and the cover.
After final fitting to the block, we glue the backing to the cover in several places.
But before you smooth out the corners and glue the parts, you MUST TRY IT ON!
Insert the backing and cover into the fabric. It should fit into the fabric.
Now let's try on the block. Notepad should easily
close.
It is at this stage that everything can be adjusted, trimmed, smoothed
(if something doesn’t suit you).
Next, we take out the block and the cover with a fabric backing.
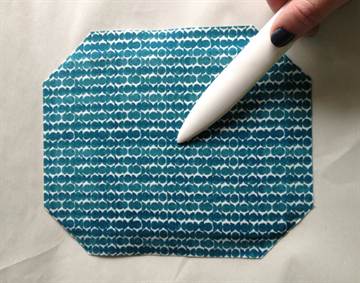
Iron the corners.
Turn it 45 degrees and iron it.
Then carefully fold it into a corner and iron it again.
And so on all 4 corners.
Don't forget to bookmark it!
To be honest, I always forget about this moment :)
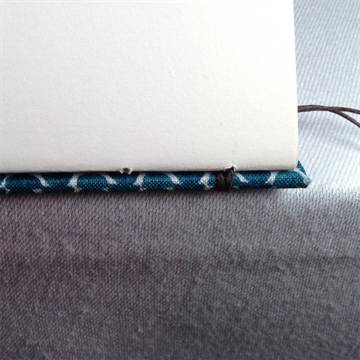
About the bookmark - some sew it exactly in the middle of the fabric (into the spine),
I'm moving it a little to the right.
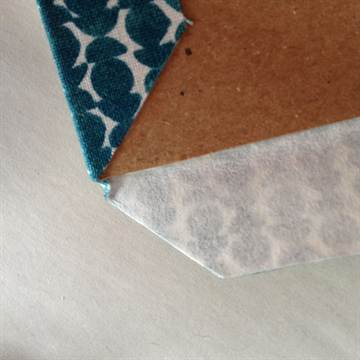
I coat the cover with glue around the perimeter. I glue the fabric.
In the corners you need to additionally lubricate the fabric with glue.
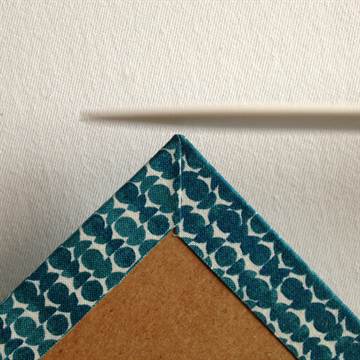
You should get the following:
Don't forget to look at the front side - there should be no distortions or displacements.
The glue dries for about five minutes - this gives you just time to move the fabric if something is lying incorrectly.
And when folded, everything should be fine too :)
Glue in the endpapers. This part is very important.
First, fold the paper in half (with the pattern inward).
Now ATTENTION!
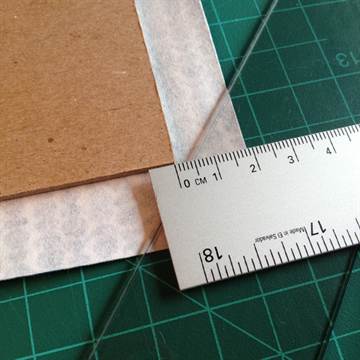
Move the gauze aside. If it is retracted completely, then the size of the endpaper
matches the block size. Now my blocks are made with a small gauze sticker on the block, so I trimmed the endpaper by 3 mm (look carefully at the photo).
I make a thin strip of glue near the gauze.
I'm including the flyleaf. I apply glue to the gauze and glue it to the endpaper.
Apply glue to the endpaper and cover.
Turn the block over and carefully align it along the edges.
The main thing here is not to rush - let the block rest for 10-20 minutes.
It's better if you put a press on top.
Now we coat the second paragraph with glue and glue it in.
We glue the paper and cover in the same way. Don't forget to apply glue to the fabric too -
so that the endpapers are glued neatly and tightly.
Carefully try it on and glue the endpaper to the cover.
Be sure to press the block and see if anything has moved.
The whole block is pressed for an hour and the notepad is READY!
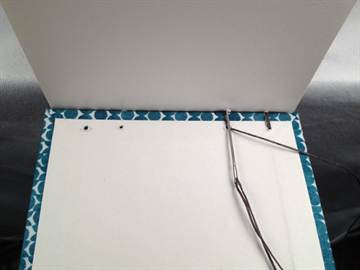
The final touch is to place the corners.
I additionally lubricate them with glue and press them a little with pliers so that they don’t fall off.
And thanks to my friend Katerina for the inspiration - she gave me a set -
passport cover and phone case.
Beautiful works to you, friends:)
When choosing a gift, people always puzzle over originality and practicality. After all, no one wants a donated item to gather dust somewhere in the back drawer of a closet. Most often, people choose a notebook as a gift. This is simply a necessary thing not only for work, but also for everyday life. It can be a very stylish accessory and add a special twist to your look. Of course, it’s very easy to buy a notebook in a store; there’s just a huge selection of options. You can buy the cheapest one, or you can buy an original work by a famous master. But the best solution is to create a notepad yourself. This option will allow you to choose the thickness of the product, size, and packaging. You will really like this gift and will say without words about your attitude towards the person. Our article will tell you how to make a notepad for special occasion with your own hands.
Making a bright paper notebook with your own hands
For beginning craftsmen, the easiest way is to make a notebook out of paper. There are thousands of options. You can do the simplest ones, but you can try to create a beautiful and original work. This article will talk about how to make a notebook from simple but high-quality paper. This is a very exciting activity that will bring a lot of interesting moments and ideas.
To make such an original item, you need to purchase or prepare thick cardboard, which is cut to a size of twelve by fifteen centimeters - 2 pieces. You also need to buy a beautiful fabric for the top of the cover, thick, maybe watercolor paper, cut to a size of eleven and a half by nineteen centimeters - 30 leaves. Cut the next thick paper to a size of eleven by fourteen centimeters - 2 sheets. You will also need newspaper, glue, a glue brush, a knife, scissors, an awl, a stationery knife, a ruler, a square, threads, a needle, and a weight.

From the very beginning it is necessary to trim the fabric, it must be more cardboard by two centimeters.

Use a square to cut 45 degree corners.
The gap between the corner of the cardboard and the corner of the fabric should be three centimeters.
When working on newspaper, you need to coat the cardboard itself with glue; there is no need to set it up a lot. Now glue the cardboard to our fabric.

Glue the corners of the fabric on the back side as well, working well with the corners.
Use paper to remove excess glue, blotting it gently. Now use a knife to round the corners.
Now White list The paper needs to be coated with glue and the back of the cover covered. To create a second cover, you need to do all these steps again.
Now bend the white sheets. There should be five such sheets, and by bending them in half, we get ten pages.

In order to sew all the leaves, you first need to create a template. On a simple piece of paper, mark the center of the fold and the middle.
Draw marks for the holes as shown in the picture below:

We apply the template to the original sheet and make holes using an awl. Let's do all the pages like this.

Let's move on to assembling our notebook
Now we fold the bottom of the notebook and the leaves on top. They will serve as a guide. We punch holes. Pay attention to the fabric pattern. We do the same with the next cover.

We sew the details. We place the cover and leaves so that they peek out a little from behind the table.

We open the middle and now put some weight, for us it’s a sock with cereal. We take a thread the length of our hand and begin to stitch the notebook.

Direct the needle first into the hole of the leaf and then into the cover. This creates a loop. Now pull the leaves to the edge of the cover.
Make similar loops with the remaining holes.

This is how we sew on all the leaves.

We fasten the top cover, sew and pull tightly so that the notebook holds.
It turned out to be a very original and beautiful gift.

Using an unnecessary notebook for work
It's even easier to create a notebook from a simple notebook. Everyone can guess how to make a notebook out of a notebook. This does not require special materials or tools. An ordinary general notebook needs to be disassembled by removing the paper clips. Make rectangular blanks of the same size from the sheets. It’s easier to cut more than one leaf at a time. You can decorate your notebook by inserting colored inserts between regular sheets.
Mark the cover of the used notebook and cut out the required dimensions. Place all the leaves near the edge of the notebook and punch them with a stapler. If you don’t have such an assistant, then sew all the leaves with a needle and thread, puncturing holes in advance.

The notebook cover can be decorated with any in a convenient way. You can use fabric applique, self-adhesive colored paper, ribbons, beads, and small beautiful details. For originality and exclusivity of the work, the masters use photographs; black and white ones look especially beautiful. Let your imagination know no bounds, and the gift will turn out very beautiful!
Not long ago I came across the word “Moleskine”. The definition was unfamiliar to me. And imagine my surprise that this is a trademark of a company that makes the most banal notebooks.
I've been finishing all my notebooks since school. I glued pockets with separate leaves for quick lists, created multi-bookmarks, and tinted the edges of the sheets. Later I got electronic notepads, but that's a different story.
In the vastness of the RuNet I met detailed lesson for making an unusual notebook. Making your own notepad is not difficult. The master class contains a detailed photo report with comments from the author. I present the article “as is”.
A technique similar to classic book binding is described. First we need regular office paper. You can combine colors, sew in dividers, etc. I used A4 paper 80 g/m2 in vanilla beige color and designer colored tracing paper 90 g/m2.
We select sheets of paper in a notebook. If the paper density is about 80 g/m2, then it is optimal to select 5 sheets. If the paper is thicker, then it is better to make notebooks of 2-3 sheets.
Fold the notebook in half:
And so on several times until the desired thickness of the future block is achieved. I have 13 notebooks here, i.e. The notebook will contain 130 sheets of A5 format.
We place the future block at the spine with two pieces of binding cardboard (this is done so that there are no dents left on the paper from the staples, and it is pressed evenly) and secure the spine with office clips, as shown below:
The block usually sits under pressure for about 3 hours, but I often leave it overnight.
While the paper is being pressed, you can look out the window and drink a cup of coffee :)
When our notebooks are compacted, we open the clips and straighten the spine by tapping them on the table. We secure the perfectly even spine again with clips, like this:
Next we have to cut 6 holes at equal distances on the spine. I use a pre-prepared sheet of paper with markings; for an A5 notebook format, you can download one from this link and print it out. If the format is non-standard, I think you can easily mark the block with a pencil and ruler :)
We cut these holes on the spine (as one option, you can draw marks on the spine itself, and then use an awl to pierce holes in each of the notebooks, but in my opinion this takes longer):
I used a small file with three edges, bought at Auchan :)
When our holes are ready, we can easily and masterfully sew the block. We will need two fabric ribbons. I use cotton. The tapes should be of such width as to fit between two sawn holes:
I feel comfortable sewing by placing the block on the edge of the table facing me. There may be variations here, but the main thing is to try not to wrinkle or stain the paper in the process. Often, at first, not everyone succeeds. For sewing I use leather needles and Iris thread for crochet. We place one of the notebooks in front of us, as indicated in the photo.
We sew the first notebook with a “forward needle” seam, using a single thread, leaving the tail outside. We do not pierce the fabric ribbons, but simply bend them around with thread:
We place the second notebook on top of the first one, without confusing the right and left edges of the notebooks, i.e. don't turn them over. We insert our needle into the hole in the second notebook:
And we stitch it in the same way as the first one, catching the thread on the thread of the previous notebook in the place where we go around the ribbons:
When we have reached the edge, we tie the working thread and our left tail into two or three knots, having first pulled them up well:
Place the third notebook on top and do the same:
In the places where our ribbons are located, we hook the working thread to only one previous one:
Sew on the third notebook:
And now we must tie a knot, connecting the third notebook with the previous ones. To do this, we thread a needle through a thread between the 1st and 2nd notebooks:
We remove the needle, leaving a loop:
And we thread the needle through the resulting loop like this:
We press the notebooks together to make our knot tight:
It is essentially a simple sewing knot and is often tied when finishing sewing. Now we boldly lay all subsequent notebooks on top, sewing them to the block and tying knots along the edges
If you run out of thread, it is convenient to tie it on at the moment when we are above the ribbon. In this case, the knot is guaranteed to remain on the spine and will not be visible on the finished product.
When all the notebooks are sewn together, we tie not one, but two or three sewing knots on the side.
Place the block again between the cardboards, Special attention giving an even spine. Notebooks should lie next to each other:
And we fasten our improvised press from above and below:
Now you need to glue the spine. I use Silicone Sealant from Moment. It holds notebooks together quite firmly, while remaining elastic even after drying, as a result of which the notebook opens and leafs easily. Also, after using it, there is no need to additionally glue the gaps between notebooks.
Apply sealant to the spine:
And spread it along it with a sponge, paying attention to filling every crack.
When all the cracks are filled, you can remove the excess and level the layer.
We fasten the clips along the spine again, trying to get as close to it as possible with their “pressing” part.
Usually the block takes an hour to dry, but if possible, it is better to leave it under pressure longer. I also often leave it overnight.
In the meantime, we can prepare future endpapers. For them we will need two sheets of thick paper (in our case A4 format), preferably from 180 g/m2, you can use scrapbooking paper. We make creases in the middle:
And fold them in half, with the “beautiful” side inward:
As it dries, we take our block out from under the press:
I glue on a couple of pieces of kraft paper before I glue on the endpaper. It will tailor the relief of the ribbons under the endpaper and add strength to the product.
I glue it using a UHU glue stick like this:
And I glue the ribbons on top of the craft:
Next we glue on the endpapers. I like to make durable and good quality notebooks, so I use Moment Crystal glue. To apply the glue strip evenly, protect with a sheet of paper that part of the block that the glue should not get on:
We remove the sheet and glue the endpaper. We glue a piece of craft paper with ribbons onto the endpaper at the top:
Now we have to align the edges of the resulting block. There are 4 ways:
1. Buy a simple guillotine cutter. It justifies itself if you plan to make notebooks often and in large quantities.
2. Try cutting it manually using a construction knife. The knife can be bought in Auchan, Leroy Merlin, etc. Choose an expensive, heavy knife and good replacement blades. Break blades as often as possible. At first glance, this method seems impossible, but in my master classes many people manage to cut the block quite decently the first time. And with certain training, it often turns out not far from ideal.
Place a metal ruler at the edge and press it firmly against the block with your left hand. You should not cut less than 5 mm, it is very difficult. Right hand cut with a knife, holding your hand strictly perpendicular to the work surface. We pass the knife over and over again without pressing hard. It’s better to have more “passes”, but almost no pressure. As a result, the cut can be processed with fine sandpaper.
Photo from my MK:
3. You can take the block to a printing house near your home or work. Often they will not refuse to cut a block, and it costs around 5-15 rubles. per block. If there is only one block, they often cut it for free :)
4. Leave as is:) The shaggy edge emphasizes that the product self made.
I'm using the cutter:
As a result, we get a finished block.
I already wrote once how to make a notepad out of a block, but some things there are outdated, despite the fact that general principle remained. I promised to update the information a long time ago - and here it is :)
We will need two binding cardboards slightly larger than the block size and 300 g/m2 cardboard for the spine.
We cut the cardboard so that when placed on the block there is 5 mm left over on 3 sides, and the spine has 5-7 mm less:
On cardboard for the spine (mine is 10 cm x cover height) we make several creases 7 at a distance of 2-3 mm from each other. This is done so that the spine is beautifully rounded during use. The distance from the first to the last creasing should be 3-4 mm greater than the height of the block spine.
This is approximately how the cardboard spine should sit on the block:
Now we glue the spine with the cover cardboard. I use Moment Crystal glue. Do not forget to retreat those 5-8 mm from the outer creases on the spine, which we laid when cutting the cardboard.
I want a softer notebook, so I glued an extra layer of fleece on top :)


Stationery stores offer a wide variety of different notebooks. However, it is much more interesting to make a notebook for notes with your own hands, because handmade creativity allows you to get an absolutely exclusive thing the right size, color and thickness.
By the way, if a loved one is planning a holiday, then a handmade diary made with soul and originally designed will be an excellent memorable gift.
About, how to make a stylish notebook from scratch from paper and glue and other available materials, we will tell you in this article.
Step-by-step instructions - making a notebook with your own hands from paper and glue
Notebooks with glue, that is, made using the technology of seamless binding of pages, are most popular in scrapbooking.
Such a notebook can be easily made with your own hands, and if you approach the creative process responsibly, then a homemade diary will be in no way inferior in strength to industrially manufactured products.
To make a notebook you will need the following materials and tools:
- Watercolor paper. It is better to choose this one, since it is thicker and more pleasant to the touch compared to regular office paper;
Gauze or regular medical bandage; - PVA glue - best option for creativity. This inexpensive, environmentally friendly adhesive perfectly glues paper and cardboard, sets quickly, does not shrink strongly when drying, perfectly fills cracks and gaps, and ensures high strength of the adhesive seam. If PVA is not at hand, you can use regular silicate office glue for paper and cardboard.
- Stationery clips, clamps or regular clothespins;
- Glue brush;
- Colored paper;
- Thick cardboard for cover(ordinary packaging cardboard from an unnecessary box will do);
- Ruler;
- Pencil;
- Stationery knife;
- Double sided tape.

 Fold A4 sheets in half and stack them
 We clamp the sheets and glue them
  We make a cover from any sheets
 The procedure for making a homemade notepad is as follows:
- Fold sheets of watercolor paper in half. We select their number depending on the desired thickness of the notepad;
- We fold the resulting blanks into an even stack, clamp them with clothespins or other available devices;
- Apply a bandage or gauze to the junction of the sheets, coat with PVA glue, and leave to dry for several hours;
- When the first layer of glue has dried, we glue the joint again, reinforcing the joint with gauze, and leave it to dry again;
- The base of the future notebook is ready, all that remains is to check the quality of gluing the pages and, if necessary, strengthen the connection with glue;
- Let's start preparing the cover. To do this, we cut out blanks from a sheet of cardboard using a stationery knife, the size of which on each side should exceed the size of the pages by 5 millimeters. We glue the resulting blanks onto a sheet of thick paper using double-sided tape;
- We decorate the inside of the cover using colored paper. It can be glued using either PVA glue or double-sided tape. The second option is more convenient and takes less time;
- We glue the block of pages with the cover - our notebook is ready! All that remains is to decorate the cover to your liking.
VIDEO INSTRUCTION
We offer you a selection of ideas and methods original design notebooks and diaries.
The scrapbooking technique allows you to use for decoration not only scrap paper and napkins for decoupage, but also everything that is at hand: magazine clippings, ribbons, rhinestones, beads, buttons, memorable elements, etc.
How to make a notebook out of paper without stitching or glue
You can also do it yourself mini notebook without glue and stitching.
This quick method is simply irreplaceable when you urgently need a notebook for notes.
To make a cute origami notebook without glue, you will need:
- one sheet of A4 paper (preferably colored);
- scissors;
- stationery knife.
The process of making a mini-notebook is quite simple:
- Bend a sheet of paper in half lengthwise;
- We unfold the sheet and bend each of the two halves in half again towards the center;
- We turn the sheet over and repeat the same folds, but this time along the width of the sheet;
- We cut the sheet along the bend so that we get 8 identical rectangles, bent in the middle;
- We divide the resulting rectangles (future pages of the mini-notebook) into 2 parts;
- We take one rectangle from the first stack and measure 2.5 centimeters at the bend on each side. We put the entire stack together and make neat cuts on both sides according to the markings;
- We take one rectangle from the second stack and measure 2 centimeters at the bend on each side, put dots at these places and connect them into a segment. We fold the entire second stack together, iron it along the fold and make a neat cut using a stationery knife along the marked line;
- We take the first stack of rectangles, twist one side of the future pages into a tube and push it into the hole of the second stack;
- We straighten the pages - our mini-notebook is ready without glue or stitching. All that remains is to design the original origami notebook to your liking!
VIDEO REVIEW
Good afternoon, our dear readers. Ekaterina is with you! We have already written about, Now I decided to write about how to make a notebook with your own hands from paper. I think you will like this topic and find it useful))))
It's more pleasant to write down your shopping list or phone numbers if you like your notebook. But it is often difficult to choose a beautiful and convenient notebook that suits the shape, color and design. Therefore, a great gift idea is to make an address book or notepad with your own hands. You can choose the size and color of the pages and cover, and design it in any style, using, for example, your photographs. Below is an example of how you can make your own author's notebook.
How to make a notebook with your own hands from paper
You will need:
- writing paper of various colors, you can use sheets from unnecessary notepads or notebooks (you determine the quantity and size yourself)
- thicker patterned paper to divide the notebook into blocks (if necessary)
- thick cardboard for cover
- paper for cover design
- decorations for cover decoration
So, we've got everything ready and let's get started:
- Determine the size of your notebook sheets and cut the writing paper to these sizes. For an address or telephone book, you can take 5 sheets for each letter of the alphabet, and for a regular notepad, 100-130 sheets will be enough. Fold the sheets in the order in which they will be in the notebook.
- If you will use division into blocks, for example, 25-30 sheets or by alphabetical letters, then also cut and insert the separator sheets in the chosen order.
Cut the cardboard for the cover and cover it with patterned or textured paper. For example, scraps of wallpaper or any self-adhesive paper are perfect. You can also use fabric, lace, braid, rope, etc. - Now we need to connect the notebook together. To do this, you can contact a bookbinding workshop, or you can independently make holes in the paper and cover using a hole punch (3-4 or more) and connect the sheets with ribbons, tying their ends with bows on the front cover.

- If you are creating an address or phone book, then you need to attach labels with letters. To do this, you need to cut out the required number of tabs from medium-density cardboard, glue them onto sheets of notepad and write a letter on each.
- After this, all that remains is to decorate the cover of your notebook with any details, using any technique (scrapbooking, quilling, decoupage, etc.).
You see, making a notebook with your own hands is not so difficult. The main thing is imagination and creativity.

