Frames for steel bathtubs. Secrets of making a bath frame
It is impossible to say which room in an apartment or house is the most important. To one degree or another, each of them is irreplaceable and serves its own specific purposes. The specification of the room has a certain influence on what materials should be used when carrying out finishing or repair work, what color scheme to choose for interior decoration, and so on.
So, in the bathroom it is necessary to use only moisture-resistant materials that can withstand temperature changes. For example, before making a frame for a bathtub, you should pay close attention not only to studying the features of the installation process, but also to the basics of choosing a material suitable for these purposes.
How to choose material
As mentioned above, only a material that can confidently cope not only with the mechanical loads that this piece of plumbing will exert, but also with almost constant exposure to moisture, can be suitable for making a frame for a bathtub. The conditions in which all the elements inside the bathroom will have to be can be called a real test of strength, and therefore it is worth identifying some criteria according to which they need to be selected.
- Moisture resistance. Resistance to moisture can be called the main condition for choosing any material used for work in the bathroom. This room will always be damp to one degree or another, and therefore all materials must have increased resistance.
- Fungus resistance. Based on the above, an important property of the material that you should pay attention to is the ability to resist the occurrence of mold and other fungal infections. Dampness and darkness are ideal conditions for the emergence and development of fungus, which means this must certainly be taken into account when choosing a material.
- Mechanical strength. Another condition for choosing a material for making a bathtub frame is its strength. Depending on the material chosen, the bathtub may weigh more or less, but in any case, when filled, the weight will be quite decent. And if we add to this the weight of a person, then the load on the structural elements of the frame will be quite significant.
Based on the selection criteria listed above, the following materials can be used as a material suitable for making a frame for a bathtub:
- Wooden beam. This material is publicly available, quite cheap and durable, which makes it possible to use it for the manufacture of a bathtub frame. However, it is necessary to take into account that the timber must be treated with antiseptic and waterproofing compounds before installation.
- Metal profile pipe. Profile pipes are also durable, easy to install and affordable, but at the same time they require additional treatment with anti-corrosion compounds.
- Galvanized metal profile slats. The slats, which are most often used to make laths for finishing, can also be used to make a bathtub frame. The lightness and yet strength of this material make them a very good choice.
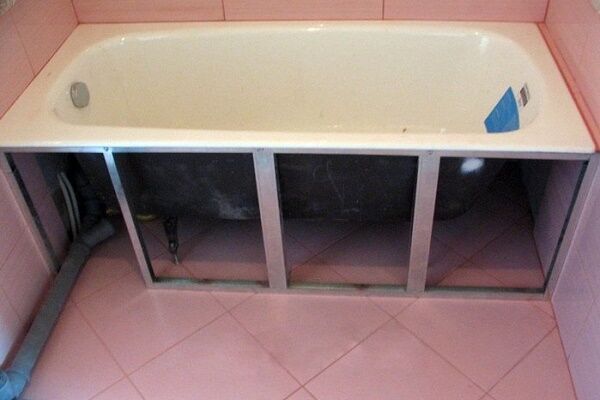
Frame making

As for the actual manufacture of the frame, it should be noted that this work can be done with your own hands without the involvement of third-party specialists. You only need a certain minimum of tools and straight hands. As in all other cases, work should be carried out in stages.
Note! Most often, the bathtub is installed first, and then covered with a frame. In some cases, when you want to get away from stereotypes, a frame is made into which the bathtub will be installed.
We will not dwell on only one option, but will consider both.
Marking

To begin with, the place where you plan to install the bathtub needs to be marked for installing the frame. Everything here is individual. Each bathtub, depending on the model, has its own dimensions and this should definitely be taken into account. Based on the parameters of the bath, markings are applied to the floor and walls. You can use painter's cord.
Base
The first element of the frame structure is the base. It serves as a support for all other elements, and therefore maximum attention should be paid to its installation. Supporting elements are laid along the marking lines and screwed to the floor with anchors. It is necessary to ensure that the base is strictly horizontal, for which you need to use a building level.
Supports
Top tie
Then the elements that will serve as screeds for the entire structure are laid and secured. Their installation will be carried out horizontally, on top of the supports. It is necessary to remember to control the horizontal position. It should also be noted that, depending on the design of the frame, the upper horizontal elements can be located not only on top of the frame supports, but also mounted on the wall.
Sheathing

As the final element of the frame design, you can consider a sheet of OSB (or plywood), which is laid on top of the frame and fastened. Then a hole is cut into it for the bath tank itself.
At this point, the installation of the bathtub frame can be considered complete. Subsequently, the frame is sheathed, for example, with waterproof plasterboard. As mentioned above, the work on making the frame is not too complicated and can be done independently. To better understand the nuances of the process, you can familiarize yourself with the corresponding photos - and video materials.
Photo

To install a bathtub, it is often necessary to prepare a reliable and durable frame. With such strong supports, the plumbing fixtures will last for years and remain stable. However, not all owners know how to make the base for such items.

Peculiarities
Many people are confident that installing a bathtub does not require unnecessary manipulations; it is quite possible to get by with the legs holding the bowl. Of course, in many cases this is true, and installation of additional frame structures is simply not required.
However, it is worth considering that only a heavy and expensive cast iron model will stand securely and firmly on legs, because it really does not need a frame.
The stability of such plumbing is ensured by its massiveness and impressive weight. Lighter and more affordable models made of steel and acrylic cannot boast of such stability, so for their installation it is necessary to prepare a frame.

Very often frame structures come complete with bathtubs. If these are not included in the set, then all parts must be purchased separately.


Such design solutions look original and stylish. In this case, the plumbing configuration itself does not play any role. With this design, the frame will also need a cast iron structure.
Not all bathtubs have simple symmetrical shapes. Today, stores sell many original options of non-standard shapes. Included with these options are unusual frames, and entire platforms of a suitable structure. In addition, such plumbing fixtures most often have wide sides, which make installation of the model faster and more convenient.


Without a high-quality and reliable frame, a light and unstable bathtub will be subject to deformation. Because of this, the enamel on the plumbing may begin to crack and peel.
In order for the product to lose its original appearance, it is necessary to place it on a frame base. You can do the installation of the frame under the bathtub yourself. This kind of work cannot be called difficult. Moreover, the frame can not only be installed, but also made with your own hands. To do this, it is necessary to use exclusively high-quality and durable materials - the platform must be as strong and durable as possible.


Materials
Different materials can be used to prepare the frame. The main requirement that they must meet is increased strength and wear resistance.

Wood
Wooden beams are often used to make the frame. This material is environmentally friendly, lightweight and quite durable. To work with such raw materials, you do not need to use expensive professional tools.
Wooden structures are considered the most economical, but no less reliable. However, these frame options have their weaknesses. For example, wood does not tolerate high humidity. In a bathroom environment it cannot be avoided. For this reason, over time, the frame may begin to rot and deteriorate. In addition, mold and mildew may appear on such a basis. It will be very difficult to get rid of them. To prevent the base from turning into “dust”, it must be regularly treated with special protective solutions.


Metal
No less popular are frames made of metal profiles. According to experts, the wear resistance of such foundations leaves much to be desired, since iron and aluminum elements are not designed for impressive loads. For this reason, they are recommended to be used only for creating auxiliary supports and further installation of a decorative plasterboard faucet along with legs.


Profiled pipe, corners
Experts say that frame structures made of profiled pipes and metal corners are the most reliable and durable. They can withstand impressive loads, especially if they are thick enough.
When choosing a material for making a frame for a bathtub, you must take into account that welding will be required to assemble the metal elements.
An all-welded base will make the entire structure more reliable and durable, but it will be much easier for any craftsman to work with a wooden block that does not need to be welded.


Dimensions
The dimensions of the frame structure largely depend on the dimensions of the plumbing fixtures. For example, models with dimensions 170x80, 170x70, 100x70 cm must be installed on bases with similar dimensions. The dimensions of the bathtub depend on its shape. For example, parameters of 170x80 cm are typical for simple rectangular products, 194x100 cm for oval ones, 130x130 cm for corner ones.
Be sure to measure all necessary surfaces before designing the frame.
You should try not to make a mistake with the dimensions if you make the base yourself. Otherwise, the plumbing will be unstable.

How to do it yourself?
Making a frame is not a difficult job. To make a wooden structure, you will need 40x40 cm pine bars, moisture-resistant plywood, and 28 mm thick edged boards. Frames from these components are created using a wood saw, hammer, plane, screwdriver and chisel.
This process includes several stages:
- First you need to make the top trim of the wooden frame. This is necessary so that the structure does not wobble in the future and does not “play” under the weight of the bathtub.
- The racks must be placed in a vertical position. On the shorter part of the structure there should be at least one supporting part, and on the long side - 3-6 racks (it all depends on the dimensions of the bathtub itself). The bars should be fastened together using nails and self-tapping screws.

- You can proceed to assembling the upper trim. It needs to be secured to the walls with dowels. You need to position the bars so that the sides of the bathtub rest on it. The most reliable designs are those in which steel fonts rest simultaneously on 3 wall ceilings.
- After this, you can proceed to installing the bath.
- To make a frame from metal profiles, you need to put the bathtub in its main place, take all measurements, cut off the excess parts of the profiles and fasten them together.


- It is necessary to adjust the frame to the bathtub in order to achieve the tightest possible fit of all the constituent elements. Then you need to weld the profiles together.
- The metal frame should be made taking into account that the drywall and tiles are then in the same plane.
- At the end of all work, it is necessary to seal all joints between the bathtub and the ceilings with a special sealant or rubber.


Lined bricks can also serve as a frame for the bathtub. They do not need to be boiled or made into complex boxes, as is the case with metal or wooden options.
- You need to build two brick supports. They should be at a distance of 50–60 cm.
- As for the width of the support, it should not exceed the dimensions of the font itself.
- It is advisable to make the supports so that they follow the shape of the bottom of the bathtub bowl.


- In the place where the drain is located, the support should be lower by a couple of centimeters to improve the outflow of water.
- It is necessary to ensure that the sides of the bath are horizontal. There is no need to achieve a slope, because such elements, as a rule, are used at the stage of manufacturing plumbing.
- At the end of the work, the bathroom must be placed on brick foundations as legs. To make the structure more reliable, it can be additionally attached to the walls.
- If gaps appear between the brick structure and the bottom of the bathtub, they should be filled with tile adhesive or regular foam.

- If a metal profile is used to make the frame, it should be further strengthened. To do this, you can use wooden blocks soaked in antiseptics.
- A stand for plumbing fixtures made from a profile pipe also requires welding. This is perhaps the only difficulty that a home master may encounter.
- It is very important to foam the steel frame from the outside. In such cases, a frame for the screen is constructed. This design is simple and can be made without dismantling the font.
- To distribute the weight of the bath evenly, you can use more than just the legs. A simple backing made of bricks and boards will also cope with this task.

- After connecting all communications, it is recommended to hide them behind decorative skirting boards.
- It is worth considering that all-welded structures (both homemade and factory-made) are less reliable than prefabricated ones, since assembling a base with bolts with your own hands is the same as making connections that are not inferior in strength to solid metal.
- It is recommended to provide a separate access door to the drain equipment so that it can be inspected and repaired.
- For fastening, you should use self-tapping screws treated with an anti-corrosion compound.
- To cover the frame in the bathroom, you must use only moisture-resistant plasterboard. Ordinary material in such an environment will very quickly fail.
The desire of developers of new types of plumbing fixtures to reduce their weight as much as possible is fully justified by the desire to facilitate installation and reduce the load on the base. Specialized markets offer a wide range of products, the installation of which you can easily handle yourself.
However, the lightness deprived the container of an important quality - stability. A bathtub frame that you can build with your own hands will help you avoid tipping over.
We will tell you in which cases you cannot do without additional support, indicate suitable materials for assembling the frame, and provide tips on choosing the type of structure. Step-by-step instructions with photo accompaniment will help you make a reliable frame for any bathtub.
Frames are structures that provide stability to lightweight types of plumbing fixtures. On an industrial scale, they are purposefully produced for the installation of bathtubs made of acrylic, multilayer fiberglass, quarry, and, if necessary, independently installed for bowls made of steel alloys and cast iron.
Structurally, the frame is a system of one or two horizontal frames and vertical supports. Factory-made products are usually clearly designed for the average human weight and the mass of water collected in the container.
However, many owners of light plumbing fixtures feel insecure when getting in and out of the bath, especially since the actual weight of users is often far from the average.
Image gallery
Frame - a supporting structure constructed to increase the stability of plumbing fixtures
Frames are used to increase the area of the support system in contact with the floor and adjacent walls
The design that enhances the stability of the bowl will eliminate the fear of the container accidentally tipping over and resulting in serious injury.
Often frames for bathing containers are supplemented with devices that allow rational organization of free space in the bathroom
Frames are used not only as a supporting structure, but also as a basis for finishing
The construction of the frame allows you to hide the equipment of the hot tub and the connection to communications
In most cases, the frame is covered with a screen, which can only serve as decoration or serve as a box for storing detergents
Not too often, but still decorative frames are used, the purpose of which is only to strengthen the support and original design of plumbing fixtures
Making a frame for installing a bathtub
Method for increasing the supporting area
Increased comfort while taking a bath
Arrangement of space in the bathroom
Laying out the base for further finishing
Masking and equipment protection
Functions of the screen on the frame
Decorative frame for acrylic model
Bathing containers of traditional dimensions, from 150 to 170 cm long, can hold approximately 140 to 200 liters. Let’s equate the weight of one liter to a kilogram, add the weight of the body immersed in the bath and the result will be a load equal to approximately 250-300 kg.
The total weight, of course, significantly loads the bowl, but does not give complete confidence in its unshakability, especially if the bathtub has a fancy configuration. The supporting legs, on which all the considerable mass is distributed, are questionable.
Their plan area is approximately 10 cm², which makes us think about strengthening and increasing the supporting area.
Frames for bowls of non-standard configuration perform several functions simultaneously: they complement the design of sanitary ware, ensure stability of the bowl and comfort during procedures.
In addition to the desire to ensure the safety of procedures by ensuring stability for the frame, there are a number of other compelling reasons. It is built if you plan to install a bathtub screen covering communications and fittings. In this case, the weight of the bowl does not matter at all; the frame is mounted under the screen and around the cast iron products.
They arrange the frame if there is a need to raise it to form a normal water drainage or to create a podium around a luxurious jacuzzi.
Naturally, to solve different problems, structures are built according to different schemes, but the principle and technology are the same. There are no significant differences in the materials used.

In some cases, the installation of a frame is necessary to raise the bathtub relative to the floor level and ensure normal drainage of water from the plumbing into the sewer
Materials for homemade frames
When selecting material for the construction of a planned structure, you should focus on your own skills, knowledge in the field of construction and capabilities. The load-bearing capacity of the chosen option and resistance to the damp environment traditional for bathrooms are also important.
In the construction of homemade frames the following are used:
- Lumber. Basically a wooden block with edge dimensions from 40 to 60 mm. Cutting and joining the timber into a supporting structure is done quickly; fastening and forming nodes does not cause difficulties even for an inexperienced craftsman.
- Profiled pipes. The strength and load-bearing capacity of rolled metal with a square or rectangular cross-section makes it possible to significantly reduce the dimensions of the supporting structure; it is more elegant and “neater” than a wooden one. However, the manufacture of metal structures is available to a contractor with welding skills.
- Metal profile for gypsum fiber board. It is used primarily not for reinforcing frames, but to create a base for a decorative screen. To work with the profile, you need the usual tools available to every owner; experience in such work is not necessary.
Lumber is the least suitable of all the proposed options for working in a bathroom, but assembling a frame from it can be done without problems.
Errors and shortcomings are easier to redo than flaws in metal structures, and they don’t hurt your pocket as much if you need to purchase additional material for rework.
Image gallery
Lumber is an easy-to-process and cut, easy-to-join option for constructing a frame. No special skills are required from the performer
The welded structure is smaller in size, but at the same time more reliable in strength. The master requires welding skills and the appropriate equipment
To build an aluminum profile frame, you need some experience in the construction industry. The material is technologically advanced, but is mainly suitable for finishing devices
The construction of a frame made of steel profiles for gypsum fiber boards is carried out in a similar way, but its load-bearing capacity is higher, which means that it is permissible to use a thinner type in the work
Timber support structure
Welded metal structure
Aluminum profile frame
Steel profile construction
It is important to initially remember the characteristic vagaries of wood; before starting work, treat the block with antiseptic impregnation. During assembly, it is advisable to use galvanized hardware and corners if there is no experience in arranging connecting nodes with notches.
Profiled metal products are also not very resistant to moisture. To construct a frame, it is better to buy it galvanized or have it galvanized after purchase.
If a metal structure is installed without cladding with decorative panels, it is better to coat the profiled pipes with powder paint. The result looks decent and protects against rust.
The frame made of a metal profile used for fastening drywall is resistant to moisture and does not require additional treatment with a water-repellent compound
An aluminum profile or its equivalent made of galvanized steel tape is not at all afraid of water. A frame made of this material covered with plasterboard will last for decades.
True, you shouldn’t rely too much on the fact that it will be able to compensate for the swaying of the acrylic bathtub, although it will diligently prevent it, but to the extent possible.
The profile is simple and easy to use; it can be cut and connected without difficulty. Ceramic tiles, mosaics, and plastic panels can be perfectly glued to drywall attached to an aluminum or steel frame. If preference is given to steel products, then for installation in the bathroom you need to buy a galvanized profile.
It happens that two or three materials in combination are used in the construction of the frame. For example, the piping is made of a bar, and the racks are made of a metal pipe. If it is necessary to raise the bathtub above the floor level, brick supports, foam concrete blocks or large timber are placed under the bowl.
If several problems are solved during the construction of a frame, several types of building materials are used. It should be remembered that direct contact of metal, brick, wood should be excluded by laying waterproofing material between them
Dependence of the complexity of a structure on its shape
It is clear that the more complex the shape of the bowl in plan, the more work an independent craftsman will have to do.
According to the degree of complexity, the arrangement methods can be divided into the following options:
- Regular rectangle. Its construction will not cause difficulties, especially if the frame is installed in a niche or in a corner formed by two adjacent walls.
- Triangle with a curly outer side. Similar designs are suitable for corner baths. The sides converging at right angles are usually located in the corner of the room, the frame is constructed along the outside, and includes several interconnected frames.
- Oval. It is arranged along the contour by installing a large number of frames or broken strapping. Although there is a simpler method.
To ease the effort when installing oval and fancy-shaped bathtubs, a rectangular structure with gypsum fiber lining is constructed.
A hole is cut out in the horizontally laid top sheathing panel for the bowl so that its sides rest completely on the frame.
Image gallery
Various techniques are used in arranging oval bowls. The simplest of them consists of constructing a box with a hole in the top panel
The frame itself is constructed according to the usual scheme, but plywood or OSB is laid on top
To install the bowl, a hole is cut in the top panel of the box so that there is support everywhere under the sides of the bath
To accurately mark the dimensions of the hole, a template is made that follows the outline of the bathtub, but is 3 cm smaller on all sides
Arrangement of an oval bath
Specifics of frame construction
Forming a hole for the bowl
Template for marking the hole on the panel
Most homemade products do not require repeated assembly/disassembly. They are arranged in a non-disassembled form, although sometimes the possibility of dismantling and subsequent construction in a new place would be very useful for those who like to move frequently.
The frames supplied with acrylic bathtubs can be easily disassembled and reassembled many times. They include, as standard, a welded frame and adjustable supports in the form of steel threaded rods with plastic attachments. They come with fasteners and instructions with a detailed step-by-step description of the actions.
Methods for constructing support structures
Any work must be preceded by a project, be it drawing up a large-scale plan with precise calculations or a diagram with dimensions and approximate sketches. It is worth considering in advance the design option and methods of its assembly, taking exact dimensions and drawing a plan, at least by hand.
It should be remembered that, regardless of the stage of repair, the sections of walls and floors that will be covered by a stationary frame must be repaired, the surfaces leveled and treated with waterproofing.
Before installing the support frame, the bowl itself is installed and leveled to the horizon. It is advisable that the plumbing equipment be connected to communications, and that the position of the equipment in the jacuzzi is precisely determined
It’s worth immediately thinking about where the technical systems and components will be located to monitor them. Provision should be made for the removal of equipment and fittings for repair or replacement.
If you are going to build a frame around already installed old plumbing, you need to check the connection points to the sewer and water supply. If possible, it is necessary to repair the floor under the bowl, replace doubtful sections of pipes and fittings.
Assembling the finished support kit
Let's first look at the method for the prefabricated structure included in the package. Work is performed in a strictly defined sequence.
First, the frame is attached to the bowl turned upside down, then they are turned over together, put in place, leveled and secured.
Image gallery
Step 1: To attach the frame included in the acrylic bathtub, turn the bowl upside down and place it in a place convenient for work.
Step 2: Before attaching, place the frame on the bottom of the acrylic bowl to select the optimal position and mark the attachment points
Step 3: Let's look at the parts of the prefabricated frame included in the bathtub that need to be attached to the bathtub
Step 4: In the sides, at the points where the vertical stud posts are located, located in places of maximum load, drill holes and install long studs
Preparing the bath for attaching the frame
Fitting the welded frame to the mounting location
Preparation of fastening elements
Drilling holes for installing studs
After a successfully completed preparatory stage, we begin assembling the frame, strictly following the instructions of the plumbing manufacturer.
Depending on the brand and configuration of the product, there may be some deviations in the steps performed.
Image gallery
Step 5: To fix the position of the frame, tighten the nuts along the threads of the long vertical posts
Step 6: Focusing on the readings of the building level, laid in different directions on the welded frame, tighten the nuts
Step 7: Carefully level the frame and, if necessary, change the position of the nuts. Checking the strength of the fastener installation
Step 8: Assemble the legs of the bathtub from short pins and plastic supports, increasing the support area
Step 9: Carefully check the height of all legs used in installation, screw the retaining bushings onto them
Step 10: We install the legs with bushings and fix them to the frame
Step 11: If you plan to install the included screen, attach clamps to the sides of the bowl to secure the screen
Step 12: Turn the bathtub over, check that the bowl is horizontal with a building level, and adjust if necessary by tightening the nuts or bushings
Tightening the nuts to hold the position of the posts
Leveling long racks
Checking the strength and levelness of the installation
Assembling bathtub legs with plastic supports
Height adjustment and bushing installation
Attaching bathtub legs to a welded frame
Installing and Attaching the Screen Clamp
Installing the bathtub into working position
The frame is assembled and secured together with the bowl resting on it. All that remains is to connect the bathtub to the communications, install a siphon and hang a screen.
If there is no intention to arrange an additional supporting structure, then the actions are performed in the following order.
Image gallery
Step 1: Before finally attaching the screen, try it on the frame to immediately determine where you need to adjust the height of the studs
Step 2: If we planned to install a factory screen, then to fix it during assembly of the legs we also had to screw in magnetic clamps
Step 3: Aligning the magnetic holders with the complementary metal plate on the inside of the screen, snap it onto the top edge
Step 4: After hanging and fastening the screen, seal the gap located between the walls and the sides of the bathtub in contact with them
Trying the screen to the installation site
Magnetic screen fixing devices
Snap the screen to the top edge
Sealing the joint between the wall and the bowl
If a decision is made to make an additional reinforcing frame, a frame made of a bar or profile is arranged around the perimeter of the bowl.
Image gallery
If you want to equip your bathtub with a screen that harmonizes with the overall decoration of the room, the factory frame is not enough, you need an additional structure
Despite the angular location of the bowl, an additional supporting structure is built around the entire perimeter
To construct a frame for the curved side, several interconnected frames are installed
Installation of an additional frame for finishing
Frame structure for a corner bowl
Specifics of assembling a curved structure
Increasing the support area
Profile construction device
Let's look at an example of constructing a frame for a cast-iron bathtub, the two sides of which are adjacent to adjacent walls. To prevent water splashing from the shower head from spilling onto the floor during procedures, fill the gap between the sides and walls with polyurethane foam or treat it with plumbing sealant.
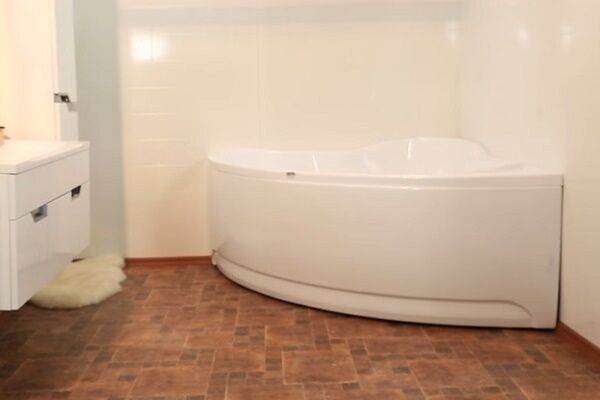
An acrylic bathtub is a structure that requires reliable, rigid support, as it has thin, plastic walls. There are several ways to install it, but the most reliable and practical is a metal frame. Sometimes a combined fastening method is used. If the bottom is thin and bends underfoot, the frame is combined with brickwork that supports the bottom. How to install an acrylic bathtub with your own hands is detailed in this article.
Required Tools
At the first stage of installing the structure, you should prepare all the necessary fixtures and tools, namely: 
- hammer drill with a drill of the required cross-section and length - for making holes in the wall;
- screwdriver– for tightening fasteners when assembling the structure; in addition, they can drill holes in the bath itself, if necessary;
- open-end wrench appropriate size - to adjust the height of the legs of the bathroom frame;
- construction corner– carry out inspection of corners;
- roulette;
- building level– to level the structure horizontally;
- pencil or a construction marker - for marking.
It’s also worth taking care of additional consumables in advance: sealing tape or plumbing corner– for sealing joints between the wall and the bathroom. But you can also use simple silicone sealant if the walls in the room are perfectly smooth.
Advantages over mounting on legs - which method is better?
Let's start with the fact that all manufacturers of this product recommend using specialized frame-shaped frames during installation, on which acrylic bathtubs are installed.
This design 100% evenly distributes the load on the bowl exerted by water and the weight of a person, preventing breakage and sagging of the body. At the moment, all manufacturers produce serial frames designed for specific models - there are no universal ones.
What is a frame? Herself frame frame- This is a structure made of a square profiled pipe, which is coated with a special powder composition, which prevents its corrosion in a damp room.
The skeleton consists of special stiffening ribs, supports for each corner of the bathtub and legs that can be adjusted by twisting. Despite the fact that high-strength fibers are used in the production of acrylic bathtubs, it is impossible to install the structure reliably without a rigid frame.
 Frame advantages:
- uniform distribution of load on the structure;
- the bottom of the bathtub does not “play” under your feet;
- reliable and durable installation;
- when mounted on a frame, fastening to the wall plays a purely symbolic function - so that the bath does not tip over. But such incidents do not happen in practice.
Flaws:
- are expensive;
- complicate installation.
As we see, the advantages of the frame are obvious.
As for the legs, their main advantage is considered to be only their low cost. The design is flimsy and unreliable - two crossbars are attached to the bottom of the bathtub on different sides, and then the legs are screwed to them. It is not difficult to assemble, but you should understand that if the bottom of the bowl is thin, you will have to mount a brick frame underneath it. Otherwise, the weight of an adult can bend it.
The advantages of this design:
- low price;
- ease of installation;
- ease of transportation.
Flaws:
- uneven load distribution, since the bathtub does not rest on anything in front;
- side mounting to the wall is required;
- the need to additionally construct a brick frame under the bottom of the bowl.
As you can see, there are many more disadvantages, besides this, no one will give you a guarantee that such a structure cannot simply tip over if the fastening to the wall turns out to be unreliable.
Choosing the optimal metal frame
There are several types of frames used depending on the quality of the material used to make the acrylic bowl;
- Frame without side supports for heavy-duty bowls. Included with such products there are no side supports, there is only the frame itself and legs. Bathtubs with high quality characteristics are installed on a frame that matches the shape of the bowl. The bottom of the frame is designed in such a way that the load is distributed as evenly as possible. In this case, the sides do not need to be fixed to the wall; they are made of durable acrylic and act as a reinforced upper frame. This type of support should in no case be chosen for cheap models, since their sides are not designed to withstand high loads on their own.
- Rigid design with side supports, which also supports the sides of the bathtub. Despite the fact that such a frame is difficult to install, it is considered the most reliable and versatile at the moment.
- Frames for corner bathtubs with hydromassage, made of square reinforced profile with a high degree of reliability and stability. They are much more expensive, but you don’t have to choose. Hot tubs are heavy and require strong support.
If the frame is not provided in the bathtub, and the manufacturer included only legs in the kit to reduce the cost of the product, it can be purchased separately. The main thing here is to know exactly your font, the most popular ones: 170x70, 160x70, 150x70,140x70 .
It is worth saying that to save money, you can make a frame for an acrylic bathtub yourself, but the work is dirty, labor-intensive and complex.
How to assemble and install correctly - step-by-step instructions
The process of installing an acrylic bathtub is not complicated, and you can easily do it yourself in a few hours, without the involvement of plumbers.

What is included:
- Metal profile with ready-made holes, cut to the required sizes;
- adjustable legs;
- thrust bearings;
- self-tapping screws;
- racks;
- nuts;
- locknuts;
- washers;
- wall stops;
- assembly instructions.
Before installation, you need to check the package contents, and if you find out that something is missing, contact the seller.
How to secure and adjust the legs?
So, all the tools have been collected, the equipment has been checked, you can begin installation:
STEP 1. We unpack the bathtub and place all the components in one place for easy assembly.

STEP 2. We cover the floor with soft rags or cardboard from packaging to avoid it, and carefully turn the bathtub upside down. We put it in the middle of the room so that it can be walked around from any side.

STEP 3. We assemble the bathtub frame according to the instructions supplied by the manufacturer: we observe all the indentations and fastening points specified by the manufacturer. You need to put the two longest profile slats on the bottom and screw horizontal strips for the legs to them using bolts.


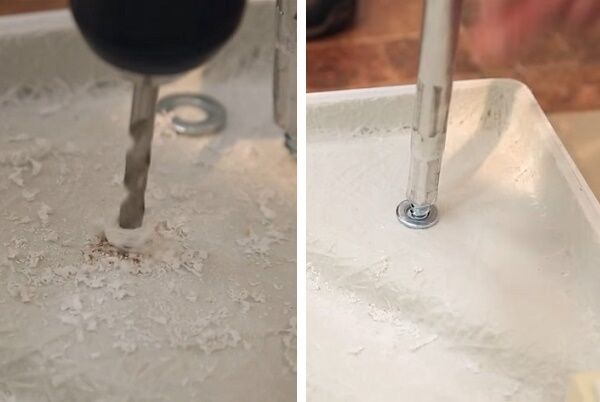
STEP 4. Assembling the legs. You need to screw plastic stops and washers with nuts onto the studs in the order shown in the picture.

STEP 5. We thread the pins with the free end up into the holes of the short profile.
Use your fingers to tighten the nut so that the distance between the stop and the bathtub body is 1-2 mm.


STEP 6. We screw onto the protruding end of the stud: a washer, 2 nuts, a washer and a leg - in exactly that order. Steps 5 and 6 must be repeated for all other supports.

STEP 7. Using a screwdriver and self-tapping screws, we screw the longitudinal profiles to the bottom of the acrylic bowl, checking that all the indentations specified in the instructions are observed.

STEP 8. Adjust the length of all legs and carefully tighten all nuts on the studs using a wrench.


STEP 9. We turn the bathtub over and place it on its feet. By twisting we adjust the height from the floor, it should not be more 65 cm– the most optimal and safe. You can check the horizon using a building level, and if there is a distortion, it should be eliminated.

If you want the water in the bowl not to stagnate, then you can make a small technological slope towards the drain, just half a centimeter is enough. To do this, after installing the structure in its permanent place, slightly raise the edge opposite to the drain by unscrewing the support leg.
Features of mounting a support for a corner and asymmetrical font
The process of installing the frame on a corner bathtub is practically is not different from installing it on a rectangular one, the only difference is that the number of profiles and fasteners varies slightly, it all depends on the specific manufacturer, so it’s worth studying the instructions in detail.
It is worth noting that corner and asymmetrical fonts have a fairly large volume, and the frame for them must be reliable and durable. It is highly undesirable to install such a font only on the legs, even if they are included with the product. Spare no expense and buy a bathtub frame made of profiled pipe.How to attach to the wall?
If your frame provides additional supports for mounting to the wall, you must use the following instructions:
STEP 1. On the underside of the edges on the wall we place marks with a marker.

STEP 2. We remove the structure and, using a building level and a marker, draw a line for the side of the bathtub.

STEP 3. We attach the side supports as shown in the picture and mark the places for drilling.

STEP 4. Using a hammer drill and an 8mm drill (depending on the size of the dowels, but usually 8 is used), we drill holes to the depth specified in the instructions.

STEP 5. We fasten the side supports to the wall using dowels and self-tapping screws.

STEP 6. For a better fastening effect, coat the support areas of the bathtub sides with sealant.

STEP 7. We place the bathtub along with the frame on supports. Press well, fill with water and coat the joint with the wall with sealant or cover it with a corner.

Now you can work on sewerage and screen installation.
Useful video
For information on how to install a bathtub on a frame, watch the video below:
Conclusion
You can install an acrylic bathtub of any configuration on a frame yourself, if you follow all the recommendations of specialists and follow the instructions. But if you don’t have confidence in your abilities, then it’s better to turn to professionals. Remember, the acrylic structure is very fragile and can burst if handled carelessly.
This article is instructions for installing a bathtub from making the frame to finishing the finished structure. Particular attention is paid to the frame.
The frame for an acrylic bathtub does not always come with it; in some cases (for example: individual order, bathtubs of non-standard shapes) you have to make it yourself.
Preparatory work
Using the example of an oval bathtub, we will consider the construction of a frame fixed on both sides to the walls, followed by its construction.
The design is (from bottom to top):
- the base of the frame is a wooden beam that follows the shape of the bathtub;
- racks are vertical elements. In rare cases, often associated with inconvenient installation, it becomes necessary to install braces;
- an upper belt, the purpose of which is not only to transfer the load through the racks to the base, but also to provide spatial rigidity of the structure;
- a sheet of chipboard (or thick plywood), with a pre-made hole that matches the contour of the vertical surface of the bowl. Allowance is made to the larger side. This element is used only for non-rectangular bathtubs;
- all elements are fixed to each other.
In the case of rectangular bathtubs, the frame dimensions are calculated based on the fact that the outer (finishing) layer is flush with the outer edge of the bathtub rim.
In order not to damage the decorative enamel of an acrylic bathtub, whenever possible, all necessary values are calculated, instead of taking all dimensions on site.

To purchase wood, you need to understand the amount of timber: the upper belt is made around the perimeter of the bathtub. The distance between two posts should not exceed 500 mm. Also, for ease of installation, racks are additionally installed near the walls. Functional need for using racks and bases near walls. In case of refusal of these elements in the wall section, the upper chord is fixed directly to the wall. The material is ordered taking into account a margin for trimming of 5-10% and a multiple of the ordered size of the timber.
The algorithm for calculating the height of the rack elements is as follows:
From the mark of the top of the bathroom (its height to the floor level), the following thicknesses (vertical dimensions) are subtracted: the base and top belt beams, the height of the insulating layer located between the base and the floor covering and necessary to protect the wood from condensation.
Don't forget to pay attention to the possible slope of the floor
We cut the frame elements and cover them with protective enamel. This will increase the durability of the wood in a damp room. Let the coating dry.

- We fix the base to the floor with anchors or dowels, depending on the design of the floor.
- We secure the racks to the base using shorts or other elements designed to connect horizontal and vertical beams. Installation is carried out using self-tapping screws.
- Using the same connecting elements as in the previous paragraph, we secure the upper belt. We glue the insulation where the top chord is attached to the wall.
- We place a prepared sheet of waterproof chipboard (backing) on the frame. We fix it with self-tapping screws (preparation of chipboard for installation is given below).
We place the base elements on the floor, pre-glued with insulation.
As a substrate, moisture-resistant chipboard with a thickness of at least 25 mm or moisture-resistant plywood (FK or FSF) with a thickness of 15 mm or more is used.
Cut a hole in the chipboard for the bathtub:
- Using a template, transfer the dimensions of the hole onto the sheet. The template is provided with the bathtub;
- The hole is cut using a jigsaw or a narrow hacksaw, if one is not available;
- Place it on the frame and try on the bathtub.
If everything worked out correctly and all the dimensions matched, we take out the bathtub and fix the sheet. We cover unpainted wooden and metal elements with a layer of protective enamel and let them dry.
Installing a bathtub on a frame

A more convenient and correct option is when ceramic tiles have already been installed on the substrate, but it happens that in order to save time, the bathtub itself is first installed, and only then the tiles are applied to it.
Knowing the thickness of the tile and the height of the trowel tooth used to apply the adhesive mixture, we determine the height of the cement-sand cushion. To do this, to the mark of the top of our frame, add the thickness of the tile and half the height of the spatula tooth, subtract the size from the bottom of the side to the bottom of the base of the bathtub. We have the top of the pillow marked. Having the height of the cushion and the required support area for the base of the bathtub, it is easy to calculate the amount of cement-sand mixture.
In the case when the tile is already glued, the height of the cushion will be less by the thickness of the tile itself and half the height of the trowel tooth.
After filling the pillow, carefully install the bathtub into the design position. If at the time of installation the work on covering the substrate with ceramic tiles has not been completed, to compensate for this distance we use linings purchased in the store or prepared from scrap materials. The pads should be placed evenly around the entire perimeter of the bath in increments of 400 - 500 mm. Let the solution set.
After installing the bathtub, we connect the communications.
Finishing work
In order to reduce the noise level (the pillow partially performs this function) from water entering the bathtub, insulation, for example extruded polystyrene foam, can be inserted into the frame. It is cut to dimensions 2-3 mm larger than the frame cell and inserted flush with the outer edge of the beam. Don’t forget to leave room for an inspection window, which you can buy in a store or do it yourself. The inspection window should be located so as to provide access to all communications.
Let's start installation:
- As a base for ceramic tiles, you can use moisture-resistant plasterboard sheets (2 layers) or cement-bonded particle board, or other moisture-resistant sheet materials.
- We lay the tiles on the base using an adhesive mixture.
- We grout the tile joints using sealant.
Steel frame
Work on the construction of a ferrous metal frame is not much different. Therefore, let’s pay attention only to the nuances:
- Angles or profiled pipes are used as a profile.
- Bolts or welding are used to connect frame elements to each other.
- The design of the frame is calculated based on the fact that the weight from the bathtub is correctly perceived by it.

The key to success in this work is not only the choice of quality materials, but also compliance with these instructions.

