How to make the lightest crossbow. DIY crossbow
Each of you, since childhood, knows what bows are and what they look like. Let's say even more. You've probably tried to make a bow yourself more than once, and then, holding a homemade weapon in your hands, chased cats through the trees and scared the girls. Some people ran with a bow, while others found it easier to make a slingshot, especially since the principle of their operation is almost the same. Moreover, even a girl could make a slingshot.
How to make a simple crossbow with your own hands
For this all you needed was a suitable stick and an elastic band. Then they tied an elastic band in a forked stick, took a small pebble and went to hunt sparrows. To successfully shoot from a slingshot, you had to take a small pebble, place it in the center of the rubber band, pull it with all your strength and quickly release it, in a similar way to shoot from a bow.

photo. Homemade crossbow
Today we just cheerfully remember our childhood fun, homemade weapons that brought so much joy, although in adulthood we replaced toy bows and slingshots with more modern and serious weapons - crossbows, hunting or sports bows. Let's just say that the design is practically the same, only more advanced, with many important elements, sighting and block mechanisms.
You can buy such small arms at any specialized store, but our desires do not always coincide with our financial capabilities. Therefore, we are not at all surprised that many fans of shooting with crossbows and bows want to make homemade small arms with their own hands. Despite the fact that this is not so simple, since you need to have the correct crossbow drawings, it is much more economical. Well, if you feel that you can make a crossbow yourself, then why not try it!

What is needed to make a homemade crossbow?
Bows differ from crossbows in their design; they are a little bulky and inconvenient to transport, which is why most hunters give their preference to the second weapon option. But if you decide to make a crossbow with your own hands and are ready to get to work, even now, we must stop you. After all, in order to make such a weapon, desire and hard work are not always enough; you need to be at least a little prepared financially and technically.
It is also not enough to take the first drawing you come across and start drilling, cutting, planing, sharpening a crossbow from scrap materials. Believe me, the result may bring little joy, because as a result, the crossbow may turn out to be either too heavy, not very convenient, or may not meet your requirements and dreams at all.
So, what do you need to make your dreams, which would satisfy you? First of all, decide which model you want to make. After all, today there are many options for crossbows that differ in their design, features and characteristics. Then you need to think about what available materials you will make it from.

photo. Homemade crossbow made of wood
How to make a crossbow trigger at home, a sight, a rod, a lock, a reel, a crossbow stock for a crossbow with your own hands - required parts and spare parts for a crossbow
Well, now you need to remember something about crossbows. So, what does a crossbow consist of:
- bed;
- guides;
- trigger mechanism;
- tension device;
- bowstring;
- arrows.
In addition, such small arms differ in the level of tension of the shoulders:
- crossbows with a tension level of about 20 kg. These are models used for recreation and entertainment;
- crossbows with a tension level of up to 20-55 kg. The target range of such devices is about 60-80 m;
- crossbows with a tension level of more than 55 kg. In such devices, the tension of the bowstring is performed using special devices called cocking.
According to the type of shoulders, crossbows are:
- block;
- straight;
- classic.
The stock in crossbows can also be of different types:
- traditional;
- ancient type;
- sports type.
Having a basic understanding of crossbows, you can make a choice of design drawings for small arms. But before that, we recommend that you pay attention to one more important detail, namely your technical capabilities. Of course, you can make a crossbow with your own hands from scrap materials, using wood and metalworking equipment. Such machines are necessary to produce important parts that require machine work.
.jpg)
Image of a handmade crossbow
How to assemble a crossbow: an antique wooden medieval crossbow or a homemade modern six-shot combat crossbow according to the simplest schemes with proportions and dimensions
As a rule, making a crossbow begins with a stock, and for this you need to choose wood. The wood used to make the stock must be strong, not splinter or warp. Birch, beech, walnut, and ash are considered excellent options. There should be no problems with choosing a tree.
A wooden board with a thickness of about 30 cm is suitable as the starting material for the stock. Next, you need to decide what dimensions the stock should have. How to choose the right size can be seen in the table.
The stock is measured starting from the trigger to the points located on the back of the butt. We will also give an example of a table of different sizes in order to correctly make a bed, taking into account the parameters of your own physique.
| Arm length cm |
Stock length up to middle of the back of the head butt, cm |
Pupil height above collarbone, cm |
Vertical bend from the extension of the aiming line to the upper ridge of the butt, mm |
Chest Width between axillary depressions, cm |
Lateral removal of the butt from vertical aiming strip, mm |
||
| at the neck | at the back of the head | in the heel of the butt of the head | in a sock | in the sock in the sock of the back of the head butt | |||
| 42 | 38-40 | 23 | 42-44 | 66-70 | 50-52 | 18 | 6 |
| 41 | 37-39 | 22 | 41-43 | 65-69 | 48-49 | 17 | 5,6 |
| 40 | 36-38 | 21 | 40-41 | 64-68 | 46-47 | 16 | 5 |
| 39 | 35-37 | 20 | 39-40 | 63-65 | 44-45 | 15 | 45 |
| 38 | 34-36 | 19 | 37-38 | 60-62 | 42-43 | 14 | 4 |
| 37 | 33-35 | 18 | 35-36 | 58-59 | 40-41 | 12 | 35 |
| 36 | 32-34 | 17 | 34-35 | 57-58 | 38-39 | 10 | 3 |
| 35 | 31-33 | 16 | 33-34 | 56-57 | 36-37 | 8 | 2,5 |
| 34 | 30-32 | 15 | 32-33 | 55-56 | 34-35 | 6 | 2 |
| 33 | 29-31 | 14 | 31-32 | 53-54 | 32-33 | 4 | 15 |
After you measure your body, according to the table, you can choose the most suitable sizes for the bed. If you take into account all the nuances, then the bed will suit you in the best way.
Next, you can begin the process of making the stock. First of all, we recommend that you create a template from paper. To do this, you need to draw a bed on paper according to the measurements taken. But if this seems too complicated or unclear to you, you can use ready-made stock options, the drawings of which are presented on Internet portals.

photo. Homemade arrows for a crossbow
Next comes the turn of making the arms of small arms. It is necessary to select the right material. You can make shoulders from an old, long-decommissioned sports bow; if you don’t have one, textolite or fiberglass will do. True, from such materials only arms with a small tension force are obtained; in the future you can use such a crossbow only for entertainment purposes. An old, unnecessary car spring is considered an excellent option. It can be found at any car junkyard or in a neighbor's garage. In addition, if you are not too lazy to go to the store, you can buy fiberglass, carbon fiber or other composite materials to make shoulders.
It is worth saying that shoulders made of fiberglass or composite materials turn out good. If you decide to make a crossbow with your own hands from scrap materials, then a car spring would be the best option for the shoulders.
Drawings of a crossbow, what a crossbow can be made from - a crossbow from a saw, board, plywood, bow and other materials. We make a crossbow with specified characteristics
So, you already have an idea about the types of crossbows, you can say that you are technically and physically prepared, you have collected all the necessary materials at hand and are ready to start working right away. So, let us help you a little by providing the necessary drawings for making a crossbow with your own hands, which will have the following characteristics:
- weight up to 3 kg;
- dimensions 960*820 mm;
- tension force up to 40 kg;
- target firing range is approximately 100 m.
Let's start making the mount. To the part as in the figure, you need to attach the stock and shoulders of the crossbow:

The part needs to be cut out of a metal sheet, which will have a thickness of 2.5-3 mm. Then it needs to be bent and welded with a welding machine. We insert two bolts into the hole in the center of the fastening element and at the end of the stock of the crossbow structure. You need to weld a stirrup to the fastening element as in the picture to make it easier to tighten the bowstring.

The stirrup can be bent from wire having a diameter of 6-8 mm.
To make the shoulders you will need a car spring 6 mm thick.

On the wide part of the shoulder you need to make 4 notches, slightly semicircular. These will be the holes for the bolts that will allow you to attach the arms to the mount. Drilled holes can weaken the arms and cause them to become deformed. Let us give you an example of a drawing of the shoulders and deck of a crossbow device:

photo. Crossbow drawings
A stock taken from small arms will reduce the time and costs of making a crossbow. The main thing in this is the correct selection of the size of the bed. If there is a trace left from the trunk in such a stock, then it can be hammered in with wooden blocks using epoxy glue. In addition, if you want to make a crossbow with your own hands, then you can use wooden parts to make the under-barrel pad and butt. The buttstock must be attached to the guide and serve as the basis for the trigger device. We present to you the drawings of the butt:

The crossbow that we propose to make yourself is a block one, so to make it you will need drawings of the block mechanism:

Also in your work, drawings of block elements and individual parts will greatly help you:


The guide lines must be processed very carefully, because they must be perfectly smooth and straight. The guides will also need to be polished. You can see the dimensions of the groove for the guides for the arrows in the presented drawing.

The crosspiece to which the shoulders are attached must be installed at the end of the stock. You can make a cross from aluminum or wood. The sighting mechanism consists of a rear sight and a front sight. You can make a crossbow with an optical sight, although for this you will need to include an aiming bar in the design of your homemade weapon. After you have made it according to the drawings, you will have to make its vertical and horizontal adjustments. The presented drawings are suitable for making a crossbow, which can be made from any available material.

photo. Ready homemade crossbow
It is worth saying that you can find options for drawings of a wide variety of crossbow models, block, recurve, on the Internet. Making them with your own hands is not so difficult, the main thing is to have a great desire and no obstacles can hinder you in your endeavors. If you don't try, you will never know whether it is difficult to make or not. Therefore, we recommend that you don’t miss your chance, prepare the necessary materials, arm yourself with the necessary tools, print out all the drawings and start making a homemade crossbow with your own hands. Good luck to you!
Watch how to make a simple but powerful crossbow with your own hands video - the simplest six-shot crossbow from a saw:
The crossbow was invented by the Romans many centuries ago. Later they stopped using it in battles, but seven hundred years later the Europeans brought the weapon back into use, having modernized it well. You can try yourself in the role of a warrior now. If you can’t buy an expensive weapon, then we will make you happy. You can make a simple crossbow with your own hands at home.
A handmade homemade crossbow is made of wood, paper or metal. It all depends on what you have on hand at home and what you will use it for.
There are recommendations on how to easily assemble a block, spring, toy and repeating crossbow yourself, using step-by-step instructions and simple diagrams. Therefore, everyone has the opportunity to use the hidden weapon of an assassin or arrange a battle with colleagues using a small wrist office crossbow made of cardboard.
The history of the crossbow
The main advantage of a block or simple crossbow compared to a bow is that there is no need for training or special skills. There is no need to use force to aim here. Due to the levers, the device helps to cope with the bowstring.
In past centuries, many officials and rulers considered the possession of these weapons a dangerous undertaking, as they were afraid of a riot. Therefore, the Weapons Control Order was soon issued, when crossbows were banned throughout Europe. But after the outbreak of hostilities with the Turks, the decision was canceled. Richard the Lionheart made it the main element in the equipment of his warriors.
Making a crossbow yourself is not so easy, but it is possible if you have basic design skills, drawings and a few power tools. You are required to comply with safety precautions, since you are, after all, creating a weapon. Therefore, it should not be directed at people, nor should it be given to small children.
Nowadays you will no longer need medieval spare parts in the form of animal bundles or special fibers; improvised materials will do. But this is enough to shoot at cans or bottles.

How to make a crossbow from wood
A wooden shooting crossbow made of PVC or plywood block type is the most famous option.
Manufacturing instructions:
- take a piece of wood that will be the base, attach a metal plate or corners to the end;
- take another block, smaller in size (about 5 cm wide, 2 cm thick), make holes on the sides, place it at the base, 10 cm from the edge;
- in two 15 cm plates in the middle, make fastenings for springs, make a hole at the edge for installing the shoulders to the base;
- on the other side of the plate, make holes for a roller, which is sold in any market. Repeat these steps with the other plank;
- attach the shoulders to the base;
- use small spring springs (they act as a return mechanism), attaching one end to the shoulders and the other to a steel plate;
- Install rollers on the edges of the smaller beam, secure the part at the base;
- create two guides from organic glass;
- build a trigger mechanism from clothespins, rubber bands or something more powerful;
- paint the device and place the butt in a place suitable for your hand.

How to make a crossbow out of paper? Even easier!
Making a paper crossbow from cardboard that also shoots is as easy as shelling pears. Paper weapons shoot arrows from pencils, pens, matches, Lego skewers or rulers. In general, anything that is light in weight and looks similar to real arrows. For production you will need:
- 12-18 sheets of paper;
- three spatulas or ice cream sticks;
- threads;
- scissors;
- pencil;
- paper knife;
- scotch.

Step-by-step instruction:
- fold five sheets in half;
- straighten and cut at the bend;
- screw the halves onto a pencil and secure with tape;
- put a 4 cm mark on the stick (spatula) and on the tube;
- insert the spatula to the mark, then break off;
- wrap the tube with tape for strength;
- bend the sides of the crossbow;
- take five sheets of paper and wrap them around a pencil;
- attach the sides to the tube;
- fasten the bowstring, tighten it and make a mark at the limiting point;
- make a hole for the hook;
- make a hook from a piece of stick and secure it in the hole;
- cut one sheet in half, twist the tubes and secure in the descent area;
- make another tube measuring 5 cm, insert it into the front part (it will be a guide).

How to make a mini crossbow for a child
A small children's crossbow will be an unusual gift for a child. The power is small, since the bowstring will be a simple elastic band. This will require a minimum of materials. It is done like this:
- you need to connect three small boards together;
- make the shoulders from metal and secure with screws;
- cut off the gripping part from the clothespin;
- the handle can be taken from a ski pole and installed using glue;
- you can make a couple more shoulders for the elastic bands; bearings that are attached to a common plate are suitable for this;
- for the pusher, take a small piece of wood, which is driven under the clothespin;
- a groove is made for attaching the bowstring;
- a bowstring is created from a strong elastic band;
- for the trigger, just take a spare part from a children's pistol and attach a metal part to it;
- connect the shoulders and the base;
- attach the trigger mechanism with a screw;
- fasten the elastic band;
- secure the sight, if desired.

How to make a powerful crossbow for hunting or fishing
To create a real military weapon for hunting or fishing, more serious parts and diagrams will be required. What are the shoulders made of? Take a metal bow, make the stock out of wood, and make the bowstring out of elastic synthetic fibers.
The mechanism and fastenings made of bolts are the most difficult thing; only those who know how to work with metal can do it. But you can order the necessary spare parts in the workshop according to the drawings, and then assemble everything at home. But bolts and nods are easily made from wood or plastic, arrows with tips are made from wood or iron rods.
Not everyone can assemble a hunting or underwater crossbow. Therefore, it is better to entrust the work to a master to be sure of the result.
Video instructions on how to make arrows for a crossbow
Video instructions on how to make a toy crossbow
One of the most popular types of small arms is the crossbow. And although hunting with such a device is prohibited in our country, there are still many who want to acquire such a “toy” in order to shoot at targets. At the moment, you can buy such weapons on many websites or in stores, but such a purchase will be very expensive. It is much more profitable to make a crossbow with your own hands at home, and you will find out what is required for this below.
Preparation
Today there are many varieties of this sporting weapon. First of all, these are classic models familiar to us from historical films and block crossbows - modern weapons equipped with complex mechanisms. The last option will be quite difficult to create at home, so let's focus on the classic one.
What parts does a crossbow consist of:
- Trigger;
- Bowstring;
- Crossbow stock;
- Bolts and arrows.
Making a crossbow at home will be much easier if you immediately stock up on all the necessary materials and tools. For this you will need:
- Well sharpened knife;
- Hammer;
- Drill or brace;
- A regular hacksaw, which can be replaced with a grinder with a wood disc;
- Plane;
- Chisel.
How to make a crossbow with your own hands
In addition to the tools to create this small weapon, you will need a piece of wood measuring 900 mm in length and 30 mm in thickness. In this case it will do:
- ash;
- hazel;
- poplar.
- birch.
First of all, you need to prepare a wooden blank. To do this, cut the branch to the required size and paint over the cuts. This must be done so that the liquid comes out of the wood slowly and evenly. Please note that the wood must lie in a dark place for at least a year, only in this case the weapon will fire with special power. After this, the bark is removed from the workpiece and left to dry for another week. Next, the log is sawn into two parts and the crossbow itself is made from the northern part - the strongest.

Draw the stock of the weapon on the board and cut it out using a hacksaw or grinder, then make a small groove for arrows on the top of the workpiece. On the front side, cut a groove in which you will attach the arc. If knots or chips appear on the stock during the process, remove them with a knife and treat the area with sandpaper.
How to make an arc
For this part you will need a flat board with a length of at least 750 mm, a width of 200 mm, and a thickness of 60 mm. We dry the workpiece well and let it stand for several days, and level it. The width of the part in the middle is 40 cm, and at the edges it narrows to 15 cm.
At a distance of 100 mm from the cut groove for this part, we create a through hole through which we stretch the rope - it will become the main fastener for the crossbow arc. Then we insert the part into the groove and fasten it firmly with a rope, as shown in the bottom figure.

This part plays a fairly significant role in the “lethality” of the weapon, and to create it you will need the following materials:
- nylon threads;
- wooden plank;
- two nails without a head;
- rubber glue.
First of all, you need to make a special machine for weaving this part: take a rope and measure the length of the bowstring. After this, saw off a board with dimensions slightly larger than this parameter. Next, mark the length of the string on the board and drill two holes in these places - this is where you need to insert your nails.
Take the thread, tie it to one of the nails, and leave a margin equal to the length of the bowstring. After this, begin to evenly wrap the threads around the nails (Dacron is best). Continue this process until the base of the bowstring reaches 5mm. To do this you will need to make 5-6 full turns. Try to keep the threads equally tight.
Next, wrap the base near the nails on both sides several times with wrapping material. This will create loops at the ends. You can understand how to do this from the above diagram. Do not forget to wrap the middle of the bowstring, because this part suffers greatly from friction. Tie the cut ends of the threads with a sailor's knot and lubricate them thoroughly with glue so that the entire structure is strong. After which you can pull the bowstring onto the arc and adjust the degree of its tension.

How to make a trigger mechanism
The simplest option would be a pin-type lock; we will choose it for our weapon. Pull the string as far as possible and drill a through hole in this place. Also make a small transverse recess at the top of the crossbow stock. Now secure the lever at the bottom of the part. Make a wooden axle and secure it with wire.
Secure the stock and lever with ropes so that the latter moves with maximum friction. The depth of the “ammunition” groove should be equal to 1/4 of the volume of the arrow, and this recess must be “sawed” from the top of the lock to the front edge of the crossbow.

How to make arrows
In order to get ammunition for your small arms, you don’t have to run to a sports store, because you can easily make it at home. To do this, you will need several ordinary wooden blanks, which need to be well planed and treated with fine sandpaper. It is better to choose light types of wood for arrows; in this case, shooting will be more accurate. As for the tip, if you don’t have special ones, then sharpen the tip of the arrow - with such ammunition it will be quite possible to shoot at targets. You should not drive nails into the head, because this increases the chance that the arrow will split when it hits the target.
Be that as it may, you should remember that in our country, shooting with crossbows is equivalent to using firearms. So if you want to make such a device, then under no circumstances use it for its intended purpose. Treat your crossbow as a beautiful souvenir, and then the law will not have any claims against you.
A very popular weapon now is the crossbow. Despite its complexity, a crossbow can be made at home. In past ancient times it was used as a formidable weapon. Nowadays the crossbow is used in shooting range sports at short and medium distances. Nowadays you can buy everything, including a crossbow. But it’s much more interesting to do it yourself. For those who are skilled in craftsmanship and know how to use machines and tools, this will not be difficult.
Previously we described how to do it, if you are interested, take a look.
For a crossbow we need a wooden blank and iron.

The wooden blank is cut to these dimensions.

We take a spring plate measuring 650×100×8. Use an angle grinder to cut off the excess little by little. We make an arc measuring 35 mm - this is in the middle and with edges of 18 mm.

Using an emery machine, we reduce the edges from the middle to the edge, reaching 5 millimeters in thickness. We stretch a steel dart onto the arc (or a cable). We fix it firmly. In order not to interfere with the arc bending exactly in the middle, we place a round piece of wood. Simultaneously with tensioning, we look at the tension and tension gap.
These dimensions are the basis for our work on making a crossbow at home.

We saw the iron blank and get a part that will be the main one in our crossbow - the hook, it is also called the “cat”.


To make a lock we need a trigger and a sear. On top of the axle we make a hole into which the strip spring bolt should fit, which secures the pin from moving


Next we will make the lock and body.

We measure very carefully and make holes for the pins.

Then we make protection for the trigger and measure it to the wooden base.

Cut a hole for the lock.

Inserting the lock


We attach the rear sight. We make a dovetail and solder an aiming device to it. Depending on the heating temperature during bluing, this can be done with POS or PSR.

It is necessary to drill holes in the arch; this must be done with a Pobedit drill. All this is necessary to attach the clamps.

We sharpen the rollers to the required sizes.

We cut the clamps to the size we need and then fasten the clamp to the bow of the crossbow.


Making stirrups

I clamp the string (cable) with a vice. Advice, do not try to rivet, you need to squeeze!

In the process of production.

Detail made.

We make an opening for the guide from a wooden blank

We glue a metal strip in the form of a groove.

Using cutters and wood chisels we make the stock.

I don't think that when we decide to make a crossbow, we will have at hand all the tools we want and a bunch of raw materials. Therefore, it is difficult to predict what our crossbow will be made of, so we will simply consider the main components made with minimal complexity. We will also, if possible, avoid metal parts.
In order to present a general view of what should happen, I will give a picture from the site www.daslife.ru.
Naturally, I do not suggest doing everything according to size, just taking into account the overall structure.
One of the most important parts of a crossbow is the arc. As you might guess, it has a decisive influence on the speed of the arrow, and therefore on the combat power of the crossbow. An arc can be made from both wood and metal. A wooden arch can be either made from a single piece of wood or combined.
The option using one type of wood is the simplest, but also the least powerful. Almost any type of wood is suitable for manufacturing: ash, maple, hazel, juniper, birch, oak, yew, elm, white acacia. You can use both thick branches and trunks of young trees. Ideally, take the harvest in winter when there is no sap flow; naturally, the worst time is in spring. As you might guess, a workpiece with knots is a completely unsuitable option. In general, making an arc is in many ways similar to making a bow, and you can read about it on Hobbit's blog.
Making a composite arch is not cheap, because it requires covering the arch with tendons and horny plates. Most likely you won’t have either one or the other, or glue on hand =)
Although we agreed to use wood, it is worth noting that the springs of Soviet passenger cars will make very powerful arches, and if possible, they should be used.
Attaching the arc to the stock is usually done to the end of the crossbow using ropes, through a window 10-15 centimeters from the arc. The picture shows examples of fastening the arc; as you can see, wooden wedges can be used to secure the arc. 
Another important element is the trigger mechanism. Let's consider the simplest option - a pin lock. 
When erected, the bowstring hooks onto the protrusion, and underneath there is a cylindrical pin (1) that rests against the body of the trigger lever (2).
Also, to ensure that the arrow does not leave the crossbow before the shot, it is recommended to apply a little pressure. Similar to the one shown in the photo. 
The crossbow stock, the recess in which the arrow is located, is perhaps the most labor-intensive part of the crossbow and requires filigree processing. If we don’t have a metal stock processed on a milling machine (and we don’t), we can replace it with a carefully sanded wooden one. Do not forget that the advantage of a combat crossbow over a wooden bow is not only in shooting power (although a homemade crossbow without rollers and a block system is unlikely to exceed a bow in this indicator), but primarily in the convenience of its design and the ability to conduct aimed fire. To do this, it is necessary, taking into account the flight path of the arrow, to adjust the stock so that it is located at an angle. The average value is 5.6 degrees, but we advise you to decide on the distance at which you will send the arrows, and what is called “shoot” the finished product, after each series of shots changing the angle of the stock until your homemade crossbow begins to send arrows exactly at target.
Well, the last point is the bowstring tension device. Since the tension force of the crossbow arc can exceed 100 kg, at least the simplest device for tensioning the crossbow should be provided. 
And finally, a photo of a homemade crossbow. 
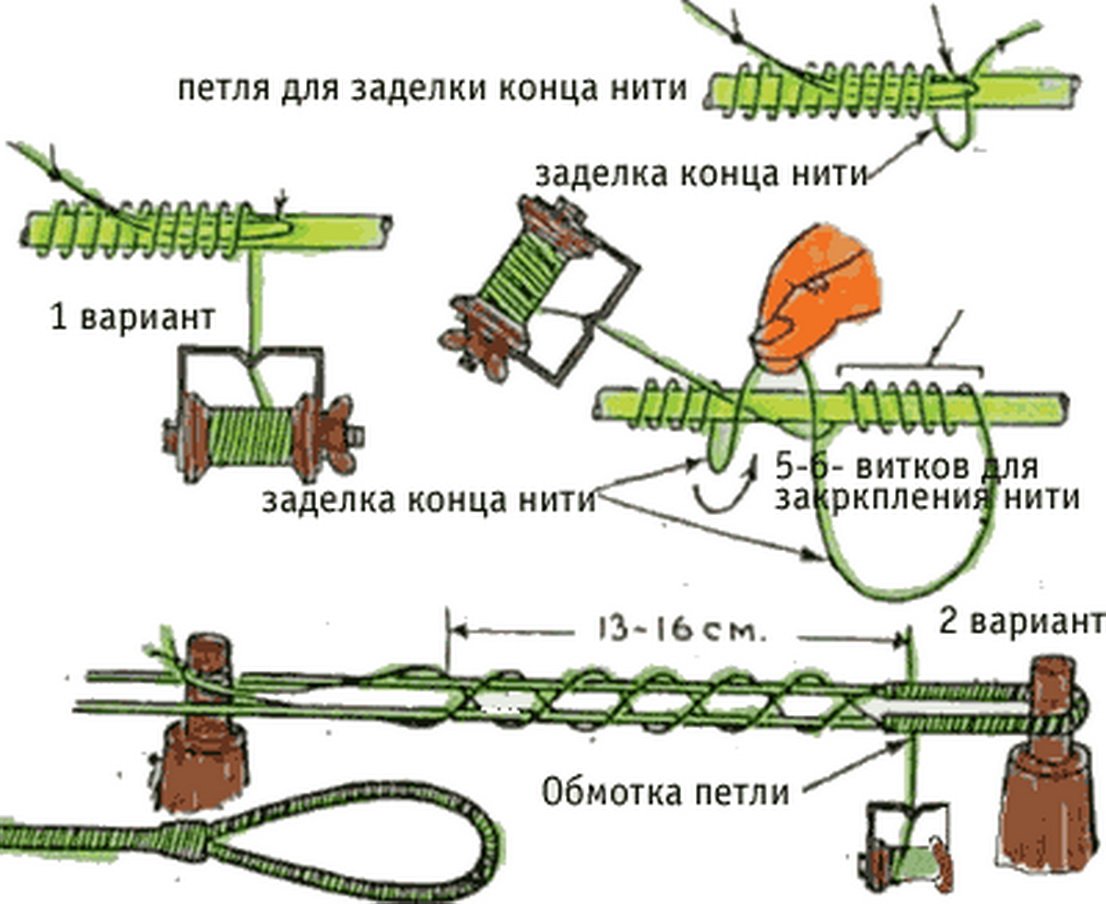
Making a crossbow string(taken from www.turmaster.com/)
During a shot, the bowstring receives significant tension and rupture pressure; therefore, one of the conditions imposed on it is its ability to withstand a large number of shots, i.e. have durability, vitality. In addition, the bowstring should be light and low-stretch.
The following threads are used to make bowstrings: lavsan, dacron, kevlar, deinema, SVM, fastflight and other synthetic fiber threads.
In this case, you need to have a simple device.
As can be seen from the figure, it consists of a wooden plank, in which on one side there is a slot and a movable threaded rod, allowing it to be installed and secured in different places; at the other end of the plank on the axis there is a V-shaped part made of plywood or wood with a thickness of about 10 mm. Two rods are permanently fixed at the ends of the part. The V-shaped part is fixed in two positions. The first position is shown in the figure, in the second position the two rods are in line with the movable rod.
If such or a similar device is not available, the string can be wound between two nails driven at the required distance along the length of the string. Winding the thread is done in a circular motion of the hand with uniform tension on the thread. The number of threads depends on the strength of the bow
After the bowstring is wound, a safety winding is made of the loops and its middle.
The safety winding is made using twisted silk thread, nylon, nylon, or cotton bobbin thread. When making a bowstring from Kevlar threads, it is necessary to strengthen the loop, either by making additional padding from the threads and weaving them into the bowstring, or by doubling the number of them in the loop. After winding the middle of the loop, the V-shaped plate is rotated to its original position and the end of the bowstring is wound.
The second loop is wrapped in this way. In this case, it is necessary to accurately maintain the middle of the winding. The string attached to the bow should not have sagging threads; their presence indicates poor-quality manufacturing of the string. As a rule, this happens if the windings are not made with the same tension.
The safety winding in the middle of the string is made at the moment it is put on the bow. The safety winding should not be made too tightly: this significantly extends the service life of the bowstring.
To protect the bowstring from moisture, lightly rub it with beeswax. The wax should be rubbed in carefully so that the string threads do not break or become deformed. It must be remembered that lubricant increases the weight of the bowstring and leads to a decrease in the speed of the arrow, so it should be lubricated with a small amount of wax.
The threads from which the bowstring is made, under the conditions created by the work of the shoulders, are lengthened (from lavsan or dacron by 2-3%, from Kevlar by 0.8%). In this regard, when making a bowstring from Kevlar, it is recommended to make it slightly longer than from Dacron and Dacron.
Shooting practice involves replacing bowstrings after 5,000-10,000 shots. Kevlar bowstrings last significantly less and can withstand about 2000-5000 shots.
By twisting the bowstring, you can change its size until the accuracy of shooting becomes satisfactory. The maximum number of turns to change the length of the bowstring is 30. If more turns are required, it means the string is too long and a new one should be made
Making a crossbow string 
Metal rope string
A cable with a thickness of 1.5 - 2.5 mm is suitable for making a crossbow bowstring. But it has a number of features that must be taken into account. In general, a bowstring made of synthetic threads is more preferable.
Features of using a metal cable:
Structurally, the cable is designed for static loads. Under dynamic loads, it collapses much faster.
Over time, the cable will stretch and, accordingly, the bowstring will weaken
The mass of a rope bowstring significantly exceeds the mass of the same bowstring made of synthetic materials. This indirectly affects the speed of the arrow, since the arms require more energy to accelerate the massive cable.
When chafing or excessive stress occurs, the cable, as a rule, breaks in places of kinks, knots, fastenings
You can get loops at the ends of the cable by tying it with an ordinary oak loop. Soldering, as a method of connecting cable ends, is less reliable in operation. Riveting the ends of the cable in a copper or brass tube has worked well. 
Loops for attaching a bowstring to a crossbow.
Some examples of more complex trigger mechanisms