How to build a garden gazebo. Do-it-yourself gazebo made of wood step by step: instructions with photos
The further activities that you will carry out in the gazebo will depend on the location of the structure. That is why it is not advisable to install it in an open place, because it will be very hot and stuffy inside - it is best to choose a small area in the shade of a tree. If there is a small pond or fountain on your site, you can start construction there. The simplest gazebos for summer cottages are built from wood – it is the creation of such a structure that we will talk about today.
It is very important to prepare the material for a long service life if you do not want the gazebo to fall apart after several winters. Thus, it is advisable to coat wooden beams to create supports from below with an anti-rotting impregnation and wrap them with roofing felt and film so that the wood does not rot. And the cladding boards are pre-treated with drying oil or mastic, which protects the material from rotting and attacks by insect pests.
The simplest do-it-yourself gazebo - instructions and construction steps
Of course, you can purchase a ready-made design, but this will be quite expensive. Moreover, the construction of the gazebo, which we will tell you about, will take you a maximum of a week! The main thing is to do everything according to the rules.

Interior decoration: how to decorate a vacation spot?
Knowing how to build a simple gazebo, you can begin to carry out the work. However, upon completion, you will find that something is missing inside. Interior decoration will help you complete construction. The inside of the beam should also be covered with plywood or sheets of plasterboard, which are covered with wallpaper or painted on top. For reliability, the laid floor can be covered with linoleum, which does not allow water to pass through.

We will send the material to you by e-mail
B A gazebo is an indispensable attribute of a private house, a country cottage and just a dwelling that has a separate plot of land. It will protect from sun rays, rain and other adverse weather conditions. Under the roof of the gazebo it is always comfortable to spend time with friends or sit down with your family during an evening tea party. However, not everyone knows how to make a gazebo with your own hands from wood step by step. Let's look at the rules for constructing a gazebo: what to make it from, what materials are needed, and, finally, the stages of its installation.
Wooden gazebo
Wooden gazebo: what are the advantages?
Today there are many materials from which you can make a gazebo. The most common of them are metal and wood. In this article we will look at how to make gazebos with your own hands from wood step by step. Why made of wood? Because this material has a lot of advantages:
- easy to install, since wood is a relatively light material;
- Wood is an environmentally friendly material, so it will not cause harm to the environment;
- Wood is a fairly durable material: it is impervious to ultraviolet rays. To prevent the wood from rotting from exposure to moisture, it should be coated with a transparent wood varnish;
- Wood goes well with stone, concrete, metal and other materials. In terms of decor, it is universal;

- Wood carving is also popular now. Exquisite relief designs will become a unique decor for the gazebo.


- Iron or wooden pegs - pegs - will be needed to mark the area where the gazebo will be installed. Also, for convenience, a fishing line is used, which is pulled between pegs installed along the intended edges of the structure;


- Auxiliary materials: saw, plane, nails of different sizes, etc.
The amount of materials needed depends on the size of the planned gazebo.
Stages of constructing a wooden gazebo
Selection of design and drawing of the gazebo
Before construction begins, you need to decide what kind of gazebo you want. Here the flight of imagination is unlimited. Designs can be rectangular, hexagonal, round, square, etc. Having decided on the shape, you need to set the dimensions of the future building.


Below is a plan for the construction of an octagonal wooden gazebo. This design is very convenient because inside the gazebo it will be comfortable and convenient: it can easily accommodate up to 12 people. Its area may vary depending on the location and your desires. The height of the gazebo is 2.5 meters.
Construction stages
Marking
The site selected for construction is cleared, and in accordance with the above dimensions, iron pegs are installed in the corners. The fishing line is pulled at the corners. Mark the location where the entrance will be located.

Foundation preparation
According to the markings, he digs holes, at the bottom of each of them we make a sandy base. It is highly advisable to compact the sand before laying the foundation to avoid excessive settlement. We place concrete blocks or bricks at the bottom, fill it with gravel, compact it and fill it back with soil. All blocks must be set strictly according to level.

Instead of blocks, you can make formwork in each hole and pour cement mortar.

Base structure
After the foundation is ready, we install the wooden base in accordance with the drawing. There are two ways to do this. The first method: we set up a base of wooden blocks using internal jumpers, sew up the floor and only after that we set up wooden posts, securing them to the floor with nails and metal plates.

The second method involves placing wooden posts directly on each foundation pillar between the foundation lintels.

The beams are fastened using metal corners.


To ensure the reliability of the structure, at the stage of constructing the foundation, you can place a metal rod in each post, onto which the base of a wooden post will be inserted.

Installation of harness
Next, along the edges of the gazebo (except for the place where the entrance to the structure is planned), we install a frame made of wooden beams, made in the form of some kind of pattern. We fix the beams with nails and screws. We leave the entrance area open.

Roof structure
Now we are equipping the roof of the gazebo. If you want to make a roof with an oblique slope, install 8 rafters on supporting pillars, connect them with a horizontal cross member. The result will be a structure in the shape of the letter “A”. If you prefer a lean-to wooden gazebo with your own hands, step by step, then we arrange one continuous rafter on the pillars.

We lay the roof, and only after that we lay the tiles on its surface.

To understand how to make a wooden gazebo with your own hands step by step, a drawing is simply necessary. Having calculated and planned the entire structure from the very beginning, the installation process will be easy and fun.
A country house has been built, but the site has not yet been developed? It's time to think about a place to relax. Where is it nice to relax both in the summer heat and in the pouring rain? Of course, in a gazebo that we built with our own hands. In a wooden building it is cozy and comfortable to read a book with a cup of tea, celebrate holidays with your family or with a group of friends. You're probably already interested, right? In the article you will find up-to-date information on building a wooden gazebo with your own hands.
Wooden gazebo, its advantages and disadvantages
Before you start construction, search for drawings and select a place for a gazebo, you need to carefully study the properties of the material. The advantages of wood are as follows:
- Weight. Allows you to facilitate the installation of the structure and save money on the construction of the foundation.
- Environmental friendliness. Wood is a safe material; in such a gazebo they eat, relax with children and spend a lot of time.
- Ease of processing. Complex design solutions are implemented by people with minimal construction skills.
- Price. The cost of a gazebo made of coniferous wood, oak or birch is low compared to metal structures, and is affordable to everyone.
- Harmony. The building is in harmony with 90% of landscape designs due to its naturalness.
Harmonious and beautiful, will fit into any site design
Alas, no material can do without its shortcomings.
- Low fire resistance. To avoid fires, it is not recommended to install stationary barbecues near the gazebo; the material must be treated with a special impregnation during construction.
- Moisture intolerance. A constant source of water nearby (river, lake, artificial fountain) leads to rotting of the structure. This is prevented by applying waterproofing agents to the parts.
Getting ready to build a gazebo: project drawings, optimal dimensions
The choice fell on an easy-to-build rectangular gazebo. For this type of structure there are two roof options: gable or hipped. We decided to make the roof of the first design, since it is easier for beginners.
- The base of the gazebo is a square with a side of 2 meters 10 cm.
- The length of the support posts is 2 meters.
- The distance from the base of the roof to its top is 66.5 cm.
- The middle harness is performed at a height of 70 cm from the floor.
Project of a gazebo with opaque cladding up to the level of the middle frame. For such a construction, it is recommended to install stationary jibs to strengthen the structure, the length of which does not exceed 15 cm.
In one of the sides of the gazebo there is an opening for entry and exit. It is performed in the middle, the distances from the corner posts are 60 cm. The width of the opening is 80.9 cm (including additional beams).
Dimensions 2x2 meters with entrance opening
The length of the rafters is 1.99 meters. When making a protruding roof, the area that the gazebo will occupy will be 2.5 x 2.5 m2. This should be taken into account when subsequently decorating the area around the building.
These dimensions are optimal for a structure in which a family relaxes on the territory of a country house. Of course, you can adjust the height of the gazebo or the area of its base if it is planned for large-scale celebrations and events.
Choosing the material (wood, logs, beams, etc.), tips. Calculation of the required quantity
When choosing a material for making a gazebo, attention is paid to the type of wood and construction method.
Most often, the building is erected from the following rocks:
- Pine: rot resistance and mechanical strength. Disadvantage - it is easily affected by wood-staining fungi.
- Spruce: hygroscopic and less susceptible to bacteria.
- Larch: 30% stronger than pine and more resistant to moisture. Disadvantage - difficult to process; durable, but easy to crack.
As for the construction method, there are 3 types.

There are 2 types of boards from which it is convenient to make wooden structures:

The board is tongue-and-groove, it will be easy to attach
The board is recommended to be used by craftsmen who erect buildings with one hand, since installation will not require additional assistance due to the weight of the material.
- racks - 27 meters of timber or 54 lm of board,
- rafters - 10 linear meters of boards,
- top trim - 8 lm of board,
- floor covering - 40 linear meters of boards,
- railings (middle railing) - 8 lm of board,
- roof - 8 square meters (roofing felt or tiles).
List of tools for construction
Before starting work, prepare the following tools:
- saws - circular and for cutting at an angle,
- electric plane,
- chisel,
- hammer,
- jigsaw,
- carpentry workbench,
- tape measure and building level,
- ladder,
- drill and bits.
Construction of a wooden structure step by step
Laying the foundation: is it necessary and how to make it?
Before starting work, you need to prepare a drawing yourself or find it on the Internet
A common mistake when constructing buildings near bodies of water is an incorrectly selected foundation. You should also take into account the possibility of close groundwater and the specifics of wooden buildings; we recommend building it not monolithic, but columnar. This type will allow the gazebo to gain additional stability and save time.
Following the instructions, the process of laying the foundation will be quick and uncomplicated.
Marking scheme for the foundation
To begin, mark out the area for construction according to the drawing. Install stakes around the perimeter of the gazebo and tie them with thick thread.
Preparatory work
After this, check that the supports are installed correctly by measuring the diagonals (distances between opposite corners). They must be equal.
Perhaps the best option for a small gazebo
The next step is to dig holes for the supporting pillars. Depth - 40 cm, width - pole diameter + 15–20 cm. For our gazebo, four supports are quite enough, but if you are planning a gazebo with an area of 6 square meters or more, it is advisable to make an additional hole in the center. This will help prevent the floorboards from sagging.
Before installing the posts, treat them with an antiseptic material (tar or bitumen).
Then insert the supports into the holes and backfill. It is better to do this using large crushed stone or crushed old brick. Compact the material and check the verticality of the pillars with a building level.
The final stage. Prepare concrete mortar and fill the holes. Two or three days should pass before further work, depending on air humidity. The pillars can be decorated separately with bricks. This will improve the appearance of the foundation and further protect it.
Construction work on making a gazebo for your dacha with your own hands
The construction of a gazebo begins with the installation of the base.
Place the pre-prepared beam horizontally, at a distance of 10 cm from the ground, and secure it with self-tapping screws to the support pillars (column foundation). It is necessary to carry out this work carefully, since the stability of the structure and service life depend on the quality of the foundation.
Reliable fastening with metal corners
A small indentation from the ground will ensure good ventilation. In a wooden gazebo, a floor made of the same material looks great. In the manufactured base we install logs for a durable floor frame. The distance between two adjacent supports is at least 40 cm.
There are two options for fastening:
- screwing in screws at the joint;
- tied with metal corners.
The next step is to lay the floor boards over the sheathing. They need to be nailed with a small gap of 1–2 mm for better ventilation. Each element is screwed with two screws on each side. If you decide to use nails, you need to drill holes for them in advance, this is necessary so that the board does not crack.
Laying the floor in the structure
Treat all wooden parts with waterproofing material if you are using a regular board and not a terrace board (it does not require treatment).
Next, install the supporting supports. Place the pre-prepared beam strictly vertically on the supporting supports. Check with a building level and strengthen with jibs. To strengthen the structure, perform a middle strapping. To do this, take a board prepared in advance, mark and cut out the necessary parts according to the drawing. Then use self-tapping screws to secure the base to the beams.
The top trim connects the support pillars and is the basis for the roof. Screw the prepared boards with self-tapping screws and secure with metal corners for greater strength.
Top and middle trim
We install the railings, make cuts in the risers, as shown in the photo, and secure them using corners. Under them we fix the sheathing for exterior finishing, retreating from the edge by the width of the covering material, plus 1–2 cm.
It is impossible to imagine a gazebo without railings
To give the future gazebo stability, you can do this part of the work from timber. Cuts are made from the end and connected, securing it with two nails, as shown in the photo below.
The length of the cut is equal to the width of the beam
For the roof you will need to assemble a rafter system. It consists of triangles for roofing material.
With such cuts in the rafters the roof will be much more reliable
In the rafter boards, using a pre-prepared template, cut out a gap for the timber (board) of the strapping at a distance of 30–40 cm.
Detailed drawing of the gazebo roof
Assemble the template very carefully, checking and trying it on several times. A roof with an overhang will give you the opportunity to relax in the gazebo in rainy weather and not get wet. Fasten three boards with a metal corner. The finished triangles are raised to the height of the roof and nailed obliquely with long nails or fastened with metal corners. To ensure the stability of the roof during installation, it must be supported in the center. This can be done with timber; after finishing the work it is removed. After installing each part, check the horizontal and vertical using a building level.
The inner ends of the rafters are fixed to the central headstock in the same way as in the photo.
Internal headstock for securing rafters
Internal headstock, bottom view
If you decide to use four boards on the roof instead of eight, then you can secure them in another way. The two main ones are connected to each other using self-tapping screws, and the remaining ones are attached to them.
Fastening a four-rafter system
All triangles must be covered with OSB boards 6–8 mm thick, strictly cutting them according to the drawings.
Before you start laying the roofing material, nail one horizontal board at each end of the roof, in the picture under the letter A, on the sides. This point should not be forgotten, as it will protect you from slanting rain, and the ends of the board from moisture.
This board will protect both you and the building itself from raindrops
Additionally, you can install drips, then no rain can wet you and your gazebo.
Drip caps will reliably protect the edges of the gazebo from any downpour
Lay the selected material (bitumen shingles or roofing felt) with an overlap for better insulation from moisture. Laying should be done from the drip side, gradually moving towards the base. Protect the connections of the roof triangles from precipitation with pieces of the remaining roofing material.
Fix the bitumen shingles with special nails in a certain place on the roofing sheet
To decorate the gazebo, between the railings and the top trim, make a sheathing of 30x40 mm bars. Cut the ends at an angle of 45 degrees, and sand the elements to a smooth (without burrs) surface. Then use long nails to nail the ends to the middle trim and to the base of the roof. Arrange the pieces crosswise.
On sunny days there will always be partial shade inside the gazebo
The tighter you want the “windows”, the more often you need to install the bars.
Finishing: what to cover, whether and how to paint
If you want to preserve the naturalness of the material, then the maximum that should be done at the final stage of finishing is to coat the surfaces with varnish. If you want to show your creativity, then the gazebo can be painted according to your unique design. To do this, wooden surfaces need to be treated with a primer, wait until it dries and start painting. To make the color more saturated, you can apply 2 layers.
- The first finishing option is to install balusters. It all depends on your imagination, there are many options on sale, choose the one you like and go ahead with the tools. You can also order them to size and secure them in the frame of the gazebo. This is done using screws and simple movements with a screwdriver.
For every taste, for every design idea
- Another option for interior finishing is lining. This material is a board with a double-sided connection for covering rooms. This connection allows you to carefully match the elements one to one. This material is most often chosen due to its low cost, ease of installation and thermal insulation properties. Also, the lining will give your gazebo a natural look.
You can also combine finishing - lining + balusters
- The interior decoration is made from pine boards. This option has a low price compared to oak, cedar or larch. A variety of colors will help you choose boards that best suit your landscape design.
Mounting occurs horizontally or vertically. The first visually stretches the gazebo in width, the second - in height.
For finishing you will need nails, a screwdriver, a hammer, a drill, a hammer drill and a hacksaw.
- At the first stage, treat all material with an antiseptic to prevent rotting and the appearance of fungi and other microorganisms. After drying, apply a fire retardant and wait a day.
- The next stage is the installation of the lining on the sheathing, which was carried out at the previous stage. The first boards must be fastened, starting from one of the corners of the gazebo, as carefully as possible, since the entire further process depends on them. Secure them to the sheathing using special clamps (pictured), driving in small nails. Install the following panels as close to each other as possible, but leaving a gap of about 1–2 mm, so that when humidity increases, the material does not begin to bulge when the boards swell. Check the installation of each part according to the construction level.
It’s easy to attach the paneling using these devices.
- The last stage is varnishing. This is done for waterproofing and improving appearance.
Photo: types, options for finished structures
 Simple, ventilated design with a hipped roof
  Option for a gazebo with a barbecue inside it: functional and convenient
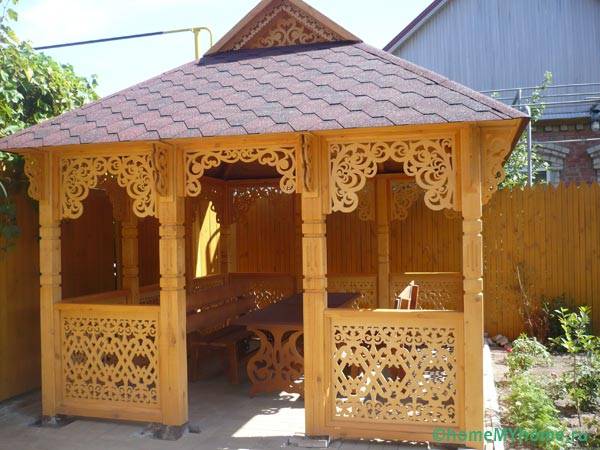
  Russian folk style may not suit every area
  A simple composition of logs with lathing
For almost every person, a dacha is a second home or a favorite vacation spot. Caring for a garden and vegetable garden, as well as performing construction work in a house, are labor-intensive processes that require financial investment and physical labor. The gazebo is not only a beautiful addition to the site, but also serves as a wonderful place to relax. When choosing materials for building a gazebo, most people prefer wood. Making your own gazebo will save you a lot of money.
The main advantages of wooden gazebos:
- Beauty. Undoubtedly, the creative abilities of ordinary people are sometimes pleasantly surprising.
- Environmental friendliness. Wood does not contain harmful substances.
- Reasonable price. Wood can be easily purchased at hardware stores at an affordable price.
- Easy to use. Wood is quite easy to work with and does not require special professional skills.
- At high temperatures, especially in summer, wooden gazebos do not heat up.
The disadvantages include:
- Fragility. The tree may be subject to rot and the likelihood of damage from wood-boring beetles is high. To extend its service life, you need to remove fallen leaves from the floor at the end of the summer season to avoid rotting. It is also necessary to treat wooden surfaces with special antiseptic compounds; this is done immediately upon completion of construction, but before painting/varnishing wooden structures. Cracks that appear over time must be filled with putty. In winter, to protect the gazebo, the roof should be covered with stretch film and it is advisable to move all unnecessary items indoors.
- High flammability. Due to the high risk of fire, it is unsafe to install barbecues and braziers in the gazebo. The likelihood of a fire is reduced when wood is treated with special compounds that minimize the risks of such a disaster.

At the preparatory stage, it is necessary to choose the location, size and type of structure, construction style and building materials. The choice of gazebo size depends on the main purpose of constructing the structure. For family or friendly gatherings, a large gazebo is needed; for personal needs, a small one is enough.
Selecting a location is a responsible process. The durability of the structure depends on this factor. If a structure is built in a lowland, then due to frequent rainfall it may rot. The wind protection factor is also important. Endless drafts are unlikely to bring pleasure from gatherings in the gazebo. From a landscape design point of view, the view from the proposed gazebo should be good. The ideal option is to build a structure deep in the garden.
For complete harmony, it is necessary that the gazebo be consistent with the style of building the house, otherwise such dissonance will stand out strongly on the site.

Gazebos can be classified according to the following criteria:
- by type of construction;
- according to form.
Common shapes are: rectangular, hexagonal and round.
According to the type of gazebo, they can be divided into open, semi-closed and closed. Closed canopies are universal for use at any time of the year. Semi-enclosed gazebos resemble a small house.

An important nuance is to take into account the style of construction in accordance with the landscape design. The most common styles of gazebos include classic, Victorian, rustic, oriental and custom.
The classic style of construction is characterized by clear lines. The design is based on hexagonal and quadrangular bases.
The Victorian style is characterized by decorative and ordinary plants, so when building with this nuance in mind, the base of the gazebo is built together with a special lattice.
The oriental style differs from others in the shape of the roof and extraordinary ornaments.


Having decided on the style and appearance of the proposed gazebo, it is necessary to draw up drawings. Thanks to them, you will be able to understand how to make the necessary construction. A correctly drawn up project will help save time when constructing a structure, calculate the exact amount of required building materials, and take into account all the nuances before starting construction in order to obtain a high-quality and durable structure.
The project diagram must include a view of the proposed structure from all sides, indicating dimensions.

In accordance with the planned wooden structure project, the construction process requires the presence of the following materials:
- wooden blocks;
- piles;
- boards;
- cement;
- crushed stone;
- sand;
- nails or screws;
- metal corners;
- materials for roofing;
- fittings;
- brick;
- roofing felt

The necessary tools are:
- hammer;
- chisel;
- drill/screwdriver;
- spanners;
- electric plane;
- Circular Saw.

After the preparatory stage, the process of performing construction work follows, which includes the sequential implementation of steps:
- Clearing and leveling the construction site. At this stage, you need to clear the area of debris, cut down trees and bushes if necessary, and level the area.
- Choice of foundation. A properly laid foundation is the basis for the success and durability of a building. There are such base options - strip, slab and columnar. The simplest and not requiring large financial investments is columnar. To do this, it is necessary to mark the territory of the future gazebo with wooden posts and ropes stretched between them. Then remove the top soil layer from the selected area to a depth of at least 0.5 m. After this, lay sand (10 cm), crushed stone (10 cm), and concrete mortar (30 cm) in successive layers. This solution is made from sand, crushed stone and cement. Next, lay a layer of roofing felt on the concrete layer. Then you need to make brick columns in three or four rows in order to create space between the ground and the gazebo to avoid rotting of the wood. At the final stage of creating the foundation, you need to re-apply a layer of roofing material.
- Floor installation. To accomplish this task, you need to choose the option of installing the floor: on the base of the structure or taking into account the walls that rest on the floor. The second option is quite simple. To arrange the floor, wooden beams are used, treated with layers of copper sulfate to prevent them from rotting and being eaten by insects.
- Construction of the frame and roof. When performing such work, it is important to focus on the load-bearing beams, because they are responsible for the stability of the gazebo. When assembling the frame, wooden boards and beams are used. The load-bearing supports are mounted from wooden blocks. The basis of the frame is made up of special beams that are placed on concrete blocks. Floor joists and vertical posts are attached to the base of the structure. To the frame - vertical posts, using metal corners and self-tapping screws. To position the base vertically, it is necessary to use special supports. When building the frame, so-called top frames (special horizontal beams) are used. The easiest way to build a roof is to use wooden logs, which create geometric outlines for the building.
- Wall cladding. At this construction stage, the choice of material is important: sheet metal, boards, slate and others. The main disadvantage when choosing sheet material is the lack of sound insulation, especially in rainy weather. The simplest option is to use wall cladding using wooden boards. Depending on the style and design of the planned structure, you can make solid or lattice walls.
- Improvement of the gazebo. The final stage is filling and creating the necessary interior of the resulting structure.
The choice of furniture and the availability of electricity depend on the desire and imagination of the owner.
Video
Photo: original gazebos


Scheme
The diagrams will help you design your own wooden gazebo:


