How to make a wardrobe with your own hands. DIY built-in wardrobe made from various materials
Nowadays, all interior designers suggest saving the area of rooms so that there is space and free space. An excellent solution for this is built-in furniture, such as a wardrobe. Quite a profitable solution not only in terms of space savings, but also from a financial perspective.
A built-in wardrobe, in contrast to a conventional design, has a number of significant advantages. It holds much more things, less material is needed for manufacturing, due to which the cost of such a design is much lower. In addition, space is saved and space is freed up for other things. Basically two types of arrangement are used:
Installing a built-in wardrobe requires precise measurements. Due to the tight-fitting design, installation problems may occur due to improperly aligned surfaces or measurement errors.
How to design a façade for a built-in wardrobe?
There are many materials on the modern market from which you can make a beautiful façade for a built-in wardrobe. Since the dimensions of such a design are usually quite large, you can think about a special design, for example, decorating the doors in an unusual way. Here you can show your imagination and come up with a personal sketch, or find something you like from the already proposed options:
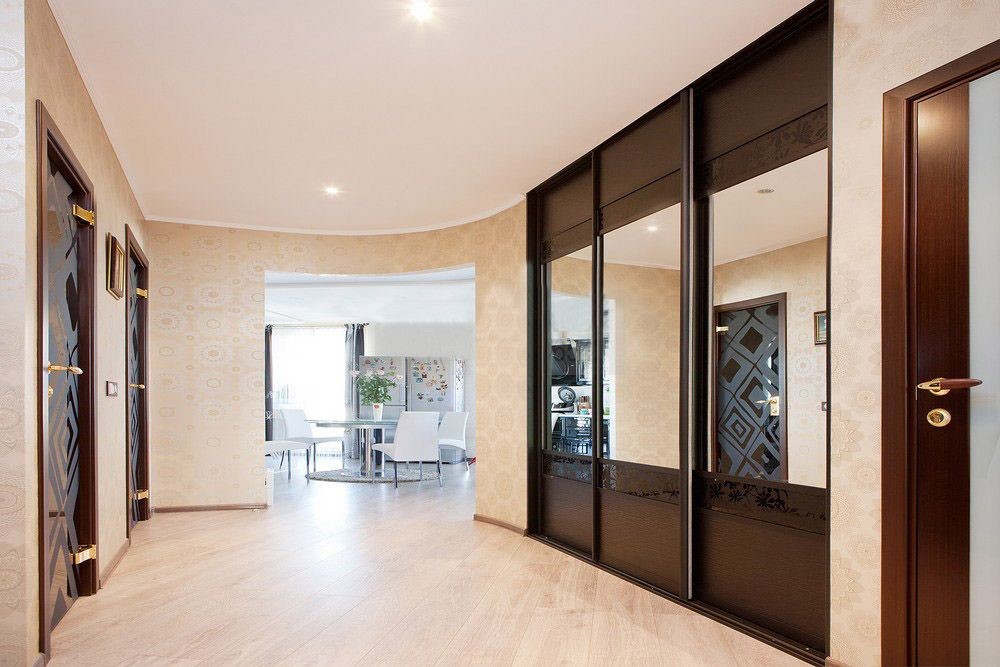
- Mirror. The most common option for visually increasing the area of a room using additional funds. This solution is perfect for those who are faced with the problem of saving extra space. Mirrors can be placed either the full height of the door or used to decorate a small part of it. Designers also advise not to overuse this material and limit yourself to decorating one door in this way, and make the second one from a different material or decorate it in some special way. Can be used as additional elements drawings. They can be grooved or sandblasted. Both are distinguished by their special grace and create a gentle and romantic atmosphere. Thanks to modern technologies you can not be afraid to experiment with shapes, since it is possible to create a drawing of any complexity and even any color. Sandblasting patterns can be used not only as individual elements, but also as decoration for the entire surface of the mirror. Such an unusual solution – matting the mirrors – will add an element of mystery and sophistication to the style of the room;

- Film. Can be combined with any other material, is easy to use and does not require special care. If glass is used as the main material, it is recommended to glue the film on the back side so that it is less exposed to external influences. The modern market offers a wide range of films for decorating built-in wardrobes. You can use both matte and glossy or shiny materials. This diversity allows you to create special compositions of various shapes and types, as well as colors;

- Photo facade. An unusual solution for cabinet design that is gaining popularity. Thanks to the use of photography to decorate the facade, not only the cabinet itself acquires an element of uniqueness and exclusivity, but also the entire room as a whole. Using photography, you can create a special atmosphere by placing a picture of a sandy beach, or, conversely, a tropical jungle on the front of the cabinet. Many people now use urban motifs in their design, placing a panorama of the metropolis as a photo facade. You can select individual elements, such as household items, people, animals, birds, plants and much more. An excellent solution for those who like to stand out and surprise;

- Acrylic. Goes well with a mirror surface. Acrylic is characterized by a high degree of resistance to light. Never loses its shine, even after years of use. Always looks presentable and catchy. Can be picked up bright colors and arrange them, creating a special design or pattern. For decoration, you can place unusual elements in the glass melt, for example, unusual stones or simple glass beads, beautiful flowers or fragrant plants, colorful leaves or green algae and much more;

- Tree. For those who prefer a more restrained and classic style, it is proposed to use wood as a material for the cabinet facade. The most commonly used materials are bamboo or rattan. This material costs a lot due to its natural origin. But natural wood will look great in an eco-style interior. It’s quite a fashionable trend now to be closer to nature, taking a break from the bustle of the city and at the same time paying tribute to the surrounding beauty. If it is not possible to purchase natural wood, then you can opt for chipboard or MDF. These fiberboards look no less presentable, but are much cheaper;

- Leather. The designers offer a rather unusual solution for those who want to decorate the cabinet facade in a special way. It would seem that leather is not the most suitable option for this, but if you look in more detail, you can find a lot of advantages from such a solution. Leather is a very practical and durable material, i.e. There is no need to worry that over time it will lose its presentable appearance and will look completely different from how it did when it was first used. For the cabinet facade, designers suggest using soft artificial leather. It can be used to sheathe the entire facing side, or just a separate part of it. Such a delicate material will give the room a feeling of coziness and comfort, without resonating at all with other interior items.

To decorate the facade of a built-in wardrobe, you can also use various accessories and decorative elements. However, it is important to remember that any design should not harm the main function of the cabinet - storing things within easy reach. Therefore, the doors should open easily and freely.
What can be placed in a built-in wardrobe?
Usually there is a lot of space in such a closet, so you can distribute it wisely, leaving space for all the necessary and necessary things. The main elements that can be in the closet:

It is best to divide the closet into three levels, where mezzanines with rarely used things will be located at the top, clothes will be located just below, and shoes will be stored on the lower tier. You should not place heavy objects on the very top, since under strong pressure the structure may not withstand it, break and collapse.
How to make a built-in wardrobe yourself?
After the location, material for the facade, as well as the internal filling of the cabinet have been chosen, you can begin to develop a drawing. It is best to opt for something simple and at the same time practical. It is necessary to make a drawing based on the size of the room itself. Each apartment may have its own flaws associated with the curvature of the walls and floor, so it is necessary to constantly adjust and measure the load-bearing elements so that, in the end, everything turns out smooth and beautiful. 
Since a built-in wardrobe is different from a regular one, it requires a special approach. Mounting to the wall can be using brackets or regular baseboards. True, the second option may not look very neat and stand out, but it costs much less. 
Doors can be hung in three ways: using top and bottom rails, as well as a monorail. The most the best option is the bottom design. It's easy and simple to do, and it's inexpensive. The rollers should also be chosen very carefully so that they are strong and can support the entire weight of the door. It is imperative to install stoppers for the doors so that they do not hit the cabinet every time they are used. 
If you follow all these rules, you can quickly and easily make a built-in wardrobe yourself. It's important to remember that there are no one-size-fits-all instructions here. Each design is individual, taking into account the characteristics of the room itself. You can use generally accepted basic rules and apply them to your project.
Detailed instructions on how to make a built-in wardrobe for a niche from gypsum fiber sheet. And what is the difference between gypsum board and gypsum board?
All the details about the location of the built-in wardrobe, the design of its facade, and the internal contents will help you make a similar structure yourself. The main thing is to follow some rules and follow safety precautions so that the manufacturing process brings only pleasure.
It is not for nothing that the built-in wardrobe is widely popular. A sliding wardrobe not only has a large capacity, taking up a minimum of usable living space. It is capable of performing other useful functions in the interior, and making it with your own hands is not so difficult.
What does coupe mean?
In the common parts of ancient European cities, the streets were very cramped, and the sidewalks were so narrow that it was sometimes impossible to open the carriage door. Because of this, somewhere in the 17th century. coupe carriages with sliding doors appeared. Legend attributes the invention of the coupe to the French court carriage maker Jeantot. But, most likely, this is only a legend - Jeantot is famous for having invented a steering linkage, which made it possible to make sharp turns without the risk of capsizing.
The coupe carriage is a rather playful concept: parts of the city remote from comfortable neighborhoods were visited mainly for secret dates. Some linguists derive the word “coupe” from “couple” - couple, extramarital affair; marriage – “marriage”, hence the mariage known to gamblers, a queen and a king of the same suit.
Then sliding doors were suitable for railway workers for 1st class and sleeping cars. And in the furniture business, any wardrobe with sliding doors is considered a wardrobe. So the wardrobe is not necessarily built-in. And the built-in wardrobe may not be a compartment.
How is a wardrobe useful?
The main types of direct sliding wardrobes are shown in the figure. It should be immediately noted that radius sliding wardrobes, in which the front surface is curved, require high furniture professionalism, and it is better not to take on such a project yourself. Therefore, we will leave radius cabinets aside for now.

First of all, the wardrobe can be arranged in a niche, first pos. left. Making a cabinet of this type yourself is not much more difficult than making a stool. Expenses are minimal; after all, three walls, a bottom and a tire are already there. An inconvenient place turns into a useful one.
Second from left- actually the same cabinet in a niche, but the niche is the entire width of a blank wall. Thus it is possible to small apartment, practically without reducing living space. The visible volume of the room can even be expanded by finishing or decorating the doors accordingly.
Next in order– in the opening of the interior partition. A common technique when arranging open-plan apartments in modern monolithic houses. Gives convenience and allows you to save a lot on expensive construction and plastering finishing works Oh. By the way, those described above are also economical - the inside of the cabinet can be made of chipboard, and the doors too; After all, they most often go under decor and finishing.
Closet on the far right– it’s already framed, so the material needed for it is more expensive. These are mainly used for zoning budget one-room apartments or, conversely, expensive penthouses without interior doors.
And finally, a wardrobe, like a regular one, can be straight or angular, leaning against the wall or placed across it. The latter, as stated, are used for zoning. They have two faces, but no rear at all. They are often made double-sided, with doors both here and there, for easy access to the contents. The closet can also be turned into a wardrobe by replacing the hinged door with a sliding one.
We will take a closer look at the cabinet built into the niche; We'll touch on the rest in passing. It’s the easiest way to do it yourself, and it saves the most money. In addition, you most likely will not need special tools and sawing work that requires solid skills. Why? Let's get to that.
In general, the procedure for making a wardrobe is as follows:
- Material selection;
- Determining the extent, nature and method of placement of filling;
- Door design, with the choice of hanging method;
- Choosing a method for hanging shelves;
- Niche preparation;
- Measurements and drawing;
- Purchase of accessories, materials and cutting of blanks;
- Cabinet assembly and interior lighting installation;
- Exterior finishing.
Materials
When designing a cabinet, you need to start with choosing the material. The entire manufacturing process depends on it, and depending on the choice, it can fundamentally change.
Wood and lining
Wood is a traditional and, nowadays, prestigious furniture material. But for a built-in wardrobe, wood is far from the most suitable. The humidity in the niche will certainly be higher than in the room, and the wood will warp; its decorative role in this case is minimal. If you still need a wooden cabinet, the wood for it should be straight-grained, without strands, knots, cracks, seasoned and thoroughly impregnated with hot drying oil or water-polymer emulsion.
Note: It is not at all necessary that the niche be damp. For warping of wood, the difference in humidity from the blank wall to the doors and its sharp jumps when opening are important. Because of this, it is not recommended to place wooden cabinets in niches.

Lining for a cabinet in a niche, plastic or MDF, can be used without preliminary preparation, but another limitation appears - the frames of the door leaves. They have to be made of wood, with the same conditions and requirements as indicated above, plus the care of manufacturing. You also need to glue the lining boards together, but this is not a problem: there is a tongue and groove for it, and it holds up perfectly on the PVA. In general, a lining cabinet can be recommended only for those cases when a sliding wardrobe in a niche should fit organically into the interior, as in Fig.
Drywall

Drywall - excellent, easy to work with finishing material with wide possibilities. Designers and amateur DIYers create real masterpieces from it. But As a basis for a cabinet of any design, gypsum board is completely unsuitable. It is possible to make a cabinet from plasterboard, see figure, but it is difficult. Let's figure out why.
Drywall is a rather heavy, fragile and at the same time not very durable material. It is intended exclusively for decoration and cannot be part of a supporting structure, even lightly loaded. Simply put, drywall cannot hold anything on itself; on the contrary, it must be attached to something and something must hold it. A piece of plasterboard 400x400 mm, laid flat on a frame, sags noticeably by itself within six months. According to the technical specifications, gypsum board sheets must not be stored vertically or leaned against the wall.

That is, you cannot simply cut gypsum boards and fasten them together, like, say, laminate (see next). Each shelf must be a box-shaped spatial structure, which requires a complex frame (see figure on the right). But the resulting structure (see next figure on the left), with the correct geometry and proper strength, will be far from aesthetic; You also need putty and decorative finishing.
Note: For the frame of a cabinet made of gypsum plasterboard, wood is doubly unsuitable - the cavities of the finished structure will attract moisture. Only standard C- and U profiles with standard fasteners are suitable for the frame.

Then - the doors. There is no way to make them from gypsum plasterboard - the fastenings will break simply under the weight of the sash. And the doors are exactly the essence of the wardrobe. Making cabinet shelves with doors from plasterboard is monkey work and reduces the usable volume. There are no wardrobes made of gypsum plasterboard, and a wardrobe with shelves made of gypsum plasterboard makes no sense.
In fact, a plasterboard cabinet is not furniture, but building construction, and is carried out using construction, not furniture technology. But at the same time, it can have outstanding aesthetic merits and be the most significant object of interior design.
Laminate, MDF, fiberboard
These are the most suitable materials. Making a cabinet from them can be quite simple at minimal cost, see about sawing. These materials have all the beneficial properties of wood and at the same time are insensitive to gradients and humidity fluctuations because during their manufacturing process, the microstructure of the tree is transformed into another. Just one note: fiberboard should be of medium or high density. The back wall of inexpensive cabinet cabinets is often made of low-density fiberboard, similar to thick cardboard corrugated on one side, but it will soon fail in a niche.
Filling
The internal content of the cabinet determines its internal layout. There are four rules here:
- Raw - set aside separately.
- The necessary and small things are before your eyes.
- Dry - higher.
- Valuables - in boxes.
For example, it is wrong to place the section for outerwear in the middle - dampness will flow from it to the sides. If you place it on the side, the moisture from the clothes will go where it’s easier – out. In the bedroom, there is no need to place drawers or shelves for bed linen directly above the floor - dust and moisture are concentrated approximately 40 cm above the flooring. Well, it’s clear that a wallet or smartphone shouldn’t be lying around in plain sight near the entrance.
The ultimate goal of content placement is to achieve a minimum shelf width; this will be needed to calculate the doors. The placement procedure is quite responsible; the convenience and durability of the cabinet largely depends on the successful layout.
Video: internal layout of a sliding wardrobe
Doors
Doors are the salt of a wardrobe, its most complex and important element. There are three significant points:
- Number and width of sashes.
- Suspension design.
- Sash stoppers.
Doors
On at this stage The task is to find the number of sashes for a given width of the opening for the cabinet. The fewer the doors, the more convenient the cabinet, but the likelihood of warping and jamming is higher. The maximum permissible width is 600-700 mm; with larger doors they can be difficult to move simply because they turn out to be very heavy.
The overlap of the wardrobe doors should be within 50-70 mm. If the overlap is too small, you will either have to open and close the doors carefully, or put up with the gaps. If there is too much overlap, the internal layout of the cabinet becomes difficult, especially if it is intended for a hallway or other cramped room.
At the same time, the width of the door should not exceed the width of the narrowest shelf, otherwise it may become inaccessible. We also take into account the permissible overlap and subtract 40-50 mm for the side profiles; without them, the doors will hit the wall. In general, the procedure is as follows: based on the maximum door width, we first determine the number of overlaps (one less than the doors) and check the resulting door width. It doesn’t fit into the maximum - you need to make one more door, and so on until everything fits together.
Calculation example:
Opening width – 1.75 m; the narrowest shelf is 0.45 m. A double-leaf cabinet will no longer work, it does not work both for convenience and for the maximum allowable width of the door. Then we’ll put two overlaps, this will give 100-140 mm minus to the opening, and we’ll also put 50 mm on the sidewalls. Total - 150-190 mm, 0.15-0.19 m. 1.75 remains for the doors - (0.15-0.19) = 1.6-1.56 m. Divide by 3, door width comes out to 0 .53-0.52 m. A lot, what to do? Let's estimate with 3 overlaps (4 doors). It comes out to 37-39 cm per door. But making 4 doors is more difficult and expensive (an extra set of fittings), so it makes sense to go back to the layout sketch and rearrange the inside so that the narrowest shelf is 55 cm.
Suspension
Three systems for hanging wardrobe doors are widely known: double-rail with a lower support, double-rail with a top support and monorail. Each of them has its own advantages and disadvantages. The choice is ultimately determined by the size, purpose of the cabinet and the financial capabilities of the customer/craftsman.

Bottom rail
The most common system; Its structure is shown schematically in Fig. on the right, and the design of the upper and lower rails is in Fig. left. The support rollers are the lower rollers, the upper rollers prevent the sash from falling out. This system is also the most reliable: the sashes almost never jam or touch each other.

The lower rollers are heavily loaded, so when assembling yourself, you need to follow certain rules, as illustrated in Fig. below. The rollers are made of plastic, and when purchasing you need to look to see if you can get polypropylene ones; There are a lot of cheap polyethylene ones on sale in a low-quality metal carriage. If the rollers are propylene, then you don’t have to look too closely at the metal; Both steel and aluminum are equally reliable.
Installation of the sashes is simple: insert the top into the groove of the rail, lift it all the way, insert the bottom into the groove - ready. However, the bottom support system has disadvantages:
- Sensitivity to floor subsidence, and the very weight of the cabinet increases it. On the old wooden floor After a while, the doors may begin to move along the lags on their own, or even fall out.
- Sensitivity to dust and dirt. The loaded surface of the rail is in the dustiest layer of air, the rollers roll and compact the dust, tubercles form in the groove of the lower rail, after a while the doors begin to rumble unpleasantly, and the rail with the rollers needs to be cleaned.

Top rail

Here the support is moved to the upper rail, see fig. on right. Concrete ceiling does not sag, and is properly finished and does not generate dust, so the doors move quietly and smoothly. Fittings of this type are not complicated or expensive, and installation differs from the previous one only in that the sash must be tilted during installation. There are three disadvantages, but two of them are significant, so suspension with a top rail is not widely used:
- A lower guide is definitely needed; without it, the doors will inevitably hit and rub each other.
- If there is an accidental push or pressure on the sash, its rollers come out of the groove and the sash falls inside the cabinet.
- The top rail is not very rigid, so in some cases it is necessary to level the ceiling where the suspension is installed.
Monorail
The peculiarity of the system is that each carriage has 2 pairs of rollers (see next figure), and the suspension of each sash runs in a separate guide. Paired rollers, together with the guide profile, counteract door wobble to some extent. Thanks to this, with careful handling, you can do without the bottom rail and not touch the floor. But you still can’t push the doors inward, otherwise they will touch each other. Therefore, lower guide rollers with a rail for them are also sold for the monorail.

A cabinet with such a hanging is suitable primarily for the bedroom, where adults use it, and neatly. A durable and precisely adjustable suspension allows you to make wide doors, and this, in turn, allows you to place both a wardrobe and a dressing room against a blank wall. Rigid box rails make it possible in most cases to avoid leveling the ceiling. There are four main disadvantages of the monorail:
- Complex and expensive fittings.
- The need for a decorative overlay at the top, because There is a wide gap between the sash and the rail.
- Complex installation: you must first insert carriages with rollers into the rail, then attach the rail to the ceiling, and only then hang the door. An assistant is needed to hang the leaves on the monorail.
- After hanging the sashes, adjustment is required.
Stoppers
It is advisable that the cabinet doors do not roll back and forth on their own, and that they do not need to be carefully pushed into place. In a double-leaf cabinet, the problem is solved by magnetic latches on the sides. But there is nowhere to put the latches on the middle doors: the magnet doesn’t hold it casually. Therefore, the main type of wardrobe latches is mechanical.
There are mainly two types used: a recess in the support rail and a flat figured spring. If you make the cabinet yourself, then the recess is not suitable: such rails are made in the factory of a standard size for standard cabinets.

The spring clamp shown in the figure is easy to make yourself and install in place in a guide cut to size. The principle of its operation is simple: the antennae protrude slightly and the roller falls between them. And when the roller rolls onto the edge of the spring, the edges of the antenna rest against the sides of the groove, which prevents the latch from moving. To move the latch into place, you need to press both antennae at once.
But all latches for sliding wardrobes have a common drawback. When opening/closing the door, the force is already acting at odds, and the resistance of the latch increases it even more. Most breakdowns of sliding wardrobes occur precisely because of the latches.
Therefore, the best stopper for sliding wardrobe doors is a carefully aligned support rail, high-quality fittings and careful use.
Fastening the shelves
For a cabinet built into a niche, the methods for hanging shelves in cabinet furniture are poorly suited or not at all suitable - you cannot reach the sides from the outside. In a niche, they either build a rigid frame, which is difficult and expensive, or use special adjustable suspension systems like the one shown in the figure. It's easier, but also not cheap.

Meanwhile, the simplest and cheapest way to attach shelves is to pieces of regular plinth, floor or ceiling, see fig. on right. MDF skirting boards, as you know, are available in a huge range of sizes, textures and profiles. So that the shelf fasteners are not noticeable, a piece of plinth can be taken shorter than the depth of the shelf by a third, and its end can also be cut off at an angle. In this case, the self-tapping screw farthest from the edge of the shelf must be screwed in from above through the shelf board.
Note: the upper and lower partitions in the closet can be attached to the floor and ceiling in the same way, without shortening the plinth sections for reliability. Their ends, if you take a small ceiling plinth, will be completely covered by the upper and lower guides, and together with the shelves fixed in a similar way, a very strong and rigid structure is formed. Which, in addition, will support the plank floor from sagging under the weight of the doors.
Niche
Professional furniture makers rarely and reluctantly undertake to manufacture built-in furniture on site - the work is tedious and unprofitable. Custom built-in furniture is most often the same cabinet furniture that is delivered and assembled in a niche. And here it opens up for the DIYer great opportunity simplify and reduce the cost of your closet, making it at the same time stronger and more spacious.
Diagonals
A necessary condition for the success of such an undertaking is that the niche opening must be rectangular, and the floor and ceiling where the doors are installed must be horizontal. You may have to spend a little time here construction work, but their volume is small and their complexity is low.
Note: for a monorail suspension, the usual horizontal level of the ceiling is sufficient. The rail is leveled with spacers. But not by adjusting the sashes after! In an inclined guide, vertically hanging sashes will slide to the side.

The floor and ceiling are checked by level, but what about rectangularity? The usual method in construction - using cords along diagonals - does not work well. The fact is that furniture precision is higher than construction precision. In finishing work, 3 mm/1 m is permissible. In furniture, if a seam 2 m long diverges in length by two millimeters, this is already noticeable to the eye. But any cord is stretchable, and it is inconvenient to wield it in a vertical opening; It won’t work without a lot of experience and construction precision.
There is a way to measure the diagonals of the opening, not just with furniture precision, but with machine-building precision, see fig. It's very simple: two slats with pointed ends. The angle at the apex is less than 45 degrees, and preferably 20-30, as long as the material of the slats is strong enough. The slats are fastened with rings made of “money” rubber bands, which are sold in any office supply store.
The measurement procedure is elementary simple:
- We insert the device diagonally until the ends of the slats stop in the corners.
- We make a mark with a pencil or a nail, as in pos. 1.
- Insert it into another diagonal, push it apart/move until it stops.
By the divergence of the halves of the line, the magnitude of the inequality of the diagonals is immediately visible. Maximum accuracy - half the thickness of the mark, i.e. you can achieve 0.15-0.2 mm. And to assemble the cabinet without problems, you need up to 3 mm in an opening of 2x2.5 m.
Note: if you are preparing a place for a cabinet - a zoning partition, standing perpendicular to the wall, you will have to measure and adjust 8 diagonals - one pair at a time on the face and back, and two pairs inside between the upper and lower opposite corners. Along the width of the cabinet, two perpendiculars are cut from the wall, and instead of the currently missing sidewall, two slats or a piece of plywood are installed.
And now, what prevents you from using the walls of a niche, its floor and ceiling as the same for a closet? You just need to keep it dust-free. And achieving this is not at all difficult or expensive:
- We remove old wallpaper or paint with a gel surface-active (surfactant) remover. It is non-toxic, odorless, and the old coating can be removed with a spatula after 10-40 minutes.
- Using a foam roller, we impregnate the walls 2-3 times, at intervals of 24 hours, with PVA water-polymer emulsion.
- We paint with acrylic enamel.
A niche prepared in this way does not accumulate dust for exactly 10 years, and there is no need to remove the old baseboard from the floor. Durable acrylic enamel is not easy to damage. And the costs are less than for a sheet of simple, non-laminated fiberboard for the back wall.
Note: visible to the eye Small irregularities in the walls can be removed with an abrasive mesh on a wooden block. It is better to do this after the first impregnation with PVA - there will be less dust.
Dimensions and drawing

With this manufacturing method, shelves and partitions, of course, will have to be cut to fit. To do this, you will have to draw a view of the cabinet from the facade, approximately as shown in the figure. Then, on the ceiling, for any type of suspension, mark a line at the location where the guide is installed. Then, from its ends, make vertical lines on the walls along plumb lines, and from this imaginary plane, measure the configuration of each shelf and partition in place. From the resulting depth of the shelves/partitions, you need to subtract the width of the support profile + 20 mm from the FRONT.
What's the point? The peculiarity of the finishing work is that the layer of plaster/primer towards the inner corners is thicker. This happens because in the middle of the wall or at the outer corner there is greater freedom of movement with the tool. The difference in the width of the room in the middle and between the corners rarely exceeds 10 mm and is not noticeable to the eye, but for furniture even 2 mm is too much.
The configuration of the niche is, in general, a low truncated rectangular pyramid, overturned on its side. Accordingly, the shape of the shelves with partitions in plan will be close to a trapezoid. But is it possible to cut them with the required precision? Nowadays, it is quite possible and you won’t even have to install carpentry at home. And you don't need a jigsaw or circular saw. Templates and patterns - too.
Sawing and fittings
The fact is that now it is easier and cheaper to simply order sawing of blanks. In almost every town there is a furniture workshop with a computer and a specialist who knows ACAD, if only the drawings were accurate. Many furniture makers also acquire computer-controlled sawing robots - the cost of sawing by such a hard worker almost does not depend on the size and complexity of the part, and it pays off well on non-standard small items that are always in demand.
Furniture makers buy material at wholesale prices, therefore, based on the total area, the cost of blanks is 20% or more less than when purchasing material independently at retail. Many also give a discount on trimmings (robotic - almost all); After all, they won’t lie around in the trash, but will go to work.
Note: The thickness of the laminate or MDF for the cabinet is at least 16 mm. For doors on a monorail - at least 25 mm.
Also a standard service when sawing is edge cutting, i.e. sealing the ends of PVC boards to match. For a built-in wardrobe, of course, you only need to edge the front ends - it will be cheaper. The thickness of the PVC edge can be from 0.2 to 2 mm. If you want a thick edge, in the drawing its thickness must be subtracted from the width of the board.
Assembly, light, finishing
The methods for assembling the cabinet, in fact, have already been described. It is only necessary to add about the door hanging. The suspension systems described are not the only ones on the market. Technology develops, existing ones are improved, new ones appear. But for each one of more or less decent quality, a specification must be given indicating installation dimensions and tolerances, specifications for rails, etc.
Therefore, before ordering cutting of doors, take a closer look at what is sold around you and what will suit you best. The final size of the sashes depends on the method of suspension, and the necessary clearances are specified in the specification for the suspension.

About interior lighting. Cabinets are made of flammable materials, so it is better to use low-power 12 V halogen lights for interior lighting. The cabinet lights are powered from an AC/DC adapter plugged into an outlet using double-insulated wires. Running 220 V wiring into the closet, and even permanent wiring, is completely unacceptable!
As for the decoration - mirrors, decorations, paintings and drawings - this is a matter of taste. One note: it is not advisable to hang glass mirrors on doors made of wood materials; they are too fragile and heavy. An acrylic mirror is better. Or solid mirror doors, but that’s a separate conversation, and very expensive.
How much can you win?
Now let’s figure out whether a homemade cabinet in a niche is really inexpensive. And will the savings be worth the time and effort?
If you make a cabinet in a hallway niche as described above, the materials will cost 5-8 thousand rubles, including cutting costs. Well, 10,000, if, as they say, from the belly. Time – 2-3 couples of weekends for an average home handyman. And ordering a wardrobe for the same niche is hardly possible for less than 12,000. Most likely, from 20,000. Completion time – 2 weeks.
The savings on a wardrobe covering the entire wall of the bedroom are even greater. Here, the typical regional ratio of homemade/custom cost is 13,000/32,000. But making something like this requires more serious skills.
But making a wardrobe partition yourself is no longer so profitable: the advantages of well-established technology are also felt by the pros. And the work is difficult - a skilled craftsman will have to tinker with it for a month, if he doesn’t have to redo it yet. You will be able to profit no more than 2000 on a closet in a one-room apartment of average size.
(1
ratings, average: 5,00
out of 5)
IN last years hinged wardrobes have given way to leadership to their compartment-type counterparts, which have firmly taken first place in popularity among users. If desired, you can purchase a cabinet of any size and configuration. But there is an urgent problem, which is the money issue, because for a quality product you need to pay accordingly, which in times of crisis is an impossible task for many. You can find the answer if you know how to make a wardrobe for your bedroom yourself. Self-assembly always has an advantage, because a home craftsman can realize any of his desires and fantasies.
To install a sliding wardrobe you will need the following tools:
- building level to achieve the ideal position of individual components horizontally or vertically;
- construction corner for ideal placement of parts at right angles to each other;
- regular hammer;
- rubber hammer;
- a screwdriver with a set of bits or a set of screwdrivers;
- tape measure, pencil;
- hex wrench;
- sandpaper;
- iron for gluing melamine edges to the ends;
- electric hammer drill or hammer drill;
- drill with a Pobedit tip for drilling holes in walls;
- wood drills;
- electric jigsaw for filing individual parts;
- miter plate or hacksaw for metal;
- construction stapler.
In order for the installation to be completed quickly and the process not to be stopped due to the lack of any element, it is necessary to immediately prepare all the material.
You need to prepare the following materials:
- material for cabinet walls and shelves;
- melamine edge;
- confirmations;
- dowels;
- floor holders;
- self-tapping screws;
- rods for hangers;
- rod holders;
- hardboard for the back wall, if the cabinet is free-standing and not built-in;
- nails for fastening hardboard or staples of a construction stapler;
- furniture corners if a built-in wardrobe will be installed;
- filling for sliding doors;
- upper and lower guide profiles for sliding doors;
- vertical and horizontal profiles for the ends of sliding doors;
- rollers;
- stoppers;
- buffer tape.
If you don’t have any knowledge of furniture making, it’s better to look at the photos of all the necessary materials to figure out what you need to purchase.
Before answering the question of how to make a sliding wardrobe with your own hands in the hallway, you need to understand the materials for the work. The right choice for the manufacture of a sliding wardrobe is the key to the quality and durability of the future design. It depends on how strong it will be, what loads it can withstand and how long it will last in its original state.

Application of drywall
Drywall is a very functional material with great capabilities and a wide range of applications. You can create a wide variety of designs from plasterboard, which is successfully done by good designers and craftsmen. Using drywall for a cabinet is acceptable, but highly undesirable. It is very difficult to create a good solid structure from it.
The advantage of drywall is its strength, the disadvantage is its fragility. It is impossible to create structures from plasterboard without the use of additional materials. If it was decided to assemble the product using drywall, then you need to be prepared that you will soon have to do renovation work or disassemble the structure.
To build a cabinet from plasterboard, you must first make a frame from a metal profile. After installation, you will have to cover the surface of the drywall with putty and paint, and this is still a considerable amount of work.
The big disadvantage of plasterboard cabinets is that when mounted on a metal profile frame, the walls and shelves will be quite thick. This will deal a strong blow to useful space, which will not be saved.
 Making a wardrobe from plasterboard
 Using wood
Unlike plasterboard cabinets, designs made from natural wood is a symbol of wealth, good taste, prestige. But its use is not always advisable.
If we consider a built-in closet built in a niche in the hallway, then wood will not perform well there. From humidity wooden elements the cabinet will begin to deform. Humidity fluctuations during door opening play a significant role in this.
If you decide to make a cabinet out of wood, then you need to choose straight-grain wood, without knots, bends or cracks. It must be treated with special moisture-resistant compounds.
 Sliding wardrobe made of wood
 Chipboard, fibreboard, MDF
These materials are great for building a wardrobe. They are more resistant to the effects of humid air than wood, and are also not inferior in strength. The process of making furniture from them is simple.
A wide selection of shades allows you to find the option that fits better than others into the hallway or bedroom. Acquainted with color scheme You can use it from photos, in furniture store catalogs, or from photos in our article. In the future, when purchasing material, the choice will be easier to make.
 Sliding wardrobe made of MDF
 Size and drawings
In many cases, using a sliding wardrobe, you can solve the aspect of saving space, which can be seen even in the photo. It is worth noting that great solution lack of space, a radius cabinet can become. The cost of its parts is an order of magnitude higher, but the appearance and performance capabilities are better. A radius cabinet placed in the corner of the hallway can visually expand it without taking up a single extra centimeter of space. Before purchasing materials, you need to decide on the installation location of the cabinet, prepare the appropriate drawings indicating all dimensions and design details.
Depending on what type of cabinet you will build, the amount of materials used will depend. If you plan to make a cabinet, you will have to install the back and side walls, as well as the top cover. Accordingly, when building a built-in wardrobe in a niche in a hallway or bedroom, the side walls are not needed like the top cover. The shelves are mounted using the entire height of the wall. In this case, the top guide for the sliding door is attached directly to the ceiling.
Drawings can be prepared using a ruler, pencil and a sheet of paper. This will take quite a long time. This can be done faster and better with the help of special programs. You will need minimal experience working with a computer, as well as accurate measurements of the space for a closet in the bedroom or hallway, and it can be either a framed rectangular cabinet or a radial one with various additional elements.
To make it easier to create a model, you can see photos of existing products in our article. An idea of what cabinets are currently being made will give impetus to flights of fancy when creating your own unique project.
When assembling a sliding wardrobe, please note that the length of the rod should be 1.5 times longer than the internal shelves. Typically, its standard length is 90 cm, and the shelves are 60 cm.
The distance between shelves should be of different heights. To store things, you need to make the opening height 35-40 cm, and 20-35 cm is enough to place books. The opening for long clothes should be 150-160 cm, for shorter ones 80-100 cm.
The height of the opening in the mezzanine should be 40-60 cm, then all unnecessary things can be placed without difficulty. The cabinet width of 70 cm is enough to place clothes on hangers.
Preparatory work
At the preparatory stage, it is necessary to bring everything into a state ready for assembly. It is necessary to cut the material intended for the body according to the prepared diagram. It may not be possible to do cutting at home. It is possible to cut the material using a jigsaw, but it is very difficult to do it smoothly, especially if you have no experience in such work. It is recommended to contact any furniture workshop, provide blanks and a cabinet design, and specialists will complete the work quickly and efficiently.
Cutting the profiles for the door and guides can be done at home using a miter saw or a hacksaw. Applying melamine edging to the ends of cabinet walls and shelves is very simple. To do this you need a regular iron and a construction knife. Before edging, it is necessary to sand the ends with sandpaper to smooth the surface as much as possible.
After sanding, an edge is applied to the end and ironed. Under the influence of temperature, the glue melts and then hardens, which ensures reliable adhesion of the elements. Next, you need to cut off the protruding edges of the edge with a construction knife, and sand the cut areas with sandpaper.
If you build a built-in closet, you will have to tidy up the walls. To do this, you need to clean them of old wallpaper or paint and cover them with PVA water-polymer emulsion in 2-3 layers. Each layer needs a day to dry, after which the walls can be painted in any color.
Frame making
After carrying out all the necessary preparatory work you can assemble the frame in a niche if you are installing a built-in wardrobe. It is better to start on one side and gradually move forward, installing all the elements in order.
First, the shelves are attached to the side and rear walls using corners. Next, a stand is installed, which is attached to the wall, as well as to the installed elements. Then the remaining shelves are mounted by attaching them to the wall and rack.
Shelves that are not intended to be fastened to racks are placed on the floor supports after the frame is fully assembled. During the process of assembling the frame, you need to check the diagram to avoid inconsistencies. You need to make sure that there are no distortions, otherwise the design will end up crooked.

 Hole preparation
  Lower part of the frame
  Tools for fixing shelves
  Fastening the shelves
  Assembled wardrobe frame
 Making doors
The door assembly proceeds according to the following algorithm:
- in vertical profiles, three holes are made at the ends: one at the top at a distance of 8 mm from the edge, two at the bottom - at a distance of 8 and 42 mm. You will have to drill through two walls. In the first wall there should be a hole with a diameter of 10 mm, and in the second - 5.5 mm. First, we take a drill with a diameter of 5.5 mm and drill through both walls, then with a 10 mm drill we drill only the first. These holes are needed to fasten vertical and horizontal profiles;
- If a mirror or glass will be used to fill the door, it is necessary to stick a self-adhesive film on its inside. If the glass breaks, the fragments will not scatter on the floor, but will remain on the film. Thanks to this, the risk of injury is reduced to almost zero;
- at the next stage, horizontal profiles are installed. Before this, you need to attach silicone seals to the ends of the glass so that they are securely fixed in the grooves. You will have to tamp down the profile, as the filling can be tightly moistened into the grooves. To do this, you need to attach to your profile wooden beam and gently tap it with a rubber mallet;
- vertical profiles are also installed using a mallet and a block;
- All that remains is to install the rollers on top and bottom of the doors and fasten everything with self-tapping screws. We tighten the adjusting screws into the lower roller device.
To install sliding doors in a closet, you need to attach the top and bottom tracks. In the cabinet they are attached with self-tapping screws to the ceiling and floor of the product itself. If a built-in wardrobe is built, the guides are mounted in the ceiling, using dowels, and the floor. After this, the sliding doors can be installed. First, the top is inserted into the profile, and then the bottom. Sliding doors are height adjustable, after which buffer tape is glued to the ends.
Assembling the door into a radius cabinet is carried out according to a similar algorithm. The differences are that a rectangular cabinet has straight components, while a radius cabinet has curved components.
Assembling the closet
The built-in wardrobe is assembled using confirmations and dowels. Confirmats fasten individual elements together, and dowels give the structure strength and rigidity. When assembling, use the prepared three-dimensional drawing of the cabinet and diagram.
To drill holes in the ends for confirmations, use a drill with a diameter of 5 mm, for planes - 8 mm. The shelves are installed on shelf supports. The back wall is secured using small nails and a hammer or a staple gun and staples. Making a built-in wardrobe with your own hands in a niche in a hallway or bedroom is even easier. There is no need to install walls on the sides and back.
Internal walls and shelves can be attached to the wall using furniture corners. To do this, you need, guided by the plan diagram, to make holes in the wall, drive dowels into them and fasten the corners with self-tapping screws. Then the walls and shelves are attached using self-tapping screws to these corners. To strengthen the structure, you can fasten the elements using confirmats.
 Stages of assembling a sliding wardrobe
 How to make closet lighting
Connecting the light in the closet needs to be taken seriously. Since the structure is made of flammable materials, it is necessary to install light bulbs that do not heat up to high temperatures. 12 V halogen lamps are ideal for this. They should be connected to the AC/DC adapter using double insulated wires. Direct connection to a 220 V network is unacceptable.
You need to think about lighting at the preparation stage. This will make it easier to route the wiring.
There are two installation methods: open or closed. The second option is better, since the risk of damaging the wiring will be much less. To do this, cable channels are laid to the installation site of the lamps. The wires are placed in the middle, after which they snap into place. It is best to mount it to the ceiling.
Next, a lamp is installed, which is connected to the power supply. Many manufacturers provide connection diagrams with their products. By consulting them, lighting installation work is completed in a very short time. The way you turn on the light plays a significant role in convenience. It is better if the lighting system is triggered by a motion sensor. There are many lamps on the market that are equipped with this element at the factory manufacturing stage.
 Connection diagram for lighting in a wardrobe
  Lighting with LED strip
 Furniture lamps
  Cabinet with external lighting
  Sliding wardrobe with lighting
 Common mistakes
Mistakes often lead to many problems and additional work. Therefore, at the design stage, it is necessary to check your drawings for their availability.
The most common mistakes:
- shelves in the closet should be 10 cm smaller than its thickness. It is this distance that the sliding system takes on;
- Drawers cannot be installed opposite door frames. They simply will not open, since these places are dead zones;
- if the closet has shelves larger than 60–70 cm, they need to be strengthened with supports, otherwise they will gradually begin to sag;
- All wardrobe doors must have the same width. This is the only way to ensure full access to things;
- Access will best be ensured if each door has its own compartment. If you neglect this recommendation, it will be difficult to reach some compartments - the sliding structure will not allow it;
- When designing drawers with handles, you need to take into account their overall size and compare them with the installation location of the sliding structure, so that in the future they do not interfere with each other.
With sufficient knowledge, you can design and manufacture any structure. It is important to know that before assembling a sliding wardrobe with your own hands, you need to carry out thorough preparation, decide what you want to see upon completion of the work. So that after the construction of the cabinet you do not regret your choice, check out the photos of products of various models, and choose the one that you like and suits its parameters, and will fit better than others into the interior of the bedroom or hallway.

A mandatory piece of furniture that should definitely be in every home is a closet designed for storing things. Sliding wardrobes are especially popular - they are not only fashionable, but also an incredibly functional interior detail. Unfortunately, family budget problems do not always allow them to purchase such a valuable item, so many have to look for another way out. An alternative option is to create a wardrobe with your own hands - drawings and descriptions that will be useful during the work process will be presented below. This way you can not only build a piece of furniture that will meet your wishes, but also save a lot Money and also acquire useful skills.
The demand and popularity of this piece of furniture is due to a number of advantages:
- spaciousness;
- saving space;
- attractive appearance;
- harmonious combination with the design of any interior.
A hand-made wardrobe will fit perfectly into both prestigious apartments and a miniature studio apartment. Main feature technology is the design of doors: moving to the sides due to rollers, they provide a person with access to the contents. Having decided to assemble a wardrobe with your own hands, you will need appropriate instructions, drawings, diagrams and certain recommendations that will significantly simplify the work process.

The first thing to do is determine the size of the cabinet and its location. This is followed by drawing up a drawing of a wardrobe with the desired dimensions and purchasing the necessary fittings. If you have no experience in this matter, it is recommended to start with the simplest rectangular model, since radius wardrobe Difficult to install for beginner carpenters.
The simplest way to make a wardrobe is to place it in a niche or closet. In this case, you won’t have to rack your brains about making the walls, bottom and top, since these elements will already be ready. All that remains is to come up with the doors of the wardrobe and the internal filling of the wardrobe. Consequently, not much materials will be required, and the work will take much less time. To place such a furniture product, a corridor is often chosen, since this is the place where business card any apartment.
A sliding wardrobe is one of the most convenient and compact ways to store things. It has small shelves for light items of clothing, and large ones for bulkier items, there are compartments for storing skis, a compartment equipped with a rod for placing outerwear, etc.
The compactness of the closet is made possible by sliding doors, which do not require space to swing open; they move on special rollers located inside the structure of the door itself. Even a person inexperienced in such matters can assemble such a cabinet, since the assembly principle is quite simple and does not require the use of special tools.
Read the instructions and sort the parts
First, you need to carefully read the instructions and understand the individual parts - find the lower and upper elements, side posts, internal partitions.
If you mix up even one part, you are guaranteed to have to disassemble the newly assembled structure and reassemble everything again. Therefore, it is so important at the initial stage to correctly determine the location of all parts of the cabinet.
Assembling the frame

First we install the base (bottom element).
As a rule, this plate is attached to stands located along the long side using confirmations (these are so-called Euroscrews that have a recess in the head for a special hex key).
Installing internal partitions

At the lower end of the partitions there are holes into which dowels must be inserted before installation.
A dowel (chopik) is a small piece of a round rod that serves to strengthen wooden joints.
There are blind holes in the bottom plate, which are intended for such dowels. Having aligned the dowels and holes, we install the vertical partitions in their place (an assistant will be needed here).

We fix the shelves
Now, in order to prevent the structure from becoming loose, we install shelves, which in this case act as stiffeners.

We secure them with confirmations.
At this stage, fasteners must be screwed in completely, leaving no free play.
We install the side racks and the top cover

Now the final part of assembling the frame is the installation of the side posts and the top cover. All three elements must be installed simultaneously.
Although this action depends on design features and the location of fastening points on these parts. First, we install the sidewalls, fastening them at the bottom with the base with confirmations.
Then we put the lid on top, align the holes in all the parts and also tighten the fasteners. Here you need to leave a little free play, since you will need to level the entire frame.
Aligning the structure

The alignment process consists of the following steps. It is necessary to use a tape measure to first measure one diagonal, then the second and, based on the difference in values, determine in which direction you need to “press” (move) the top of the cabinet so that its corners are perfectly straight.
Now you can wrap the confirmations to the end with force.
We nail chipboard sheets

The next assembly step is to nail the fiberboard sheets to the back of the cabinet.
These sheets will not only serve as a back wall, but will also reliably keep the structure from loosening throughout the entire period of operation.
As a rule, the canvases have a decorative treatment on the front side in the form of a laminated colored surface. The sheets are fastened using small nails, which must be driven into the ends of all cabinet elements (racks, partitions, shelves).
Here it is important to guess the place of nailing, because the cabinet parts are not visible from the back side, and damage resulting from the wrong choice has a negative impact on appearance products.
We place the rails - guides
Now the most crucial moment is the installation of the lower and upper rails for the doors. The bottom rail has two grooves for the movement of rollers:

And the top is divided into two sections:

In both, you must first drill holes for screws to attach them to the base and cover.

The holes must be chamfered to allow the screw to be screwed in flush.
It is enough to make 4 holes in each plank. We fasten the bottom rail first, marking the corresponding fastening points.

The distance from the edge of the base to the leading edge of the rail should be 2.5 cm.
To ensure that the doors do not jam and they move evenly, it is necessary to install the cabinet strictly horizontally, which can be done using a regular building level.

The longer the level, the more accurate the horizontal indicators will be.
The top rail is attached in a similar way with the only difference being that you need to drill holes in a checkerboard pattern in both compartments.

Screws from the set supplied with the cabinet are used as fasteners.

From the front end of the top cover to the beginning of the edge of the rail, the distance should be 2 mm.
We install rods and fittings
The final construction stage will be the installation of a bar to accommodate outerwear.

First you need to mark the attachment points for one holder (it is secured with 3 screws), drill holes and tighten the screws.


Then install the second holder on the rod, pressing it with a screw.
The assembled structure must first be tried on, aligned horizontally, and then outlined and attached with the same screws.

We hang the doors
Before this stage, you need to check the gutters in the lower bar for the absence of debris that will interfere with the movement of the rollers, once again make sure that the planes are horizontal and check all connections for rigidity.
The door is first inserted into the top rail.

And then the end rollers need to be placed in the groove of the lower rail.

All 4 doors are installed in this way (the main thing is not to confuse the picture).
In principle, there is nothing complicated in installing a wardrobe. You just need to take a responsible approach to all stages of its assembly, and then you will not only improve your skills as a home craftsman, but also probably be grateful for preserving the family budget.
Assembly is complete - the result is in the photo


