Making a homemade wood milling machine: spindle and shaft design. Homemade practical wood cutter Do-it-yourself homemade wood cutters
A machine for milling wood and other materials is a very useful thing for the household. Nowadays it is not a problem to find suitable equipment, but it is obscenely expensive. But making a milling machine with your own hands, without spending a lot of money on a branded or Chinese equivalent, is within the power of any business person.
To do this, you need an electric motor of suitable power, a table and a guide structure.
Drive for a homemade milling machine
When designing a simple homemade milling machine, you should pay attention to the electric drive.
The first factor is power. If the machine is made for shallow sampling of wooden blanks, then a motor with maximum power 500 Watt. However, such a machine will often stall and will not justify the time and money saved on purchasing a low-power engine. According to observations, best option– install a motor with a power starting from 1100 W. A 1-2 kilowatt drive will allow you to use any type of cutter and do wood processing as usual.
Both stationary electric motors and drives of powerful hand-held power tools, such as an angle grinder, drill, or hand router, are suitable here. The second important factor is turnover. The higher the number of revolutions, the cleaner and more uniform the cut will be.
If the engine is designed for a 220-volt household network, then you won’t have to fantasize about the connection. But three-phase asynchronous motor it must be connected according to a special scheme - star-delta, which guarantees a smooth start and delivery of the maximum possible power in this situation (when a three-phase electric motor is connected to a single-phase network, 30 to 50 percent of efficiency is lost).
Making a homemade elevator for a router
 |
 |
 |
Assembling a homemade milling machine from scrap materials is half the battle.
Manual wood router: features of use and rules for a successful purchase
It's important to do it. This will make it possible to adjust the cutter's cut height without special effort without wasting much time. The photo shows a method for assembling a simple control elevator made of thick plywood sheets. The structure itself is attached to the table top. The machine will turn out without pulleys and belts, and the cutters will be mounted on the shaft of the engine itself.
Therefore, the drive must initially be at high speeds. The lift for the milling machine consists of a supporting body, a carriage, sliding skids, a threaded axle and a fixing screw. When the axis rotates, the carriage with the motor moves up or down along the axis. The runners act as guide stops. The fixing screw secures the carriage motionlessly after adjusting the height. The supporting body holds the entire structure and is attached to the workbench cover from below. It is important that the carriage with the motor does not wobble in the body, otherwise during milling the wood sample will be uneven and not beautiful.
This device for a milling machine ensures smooth regulation of the extension of the replaceable cutter above the table surface. For greater convenience, you can equip the elevator with homemade gears and place the swing arm on the side rather than on top.

If there is no ready-made table, and you make it yourself, then you need to take into account that different materials behave differently during operation.
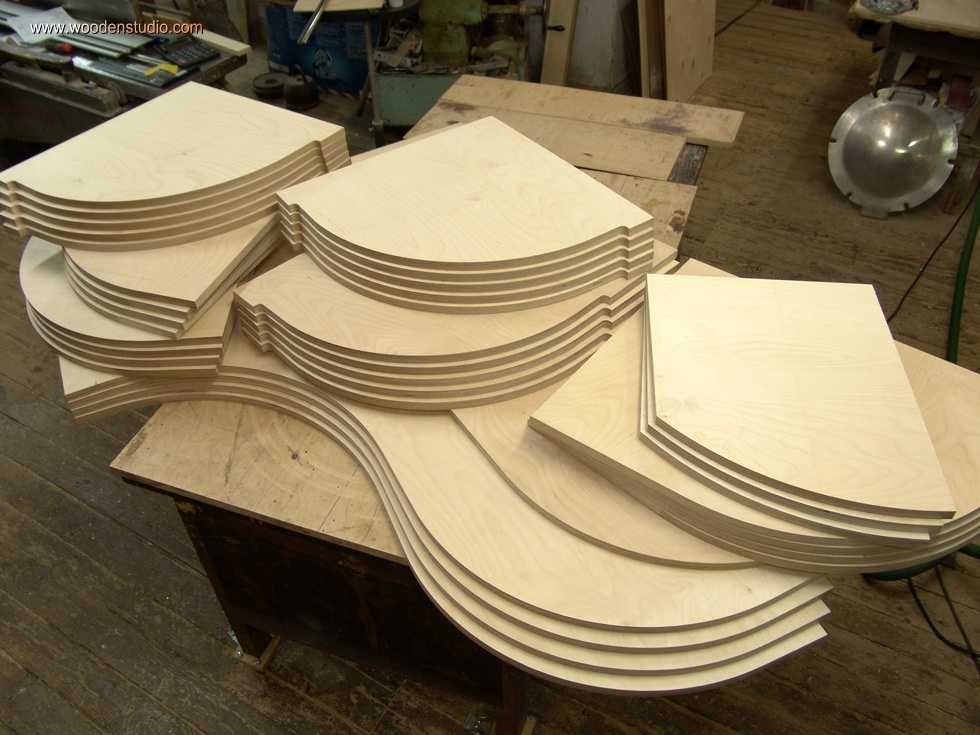
For example, a homemade table for a router made of wood is afraid of moisture, but wooden structures are easier to make and they partially absorb vibrations. As can be seen in the photo, guides for supporting the workpiece can also be made of chipboard or plywood with the ability to adjust the position in the horizontal plane.
As for shavings, an old unnecessary vacuum cleaner is often used in homemade structures. Do not forget about safety precautions - all unused space around the rotating cutter must be closed.
It would also be a good idea to make a clamping mechanism to fix the workpiece being pushed along the way.
Download a drawing of a homemade milling machine
New entries:
Cutters are multi-purpose, high-performance tools. They are used to select grooves, create profile cuts and various edge profile shapes.
Household cutter milling machine: components, approximate production process
The variety, capabilities and quality of the operations performed depend on how the milling cutter works and what type and profile of cutting teeth are used.

Types and Types of Wood
To ensure high quality workmanship using hand milling, it is first necessary to have a towing column with a rigid mounting of the workpiece in the positioning device, as well as the appropriate type of knives.
The simplest positioning device is a router, which is equipped with a support blade installed under or above the cutting profile. By adjusting the vertical position of the milling tool, grooves can be cut to join parts or to obtain another profiled edge using such a tool.
Operation of a conventional terminal milling type cutters without bearing support requires the use of a parallel stop or a copy ring.
Initially, these devices are equipped with a portable router.
To understand how the router is controlled by the stop, you just need to try to make an accurate groove.
It immediately becomes apparent that this will be virtually impossible without strong positioning using a pattern or emphasis. Depending on the cutting profile, the milling knives moving along the stairs use the following grades and are used for different procedures:
- with a slider - to obtain a rectangular groove in the workpiece;
- Conical - for making various internal angles;
- galvanic - for the formation of semicircular gutters;
- trousers - for cutting hidden couplings;
- V-shape - choice of gutters at an angle of 45 degrees;
- kaila - for rounding the edges and forming profile curves in a quarter of a circle with different radii;
- profile - or decorative, which allows you to create different profiles;
- Disc - which allows you to create grooves of various widths in the pads and use them to fix joints.

To produce these or other parts, it is important to choose the right type of cutter, which can be found in ready-made kits specifically designed for processing wood materials.
They usually have both types - an edge, a load-bearing support and an end.
To obtain certain decorative profiles or grooves, there may be non-standard blades that must be purchased additionally. In addition, it must be taken into account that deep sampling requires mills with extended legs.
Grout type and optimal depth
To avoid cutting material while the router is in operation and ensure a clean part when cleaning the job, it is necessary to control the sharpness of the cutting edges of the tool.
Correctly, whether the milling machine is working on wood, you can judge the burns on wooden surface products. Due to the friction that accompanies the working process, milling is reduced at high temperatures, which significantly affects the hardness of the steel cutting edges and results in these teeth.
To avoid this, the deep groove should be tried in several passes, with the depth of the blade plunging into the material after each cycle, while it is recommended to remove up to 3mm of layer.
For a manual milling machine with high power, the layer can be selected for 4-6 mm. However, you must ensure that the router moves exactly along the guide on the template or along the parallel station.

To prevent the expression of negative aspects, several factors need to be considered:
- density of treated wood;
- cutter diameter and speed;
- Router speed.
All these factors are interconnected.
The cutting speed is selected depending on the type of wood and the diameter of the tool used. For this purpose, special calculation tables are available to determine optimal mode milling machine operation.
The larger the cutter diameter, the lower the rotor spindle speed and faster linear control of the material surface.
The transfer speed at which the router moves depends largely on the ability, but the important point is to prevent the mill from overheating due to the slow movement of the material.
An important aspect in the work is the choice of the correct direction of movement of the mill on the workpiece. The most effective wood removal occurs when the tool is positioned in the direction of the cutting parts of the rotary cutter.
This shift does not result in chip removal and is considered safe.
Safety precautions when working with a lawn mower

Manual routers have a high spindle speed, so you need to take extra care and attention when working with them.
To avoid injury, you can follow basic safety rules when using power tools.
- Installing or replacing blades in a socket should be done when the equipment is completely unplugged to prevent spontaneous switching.
- The back of the cutter should be completely screwed into the body.
Otherwise, it is not held securely enough and may result in injury.
- There should be no oil contaminants, resins or brown stains on the shaft of the router blade that causes it to slip off the head.
- Before installing the blade, make sure the blade roller mechanism is working well.
- The part must be securely fastened and all foreign objects must be removed from the surface to be treated.
- Hold the tool firmly and confidently, as the first contact of the cutting tool on the surface is the push and kickback you should be prepared for.
- There should be no negligence in clothing that could result in serious injury.
When working, there is no need to ignore protective equipment - goggles, respirators and gloves, since very fine wood dust is generated at work.
09.21.2015 at 18:09
A machine designed for milling wood is very useful thing in any household. Even moreover, if a person is economical and needs to periodically perform milling work, a tofa milling machine will not just be a necessary thing, but a necessity. In the current market conditions there is no problem finding the necessary equipment, but, unfortunately, its price is prohibitively high.
But anyone with mechanical knowledge can make a homemade milling cutter without spending money on expensive branded equipment or its Chinese equivalent.
And to make a manual wood router, you need three components: an electric motor with good power, a guide structure and a table.
Make a router... with your own hands?
When designing even the simplest homemade woodworking machine, you must first of all pay attention to the electric drive.
DIY cutter: making homemade wood cutters
The first thing you should pay attention to is power. If the engine is intended for manual work on thin wood, then you can use models with a power of no more than 500 Watts. But it is worth noting that such a homemade machine will ultimately not live up to its purpose and will stall very often. The best option, based on experience, is a motor with a power of at least 1100 watts.
Thanks to the drive, which has at least one kilowatt of power, the machine can use any type of cutter and process wood in a stationary mode.
It is best to use electric motors from powerful power tools, such as an angle grinder, drill or hammer drill.
In some cases, you can use stationary electric motors, but in this case, a homemade router will significantly add weight and price.
The second thing you should pay attention to is the number of revolutions.
The higher the speed, the more uniform and accurate the cut will be. It is noted on numerous forums that the best option is an engine with at least 3000 rpm. If a router is needed to work on thick wood, it is recommended to use more high-speed electric motors.
To assemble the main part you will need the following parts:
- Electric motor.
The basic requirements for it are described above.
- Milling cutter. You won’t be able to make a cutter yourself, so the only option is to buy the part.
- Cartridge. A wood router requires a chuck to be installed. The best option is a cartridge removed from a hammer drill. The operating principle is the same, and the power of the tool determines the high strength and wear resistance of the part.
For the base of the electric motor, you can use strong plastic (polyvinyl chloride), or you can not spend extra money and just use chipboard sheets.
You need to cut it out and attach it to the base of the engine. Next, a logical question arises: how can you connect the chuck from a hammer drill and the engine? There's nothing you can do about it. Despite the fact that the milling cutter is homemade and is almost entirely done by hand, to attach the chuck you need a special adapter, which can only be installed by a professional craftsman.
After all the steps, we can say that the wood router is ready.
All that remains is to select the necessary cutters and start working. However, it is impossible to complete a full-fledged job if there is no special table for a manual router.
Router table
Since you need not a stationary, but a manual version of the router, it is advisable not to waste extra time and money and make a portable table.
- The table cover must be made of durable materials. A homemade table will be in no way inferior in quality to a professional one if you use MDF boards or phenolic plastic - both materials are durable, reliable and can be used for many years.
- You can install a mount on the table on which the router for woodworking will “sit.”
It should be taken into account that the plate must be selected based on the size of the cutters, which can have a diameter from 3 to 80 mm.
- Longitudinal stop.
The video below demonstrates a working milling cutter, which was created by human hands. The results of his work are also shown:
Making a homemade router for working with wood will not be difficult and will significantly save money for any person who spends a lot of time processing wood.
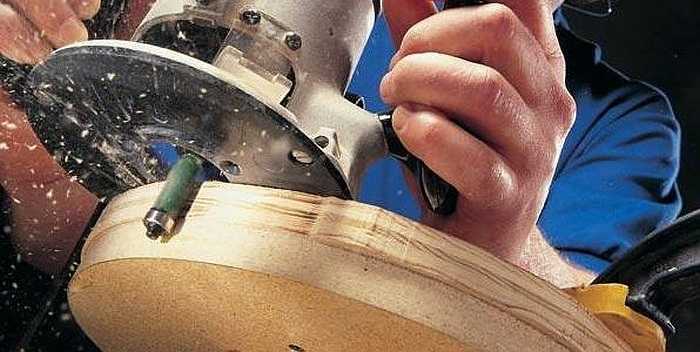
Instructions for sharpening cutters for wood and metal
In the modern variety of services presented on the building materials market, it is easy to find help in sharpening cutters.

Wood cutter
But don't rush this work you can do it yourself.
This is typical not only for work on sharpening cutters, but also for other types of work.
How to sharpen a cutter
The standard cutter sharpening machine has two chucks of different configurations.
One of them is for three feather cutters, and the second is for two and four feather cutters. It is difficult to make a mistake in this case, since if the number of cutter feathers is incorrectly set, it will not be possible to insert the cutter into the chuck.

Metal cutter
Having decided on the choice of chuck, you can proceed to the immediate stages of sharpening the cutters:
- sharpening on a ribbon;
- end sharpening.
Sharpening on a ribbon
You must use one of the corresponding cup sockets.
DIY wood cutter video
From the standard set of collets, select a collet of the appropriate size (8 mm, 10 mm, 12 mm).

Mill sharpening machine
We insert the collet into the chuck and secure it with a clamping nut. This procedure is done without any effort; the clamping nut rotates freely and does not need to be tightened.
- In the socket of the glass we set the length of the ribbon to be sharpened.
As a rule, this distance is adjusted by unscrewing the screws located in the cup socket. By moving the bottom of the socket up or down, we select the length, and then fix the screws back.
- We install the cutter into the chuck through the upper hole, while pre-setting the diameter of the cutter and the sharpening angle on the adjusting screw.
We fix the prepared chuck in the glass, while correctly setting the lines of the cutter in relation to the element being sharpened. That is, the cutter should cling to the pin with its grooves.
- Then we turn on the machine and, using the feed regulator, bring the cutter to the grinding wheel until the sound of contact begins and sharpen the cutter strip on all sides. The metal removal from the cutter being sharpened can be reduced or increased using the regulators installed on the machine. This adjustment is necessary when changing the diameter of the cutter and correcting existing irregularities in the cutter being processed.

End sharpening
Sharpening the end cutter
To sharpen the cutter along the end, you must use the second chuck socket located on the machine.

Sharpening the cutter
In this case, you need to perform the previously described steps to set the diameter and length.
- Depending on the hardness of the metal being processed, the settings on the socket are set.
The harder the metal, the more the socket ring rotates towards the “+” sign.
- Next, turn on the machine, insert the prepared chuck with the cutter into the socket and process the part until the characteristic noise stops.
Each groove of the cutter is machined.
- In the additional slot of the machine, the cutter is sharpened from the end, for which the above steps are performed.
- The last operation is processing the rear wall of the cutter, which is performed by inserting a chuck with a cutter into the corresponding slot of the machine.
- Thus, the cutter was sharpened in compliance with all the required geometric features separately and in relation to each other.
The sharpening is uniform on all sides.
Do-it-yourself sharpening of cutters
You can perform this procedure yourself and use available tools.

This feature will save money and, if used repeatedly, save valuable time.
- First, we clean the cutter from carbon deposits, for which we use a special liquid, similar to those used to clean car engines.
You need to fill the cutter and wait about three minutes, then clean the cutter on all sides with a brush.
- Next, we take a diamond stone and begin to sharpen the cutter along the leading edge (movement of the cutter channel along the diamond stone).
- The block is wetted plain water. After sharpening, you need to wipe the cutter with a cloth.

Quality manual sharpening differs significantly from sharpening using a special machine, but the manual version saves time.
- Milling cutter from a drill
- Stationary machine
Making a milling machine for your home workshop is easy. You just need to take into account that all machines (professional, student and homemade) have a certain number of wood processing techniques due to the position of the wooden workpiece relative to the cutting tool. The sample being processed can be stationary or undergo translational movements. Therefore, they make homemade milling cutters from different cutting electric tools.
Milling cutter from a drill
This is the simplest wood milling machine that you can assemble with your own hands. In any hardware store there are cutters made like a regular drill: their design includes a shank that exactly fits the dimensions of the internal diameter.
But when working with such a manual router, you need to firmly secure the workpiece. It should not move or hesitate. Most often, the workpiece is fixed clamps . The more clamps are used, the more firmly the workpiece is secured.. Sometimes a regular vice is used. They are used when it is necessary to carry out end processing.
The problem with using a homemade milling cutter from a drill is the difficulty of maintaining the required processing size. The slightest trembling in your hands will ruin all your efforts.
It is necessary to make devices for the milling machine from a drill that will hold the electric tool in a certain position.
If you need to make a groove in a wooden piece:
- The cutter is selected and installed according to appearance similar to a drill. Feature - the working edges are located in the front part (like the drill) and in the longitudinal position.
- The workpiece is clamped well.
- Clamps are attached to the drill, attached to a stop made of chipboard, plywood or board. By resting the stop against the workpiece, you can move the homemade router along the line and determine the position of the future groove.
The photo shows a drill with a wooden stop.

Stationary machine
What you will need for production:
- Milling cutter - drill, grinder, several devices in the form of a small electric motor and a spindle for a wood cutting machine.
- Tabletop.
- Bed. It must be strong and reliable: this is the load-bearing part of the machine on which the tabletop and cutter will be attached.
The most difficult option is to manufacture a machine from a separate electric motor and spindle. It is easier to make equipment from ready-made electrical tools.

A milling machine performs processing in a vertical or horizontal plane; the installation position of the working element depends on the choice of processing method.
Milling cutter homemade machine from the grinder is located vertically, processing is carried out in the horizontal plane.
The bed can be of any design (drawings are optional). It is better to make it in the form of a frame from metal corners. Attach a sheet of chipboard to it with bolts. Then:
- Determine the place from where the working shaft will come out.
- Make a hole with a diameter larger than the diameter of the shaft.
- Attach the grinder with two clamps, which are attached to the tabletop with screws and nuts.
The screw head is placed on the side of the tabletop surface where the workpiece will move. The fastening nuts are from the angle grinder side. The screw heads are installed flush.

For a homemade machine, you need cutters that resemble cutting discs in their fit on the shaft. They do not have grooves for keys. They, like the discs, are attached to the angle grinder with a clamping nut. If there is a need to use key-type cutters, then an adapter is made:
- One end has a threaded connection. With this side it is screwed onto the angle grinder shaft at the place where the clamping nut fits.
- The second end is made for fitting the cutter onto the key. Usually a bolt and a washer are used for fastening (they press the working tool against the adapter), so a threaded hole is made at the end to match the diameter of the bolt used.
Guides are installed along the tabletop along which the workpiece will move.. Most often, pieces of plywood and chipboard are used: with their help, you can create guides of various configurations, which allows you to mill the workpiece in different directions. Guides are removable products attached to the frame with self-tapping screws.
Using a stationary milling cutter, the accuracy of the processes performed is determined, regardless of the number of revolutions. The quality of the resulting structures is higher than when using hand tools. Although the latter is easier to do yourself.
From this article you can learn how to make a wood milling machine with your own hands at home to perform basic operations with workpieces. The text sets out step-by-step technology creating a tool: an analysis of the design features of the device and all the components necessary for its installation, drawings with dimensions and detailed descriptions that will help create each of these elements and assemble them together.
Wood milling machines can have different purposes. Some devices are designed to perform only one operation, others are multifunctional. Buying a professional tool is an expensive pleasure, so many craftsmen resort to making a woodworking machine with their own hands. Most often, this router is used in small furniture workshops.

Routers are usually used to process wood along straight or curved contours. The working element in the design is the knife head, which carries out rotational movements. In most cases, this part is located vertically. There are many types of routers, each of which has its own design features.
The most popular types of devices:
- standard single-spindle (the spindle is located vertically);
- single-spindle designs, where the spindle or homemade milling table tilts;
- copy milling cutters with a top-mounted spindle;
- copying structures with a horizontal spindle (the tool is designed for processing wooden propellers).
Note! In all of the listed designs, except the last one, the material is fed manually.
Milling machine design: single-spindle designs
The design of a single-spindle machine includes a horizontal table with a pair of tongue-and-groove sockets designed for fixing guide rulers. It is installed on a cast iron frame. Under the table there are slides that move along guides. They have a spindle mounted on a thrust bearing and a pair of bearings. At the top of this element there is another spindle - a plug-in one. It is designed for mounting cutting parts.

The slide with spindle can be raised if necessary. For this purpose, a bevel gear with a handwheel or a screw is used. A belt drive allows the spindle to move. Moreover, a counter drive, a motor or a motor shaft can be used for this.
To make such a wood router with your own hands, you need to take into account some nuances. In some cases, it is impossible to do without additional spindle reinforcement. This need arises if it is necessary to process workpieces of great height or if the part is subject to serious loads. To do this, you need to install and secure the upper stop on the machine table. This element is fixed on the bracket. To control the movement of the workpiece during the milling process, it is advisable to use a guide ring or ruler.
Machines in which the spindle or table tilts allow you to do a wider range of DIY woodworking jobs. In addition to standard operations, such designs allow for higher quality processing, obtaining a clean and uniform surface. This result can be achieved by processing wood at an angle, using cutters with a very small diameter. A device with a tilting spindle is much safer and more convenient.
The device of a homemade wood copying machine with an upper spindle placement
These devices are used to perform copying work. This does not require high power. Such designs allow milling and drilling to create openwork products.

The copier can replace three tools at once:
- Fraser.
- Drilling machine.
- Jigsaw.
Wood processing is carried out using cutting mills. The spindle develops a large number of revolutions, due to which the processed surface is very clean.
A homemade woodworking machine can be used for various purposes:
- calibration of bosses;
- production of openwork frames;
- working out the walls of the ribs, etc.
The basis for this design is a frame made of cast iron. Her top part curved in the shape of a sickle. This area is used for mounting the electric motor.

Note! The bed serves as a connecting link on which all the elements of a homemade wood milling machine are installed. The stronger and more reliable its design, the better.
The engine is mounted on guides. Due to the system of levers, it can move up and down these elements. This section is set in motion by pressing the pedal, which is equipped with a special stopper. The rotor shaft of the engine is connected to the spindle, where the chuck with the tool is secured. This cartridge can be self-centering or American.
In the lower zone of the frame, a table is mounted on a movable bracket. This design can move vertically along the guides using a handwheel. There are other options for making a homemade wood milling machine with your own hands; a drawing of such a design involves vertical movement of the table also during operation by pressing the pedal. In such models, the electric motor and spindle remain stationary.
How to make a wood lathe with your own hands: drawings and technology
The easiest way to make a tool yourself at home is to construct a lathe or milling machine from a drill or electric motor removed from another tool. This process is not that complicated, so every master can handle it. To do this, you will need an electric motor, the power of which does not exceed 500 W, and available materials. A drill can also be used as a drive. Of course, making a lathe will require some skill.

To build the machine, the following elements are required:
- metal frame;
- electric motor;
- handyman;
- tailstock.
It wouldn’t hurt to get a drawing that will help you navigate the dimensions and correctly manufacture all the structural elements for its subsequent assembly.
How to make a homemade drilling machine with your own hands with a motor
First you need to prepare the electric motor shaft. To do this, a faceplate is installed on it; a steel center with a thread is also suitable. Installation of the second center is carried out in the tailstock tube. To make the frame, you will need a pair of corners measuring 5x3 cm, their length is 15 cm. A motor is attached to the frame using a bolted connection.

Note! The central part of the tailstock must coincide with the middle of the electric motor shaft.
At the next stage of making a homemade machine, you assemble the headstock yourself. This element is formed from a pair of horizontal and a pair of vertical corners. A pipe intended for the spindle is attached to it. You need to insert a bolt into it, the diameter of which is 1.2 cm. First, its head is sharpened at a right angle. Thus, the central part of the spindle is designated. After this, the headstock is installed on the bed. On the top post, which connects to the horizontal corners, it is necessary to secure the tube by welding.
To make a tool rest, you need to take a steel rod with a chamfer. This element must also have a hole that will be used to secure the support ruler. It is necessary to vertically weld the tube with the locking screw to the long angle. Then the tool rest rod is inserted into it.
The motor rotor on which the faceplate is attached will be used as the headstock spindle. You need to make several holes in it. A fork will be inserted in the central part. The holes along the edges are intended for fixing the part with screws.

How to make a wood lathe from a drill with your own hands
Instructions for use. Accessories. Recommendations for choosing designs and a review of the best models.
The design of the milling cutter consists of the following elements:
- countertops;
- beds;
- spindle;
- parallel stop;
- feed skid;
- vacuum cleaner.

Helpful advice! The recommended motor power for the machine is 2 kW or more. A tool with lower performance will not be able to process hardwood workpieces.
Selection of materials for making a woodworking machine with your own hands
In order for the frame to withstand high dynamic loads, it is advisable to use metal as the material for its manufacture. The most suitable option is a pipe with a square or rectangular cross-section. It is allowed to use a massive metal corner.
The choice of such materials allows you to create a structure without using welding machine. All elements are connected using bolts. The design is collapsible, which makes it easier to carry and transport. In addition, using the appropriate drawing of a milling table, you can create adjustable legs with your own hands. Movable supports allow you to adjust the machine horizontally.
The following materials are suitable for making countertops:
- multilayer plywood sheets;
- planed board;
- MDF, OSB or chipboard.

The tabletop must have a smooth surface. Any irregularities will affect the quality of work. In addition, it is necessary to eliminate all factors that could cause scratches during processing of workpieces.
When making a table for a router with your own hands, a flat surface can be achieved in several ways:
- finishing with plastic;
- careful fitting and sanding of planed boards;
- metal finishing.
To make a router with your own hands, you can use an asynchronous or commutator motor. The first option is quite unpretentious in operation and does not impose restrictions on the size of the cutters used. Disadvantages include high noise levels. A brushed motor is more affordable, but its brushes wear out faster.

How to make accessories for a router with your own hands
Homemade cutters wood saws are capable of effectively processing wood, but upon contact with hard materials, the cutting elements quickly become dull. Therefore, the range of applications of such parts is significantly limited.
To make a wood cutter with your own hands, you need to take a cylindrical workpiece and cut off half of its diameter in the area where the cutting zone will be located. After this, it is necessary to smooth out the resulting transition. You need to remove another 1/4 of the diameter from the cut part of the workpiece and perform a similar operation. Then you should give the processed area of the cutter a rectangular shape. To do this you need to cut off its lower part. The thickness of the resulting working area should be 2-5 mm.
Helpful advice! To cut a metal workpiece for a cutter, you can use a drill or grinder, adapting this tool to perform this task. The cutting edge can be made using .

- It is advisable to sharpen the cutting part at an angle of 7-10°. A sharper edge will cut much worse and will quickly lose its edge.
- Using an angle grinder equipped with metal discs, you can give the cutting part of the cutter the required configuration. Diamond-coated needle files are also suitable for these purposes.
- If the cutter has a complex configuration, you can flatten or bend it.
How to make a milling machine with your own hands
The simplest milling machine can be made according to the same principle as turning tool, described earlier. There are several ways to design the leading center of the structure.
In the first case, a steel tube with thin walls is mounted on the shaft. This method is considered the simplest, but it is not without its drawbacks. The operator will not be able to process workpieces whose diameter is smaller than the internal cross-section of the pipe. In addition, such a structure cannot be quickly dismantled if the need arises.

In the second case, the workpiece will be attached to the faceplate. To do this, you can use screws, for which you first need to make holes. This method also has disadvantages. The diameter of the workpieces being processed is limited by the size of the faceplate. To simplify this process, a special cartridge can be made, although in this case some restrictions cannot be avoided.
The back center, which will be used to secure long workpieces, must be installed on the tailstock. The electric motor is mounted on the frame. In general, the simplest designs of turning and milling tools are very similar. If you want to get a more functional device, you can make a CNC milling machine with your own hands, but this will require additional technical knowledge.
DIY table manufacturing technology for a router with drawings
There are several designs that can be used to mount a desktop CNC router. Tables can be stationary or portable. In addition, there is also an aggregate variety. This design allows you to expand the table surface for using a router.
Most often, craftsmen give preference to stationary structures with a metal frame. Dutch plywood is suitable as a material for the countertop.

Note! When making a table for a manual router with your own hands, you must take into account the height of the person who will work at it.
List necessary tools and materials includes:
- metal parts for the frame (pipe or corner);
- aluminum guides;
- axes for fixing the router;
- putty, as well as priming and painting compounds;
- self-tapping screws;
- furniture bolts (60x6 mm);
- hexagonal adjusting bolts with nuts (4 pcs.);
- Finnish laminated plywood with moisture-resistant properties (sheet thickness 1.8 cm);
- material for making a parallel stop (plywood or boards);
- drill and set of drills;
- screwdriver and electric jigsaw;
- welding machine;
- auxiliary devices (brushes, rags, spatula).

Having everything you need, you can easily make the design of a milling table with your own hands; video reviews of the technology, of which there are many on the Internet, will help you visually familiarize yourself with this process.
Do-it-yourself CNC machine manufacturing technology: drawings and assembly
A CNC router differs from a conventional tool in the presence of a program that controls its operation. In many videos, homemade machines are made on the basis of a beam with a rectangular cross-section, which is mounted on guides. A CNC router is no exception. During installation of the supporting structure, it is advisable not to use welded joints, fixation is best done using bolts.
The fact is that welds are vulnerable to vibration, which is why over time the frame will be subject to gradual destruction. As a result of changing geometric dimensions, the equipment will lose its accuracy and processing quality. It is desirable that the table design includes the ability to move the tool vertically. A screw drive is suitable for these purposes. The rotational movement will be transmitted using a timing belt.
The vertical axis is the most important design element. To make it you can use aluminum plate. In this case, it is very important that the dimensional parameters of the axis correspond to the dimensions of the future machine.

Helpful advice! Using a muffle furnace, a vertical axis can be cast from aluminum according to the dimensions specified in the drawing.
The assembly of the machine should begin with the installation of two stepper-type electric motors. They are installed behind the vertical axis directly on the body. One motor will control the horizontal movements of the milling head, the other will control the vertical movements. Then you need to move on to installing the remaining components of the structure.
Rotational motion will be transmitted to the key elements of the tool using belt drives. Before connecting software control to a finished router, you must check its functionality and, if there are any shortcomings, eliminate them. Many craftsmen use video reviews to assemble a machine with their own hands, where this process is discussed in detail.
Equipment for creating a CNC milling machine for wood with your own hands
To create a CNC milling machine at home, be sure to use stepper motors. They provide the ability to move the tool in 3 planes. Ideal for creating a homemade machine electric motors, present in a dot matrix printer. It is necessary to ensure that the motors have sufficient power. In addition to the motors, steel rods will be required.

A dot matrix printer only has a couple of motors, but to create a router you will need three. Therefore, you will need several old printing devices. It is desirable that the motors have 5 control wires. Thanks to this, the functionality of the tool increases.
Other engine parameters are also important:
- degree of rotation per step;
- winding resistance;
- voltage level.
To assemble the drive you will need a stud and a nut. The size of these parts is selected taking into account the drawing. To secure the motor shaft and pin, you can use a thick rubber winding from electric cable. A nylon bushing is suitable as a retainer and a screw should be inserted into it. As an auxiliary tool, you can use a drill and a file.
The tool will be controlled software. Required element machine - LPT port, providing connection of the control system to the milling cutter via electric motors. The quality of the components used to assemble the machine determines its service life and the quality of the technological operations performed. Therefore, the selection of parts should be approached carefully. When all electronic components the machine will be installed and connected, all that remains is to download the drivers and software.

How much will it cost to buy a CNC milling machine: tool prices
If almost any craftsman can handle the manufacture of a manual milling cutter and a stationary table, then assembling a CNC machine will seem like an impossible task for many. Moreover homemade designs do not have the capabilities that a factory-produced tool can offer.
Helpful advice! If you intend to use a router to perform complex woodworking, it is better to give preference to factory designs that are precisely calibrated and have many functions.
Prices for them vary depending on functionality, table size, power, manufacturer and other parameters.
Average prices for factory-produced CNC milling machines:
| Machine name | Table length, mm | price, rub. |
| LTT-K0609 (LTT-K6090A) | 900 | 228970 |
| WoodTec MH-6090 | 246780 | |
| LTT-P6090 | 329120 | |
| RJ 1212 | 1300 | 317000 |
| WoodTec MH-1212 | 347350 | |
| RUIJIE RJ 1200 | 399200 | |
| WoodTec MH 1325 | 2500 | 496350 |
| WoodTec MH-1625 | 540115 | |
| WoodTec VH-1625 | 669275 | |
| RJ 2040 | 3000 | 1056750 |
| WoodTec VH-2030 | 1020935 | |
| WoodTec VH-2040 | 1136000 |
Assembling a machine with software is a rather complex process that requires certain skills and knowledge. This work cannot be done without a suitable drawing and the necessary parts. Items such as signal cables, stepper motors, and microprocessor boards can be removed from older equipment or purchased online. Many online stores offer ready-made kits for assembling milling machines for home workshops.
Making a wood milling machine with your own hands: video instructions
Having a milling machine really simplifies the work of inserting hinges, forming complex holes, recesses, wood carving, etc. But this does not mean at all that it is necessary to have professional and expensive equipment: it is enough to have a simple manual device.
The only thing you need is to be able to basicly handle wood and use power tools. In addition, you need to have a desire, otherwise without this there will never be a result. Those who have no desire to work simply buy furniture or hire craftsmen to, for example, install a new door and cut locks. Any work, especially with power tools, requires certain knowledge, and especially safety precautions.

The milling device is designed for processing both wood and metal. With its help, it is possible to form recesses or holes of any configuration. This greatly simplifies tasks such as inserting hinges and inserting locks. Doing this with a chisel and an electric drill is not so easy, and it takes a lot of time.
There are stationary milling devices and portable (manual). Hand-held electric milling machines are considered universal devices, with the help of which, in the presence of attachments, it is possible to perform operations for various purposes; you just need to change the position of the part, in relation to the device or vice versa.
Stationary devices are used in factories or factories where mass production of wood or metal products is established. Under such conditions, the cutting attachment is stationary, and the workpiece moves along the desired path. When using a hand tool, on the contrary, the part is fixed motionless and only then it is processed, although there are parts that require fixing a hand tool. This is provided for in the design, therefore, it is considered more universal. This is especially true when a large number of parts need to be processed, and it is not possible to use a stationary machine.
 A homemade milling machine is a horizontal platform with a hole in the center, to which a hand-held device is attached from below.
 There are many types of milling machines, but for use at home or for starting your own business, universal models are more suitable. As a rule, they are equipped with a set of cutters and various devices for performing various types of operations. The only thing is that if you have a manual milling cutter, simple operations can take much longer than when using a stationary machine.
Using a manual milling device it is possible to:
- Make grooves or recesses of any shape (curly, rectangular, combined).
- Drill through and non-through holes.
- Process ends and edges of any configuration.
- Cut out complex shaped parts.
- Apply drawings or patterns to the surface of parts.
- Copy parts if necessary.
 Copying parts is one of the functions of any electric milling machine.
 The presence of such functions makes it possible to simplify the production of the same type of furniture or the production of identical parts not related to furniture production. This is one of the main advantages of this tool. As a rule, to produce similar parts it is necessary to install copying machines, which are designed to perform only one operation, which is not always profitable, especially in small businesses.
Getting started and caring for the tool
To understand how this device works, you should familiarize yourself with its main parts and their purpose.
Composition and purpose of main components
A manual milling device consists of a metal body and a motor, which is located in the same body. A shaft protrudes from the housing, onto which various collets are placed, serving as adapters. They allow you to install cutters of various sizes. The cutter is inserted directly into the collet, which is secured with a special bolt or button, which is provided on some models.
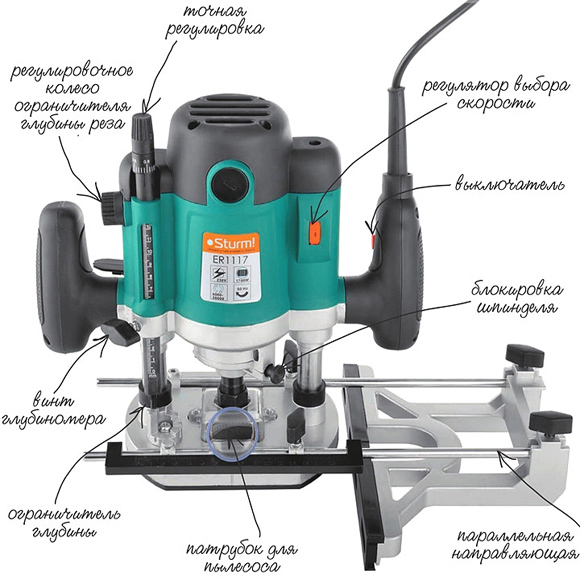 Basic elements of manual milling device and their purpose.
 The design of the milling device includes a metal platform, which has a rigid connection to the body. It is attached to the body by means of two rods. On the outside, the plate has a smooth coating that ensures smooth movement during operation.
The manual milling device has some characteristics that can be adjusted:
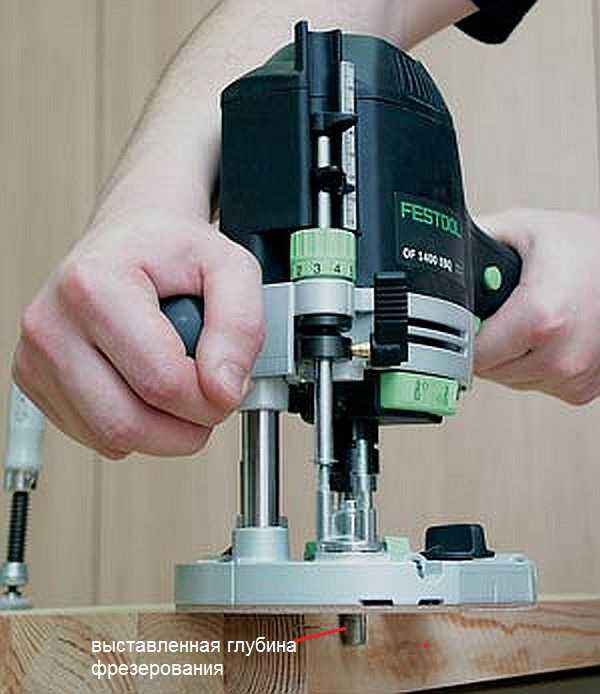
- Due to the handle and scale for adjusting the milling depth. Adjustment is carried out in 1/10 mm increments.
- By adjusting the rotation speed of the cutter.
On initial stages When mastering the tool, it is better to try working at low or medium speeds. Although you should always remember that the higher the speed, the better the work. Especially if this concerns critical, visible areas that cannot be masked.
In addition to these levers, there is also a button to turn the product on and off, as well as a lock button. These elements are considered basic, ensuring high-quality and safe performance of work. There is also rip fence, which promotes ease of use. It can be rigidly fixed or with the ability to adjust the shift of the working area away from the center.
Caring for a hand-held milling device

Usually, a factory product falls into the hands of a person tested and lubricated, so no additional measures should be taken. Only during its operation you need to monitor its cleanliness and serviceability. At the same time, it should be regularly cleaned of dust and the lubricant should be changed, if so written in the passport. Lubrication is especially necessary for moving parts. As an option, you can use aerosol lubricants, but you can also get by with regular ones, such as Litol. The use of thick lubricants is not recommended, as chips and dust stick to them. If aerosol lubricants are used, then this factor can be eliminated.
The sole, the smooth part of the body, also requires lubrication. Regular lubrication will ensure smooth movement.
Despite this, the purchased item should definitely be checked for quality of assembly and presence of lubricant.
Unfortunately, not all manufacturers, especially domestic ones, care about build quality. There are cases when, after the very first hours of operation, screws or screws are unscrewed from a product because they were not tightened properly.
Rotation speed adjustment
The operation of any tool is associated with certain conditions related, first of all, to the nature of the material being processed. It can be plywood, composite material or regular wood. Depending on this, the rotation speed on the electrical appliance is set. As a rule, the technical data sheet always indicates the operating parameters of the device, depending on the technical characteristics and characteristics of the surfaces being processed, as well as the cutters used.
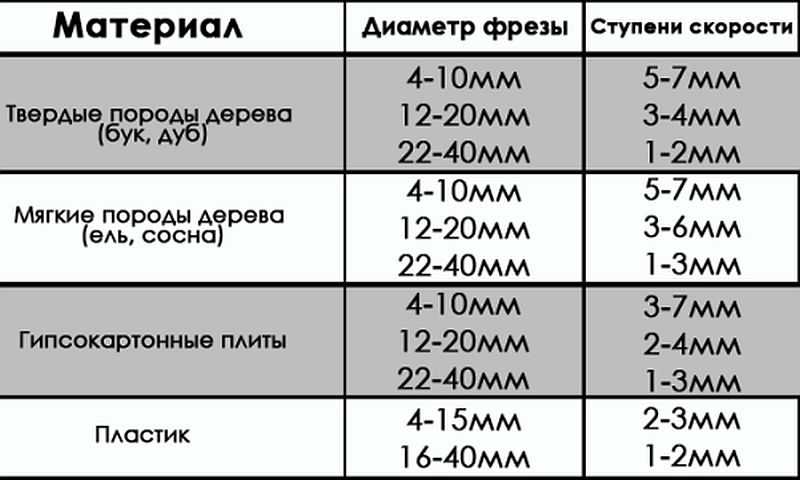 Indicators of processing speeds when using various cutters.
 Fixing the cutter
The first thing the work begins with is installing and securing the cutter. At the same time, you should adhere to the basic rule - all work is performed with the cord plug removed from the socket.
The cutter is installed according to certain marks, and if they are missing, then to a depth of no less than * the length of the cutter itself. How to install a cutter on a specific model can be found in the instructions, which must be included in the technical documents for the device. The fact is that each model may have its own design features and it is not possible to talk about this in the article.
 Installing the cutter on the device before starting work.
 There are both simple and more “advanced” models, as they say. Some models have a shaft rotation lock button, which makes installing the cutter easier. Some, especially expensive models, are equipped with ratchets. So it won’t be possible to specifically describe the process of installing the cutter, and it doesn’t make sense, since everyone who is familiar with the work similar devices, will figure it out in a moment.
Milling depth adjustment
Each model has its own maximum milling depth. At the same time, it is not always the maximum depth that is required, but a certain depth that is set before work. Even if maximum depth is required, in order not to overload the device, the milling process is divided into several stages, changing the milling depth in steps. For adjustment, special stops are provided - limiters. Structurally, they are made in the form of a disk located under the bar, on which stops of various lengths are fixed. The number of such legs can be from three to seven, and this does not mean that the more there are, the better. It is better if it is possible to adjust each of the legs, even if their number is minimal. To secure this stop in the optimal position, you should use a lock in the form of a flag.
The process for adjusting the milling depth is as follows:

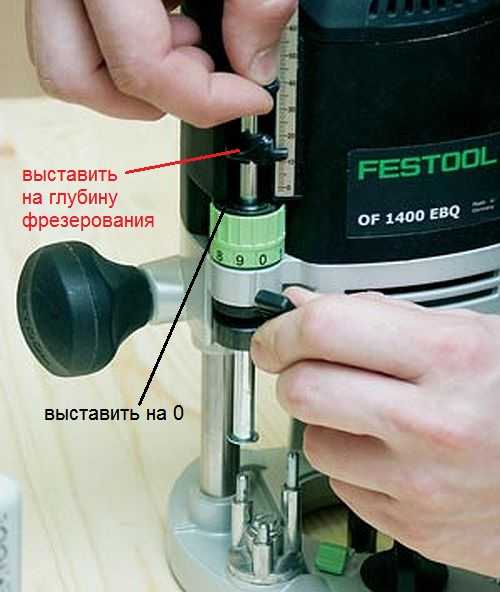 Thus, the workpiece is milled to a given depth.
 On high-quality, expensive models there is a wheel for precise adjustment of the milling depth.
 Using this wheel, you can more accurately set the depth without disturbing the previous setting.
 This wheel (green in the photo above) allows you to adjust the depth within small limits.
Milling cutters for hand milling tools

A milling cutter is a cutting tool that can have an intricately shaped cutting edge. As a rule, all cutters are designed for rotational movements and therefore have a cylindrical shape. The shank of the cutter, which is clamped in the collet, has the same shape. Some cutters are equipped with a thrust roller, so that the distance between the cutting surface and the material being processed remains constant.
Milling cutters are made only from high-quality metals and their alloys. If you need to process soft wood, then HSS cutters will do, and if you need to process hard wood, then it is better to use cutters made of harder HM alloys.
Each cutter has its own technical characteristics, which provide it with high-quality and long-lasting performance. The main indicator is the maximum speed of its rotation, which should never be overestimated, otherwise its breakdown is inevitable. If the cutter is dull, you should not try to sharpen it yourself. Sharpening of cutters is carried out using special, expensive equipment. After all, you need not only to sharpen the cutter, but also to maintain its shape, which is no less important. Therefore, if for some reason the cutter becomes dull, it will be cheaper to buy a new one.
The most popular cutters
There are cutters that are used in work more often than others. For example:

 Groove molds are designed to create recesses in any location on the workpiece.
 There are cutters that are simple, monolithic, made from a single piece of metal, and there are typesetters. Set cutters consist of a shank, which serves as the basis for a set of cutting elements. By selecting cutting planes and installing them on the shank, using washers of various thicknesses, you can form an arbitrary relief on the surface of the workpiece.
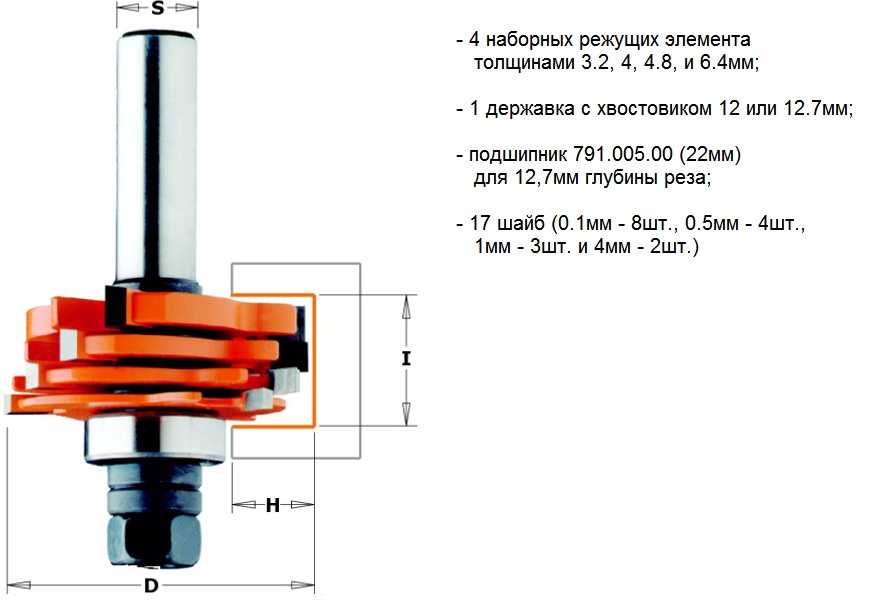 A set cutter is a set of cutting surfaces and washers that allows you to assemble a cutter of the desired shape.
 In fact, there are a lot of cutters and this is only a small fraction of what is produced. All cutters differ in the diameter of the shank, the diameter of the cutting surfaces, their height, the location of the knives, etc. As for manual milling equipment, it is enough to have a set of five of the most common cutters. If necessary, you can purchase them at any time.
Rules for working with hand milling tools
Working with power tools requires special rules, especially when there are rapidly rotating elements. In addition, as a result of work, chips are formed that fly in all directions. Despite the fact that most models are equipped with a protective shield, this does not fully protect against the flow of chips. Therefore, it is better to work with such a tool wearing safety glasses.
 The photo shows a model where a vacuum cleaner is connected to remove chips.
 General requirements
If you follow the basic requirements for safe work with an electric hand router, the end result will please you with the quality of work and a safe outcome. These are the conditions:

The requirements are not very complex and quite feasible, but ignoring them means exposing yourself to danger. And one more thing, no less important, is the ability to hold a milling tool in your hands and feel how it works. If serious vibrations are felt, then you need to stop and analyze the reasons. It is possible that the cutter is dull or there is a knot. Sometimes it is necessary to correctly set the rotation speed of the cutter. Here you can experiment: either add speed or reduce it.
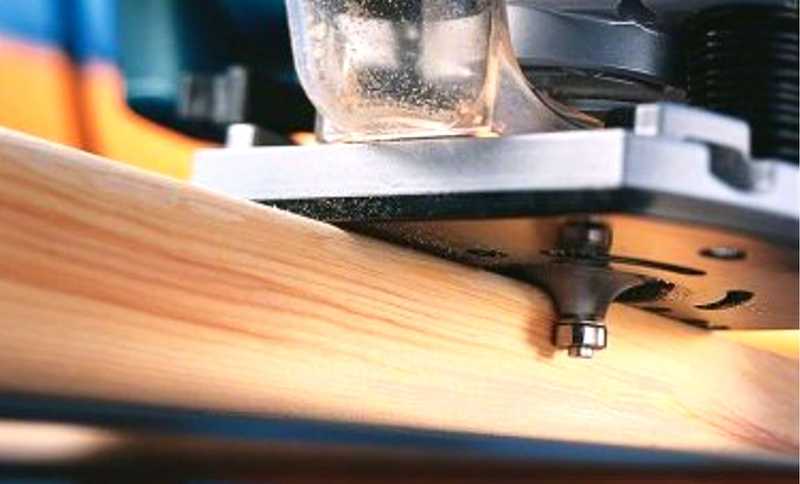
Edge processing: using templates
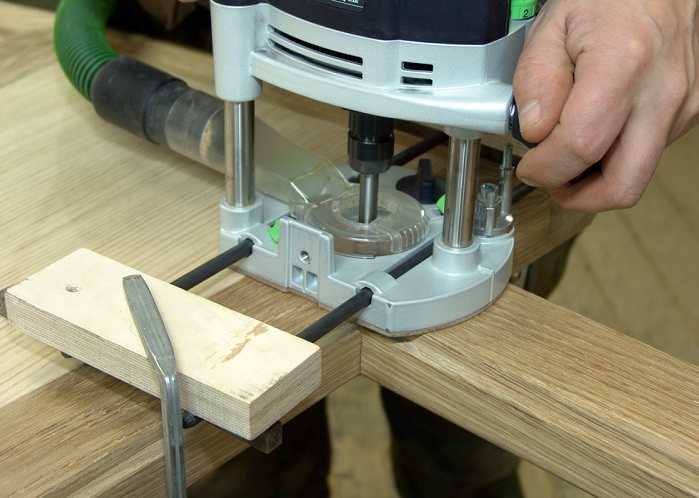
Edge processing wooden board It’s better to do it on a surface planer. If this is not possible, then you can use a hand router, although this will take some time. These works are carried out both without a template and with a template. If there are no skills or very few of them, then it is better to use a template. For processing edges, straight edge cutters are used, both with one bearing at the end of the cutting part and with a bearing at the beginning (see photo).
 Edge cutters.
 You can use an already processed board or other flat object as a template. Moreover, the length of the template must be greater than the length of the workpiece, both at the beginning and at the end of the workpiece being processed. This will avoid unevenness at the beginning of the edge and at the end. The most important thing here is that the template or object acting as a template has a smooth and even surface. In addition, its thickness should not be greater than the gap located between the bearing and the cutting part.
The width of the part is less than the length of the cutting part
Moreover, the longer the cutting part, the more difficult it is to work with the tool, since more effort is required. In this regard, it is better to start working with cutters that have an average length of the cutting part. The operating principle for edge processing is as follows:
- The template is attached so that it is at the desired height and has a flat horizontal surface.
- The template is firmly mounted to a table or other surface.
- The cutter with the roller is installed so that the roller moves along the template, and the cutter (cutting part) moves along the workpiece. To do this, perform all the necessary manipulations with the template, workpiece and tool.
- The cutter is installed in the working position and clamped.
- After this, the tool turns on and moves along the template. In this case, you should decide on the speed of movement, which is determined by the depth of processing.
- The milling unit can be either pushed or pulled, depending on what is convenient for you.
After the first pass, you should stop and evaluate the quality of the work. If necessary, another pass can be made by adjusting the position of the tool. If the quality is satisfactory, then the clamps are removed, freeing the workpiece.
Using this approach, it is possible to remove a quarter along the edge or in some of its parts. This is done by setting the cutting edge so that it extends to the required depth into the part.
 Quarter shot on a furniture façade.
 If you replace the cutter with a shaped one and move the guide, as well as use a stop, you can actually apply a longitudinal pattern to the part (pictured below).
 Applying a longitudinal figured pattern to the workpiece.
 If you use a similar milling technique (with a template), you can easily master the technique of working with wood in general. After some time, you can abandon the templates, since installing them takes a lot of useful time.
 How to make a straight edge without a template: you can’t do this without experience.
 The width of the part is greater than the length of the cutting part
Quite often, the thickness of the workpiece is greater than the length of the cutting part of the cutter. In this case proceed as follows:
- After the first pass, the template is removed and another pass is made. In this case, the template will be the already processed part. To do this, the bearing is guided along the machined surface. If the cutting part was again missing, then another pass will have to be made.
- For final processing, you should take a cutter with a bearing at the end, and the workpiece should be turned upside down, after which it is secured with clamps. As a result, the bearing will move along the machined surface. This approach makes it possible to process thick parts.
 The bearing is guided along the machined surface, and the cutting edge processes the rest of the workpiece.
 In order to master the work of a hand milling tool, you will need a lot of rough blanks, which you don’t mind throwing away later. No one succeeded the first time. To achieve anything, you need to train hard.
Achieving Various Shaped Edges
If a figured edge is required, which is most likely necessary, then first pay attention to the condition of this edge. If it is uneven, then you will have to level it and only then begin to form a curved edge by selecting the appropriate cutter.
 Rounded edge.
 It is necessary to prepare the surface so that the cutter does not copy the curvature along which the roller will move. In this case, a sequence of actions is needed, otherwise a positive result will not work.
If you need to process a frankly curved surface, then you can’t do without a template. It can be cut from plywood, about 10 mm thick, by first applying a pattern and cutting out the template with a jigsaw. The edge of the template must be brought to perfection using a hand router.
I am sure that most people have had to deal with wood at least once in their everyday life. For the simplest work, every owner has a saw or hacksaw for wood, but this tool can only cut material.
However, the owner of a private house often has to do more complex work than simply cutting wood with a hacksaw. Therefore, a thrifty owner who is used to doing everything on his own will always need a device for performing wood milling work.
Today the market offers a large number of different tools and you can purchase the simplest milling equipment for about 17,000-21,000 rubles. However, inexpensive models also have their drawbacks, and they won’t suit everyone. functionality such equipment.
Therefore, a good solution would be a homemade unit for milling wood, which can be assembled by any craftsman even with minimal experience in handling metalworking tools. In addition, there are quite a lot of drawings and instructions on the Internet.
All below drawings with dimensions should be considered as guidance and information only. Milling machines assembled at home cannot have any standards. Regardless of what equipment you decide to assemble with your own hands, the main thing is that it solves the assigned tasks.
Example: router attached at the bottom.
There are several types of milling cutter, so before you start manufacturing the machine, you should decide for what purpose the machine will be used.
Since working with complex workpieces requires a powerful and high-speed milling cutter, most craftsmen advise choosing equipment with auto-stabilization and manual spindle adjustment.
Devices equipped with the system are more convenient to use soft start and a quick stop. It is considered a great advantage if you can replace electric motor brushes without disassembling the equipment housing.
Any craftsman will be happy with such a milling cutter. Most instructions do not recommend using the equipment upside down. As a rule, such a restriction has no justification and may not be observed.
Selection of materials and components
Milling machine for home workshop, as for production, consists of the following main elements:
- bed;
- table top;
- device that drives the cutter (drill or electric motor).
bed
An important part of the milling machine is the bed, since it is on it that all other elements of the equipment are mounted. The frame must be very reliable and able

Milling machine bed.
withstand large dynamic loads. It is best to use metal to make the frame. It is best to use a square or rectangular pipe or a massive corner. This is because:
- You can skip welding and use a bolted connection. In addition, the collapsible model is convenient, especially in cases where it has to be temporarily moved to another place or simply taken out of the workshop while the premises are being renovated;
- The machine is not assembled for one-time use. The table supports can be made adjustable, which will simplify the horizontal adjustment of the machine anywhere with a slight surface slope, which is very important when working with such equipment.
Dimensions don’t really matter, it all depends on how large the workpieces are supposed to be worked with. The main thing is that the frame is strong and stable.
Tabletop

Scheme of a homemade countertop.
If for making a frame the best material If metal is considered, then for a countertop, on the contrary, it is necessary to use wood or materials based on it. For the countertop you can use:
- planed board;
- multilayer plywood;
- chipboard, OSB or MDF boards.
When choosing a material, you should focus on the specifics of the further use of the machine. In accordance with this, the type of material and its thickness are selected.
The surface of the table top must have a smooth surface, otherwise it will not be possible to achieve precision milling. You also need to eliminate the possibility of scratches on the workpiece. You can get a smooth work surface in the following ways:
- plastic cladding;
- careful adjustment of planed boards;
- iron cladding.
Important! When creating a milling machine at home, it is worth remembering safety precautions. It is imperative to make a protective casing around the cutting part of the router.
Electrical equipment
As already mentioned, there are many designs of milling machine. Accordingly, to rotate the cutter, you can use a ready-made factory-made milling cutter, an electric motor or a hand drill. When using an electric motor in a machine, you first need to decide on its type:
Asynchronous
It is unpretentious in operation and makes it possible to use large cutters. The disadvantages include noisy operation, but how important is this for woodworking? It is up to each master to decide individually.
Collector
It is the most affordable option, but the electric motor brushes wear out a lot. The degree of wear depends directly on the intensity of operation of the equipment.
The power of the electric motor used also plays an important role:
- up to 500 W. The machine with a low-power electric motor is suitable for surface processing of wood. You can also make grooves, but only with small cutters and in soft wood;
- up to 1,200 W. Equipment with an electric motor of this power is more versatile and can even be used for deep wood processing. Typically, a 1.2 kW electric motor is enough for domestic needs;
- up to 2,000 W. In principle, this is already equipment that can be used to work with any wood and cutters. This machine can process plastic parts and even aluminum.
Also, when selecting an electric motor, you should pay attention to the number of revolutions. But everything is simple here - the higher the speed, the cleaner the wood processing. In addition, the high-speed electric motor allows you to easily and without problems cope with wood defects such as knots.
Power supply
Typically, for a home milling machine, electric motors are used that operate on a regular 220V network. There are no problems with the installation and connection of this equipment.
But with three-phase models the situation is different. You need to decide for yourself whether it is worth running a separate line for the machine or not. However, if three-phase power is already supplied to the workshop, then the corresponding asynchronous motor will be the most the best option.
High power, smooth start and instant stop - this machine can effectively work with almost any type of wood and perform a wide variety of operations.
Assembly order

The engine is located under the table top.
Before how to do equipment for milling wood work, you need to decide on the location of the electric motor.
Many people believe that it is best to place it below the countertop. This or that cutter is mounted on an upward-pointing shaft with a special clamping chuck.
In this case, a mounting plate with a round cutout is mounted on the underside of the tabletop, to which the machine’s electric motor is attached. You can, of course, use a belt drive, but this will only complicate the design.
It is also possible to place the engine horizontally. It is quite possible that this option will be preferable to someone.
Additionally
Before assembling the machine, do not forget about a competent circuit for switching on the equipment and protective devices. Milling equipment must be equipped with the following elements:
- emergency braking toggle switch;
- work area lighting;
- protective casing;
- dust collector
When working with milling equipment, sometimes there is a need for special clamps, with the help of which, for example, you can attach a small strip to the tabletop, which acts as a guide. This is quite convenient, especially when you need to process thin or small parts.
Permanently installed clamps are not the best option. Agree that it is much more convenient to use removable clamps, which can be easily reinstalled depending on the task being performed.

If you plan to create small wooden crafts, then you can make a milling machine from a drill.
It can be quite easily mounted on a special tripod (as on photo).This installation is quite compact and can be easily moved to any place; moreover, it can also be used as drilling machine.
Or you can place the electric drill horizontally. This is a good option if you need to chamfer or select grooves. The cutter is clamped in the chuck and is ready for work, but the scope of such devices is quite small.
Conclusion
Now there is quite a lot of information on how to independently assemble a simple wood milling machine. Creation of more complex devices, e.g. CNC requires knowledge, experience and accurate calculations. However, in practice, such designs are practically not used to perform household tasks, since this is almost semi-professional equipment and therefore it was not even considered.
Video
A homemade milling machine in action and the process of its creation are shown.

