Products made from large shells. DIY crafts from shells for beginners with photos
sailboat
We suggest assembling a sailboat with your own hands.
If you are on the sea coast, do not buy ready-made shell souvenirs.
It’s better to collect a collection of shells yourself and make an elegant, beautiful sailboat with your own hands!
You will need:
Materials:
- one medium rapan for the body;
- three wooden sticks (thin skewers or branches) for the masts and one for the bowsprit;
- 6 matches for yards;
- a dozen to one and a half small shells for sails;
- threads for rigging;
- a large scallop shell for the stand.
Tools:
- knife;
- glue (preferably superglue “Moment”, it really sets instantly. You won’t spend half an hour pressing a shell to the mast, waiting for the sail to stick!)
Manufacturing:
We measure the length of the masts, divide the sticks into the required sections. We sharpen the tops with a knife for beauty.
We glue the sails to the masts: small shells at the top, larger shells at the bottom.
If you want to make the model more complex and beautiful, we will also glue to the masts transverse yards made of matches sharpened at both ends, on which the “rigging” will be attached.
For strength, tie the yards with thread at the junction with the mast. Let's wait until everything sticks tightly.


Now we will install the masts in a rapan casing.
For stability, we recommend inserting them into plasticine balls glued inside the rapana, and then securing them with drops of glue. We wait again: it is important that the masts hold tightly. For additional stability, the lower yards can be glued to the hull.
On the front of the sailboat we will glue a sharpened long stick - a bowsprit. We glue the front sails to it and the hull - a jib and staysail, and on the stern of the sailboat there is a rear sail - a mizzen. When everything is glued together, we stretch thin white threads between the upper and lower yards of each mast, as well as between the upper yard of the forward mast and the bowsprit.
To prevent the threads from unraveling, add a little glue. For beauty, you can also glue flags made of multi-colored shell pieces to the tops of the masts. Finally, let's glue the sailboat to the stand. You're ready to sail!
Lily

Mom is pleased to receive flowers as a gift, but is it a pity to throw away dried bouquets? Does she hate artificial flowers? Here's the solution: make a bouquet of amazing flowers that will never wither, but you can't call them artificial either - the composition looks so original. If in the summer you collected a variety of shells on the seashore, then the idea of a DIY flower is for you.
For each flower you will need:
- 5 small shells for petals;
- a lump of colored plasticine for the center of the flower;
- a long wooden skewer (straight stick, twig) for the stem.
Making crafts:
We stick the petal-shells into the plasticine ball with their tips and press lightly so that they hold tightly.
Then we stick a skewer-stem into the same ball from below.


Here you have a flower!
The classic daisy flower is made from oblong white and lilac shells. But you can take shells of any shape and color - scallops, toothless ones; not only white, but also brown, orange, pink - and you will get a bouquet of amazing beauty!
Let us also add that plasticine balls do not have to be the same color. It’s much more beautiful if you mix several bright colors into a lump! Make three or five flowers together with your child - while the baby is interested. And give your mom an extraordinary homemade bouquet of shell flowers on a festive morning!
Seashell painting
Who among us has not collected shells! Many even collect them. And, returning from a vacation on the seashore or river, they bring more and more exhibits. If you have a lot of them at home, this topic is for you. Try to use your imagination, be sure to involve your children in the work and create such a wonderful picture.

Progress:
The collected shells (about a hundred) should be thoroughly washed in running water. If some people experience a matte coating, don’t despair. The shine can be easily restored by treating the surface with a toothbrush moistened with a 10% solution of hydrochloric acid. Sort the cleaned shells by color and size.
Now you can start composing the composition. First, arrange the shells on a sheet of cardboard so as to obtain the desired pattern. There are many options here, it all depends on the choice of your imagination. Take regular organic glass (painted or tinted). Then transfer the shells sequentially to the glass and secure. Use “Moment” extra-strong glue. When the composition dries, cover the shells with 2 - 3 layers of varnish. Frame our work.
Ideas from the Internet
Panel


These frames are all made from shells.


Flowers


Animals


Compositions


Summer crafts for children: simple DIY seashell crafts: frogs, butterflies, ladybugs, master class.
In summer you really want to go to the sea! At sea, children, in addition to swimming and sunbathing, play with pebbles and shells, collect them and bring them home from the beach.
What can you make from such shells with your own hands? They make original and unusual crafts; many people bring them from their seaside holidays as souvenirs.

But children are quite capable of making the simplest crafts from seashells with their own hands. For example, making a butterfly or funny frogs will not take much time.
How to make crafts and souvenirs from shells for children with their own hands
Superglue or a glue gun is usually used to hold parts together in shell crafts. The easiest way for children to attach shells to each other is with plasticine, although crafts made this way are less durable.
The shells can be left in their natural color or pre-painted with acrylic paints. The finished work can be varnished if desired.
Ladybugs made from shells. Crafts master class for children
Ladybugs are the simplest crafts made from shells. To make them, you need to select the most voluminous shells, paint them red, wait for them to dry, and use black paint or a marker to draw a head, stripes and spots.

Decorate the craft as desired. For example, glue a flower onto a green sheet of colored paper.
Making frogs from shells. Crafts workshop for children
The first option is the simplest
What you need for crafts
In order to make the first, simplest version of a frog from shells, you will need three shells: two identical shells of the same size and one larger shell, glue or plasticine, and plastic eyes.

Stages of work
- Paint the shells with green acrylic paint on both sides.
- Glue plastic eyes inside shells of the same size.
- Glue shells with eyes onto the largest shell.
- Organize a pond with reeds (for example, made of colored paper) for the frog.

Second option
What you need for crafts
For this version of a frog made from shells, you will need several pairs of shells of the same size: two for the eyes, two for the lower legs and two for the upper ones (for some reason we didn’t have them in the photo), two for the head, two (but one is also possible) for the body, glue or plasticine, plastic eyes.

Stages of work


Summer craft panel made of shells with butterflies and flowers
For this craft, select shells that are suitable in size and shape (for the butterflies you will need small fragments of shells), paint them, and after drying, glue them onto a cardboard background.

Happy creativity! Especially for blog readers "MORE creative ideas for children"(https://site), with sincere respect, Yulia Sherstyuk
All the best! If the article was useful to you, please help the development of the site by sharing a link to it on social networks.
Posting site materials (images and text) on other resources without the written permission of the author is prohibited and punishable by law.
After a summer vacation, we come home to our city apartments with a bunch of beautiful shells that we collected from the sea or river with our children. What can be made from these shells? Lots of great crafts! Such crafts will help you and your children have fun and usefully spend time, and the interior of your home will be replenished with new beautiful products. From shells you can make your own paintings, candles, panels and much more.
For example, to make a candle from a shell, you just need to melt paraffin or wax in a water bath, pour it into the shell and insert a string wick. So the stylish and original candle is ready!
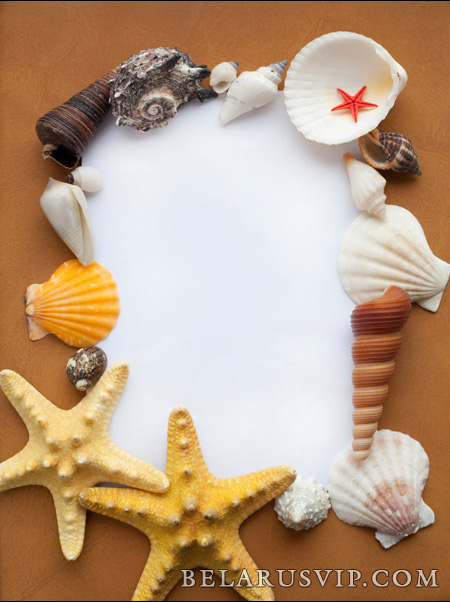
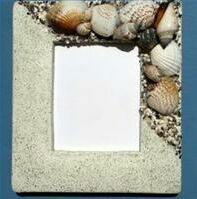
Shell photo frames
Photo frames decorated with seashells look delicate and add a refreshing touch to your photos. Photos taken at sea look especially great in such frames!
To make frames decorated with shells you will need:
actually, the shells themselves,
simple cheapest wooden photo frames,
PVA glue or other.
You can also use various beads, straw, beautiful pebbles and even river sand. And then everything depends only on your imagination. Just experiment and stick shells onto the frame. See what photo frames you can make:
 The photo frame is partially decorated with shells, and the main part of the frame is sprinkled with sand. |
 The photo frame is decorated with shells around the entire perimeter |
 |
 Photo frame decorated with seashells and rhinestones |
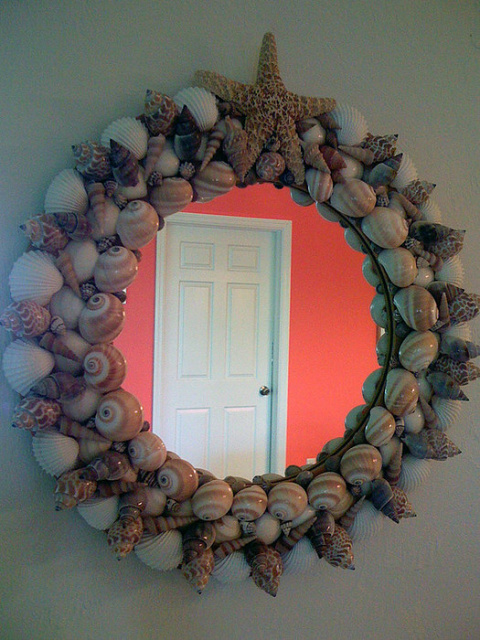
Using the same principle, you can decorate a mirror frame or even a wall clock with shells.
Craft shells can be used as is or pre-painted.
This is a fairly simple craft that is easy to put together. All you need is shells and good glue. The shells are glued together to form a flower (see photo). By the way, you can decorate various things with shell flowers. For example, a jewelry box. A box decorated with such flowers will be a great gift for mom!
Shell craft - pencil holder

You can make a wonderful pencil holder decorated with shells with your own hands from clay or salt dough. This exclusive pencil holder will decorate any table!
To make a pencil craft you will need:
clay or salt dough,
Color the shells with bright colors. Fashion a pencil holder of the desired shape from clay or dough and decorate it with painted shells, pressing them into the walls of the pencil holder. To be on the safe side, you can first coat each shell with glue. Now the craft needs to be dried so that the pencil holder hardens.
Sea coast in a bottle
You can make a fun craft from an ordinary plastic or glass bottle, sand, pebbles and shells - a beach in a bottle. This craft can be made by children of any age. You just need to pour river sand and small shells, pebbles into the bottle and close the bottle with a lid. That's it - the beach in a bottle is ready! By the way, putting sand, pebbles and shells into a bottle is great.
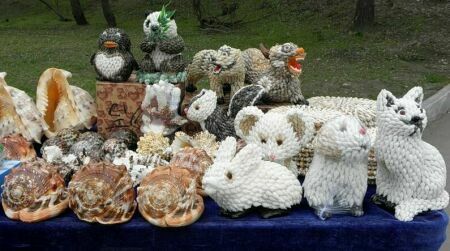
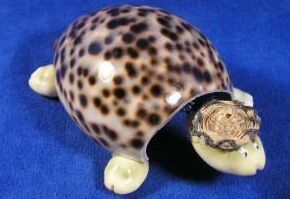
Crafts-souvenirs from shells in the form of animals and people
You can use shells to make funny souvenirs in the shape of animals or people of varying degrees of complexity. For example, even a three-year-old child can make a turtle. You just need to glue five shells together - one large one for the shell, four small ones for the paws and one more for the turtle's head. You can draw or glue eyes on the turtle’s face and attach a hat made of cardboard or straw to the turtle’s head.
More complex crafts are suitable for older children. You may need the help of an adult to make them.

DIY paintings and panels made of shells
Very beautiful decorative decorations for the interior are panels and paintings made of shells. To create such a picture, in addition to shells, you will need paints, glue and any other decorative elements, depending on your desire. You can use beads and beads, blades of grass, sticks, sand, fabric, buttons... The process of creating a picture or panel will delight both the child and you, and the result will exceed your wildest expectations! Hang your finished painting in a frame and on the wall and be proud of your creation!
You can decorate basically anything with shells!
Who among us has not collected shells! Many even collect them. And, returning from a vacation on the seashore or river, they bring more and more exhibits. If you have a lot of them at home, this topic is for you. Try to use your imagination, be sure to involve your children in the work and create such a wonderful picture.

Progress:
The collected shells (about a hundred) should be thoroughly washed in running water. If some people experience a matte coating, don’t despair. The shine can be easily restored by treating the surface with a toothbrush moistened with a 10% solution of hydrochloric acid. Sort the cleaned shells by color and size.
Now you can start composing the composition. First, arrange the shells on a sheet of cardboard so as to obtain the desired pattern. There are many options here, it all depends on the choice of your imagination. Take regular organic glass (painted or tinted). Then transfer the shells sequentially to the glass and secure. Use “Moment” extra-strong glue. When the composition dries, cover the shells with 2 - 3 layers of varnish. Frame our work.
Of course, the composition of shells will depend only on your creative abilities. You can not limit yourself to a simple pattern, but create whole pictures. You can also make tabletop figurines and souvenirs.


Beautiful crafts made from shells
It's time for vacation! The lucky ones choose swimwear and pack their suitcases... And someone has already arrived from the southern coasts with a chocolate tan, unforgettable impressions, photographs... And, of course, with at least a handful of pebbles and shells, picked up on the shores of the gentle warm sea, from which you can make beautiful crafts.
When we get to the beach, we, along with our clothes, throw off all our solidity and turn into big children who, together with the little ones, build sand castles and enthusiastically collect seafood. And why not collect them? Smooth pebbles that are so pleasant to hold in your hands, of various colors and patterns... Shards of corals polished by the waves - mysterious underwater kingdoms that we were able to look into... Wonderful shells - even the most modest of them can be looked at endlessly, they are so amazing in the perfection of their forms.
And now in our pockets there is a growing collection of souvenirs that were given to us for free, but therefore no less valuable. Well, if we went on vacation with a child, then there is no doubt that our luggage will increase by half a kilo of “treasures”. And so on every trip!
Have you ever wondered what to do with these collections? After all, if we store everything we collect, there will soon be no room left to live in our house! One of my friends came up with an idea: she and her children go to nature to “let go of stones”!
Well, I have a different recipe. I make beautiful crafts from pebbles and shells in the form of pictures that can take root in your own interior, as a keepsake of an unforgettable trip, or can serve as an original, one-of-a-kind gift.
Materials
- Seafood: stones, shells, pieces of coral, wave-turned sticks, etc.
- Ceramic tiles, plain or with a light, unobtrusive pattern, of any size. Many of us have tiles left over from renovations that “live” in our homes, which we keep just in case. Perhaps this is the case!
- Frame of appropriate size for the tile. A wooden frame, as it is more natural, looks better. But the plastic one has an advantage: with it, your painting will be moisture resistant, and therefore can decorate the bathroom!
- Any universal glue that glues “everything to everything.”
- Standard frame fastener. Or 4 nails, a paper clip, a hammer, pliers, two small screws.
Operating procedure
- The most important thing is to decide on the composition. It is a harmonious composition that makes a painting a painting, and not a meaningless set of objects. Therefore, pay maximum attention to this stage. “Play” with the objects, trying to get them placed on the tile in a nice group. When laying them out on the tile, do not forget to put a frame on it, since it is also part of the composition. Avoid direct symmetry, but try to balance objects, avoid the accumulation of small details on one side of the picture and large ones on the other. Place visually heavier objects at the bottom, then the picture will look stable. Consider the texture and color of objects. Move them around the surface, replacing one with another until you are satisfied with the result.
- Now, one by one, lift the objects, smear them with glue from below and return them to their places, making sure that they take their original position and the harmony is not disturbed.
- Insert the picture into the frame using special fasteners or just 4 nails, driving them close to the tile.
- Attach a loop on which the picture will hang - fasteners are often sold complete with frames. If you don’t have a ready-made loop, you can easily make a strong loop that can withstand the weight of the picture from an ordinary paper clip and screw it to the top bar of the frame with small screws.
Now you know how to create from shells. Good luck!
We suggest assembling a sailboat with your own hands.
If you are on the sea coast, do not buy ready-made shell souvenirs.
It’s better to collect a collection of shells yourself and make an elegant, beautiful sailboat with your own hands!
You will need:
Materials:
- one medium rapan for the body;
- three wooden sticks (thin skewers or branches) for the masts and one for the bowsprit;
- 6 matches for yards;
- a dozen to one and a half small shells for sails;
- threads for rigging;
- a large scallop shell for the stand.
Tools:
- knife;
- glue (preferably superglue “Moment”, it really sets instantly. You won’t spend half an hour pressing a shell to the mast, waiting for the sail to stick!)
Manufacturing:
We measure the length of the masts, divide the sticks into the required sections. We sharpen the tops with a knife for beauty.
We glue the sails to the masts: small shells at the top, larger shells at the bottom.
If you want to make the model more complex and beautiful, we will also glue to the masts transverse yards made of matches sharpened at both ends, on which the “rigging” will be attached.
For strength, tie the yards with thread at the junction with the mast. Let's wait until everything sticks tightly.


Now we will install the masts in a rapan casing.
For stability, we recommend inserting them into plasticine balls glued inside the rapana, and then securing them with drops of glue. We wait again: it is important that the masts hold tightly. For additional stability, the lower yards can be glued to the hull.
On the front of the sailboat we will glue a sharpened long stick - a bowsprit. We glue the front sails to it and the hull - a jib and staysail, and on the stern of the sailboat there is a rear sail - a mizzen. When everything is glued together, we stretch thin white threads between the upper and lower yards of each mast, as well as between the upper yard of the forward mast and the bowsprit.
To prevent the threads from unraveling, add a little glue. For beauty, you can also glue flags made of multi-colored shell pieces to the tops of the masts. Finally, let's glue the sailboat to the stand. You're ready to sail!
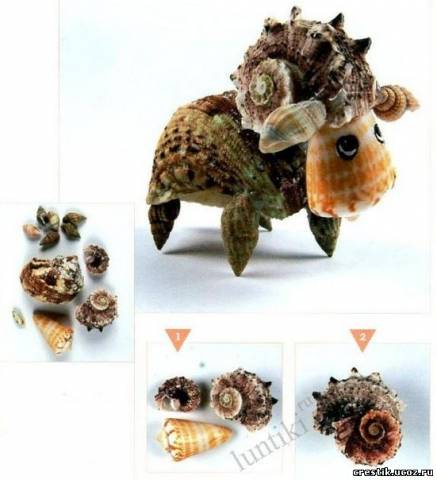
For crafts made from natural materials (from shells), we will need additional materials:
- quick-drying glue or plasticine,
— modeling paste that hardens within 36 hours (for shaping some body parts and small elements),
- nail polish (colored and clear),
- gouache and core brushes No. 0 and No. 1 (for drawing eyes, mouth, mustache),
- beads, beads and sequins (for the eyes of the figures),
- wire, fishing line and pieces of lace (for the tail and horns),
- natural material - grains, seeds, acorn caps, tree branches.
And you will also need patience and imagination!
Porcupine Thorn 

The dragon is fidgety. 
Toad Klushka. 

Giraffe Zhenya. 

from the book “Fantasies from Shells”, Klavdiya Morgunova
The long-awaited summer has arrived. And many have already packed their suitcases and bought tickets to the warm sea. And on the way back, almost everyone has a bag of shells in their suitcase... I really want to keep these memories longer...
The shells themselves are very different. In rivers, you mainly find simple flat oval mussel shells. They can also be found in the Baltic Sea. A much greater abundance of shapes and sizes can be found in the southern seas. Donaxes, cardiums, zebras and many other mollusks live in shells of the most bizarre shapes. These can be spiral shells, spindle-shaped or heart-shaped shells, as well as many other shapes.
Crafts made from shells begin with collecting them. Even a child can cope with this. The collected shells should be washed with running water and dried. After this, to make crafts from shells, they need to be examined and sorted. Looking at each shell, trying them on one by one, images of future crafts will appear in your head.
Ask for help in sorting the child. With those who are younger, you can consolidate knowledge of the concepts of “more and less.” And older children are able to offer their own versions of crafts.
The next stage will be the actual production of the shell craft itself. It is better to start creativity together with your child with simple things. It is best to start with a snail or turtle. If the child has never seen or does not remember these animals, then it is better to prepare a high-quality photograph or drawing of the selected animal in advance.
For crafts from shells, we recommend that you use plasticine. This material makes it possible to fasten the shells together well, and it is also quite easy to sculpt the missing details of the animal image from it.
The right stand will help you create a complete image or an entire composition. When making crafts from shells in the shape of animals, it is better to use natural coasters. Such bases can be a flat stone for a turtle, a thick branch for a snail, etc. Try to make the stand for the shell craft contrast with the animal, otherwise your craft will get lost against the background of the stand. If you want to preserve the memory, then it is better to make a thematic inscription on the stand. A child will be happy to give this craft made from shells with an inscription to his godparents or grandmother for the New Year or other holiday.
In general, choose an idea and create!!!
Animals:


Flowers:


Frames for photos or embroidery:

Little things for the interior:


There is a traveler in each of us, and in order to prolong the pleasant sensations from happy days spent on vacation at the seaside, every time we bring small reminders to the stuffy cities - beautiful pebbles and shells. And if everything is prosaic with the first ones, their place is in glass vases or aquariums with fish, with the latter there is room for your imagination to run wild. Let's breathe a second life into sea shells!
Order is needed in everything
First, let's do some cleaning. Even if there are no foreign particles or shellfish remains on the surface, the shells should be soaked in a chlorine-containing solution. Any bleach or chlorine detergent will do.


Advice! If the contamination is not severe, half an hour is enough; removing dark deposits will require a long time and additional cleaning with a brush.
To get rid of live shellfish and their relatively fresh parts, the shells need to be placed in boiling water and the excess removed using tongs. There is another way - warm them up for 30 seconds and clean them of remains in the same way. If the first half a minute does not produce results, repeat the process until all particles are removed. Next, the material must be disinfected by rinsing in a solution with chlorine.
If there are chips
If cracks or chips are found, they must be sanded. Regular sandpaper or a sanding block will do for this.
Advice! To give the sink a more beautiful appearance, you can cover it with transparent nail polish or furniture, or rub with oil/fat cream. If you choose the second method, when gluing the contact points, you must first degrease them with alcohol.
Drilling holes
If we are planning necklaces, bracelets, dream catchers and other crafts that require stringing, we drill holes in advance.
You can do this in two ways:
- Using a drill or - place the shell on a wooden board and glue it with tape. We take the thinnest drill and make a hole right on top of the tape, this will not allow the material to crumble.
- Using a nail and a hammer – we cover the sink with tape (painting paper), draw a mark on the depressed side, place the point of the nail and lightly hit the head with a hammer several times to mark the hole. Next, we gradually expand it with the same nail or awl to the desired diameter.
Advice! The shell structure is fragile, so to avoid splitting, you need to remember a simple rule: the thinner the material, the thinner the drill or nail should be.


From simple to complex
Working with sinks is not difficult, but requires careful handling. Let's go from the simplest to the more complex options for crafts. Bracelets and beads can do it all! Let's look at more interesting ideas.


Frames
The usual colors will sparkle with other colors if you decorate them with sea shells.