DIY playground. Best step-by-step instructions
Every child needs movement during the period of active exploration of the world. He needs to play, run, have fun. Children usually spend their time outside on playgrounds. This place should be as safe and functional as possible. Such requirements apply to all sites, no matter where they are built.
If a vacation spot is being set up on a suburban area, you should become familiar with the technology of work and prepare the necessary materials and tools. It is better if someone who has basic carpentry and plumbing skills builds a playground in the yard with their own hands.
Primary requirements
Each playground is created to develop the child's skills and increase his level of physical fitness. The main feature of such complexes is that the child can play and move independently. Adults here act only as observers. For this reason, all playgrounds are decorated very brightly. In addition, each building in the complex can be used differently. As can be seen from the numerous photos of playgrounds, various structures can be positioned differently depending on the design idea.
The requirements according to which playgrounds must be built can be found in the relevant SNIP. The most relevant established standards are the following:
- The site should be fenced off from passages. At the same time, a distance of at least 10 m should be made from it to the parking lots.
- The playground area should be made impassable. It should be separate from footpaths.
- The site is landscaped around the perimeter. In addition, it is necessary that the territory have both darkened and sunny areas.
- The site should be located 20 m away from other large open areas and waste receptacles.
- Every three months, all equipment installed on the playground must be inspected. It must be functional and undamaged.
- The sand in the sandbox should be changed every year. At the same time, the safety of sand on the playground is confirmed by certain sanitary and hygienic standards.
For children of different ages, it is necessary to divide the playground into certain zones. They are performed for children under three years of age, preschool children, and primary schoolchildren. However, often a playground for children includes attractions for several age groups at once.
The sandbox must be equipped with a lid. Therefore, it is better to make it simple. Such an element of the playground should not only be beautiful, but also functional. With a complex sandbox configuration, it will be difficult to make a lid. It is better to make it in the form of a hexagon or square. Photos of sandboxes will help you choose the appropriate option.

Advice! If there are two roof flaps for the sandbox, children will be able to open it independently. Adults will only need to supervise the process.
Ideas for creating playgrounds
The design of playgrounds for children involves the use of various equipment. If you don’t have the necessary equipment, you can use the advice of experienced professionals. You can also experiment with structures installed on the territory of the playground. For example, you can install a basketball backboard at the entrance to the slide house. If you have large tires, it is easy to set up an obstacle course on the playground (as in the photo).

The sandbox in the playground is made not only from boards. It is often surrounded by stumps. If you are using tires from a passenger car, you will need to prepare five pieces. The sandbox is fenced off with tires, laying them two on top of each other. The main thing is to securely fix the tires in place. This is usually done using metal pins. Then the tires are covered with sand. Then such a fence is painted.
In addition to the slide-house, you can equip a small house on the site in the standard version. If you know how to work with wood, you can install various models of airplanes and ships on the territory. Children will happily climb on them. You should not chase exact forms - children often complete various devices and designs in their imagination.

Children's playground with ready-made kits
A children's playground can also be made from purchased exercise equipment. In various stores you can find many designs that are made for installation on playgrounds. Here you can find houses and slides, swings and rope ladders. Installing a children's playground in the courtyard of a private house is not difficult if you have ready-made kits.
The main thing is to read the instructions that are issued along with the design. Exercise equipment for playgrounds must be installed on a rigid base. This requirement is specified in SNIP. Most often, purchased designs have a more attractive appearance than homemade ones. This is confirmed by numerous photographs of such products.

Making a platform with your own hands
No children's playground is complete without a slide. This simulator should be comfortable and functional. The design can be made of different materials:
- steel corners - they must be at least 3 m thick;
- Sheet steel;
- pipes - will be needed to create a frame;
- plywood;
- boards.
When choosing such materials, you can equip a durable and functional slide.

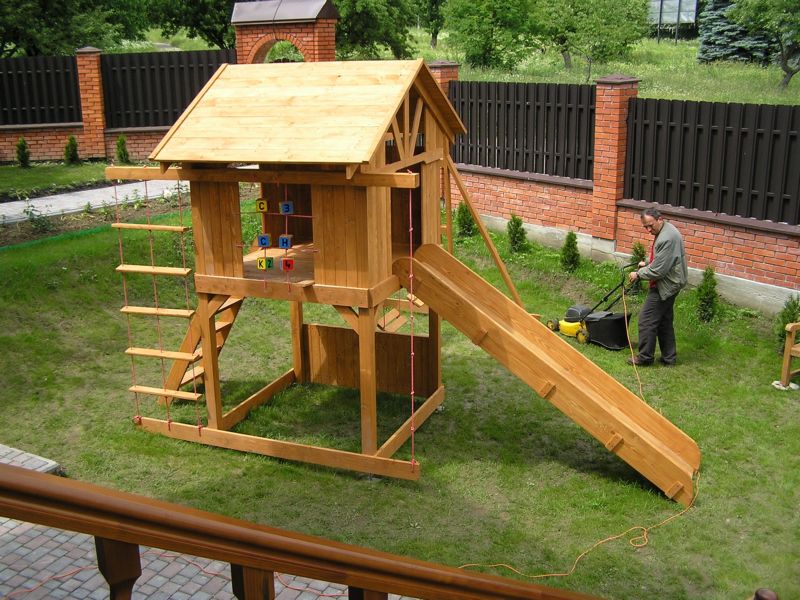
Creating a slide house
The slide-house is mounted on racks, which are usually made of timber. There should be 4 supports. This frame allows you to creatively approach the creation of the main children's simulator. In this case, you can make several ascents - ordinary steps, a ladder and a rope ladder. In this case, one stingray is enough.
The angle that is made when creating the slope should not exceed 30 degrees. This avoids overclocking and injuring children. With such a design, children's leisure time can be very well diversified.

Advice! If there are plastic panels, it is better to make a ramp from them. In addition, plastic slides for playgrounds are often sold in stores. You can purchase curved slides. Children get more joy from going down such a structure than from going down a straight wooden slide. The playground must be comfortable for the child, so all elements must be created in accordance with certain requirements.
Materials
To build a slide house on the site, you should select certain materials. To create such a design you will need to prepare:
- 5 bars.
- boards from 50 to 100 mm;
- boards with a thickness of 25 and a width of 100 mm;
- plywood sheets 15 mm;
- mounting angles;
- nuts and bolts;
- self-tapping screws;
- a pipe equal in diameter to the cross-section of the beam.
After preparing the materials, you can begin to create the base of the slide-house for the site.
Preparing the base
It is necessary to find a place to install the slide, and also prepare a hole that will be needed for the foundation. It is worth making a square frame. There should be a distance of 1 m between the posts. Each side of the pit should be 1.5 m long. In addition, the pits should have a minimum depth of 20 cm.
The bottom of the pits must be compacted, and then crushed stone must be poured. This layer should be 10 cm thick. It also needs to be compacted. You can dig a small hole under each block. The depth of each of them should be at least half a meter. The lower edges of the beams are impregnated with bitumen.

A crushed stone cushion must be placed at the bottom of the pit. Crushed stone must be selected in fractions of 15-25 mm. After filling the gravel at the bottom of the holes, pillars are inserted into them. They are leveled and correctly oriented. Then the concrete solution is poured.
Advice! Concrete is strong if it contains the optimal amount of water. The mixture should be thick when kneading. In order for concrete to move, it is necessary to add plasticizers to it. They are easy to purchase at a hardware store.

Ramp and bottom harness
The strapping of the bars must also be done using 50 mm boards. They are mounted at the floor level of the structure. In addition, to increase the reliability of the house, it is worth making a jumper. The boards should be screwed to the beams using self-tapping screws. Fastening elements must have a minimum length of 100 mm. In addition, it is necessary to make a tray for the stingray.
For this purpose, you should follow simple steps. First, cut 2 boards that are slightly longer than the slope. Then the angles of contact of the slope with the ground and the harness are marked. The board is cut to the required size using a jigsaw. Then the jumpers are cut. Long boards must be laid on the ground, and then the jumpers must be secured to them with self-tapping screws.
There should be a distance of about 30 cm between the jumpers. However, the first and last of them are mounted 5 cm from the edge. A cutout is made on top of the board. This is necessary to create full support for the ramp on the harness.
Then the slope is attached to the harness with corners. They are fixed with screws and nuts. The corners must be installed in such a way that children do not get scratched while playing. In addition, it is necessary to ensure that no fasteners or sharp parts protrude from the side of the slope. The slope is sewn up with plywood, which is installed on self-tapping screws. The fasteners are recessed into the material by 1 mm. Then the attachment points are puttied and sanded.
Ladder
It is necessary to cut 2 pieces of board 50 mm thick. Their length should be slightly longer than the length of the stairs. The corners of the connection with the ground and the harness are cut off. Then you need to cut grooves for the steps in the boards. Afterwards the steps are cut to the required width. All that remains is to assemble the ladder. The steps are fixed to the side boards with self-tapping screws.
The ladder must be securely fixed. It is attached to the strapping beam. Railings and supports are installed on each side of the stairs. They are processed with a plane to remove irregularities and sharp edges. Then the structural parts must be carefully sanded. The upper edge of the railing is attached to the posts.
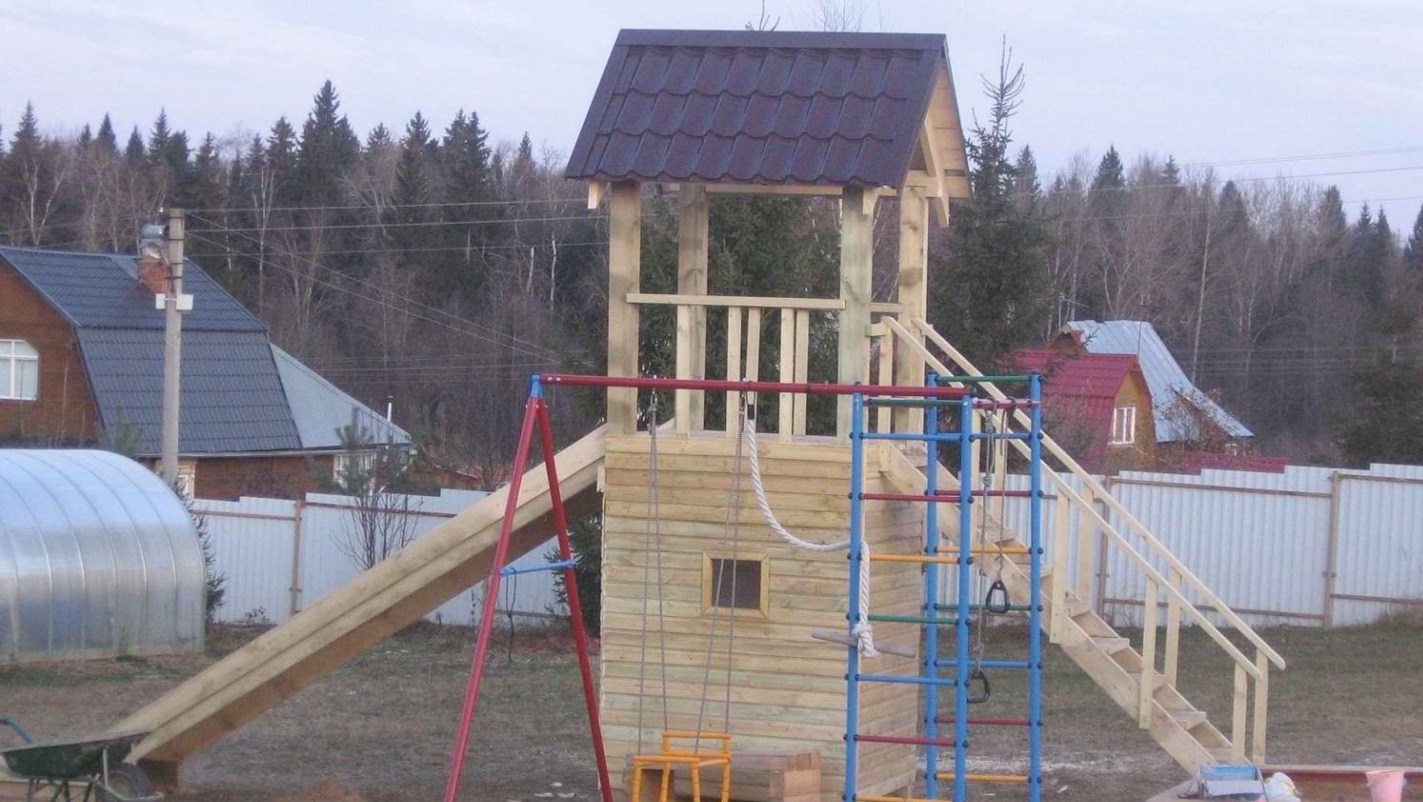
Entrances and roof
Every slide on the playground features an extreme climb. To do this, you should make a tray of the same size as for the ramp. The part of the harness, which is located on the side of the extreme entrance, must be reinforced with steel corners.

Then cut pieces of plywood are laid on the floor of the house on the site. The ceiling is also lined with the same material. The house must be sheathed on the outside with plywood sheets. Its entrances are designed in the form of circles or ovals. Their size should be such as to provide maximum comfort for children playing on the playground. To create a roof, you need to cut 4 rafters. They are made from 25 mm boards. The angles of the rafters can be determined based on the height of the roof. They are attached to the corners of the frame, and then connected to each other on top with metal corners. The roof is covered with plywood of the required size.
Final work
When the work is completed, it is necessary to sand all the places where children can get a splinter. A rope is attached to the top harness on the side of the extreme climb. It should have nodes located every 20 cm. The house is painted in such a way that it looks attractive. You can apply various images to it, as in the photo.

conclusions
It is not always possible to buy a ready-made play structure for a playground. In this regard, a children's playground in the yard is often done with one's own hands. The main condition is that the materials used must be durable and of high quality. Wood is often chosen to construct various structures for playgrounds in the yard.
It is important to control the quality of processing of elements. Some areas should not be allowed to remain uncleaned or structural parts to have sharp edges. This can cause injury to children playing on the playground.

A small house is installed on each playground. It is usually made from scrap materials. You can build a house with your own hands with the participation of the children themselves. This will not only please the kids, but also make the designs more convenient.
Reading time ≈ 9 minutes
A country house is a great place to relax from city worries and unnecessary fuss. Here you can enjoy the fresh air, the beauty of nature, and also start arranging your site. That’s why it’s so important to have a dacha where you can hide from all your problems at any time and fully relax in the presence of your family and children. There must be a small playground in the local area so that the child has something to do. Setting up a play area yourself is not as difficult as it seems at first glance. By choosing the right place and preparing the necessary materials, you can build an entire installation with a slide, sandbox, and even a mini-pool.
How to choose a place
When we travel out of town, we, of course, take our children with us. On the territory of the infield, they can play in the fresh air as much as they want. This is why it is so important to provide them with a play space that should be interesting and at the same time safe.
The choice of location for a playground made with your own hands in the courtyard of a private house should be approached responsibly and seriously:

What should a playground be like?
Before you independently build a play area for children at your dacha, you need to draw up a rough plan and draw a drawing. When arranging a space, it is important to consider the following nuances:

Today, there are a number of safety requirements that every play place for children must meet. How to make a playground that is suitable for your child:

How to choose material
It is better to choose the design of the play area together with the child, because it is very important to take into account his desires and preferences. And the choice of material falls solely on the shoulders of the parents; the modern assortment today is quite extensive.
What objects may be included in the arrangement of playgrounds:

What materials are best to choose when decorating a children’s play area in the country:

Creation technology
Before you begin independently constructing structures in the play area for children, the space should be well prepared:

DIY sandbox
One of the main elements of any children's playground is the sandbox. Let's look at, as an example, how to make it out of wood with step-by-step recommendations:
- Place the sandbox in an open area with good viewing angle and visibility so that the child is always within the parent's line of sight.
- To make playing in it comfortable and safe in summer, you can install a fungus or an umbrella over the sand to create shade.

- First you need to build a base, let's take the dimensions of a square of 1.7 by 1.7 meters. For marking, you can use pegs, as well as a special fishing line or tape. The main goal will be to prevent rainwater from accumulating inside.
- We remove the top layer of soil up to 0.3 meters (or 20 centimeters). When creating the base, remember that the sand should not be mixed with the ground. Therefore, the base of our sandbox will be a thick polyethylene film or special geotextile (we make holes in it up to 10 mm in diameter). Sprinkle a thin layer of sand under the base.

- Let's start processing the frame parts. Since this is wood, all elements must be sanded well and coated with a special treatment. These will be the following components: 4 beams 50*50*450 mm, 4 boards 25*300*1700 mm, 4 horizontal planks for creating sides 25*150*1700 mm.
- We begin assembling the frame only when all elements are thoroughly treated with an antiseptic. First, according to the markings, we install 4 beams to a depth of 150 cm; they must be laid strictly along the perimeter of the square.

- We nail the boards to the bars, securing them with nails. This is how we secure the corners and align them. After which we proceed to install horizontal boards, on which children can lean while playing or sit. We fasten them with screws.
- We lay geotextiles or protective film on the base, and then install another row of boards. We remove excess polyethylene and can cut it off with scissors.

- At the final stage, you can install protection from the scorching sun. Most often in sandboxes you can find wooden mushrooms with a wide cap, painted with intricate designs in bright colors. But we will make two small benches.

- To fill the structure, bring some coarse river sand up to 900 kilograms into the sandbox. The sand must be cleared of dirt and sifted before the child can play with it.
- We attach the boards and seats as shown in the photo, video instructions will be below. Our sandbox is ready!
Every child dreams of having his own small, secluded corner. Build a children's playground on your country property and make this dream come true. This interesting structure will not only capture the child’s attention, but will also contribute to his physical and mental development.
It is not necessary to buy a ready-made playground; a playground can be easily built using available materials: boards, tires, logs, ropes, oilcloth and much more. All you need is a good idea and a little time to make.

Choosing the location of a children's playground in the country
There are not many of these conditions, but they must be fulfilled, since this concerns the safety of your child:
The child requires constant supervision, so we choose the most visible place to build a children’s playground with our own hands. You should be able to see what the baby is doing from the windows of a private house and from your garden (if you have one).

Try to distance the playground from outbuildings.

Choose a place with less loose soil; you won’t have to dig deep during construction, and leave a more fertile place for planting your favorite vegetables.

Consider the “light-shadow” mode for the children’s corner; it is advisable that the place has both a shadow and a sunny side. If this is not possible, stock up on artificial shading options using available materials.


A solid fence will be an excellent help: by placing a playground nearby, you can use it as a wall on which you can easily attach a drawing board, a rope ladder, and even a small climbing wall.

Children's playground made from scrap materials: preparatory stage
Before you start building a children's corner on your summer cottage, you should draw up a detailed construction project:
Determine the size of the playground. For kids, an area of 4-6 m2 is enough; you can fit a small sandbox and an inflatable pool here. Additionally, you should consider a fence so that children do not have the opportunity to run away. For older children, more space is required - 10-12 m2; a fence here would, of course, be inappropriate.

Draw a schematic diagram of the planned arrangement of equipment for the playground.

Prepare the area and covering: here it is possible to use a lawn, crushed stone with sand (a layer of crushed stone + a layer of sand 10-15 cm), crushed stone and rubber covering.

Design ideas for children's playgrounds
What kind of shells and how to place them on the site is a purely individual thing. However, we recommend adding the following elements:
Sandbox. How can you do without your favorite sand cakes and towers! Working with sand is a very useful activity for a child, because playing with this natural material actively develops hand motor skills. It is advisable to install a roof over the sandbox. This will protect it from rain and birds.

House. It is thanks to this design that children will acquire their own secluded corner. It’s not difficult to build: we build a frame on a log foundation, build frames on top and bottom for the floor and ceiling, and cover it with boards. Ready!

Slide. Another integral part of the site. It can be made from stainless steel, plastic, wood. Usually the slide goes well with a complex of equipment (stairs, ropes, house).

Swing. One of the most popular shells among children. It won’t be difficult to build it: you only need a rope (or chain) and a seat (board, tire).


Decorative elements: animal figures made from improvised materials such as tires, plastic bottles, leftover boards and logs will fit perfectly into a children's corner. You can find a lot of ideas and ways to make them on the Internet, and use a photo to make a figurine you like.


Slate boards, horizontal bars, rope ladders, etc., depending on the child’s preferences.

Elements for role-playing games: a school desk, a car, a market stall - everything that will help the child feel like an adult.

There is another simple way to design a children's corner at your summer cottage - this is to buy a ready-made rubber playground. Such designs have a base in the form of a trampoline; the design can be selected from a photo on the Internet. Easily inflated with an electric pump.

In what style to make a children's playground is a purely personal matter. The main thing is that your child is interested in playing in this interesting corner. Try to rely on his opinion when choosing a theme for the design. And if you involve your child in some of the work, the result will delight you even more!

Photos of children's playgrounds at the dacha


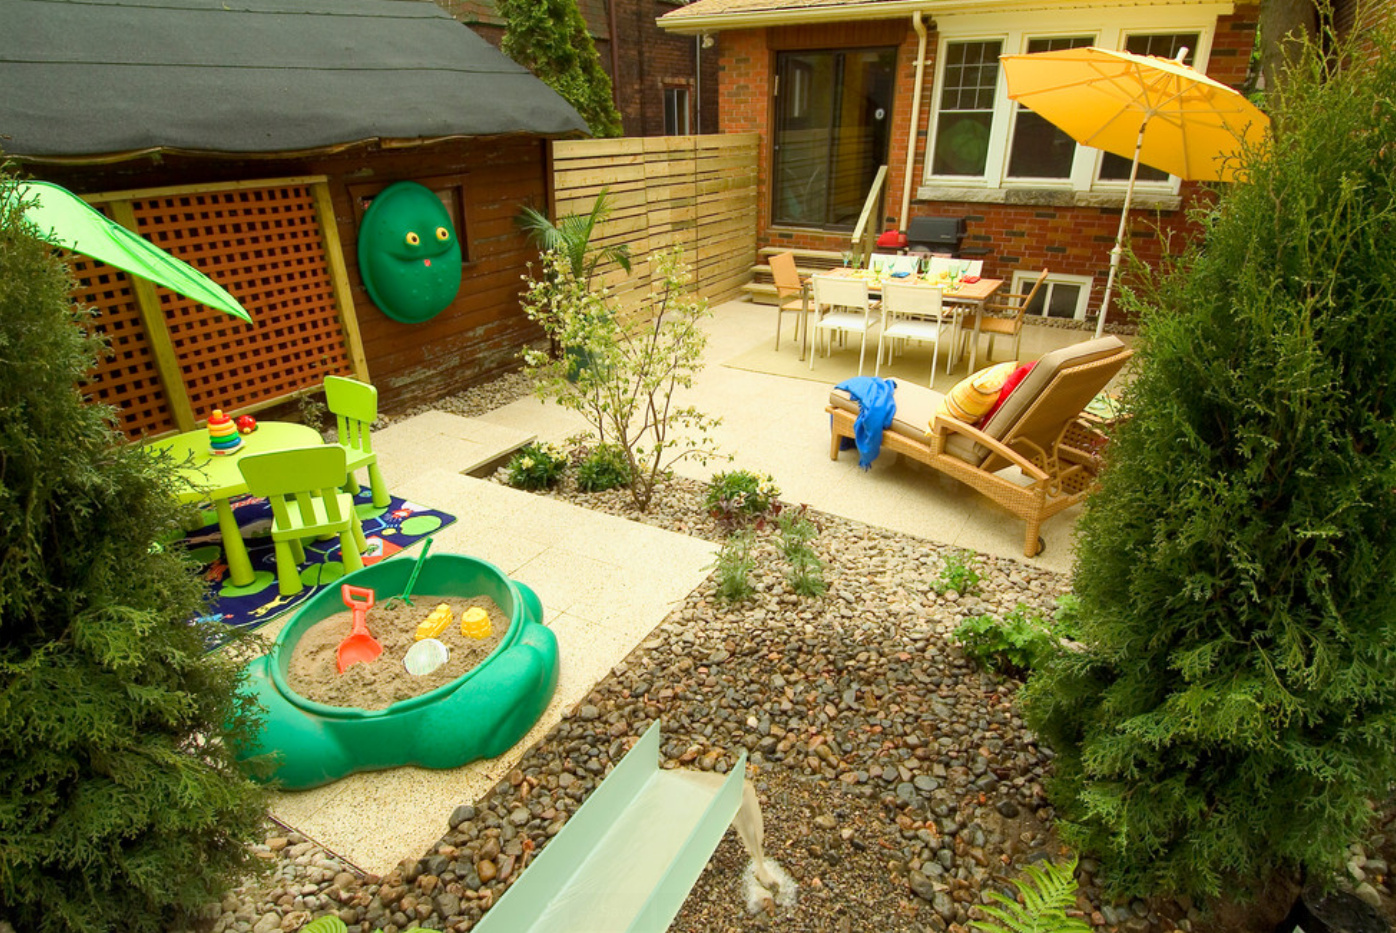
A place with carousels, a sandbox and toys is not just a decoration for the site, but a whole world - children's; DIY playground, photo which you will see below or in the courtyard of a multi-storey building, or on your own summer cottage will be a gift not only for all the children, but also for their parents, because it will be safe, comfortable and cozy. All the best for children!
DIY playground ideas
On the list DIY playground ideas you can see things that are familiar to us since childhood. The main task is to make each element in such a way as to skillfully combine a safe stay on them so that children find this safety interesting. We will perceive the playground as a collection of the most necessary, favorite entertainment for children.
The first thing to start construction with is allocating the area itself for construction. Yes, you can just put up attractions, but remember that in order for them to last a long time and delight the kids, they must be stable and durable, which means it won’t work without leveling the landscape. The construction of this place can be approached as if it were a construction project - level the soil, fill it with crushed stone and concrete it. But then you will need to either cover the entire surface with some safe material, non-slip and not hard, for example, a rubber coating. But it is much better to use an existing lawn or build it using roll technology. On do-it-yourself children's playground in the country both in design and in the range of entertainment, it is limited only by your imagination. It is better to choose a place on the leeward side, so that under no circumstances is there a so-called air corridor or draft. It will also be important if there is shade in the area during the daytime heat; if there is no shade from the house or garden, then you need to organize awnings and awnings.

The main element and component will be the sandbox. It will be interesting to play with both very young children and older ones. Of course, it would be superfluous to talk about the quality of the sand, and it is clear that it must be absolutely clean and sifted, but this cleanliness must be maintained. Therefore, when you put together a structure from wood, provide a lid with which you can cover all this sandy wealth. As a cover, you can use a mesh, a flexible cover from an inflatable pool, etc. This is important to use for do-it-yourself kindergarten decorations. It is also very important to have wide sides, which will be used as benches, as well as for sculpting beads. For convenience, build a roof high above the sandbox, which will allow you to play even in bad weather or bright sun.

Swings and carousels can be ordered ready-made; today there are a huge number of companies that specialize in installation and manufacturing do-it-yourself kindergarten playgrounds. However, you can make some of the types yourself. It will not be difficult to build balance beams - a swing on which two children ride, taking turns soaring up and then falling down. It is necessary to calculate the maximum load and, based on it, select options for materials and fastenings. You need to make holders and backs at the ends of the board so that the kids feel safe. It is important to make hanging swings from materials that children cannot injure themselves on; ropes and rubber would be optimal (the household version is a rubber tire, not very large in size).

Other traditional items that are often used include mini exercise machines of various types. This is very important, since they are the ones who help to spend at least a little of the children’s irrepressible energy. If you can’t make horizontal bars, you can dig car tires halfway into the ground so that there is enough space between them to jump over. You can also organize an unusual Swedish wall from rope ropes, intertwining them like a net. Be sure to consider a system of soft mats under it with a coating that will not be afraid of moisture. If you have older children, and there are a sufficient number of trees on the site or in the yard, then it is possible to organize a miniature rope park with a set of boards, ropes, and ladders.
Make a playground with your own hands
In order to make a playground with your own hands not only a place for games, but also for quality child development, you can use the same furniture as when developing.

The table is necessary for creative work: drawing, sculpting, appliqué, creating crafts. DIY playground You can’t do without such a structure, whether you are making it for one or two children or for children from the whole yard. But an ordinary table according to standard drawings is not always suitable. If you want to achieve maximum safety and comfort, you can make the tabletop in the shape of a four-leaf clover, and make a small bench in each of the four recesses. Wood is a good material for such furniture, but it will need to be coated with a large amount of furniture varnish to avoid damage from snow and rain. Plastic is better, but it will be problematic to make something out of it yourself. You can organize master classes at such a round table, for example, teach kids,...

On DIY playground, photo which you see, it is the house that occupies the central place. The inside does not have to be empty; you can put benches there for children to play in the hospital, benches to place a counter or a cash register for playing at the store.
DIY playground: photo


A playground made by yourself will become a favorite place for children in the garden, where they will feel like full owners, a place of games and real adventures. For parents, this is a chance to show their skills and earn popularity not only among their children, but also among their friends. By showing a little imagination and courage, you will get a favorite place for children to play - create a reliable base for them, and the rest of the splendor will be added by the bright children's imagination.
There are many great playground ideas that you can make yourself, but don't miss the opportunity to involve the children themselves in setting up the playground. 
Children's playground with sandbox.
A children's playground with a sandbox is a favorite place for little ones to play. To keep the sand clean, you can make a closing lid for the sandbox, which when open turns into a bench. 
Just a little imagination and by adding a triangular box for storing toys to the sandbox, you get almost a ship. 
All that’s left to do is install a strong staircase mast and decorative sides.

Another option for a children's playground with a sandbox. Isn't it fun to have a chalkboard next to the sandbox for kids to draw on? On the other hand, an additional wall will shield the playground from both the wind and the sun.

DIY playground made from stumps and branches.
Climbing trees is a favorite activity for children; such a playground made from old wood will be a real adventure for your child and his friends.

Children's playground with swings.
How great it is to run and jump, and then relax on your favorite swing. A beautiful garden, the aromas of summer, the chirping of birds - it’s so nice to enjoy all this while swinging on a swing on a wonderful summer day.

DIY playground made from old pallets.
All children love houses in the garden, especially if they themselves helped build this house from pallets, and for the first time held a serious tool in their hands.

DIY children's house.
For those who want to make a children's house at their dacha, our drawing with exact dimensions will help. By installing this house in a cozy corner of the garden and painting it beautifully with your children, you will bring pleasure to your little ones.

Children's playground with slide near the terrace.
An ordinary terrace can become a beach-style children's playground if you install a slide on it and make a sandbox below. Kids can play in the sand for days, and if you can't spend the summer with them at the seaside, you can bring the beach home. In hot summers, you can install an inflatable pool nearby for the little ones.

On a hot day, real adventurers will find life-saving coolness in a small tunnel equipped with a small door and similar to the famous hobbit house.

DIY playgrounds in the shape of a ship.
Such playgrounds will not only bring pleasure to children, but can also become an interesting element of the landscape design of your dacha.

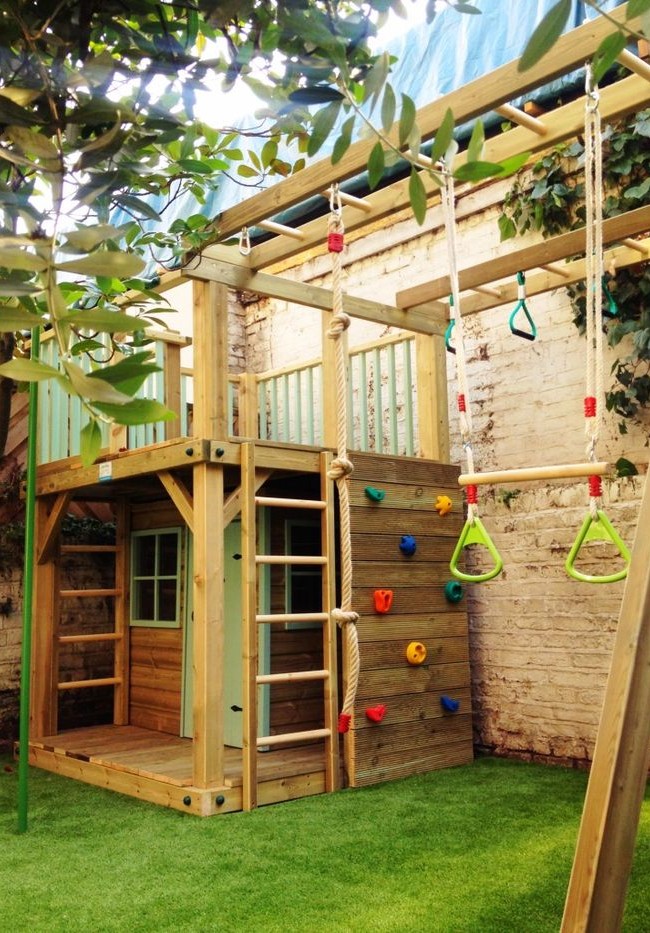
Children's playground and gym under the high terrace.
The place under the high terrace can be equipped as a sports ground for older children, so they will have the opportunity to engage in regular training every day.

Children's house under the terrace.
For the little ones, you can make a playhouse under the terrace, where they will feel like complete masters, because... No one else can enter there except them.

How to make a playground next to your house with your own hands.
Previously, the space under the terrace was not used and was a spontaneous warehouse for all sorts of “useful things”. Because There are two exits from the terrace, and the terrace is quite high. It was decided to make a children's playground. In addition to the slide and sandbox, under the terrace there is a cozy place with a children's playhouse, and on the wall of the house there is an additional drawing board and a shower with a tap for washing hands and feet.

The space under the terrace will later be partitioned into two parts - in one there is a children's playground, in the other there is a place for storing garden tools. First, taking into account waterproofing, a wooden frame was made for the platform.

Then the soil for the sandbox and the area near the slide was removed. This is the hardest part of the job.

In the area under the sandbox and next to the slide, ebbs were made and sand and crumb rubber were poured for children's playgrounds.

Children's playground under a canopy.
A cozy playground can be made from a regular canopy by adding a small raised platform for a slide.

Bright do-it-yourself playground.
No matter how simple your playground design is, you can always add some cheer to it with bright, bold colors.

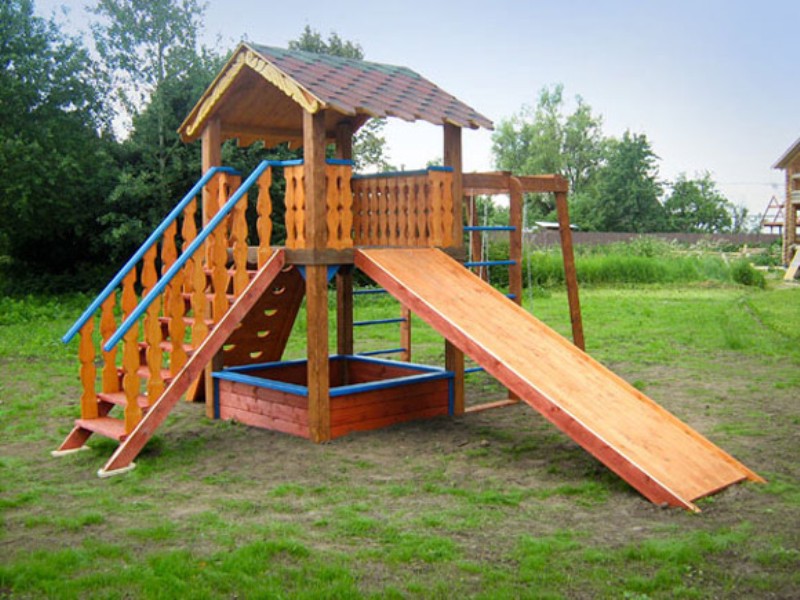
A simple wooden playground.
Even if you have no construction skills at all, you can always find a simple and interesting option for a playground that you can do.

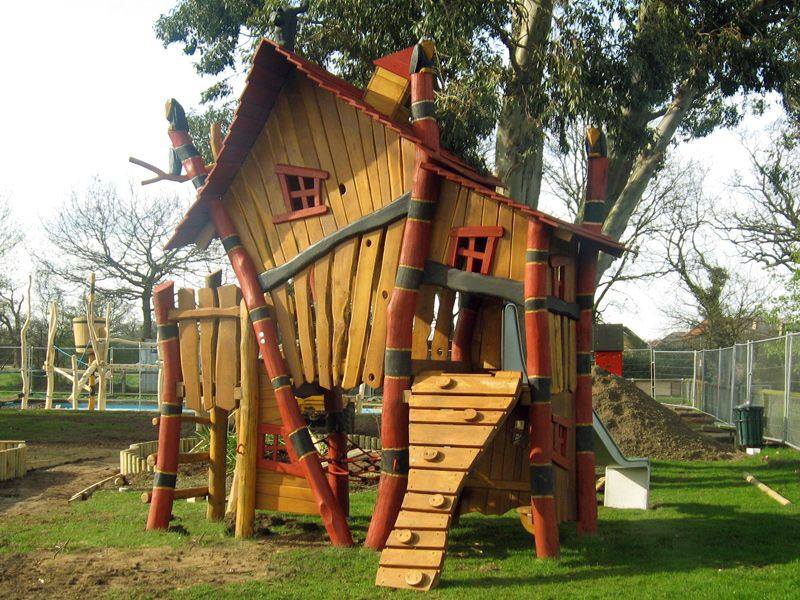
Dream playground - treehouse.
A children's tree house is a wonderful idea that not only children, but also adults fall in love with. Such sites are not made on fruit trees - because the fasteners go straight into the tree, but if your site is located next to a forest, this is the best idea for a playground.

How to make a tree house with your own hands.
Usually, fairly large trees are taken for a tree house; if there are no such trees in your garden, you can make a platform for the playground, which will be mounted both on the tree and on wooden posts in the corners.

Instead of driving several small bolts into the wood, it is better to use one larger one.

The order of work is as follows: first, two beams are attached to the tree, then a frame under the platform is installed on them, which in our case is reinforced with posts at the corners of the platform.

And no matter how complicated the site plan may look for a young dad, in reality it is a small square platform on which a children’s house is being built.

Such a platform is a simple and attractive design that looks good in any corner of the garden.

DIY children's playground in a rustic style.
This children's playground is made according to the same principle, but instead of a children's house, a beautifully decorated gazebo is made on supporting posts, which also serves as a canopy for the sandbox on a hot day.

Children love summer most of all because they can spend almost the whole day outside. Children's playground projects can be completely different - from the simplest to the fantastically beautiful. But in any case, a do-it-yourself playground will allow you to truly fulfill one important dream of your baby.