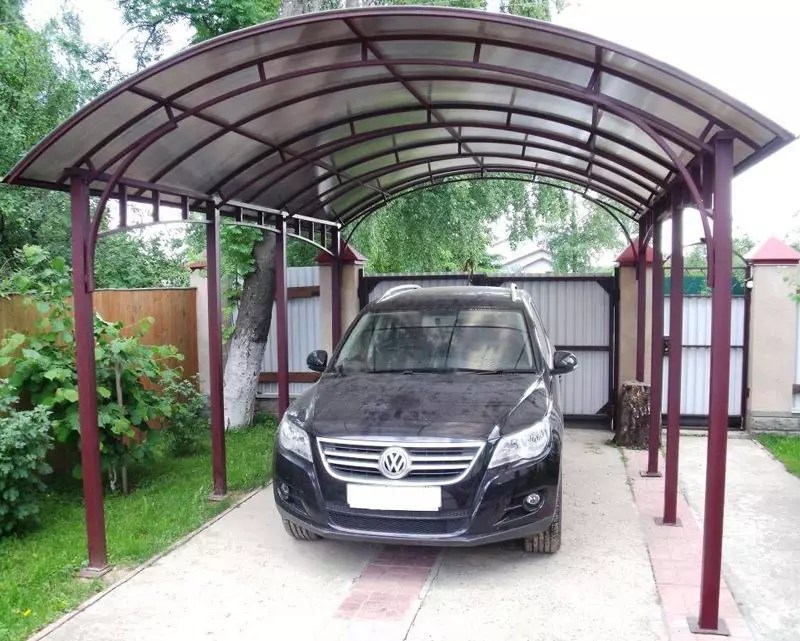
Wooden carports: designs, preparatory work, construction and finishing. How to build a carport with your own hands - accessible step-by-step instructions How to make a carport yourself
Many owners of a country house or dacha like to organize and improve the site themselves. Some home craftsmen are not inferior in level to highly paid professionals. This fully applies to such a structure as a carport made of wood. In order to put an idea into practice, it is necessary to have not only some general construction skills, but also to know the principles and methods of constructing a structure.
Designing a carport
First of all, you need to decide on the location. It is recommended to choose a site closer to the entrance to the territory. Preferably without turns, so that the driver does not have to make difficult maneuvers. If space allows, it is better to equip space for two cars. Then they choose one of the design options for the structure, look for or make their own drawings and sketches.
The dimensions of the structure directly depend on the brand of the machine. The length of a small car can be 3.5 m, but an executive sedan sometimes exceeds 5 m.Perhaps the owner decided to expand the functionality of the structure and, taking this opportunity, decided to make a canopy made of wood with a utility unit, the size of which is added to the basic dimensions. Having a project in hand and having decided on the shape of the structure and material, they calculate the required quantity. In addition, it is necessary to take into account the properties of the soil if the structure is to be erected on an empty site.
What materials are used for construction
To make a carport with your own hands you will need:
- Crushed stone, sand, cement. The structure must be installed on a reliable foundation. These materials are needed for screeding, preparing the surface for laying paving stones or other decorative finishing.
- Beam or log as power supports. If the supports are 2 or 4, then the recommended cross-section is 20 cm. When a carport is made from timber of a smaller cross-section, the number of power posts must be increased.
- Boards, timber, slats for creating a rafter system. For sheathing under the roof, lumber with a sum of sides of at least 20 cm is suitable. For example, timber 5x4 cm or board 7x3 cm, 10x25 cm. The rafters will require larger material. With a step of 0.5-0.6 meters, it is permissible to use a board of 10x3 cm. If the distance between the rafter supports is 1 meter, then the cross-section is increased by at least one and a half times, that is, a material with dimensions of 15x4 cm or 20x4 cm is used.
- Fastening elements. In order to assemble a wooden shelter, you can make connections that are used in the work of a carpenter and a qualified carpenter. It is much faster and easier to use ready-made fasteners, the range of which allows you to implement any project of any complexity.
- Roofing material. When making, the master is not limited by any framework and can use any coating he likes. For example, if it is conceived, then it will look harmonious with an identical main coating.
- Protective compounds for wood. The wooden carport will be used outdoors. The treated surface will significantly extend the service life and maintain the attractive appearance of the structure.
Types of carports
Structurally, the work can be done using two main options based on the type of fixation. In the first case, the wooden structure will be adjacent to the main or additional structure on the site. The wall of the house will serve as a support. A power beam is mounted to it, which will be the basis for the rafter system.
As a power beam, you can use a blank made of laminated veneer lumber, which has excellent strength and durability characteristics. The result is a lean-to canopy with good performance characteristics and low construction labor intensity. The length of the roof can be easily increased without any special physical or material costs. The result will be additional space under a wooden canopy with a utility block.The second way is that the car shelter will be a completely autonomous structure. In this case, special attention is paid to the installation of support posts, which can be fixed in various ways:
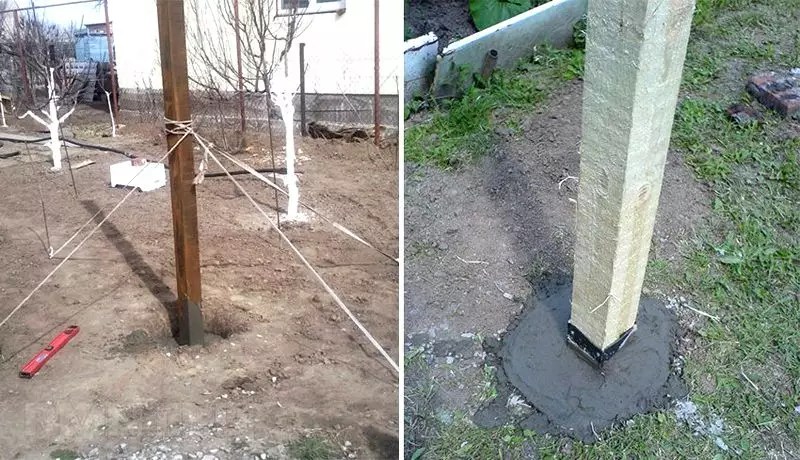
- Installation in the ground. Labor-intensive process. It is required to dig a hole for each rack. Then a layer of crushed stone and sand is placed on the bottom and a support is installed at a level. First, the part that is below the soil level is treated with a waterproofing compound, for example bitumen mastic. It is recommended to install a support platform made of sheet metal at the lower end of the stool with an area 2-3 times larger than the cross-section of the beam or log in order to provide for shrinkage.
- Installation on a specially made foundation. In the process of preparing the area, a screed is made on the ground, but on the sides where the supports will be installed, a trench is dug for the strip foundation. In case of weak and moving soils, more reliable support is provided. For example, a pile or columnar foundation. During the process of installation and pouring concrete, you can pre-install embedded elements for subsequent fixation of the racks that will hold the carport.
- On a finished site made of concrete, asphalt, paving stones. The market offers a large selection of fasteners for assembling wooden structures. Metal supports and thrust bearings are easily fixed to any surface using anchor mechanisms. They are attached to the tree using self-tapping screws.
Advantages and disadvantages of a wooden canopy
A huge advantage of these designs is the very possibility of their manufacture without the involvement of specialists and the use of special tools and equipment. Making a canopy out of timber for a car or other household purposes is quite a feasible task for an ordinary site owner. The wood is processed using household tools. There is no need to bring a welding machine and other complex equipment to your dacha. For the simplest models, you will only need a hacksaw and a screwdriver, and a shelter for wooden cars will be ready.
Another advantage is that the construction of beams does not require large expenditures. Often, after the construction of the main structures, materials remain, which are put into use. You just need to purchase some additional design elements. A very strong and reliable structure is made from laminated veneer lumber, which is on average one and a half times stronger than its conventional counterpart. In addition, this material is practically not subject to warping when fixed open.
Features of installing a carport made of wood
The design is quite simple, but has some nuances during construction. For example, if a shelter for two cars is planned, then it is better to increase the area in width. Then each car will be able, regardless of the presence of a second one, to be placed in a shelter or, on the contrary, to leave.
When designing a structure, you should not blindly copy the model you like on your site. A handmade structure that is not bad in itself may not fit into the style of the house and landscape. Although the material allows you to fulfill any design idea. From technological high-tech to ethnic motifs in decoration.
Video about building a carport made of wood
Almost no modern yard is complete without a convenient or canopy. A simple structure serves as reliable protection from atmospheric agents and protects your car from the sun, early rotting and corrosion. Would you like to make a carport for your car? In fact, such a design does not require a lot of money and effort. It is quite possible to do it yourself. Let's figure out how to build a simple garage or functional shed that will reliably protect your car. We will also find out what materials can be used for such construction.
Let's first figure out why it is better to make a carport for the country house. First of all, when there is no cover over the car, raindrops can penetrate inside the body, which will eventually cause the appearance of. In addition, hail can leave dents in the surface of the car, and dust can get into all the cracks. At the same time, the sun's rays can burn the upholstery on the seats.
The country canopy is quite light, but it is quite enough to cover a car that is not constantly in the country. The structure for the car can be built very quickly. In this case, the building can be made from a profile pipe, from ondulin or from boards, and simpler options are made from fabric.
You can also purchase a ready-made version from the manufacturer, for example, folding or prefabricated. You can make options from affordable materials. You can see what different carports look like in the photo.

carport
If you decide to build such a structure for a car yourself, then you need to know about the following features:
- Before starting work, you need to complete preparatory work, including designs and drawings. In this case, it is necessary to take into account the volume of material required, as well as permissible loads, dimensions, cost and location;

- After drawing up an approximate estimate, you need to purchase the necessary materials. Also consider the consumption of additional materials that may be needed;
- It is important to decide where the structure will stand. And also, what its height should be depending on the dimensions of the car. Preparatory work includes preparing the base and leveling the site. In this case, it is necessary to take into account the slope of the territory, subsidence and occurrence of groundwater;

- The most difficult stage is the construction of the structure. The frame installation, construction and covering are carried out.

You can make a beautiful canopy with a gate. Also, such a device can be one part of a utility unit or complement a barn. You can build a cantilever version of the structure, but for a simple structure a regular one can be used.

Location of carport on a summer cottage
Before starting any construction work, you need to consider a place for the canopy. From the selected area you need to remove the turf to a depth of 12-15 cm, and then build a cushion of crushed stone and sand. In this case, you can build a slight slope, as well as around the perimeter. Then you need to lay any parking covering on the pad. If the machine is too heavy, you can install a reinforced concrete screed.

Depending on the method of location on the site, the structures can be autonomous, and can also be used as a garage, bathhouse or utility block. Also popular are the galleries that connect the house and the gate.
Individual devices stand on metal or wooden supports. If the structure is adjacent to another building, then it may have the following support options:
- beam-supported, when one of the sides is supported on a beam, and the other on supports;
- cantilever-support– fastening is carried out using brackets or corners;
- console version recommended for small structures.

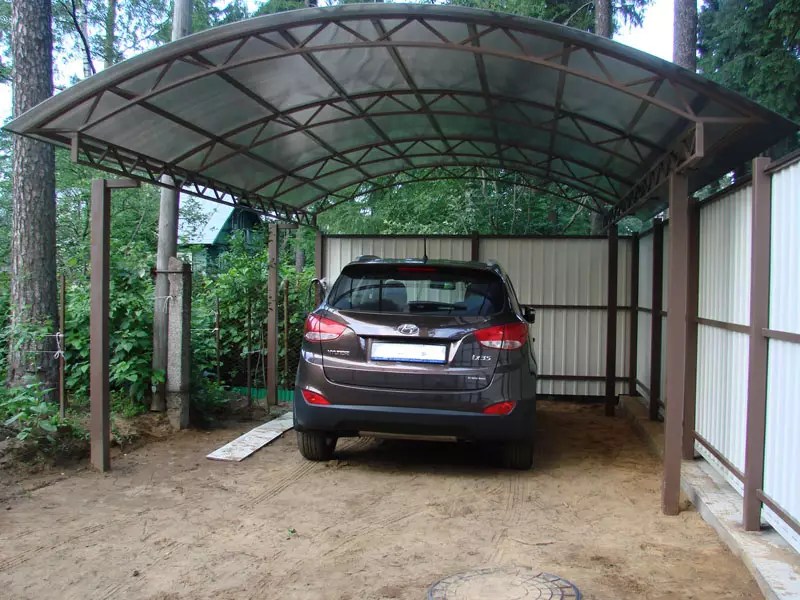
Carport in front of garage
Now let's look at the options for garage canopies and the features of their construction. The most common option is when the canopy is placed in front. It can be made for one or two cars. A similar structure can be built between the garage and the house. In the photo you can see the most popular ideas. Sometimes a combination of a garage and a garage is used.
When deciding how to make a lightweight canopy, you can place it on the side of the main structure. For the construction of the roof, materials such as metal profiles, pipes, and also are used. The roof can be made of polycarbonate, corrugated sheets or metal tiles. Part of the canopy can also be placed over the garage. Similar designs can be of the following types:
- open have a common wall with the garage;

- closed have three walls. In this case, cladding is performed using wood, awning fabrics or lining. If necessary, the canopy can be covered.

In addition, such buildings can be collapsible or stationary. Often a garage with a canopy is built under a gable roof; this option is recommended for a wooden frame. If the structure is arched, then you can use a metal frame with supports.
Garage or shed - which is better: the answer to this question depends on financial resources, the purpose of the structure and the materials used. The most convenient solution is a combined option.
Carports attached to the house: photo
An extension near the house is popular because adjacent structures are easier to install. You can also use a simpler mount. Before deciding how to build such a canopy and how to attach it to the wall, you need to understand the materials.
The frame for construction near the house is often made of wooden beams or metal pipes. Also, structures next to the house are made of stone or filled with cement supports.

The project for a canopy in front of the house requires the presence of strong supports that can withstand the weight of the main roof of the house. You can see how to make beautiful designs in the photo.
Any such structure consists of a roof and a frame. Particular attention should be paid to the base. You can choose the following material:
- wood It is easy to process and does not require any complex tools. But this material requires special care. Over time, the tree becomes covered with fungus, rots and cracks. It must be protected with special impregnations;

- steel profile pipe installed using a welding unit. Such material can last a long time;
- combined option involves the use of cladding a steel frame with wooden slats.
For the roof, a more aesthetic solution is to use cellular polycarbonate, or you can also use a profiled sheet.
Features of carports for 2 cars
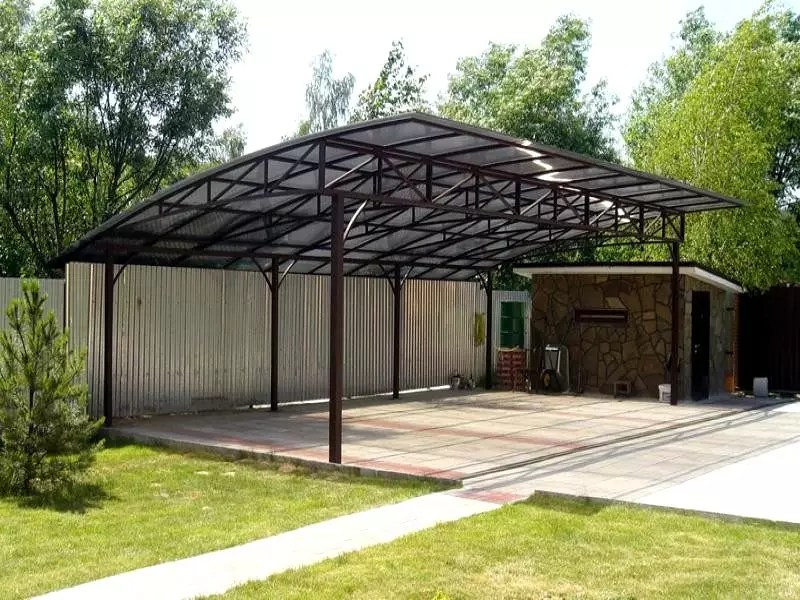
Using carports, you can build practical structures for two cars. When choosing a specific design for two cars, you need to choose the right dimensions. The photo shows the best options for such buildings. You can combine this design with a utility unit. The spacious structure for two cars has dimensions of 8 by 6. The standard width should be at least 2.5 meters.
carport
How to cover a carport
When choosing a canopy, you should focus on the general architectural style of other buildings. It is important to decide on the materials. The important point is the covering. The choice of material also depends on the type of roof. The following options are often used:
- single slope option is the easiest to install. It is recommended for the construction of free-standing buildings;

- gable structures also used for autonomous structures and tent buildings;

- used for attached and separate sheds arched roofs.
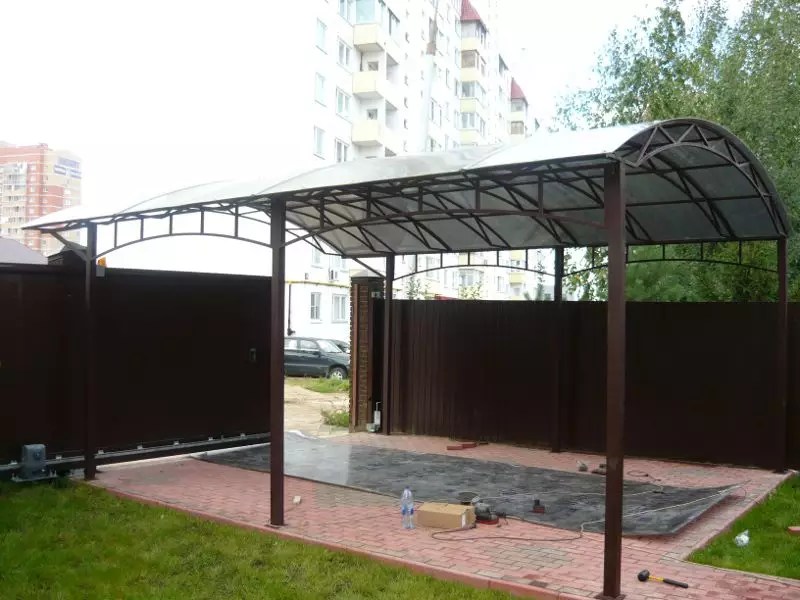
For the construction of structures with a gable roof or a pitched roof, materials such as metal tiles, slate, corrugated sheets, ondulin or polycarbonate are used. To make arched structures, rolled metal and polycarbonate are used.
The simplest option is a pitched roof. In this case, the slope of the slope is approximately 25 degrees. Rigid sheet material is excellent for pitched structures.
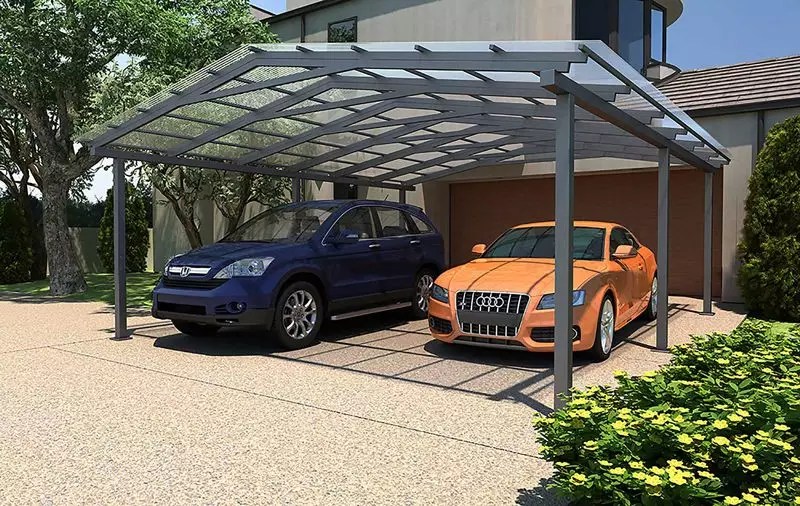
Polycarbonate carports
Polycarbonate can be used to build durable structures for two cars or one. This material has many advantages, for example, affordable prices. Polycarbonate can be placed over any carport. At the same time, simple designs for the dacha can be easily done with your own hands.

When deciding how to make a structure, it is necessary to take into account the material of the frame, and the thickness of the polycarbonate is also important. In the photo you can see what similar structures made of this material look like for 2 cars or for one.
Polycarbonate is placed on the frame structure and secured using special ones. Using this material, you can build a garage with a carport.
Carport made of corrugated sheets
A carport made from corrugated sheets is one of the most popular. This coating can be easily done with your own hands. In addition, this design is lightweight. It can be firmly fixed to the frame, which will ensure its stability in strong gusts of wind.
This material can also be used as an awning cover. You can see what a canopy made of corrugated sheets looks like in the photo.

Before work you need to make at least the simplest drawings. Installation is quite simple. Regardless of the design option, corrugated sheets must be laid from bottom to top. First, the first part is attached, and its edge is screwed with self-tapping screws. You can also use clamps with a rubber gasket. After this, another overlapping sheet is installed. Two more self-tapping screws are screwed at the joints.

Carport made of metal tiles
In the photo you can see options made of metal tiles. With drawings at hand, you can make simple designs with your own hands. If the roof for the main building is made of such material, then you can make an attached canopy under one roof. In this case, you can make a completely closed structure for installing a car.
If a shed roof is used for an autonomous canopy, then the walls can be placed on a solid foundation made of tiles, cement or concrete. Often different manufacturers offer turnkey designs. The price depends on the size of the building and the materials used.

Carport frame materials
When building a canopy, it is important to choose the right material for the frame system. The option chosen will depend on whether the structure is stand-alone or has a house attached to it.
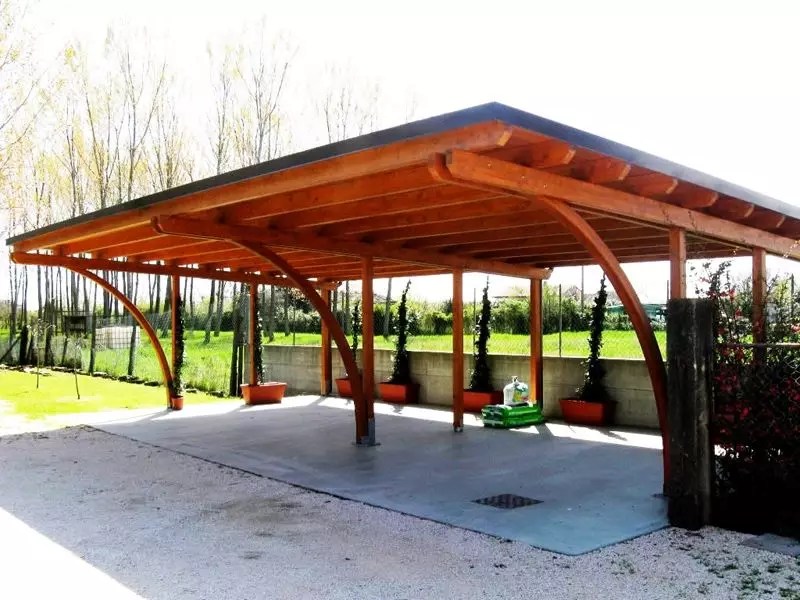
Wooden canopies
A wooden shed is quick to build and can be built with your own hands. A timber structure can last for many years if it is treated with special protective compounds. A wood frame for a car can be covered with polycarbonate, slate, tiles or ondulin.

Budget materials for the dacha include wooden blocks. They are characterized by a long service life. In order for the material to last for many years, it should be treated with antiseptic drugs.
A canopy on a wooden frame has the following advantages compared to metal structures:
- environmental friendliness and safety of the material;
- low weight of the structure;
- ease of processing and installation;
- low cost.
When deciding how to make a cover for cars, you need to take into account that they can be stationary. Also, a project for a summer house may look like an extension to a house. There are different ways to install wooden posts. To increase their stability, the supports need to be additionally concreted. A lean-to canopy can be used as an addition to an existing building. Installation of such structures requires certain drawings. One edge of the structure rests on the wall of the building, and the second on the racks.
Autonomous structures for cars are supported by four racks. The photo shows different options for such designs. If you plan to install several machines, then the number of supporting elements increases.

When constructing wooden structures, some rules will help you:
- the construction of supports must be made from rounded or profiled. To build a rafter system, you will need small diameter bars;
- roofing material must be selected taking into account the slope of the slope and the structure of the rafter structure. Polycarbonate is recommended for decking of various configurations. Corrugated sheeting can be used for single-pitch gable roofs. Soft tiles require a continuous sheathing;
- the coating should have a certain slope of 5-10 degrees.

As a rule, canopies attached to a building are made along the entire length of the adjacent wall. The average height of a wooden structure should be about 2-2.5 meters.
Metal carport
You can make a functional and reliable metal canopy with your own hands. Most often, a channel, a corner, as well as a regular or profile pipe are used for shelter. Installation can be done from lightweight materials on which an awning or ondulin is laid. For capital frame systems, you can use euro slate or metal tiles.
You can look at the photos for beautiful ideas for your dacha. Metal elements are quite reliable and can last for many years. You can also use ready-made solutions, for example, dismountable or prefabricated. They most often come in standard sizes.
To build metal structures yourself, you need drawings. Installation can be made from metal corners, channels and pipes.
Forged structures are also popular. Such buildings are expensive, and their construction requires specialists. To make a high-quality design, you need to take into account the dimensions of the machine, the installation of the frame system and coating materials. By combining all these characteristics, you can build a high-quality building.
DIY carport
How to build a quality shed depends on many factors. First you need to outline the perimeter of the future site. In order for the extension under the car to be strong, you need to pour a foundation for the supports and concrete the pillars. You can build a carport at your dacha with your own hands using a pile-screw or a strip carport. To build a foundation for the pillars, you will need sand, cement, crushed stone, supporting elements, a shovel and a concrete mixer.
If you don’t know how to make a foundation, then the drawings will help you. First you need to remove the turf and dig a hole around the entire perimeter of the future structure. How to install canopy posts depends on the material used. Holes are dug under the supports. This work can be done with a drill. Then the racks are installed and filled with a cement composition with the addition of crushed stone. After this, it is necessary to fill the ditch around the entire perimeter at ground level. If you want to know how to properly install a car shelter at your dacha, then remember that you need to let the foundation settle for a couple of weeks.
The extension involves the installation of a high-quality platform. In this case, it needs to be covered with crushed stone and laid.
When selecting materials, take into account the design of the structure near the house and the building itself. If everything is made of timber, then construction from boards is an excellent option. If the entire dacha ensemble was built using corrugated sheets, then the rest of the structures are made of the same material.
Car roofing made of polycarbonate is capable of transmitting sunlight, which makes the entire structure light. At the same time, for construction in the yard, you can use polycarbonate of various thicknesses and a varied color palette. Various roofing materials are used for covering.
We build a structure according to a design that takes into account the shape of the roof (single-pitched, double-pitched or domed version), as well as the height of the structure and wind and snow loads. This is especially important if the carport is attached to the house.
In the table you can see important points of the construction process.
| Image | Important Steps | Description |
 | Creating a metal frame | The metal frame can be welded. For this you will need a profiled pipe, a welding unit and a grinder. |
 | Construction of a wooden frame | A simple option made from timber. To do this you will need bolts and nuts, a hacksaw, a wrench for the size of the bolt and a beam. All elements are treated with antiseptic compounds. |
 | Installation of supports | The locations of the pegs are measured using pegs and twine. Holes for racks need to be dug to a depth of 50 cm. It is recommended to weld pieces of reinforcement in the lower part for greater durability. The supporting parts are placed in the recesses and filled with concrete. |
 | Installation of roofing elements | Along the entire perimeter of the frame, you need to tie the top and bottom. Before welding, the parts can be secured with clamps. It is necessary to make a large number of corners and then attach them to the frame. Then these elements are secured with ties. In this case, they will serve as sheathing and stiffeners. |
 | Final work | Cover the metal with two layers of anti-corrosion paint, and the wood with an antiseptic. Roofing material is laid over the corners and secured to the frame. |
 | How to lay out the flooring under a canopy | The budget option involves the use of rolled lawn or seeded grass. You can also use gravel chips, clinker bricks or paving slabs. |
In the photo you can see what a building made from scrap materials looks like. And also in the video below you can see a step-by-step installation of such a design.
If you want to build a yard canopy on the cheap, you can make the structures out of fabric or a banner. When deciding how to build a building, consider different options and designs. You can also look at the garden version of canopies. You can see how to build a structure in the garden or yard yourself in a step-by-step master class.
When constructing structures, remember these rules:
- the best distance between supports is 1.15 meters, and the length of the structure is selected depending on the number of cars;
- when choosing a height, do not forget that you need to take into account the dimensions of the car with the trunk;
- supports can be made of timber, concrete or brick;
- The most inexpensive, strong and durable materials include polycarbonate and corrugated sheets.
The canopy can be decorated with wooden bars, as well as beautiful forged elements. To decorate light buildings you can use vines and climbing plants.

Article
In the old days, when a traveler returned home, the first thing he did was bring his horse into the stall, and only then he went up to the house. Nowadays horses are made of iron and do not ask for oats, but they also require protection from hail and dampness. And it’s not at all necessary to build a major garage for your car. At the dacha there is a fairly wide, reliable canopy that you can build with your own hands from available materials: wood, cellular polycarbonate and profile pipe. This is an interesting task for skilled hands, and to make the work go smoothly, we have attached photos and detailed drawings to the article.
Even rocks are destroyed under the influence of the environment, and even more so complex equipment. Of course, the car will not become unusable in a week, but day after day its lifespan will be shortened by the following factors:
- raindrops will sooner or later flow into places where they can start rusting;
- hail will inevitably leave dents on the roof and hood;
 The canopy will reliably protect the car from precipitation
 - dust will clog all the cracks, for example, in the grooves for glass, in the frames of mirrors and headlights, which will affect the appearance of the car;
- The summer sun will burn out the paint on the seat upholstery and things left in the cabin, and will worsen the physical properties of the tires.
A country canopy for a car provides shading and good ventilation, the absence of leaves and bird blots on the windshield.
Build it for your pet: it’s simple, functional and reliable.
Advice. Place the canopy in a place where water does not stagnate - and you will be satisfied with the condition of the rubber.
Canopy materials
Structurally, the canopy consists of two parts: a frame and a roof, and the most important part of the work is the construction of a reliable frame. You should think carefully about the choice of material for the base of the future canopy, since replacing it will be more difficult than the roof. There are three options to choose from.

The roof of a canopy is usually made of either profiled sheets or. In the second case, the canopy will look more aesthetically pleasing and airy, but in areas where there is a high probability of large hail, it is advisable to immediately purchase a more expensive type of polycarbonate with a special protective film.
Advice. If you replace the polycarbonate with a durable awning and put it away for the winter, then the eternal problem: how to find time to come to the dacha to remove snow will be solved by itself.
Site preparation
If you do everything wisely, then you should start by organizing a place not above the car, but under it. Having chosen a site convenient for entry, you need to cut off all the turf, remove the soil to a depth of 12-15 cm and make a cushion of sand and crushed stone using a compactor. Along the way, you can build a slight slope, and if the area is low-lying, then around the perimeter. After the canopy is ready, any parking covering can be laid on this pad.
It is recommended to install a reinforced concrete screed under a heavy SUV. To do this, build a plank formwork, fill it with concrete to the middle, lay down a reinforcing mesh and add concrete. For such a site to completely harden, it will take at least a month.
There are plans for a carport - where to start?
Any construction work requires drawings. Place the car in the designated place and carefully measure the length and width of the future canopy. Mark the locations of the supports, check whether they will interfere with parking and opening doors. Please note that the roof can extend beyond the perimeter of the supports by 0.5-1 m.
Draw all this on paper in side and top projections and calculate the required amount of material. Add about 10% so you don’t have to take time off from work and go buy more.
 Carport drawing
 In addition to a steel pipe (or a wooden beam - whichever was chosen for the frame), you will need concrete to fill the base of the supports, and the following tools:
- saw, hammer, nails (for working with timber);
- grinder and welding machine (for working with pipes);
- level and plumb;
- pegs and twine (any long rope, cord);
- shovel;
- clamps;
- self-tapping screws with a press washer;
- screwdriver
Building a canopy - step-by-step instructions
When working, be sure to use a level and plumb line, carefully measure and check all lines. The sequence of operations during the construction of the frame is as follows.

Attention! If you have a pipe bender and want to get a beautiful semicircular roof, keep in mind that corrugated sheeting will not work in this case, only polycarbonate.
How to lay out the floor under a canopy
What the wheels of the car will rest on depends on your preferences and the general style of the cottage. The options may be as follows:
- grass (seeded or rolled lawn);
- gravel chips;
- paving slabs;
- clinker brick;
- asphalt.
Another great option is . These are either special tiles with a hole in the center, or a hard plastic grid. The tiles are laid on a sand cushion using a rubber hammer, the seams and holes are covered with sand or a mixture of sand and soil, and lawn grass is sown. You don’t have to sow - the wind will spread the seeds.
 Parking space made of paving slabs
 The soil under the grating is usually prepared in this way: sand and gravel cushion, geotextiles, 2-3 cm of sand. Lay out the lattice modules, fasten them, add soil and sow with a lawn mixture, usually bluegrass, fescue and bentgrass. The advantages of eco-parking are that instead of a gravel or concrete patch in your yard, you will get another section of lawn, but there will be no car ruts on it.
The construction of a canopy on a summer cottage will pay off even if you don’t have a car. You can put motorcycles, bicycles, boats, kayaks, wheelbarrows and just garden tools under it.
DIY carport: video
To shelter the car from bad weather, bird “gifts”, direct sun and autumn foliage, you can build a canopy. It's easy, reliable and profitable. Nowadays, you can choose a carport design to suit every taste and imagination: different shapes, dimensions, materials used.
To build a canopy on your own, you need to know certain technical nuances, all the pros and cons of the structure, and the preferences of the materials used.

Canopy options
A canopy is a small architectural structure consisting of supporting parts, a roof and space for a car.
Basically, it is located near the house, so it should be made in the same style as the exterior. The photo shows various options for carports.

Selection of materials
Various materials can be used to construct a canopy:

Tree
The construction of a structure made of wood is simple; all you need is a regular set of tools.

However, the structure is highly flammable, so it is necessary to use antiseptic and fire-resistant agents for processing.
Metal
The frame is made forged or welded from metal profiles. For construction you will need welded equipment and some experience, otherwise it is better to entrust it to professionals.

The disadvantage of a metal structure is that it is subject to corrosion, which means additional protection from moisture is required.

Stone, concrete or bricks
A bulky option, but it does not require various materials processing and is not difficult to use.

Types of roofs
Single-pitch
The easiest way to install a carport for parking a car. The most complex elements of this design are the tying of the pillars (mauerlat) and the installation of rafters, designed for sufficient force loads (wind, snow).

When the distance between supports is up to 4.5 m, the installation of additional supports is not required; more than 4.5 m, they will have to be installed. The slope of the roof slope must be at least 25 degrees.
Helpful advice: if the slope is 25 degrees, the length of the canopy is 5.0 m, then the last supports will be 1.5 m higher than the first ones, i.e. for 1 m of length 0.3 m of height is added: 5x0.3 = 1.5 m.

Gable or hip
A more bulky and complex multifunctional design: on the first tier there can be parking for a car, on the second - a veranda.

For a roof with one slope and rafters, different types of materials are used. For example: corrugated sheeting, roofing felt, ondulin, etc.

For an arched roof, the ideal material would be polycarbonate. An arched roof is a welded structure made of arc-shaped or forged metal.

Load-bearing elements must be properly designed for strength and structural form. Polycarbonate canopies do not burden the appearance of the site as a whole; they are inconspicuous and light.


Mobile option
Folding canopies have a metal frame and a tent roof. For its simple assembly, a couple of people and a couple of hours for the work process are enough.

Suitable for outdoor picnics or trips to the country. If desired, you can install awning walls or soft glass on the sides.
Arrangement of space for the car
The parking lot can be covered with crushed stone, concrete, stone or sidewalk tiles.

For a long period of its use, the site requires preparation. The soil layer is removed, the sand and crushed stone layers are filled in, and compaction is performed.

Make sure there is a slope on the site and a drainage system. The platform should be located at the same level with the surface of the earth; if it is elevated, it is worthwhile to provide a place for descent.


The canopy can be installed separately or as an extension to a house or other structure. Which canopy option is best for you to choose, but it’s worth considering some nuances:
- wooden - fire hazard and can rot;
- metal – susceptible to rust;
- brick or stone - requires work skills and its cost is higher.
- roofing made of roofing felt is inexpensive, but installation involves lathing the rafter system;
- polycarbonate, like corrugated sheeting, is a more acceptable roofing option in terms of price, quality, and design. But corrugated sheeting can be damaged by corrosion.
Technical aspects
To construct wooden supports, you will need beams (150x150, 100x100 mm) or cylindrical wood (radius 150-200 mm).

For metal supports: round pipe 100 mm or square pipe 80x80 mm. The gap between them will be from 1.5 to 2 m.

To construct the purlins you will need: a rectangular pipe 40x80 mm or 80x80 mm (for large-scale canopies). Mauerlat: square pipe 100x100 or 150x150 mm. For the sheathing - a 40x40 mm pipe, for the rafters - a 100x40 mm board.

Dimensions
For a medium-sized car, an area of 5x2.3 m is sufficient, for large ones such as crossovers or minibuses - 6.6x3.6 m. Two cars will fit perfectly on an area of 6.3x5.9 m.

A size from 1.9 to 2.2 m will be sufficient height, which will protect the car from possible precipitation.


The standards provide for the following canopy dimensions:
- length is 1 m longer than the length of the machine,
- the width is 1-2 m more, for two units - 2.8 m (1 m on the sides and 0.8 between them) more than their total width.

Options for canopy designs with all calculations and instructions can be found on the Internet and built on your own. Or you can hire qualified specialists who will prepare projects according to your wishes and bring them to life for an appropriate fee.

How to make a polycarbonate carport
This option involves installing a metal canopy with a pitched polycarbonate roof.

The site is fenced at a predetermined location. A layer of earth 300 mm deep is cut out. From the sides, at a distance of 1.5-2 m, recesses are dug for supports to a depth of 700-1000 mm. It is worth considering the presence of groundwater and soil characteristics.

Sand and crushed stone (about 100 mm) are poured into the bottom and compacted. The formwork and frame for the slab are made from rods with a diameter of 8 to 12 mm and cell sizes of 100x100, 200x200 mm.

Reinforcement of supports is carried out separately. About 200 mm of concrete mixture is poured into the recesses and ready-made supporting elements are inserted. Next, concrete 100 mm thick is poured.

When the concrete has hardened, we move on to further work. We make strapping along the tops of the supports by welding a 40x40 mm metal profile to the base. We fix the auxiliary harness at an angle of 90 degrees. to the supports. We get the shape of a right triangle.

Using welding, we secure the rafter stiffeners. We lay square metal rafters at right angles at a distance of 800-1200 mm. We weld a canopy over the edge of the trim.

All parts are cleaned and washed with solvent. Dry it. Apply primer and paint.

We cover the rafters with polycarbonate material, which is secured with press nuts to prevent moisture from seeping in, at a distance of 300-400 mm from each other. We seal the edges with special strips for the ends.

The sides of the canopy can be covered with a wooden lattice, awning curtains, etc.

Photo of carport


Often, the construction of a carport in the presence of a full-fledged garage is driven by the fact that there will be another car in the yard for a long time, for example, from relatives or a broken one. In this case, the cover does not always solve the problem, especially when you have to constantly take it off and put it on. In the case of a dacha, it’s even simpler: a small building completely replaces a permanent garage, which is not really needed there.
A high-quality, hand-made carport for a dacha or country house will protect your four-wheeled friend from scorching sun rays, snow caps or small birds.
The only thing that a roof and four pillars cannot protect a car from is the cold, but this is not necessary during the warm season. We will now tell you how to build such a building, from what, and how to calculate its area.
Let's start with the most time-consuming and important step - design. To build a quality shed, the first thing you need to do is evaluate the capabilities of both your budget and the site. So, when it comes to the main house in which you live, you most likely won’t be able to do without a full-fledged garage.
After all, only there they place the inspection hole, shelving, and stationary tools. But in the case of an ordinary summer cottage, where you come from time to time, it really makes sense to get by with a good-quality canopy and avoid unnecessary expenses.
Calculation of the area of the future canopy
So, what exactly is a carport? This is a simple structure of supports and a roof, which must withstand both the wind and the weight of snow, while protecting its four-wheeled ward from any bad weather.
For one car, a shelter of 3x6 meters is usually sufficient. Don’t do less, because not only the car, but also the person standing next to him who is doing some work should be protected from the rain and scorching sun. By the way, it is ultraviolet radiation that is especially harmful to a car: the paint heats up and deteriorates, and you probably know how expensive it is to bring the car back into proper shape.
How to choose a good place?
Carefully examine the landscape of your dacha: where will it be most convenient to place the canopy? Here are some good tips on where it’s best to park your car in your dacha:
Typically, a canopy is built either separately, not far from the house in the entrance area of a summer cottage, or adjacent to other buildings, even sharing a common roof with them.
In this case, it is especially convenient to supply lighting to the canopy, even with a motion sensor. Then the light automatically turns on as soon as the car approaches the dacha area. In a word, such a canopy should be located closer to the entrance, drainage ditch and away from open fire, like a barbecue or oven.
Construction of a base for a canopy
Keep in mind that you will still need to make a small platform under the canopy so that later the car does not sink into the mud. In addition, this should be a place where it will be convenient for you personally to wash the car, lift it on a jack and put some things next to it. Imagine how inconvenient all this will be in the spring, when there is a thaw, and under the wheels there is only bare, washed-out soil.
As the most budget option, you can simply pour crushed stone under the car, which will quickly allow water to pass through it. The only point: on soft ground, the crushed stone gradually goes into the ground, and every year at the opening of the summer season you will need to buy more of it.
Additionally, such an area under a canopy needs to be fenced with something so that small stones do not scatter throughout the entire area. Or, as an option, make a base for crushed stone. To do this you need to take the following steps:
- Step 1. Remove the top fertile layer (usually 50-60 cm).
- Step 2: Lay down geotextiles for road work (not roofing or other) that will allow water to pass through.
- Step 3. Pour a 10 cm layer of crushed stone, preferably dolomite, which subsequently forms one solid slab. The suitable fraction is 20/40. Compact the crushed stone well.
- Step 4. Place a 10 cm layer of sand on top of the crushed stone and compact it as well. Spill the sand so that it settles well.
- Step 5. Organize the outer layer so that sand also does not spread around the area and is not carried into the house. Asphalt, concrete, cobblestone, crushed stone and paving slabs are well suited as such a layer. Another option is a geogrid or lawn grid, in which crushed stone and soil for the lawn are filled.
Be especially careful if the soil on your site is clayey and the groundwater is quite close to the surface. In this case, to prevent the crushed stone from “drowning” in the ground in 2-3 years, simply do not skimp on geotextiles.
Review of frame and roof materials
So, let's move on to the construction of the frame itself. Today, the canopy is most often made from the following materials:
Metal, glass, plexiglass and even polycarbonate are excellent options for canopy roofs. And each of the materials is very different from each other. Which option you are most likely to choose is more a matter of budget and aesthetic preferences.
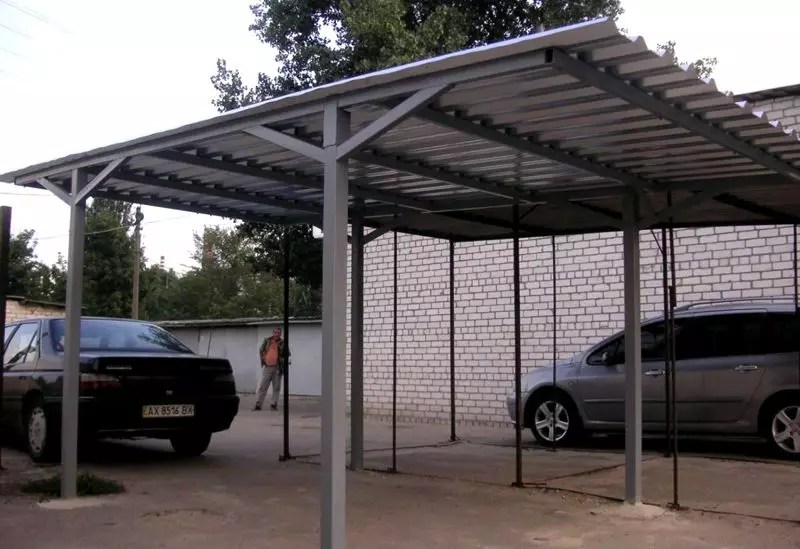
Resistance to atmospheric forces: metal canopy made of profile pipes
A metal canopy is a fairly rigid structure made of posts with attached trusses and roofing material. This one is rightly called the strongest and most stable:

The simplest option for installing a metal canopy for a summer house is a welded structure with an aluminum roof, which you can handle yourself. But if we are talking about a heavy frame “for centuries”, then you will need the help of specialists and special equipment:

It is much more rational to install a canopy made of profile pipes coated with weather-resistant powder paint. After all, a carport does not necessarily have to be stationary; both the posts and the trusses can be welded together or secured with special bolts.
At the same time, collapsible canopies have their own advantages, because they are easy to assemble and disassemble and hide for the winter season from dacha thieves, “metal detectors,” while you are in the city:

For a dacha, one of these three options is most often built, which are considered the most practical and popular:

Depending on what roof shape you choose, the complexity of constructing such a canopy will depend. So, the simplest option is a single-pitched one. But in regions with a large snow load, it is better to install a gable structure so that the snow falls off it evenly and without damaging the rafter system:
Here is a canopy built according to the proposed scheme:

It’s especially stylish when these metal trusses are slightly curved:

Let's call the arched canopy the most aesthetic. It is not easy to make it from metal, but it is still easier than from wood. Moreover, skilled summer residents have learned to make such a canopy without a pipe bender at all:
But a multi-slope metal shed is unlikely to suit you, unless you want to build an entire parking lot.
And finally, the shape of the canopy does not have to be classic in the form of an arch or one slope. For example, modern companies produce compact carports made of metal or wood:

All this miracle of constructive thought consists of ordinary profiles and polycarbonate, and there is nothing yet that cannot be brought to life with golden hands.
Easy to process and install: wooden canopy
Now let's look at the simplest but most reliable method of how carports are most often built today for cars on a regular private property. This design is convenient to attach directly to a house or garage:

Here is a diagram of a classic wooden canopy:

Technology for constructing a wooden canopy step by step:
- Step 1. Prepare holes for the future foundation. To do this, you need to drill holes 100-120 cm deep.
- Step 2. Insert pipes into the holes to a depth of 30 cm and fill them with ready-made concrete.
- Step 3. Now you need to insert the brackets for the canopy posts into the solution.
- Step 4. Place the boards on the spacers and assemble the rafter structure. Soak them in antiseptic in advance.
- Step 5. Tie the boards around the perimeter and lay the roofing. For such a canopy, a modern lightweight bitumen covering, or one that is also laid on the roof of the house, is most suitable.
- Step 6. Tie the entire perimeter with clapboard or white aluminum. If desired, also cover the inside of the canopy ceiling with clapboard.
Now you can install a light and even an outlet on the ceiling to make it convenient to connect a working tool or battery. The whole process in photographs:

Quite a cozy canopy, isn't it? By the way, it is most convenient to build a spacious carport for two cars from wood. After all, such material is relatively budget-friendly:


As you can see, such a canopy is easy to decorate and bring into the desired form with ordinary siding, of which there are a lot of colors and textures.
Let's look at the process of making such a canopy step by step:
- Step 1. The first thing you need to do is build a foundation for the canopy. This particular project required eight pillars with a diameter of 30 cm. They were sunk 120 cm deep.
- Step 2: Expose the pipes and fill them with concrete. Immediately, in the fresh concrete, brackets for wooden poles with a parameter of 140x140 mm are inserted.
- Step 3. To arrange the roof, use a double board 38x290 mm.
- Step 4. You need to add a second load-bearing board to the main pillars and bolt everything together.
- Step 5. To organize the braces, install small pillars with a parameter of 90x90 mm.
- Step 6. The roof trusses are made of 38x90 mm boards and 12 mm OSB. The boards need to be cut to size and the plywood trusses need to be made on the ground.
- Step 7. The finished trusses are lifted onto the roof. Make a solid base for flexible tiles.
- Step 8. After laying the final roofing covering, cover the ends of the truss with siding.
Here is another similar project, but with more complex roof trusses:

Canopy on a forged base: a game of strength and style
If you don’t want to build a standard rough structure in front of your favorite country house, then consider the option of forged metal. In this case, the canopy will not only reliably protect the car from bad weather, but will also serve as a beautiful element of landscape design!
The whole secret is that forging can give you a unique and most intricate design that you can think of. And at the same time, both the racks and the trusses will not be deprived of their rigidity.
Such an element will really decorate any cottage, because it is not without reason that forged metal has at all times been considered a symbol of well-being and prosperity. And if you paint such a canopy not black, but white or silver, then the surrounding space will change beyond recognition:

How to make such a canopy? As you can see, it has a base made of a straight profile, which you can easily make yourself, and additional elements made of twisted metal. And it makes sense to order them from a professional blacksmith; you just need to sketch a sketch or choose something spectacular from the proposed works.
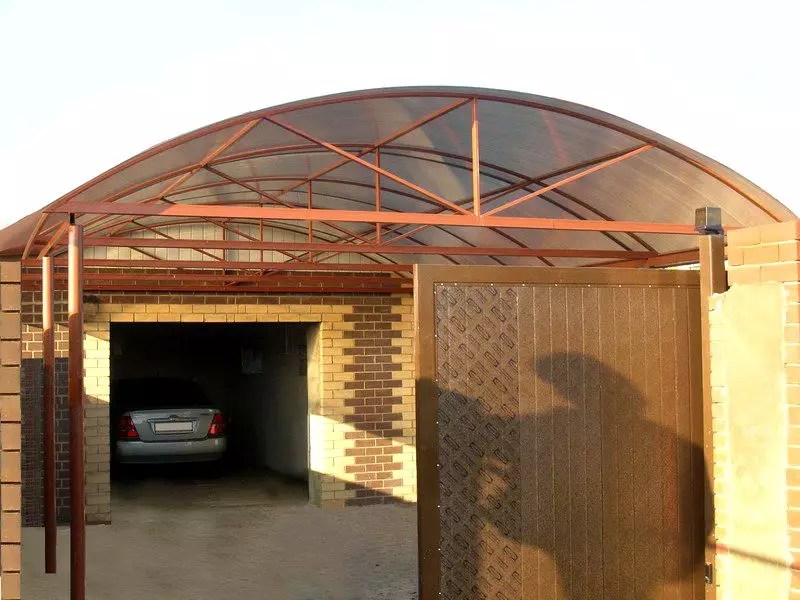
Reliable foundation: brick pillars for a canopy
Such a canopy looks almost like a full-fledged garage! The pillars seem strong, solid, and as a result, this entire structure fits perfectly into the landscape design and appearance of the house:

Even if you have never worked with brick before, it will not be difficult for you to build such columns. Let's start with the fact that you need to purchase high-quality bricks and mortar. Only solid bricks are suitable, without chips or cracks.
The appearance of the column and the exterior of the building as a whole depend on which brick and masonry technology you choose:

First you need to build a foundation with a steel pipe in the center:
The laying must be done around this pipe. To make the masonry itself beautiful and even, you will need special tools: a building level and a plumb line. From the inside, the masonry should be reinforced with a mesh, which will not reach the edge of the walls by only 1 cm. The first brick should be installed in the corner, on the mortar - so it will not move under the load of other bricks.
Most attention should be paid to the first row, from which all further installation will proceed. Place three bricks tightly together here. If you decide to make fashionable twisted masonry, then this is where the bricks of the second row are turned 90°, and as a result, the seams of the first row are at the level of the middle axis of the bricks of the second.
At the same time, use a rope or a very long stick to check the horizontal plane of all the pillars - they should be at the same height and be level on their own. That is why it is advisable to lay the pillars at the same time, one row at a time. When you have completely built each pillar, check it with a building level.
If you have to cut bricks, cut them only so carefully that no chips form anywhere. Also, if you plan to fix any decor in the pillars, such as colored pebbles or glass inserts, they need to be installed in the seams before the solution dries. It is also common for lighting to be installed for a canopy directly into the poles, then think about this point in advance, because the cable will have to be lifted simultaneously with the masonry.
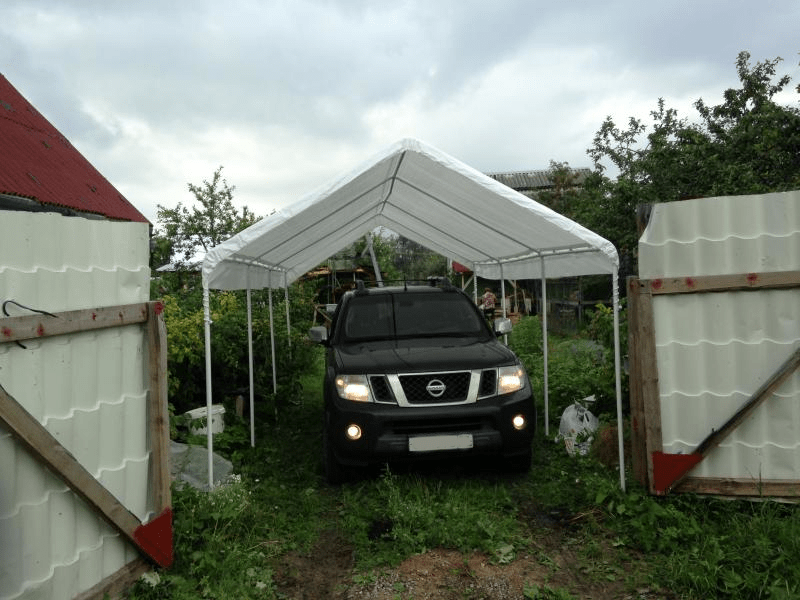
Mobility and minimum costs: PVC pipes and available materials
And finally, if you only need a carport temporarily, or you have chosen a project that is too expensive and takes a lot of time to implement, then a PVC pipe awning would be a good option.
The main advantage of this design is mobility. Today we decided to park the guest car here, and tomorrow we decided that it would be in the way and it would be better to move it along with the canopy a little further.
And also, when there is no car under the canopy, you can put light garden furniture under it and create a full-fledged recreation area. To assemble such a canopy, it will take at most half an hour:


Many modern companies produce such universal prefabricated structures made of plastic pipes. They are so compact when assembled that they are easily transported by the same car that goes to the country, and are immediately assembled in literally an hour.
Interesting, isn't it? Today, summer residents have learned to make a lot of crafts from durable and easy-to-assemble PVC pipes. Moreover, the structures themselves are no worse than the factory versions: benches, sun loungers and even greenhouses, and it is from these pipes that durable arched canopies are made.
The only negative is that the pipes will need to be well secured to the ground, otherwise winds above 15 m/s can tear them off (although this will not cause much harm to the car). And the fabric used is either a durable awning or inexpensive curtains.
But such a canopy is easy to construct not only from pipes, but, in fact, from any available material that can be found on the site of any craftsman-dacha owner:

We will also classify this simple option as the most budget-friendly, inconvenient, although clever:

Choosing a roofing covering: emphasis on style!
Now everything is more or less clear with the design, and we can move on to the roof. Almost any roofing material is suitable for arranging a country carport, as long as it is light enough and does not put too much pressure on the supports (like ceramic tiles, for example).
Thin metal roofing or soft asphalt shingles are excellent for this purpose. But it doesn’t matter whether it’s polycarbonate that fits perfectly into the surrounding landscape design, whether it’s colored or transparent.
The important thing is that it gently diffuses light, and it will be comfortable to work with the car both in the rain and on a hot afternoon:

If you have chosen this option, then get ready for the fact that there will be a lot of work, but the strength and durability of the entire structure is definitely worth it.
Even a small canopy right in front of the entrance to a country house looks bright, stylish and quite practical:

By the way, polycarbonate is such a light material that it allows you to build even such a thin frame under it:

If you want something unusual, or you are not yet ready to purchase the same polycarbonate, then use the advice of skilled summer residents. Have you ever imagined that you could literally build a canopy out of plastic bottles? Country crafts - yes, small attributes for the garden, yes, but - a whole building?!
As it turned out, it’s still possible, look what comes of it:

For this undertaking, you will only need transparent plastic bottles, water, paint of different colors (you can use regular gouache), wooden stands and a strong rope.
The installation instructions themselves are brilliantly simple:
- Step 1. First prepare the bottles: pour a little water into the bottom of each, tint it in the desired color and fill it with decorative decorations if desired.
- Step 2. Next, make holes in the caps of plastic bottles and thread ropes through them. Tie them from the inside, making a knot.
- Step 3. Build a smooth horizontal frame from wooden planks.
- Step 4. Drive nails around the perimeter of the frame and stretch a mesh of ropes.
- Step 5. Tie plastic bottles to this mesh so that they are pressed quite tightly together.
Interestingly, this is easy to do with a ready-made pergola, and there is no need to build a separate frame. And the roof itself is short-lived, of course, because the plastic begins to deteriorate in the first 5 years under direct sunlight. But why not build a new “roof” in a couple of years? Moreover, the whole process takes a couple of hours at most.

As you can see, the foundation here is columnar. To make it, you need to dig holes with a drill, insert asbestos-cement pipes into them and fill them with concrete. At the same stage, install electricity if you plan to use the workshop in the evening (and you will need to connect the same tools somewhere).
It will also be convenient to heat such a workshop with electricity. And finally, think about how you will insulate such a room: polystyrene foam, mineral wool or similar materials.
Once the floor and walls of the workshop are laid, proceed to installing the ceiling beams. Install the ceiling and insulate the partition. The fact is that in this case the roof of the canopy will also have to be insulated, because one of the rooms is already almost residential.
Attach the canopy posts to the foundation pillars using special fasteners. After the frame is assembled, you should proceed to installing the roof. Moreover, for such a project it is convenient to work with ready-made trusses, as in the previous project, or to build a full-fledged hip roof:

Any non-heavy roofing material will be suitable as a roofing covering. Ideal - soft roofing and similar materials.