We prepare decoupage according to all the rules. How to do decoupage: with your own hands at home, step by step with what you can and with what, step-by-step photos and videos
Decoupage is a technique that allows you to transfer finished images to various surfaces. Most often, decoupage is done on wooden household items or decor. But options for decorating candles, ceramic dishes and fabrics using this technique are also common. This method of decoration, compared to others, is the least simple to implement and will not require large expenses. Among other things, decoupage takes much less time and effort than, for example, artistic painting on wood. We invite you to find out how to do decoupage using step-by-step photos.
Features of the decoupage technique
Decoupage is a kind of applique, so it is quite simple to do. The desired picture, applied to paper, is glued to the surface and covered with varnish. Only thin paper products are suitable for this technique. Among them there are three types:

Photo of decoupage bottle
- Ordinary paper napkins with a pattern;
- Pictures printed on very thin paper using a regular home printer;
- Special paper for decoupage. It can be purchased at art and hobby stores.

Photo of decoupage box
Items needed to get started:
- Picture. Ordinary napkins are suitable for training. Special paper for decoupage, as a rule, is quite expensive, so you shouldn’t spend it on your very first practice decor.


- Varnish for coating. You can choose a varnish with a matte or glossy effect.

Photo of the varnishing stage
- Brush. A small flat brush made from synthetic fibers works best. If the work is large, then a larger brush will be useful.

Photos of decoration


Photo of priming the board

Photo of applying the napkin
Making decoupage step by step
Step 1. First of all, the style of future work is determined. A decorative object and drawings for it are selected.
Step 2. Surface preparation. If necessary, the wood is sanded, primed or coated with acrylic paint.

Preparing the frame for decoupage. Photo
Step 3. Cutting out the images. Everything here is extremely simple - you need to cut out pictures from the top layer of napkins along the desired contour. To ensure a smooth transition of napkins into a wooden surface, they are sometimes torn rather than cut. This creates a thin, jagged edge that will blend seamlessly into the background.

Photo of surface priming
Step 4. Now you need to decide on the approximate position of the drawings on the object. You can simply apply napkins to the finished surface and evaluate how the design will look on the finished product. When the placement plan is ready, you can proceed to the next step.

Photo of white paint coating
Step 5. Gluing the image. Decoupage differs from conventional appliqués in that the glue is applied not to the back of the image, but to the front of the image. First you need to attach the picture to its placement location. Then, glue is applied on top of it with a brush. It is best to start from the center of the drawing. A napkin soaked in glue may begin to stretch and tear, so you need to be very careful at the gluing stage. This step is repeated with all drawings for the item. After this, you need to give the product time to dry.

Photo of brushes for decoupage
Step 6. When the glue has dried, you can add any drawings with a brush and paints to the pictures. Acrylic paint and a thin nylon brush are best suited for these purposes.

Decoupage glass jar

At first glance, it may seem that this technique is difficult to perform, but this is not at all the case. With the proper level of training and the availability of all the necessary materials, anyone can handle decoupage. Knowing what is decoupage and how to do it. They will help you quickly master the technique, and step-by-step photos will allow you to imagine what products can be made.

Decoupage is a fascinating and uncomplicated activity that has many techniques and is accessible to even the youngest craftswomen. With its help, you can make exclusive interior items that will decorate not only your home, but also the exhibition halls of art galleries. In this review, we will look at how to perform with your own handsdecoupage for beginners step by step with photo. Don't worry that things won't work out, it's actually very simple. With the help of this technique, old furniture, dishes, shoes and many other things will find a new life in your home.
Products with decoupage are works of art
First of all, let's understand the definitions. Decoupage is gluing a design onto a surface. The picture can be placed on wood, leather, fabric, glass and almost any other product.
Reverse decoupage is the same process, but has only one feature - the picture is glued under the material. This can only be done on transparent surfaces: glass and plastic. Of course, in this case the picture is pasted face up.

For your information! If a plate is used for direct decoupage, then in the future it will only serve a decorative function. And when using the reverse technique, the dishes can be used as usual.
Tools and materials for work
| Materials and tools | Note |
| Using this technique you can decorate a book, dishes, flower pots, bottles, furniture, etc. In general, literally everything that is in your home. |
| Pictures can be used from special decoupage cards and napkins. In addition, for this purpose, craftswomen use drawings on fabric, old newspapers, and magazine clippings. |
| You can use regular nail scissors or a special tool that is sold in craft stores. The main thing is that the edges of the blades are very sharp. This is the only way to carefully cut out the desired image on a thin napkin. |
| You will need flat soft brushes. The pile in them should be tightly fixed. Lost lint can be a serious problem. It is better to have several brushes of different widths for smoothing and applying glue and varnish. |
| It is best to use regular household PVA. You can buy a specialized composition, but it will cost more. Among varnishes, it is better to give preference to acrylic. It does not emit toxic substances and is easy to use. |
| To decorate your work, you may need acrylic-based paints, sponges, primer, sandpaper, and craquelure. |


Decoupage kits
Basic Techniques
There are different ways to fix a drawing on a surface, let's look at them:
Method one
A simple technique of decoupage from napkins consists of placing it on an object and securing it with glue. After drying, the surface is varnished.

Method two
For reverse decoupling, a transparent base is used. The image is glued face down to the glass. After drying, fix with varnish.

Method three
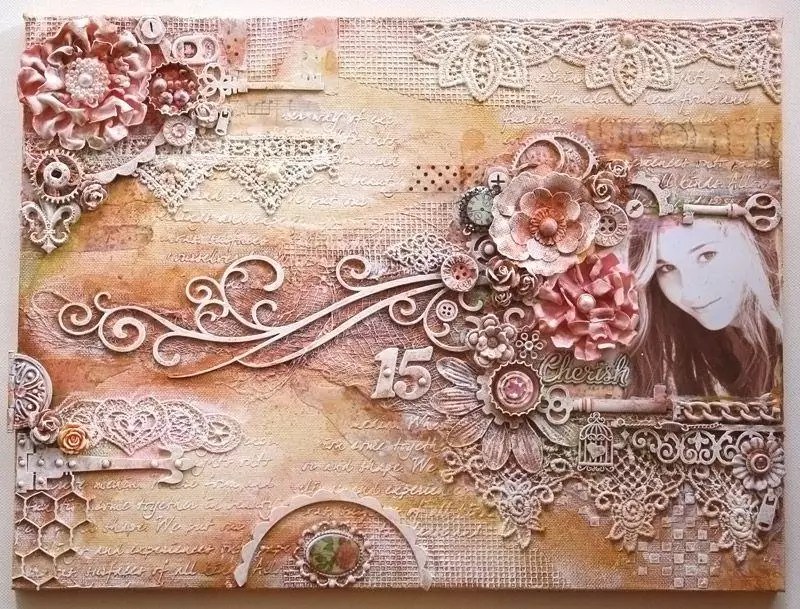
Artistic composition. To make it, many images are used, which, when glued, are combined into one. To make the picture look like one whole, painting, shadows and accents are added.

Method four
This technique is called "decopatch". For it they use pictures from magazines, drawings on fabric. To get rid of clear boundaries, the edges of paper drawings are torn off. The surface is completely filled with images.
Method five
Creating a three-dimensional image. This is a technique that requires the talent of an artist. First, an image from a paper napkin is pasted on. And then painting is done on it with careful drawing of all the smallest details.
Decoupage bottles for beginners: step by step with photos and recommendations
- the simplest and most affordable material from which you can make an original gift. You can buy a bottle of wine or fill the container with your own homemade drink. Luxurious decoration will make an impression in any case.

We have already listed the materials and tools necessary for the work, so we will not dwell on this in detail. The only thing that needs to be added to the list is a windshield wiper. They pre-treat the bottle, which has been cleared of labels.
Important! It is better to work with a glass vessel while wearing gloves. Your fingerprints are unlikely to have artistic value, so it's best not to leave them.
Bottle decoupage sequence for beginners, step by step with photos:
| Illustration | Description of the stage |
Applying primer  | For priming, you can use acrylic varnish or PVA. The soil should dry well. |
Making the background  | For the background you need to use white or light acrylic paint. You may need to apply two or even three coats to achieve a completely opaque surface. |
Applying images  | The design on the napkin is carefully cut out with scissors. If the background of the picture and the bottle matches, do without scissors and carefully tear off the napkins. To make the design on the print easier to apply, it should be soaked in a plate of water. |
We fix the drawing  | You need to apply varnish over the surface of the drawing. This can be done with a soft flat brush or a spray bottle. You should make sure that the picture is not covered with wrinkles. If necessary, it must be carefully straightened with a brush. |
Finishing  | After complete drying, you can carefully sand minor imperfections in the work. To highlight details, use a brush and dark paint. Once finishing is complete, apply a final coat of varnish. |
Another option for original design is decoupage of a bottle with tights. Master class on video:
Some tricks of decoupage on glass for beginners: step-by-step recommendations with photos of applying a design from napkins
The first experience of gluing a napkin can be unsuccessful: wrinkles and folds inevitably appear, which spoil the whole result. Some tips on how to avoid this:
- To apply a design to a convex surface, you can make “darts” on it. Cut the edges of the picture with scissors or even cut out triangular pieces. It is better to be careful with the last option; there is a risk of ruining the image if the angle of the cut is incorrectly calculated.

- You can apply glue to the surface, and then apply the design and straighten it with a brush. Another method would be just as good - apply glue over the design, straightening it at the same time.
- If the image is applied to an almost flat surface, you can pour glue into the center, apply a napkin and carefully disperse the composition, straightening the material over the surface.
- You can stick an image onto a perfectly flat sheet using an adhesive pencil.
- You can apply a design using a piece of polyethylene (a bag or a stationery file). The design is placed face down on polyethylene and moistened with water. Then a bag with a wet napkin is applied to the surface to be pasted. The package is removed, the napkin remains.

A simple master class on decoupage shoe boxes
The smooth surfaces of a cardboard shoe box are an excellent basis for decoration. This interior box will become a favorite place for household little things.
| Illustration | Description of the stage |
Surface preparation  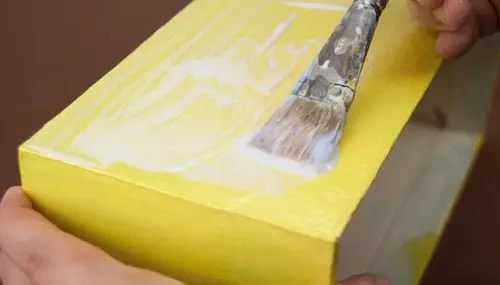 | The corners of the box need to be strengthened with pieces of masking adhesive tape, and then the surface should be primed with acrylic primer or paint. After drying, the primer should be lightly sanded with fine sandpaper. You may need to repeat the procedure if the layer does not lie flat enough. Then you need to paint the box with the color chosen for the background. |
Drawing 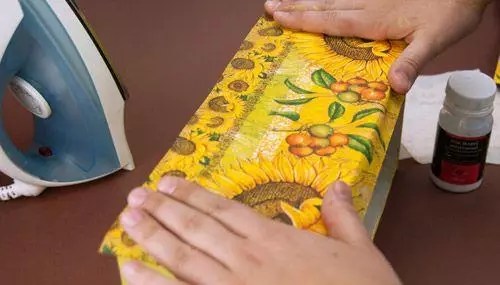 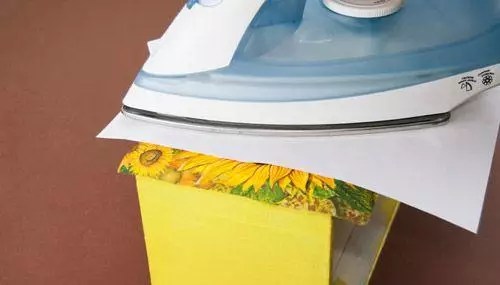 | The place for the drawing is covered with decoupage glue. After the layer has completely dried, a pattern is placed on top and smoothed with a hot iron through a sheet of paper. Afterwards the napkin is covered with a thin layer of varnish. A layer that is too thick will cause the design to become blistered. This procedure is repeated over the entire surface of the box. |
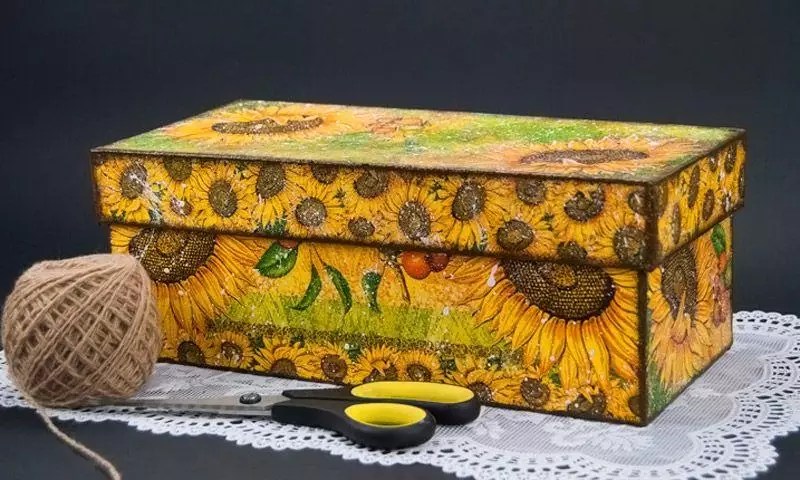
Decoration and finishing   | Using a foam sponge, apply background paint and other shades to match the image. Small details are drawn with a brush. To add some casualness, you can squirt white paint on top using the bristles of a toothbrush. Afterwards the final varnish coating is applied. |
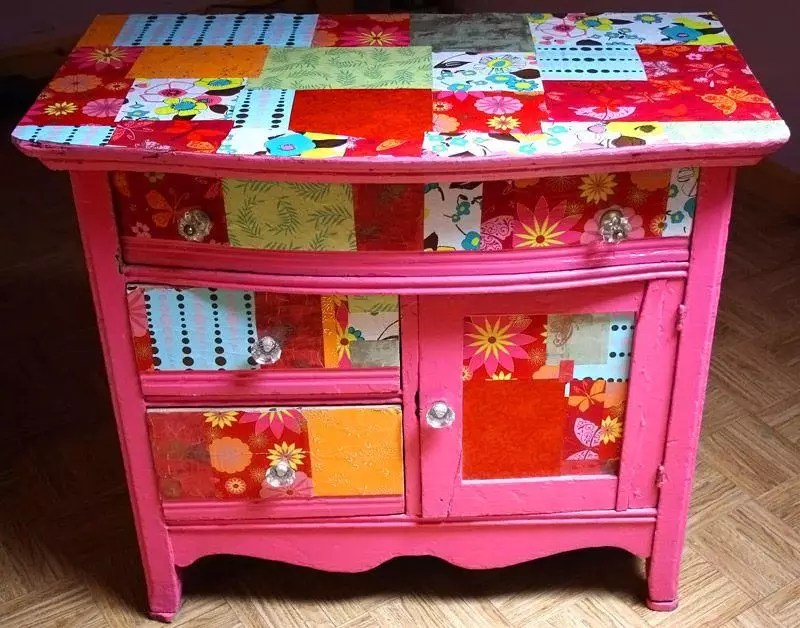
Decoupage of furniture in Provence style: master class on updating a chest of drawers
Having tried your hand at simple things, you can safely start decoupage with your own hands using napkins. In addition to the usual list of working materials, you will need wood putty. It is used to pre-level all the cracks, cracks and other irregularities on the surface of the chest of drawers, cleaned of old paint.
Sequence of decoupage of kitchen furniture with your own hands, photo and description:
| Image | Operation description |
Preparation  | The furniture must be thoroughly cleaned of all layers, and defects must be smoothed out with putty. After drying and sanding, all surfaces are coated with a primer and sanded with fine sandpaper. |
Preparing pictures  | The design on the napkins is carefully cut out or torn off by hand, and the bottom layer is removed. The picture is coated with glue and applied to the furniture. The application is carefully straightened with a brush. |
Finish coating 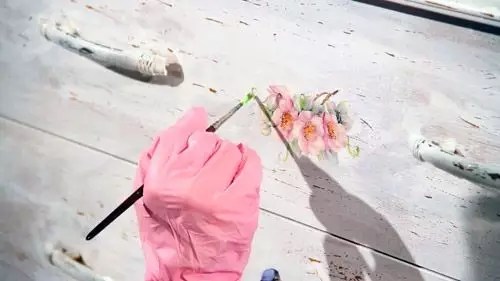 | No need to hurry. All drawings must dry. You need to varnish all the furniture, not just the place of decoration. For large areas it is convenient to do this with a spray bottle or spray can. This way the varnish will lay down in a thin layer. For the best effect, you need to apply 3-4 layers in succession, waiting for complete drying between treatments. |
 | Result. |
Helpful advice! If you need to apply a design to a polished surface, the polishing is pre-treated with sandpaper until the shine disappears.
When decorating furniture with fabric, the process is practically no different from that described.
Decoupage is a fun activity that gives you the opportunity to revive old things. Using various technologies, it is possible to produce unique items: bottles, furniture, etc. They will be a wonderful decoration for your home, suitable for gifts and even for sale. To master this technique, no special skills are required. You can learn decoupage for beginners step by step from photos in master classes, and also watch decoupage lessons on video.
What is decoupage?
Decoupage is a technique for decorating various objects by gluing to them various images that are previously cut out of paper. Things made with your own hands have special value. The human soul is embedded in them.
For beginners, it will be easier to master the decoupage technique if you first familiarize yourself with step-by-step photos and videos, and also adhere to the following recommendations:
- You can glue a pattern to a surface (a bottle or furniture) in different ways, but it is advisable to smooth it, starting from the center and gradually moving to the edges.
- To glue the picture, it is advisable to use PVA glue.
- An activity like decoupage requires patience - for example, using a hairdryer to dry furniture faster can only cause harm.
- Acrylic paint will help make the drawing more beautiful and natural, so do not neglect it.
- It is advisable to apply two layers of varnish, but you must wait until the first one dries.
- Acrylic varnish is best suited for creating products using the decoupage technique, since it has no odor and does not cause allergic reactions upon contact with human skin.
- Before gluing the paper with a pattern, you need to clean the surface from dirt using a damp cloth or alcohol solution.

On a note! The good news for beginners is that varnishes and acrylic paints can be washed off within the first 24 hours with plain water. This means that it is possible to correct shortcomings in the work.
Required tools and materials
To make an exclusive item using the decoupage technique with your own hands, you will need a certain set of materials and tools. First of all, you need to prepare the item itself for decoration using the decoupage technique. It could be a bottle, plate, furniture or something else. For decoupage, glass, plastic, ceramic or any other working surface is allowed. True, experts recommend that beginners train on a tree.
In addition to the decoupage object itself, you will need the following materials and tools:
- Special napkins with different designs.
- Special cards used for decoupage - with them the products are of better quality, but it is easier to work with napkins.
- Small scissors - preferably they have rounded ends (this makes it easier to cut out a design from a napkin);
- A flat brush 1-2 cm wide - with a tool of this size, paint and varnish are applied better.
- PVA glue or a special composition for decoupage to fix the napkin.
- Varnish - you can use glossy, matte, acrylic and others.
- Sandpaper - helps prepare the surface for work.
- A primer for leveling the surface, which will help reduce paint consumption.

Armed with these tools and materials, as well as step-by-step instructions, you can begin creating exclusive products using the decoupage technique.
Basic Techniques
To fix a pattern on the surface of the object being decorated, you can use various methods:
- Standard decoupage involves cutting out a design from paper and gluing it to a surface, followed by varnishing after drying.
- Reverse decoupling - a transparent base is used, the design is glued to the glass surface with the front side, and after drying, varnish is applied.
- Artistic composition - several drawings are combined into a single whole, you can add shadows, painting and accents.
- Decopatch - this type of decoupage requires the use of newspapers, magazines, and fabric drawings, which completely fill the working surface.
- Volumetric decoupage - first the drawing is glued to the surface, and then painting is done on it.
On a note! Beginners should start with simpler decoupage from napkins, and only after gaining experience move on to complex techniques.
Master classes on decoupage step by step with photos
Master classes will help you decorate objects using the decoupage technique. Step-by-step instructions with photos will simplify the task even for novice craftsmen.
Master class 1: furniture decoupage
To decorate furniture, you should prepare napkins with designs, paints, varnish, PVA glue, bitumen and tape. For beginners, it will be more convenient to work with a large surface, so it is advisable to choose a chest of drawers or something similar. If you want to create vintage furniture, you should not skimp on craquelure varnish, since it will help you achieve the desired effect.

A master class on decorating furniture step by step with photos is presented below.

Master class 2: glass decoupage
Glass products are suitable for decoupage. Bottles and other utensils are often used for this purpose. In this master class, you will do ducoupage of a glass jar. It is worth noting that a bottle of champagne is often decorated in a similar way for a New Year's gift.

To do this, you need to prepare an alcohol-based napkin, white acrylic paint, varnish, a stationery clip, a sponge, napkins with drawings, PVA glue, a toothpick, brushes, a toothbrush, coffee beans, burnt umber, bitumen varnish and twine.

Decoupage is a type of decorative needlework. To update the familiar home environment, the decoupage technique is used. The basis of applied needlework is decorating surrounding objects with ready-made drawings. The closest comparison is an application that every person is familiar with. A variety of materials are used that have a smooth and dense surface.
The basis of needlework is gluing a selected pattern (special or regular napkins, newspaper or magazine paper, fabrics, other materials) onto the surface of almost any product with a dense texture. It is not allowed to use a porous plane. The background is usually painted white to preserve the brightness of the design.
Types of applied arts:
- The classic method of decoration involves gluing a picture onto a smooth surface. Various reliefs, slopes, and curves are excluded. After gluing the pattern, the product is treated with several layers of varnish. Then the errors are sanded down with sandpaper to a uniform coating. If necessary, techniques of coloring, tinting, and artificial aging of the material are used.
- The reverse decoupage method is used for glass surfaces. In this case, the image in the figure is glued face down on the reverse side, and the order of work is performed in the reverse order.
- Volumetric technique combines the techniques of artistic painting and sculptural creativity. In this case, a three-dimensional panorama is recreated on the surface of the object.
- The smoky pattern involves a complete combination of motifs on the background and image. As a result, the work is similar to the artist’s original painting.
The decopatch technique is reminiscent of a patchwork quilt, in which the storyline is created from multi-colored images of different sizes that are not connected by color or theme.
Despite the variety of techniques, needlework is quite accessible to beginners who have decided to take up decoupage for the first time.
Necessary tools and equipment
The word decoupage translated from French means “to cut,” so the work requires tools that allow you to cut out and paste the design onto the selected surface. You must first select the item to be decorated.
Basic tools:
- manicure scissors with blunt tips;
- glue brush, brushes for applying varnish to the surface;
- sponges to smooth the paper surface and remove folds;
- fine-grained sandpaper;
- PVA glue diluted with water;
- multi-colored paints, preferably acrylic;
- white primer. Acrylic or water-based paint is often used, which is diluted with water to the desired thickness;
- drawings for special purposes or independently selected.
To draw small details of the picture, thin natural bristle brushes are suitable. A ruler, eraser, and pencils may come in handy.
For needlework you need thin paper with a pattern printed on it. The following types of material are most often used:
- napkins made of three layers, of which only one with a printed pattern is used in work. The material has low strength (it breaks when stretched), so it is necessary to adapt to it when doing needlework. Napkins cost about 15-18 rubles per package;
- paper made from rice or mulberry fiber is less susceptible to deformation, but the cost of one element reaches 70 rubles;
- paper decoupage cards have low elasticity, so they use the material on a flat surface. Cards cost from 30 rubles.
In addition to special materials, pieces of wallpaper, glossy pictures cut out from newspapers and magazines, and thin multi-colored fabrics are used. Every home has raw materials for handicrafts.
Bottle decoupage for beginners
Decorating glass bottles, which have a smooth surface, is accessible to beginners in decoupage techniques. The result is a beautiful and original container for wine, which can be used for its intended purpose during special and festive events. 
As a covering, special napkins are chosen, which are torn to better compose the pattern.
- Before starting work, you must completely remove the old label. To do this, soak the bottle in warm soapy water for 20-30 minutes. The surface is cleaned with a metal sponge to remove the adhesive layer. The dried product is thoroughly disinfected with acetone or alcohol liquid.
- 1-2 layers of acrylic paint are applied to the surface, after which has dried, all irregularities are processed with fine sandpaper. The pasted pattern looks brighter against a light background. If it is necessary to darken part of the surface, use appropriate paints, applied with a soft sponge.
- A suitable picture is cut out from a three-layer napkin for decoupage needlework using nail scissors. You can tear out the pattern. In this case, the edges are better connected. The prepared area on the bottle is carefully treated with glue. It is more convenient for beginners to use PVA diluted in half with water. A napkin fragment is glued onto a wet surface, fixing the image from the center to the edges.
- It is recommended to smooth the picture with a brush or sponge, “driving away” excess glue. Perform the procedure over the entire surface of the bottle, gluing the drawings in a certain order or randomly. The space between the stickers can be shaded with acrylic paints of a suitable color. It is allowed to add missing details with a thin brush.
- The finished drawing is covered with a layer of glue. When the product is completely dry, apply 1-3 layers of clear acrylic varnish on top. In this case, a second layer is applied after the previous one has completely dried. The souvenir is ready. If necessary, it can be washed with warm water.
Furniture Conversion for Beginners
Decoupage needlework allows you to continue using old furniture, updating its appearance beyond recognition. 
- It is first recommended to disassemble the products into separate fragments. It is advisable to replace or clean the fittings. Glass surfaces must be degreased by treating with alcohol and dishwashing detergent without dyes.
- Metal products must be cleaned with an acidic solution (use vinegar and water in equal proportions). Then the dirt is cleaned off with a wire brush.
- Wooden products are processed with fine sandpaper to smooth out all the unevenness as much as possible.
- A primer is applied to the treated surface; after complete drying, it is recommended to clean the surface with zero-grade sandpaper.
Pictures-images are attached to the furniture surface in various ways:
- With the standard technique, renovation materials are glued to the surface of furniture fragments. After drying, the area is covered with several layers of colorless varnish.
- Reverse decoupage extends to the enhancement of glass surfaces.
- The artistic technique gives the effect of volume to the picture. In this case, manual shading of the colored background is performed, combined with the finishing of parts of the pattern.
- Using fragments torn out with uneven edges for decoration. Napkins, material that imitates the appearance of plastic, and designer paper are used.
- The volumetric technique uses fragments of napkins to create a unique finished picture. After the surface has completely dried, fragments of the image are drawn more clearly.
Step-by-step instructions for decoupage on glass
Decoration on a transparent surface is performed on the outer or inner surface. For example, a vase or bottle is decorated on the outside, since a liquid is poured inside, long-term contact of which with the varnish is not desirable. If transparent dishes are used for eating, decoupage is applied on the opposite side so that microparticles of varnish do not get into the food.
If the working surface is smooth, you don’t have to prime it, but be sure to degrease it. If desired, the background is pre-applied with acrylic paints of the selected color. 
Step-by-step instructions for decoupage needlework on glass:
- materials and necessary tools are laid out at the workplace;
- the image is cut out from a napkin, rice paper or printed on your own using waterproof paint;
- a future picture is planned on the glass, the location of the pattern is marked with a marker, so that if it moves, the picture can be returned to its intended place;
- the napkin is moistened in clean water and pasted onto a surface pre-lubricated with PVA glue, without waiting for the layer to dry;
- It is more convenient to straighten the napkin from the center to the edges in order to smooth out all the folds and level out air bubbles;
- carefully lubricate the product with glue diluted in half with water, applying a layer with a soft brush;
- when the adhesive base is completely dry, it is recommended to open the decoupage surface with varnish;
- The entire product is placed in the oven, gradually heating it to 150°C.
After complete cooling, the glass decorated object can be used.
The dishes can be given the appearance of historical antiquity by covering the surface with many cracks characteristic of antiques. The artificial aging technique is called craquelure.
A quick-drying varnish is applied to a not completely dry painted surface.
Box decoupage
Decorating a wooden box in decoupage style allows you to create a unique souvenir with your own hands. Required for work:
- small box made of wood;
- It is advisable to dilute PVA glue in half with water;
- acrylic paints and varnish;
- scissors, brushes with natural bristles;
- napkins for decoupage.
The surface of the product should be painted with white paint 2-3 times, allowing it to dry thoroughly each time. Prepare applications from a single sheet or individual components.
The outside surface is covered with a layer of glue. Without waiting for it to dry, fragments of the picture are applied, carefully smoothing the pattern, protecting the product from forming wrinkles. The top of the box is coated with a layer of glue, after which it dries, the box is opened with 2-3 layers of acrylic varnish.
Watch processing
The wooden base of the watch dial is usually renewed. First you need to disassemble the product into its components, separating the arrows and numbers. 
The work is divided into 2 stages: decorating the circle along which the hands move, and the outer contour of the clock. The first part of the decoupage is updating the arrow space:
- a circle is cut out of paper;
- the dial is cleaned and puttied, if necessary;
- napkins or rice paper are glued onto the prepared plane, the pattern of which is made in a circle of paper;
- the picture is glued to the base, leveling the plane;
- the top of the napkin is treated with glue;
- after the workpiece has dried, the middle of the dial is covered with a paper circle, and the outer part is decorated;
- a structural paste mixed with acrylic paint of the desired color is applied to the surface;
- the finished surface is varnished 1-2 times and lightly sanded after drying;
- The watch is assembled by inserting the hands and numbers into place.
How to decorate a tea house

Using the example of decoupage of a decorative house “May Roses” for tea bags, the processing of hard-to-reach places is practiced:
- It is first recommended to finish the surface of the house with a primer, dry it, sand small irregularities with sandpaper, and cover the working surface of the product with white acrylic paint in several layers. It is recommended to maintain one direction of strokes.
- The corners, the plane under the roof canopy, and the figured arch must be painted with background green paint.
- For more comfortable work, a napkin with images of pink bouquets must be ironed with a hot iron and then lightly sprayed with aerosol quick-drying varnish.
- Paper moistened with water is placed on the file so that the image hangs slightly over the edge.
- Smooth out the glued pattern to completely eliminate wrinkles and bubbles.
- Cover the surface of the house and the lid, painted green, with several layers of acrylic varnish.
As a decoration, place a butterfly figurine on the roof, and glue a decorative bouquet of roses above the arch.
With each completed job, the master’s qualifications increase. Perseverance and a flight of imagination help make your home beautiful and cozy.
The article will tell you in detail and show you how to create incredibly beautiful crafts for home decor using the popular decoupage technique.
Decoupage is a modern trend in creativity and handicrafts, which involves the use of fabrics and paper to create beautiful decorations for everyday things: furniture, boxes, dishes, boxes and much more.
Decoupage can be flat and voluminous, artistic and in the spirit of minimalism. This creativity is within the capabilities of an experienced needlewoman and a complete beginner. If you have the opportunity, carefully study the instructions for work in this article and watch the video master classes.
What is required for work:
- Special decoupage base– thin paper with a selected design or pattern.
- Glue– special for decoupage or regular PVA
- Stationery knife
- Sharp scissors, may also require manicuring for smaller cuts.
- Ruler
- Simple pencil and eraser
- Fine sandpaper (paper)
How to get started:
- First, you should decide what surface you will decorate: tin cans, wooden boxes, corton boxes or glass bottles.
- The selected surface should be prepared: washed and dried thoroughly.
- If you have chosen wooden material for work, then you should first prepare it by rubbing it with sandpaper.
- If the selected wooden material has cracks, they should be covered with putty.
- It’s easy to prepare the material for applying decoupage: you can leave it in its original form or open it with acrylic paint.
- Before starting work without applying glue, you should place cut-out patterns from special paper on the surface to determine the design.
- Apply the glue to the selected surface in an even layer, and also apply the glue to the paper.
- Glue each drawing very carefully, straightening even the smallest folds so that the work is beautiful.
- After the glue has dried, the design should be opened with varnish.
- The varnish is applied with a brush or sponge in two layers, after the first has dried.
Video: “Master class on decoupage for beginners”
How to make decoupage from napkins for beginners step by step with photos: technique, master class
A napkin with a pattern is an ideal material for decoupage. In stores you can find a large selection of designs on napkins of different themes, which makes it possible to create crafts of extraordinary beauty in the chosen style.
Step by step:
Simple decoupage of a flower pot using a napkin

Decoupage soap with napkin
Decoupage hangers using napkins
Decoupage of champagne bottles: photos of works and ideas
Decoupage of bottles is the most popular, since it is not difficult to find an empty bottle, and the finished work looks very beautiful and is easy to decorate the house with. Also, modern manufacturers of alcoholic and non-alcoholic drinks allow you to choose a glass bottle of any shape.

Decorated wine bottles
Work step by step:
- Wash the bottle thoroughly from the inside and outside and dry.
- If you are gluing a bright image, you should open the glass with white acrylic paint (or any other color). Acrylic paint is resistant to moisture and varnish and retains its brightness.
- Carefully cut out patterns and pictures from napkins
- Open the bottle with glue and the pictures on the back side
- Glue, carefully smoothing the paper, avoiding wrinkles.
- Wait until it dries and open the bottle with varnish, dry it and apply another layer of varnish.
- Decorate the dried bottle with lace, whip, canvas or other decorative elements to your taste.
Video: “Decoupage bottles: master class”
Decoupage glass vase: photos of works and ideas
An old flower vase can be very successfully transformed using a technique such as decoupage. So you can create a country-style vase for a country house or to support the overall style of the room. A large selection of creative paper will help you accurately determine the ideal image for the vase.

Decoupage a vase using special paper

Decoupage and craquelure on a vase
IMPORTANT: The vase should be opened with acrylic paints or stained glass paints. They are moisture resistant and will not leak when in contact with water. After applying the design, open the product with varnish twice or three times.
Video: “Decoupage of a plastic bottle under a vase”
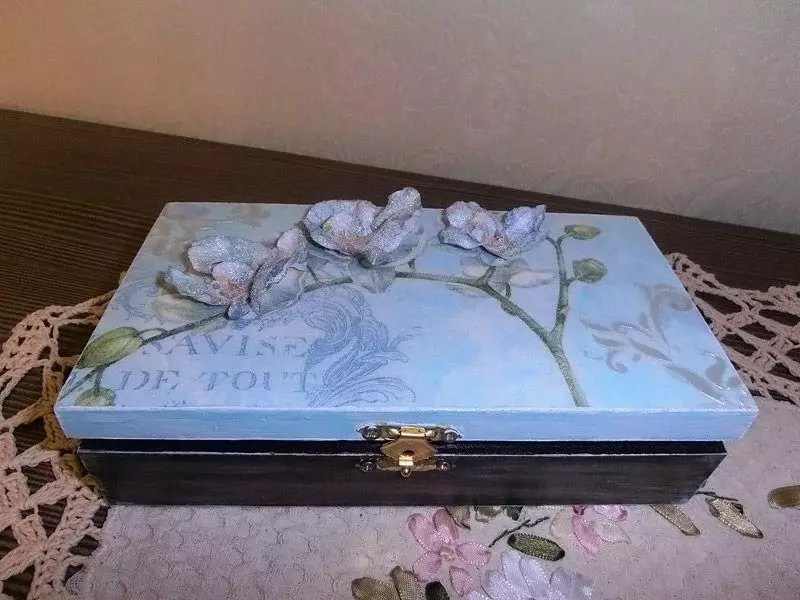
Decoupage boxes: photos of works and ideas for creativity
Every woman has a box. In it she keeps her secrets, cosmetics, jewelry or important papers. You can transform your plastic or wooden box very simply using decoupage.
Beautiful boxes:

Wooden box with decoupage decoration and lace

Stylish box made using decoupage technique with your own hands
Homemade decoupage of a wooden box
Video: “Decoupage boxes: master class”
Decoupage Easter eggs: photos of works and ideas
Using decoupage, you can also decorate Easter eggs for the holiday to make them incredibly beautiful and impressive. If you are decorating decorative eggs (carved from wood or foam blanks), they can be opened with varnish.
IMPORTANT: If you intend to decorate edible eggs, you can open them with a layer of PVA glue, which will be removed along with the eggshell during cleaning.
Photos of works:

Decorative Easter eggs

Beautiful Easter decor using decoupage

Volumetric decoupage of Easter egg
Video: “Decoupage eggs: master class”
Decoupage cans: photos of finished crafts, ideas for creativity
Decoupage can decorate your kitchen utensils and jars intended for storing cereals and other bulk products: sugar, salt, soda, cocoa, coffee, tea, and so on. Banks can be covered with a pattern over the entire area, or only some patterns and inscriptions can be glued.
Photos of works:

Stylish decoupage of tin cans

Beautiful decoupage of jars for the kitchen, decoration with lace

Decoupage of ceramic jars for the kitchen
Video: “Decorating plastic and glass jars for the kitchen”
Decoupage of plates: photos of finished crafts, ideas for creativity
A plate decorated with decoupage is necessary only for decorative purposes and to transform the room: kitchen, living room, even bedroom. You can choose any pattern and make it carefully, since the surface is smooth and comfortable. The resulting product is placed on shelves, walls or special stands.
Photos of plates:

Decor of plates for the kitchen

Decor of plates in medieval style
Stylish multi-layer decoupage plates
Video: “Decoupage plates: master class”
Decoupage cardboard boxes: how to decorate a box?
A box decorated with decoupage can be an excellent package not only for storing personal items, but also for gift wrapping. Decorating a box with decoupage is very easy, the paper lies flat and neat, the box has a comfortable, flat surface.
Photos of boxes:
Stylish decoupage box

Decoupage boxes in the spirit of minimalism
Video: “Decoupage boxes: master class”
Decoupage of tea houses: photos of finished crafts, ideas
A tea house is a special box in the form of a symbolic hut with a roof, which is intended for storing tea bags. It's convenient and beautiful. A tea house is a good gift and souvenir for loved ones.
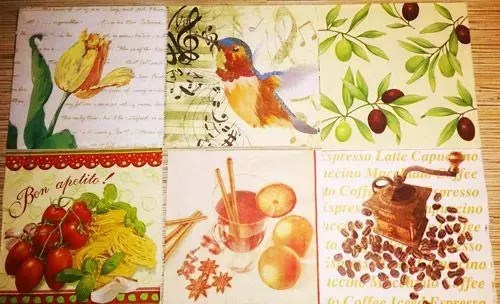
Decorating cutting boards with decoupage is necessary only for decorative purposes. Such crafts should be hung on the wall or placed on shelves in the kitchen. As a rule, they are decorated with pictures of food, fruits, vegetables, flowers and cooked food.
Photos of works:
Beautiful cutting boards using decoupage technique
Original decoupage boards

Boards for room decoration