Decorate a flower pot with paper with your own hands. Do-it-yourself pots for indoor flowers from scratch, decor of flower pots, stands and shelves for flowers
Decorating a flower pot with your own hands is a very interesting and productive type activities. After all, from the simplest and most ordinary pot made of clay or plastic, you can create a unique piece of furniture that will convey the mood of its owners.
Untreated clay pots are considered the most suitable pots for self-decoration, because their price is relatively low, and plants feel most comfortable in them. But their plastic counterparts do not have high porosity, which may prevent sufficient air from reaching the roots. To decorate a plant’s home in an original way with your own hands, you can use almost any type of “hand-made”, be it art painting, decoupage or more complex techniques, for example, crackle.
With imagination and skillful hands, you can create something amazing - to the delight of the owners and the envy of the guests! So, below are some fun ways to decorate a simple flower pot.
Decor using eggshells using the crackle technique
Crackle represents pattern consisting of small cracks on a ceramic surface. It is created using special means for decorative aging of surfaces. Most often, so-called craquelure varnishes are used for this, but to decorate the pot you can use a more accessible material - eggshells. Both beige and white shells are quite suitable. You can mix them, or even paint them in any color you like.
Before you start decorating, you need to wash the shell, then degrease it in a baking soda solution and dry it thoroughly. If the shell remains uncolored, a dark pot is best. If it has a light shade, you will need to paint it a darker color.

Oriental style pot decoration
For this technique also you will need eggshells, and some knowledge in the field of Japanese characters in order to select and correctly draw the desired symbol, with a certain meaning. In addition to the shell, you need to prepare acetone, acrylic paints and varnish, and PVA glue.
- You need to thoroughly rinse the pot and then degrease it with acetone. Then its entire surface is covered with an even layer of paint of the same color. When the paint is completely dry, the middle part of the pot needs to be painted in a different color (you can make it contrasting with the background, or just white to make the hieroglyphs look brighter).
- Next, the selected symbol is drawn on the four sides (the main thing is not to make a mistake in the drawing, because according to some beliefs they can bring happiness and good luck to the house).
- Then the eggshell is processed - the inner film is removed, thoroughly washed and degreased. Some of the shells are painted black, others can be left white or painted with the paint used for the middle part of the pot if a different color was used.
- Now you need to create a craquelure pattern around the hieroglyphs: apply glue to a small area of the pot, apply a piece of shell and press it with your finger. Then use a toothpick to push the parts of the shell further away from each other so that there is space between the cracks. In this way, all the space between the drawings is filled.
- The bottom of the pot also needs to be lined with shells of a different color.
- When everything is dry, the pot must be coated with several layers of varnish.
Decorating a flower pot with mosaics
To decorate a flower pot with mosaics, you need to prepare: multi-colored pebbles, glass or pebbles, PVA glue or a glue gun, tile grout, a brush and varnish.

If pebbles were used for decoration, then no need to apply grout. Very interesting mosaics come out if you line the pot with pieces of broken dishes, ceramic tiles, seeds or shells. To glue the shells, you need to make papier-mâché: you need to finely tear newsprint and mix it with glue, fill the shells to the brim with the resulting mixture, then they need to dry for a day, after which the surface of the shells is smeared with glue and attached to the surface with light pressure.
Decorating a flower pot using decoupage technique with your own hands
Using decoupage, you can transfer a motif of any complexity to a pot, the main thing is find a napkin with a suitable pattern.

For decoration using the decoupage technique, not only napkins are suitable, but also lace, fabrics, and any printed materials.
How to decorate a pot with sisal
Sisal is a fairly simple, but at the same time very effective material for decorating a pot. In order to complete decor with sisal threads, besides themselves, you only need construction glue. The entire surface of the object to be decorated must be coated with glue and the threads laid in a circle. Braids woven from sisal look very beautiful. You can also try to form wavy patterns.
Decorating a flower pot in a rustic style
An ideal home for modest plants that look like meadow or wildflowers would be a pot decorated with branches. This type of decoration itself is very simple, but it looks very unusual. For this you will need: thin twigs, preferably even and similar to each other, burlap, twine. Instead of a potty, you can use a jar with straight sides, having previously drilled holes in its bottom for drainage.
- First you need to trim the branches so that they are slightly higher than the pot.
- Then, using twine, you need to tie the pieces of branches together.
- The container is wrapped in burlap, and its edges are fixed with glue.
- The tied branches are laid on the burlap, and their ends are connected with a bow made of twine.
Creating a patina effect with your own hands
For lovers of Provence and country style, as well as those who simply like antiquity will like this method of decorating a flower pot. The only caveat is that only clay will do.

Flower pot decorating idea


Decorating flower pots with your own hands is one of the simple ways to make your home more comfortable and original.
Nowadays you can buy a wide variety of flower pots, but many people want their home to be decorated with unique accessories and interior details. In addition, the concept of DIY (do it yourself - made with your own hands) is becoming fashionable, and many people begin to make crafts and handicrafts, even if they have never done this before.
You can buy a simple flower pot or flowerpot in a store or online store, for example here http://tomas.kz/t/cvetochnye-gorshki-i-kashpo-5592/, and if you want to make it bright and stylish, then this will come in handy our selection of ideas on how to decorate a flower pot.
22 ideas for decorating flower pots with your own hands
- A simple ceramic or plastic pot can be decorated with beads or mosaic rhinestones. Use a glue gun or other glue, you can also try double-sided tape. Choose the pattern of the beads according to your taste.

2. Making a bright pineapple out of an ordinary flower pot is a great idea! To implement this method of decorating a flower pot, take a pot of a suitable shape. If the form does not match, then “bringing it to mind” will help polymer clay or a mass of salt dough (see photo). After this, use paints and markers of suitable colors. If you plant aloe in such a pot, it will make the pot even more like a pineapple.

3. Similar to the previous method of decorating a flower pot. Use the photo instructions below to make your own strawberry flower pot.

4. Take a permanent marker, acrylic or vintage paints and paint a beautiful design on the pot. 
5. Decorating flower pots with your own hands using water and paints in the watercolor ombre style. 
6. A simple but very cute way to decorate a flower pot using braid and lace ribbons. 
7. Decorating a ceramic flower pot in the mosaic style. Take pieces of a beautiful broken plate, cup, etc., stick them on the pot, and rub the remaining places with a construction or plaster mixture. 
8. DIY pots made from clay or other material are perfect for succulents. Bright and unusual coloring will make them exclusive. 
 10. Pots painted black “slate” color are suitable for any inscriptions.
11. Another way to decorate a flower pot with inscriptions.

12. A cute drawing like this one in the photo below will appeal to children and will take its rightful place in a child's room.

13. This method of decorating a flower pot, in contrast to the ombre style in point 5, involves a random style - mix paints of several colors in water and lower the pot or flowerpot into it. In this way you can decorate the entire pot or just part of it. 
14. Homemade flower pots made from a wooden block; additional coloring of some or all of the edges gives the product a special originality. 
15. Applying a geometric pattern to a flower pot is so simple, but it turns out to be a stylish thing for interior decoration. 
16. Watercolor beauty will decorate both the flower pot and your home. 
17. Flowing paint - popular design technique decoration, also applicable for decorating flower pots. 
18. Cute decor in a “country” style will add ease and comfort to your home. You can do this decoration of flower pots with your children. 
19. Craftsmen who master the art of felting from wool and felt can make such cute flowerpots. 
20. To decorate a flower pot, you can use a beautiful fabric. 
21. Needlewomen can knit such delicate and “warm” clothes for their flowerpots. 
22. Another way to decorate a flower pot with your own hands using paints. 
We hope you liked these ideas on how to decorate a flower pot. Write your opinion in the comments!
Flower pots can be made from the most unexpected materials: old newspapers, unnecessary cages, bottles, twigs, pencils, rags and other improvised means.
What should I plant flowers in?
Before we tell you how to make flowerpots, it’s worth telling why they are needed at all. Home flowers grow best in clay pots. But, unfortunately, they cannot retain their original appearance for long. A plaque appears on the outer walls that cannot be washed off. Place these pots with your own hands in a beautiful flowerpot and see how the flower is transformed.
When choosing a pot, buy one that is 1–4 cm wider and 5 cm higher than the pot. Garden frames for flower containers should be designed for open ground.
Some plants can be planted directly in a pot, but then you need to add drainage to the bottom. In this case, you will save on the pot.
Here are the materials from which pots and flower pots can be made, either with your own hands or purchased, from:
- clay;
- ceramics;
- metal;
- wood;
- glass;
- plastics.
- threads;
- vines;
- fiberglass.
- Clay pots have an untreated rough or smooth surface. Sometimes it is decorated with sculpting or painting. But such products are only suitable for indoor use; they allow water to pass through, so they are not suitable for the garden.
- Ceramic pots and flowerpots are treated with glaze. It decorates such products and allows them to keep water out. These containers are suitable for home and garden design.
- Metal flower containers have a modern look and will look great in a room decorated in a high-tech style.
- Wooden containers are made from environmentally friendly pure material, serve as excellent protection for flower roots from hypothermia and drying out.
- Glass ones have a modern look and look beautiful in the interior. Since they are transparent, it is convenient to monitor the water level (for example, when watering orchids).
- Plastic - lightweight, frost-resistant, not afraid of corrosion, easy to clean. Orchids, whose roots cannot tolerate many materials, grow well in such containers.
Planter made from old bird cages

An old bird cage will make a wonderful flower pot. If you feel sorry to throw away this item, but the bird no longer lives there, turn the cage into a home art object. First, wash it, dry it, then arm yourself with this:
- acrylic paint of the desired color;
- brush;
- gloves.
To get less dirty with paint, start covering the rods from the inside first, then from the outside. Choose a shade that blends in with your surroundings.
Paint inside through the bird door. If the cage is collapsible, lay it out and cover its individual elements with tone. After the paint has dried, place 1-3 flower pots inside, preferably with young vines. When they grow up, they will beautifully wrap themselves around the cage, clinging to the bars.
See what interesting and unusual materials you can use to make a flowerpot and a large plant pot to place in winter garden or at the dacha.
Flower pots made from old things

It’s not so easy to guess that these flower pots are made from old rags. Here's what you'll need for this unusual craft:
- unnecessary rags or burlap;
- cement;
- water;
- latex gloves;
- capacity.
When the rag soaked in the solution is dry, turn it over.

Pour some expanded clay inside, then soil and plant the plant.

If you want to make a pot for home flowers, then take a small container. For a garden planter, this could be, for example, a 10-liter bucket.

Look how beautiful products made from burlap look (photo below left). The top of these pots was decorated with fabric flowers. If you have unnecessary openwork fabric, you can use it to make small and large pots and place them in the garden. Leave them as is or paint them.
Give a second life to old things, show your imagination by taking:
- canvas;
- PVA glue;
- water;
- plastic bag;
- acrylic paints;
- rope;
- acrylic lacquer;
- basin;
- brushes;
- curly plastic bottle or other container.
Place the fabric in the solution, remember it and wring it out several times.

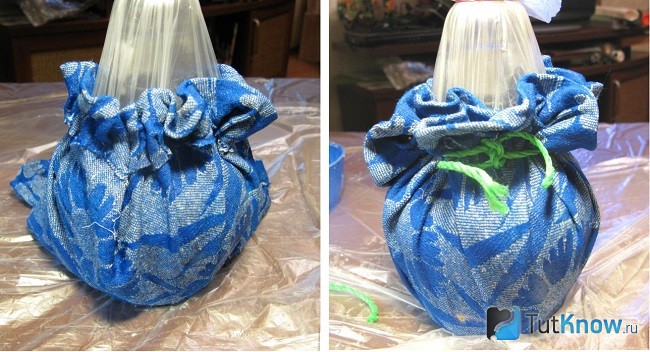
Place the bottle on a cloth soaked in adhesive solution (in its center). in a plastic bag. Fold over the edges, tie with string, and let dry. If the bottle is narrow, wrap it in newspaper, tie it, and put a bag on top.

If you want to make a flower pot for an existing pot, also wrap some newspaper around it, but not much, and put a bag on top and tie it.
To make flower pots further, fold the edges of the fabric up with your own hands, covering the side seam with a fold. They need to be made around the entire container, tying the fabric with a string.
Place the workpiece in a warm place until completely dry. It is better to place it near the radiator or periodically dry the future decor item with a hairdryer.
Without removing the bottle, paint the pot in any color, adding PVA to the paint for greater strength.

When this layer has dried well, remove the bottle from the container you made by untying the rope. Paint the outside of the planter with 2-4 coats of paint. When it dries, then apply varnish 2-3 times. You can put a pot with a plant in a flowerpot or make an inlay of artificial flowers.

And if you want to place a tree of happiness there, then pour plaster inside the container, place its trunk, and leave it like that until the solution dries.

Here are 2 more ideas on how to extend the life of old things. You can renew the pot by simply wrapping a cloth soaked in cement mortar around it. Drape it as you wish and leave it on the pot after drying.

You can cut old things into strips and weave them into braids like this.

Apply PVA generously to the pot. Starting at the top, wrap the outside of the container in a spiral. In this case, the turns should fit tightly to each other.
Flowerpots for the garden made of wood
You can plant flowers in these at the dacha, and they will feel great. The excess water will go away, and the soil will warm up enough for the roots to feel comfortable. But it is better to place them where there are no cross winds or drafts.
Plant a regular plant in such a large pot. indoor geranium, and soon you will not recognize it, since it will be completely covered with inflorescences.
Make such a flowerpot from leftover building materials, taking:
- bars;
- boards;
- antiseptic impregnation;
- wood varnish;
- hammer or screwdriver;
- screws or nails.

Craftsmen can make a large wooden pot like this or something similar and create a fairy-tale corner for children in their dacha.

Other flowerpots also look beautiful; use bamboo sticks and branches for them. To make flower pots from the first material, take
- bamboo sticks;
- jigsaw;
- thick twine;
- scissors;
- measuring tape.
Fold it in half, place the first stick in the resulting loop, twist this part of the twine in a figure eight, place the second piece of bamboo in the second loop.

Decorate the entire pot in this way, also connect the lower ends of the sticks, secure the twine to the first and last bamboo. This is how beautiful flowerpots for outdoor or indoor flowers are made.

You can make your own flower pots from branches. If they have leaves, tear them off. Trim the bottom of the branches so that it is even on this side. Attach the blanks to the pot, wrap them with an elastic band or a beautiful rope.

We decorate plastic and clay pots with our own hands
There are many ways to do this kind of crafting. If you have an old plastic pot of sufficient size or a bucket of the same material, use a heated knife to make several round holes in it, pour soil inside, and plant flower seedlings.
To prevent the soil from spilling out, first fill the container with soil to the first holes, plant the seedlings, then fill it to the second holes, plant flowers. So design the container higher and higher.
Look how beautiful the flowers look, including ampelous petunia, in such a pot. To hang it, use special fasteners or weave using the art of macrame plant pots and hang the pot. You can tie several metal chains with wire and hang a flower container from them.

Photos of flower pots will help you see the idea in action. Decorate plastic containers It is possible not only with the plants themselves, but also in other ways. Try crackle. This method allows you to artificially age a thing. Craquelure varnishes are used for it. We will achieve this effect by decorating old plastic pots with our own hands, using eggshells.
Here's what you'll need to transform your flower container:
- shell from boiled eggs;
- acrylic paint;
- baking soda;
- mascara;
- sheets of paper.

If you use white or beige shells, then cover the pot with dark acrylic paint; this tone will highlight the mosaic elements.
- Remove the inner film from the shells of boiled eggs and rinse.
- Prepare a soda solution. Degrease the shells in this liquid and dry them. If you want to color it, do this procedure at this stage.
- Spread PVA on the surface of the pot, attach several shells to one area with the convex side up, cover with paper, press lightly. Then the shells will separate into smaller fragments and stick together.
- After holding this for a few seconds, move on to the next section. If you want the crackle cracks to be wider, then move the shells apart a little.
- Cover the work with ink, wait until it penetrates the design, then wipe off the excess with a slightly damp cloth. The mascara will remain only in the cracks, the shell will not change color.
- Finish the planter with varnish to seal the mosaic and make it durable.
For work we take:
- pot;
- alcohol-containing liquid;
- sandpaper - grit 70 and 100;
- moisture-resistant putty;
- marsh color acrylic paint;
- brush.
- Degrease the outside of the pot with an alcohol-containing liquid, then go over this surface with sandpaper.
- Cover the pot with putty and let it dry.
- Apply marsh-colored paint on top of this layer. When it's dry, sand it with 100-grit sandpaper.

And here is what happens as a result.

For you and others visual aids. Look how natural materials transform plastic flower pots.

After a forest walk, bring bark (from a dry tree), moss, and pine cones. Cut a piece of birch bark of a suitable size, wrap it around the containers, and secure it by tying it with twine.
And you need to dry the moss, glue it and the cones to the surface of a pot well greased with PVA.
If you want to transform white flower pots, take just:
- containers for flowers;
- PVA glue;
- twine;
- brush.

If you want to update the container for flowers, this can be done even with ordinary pencils. Cover the pot with them around the area, placing them vertically and placing the rubber bands facing up. All that remains is to decorate with a bow and place the new piece of furniture in place.

If you want to decorate a pot in an oriental style, you will definitely like the following idea. The already familiar craquelure technique was used for it.

Here's what you need to get creative:
- flower pot;
- eggshells;
- acetone;
- silver, white and black acrylic paint;
- toothpick;
- PVA glue;
Here's what the most suitable ones mean:

Draw hieroglyphs in the central part of the pot in a circle. Decorate the distance between them, as well as the top of the pot, with shells pre-painted with black paint.
To increase the distance between the mosaic pieces, push them apart with a toothpick. She will give them the desired location.
Decorate the bottom of the container with light shells. After painting with 2-3 layers of varnish, decorating the polka dots is complete.

The scope for this creativity is immense. In the second article we will continue this interesting and necessary topic. In the meantime, here is a selection of wonderful ideas for you that will help you decorate flowerpots or make them yourself:
Flowers can decorate any interior, complementing it with bright touches of fresh rich colors. Fresh flowers in originally decorated pots can become a bright accent of the interior, highlighting the design of a room or area. Decorating flower pots with your own hands is an activity that allows you to transform ordinary containers for plants into original decorative elements.
Clay pots are an ideal basis for using almost any hand-made technique, the choice of which can only be limited by the imagination and desire of the master. Decorating a flower pot with your own hands will not only give a second life to an old product, but will once again allow you to plunge into a fascinating creative process.
As you know, plants feel great in untreated clay pots: the porosity of the clay allows the root system to receive the necessary amount of air
Unusual uses for eggshells
Eggshells are a popular, affordable and easy-to-use material for decoration. various items. To create marvelous patterns, boiled egg shells, acrylic paints, construction glue or PVA, varnish and brushes are used. To decorate flower pots, you can use either traditional white shells or create unusual patterns in various shades of the color palette.
The work begins with a shell, from which the film on the inside has first been removed, then degreased in a soda solution, washed and thoroughly dried. Motifs made from natural beige and white shells will look impressive on a dark base and vice versa. A light background can be created by applying a layer of contrasting dark tones of acrylic paint.

Decorating pots eggshell allows you to create a crackle effect, which is an elegant pattern of tiny cracks that looks like an antique effect
The technique of decorating flower pots is quite simple. . On small area a layer of glue is applied to the surface and a solid piece of the shell is applied with the convex side outward, gently pressed with your fingers for a tight fit. To give the unusual mosaic the required shape, you can use a pointed sword or awl. Large gaps that arise between large mosaic elements can be easily filled with individual small pieces. The surface decorated with a pattern is primed with PVA glue and left until completely dry.
The decor of flower pots in the craquelure style is completed by applying a layer of paint, which can act as either the main background of the product or become a colored basis for further decorating the item. When painting the shell, it should be taken into account that even after drying, the mosaic is quite mobile. The finished product is opened with a layer of varnish.
Shells for creating sea motifs
You can also use sea pebbles and glass, buttons and even small coins to decorate the pot. Combining materials will allow the author to significantly expand the field of imagination. Decorating flower pots with shells and other small objects is very similar in technique to decorating items with eggshells.

Shells – universal material for creating flowerpots in nautical style. Their ribbed surface effectively plays with tints under a layer of paint of mother-of-pearl colors
Before work, the shells should also be washed and degreased. They are attached to the surface of the pot using high-quality construction glue, which has sufficient viscosity and dries quite quickly. The glue is applied with a brush both to the surface of the attached side of the shell and to the surface area of the pot. Each shell is fixed to the outside of the pot for a few seconds by pressing with a finger. The finished product can be simply varnished, or pre-painted with acrylic paints.
Also, instead of shells, you can use ordinary pebbles.
Tying a pot with twine
Decorating twine flower pots is a fairly simple way to transform an old product, allowing you to create interior elements in an ethno-style. The material for decoration can be either a thick rope or a thin rope or even an ordinary woolen thread. Decorating small pots with coarse thick rope woven from hemp or tow looks unusual.

The pot can be braided, tied, or simply applied to its surface with a ready-made thread pattern. A piquant highlight can be a combination of decor from coarse threads with bunches of dry grass
The technique of applying and securing thread decor is also quite simple. To give an old flower pot a new look, you can make several successive turns of twine tightly adjacent to each other. To prevent the decoration from “moving apart” over time and losing its attractiveness, the coils should be made with some tension and secured with secret knots and glue. The standard pot wrapping can be supplemented by overlaying patterns and combined with a braided wrapping of the product.
Other popular decor ideas
In skillful hands, any thing that is unnecessarily stored in bins can get another start in life. So old laces from sweaters and jackets, handles from paper bags can sparkle with new colors, becoming an original decoration for a familiar piece of furniture. Small objects are easily attached to the surface of the pot using hot glue.

A composition of multi-colored pebbles with a thin cord neatly placed between them looks very unusual.

This cute pot is decorated with old bolts, nuts and other small parts and finished with a layer of bronze paint and varnish.
Decorating pots with twine is successfully combined with decorating products with fabric, allowing you to create unique interior items. Both bright pieces of fabric and regular burlap are suitable for this purpose. Twine in a natural gray shade looks impressive on variegated checkered fabric, while brightly colored braid on burlap.
Ready-made satin and organza ribbons are sold in hardware stores. Variegated ribbons can be braided into strands and braids and then simply glued to the outside of the pot. Picturesquely intertwined multi-colored ribbons, decorated with all kinds of rhinestones and beads, will give the product a playful mood. Such a bright and cheerful flower pot will be a worthy decoration for any interior.

If you want to create a bright flower pot, the appearance of which evokes only positive emotions, you can use decorated ribbons and all kinds of beads in the design.

In this simple way you can make antique pots so that they look “like in Ancient Rome”

Bottle caps, paper clips, cotton balls, bundles of fishing line and even old wooden clothespins can also be used as decoration materials for flower pots.
Video master classes from designers
Decorating flower pots with your own hands is a great way to create exclusive items for your home and summer cottage, which will delight the whole family with their appearance.
In our homes, they don’t always match the interior of the room, and are often simply plain-looking. Spring is coming and we want to transform our home, put things in order in all corners and come up with something new for comfort in our apartment. Why not start with flower pots, because they are always in sight - standing on the windowsills or somewhere near the window. At the same time, we will transplant the plants that are tired over the long winter months into fresh soil and updated pots. First we need to decide what we want to change in appearance their flower pots. Maybe we're tired of their dull brown or grey colour? Then everything is simple: take acrylic paints, a brush and change the color. Do not forget that before you start painting the pot, it must be thoroughly washed, dried and degreased (to do this, wipe the pot with nail polish remover or alcohol with a cotton swab).
It is imperative to pay attention to what material the flower pot is made of. If it is plastic, then before painting the pot, prime the entire surface of the pot with PVA glue, let it dry, and then paint it in the desired color with acrylic paint. Except acrylic paints, you can use paint from spray cans.

When the paint dries, if you don’t get an even and beautiful layer, paint the pot again and again let the paint dry well. To consolidate the result, cover the pot acrylic varnish. Only when the varnish becomes dry, start planting the flower in the pot.

As you can see in the photo above, the pots are not just painted with paint of one tone, but they are painted with designs that can be easily drawn by anyone who can at least hold a brush in their hands. The advantage of painting flower pots with your own hands is that you can come up with any design or pattern and try to bring it to life.

It is quite easy to decorate clay pots, especially those that are not glazed. The surface of the pot is porous, so before painting such a pot also needs to be primed with PVA glue. When the glue is dry, carefully paint the pot in two layers. When the paint has dried, start painting.

If you wish, you can decorate several flower pots in one theme and use them to transform any room in the house. These are the kind of pots that boys might like.

And girls may like pots with flowers, butterflies (dragonflies) or birds.

If your child already knows how to draw something, try painting flower pots together. You will surely have a useful and interesting time.

Children will surely be delighted with pots with eyes and spouts. They can serve as containers for small toys.

For the kitchen, paint the pot with flowers, berries, teapots or polka dots.

For the bedroom and living room, get creative and draw something that matches the interior of the room.

When inspiration comes, drawings are quickly thought up and immediately brought to life.

Sometimes even the drawings on the pot seem to be not enough for us, but we want to add something else so that the flower pot or flowerpot turns into something extraordinary. Then you need to look at home to see what you can glue to the pot so that it stands out from a number of its fellows. It can be anything: beads, sequins, buttons, plastic and felt flowers and other small decorations. You need to glue it with super glue or glue from a gun.

In a similar way, you can transform your flower pot by completely covering it with shells. Such a pot will well support the marine theme in the room.

Flowerpots and pots decorated with shells can decorate not only a room, but also a balcony, terrace or porch in a garden house.

If the pot turns out well, you should not plant a plant in it that will cover the results of your work with its leaves. Plant in it, for example, cacti that grow slowly and do not hang down.

A ceramic or plastic pot can be covered with pebbles. To attach the pebbles, you can use super glue or glue from a special gun.

Simple plastic pots, after being decorated with pebbles, are transformed beyond recognition.

Have you ever tried using textured plaster to decorate pots? And you try it. Get an interesting result. Apply textured (relief) plaster to the pot and, using a comb or notched trowel, apply any pattern you can imagine to the wet plaster. It is important not to smear the applied pattern, but to carefully dry the pot. In the future, the plaster does not crumble or peel.

Another noteworthy way to decorate flower pots is by gluing pieces of tree branches. Take thin tree branches (preferably non-resinous ones), garden pliers and prepare wooden “rounds”. Start from the bottom by hot glueing them to the pot and continue until the entire area is filled. Alternate small and large “pieces of wood”. When the glue has dried, coat the pot with acrylic varnish.

And if you don’t want to cut the branches with wire cutters, just put two rubber bands on the pot and carefully push the equally cut branches under them around the entire pot. Then tie the branches together with twine.

Such pots can be decorated with thin branches painted with silver or gold paint and natural or artificial berries.

Many ways to decorate pots have already been invented. Perhaps you will come up with something of your own. Here I also bring to your attention how you can decorate pots with lace. Cut out the lace fragments and glue them to the pot, which is primed with PVA glue. Next, the pot with lace needs to be painted.

To decorate a pot with twine, you will need a spool of twine, PVA glue and a brush. Take the pot and coat the strip with PVA glue. Carefully begin wrapping the twine around the pot. Then also to the very top of the pot: coat the strip with glue and wind the twine. Then let the pot dry. The twine can even be painted any color with acrylic paint.

If you suddenly want the flower pots to match the colors of the curtains or curtains, then you need to take the fabric from which the curtains are made and make a pattern for the pot. To do this, on a clean piece of paper, “roll” the pot from one edge of the sheet to the other and draw two rounded lines: along the upper and lower edges of the pot. Measure the circumference of the pot at the top and bottom, these dimensions should correspond to the lines you drew. Cut out the pattern and place it on the fabric, securing with needles. By the way, do not forget to leave an extra 1 centimeter at the top and bottom on the pattern so that you can tuck the fabric. Glue the cut fabric onto the pot with PVA glue and decorate it as you wish.

From unnecessary knitted items, sew these “suits” for your pots. They look fresh and beautiful in spring.

You might like the pot simply wrapped in burlap.

The pots in the matting bags look great, somehow it immediately feels like home.

Everything you read above makes sense to do with flower pots if they are still intact, without cracks, and the ceramic ones do not crumble or crumble. And if there is no point in transforming old pots, then take them to the country and make such a funny “potty” company out of them.

Good luck to all!
What and how to make flower pots with your own hands, read